window JEEP WAGONEER 2023 Owner's Manual
[x] Cancel search | Manufacturer: JEEP, Model Year: 2023, Model line: WAGONEER, Model: JEEP WAGONEER 2023Pages: 396, PDF Size: 15.17 MB
Page 125 of 396
STARTING AND OPERATING123
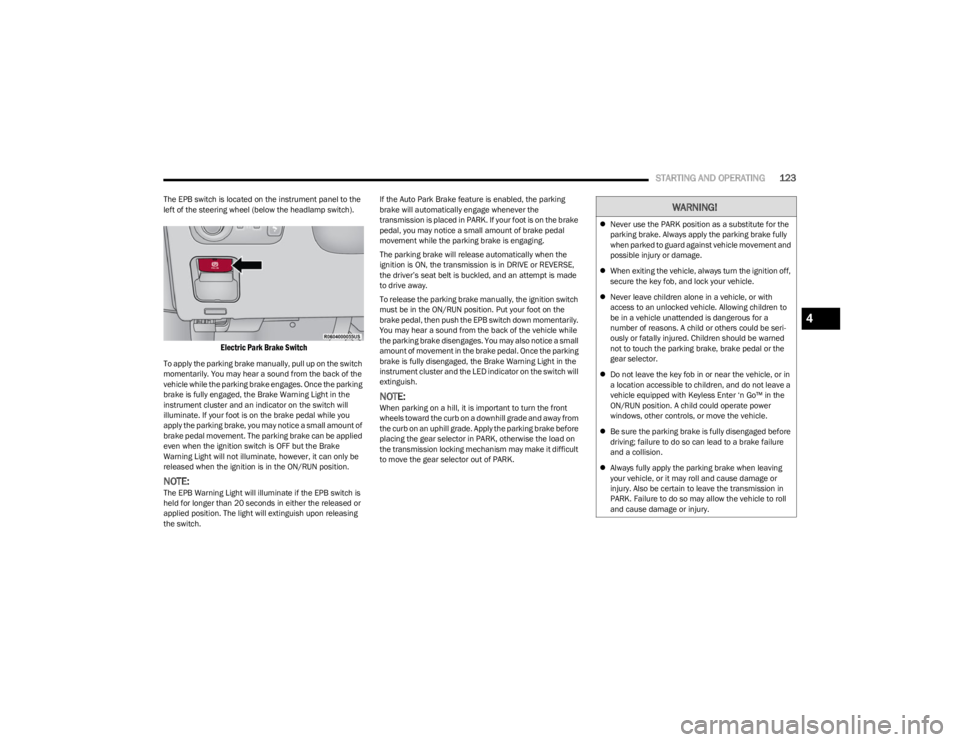
The EPB switch is located on the instrument panel to the
left of the steering wheel (below the headlamp switch).
Electric Park Brake Switch
To apply the parking brake manually, pull up on the switch
momentarily. You may hear a sound from the back of the
vehicle while the parking brake engages. Once the parking
brake is fully engaged, the Brake Warning Light in the
instrument cluster and an indicator on the switch will
illuminate. If your foot is on the brake pedal while you
apply the parking brake, you may notice a small amount of
brake pedal movement. The parking brake can be applied
even when the ignition switch is OFF but the Brake
Warning Light will not illuminate, however, it can only be
released when the ignition is in the ON/RUN position.
NOTE:The EPB Warning Light will illuminate if the EPB switch is
held for longer than 20 seconds in either the released or
applied position. The light will extinguish upon releasing
the switch. If the Auto Park Brake feature is enabled, the parking
brake will automatically engage whenever the
transmission is placed in PARK. If your foot is on the brake
pedal, you may notice a small amount of brake pedal
movement while the parking brake is engaging.
The parking brake will release automatically when the
ignition is ON, the transmission is in DRIVE or REVERSE,
the driver’s seat belt is buckled, and an attempt is made
to drive away.
To release the parking brake manually, the ignition switch
must be in the ON/RUN position. Put your foot on the
brake pedal, then push the EPB switch down momentarily.
You may hear a sound from the back of the vehicle while
the parking brake disengages. You may also notice a small
amount of movement in the brake pedal. Once the parking
brake is fully disengaged, the Brake Warning Light in the
instrument cluster and the LED indicator on the switch will
extinguish.
NOTE:When parking on a hill, it is important to turn the front
wheels toward the curb on a downhill grade and away from
the curb on an uphill grade. Apply the parking brake before
placing the gear selector in PARK, otherwise the load on
the transmission locking mechanism may make it difficult
to move the gear selector out of PARK.
WARNING!
Never use the PARK position as a substitute for the
parking brake. Always apply the parking brake fully
when parked to guard against vehicle movement and
possible injury or damage.
When exiting the vehicle, always turn the ignition off,
secure the key fob, and lock your vehicle.
Never leave children alone in a vehicle, or with
access to an unlocked vehicle. Allowing children to
be in a vehicle unattended is dangerous for a
number of reasons. A child or others could be seri -
ously or fatally injured. Children should be warned
not to touch the parking brake, brake pedal or the
gear selector.
Do not leave the key fob in or near the vehicle, or in
a location accessible to children, and do not leave a
vehicle equipped with Keyless Enter ‘n Go™ in the
ON/RUN position. A child could operate power
windows, other controls, or move the vehicle.
Be sure the parking brake is fully disengaged before
driving; failure to do so can lead to a brake failure
and a collision.
Always fully apply the parking brake when leaving
your vehicle, or it may roll and cause damage or
injury. Also be certain to leave the transmission in
PARK. Failure to do so may allow the vehicle to roll
and cause damage or injury.
4
23_WS_OM_EN_USC_t.book Page 123
Page 128 of 396

126STARTING AND OPERATING
IGNITION PARK INTERLOCK
This vehicle is equipped with an Ignition Park Interlock
which requires the transmission to be in PARK (P) before
the ignition can be turned to the OFF position. This helps
the driver avoid inadvertently leaving the vehicle without
placing the transmission in PARK. This system also locks
the transmission in PARK whenever the ignition is in the
OFF position.
NOTE:The transmission is NOT locked in PARK when the ignition
is in the ON/RUN position (even though the engine will be
off). Ensure that the transmission is in PARK, and the
ignition is OFF (not in ON/RUN position) before exiting the
vehicle.
BRAKE/TRANSMISSION SHIFT
I
NTERLOCK (BTSI) SYSTEM
This vehicle is equipped with a BTSI system that holds the
transmission gear selector in PARK unless the brakes are
applied. To shift the transmission out of PARK, the engine
must be running and the brake pedal must be pressed.
The brake pedal must also be pressed to shift from
NEUTRAL into DRIVE or REVERSE when the vehicle is
stopped or moving at low speeds.
8-SPEED AUTOMATIC TRANSMISSION
The transmission is controlled using a rotary electronic
gear selector located on the center console. The
transmission gear range (PRND) is displayed both above
the gear selector and in the instrument cluster. To select
a gear range, simply rotate the gear selector. You must
press the brake pedal to shift the transmission out of
PARK (or NEUTRAL, when the vehicle is stopped or moving
at low speeds). To shift past multiple gear ranges at once
(such as PARK to DRIVE), simply rotate the gear selector
to the appropriate detent. Select the DRIVE range for
normal driving.
NOTE:In the event of a mismatch between the gear selector
position and the actual transmission gear (for example,
driver selects PARK while driving), the position indicator
will blink continuously until the selector is returned to the
proper position, or the requested shift can be completed.
Unintended movement of a vehicle could injure
those in or near the vehicle. As with all vehicles, you
should never exit a vehicle while the engine is
running. Before exiting a vehicle, always come to a
complete stop, then apply the parking brake, shift
the transmission into PARK, and turn the ignition
OFF. When the ignition is in the OFF position, the
transmission is locked in PARK, securing the vehicle
against unwanted movement.
When exiting the vehicle, always make sure the igni -
tion is in the OFF position, remove the key fob from
the vehicle, and lock the vehicle.
Never leave children alone in a vehicle, or with
access to an unlocked vehicle. Allowing children to
be in a vehicle unattended is dangerous for a
number of reasons. A child or others could be seri -
ously or fatally injured. Children should be warned
not to touch the parking brake, brake pedal or the
transmission gear selector.
Do not leave the key fob in or near the vehicle (or in
a location accessible to children), and do not leave
the ignition in the ON/RUN position. A child could
operate power windows, other controls, or move the
vehicle.
WARNING!CAUTION!
Damage to the transmission may occur if the following
precautions are not observed:
Shift into or out of PARK or REVERSE (R) only after
the vehicle has come to a complete stop.
Do not shift between PARK, REVERSE, NEUTRAL, or
DRIVE (D) when the engine is above idle speed.
Before shifting into any gear, make sure your foot is
firmly pressing the brake pedal.
23_WS_OM_EN_USC_t.book Page 126
Page 173 of 396
STARTING AND OPERATING171
NOTE:If snow, ice, mud, or any foreign substance builds up on
the camera lens, clean the lens, rinse with water, and dry
with a soft cloth. Do not cover the lens. Rear Camera Washer
When the rear window washer is activated by pushing the
windshield wiper/washer lever forward, the rear Back Up
and digital rearview mirror (if equipped) cameras are also
washed. For more information, see
Úpage 64.
ZOOM VIEW
When the Rear View Camera image is being
displayed, and the vehicle speed is below
8 mph (13 km/h) while in any gear selector
position, Zoom View is available. By pressing
the “magnifying glass” icon in the upper left of the display
screen, the image will zoom in to four times the standard
view. Pressing the icon a second time will return the view
to the standard Back Up Camera display.
When Zoom View is selected while the vehicle is in
REVERSE, then shifted to DRIVE, the camera delay view
will display the standard Back Up Camera view. If the
vehicle is then returned to REVERSE gear from DRIVE, the
Zoom View selection will automatically resume.
Shifting to NEUTRAL from any gear will maintain the
selected view (Zoom or Standard) as long as the vehicle
speed is below 8 mph (13 km/h).
If the vehicle is in PARK, Zoom View is available until the
gear selector is placed in DRIVE or REVERSE and speeds
are at or above 8 mph (13 km/h).
NOTE:
If the vehicle is in DRIVE, NEUTRAL, or REVERSE, and
speed is greater than or equal to 8 mph (13 km/h),
Zoom View is unavailable and the icon will appear gray.
While in Zoom View, the guidelines will not be visible.
VIEWING AT SPEED
When the vehicle is in PARK, NEUTRAL or
DRIVE, the Rear View Camera can be activated
with the Back Up Camera button in the Controls
menu. This feature allows the customer to
monitor the area directly behind the vehicle (or trailer, if
equipped) for up to 10 seconds while driving. If the vehicle
speed remains below 8 mph (13 km/h), the Rear View
Camera image will be displayed continuously until
deactivated via the touchscreen X button.
FAMCAM SYSTEM — IF EQUIPPED
The FamCam system consists of an interior monitoring
camera mounted on the headliner that allows the driver to
view cargo/passengers in the rear interior of the vehicle
through the Uconnect screen.
To activate the feature, press the FamCam
button in the Controls tab of the Vehicle menu.
The FamCam feature can also be accessed
from the App Drawer, or the status bar at the
top of the Uconnect display.
WARNING!
Drivers must be careful when backing up even when
using the ParkView Rear Back Up Camera. Always
check carefully behind your vehicle, and be sure to
check for pedestrians, animals, other vehicles,
obstructions, or blind spots before backing up. You are
responsible for the safety of your surroundings and
must continue to pay attention while backing up.
Failure to do so can result in serious injury or death.
CAUTION!
To avoid vehicle damage, ParkView should only be
used as a parking aid. The ParkView camera is
unable to view every obstacle or object in your drive
path.
To avoid vehicle damage, the vehicle must be driven
slowly when using ParkView to be able to stop in time
when an obstacle is seen. It is recommended that
the driver look frequently over his/her shoulder when
using ParkView.
4
23_WS_OM_EN_USC_t.book Page 171
Page 175 of 396
STARTING AND OPERATING173
(Continued)
Level 1 Warnings:
Yellow telltale in the instrument cluster display
Yellow highlights around the detected
pedestrian/animal
Occurs when the vehicle is moving at speeds greater
than 8 mph (13 km/h) and the target is in or
approaching the vehicle path
Level 2 Warnings:
Red telltale in the instrument cluster display
Red highlights around the detected pedestrian/animal
Occurs when the vehicle is moving at speeds greater
than 8 mph (13 km/h) and a collision with the detected
pedestrian/animal is possible
The pedestrian/animal is directly in the vehicle path,
close to the headlight area
A video pop-up will display when there is a target
detected and the instrument cluster display is not
showing the Night Vision page
A chime will sound for a Level 2 Warning detection
event
Only one telltale can be displayed at a time based upon
priority.
The priority order of the warnings from highest to lowest is:
1. Pedestrian Warning Level 2
2. Animal Warning Level 2
3. Pedestrian Warning Level 1
4. Animal Warning Level 1
Level 2 Warnings may display in the Head Up Display
(if equipped).
NOTE:If the vehicle is stopped, or slowing down, all Level 2
warnings become Level 1 warnings.
You can enable or disable the warnings within the
Uconnect system
Úpage 197.
If the warnings are off, the telltales, chimes, and warning
messages will all be off. Pedestrians and animals can still
be detected by the system, but there will be no warnings. The Night Vision alert status telltale will be gray
when the warnings are suppressed. The telltale
will also turn gray to indicate that the alerts are
suppressed due to environmental factors (e.g.
daylight hours, external temperature is greater than 86°F
(30°C)) or if the gear selector is in REVERSE. When the
Night Vision alerts are active, the telltale will be green
Úpage 108.
Camera Washers
When the front window washer is activated, the Night
Vision camera will also be washed
Úpage 63.DETECTION RANGE
The system can detect people 4 ft (1.25 m) tall or greater
in the upright position. The system can also detect
animals that are four-legged and 3 ft (1 m) tall or greater
in the upright position.
The detection distance for the system is between 26 ft
(8 m) and 328 ft (100 m) from the front of the vehicle.WARNING!
Do not jerk the steering wheel in response to a
warning.
Never attempt to swerve around animals if doing so
would endanger you or others.
Do not stare at the image while driving. You could
crash and you or others could be injured.
The Night Vision system only provides alerts to
objects of interest and cannot serve as a substitute
for the driver’s personal judgment. The warnings are
meant to direct your attention to the detected
objects, but the Night Vision system does not auto -
matically brake the vehicle and may not provide a
warning with enough time to help avoid a crash.
Warnings are only provided if a pedestrian or large
animal is detected by the system.
It is always the driver’s responsibility to be attentive
of road, traffic, and weather conditions, vehicle
speed, distance to the vehicle ahead, and most
importantly, brake operation, to ensure safe opera -
tion of the vehicle under all road conditions. Your
complete attention is always required while driving to
maintain safe control of your vehicle.
WARNING!
4
23_WS_OM_EN_USC_t.book Page 173
Page 178 of 396
176STARTING AND OPERATING
Top View Plus Front View
The Front View will show you what is
immediately in front of the vehicle and is
always paired with the Top View of the vehicle.
Front Cross Path View Pressing the Front Cross Path button will give
the driver a wider angle view of the front
camera system. The Top View will be disabled
when this is selected.
Back Up Camera View Pressing the Back Up Camera button will
provide a full screen rear view with Zoom View.
NOTE:If the Rear View Camera view was selected through the
Surround View Camera menu, exiting out of the Rear View
screen will return to the Surround View Camera menu. If
the Back Up Camera was manually activated through the
Controls menu of the Uconnect system, exiting out of the
display screen will return to the Controls menu.
Deactivation
The system can be deactivated under the following
conditions:
The speed of the vehicle is greater than 8 mph
(13 km/h).
The vehicle is shifted into PARK.
The vehicle is in any gear other than REVERSE and the
touchscreen X button is pressed.
The camera delay system is turned off manually
through Uconnect Settings
Úpage 197.
Camera Washers
When the rear window washer is activated, the rear Back
Up and digital rearview mirror (if equipped) cameras are
also washed
Úpage 64.
When the front window washer is activated, the front
cameras will also be washed
Úpage 63.
NOTE:
If snow, ice, mud, or any foreign substance builds up on
the camera lenses, clean the lenses, rinse with water,
and dry with a soft cloth. Do not cover the lenses.
If a malfunction with the system has occurred, see an
authorized dealer.ZOOM VIEW
When the Rear View Camera image is being displayed, and
the vehicle speed is below 8 mph (13 km/h) while in any
gear selector position, Zoom View is available. By pressing the “magnifying glass” icon in the
upper left of the display screen, the image will
zoom in to two times the standard view.
Pressing the icon a second time will return the
view to the standard Back Up Camera display.
When Zoom View is selected while the vehicle
is in
REVERSE, then shifted to DRIVE, the camera delay view
will display the standard Back Up Camera view. If the
vehicle is then returned to REVERSE gear from DRIVE,
the Zoom View selection will automatically resume.
Shifting to NEUTRAL from any gear will maintain the
selected view (Zoom or Standard) as long as the vehicle
is below 8 mph (13 km/h).
WARNING!
Drivers must be careful when backing up even when
using the Surround View Camera. Always check
carefully behind your vehicle, and be sure to check for
pedestrians, animals, other vehicles, obstructions, or
blind spots before backing up. You are responsible for
the safety of your surroundings and must continue to
pay attention while backing up. Failure to do so can
result in serious injury or death.
CAUTION!
To avoid vehicle damage, Surround View should only
be used as a parking aid. The Surround View camera
is unable to view every obstacle or object in your
drive path.
To avoid vehicle damage, the vehicle must be driven
slowly when using Surround View to be able to stop
in time when an obstacle is seen. It is recommended
that the driver look frequently over his/her shoulder
when using Surround View.
23_WS_OM_EN_USC_t.book Page 176
Page 216 of 396

214MULTIMEDIA
Key Off Options
When the Key Off Options button is pressed on the touchscreen, the system displays the options related to vehicle shutoff. These settings will only activate when the ignition is set to
OFF.
NOTE:Depending on the vehicle’s options, feature settings may vary.
Setting Name Description
Easy Exit Seat This setting adjusts the seats to make exiting the vehicle easier.
Key Off Power Delay This setting will keep certain electrical features running after the engine is turned off.
When any door is opened, the electronics will deactivate. The available settings are
“0 sec”, “45 sec”, “5 min”, and “10 min”.
Headlight Off Delay This setting will allow you to set the amount of time the headlights remain on after the
vehicle has been turned off. The available settings are “0 sec”, “30 sec”, “60 sec”, and
“90 sec”.
Auto Entry/Exit Suspension This setting will turn the Auto Entry/Exit Suspension system on or off.
Radio Off Delay This setting will keep the radio on for the selected amount of time after vehicle shut off.
The available options are “0 sec”, “45 sec”, “5 min”, and “10 min”.
Radio Off With Door This setting will keep the radio on when a door is opened or until the Radio Off Delay time
is reached. The available settings are “On” and “Off”.
Windows With Key Fob This setting will allow you to control window function while the vehicle is off. The available
options are “On” and “Off”.
23_WS_OM_EN_USC_t.book Page 214
Page 259 of 396
SAFETY257
Here are some simple steps you can take to minimize the
risk of harm from a deploying air bag:
1. Children 12 years old and under should always ride
buckled up in the rear seat of a vehicle with a rear
seat.
2. A child who is not big enough to wear the vehicle seat belt properly must be secured in the appropriate child
restraint or belt-positioning booster seat in a rear
seating position
Úpage 275.
3. If a child from 2 to 12 years old (not in a rear-facing child restraint) must ride in the front passenger seat,
move the seat as far back as possible and use the
proper child restraint
Úpage 275.
4. Never allow children to slide the shoulder belt behind them or under their arm.
5. You should read the instructions provided with your child restraint to make sure that you are using it
properly.
6. All occupants should always wear their lap and shoulder belts properly.
7. The driver and front passenger seats should be moved back as far as practical to allow the front air
bags room to inflate.
8. Do not lean against the door or window. If your vehicle has side air bags, and deployment occurs, the side air
bags will inflate forcefully into the space between
occupants and the door and occupants could be
injured. 9. If the air bag system in this vehicle needs to be
modified to accommodate a disabled person, see
Úpage 378 for customer service contact
information.
SEAT BELT SYSTEMS
Buckle up even though you are an excellent driver, even
on short trips. Someone on the road may be a poor driver
and could cause a collision that includes you. This can
happen far away from home or on your own street.
Research has shown that seat belts save lives, and they
can reduce the seriousness of injuries in a collision. Some
of the worst injuries happen when people are thrown from
the vehicle. Seat belts reduce the possibility of ejection
and the risk of injury caused by striking the inside of the
vehicle. Everyone in a motor vehicle should be belted at all
times.
Enhanced Seat Belt Use Reminder System
(BeltAlert)
Driver And Passenger BeltAlert — If Equipped
BeltAlert is a feature intended to remind the
driver and outboard front seat passenger (if
equipped with outboard front passenger seat
BeltAlert) to buckle their seat belts. The
BeltAlert feature is active whenever the ignition switch is
in the START or ON/RUN position.
Initial Indication
If the driver is unbuckled when the ignition switch is first in
the START or ON/RUN position, a chime will signal for a
few seconds. If the driver or outboard front seat passenger
(if equipped with outboard front passenger seat BeltAlert)
is unbuckled when the ignition switch is first in the START
or ON/RUN position the Seat Belt Reminder Light will turn
on and remain on until both outboard front seat belts are
buckled. The outboard front passenger seat BeltAlert is
not active when an outboard front passenger seat is
unoccupied.
BeltAlert Warning Sequence
The BeltAlert warning sequence is activated when the
vehicle is moving above a specified vehicle speed range
and the driver or outboard front seat passenger is
unbuckled (if equipped with outboard front passenger
seat BeltAlert) (the outboard front passenger seat
BeltAlert is not active when the outboard front passenger
seat is unoccupied). The BeltAlert warning sequence
starts by blinking the Seat Belt Reminder Light and
sounding an intermittent chime.
WARNING!
Never place a rear-facing child restraint in front of an
air bag. A deploying passenger front air bag can
cause death or serious injury to a child 12 years or
younger, including a child in a rear-facing child
restraint.
Never install a rear-facing child restraint in the front
seat of a vehicle. Only use a rear-facing child
restraint in the rear seat. If the vehicle does not have
a rear seat, do not transport a rear-facing child
restraint in that vehicle.
6
23_WS_OM_EN_USC_t.book Page 257
Page 273 of 396
SAFETY271
The SABs may help to reduce the risk of occupant injury
during certain side impacts, in addition to the injury
reduction potential provided by the seat belts and body
structure.
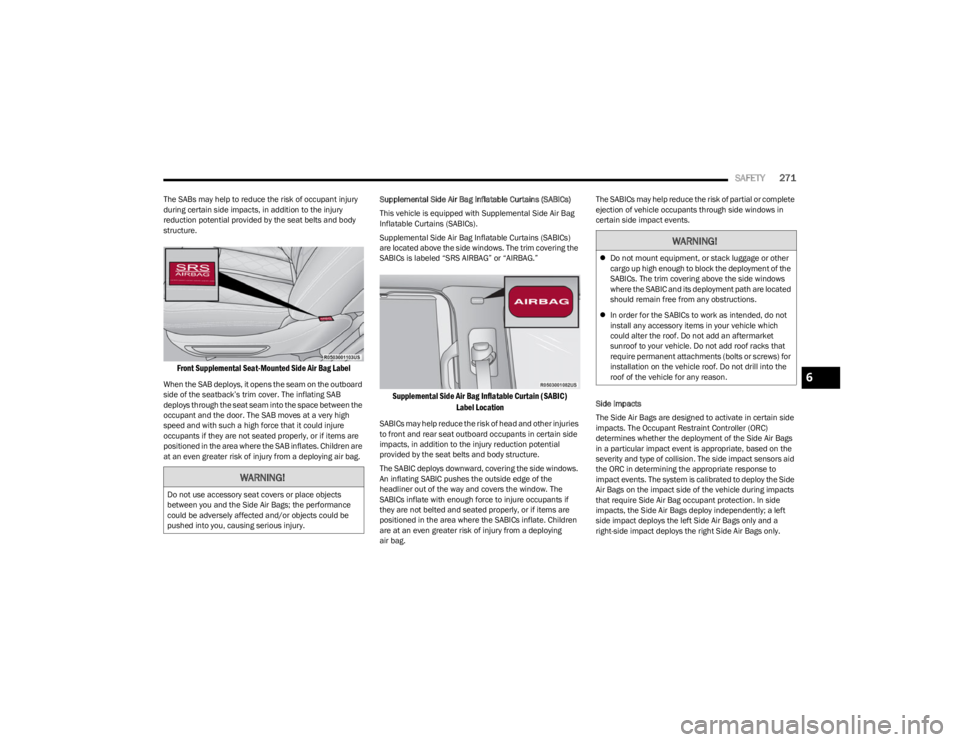
Front Supplemental Seat-Mounted Side Air Bag Label
When the SAB deploys, it opens the seam on the outboard
side of the seatback’s trim cover. The inflating SAB
deploys through the seat seam into the space between the
occupant and the door. The SAB moves at a very high
speed and with such a high force that it could injure
occupants if they are not seated properly, or if items are
positioned in the area where the SAB inflates. Children are
at an even greater risk of injury from a deploying air bag. Supplemental Side Air Bag Inflatable Curtains (SABICs)
This vehicle is equipped with Supplemental Side Air Bag
Inflatable Curtains (SABICs).
Supplemental Side Air Bag Inflatable Curtains (SABICs)
are located above the side windows. The trim covering the
SABICs is labeled “SRS AIRBAG” or “AIRBAG.”
Supplemental Side Air Bag Inflatable Curtain (SABIC)
Label Location
SABICs may help reduce the risk of head and other injuries
to front and rear seat outboard occupants in certain side
impacts, in addition to the injury reduction potential
provided by the seat belts and body structure.
The SABIC deploys downward, covering the side windows.
An inflating SABIC pushes the outside edge of the
headliner out of the way and covers the window. The
SABICs inflate with enough force to injure occupants if
they are not belted and seated properly, or if items are
positioned in the area where the SABICs inflate. Children
are at an even greater risk of injury from a deploying
air bag. The SABICs may help reduce the risk of partial or complete
ejection of vehicle occupants through side windows in
certain side impact events.
Side Impacts
The Side Air Bags are designed to activate in certain side
impacts. The Occupant Restraint Controller (ORC)
determines whether the deployment of the Side Air Bags
in a particular impact event is appropriate, based on the
severity and type of collision. The side impact sensors aid
the ORC in determining the appropriate response to
impact events. The system is calibrated to deploy the Side
Air Bags on the impact side of the vehicle during impacts
that require Side Air Bag occupant protection. In side
impacts, the Side Air Bags deploy independently; a left
side impact deploys the left Side Air Bags only and a
right-side impact deploys the right Side Air Bags only.
WARNING!
Do not use accessory seat covers or place objects
between you and the Side Air Bags; the performance
could be adversely affected and/or objects could be
pushed into you, causing serious injury.
WARNING!
Do not mount equipment, or stack luggage or other
cargo up high enough to block the deployment of the
SABICs. The trim covering above the side windows
where the SABIC and its deployment path are located
should remain free from any obstructions.
In order for the SABICs to work as intended, do not
install any accessory items in your vehicle which
could alter the roof. Do not add an aftermarket
sunroof to your vehicle. Do not add roof racks that
require permanent attachments (bolts or screws) for
installation on the vehicle roof. Do not drill into the
roof of the vehicle for any reason.
6
23_WS_OM_EN_USC_t.book Page 271
Page 274 of 396

272SAFETY
Vehicle damage by itself is not a good indicator of whether
or not Side Air Bags should have deployed.The Side Air
Bags will not deploy in all side collisions, including some
collisions at certain angles, or some side collisions that do
not impact the area of the passenger compartment. The
Side Air Bags may deploy during angled or offset frontal
collisions where the front air bags deploy.
Side Air Bags are a supplement to the seat belt restraint
system. Side Air Bags deploy in less time than it takes to
blink your eyes.
NOTE:Air bag covers may not be obvious in the interior trim, but
they will open during air bag deployment.
Rollover Events
Side Air Bags and seat belt pretensioners are designed to
activate in certain rollover events. The Occupant Restraint
Controller (ORC) determines whether deployment in a
particular rollover event is appropriate, based on the
severity and type of collision. Vehicle damage by itself is
not a good indicator of whether or not Side Air Bags and
seat belt pretensioners should have deployed.
The Side Air Bags and seat belt pretensioners will not
deploy in all rollover events. The rollover sensing system
determines if a rollover event may be in progress and
whether deployment is appropriate. In the event the vehicle experiences a rollover or near
rollover event, and deployment is appropriate, the rollover
sensing system will deploy the side air bags and seat belt
pretensioners on both sides of the vehicle.
The SABICs may help reduce the risk of partial or complete
ejection of vehicle occupants through side windows in
certain rollover or side impact events.
Air Bag System Components
NOTE:The Occupant Restraint Controller (ORC) monitors the
internal circuits and interconnecting wiring associated
with electrical Air Bag System Components listed below:
Occupant Restraint Controller (ORC)
Air Bag Warning Light
Steering Wheel and Column
Instrument Panel
Knee Impact Bolsters
Driver and Front Passenger Air Bags
Seat Belt Buckle Switch
Supplemental Side Air Bags
Supplemental Knee Air Bags
Front and Side Impact Sensors
Seat Belt Pretensioners
Seat Track Position Sensors
Occupant Classification SystemWARNING!
Occupants, including children, who are up against or
very close to Side Air Bags can be seriously injured or
killed. Occupants, including children, should never
lean on or sleep against the door, side windows, or
area where the side air bags inflate, even if they are
in an infant or child restraint.
Seat belts (and child restraints where appropriate)
are necessary for your protection in all collisions.
They also help keep you in position, away from an
inflating Side Air Bag. To get the best protection from
the Side Air Bags, occupants must wear their seat
belts properly and sit upright with their backs against
the seats. Children must be properly restrained in a
child restraint or booster seat that is appropriate for
the size of the child.
WARNING!
Side Air Bags need room to inflate. Do not lean
against the door or window. Sit upright in the center
of the seat.
Being too close to the Side Air Bags during deploy -
ment could cause you to be severely injured or killed.
Relying on the Side Air Bags alone could lead to more
severe injuries in a collision. The Side Air Bags work
with your seat belt to restrain you properly. In some
collisions, Side Air Bags won’t deploy at all. Always
wear your seat belt even though you have Side
Air Bags.
23_WS_OM_EN_USC_t.book Page 272
Page 291 of 396
SAFETY289
PERIODIC SAFETY CHECKS YOU SHOULD
M
AKE OUTSIDE THE VEHICLE
Tires
Examine tires for excessive tread wear and uneven wear
patterns. Check for stones, nails, glass, or other objects
lodged in the tread or sidewall. Inspect the tread for cuts
and cracks. Inspect sidewalls for cuts, cracks, and bulges.
Check the lug nut/bolt torque for tightness. Check the
tires (including spare) for proper cold inflation pressure.
Lights
Have someone observe the operation of brake lights and
exterior lights while you work the controls. Check turn
signal and high beam indicator lights on the instrument
panel.
Door Latches
Check for proper closing, latching, and locking.
Fluid Leaks
Check area under the vehicle after overnight parking for
fuel, coolant, oil, or other fluid leaks. Also, if gasoline
fumes are detected or if fuel or brake fluid leaks are
suspected, the cause should be located and corrected
immediately.
EXHAUST GAS
The best protection against carbon monoxide entry into
the vehicle body is a properly maintained engine exhaust
system. Whenever a change is noticed in the sound of the exhaust
system, when exhaust fumes can be detected inside the
vehicle, or when the underside or rear of the vehicle is
damaged, have an authorized dealer inspect the complete
exhaust system and adjacent body areas for broken,
damaged, deteriorated, or mispositioned parts. Open
seams or loose connections could permit exhaust fumes
to seep into the passenger compartment. In addition,
inspect the exhaust system each time the vehicle is raised
for lubrication or oil change. Replace as required.
CARBON MONOXIDE WARNINGS
WARNING!
Exhaust gases can injure or kill. They contain carbon
monoxide (CO), which is colorless and odorless.
Breathing it can make you unconscious and can
eventually poison you. To avoid breathing (CO), follow
these safety tips:
Do not run the engine in a closed garage or in
confined areas any longer than needed to move your
vehicle in or out of the area.
If you are required to drive with the trunk/liftgate/
rear doors open, make sure that all windows are
closed and the climate control BLOWER switch is set
at high speed. DO NOT use the recirculation mode.
If it is necessary to sit in a parked vehicle with the
engine running, adjust your heating or cooling
controls to force outside air into the vehicle. Set the
blower at high speed.
WARNING!
Carbon monoxide (CO) in exhaust gases is deadly.
Follow the precautions below to prevent carbon
monoxide poisoning:
Do not inhale exhaust gases. They contain carbon
monoxide, a colorless and odorless gas, which can
kill. Never run the engine in a closed area, such as a
garage, and never sit in a parked vehicle with the
engine running for an extended period. If the vehicle
is stopped in an open area with the engine running
for more than a short period, adjust the ventilation
system to force fresh, outside air into the vehicle.
Guard against carbon monoxide with proper mainte -
nance. Have the exhaust system inspected every
time the vehicle is raised. Have any abnormal condi -
tions repaired promptly. Until repaired, drive with all
side windows fully open.
6
23_WS_OM_EN_USC_t.book Page 289