ESP JEEP WAGONEER 2023 Workshop Manual
[x] Cancel search | Manufacturer: JEEP, Model Year: 2023, Model line: WAGONEER, Model: JEEP WAGONEER 2023Pages: 396, PDF Size: 15.17 MB
Page 275 of 396
SAFETY273
If A Deployment Occurs
The front air bags are designed to deflate immediately
after deployment.
NOTE:Front and/or side air bags will not deploy in all collisions.
This does not mean something is wrong with the air bag
system.
If you do have a collision which deploys the air bags, any
or all of the following may occur:
The air bag material may sometimes cause abrasions
and/or skin reddening to the occupants as the air bags
deploy and unfold. The abrasions are similar to friction
rope burns or those you might get sliding along a carpet
or gymnasium floor. They are not caused by contact
with chemicals. They are not permanent and normally
heal quickly. However, if you haven’t healed signifi -
cantly within a few days, or if you have any blistering,
see your doctor immediately.
As the air bags deflate, you may see some smoke-like
particles. The particles are a normal by-product of the
process that generates the non-toxic gas used for air
bag inflation. These airborne particles may irritate the
skin, eyes, nose, or throat. If you have skin or eye irrita -
tion, rinse the area with cool water. For nose or throat
irritation, move to fresh air. If the irritation continues,
see your doctor. If these particles settle on your
clothing, follow the garment manufacturer’s instruc -
tions for cleaning. Do not drive your vehicle after the air bags have deployed.
If you are involved in another collision, the air bags will not
be in place to protect you.
NOTE:
Air bag covers may not be obvious in the interior trim,
but they will open during air bag deployment.
After any collision, the vehicle should be taken to an
authorized dealer immediately.
Enhanced Accident Response System
In the event of an impact, if the communication network
remains intact, and the power remains intact, depending
on the nature of the event, the Occupant Restraint
Controller (ORC) will determine whether to have the
Enhanced Accident Response System perform the
following functions:
Cut off fuel to the engine (if equipped)
Cut off battery power to the electric motor (if equipped)
Flash hazard lights as long as the battery has power
Turn on the interior lights, which remain on as long as
the battery has power or for 15 minutes from the inter -
vention of the Enhanced Accident Response System
Unlock the power door locks Your vehicle may also be designed to perform any of these
other functions in response to the Enhanced Accident
Response System:
Turn off the Fuel Filter Heater, Turn off the HVAC Blower
Motor, Close the HVAC Circulation Door
Cut off battery power to the:
Engine
Electric Motor (if equipped)
Electric power steering
Brake booster
Electric park brake
Automatic transmission gear selector
Horn
Front wiper
Headlight washer pump (if equipped)
NOTE:After an accident, remember to cycle the ignition to the
STOP (OFF/LOCK) position and remove the key from the
ignition switch to avoid draining the battery. Carefully
check the vehicle for fuel leaks in the engine compartment
and on the ground near the engine compartment and fuel
tank before resetting the system and starting the engine.
If there are no fuel leaks or damage to the vehicle elec -
trical devices (e.g. headlights) after an accident, reset the
system by following the procedure described below. If you
have any doubt, contact an authorized dealer.
WARNING!
Deployed air bags and seat belt pretensioners cannot
protect you in another collision. Have the air bags, seat
belt pretensioners, and the seat belt retractor
assemblies replaced by an authorized dealer
immediately. Also, have the Occupant Restraint
Controller System serviced as well.
6
23_WS_OM_EN_USC_t.book Page 273
Page 276 of 396
274SAFETY
Enhanced Accident Response System
Reset Procedure
In order to reset the Enhanced Accident Response System
functions after an event, the ignition switch must be
changed from ignition START or ON/RUN to ignition OFF.
Carefully check the vehicle for fuel leaks in the engine
compartment and on the ground near the engine
compartment and fuel tank before resetting the system
and starting the engine.
After an accident, if the vehicle will not start after
performing the reset procedure, the vehicle must be
towed to an authorized dealer to be inspected and to have
the Enhanced Accident Response System reset.
Maintaining Your Air Bag System Event Data Recorder (EDR)
This vehicle is equipped with an event data recorder
(EDR). The main purpose of an EDR is to record, in certain
crash or near crash-like situations, such as an air bag
deployment or hitting a road obstacle, data that will assist
in understanding how a vehicle’s systems performed. The
EDR is designed to record data related to vehicle
dynamics and safety systems for a short period of time,
typically 30 seconds or less. The EDR in this vehicle is
designed to record such data as:
How various systems in your vehicle were operating;
Whether or not the driver and passenger safety belts
were buckled/fastened;
How far (if at all) the driver was depressing the acceler -
ator and/or brake pedal; and,
How fast the vehicle was traveling.
These data can help provide a better understanding of the
circumstances in which crashes and injuries occur.WARNING!
Modifications to any part of the air bag system could
cause it to fail when you need it. You could be injured
if the air bag system is not there to protect you. Do
not modify the components or wiring, including
adding any kind of badges or stickers to the steering
wheel hub trim cover or the upper passenger side of
the instrument panel. Do not modify the front
fascia/bumper, vehicle body structure, or add after -
market side steps or running boards.
It is dangerous to try to repair any part of the air bag
system yourself. Be sure to tell anyone who works on
your vehicle that it has an air bag system.
Do not attempt to modify any part of your air bag
system. The air bag may inflate accidentally or may
not function properly if modifications are made. Take
your vehicle to an authorized dealer for any air bag
system service. If your seat, including your trim cover
and cushion, needs to be serviced in any way
(including removal or loosening/tightening of seat
attachment bolts), take the vehicle to an authorized
dealer. Only manufacturer approved seat accesso -
ries may be used. If it is necessary to modify the air
bag system for persons with disabilities, contact an
authorized dealer.
23_WS_OM_EN_USC_t.book Page 274
Page 292 of 396
290
IN CASE OF EMERGENCY
HAZARD WARNING FLASHERS
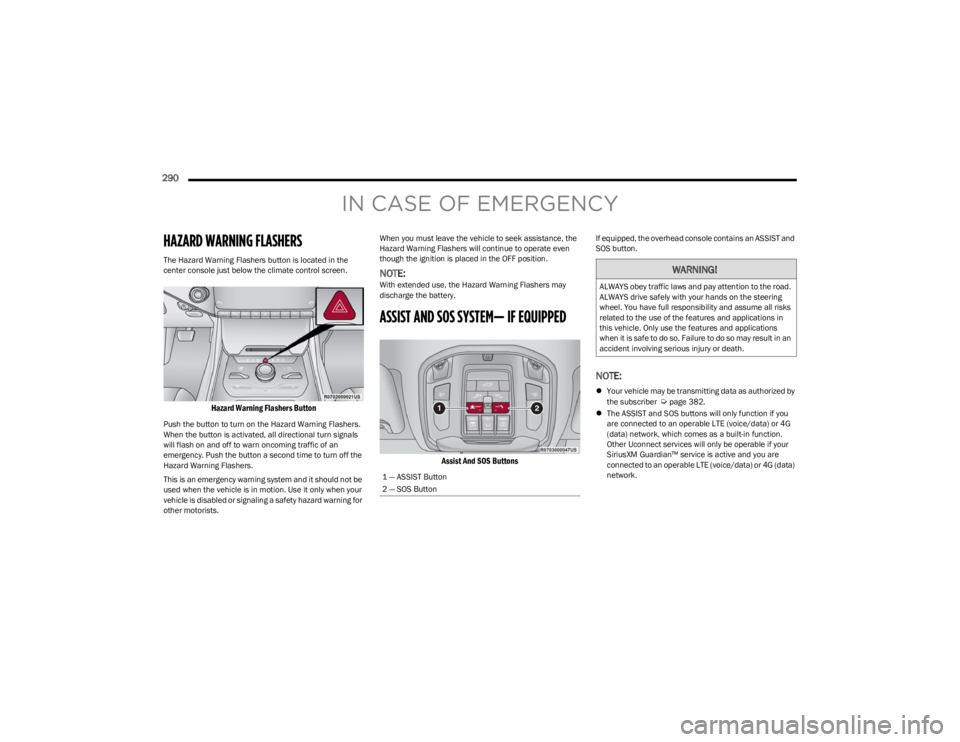
The Hazard Warning Flashers button is located in the
center console just below the climate control screen.
Hazard Warning Flashers Button
Push the button to turn on the Hazard Warning Flashers.
When the button is activated, all directional turn signals
will flash on and off to warn oncoming traffic of an
emergency. Push the button a second time to turn off the
Hazard Warning Flashers.
This is an emergency warning system and it should not be
used when the vehicle is in motion. Use it only when your
vehicle is disabled or signaling a safety hazard warning for
other motorists.When you must leave the vehicle to seek assistance, the
Hazard Warning Flashers will continue to operate even
though the ignition is placed in the OFF position.
NOTE:With extended use, the Hazard Warning Flashers may
discharge the battery.
ASSIST AND SOS SYSTEM— IF EQUIPPED
Assist And SOS Buttons
If equipped, the overhead console contains an ASSIST and
SOS button.
NOTE:
Your vehicle may be transmitting data as authorized by
the subscriber Úpage 382.
The ASSIST and SOS buttons will only function if you
are connected to an operable LTE (voice/data) or 4G
(data) network, which comes as a built-in function.
Other Uconnect services will only be operable if your
SiriusXM Guardian™ service is active and you are
connected to an operable LTE (voice/data) or 4G (data)
network.
1 — ASSIST Button
2 — SOS Button
WARNING!
ALWAYS obey traffic laws and pay attention to the road.
ALWAYS drive safely with your hands on the steering
wheel. You have full responsibility and assume all risks
related to the use of the features and applications in
this vehicle. Only use the features and applications
when it is safe to do so. Failure to do so may result in an
accident involving serious injury or death.
23_WS_OM_EN_USC_t.book Page 290
Page 293 of 396
IN CASE OF EMERGENCY291
(Continued)
ASSIST Call
The ASSIST Button is used to automatically connect you to
any one of the following support centers:
Roadside Assistance – If you get a flat tire, or need a
tow, just push the ASSIST button and you will be
connected to a representative for assistance. Road -
side Assistance will know what vehicle you’re driving
and its location. Additional fees may apply for roadside
assistance.
Vehicle Customer Care – Total support for all other
vehicle issues.
Uconnect Customer Care - Total support for Radio,
Connected Services, Phone and NAV issues.
SOS Call
1. Push the SOS Call button on the overhead console.
NOTE:In case the SOS Call button is pushed in error, there will be
a 10 second delay before the SOS Call system initiates a
call to a SOS operator, during which the LED will blink
green. To cancel the SOS Call connection, push the SOS
call button on the overhead console or press the cancel -
lation button on the Device Screen. Termination of the
SOS Call will turn off the green LED light on the overhead
console.
2. The LED light located within the ASSIST and SOS buttons on the overhead console will turn green once
a connection to a SOS operator has been made. 3. Once a connection between the vehicle and a SOS
operator is made, the SOS Call system may transmit
the following important vehicle information to a SOS
operator:
Indication that the occupant placed a SOS Call
The vehicle brand
The last known GPS coordinates of the vehicle
4. You should be able to speak with the SOS operator through the vehicle audio system to determine if
additional assistance is needed.
NOTE:
Your vehicle may be transmitting data as autho -
rized by the subscriber.
Once a connection is made between the vehicle’s
SOS Call system and the SOS operator, the SOS
operator may be able to open a voice connection
with the vehicle to determine if additional assis -
tance is needed. Once the SOS operator opens a
voice connection with the vehicle’s SOS Call
system, the operator should be able to speak with
you or other vehicle occupants and hear sounds
occurring in the vehicle. The vehicle’s SOS Call
system will attempt to remain connected with the
SOS operator until the SOS operator terminates
the connection.
5. The SOS operator may attempt to contact appropriate emergency responders and provide them with
important vehicle information and GPS coordinates.
WARNING!
ALWAYS obey traffic laws and pay attention to the road.
ALWAYS drive safely with your hands on the steering
wheel. You have full responsibility and assume all risks
related to the use of the features and applications in
this vehicle. Only use the features and applications
when it is safe to do so. Failure to do so may result in an
accident involving serious injury or death.
WARNING!
If anyone in the vehicle could be in danger (e.g., fire
or smoke is visible, dangerous road conditions or
location), do not wait for voice contact from an Emer -
gency Services Agent. All occupants should exit the
vehicle immediately and move to a safe location.
Never place anything on or near the vehicle’s oper -
able network and GPS antennas. You could prevent
operable network and GPS signal reception, which
can prevent your vehicle from placing an emergency
call. An operable network and GPS signal reception is
required for the SOS Call system to function properly.
7
23_WS_OM_EN_USC_t.book Page 291
Page 294 of 396
292IN CASE OF EMERGENCY
SOS Call System Limitations
Vehicles sold in Mexico DO NOT have SOS Call system
capabilities.
SOS or other emergency line operators in Mexico may not
answer or respond to SOS system calls.
If the SOS Call system detects a malfunction, any of the
following may occur at the time the malfunction is
detected, and at the beginning of each ignition cycle:
The overhead console lights located within the ASSIST
and SOS buttons will continuously illuminate red.
The Device Screen will display the following message
“Vehicle device requires service. Please contact an
authorized dealer.”
An In-Vehicle Audio message will state “Vehicle device
requires service. Please contact an authorized dealer.”
Even if the SOS Call system is fully functional, factors
beyond FCA US LLC’s control may prevent or stop the SOS
Call system operation. These include, but are not limited
to, the following factors:
The ignition is in the OFF position
The vehicle’s electrical systems are not intact
The SOS Call system software and/or hardware are
damaged during a crash
The vehicle battery loses power or becomes discon -
nected during a vehicle crash
LTE (voice/data) or 4G (data) network and/or Global
Positioning Satellite signals are unavailable or
obstructed
Equipment malfunction at the SOS operator facility
Operator error by the SOS operator
LTE (voice/data) or 4G (data) network congestion
Weather
Buildings, structures, geographic terrain, or tunnels
NOTE:
Your vehicle may be transmitting data as authorized by
the subscriber.
Never place anything on or near the vehicle’s LTE
(voice/data) or 4G (data) and GPS antennas. You could
prevent LTE (voice/data) or 4G (data) and GPS signal
reception, which can prevent your vehicle from placing
an emergency call. An operable LTE (voice/data) or 4G
(data) network connection and a GPS signal is required
for the SOS Call system to function properly.
NOTE:Changes or modifications not expressly approved by the
party responsible for compliance could void the user's
authority to operate the equipment.
The SOS Call system is embedded into the vehicle’s
electrical system. Do not add aftermarket electrical
equipment to the vehicle’s electrical system. This
may prevent your vehicle from sending a signal to
initiate an emergency call. To avoid interference that
can cause the SOS Call system to fail, never add
aftermarket equipment (e.g., two-way mobile radio,
CB radio, data recorder, etc.) to your vehicle’s elec -
trical system or modify the antennas on your vehicle.
IF YOUR VEHICLE LOSES BATTERY POWER FOR ANY
REASON (INCLUDING DURING OR AFTER AN ACCI -
DENT), THE UCONNECT FEATURES, APPS AND
SERVICES, AMONG OTHERS, WILL NOT OPERATE.
Modifications to any part of the SOS Call system
could cause the air bag system to fail when you need
it. You could be injured if the air bag system is not
there to help protect you.
WARNING!
WARNING!
Ignoring the overhead console light could mean you
will not have SOS Call services. If the overhead
console light is illuminated, have an authorized
dealer service the SOS Call system immediately.
The Occupant Restraint Control module turns on the
air bag Warning Light on the instrument panel if a
malfunction in any part of the system is detected. If
the Air Bag Warning Light is illuminated, have an
authorized dealer service the Occupant Restraint
Control system immediately.
WARNING!
ALWAYS obey traffic laws and pay attention to the road.
ALWAYS drive safely with your hands on the steering
wheel. You have full responsibility and assume all risks
related to the use of the features and applications in
this vehicle. Only use the features and applications
when it is safe to do so. Failure to do so may result in an
accident involving serious injury or death.
23_WS_OM_EN_USC_t.book Page 292
Page 310 of 396
308IN CASE OF EMERGENCY
EMERGENCY TOW HOOKS —
I
F EQUIPPED
Your vehicle may be equipped with front and rear recovery
tow hooks. The front tow hooks will be located in the lower
fascia/bumper. The rear tow hook is removable and is
located within the jack and tools storage bin under the
load floor of the rear cargo area
Úpage 294.
Emergency Front Tow Hooks
NOTE:For off road recovery, it is recommended to use both of the
front tow hooks to minimize the risk of damage to the
vehicle. The removable rear tow hook is designed to be used in the
receiver hitch as a recovery option. For rear tow hook
usage, remove the locking pin, place the rear tow hook
into the receiver hitch in any direction and replace the
locking pin.
Removable Rear Tow Hook
ENHANCED ACCIDENT RESPONSE SYSTEM
(EARS)
This vehicle is equipped with an Enhanced Accident
Response System.
This feature is a communication network that takes effect
in the event of an impact. Detailed information can be
found on
Úpage 273.
EVENT DATA RECORDER (EDR)
This vehicle is equipped with an event data recorder
(EDR). The main purpose of an EDR is to record data that
will assist in understanding how a vehicle’s systems
performed under certain crash or near crash-like
situations, such as an air bag deployment or hitting a road
obstacle. Detailed information can be found on
Úpage 274.
WARNING!
Do not use a chain for freeing a stuck vehicle. Chains
may break, causing serious injury or death.
Stand clear of vehicles when pulling with tow hooks.
Tow straps may become disengaged, causing
serious injury.
CAUTION!
Tow hooks are for emergency use only, to rescue a
vehicle stranded off road. Do not use tow hooks for tow
truck hookup or highway towing. You could damage your
vehicle.
23_WS_OM_EN_USC_t.book Page 308
Page 319 of 396
SERVICING AND MAINTENANCE317
NOTE:
After adding oil to the engine, always reinstall the oil
cap securely by rotating clockwise until it stops. Never
run the engine without the oil fill cap as this could
cause an oil leak.
Because the oil level is automatically detected only
when the engine has been off and restarted (after four
minutes), the system cannot immediately detect a
sudden drop in oil level while driving (for example, if the
oil pan starts to leak due to damage during an off-road
event).
CHECKING OIL LEVEL — 5.7L & 6.4L
E
NGINES
To ensure proper engine lubrication, the engine oil must
be maintained at the correct level. Check the oil level at
regular intervals, such as every fuel stop. The best time to
check the engine oil level is about five minutes after a fully
warmed up engine is shut off.
Checking the oil while the vehicle is on level ground will
improve the accuracy of the oil level readings.
There are four possible dipstick types:
Crosshatched zone.
Crosshatched zone marked SAFE.
Crosshatched zone marked with MIN at the low end of
the range and MAX at the high end of the range.
Crosshatched zone marked with dimples at the MIN
and the MAX ends of the range.
NOTE:Always maintain the oil level within the crosshatch
markings on the dipstick.
Adding 1 qt (1 L) of oil when the reading is at the low end
of the dipstick range will raise the oil level to the high end
of the range marking.
ADDING WASHER FLUID
The instrument cluster display will indicate when the
washer fluid level is low. When the sensor detects a low
fluid level, the Low Washer Fluid Warning Light will turn on
and the "Washer Fluid Low" message will be displayed.
The fluid reservoir for the windshield washers and the rear
window washer is shared. The fluid reservoir is located in
the engine compartment, be sure to check the fluid level
at regular intervals. Fill the reservoir with windshield
washer solvent only (not radiator antifreeze). When
refilling the washer fluid reservoir, take some washer fluid
and apply it to a cloth or towel and wipe clean the wiper
blades, this will help blade performance. To prevent
freeze-up of your windshield washer system in cold
weather, select a solution or mixture that meets or
exceeds the temperature range of your climate. This rating
information can be found on most washer fluid containers.
NOTE:Use care when filling under hood fluids such as engine oil,
washer fluid, antifreeze, etc. to minimize spillage onto top
of engine. Any excess fluid that is spilled onto the top of
the engine should be removed using compressed air or an
absorbent cloth.
CAUTION!
If the “Critically Low or Critically High” Oil Level Warning
Light is illuminated, the following steps should be
taken:
Critically Low: add two quarts of manufacturer speci -
fied oil as soon as possible
Úpage 376. Continuing
to operate the vehicle with “Critically Low” oil level
may damage the engine.
Critically High: contact an authorized dealer for
service. Continuing to operate the vehicle with “Criti -
cally High” oil level may damage the engine.
Do not use any oils that are not manufacturer specified
and API approved.
Used engine oil and oil filters contain substances which
are harmful to the environment. When oil and filters are
changed contact an authorized dealer and dispose of in
a safe and responsible manner.
WARNING!
Commercially available windshield washer solvents are
flammable. They could ignite and burn you. Care must
be exercised when filling or working around the washer
solution.
8
23_WS_OM_EN_USC_t.book Page 317
Page 329 of 396
SERVICING AND MAINTENANCE327
Adding Coolant
Your vehicle has been built with an improved engine
coolant (OAT coolant conforming to MS.90032) that
allows extended maintenance intervals. This engine
coolant (antifreeze) can be used up to 10 years or
150,000 miles (240,000 km) before replacement. To
prevent reducing this extended maintenance period, it is
important to use the same engine coolant (OAT coolant
conforming to MS.90032) throughout the life of your
vehicle.
Please review these recommendations for using Organic
Additive Technology (OAT) engine coolant that meets the
requirements of the manufacturer Material Standard
MS.90032. When adding engine coolant:
We recommend using Mopar® Antifreeze/Coolant
10 Year/150,000 Mile (240,000 km) Formula OAT
that meets the requirements of the manufacturer
Material Standard MS.90032.
Mix a minimum solution of 50% OAT engine coolant
that meets the requirements of the manufacturer
Material Standard MS.90032 and distilled water. Use
higher concentrations (not to exceed 70%) if tempera -
tures below −34°F (−37°C) are anticipated. Please
contact an authorized dealer for assistance.
Use only high purity water such as distilled or deionized
water when mixing the water/engine coolant solution.
The use of lower quality water will reduce the amount
of corrosion protection in the engine cooling system.
NOTE:
It is the owner's responsibility to maintain the proper
level of protection against freezing according to the
temperatures occurring in the area where the vehicle is
operated.
Use care when filling under hood fluids such as engine
oil, washer fluid, antifreeze, etc. to minimize spillage
onto top of engine. Any excess fluid that is spilled onto
the top of the engine should be removed using
compressed air or an absorbent cloth.
Some vehicles require special tools to add coolant
properly. Failure to fill these systems properly could
lead to severe internal engine damage. If any coolant is
needed to be added to the system, please contact a
local authorized dealer.
Mixing engine coolant types is not recommended and
can result in cooling system damage. If HOAT and OAT
coolant are mixed in an emergency, have an authorized
dealer drain, flush, and refill with OAT coolant
(conforming to MS.90032) as soon as possible.
Cooling System Pressure Cap
The cap must be fully tightened to prevent loss of engine
coolant (antifreeze), and to ensure that engine coolant will
return to the radiator from the coolant expansion bottle/
recovery tank (if equipped).
The cap should be inspected and cleaned if there is any
accumulation of foreign material on the sealing surfaces.
Disposal Of Used Coolant
Used ethylene glycol-based coolant (antifreeze) is a
regulated substance requiring proper disposal. Check with
your local authorities to determine the disposal rules for
your community. To prevent ingestion by animals or
children, do not store ethylene glycol-based coolant in
open containers or allow it to remain in puddles on the
ground, clean up any ground spills immediately. If
ingested by a child or pet, seek emergency assistance
immediately.
WARNING!
Do not open a hot engine cooling system. Never add
engine coolant (antifreeze) when the engine is over -
heated. Do not loosen or remove the cap to cool an
overheated engine. Heat causes pressure to build up
in the cooling system. To prevent scalding or injury,
do not remove the pressure cap while the system is
hot or under pressure.
Do not use a pressure cap other than the one speci -
fied for your vehicle. Personal injury or engine
damage may result.
8
23_WS_OM_EN_USC_t.book Page 327
Page 333 of 396
SERVICING AND MAINTENANCE331
FUSES
General Information
The fuses protect electrical systems against excessive
current.
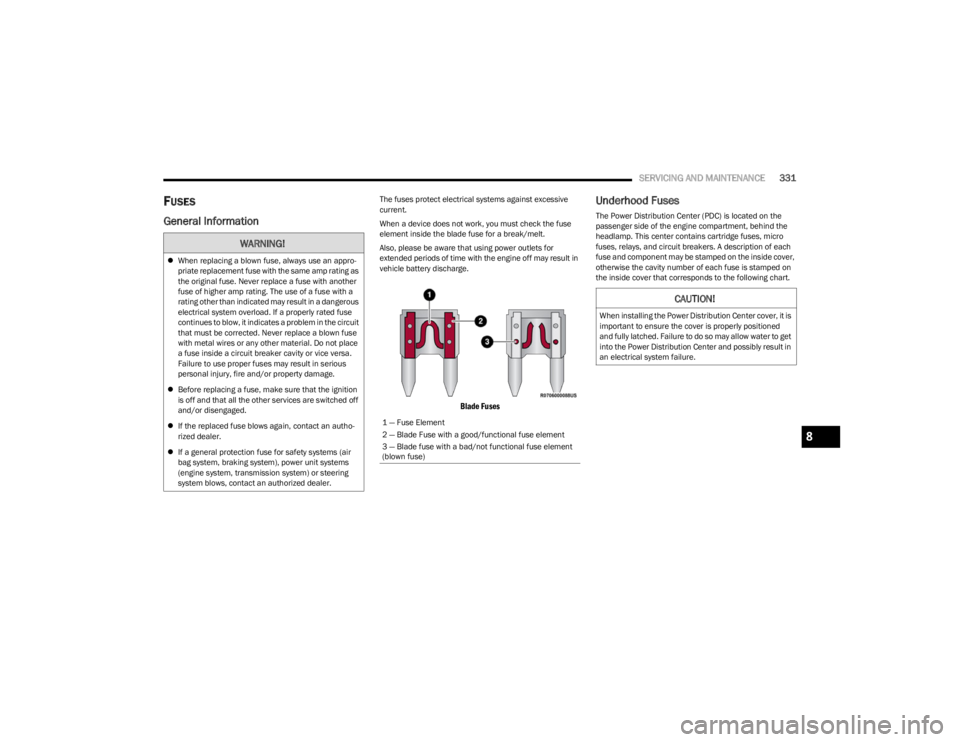
When a device does not work, you must check the fuse
element inside the blade fuse for a break/melt.
Also, please be aware that using power outlets for
extended periods of time with the engine off may result in
vehicle battery discharge.
Blade Fuses
Underhood Fuses
The Power Distribution Center (PDC) is located on the
passenger side of the engine compartment, behind the
headlamp. This center contains cartridge fuses, micro
fuses, relays, and circuit breakers. A description of each
fuse and component may be stamped on the inside cover,
otherwise the cavity number of each fuse is stamped on
the inside cover that corresponds to the following chart.
WARNING!
When replacing a blown fuse, always use an appro -
priate replacement fuse with the same amp rating as
the original fuse. Never replace a fuse with another
fuse of higher amp rating. The use of a fuse with a
rating other than indicated may result in a dangerous
electrical system overload. If a properly rated fuse
continues to blow, it indicates a problem in the circuit
that must be corrected. Never replace a blown fuse
with metal wires or any other material. Do not place
a fuse inside a circuit breaker cavity or vice versa.
Failure to use proper fuses may result in serious
personal injury, fire and/or property damage.
Before replacing a fuse, make sure that the ignition
is off and that all the other services are switched off
and/or disengaged.
If the replaced fuse blows again, contact an autho -
rized dealer.
If a general protection fuse for safety systems (air
bag system, braking system), power unit systems
(engine system, transmission system) or steering
system blows, contact an authorized dealer.
1 — Fuse Element
2 — Blade Fuse with a good/functional fuse element
3 — Blade fuse with a bad/not functional fuse element
(blown fuse)
CAUTION!
When installing the Power Distribution Center cover, it is
important to ensure the cover is properly positioned
and fully latched. Failure to do so may allow water to get
into the Power Distribution Center and possibly result in
an electrical system failure.
8
23_WS_OM_EN_USC_t.book Page 331
Page 346 of 396
344SERVICING AND MAINTENANCE
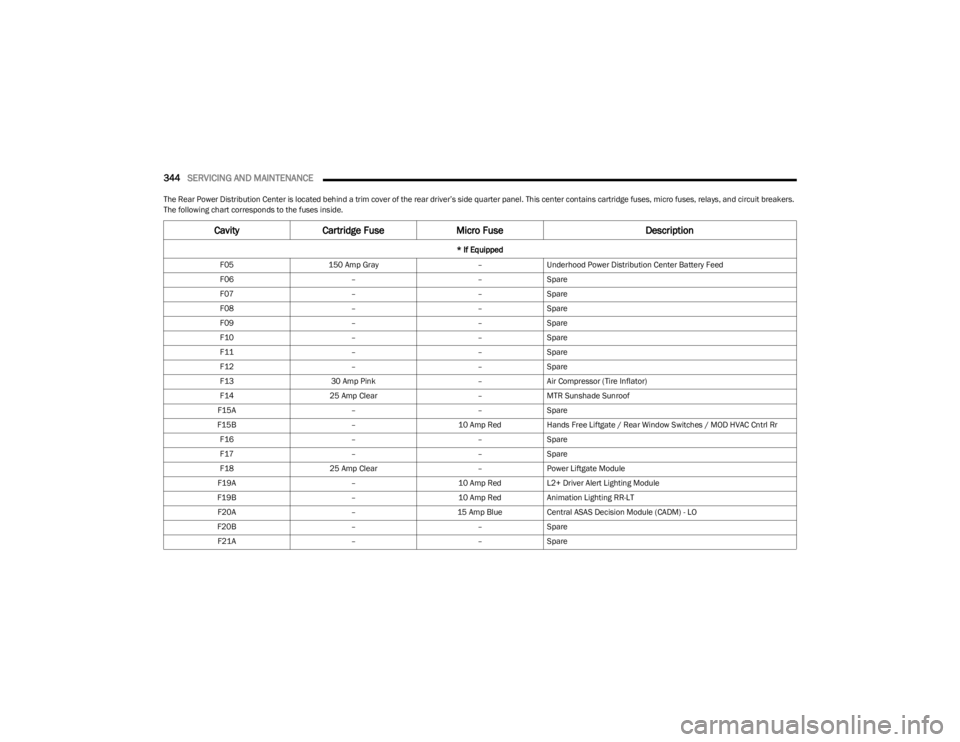
The Rear Power Distribution Center is located behind a trim cover of the rear driver’s side quarter panel. This center contains cartridge fuses, micro fuses, relays, and circuit breakers.
The following chart corresponds to the fuses inside.
CavityCartridge Fuse Micro Fuse Description
* If Equipped
F05 150 Amp Gray –Underhood Power Distribution Center Battery Feed
F06 ––Spare
F07 ––Spare
F08 ––Spare
F09 ––Spare
F10 ––Spare
F11 ––Spare
F12 ––Spare
F13 30 Amp Pink –Air Compressor (Tire Inflator)
F14 25 Amp Clear –MTR Sunshade Sunroof
F15A ––Spare
F15B –10 Amp RedHands Free Liftgate / Rear Window Switches / MOD HVAC Cntrl Rr
F16 ––Spare
F17 ––Spare
F18 25 Amp Clear –Power Liftgate Module
F19A –10 Amp RedL2+ Driver Alert Lighting Module
F19B –10 Amp RedAnimation Lighting RR-LT
F20A –15 Amp BlueCentral ASAS Decision Module (CADM) - LO
F20B ––Spare
F21A ––Spare
23_WS_OM_EN_USC_t.book Page 344