ESP JEEP WAGONEER 2023 Owner's Guide
[x] Cancel search | Manufacturer: JEEP, Model Year: 2023, Model line: WAGONEER, Model: JEEP WAGONEER 2023Pages: 396, PDF Size: 15.17 MB
Page 173 of 396
STARTING AND OPERATING171
NOTE:If snow, ice, mud, or any foreign substance builds up on
the camera lens, clean the lens, rinse with water, and dry
with a soft cloth. Do not cover the lens. Rear Camera Washer
When the rear window washer is activated by pushing the
windshield wiper/washer lever forward, the rear Back Up
and digital rearview mirror (if equipped) cameras are also
washed. For more information, see
Úpage 64.
ZOOM VIEW
When the Rear View Camera image is being
displayed, and the vehicle speed is below
8 mph (13 km/h) while in any gear selector
position, Zoom View is available. By pressing
the “magnifying glass” icon in the upper left of the display
screen, the image will zoom in to four times the standard
view. Pressing the icon a second time will return the view
to the standard Back Up Camera display.
When Zoom View is selected while the vehicle is in
REVERSE, then shifted to DRIVE, the camera delay view
will display the standard Back Up Camera view. If the
vehicle is then returned to REVERSE gear from DRIVE, the
Zoom View selection will automatically resume.
Shifting to NEUTRAL from any gear will maintain the
selected view (Zoom or Standard) as long as the vehicle
speed is below 8 mph (13 km/h).
If the vehicle is in PARK, Zoom View is available until the
gear selector is placed in DRIVE or REVERSE and speeds
are at or above 8 mph (13 km/h).
NOTE:
If the vehicle is in DRIVE, NEUTRAL, or REVERSE, and
speed is greater than or equal to 8 mph (13 km/h),
Zoom View is unavailable and the icon will appear gray.
While in Zoom View, the guidelines will not be visible.
VIEWING AT SPEED
When the vehicle is in PARK, NEUTRAL or
DRIVE, the Rear View Camera can be activated
with the Back Up Camera button in the Controls
menu. This feature allows the customer to
monitor the area directly behind the vehicle (or trailer, if
equipped) for up to 10 seconds while driving. If the vehicle
speed remains below 8 mph (13 km/h), the Rear View
Camera image will be displayed continuously until
deactivated via the touchscreen X button.
FAMCAM SYSTEM — IF EQUIPPED
The FamCam system consists of an interior monitoring
camera mounted on the headliner that allows the driver to
view cargo/passengers in the rear interior of the vehicle
through the Uconnect screen.
To activate the feature, press the FamCam
button in the Controls tab of the Vehicle menu.
The FamCam feature can also be accessed
from the App Drawer, or the status bar at the
top of the Uconnect display.
WARNING!
Drivers must be careful when backing up even when
using the ParkView Rear Back Up Camera. Always
check carefully behind your vehicle, and be sure to
check for pedestrians, animals, other vehicles,
obstructions, or blind spots before backing up. You are
responsible for the safety of your surroundings and
must continue to pay attention while backing up.
Failure to do so can result in serious injury or death.
CAUTION!
To avoid vehicle damage, ParkView should only be
used as a parking aid. The ParkView camera is
unable to view every obstacle or object in your drive
path.
To avoid vehicle damage, the vehicle must be driven
slowly when using ParkView to be able to stop in time
when an obstacle is seen. It is recommended that
the driver look frequently over his/her shoulder when
using ParkView.
4
23_WS_OM_EN_USC_t.book Page 171
Page 175 of 396
STARTING AND OPERATING173
(Continued)
Level 1 Warnings:
Yellow telltale in the instrument cluster display
Yellow highlights around the detected
pedestrian/animal
Occurs when the vehicle is moving at speeds greater
than 8 mph (13 km/h) and the target is in or
approaching the vehicle path
Level 2 Warnings:
Red telltale in the instrument cluster display
Red highlights around the detected pedestrian/animal
Occurs when the vehicle is moving at speeds greater
than 8 mph (13 km/h) and a collision with the detected
pedestrian/animal is possible
The pedestrian/animal is directly in the vehicle path,
close to the headlight area
A video pop-up will display when there is a target
detected and the instrument cluster display is not
showing the Night Vision page
A chime will sound for a Level 2 Warning detection
event
Only one telltale can be displayed at a time based upon
priority.
The priority order of the warnings from highest to lowest is:
1. Pedestrian Warning Level 2
2. Animal Warning Level 2
3. Pedestrian Warning Level 1
4. Animal Warning Level 1
Level 2 Warnings may display in the Head Up Display
(if equipped).
NOTE:If the vehicle is stopped, or slowing down, all Level 2
warnings become Level 1 warnings.
You can enable or disable the warnings within the
Uconnect system
Úpage 197.
If the warnings are off, the telltales, chimes, and warning
messages will all be off. Pedestrians and animals can still
be detected by the system, but there will be no warnings. The Night Vision alert status telltale will be gray
when the warnings are suppressed. The telltale
will also turn gray to indicate that the alerts are
suppressed due to environmental factors (e.g.
daylight hours, external temperature is greater than 86°F
(30°C)) or if the gear selector is in REVERSE. When the
Night Vision alerts are active, the telltale will be green
Úpage 108.
Camera Washers
When the front window washer is activated, the Night
Vision camera will also be washed
Úpage 63.DETECTION RANGE
The system can detect people 4 ft (1.25 m) tall or greater
in the upright position. The system can also detect
animals that are four-legged and 3 ft (1 m) tall or greater
in the upright position.
The detection distance for the system is between 26 ft
(8 m) and 328 ft (100 m) from the front of the vehicle.WARNING!
Do not jerk the steering wheel in response to a
warning.
Never attempt to swerve around animals if doing so
would endanger you or others.
Do not stare at the image while driving. You could
crash and you or others could be injured.
The Night Vision system only provides alerts to
objects of interest and cannot serve as a substitute
for the driver’s personal judgment. The warnings are
meant to direct your attention to the detected
objects, but the Night Vision system does not auto -
matically brake the vehicle and may not provide a
warning with enough time to help avoid a crash.
Warnings are only provided if a pedestrian or large
animal is detected by the system.
It is always the driver’s responsibility to be attentive
of road, traffic, and weather conditions, vehicle
speed, distance to the vehicle ahead, and most
importantly, brake operation, to ensure safe opera -
tion of the vehicle under all road conditions. Your
complete attention is always required while driving to
maintain safe control of your vehicle.
WARNING!
4
23_WS_OM_EN_USC_t.book Page 173
Page 177 of 396
STARTING AND OPERATING175
SURROUND VIEW CAMERA SYSTEM —
IF EQUIPPED
Your vehicle may be equipped with the Surround View
Camera system that allows you to see an on-screen image
of the surroundings and Top View of your vehicle whenever
the gear selector is put into REVERSE or a different view is
selected through the touchscreen buttons. The Top View
of the vehicle will show which doors are open. The image
will be displayed on the touchscreen display along with a
caution note “Check Entire Surroundings” across the top
of the screen. After five seconds, this note will disappear.
The Surround View Camera system is comprised of four
sequential cameras located in the front grille, rear liftgate
and side mirrors.
NOTE:The Surround View Camera system has programmable
settings that may be selected through the Uconnect
system
Úpage 197.
Press this button on the touchscreen to enter
the Surround View Camera menu in the
Uconnect system. When the vehicle is shifted into REVERSE, the
Rear View or Top View is the default view of the system.
When the vehicle is shifted out of REVERSE with camera
delay turned on, the camera image will continue to be
displayed for up to 10 seconds unless the vehicle speed
exceeds
8 mph (13 km/h, the vehicle is shifted into PARK
or the ignition is placed in the OFF position. There is a
touchscreen X button to disable the display of the camera
image.
When the vehicle is shifted out of REVERSE with camera
delay turned off, the Surround View Camera mode is
exited and the last known screen appears again.
When enabled, active guidelines are overlaid on the image
to illustrate the width of the vehicle, including the side
view mirrors and its projected back up path based on the
steering wheel position.
Different colored zones indicate the distance to the rear of
the vehicle.
The following table shows the approximate distances for
each zone:
Modes Of Operation
Manual activation of the Surround View Camera is
selected by pressing the Surround View Camera button
located in the Controls menu within the Uconnect system.
Top View
The Top View will show in the Uconnect system with Rear
View or Front View in a split screen display. There is
integrated ParkSense arcs in the image at the front, rear,
and if equipped, the sides of the vehicle. The arcs will
change color from yellow to red corresponding to the
distance zones to the oncoming object.
Surround View Camera View
NOTE:
Front tires will be in image when the tires are turned.
Due to wide angle cameras in the mirrors, the image
may appear distorted.
Top View will show which doors are open.
Open front doors and/or liftgate will cancel outside
image.
Top View Plus Rear View
This is the default view of the system in
REVERSE and is always paired with the Top
View of the vehicle with optional active
guidelines for the projected path when
enabled.
Rear Cross Path View
Pressing the Rear Cross Path button will give
the driver a wider angle view of the rear camera
system. The Top View will be disabled when this
is selected.
Zone Distance To The Rear Of The
Vehicle
Red 0 - 1 ft (0 - 30 cm)
Yellow 1 ft - 6.5 ft (30 cm - 2 m)
Green 6.5 ft or greater
(2 m or greater)
4
23_WS_OM_EN_USC_t.book Page 175
Page 178 of 396
176STARTING AND OPERATING
Top View Plus Front View
The Front View will show you what is
immediately in front of the vehicle and is
always paired with the Top View of the vehicle.
Front Cross Path View Pressing the Front Cross Path button will give
the driver a wider angle view of the front
camera system. The Top View will be disabled
when this is selected.
Back Up Camera View Pressing the Back Up Camera button will
provide a full screen rear view with Zoom View.
NOTE:If the Rear View Camera view was selected through the
Surround View Camera menu, exiting out of the Rear View
screen will return to the Surround View Camera menu. If
the Back Up Camera was manually activated through the
Controls menu of the Uconnect system, exiting out of the
display screen will return to the Controls menu.
Deactivation
The system can be deactivated under the following
conditions:
The speed of the vehicle is greater than 8 mph
(13 km/h).
The vehicle is shifted into PARK.
The vehicle is in any gear other than REVERSE and the
touchscreen X button is pressed.
The camera delay system is turned off manually
through Uconnect Settings
Úpage 197.
Camera Washers
When the rear window washer is activated, the rear Back
Up and digital rearview mirror (if equipped) cameras are
also washed
Úpage 64.
When the front window washer is activated, the front
cameras will also be washed
Úpage 63.
NOTE:
If snow, ice, mud, or any foreign substance builds up on
the camera lenses, clean the lenses, rinse with water,
and dry with a soft cloth. Do not cover the lenses.
If a malfunction with the system has occurred, see an
authorized dealer.ZOOM VIEW
When the Rear View Camera image is being displayed, and
the vehicle speed is below 8 mph (13 km/h) while in any
gear selector position, Zoom View is available. By pressing the “magnifying glass” icon in the
upper left of the display screen, the image will
zoom in to two times the standard view.
Pressing the icon a second time will return the
view to the standard Back Up Camera display.
When Zoom View is selected while the vehicle
is in
REVERSE, then shifted to DRIVE, the camera delay view
will display the standard Back Up Camera view. If the
vehicle is then returned to REVERSE gear from DRIVE,
the Zoom View selection will automatically resume.
Shifting to NEUTRAL from any gear will maintain the
selected view (Zoom or Standard) as long as the vehicle
is below 8 mph (13 km/h).
WARNING!
Drivers must be careful when backing up even when
using the Surround View Camera. Always check
carefully behind your vehicle, and be sure to check for
pedestrians, animals, other vehicles, obstructions, or
blind spots before backing up. You are responsible for
the safety of your surroundings and must continue to
pay attention while backing up. Failure to do so can
result in serious injury or death.
CAUTION!
To avoid vehicle damage, Surround View should only
be used as a parking aid. The Surround View camera
is unable to view every obstacle or object in your
drive path.
To avoid vehicle damage, the vehicle must be driven
slowly when using Surround View to be able to stop
in time when an obstacle is seen. It is recommended
that the driver look frequently over his/her shoulder
when using Surround View.
23_WS_OM_EN_USC_t.book Page 176
Page 200 of 396
198MULTIMEDIA
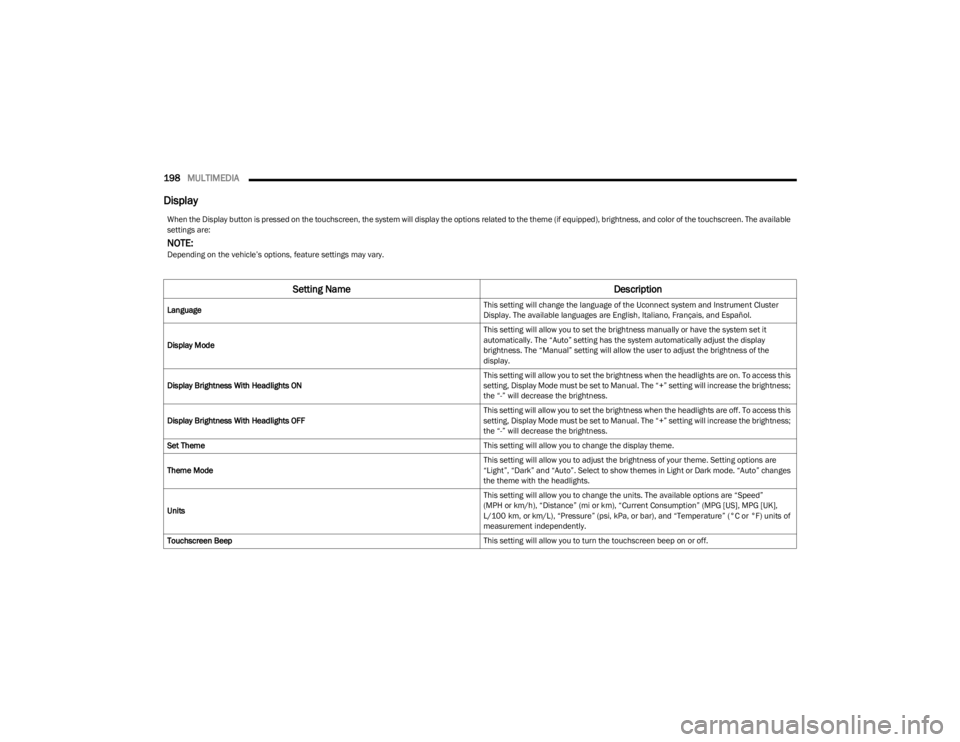
Display
When the Display button is pressed on the touchscreen, the system will display the options related to the theme (if equipped), brightness, and color of the touchscreen. The available
settings are:
NOTE:Depending on the vehicle’s options, feature settings may vary.
Setting Name Description
Language This setting will change the language of the Uconnect system and Instrument Cluster
Display. The available languages are English, Italiano, Français, and Español.
Display Mode This setting will allow you to set the brightness manually or have the system set it
automatically. The “Auto” setting has the system automatically adjust the display
brightness. The “Manual” setting will allow the user to adjust the brightness of the
display.
Display Brightness With Headlights ON This setting will allow you to set the brightness when the headlights are on. To access this
setting, Display Mode must be set to Manual. The “+” setting will increase the brightness;
the “-” will decrease the brightness.
Display Brightness With Headlights OFF This setting will allow you to set the brightness when the headlights are off. To access this
setting, Display Mode must be set to Manual. The “+” setting will increase the brightness;
the “-” will decrease the brightness.
Set Theme This setting will allow you to change the display theme.
Theme Mode This setting will allow you to adjust the brightness of your theme. Setting options are
“Light”, “Dark” and “Auto”. Select to show themes in Light or Dark mode. “Auto” changes
the theme with the headlights.
Units This setting will allow you to change the units. The available options are “Speed”
(MPH or km/h), “Distance” (mi or km), “Current Consumption” (MPG [US], MPG [UK],
L/100 km, or km/L), “Pressure” (psi, kPa, or bar), and “Temperature” (°C or °F) units of
measurement independently.
Touchscreen Beep This setting will allow you to turn the touchscreen beep on or off.
23_WS_OM_EN_USC_t.book Page 198
Page 202 of 396
200MULTIMEDIA
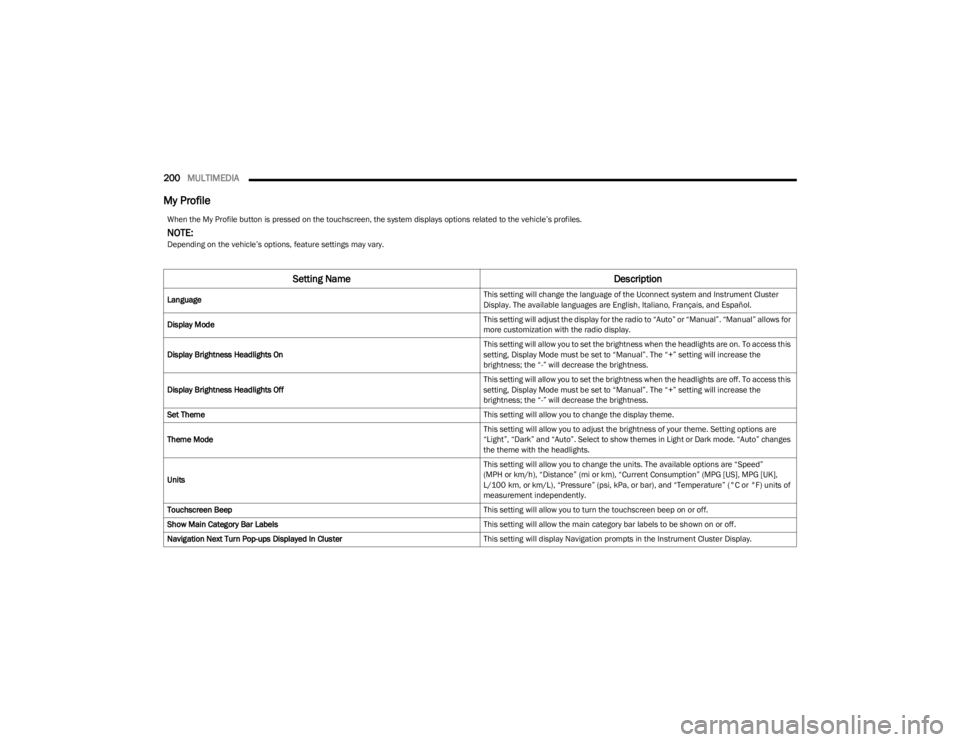
My Profile
When the My Profile button is pressed on the touchscreen, the system displays options related to the vehicle’s profiles.
NOTE:Depending on the vehicle’s options, feature settings may vary.
Setting Name Description
Language This setting will change the language of the Uconnect system and Instrument Cluster
Display. The available languages are English, Italiano, Français, and Español.
Display Mode This setting will adjust the display for the radio to “Auto” or “Manual”. “Manual” allows for
more customization with the radio display.
Display Brightness Headlights On This setting will allow you to set the brightness when the headlights are on. To access this
setting, Display Mode must be set to “Manual”. The “+” setting will increase the
brightness; the “-” will decrease the brightness.
Display Brightness Headlights Off This setting will allow you to set the brightness when the headlights are off. To access this
setting, Display Mode must be set to “Manual”. The “+” setting will increase the
brightness; the “-” will decrease the brightness.
Set Theme This setting will allow you to change the display theme.
Theme Mode This setting will allow you to adjust the brightness of your theme. Setting options are
“Light”, “Dark” and “Auto”. Select to show themes in Light or Dark mode. “Auto” changes
the theme with the headlights.
Units This setting will allow you to change the units. The available options are “Speed”
(MPH or km/h), “Distance” (mi or km), “Current Consumption” (MPG [US], MPG [UK],
L/100 km, or km/L), “Pressure” (psi, kPa, or bar), and “Temperature” (°C or °F) units of
measurement independently.
Touchscreen Beep This setting will allow you to turn the touchscreen beep on or off.
Show Main Category Bar Labels This setting will allow the main category bar labels to be shown on or off.
Navigation Next Turn Pop-ups Displayed In Cluster This setting will display Navigation prompts in the Instrument Cluster Display.
23_WS_OM_EN_USC_t.book Page 200
Page 209 of 396
MULTIMEDIA207
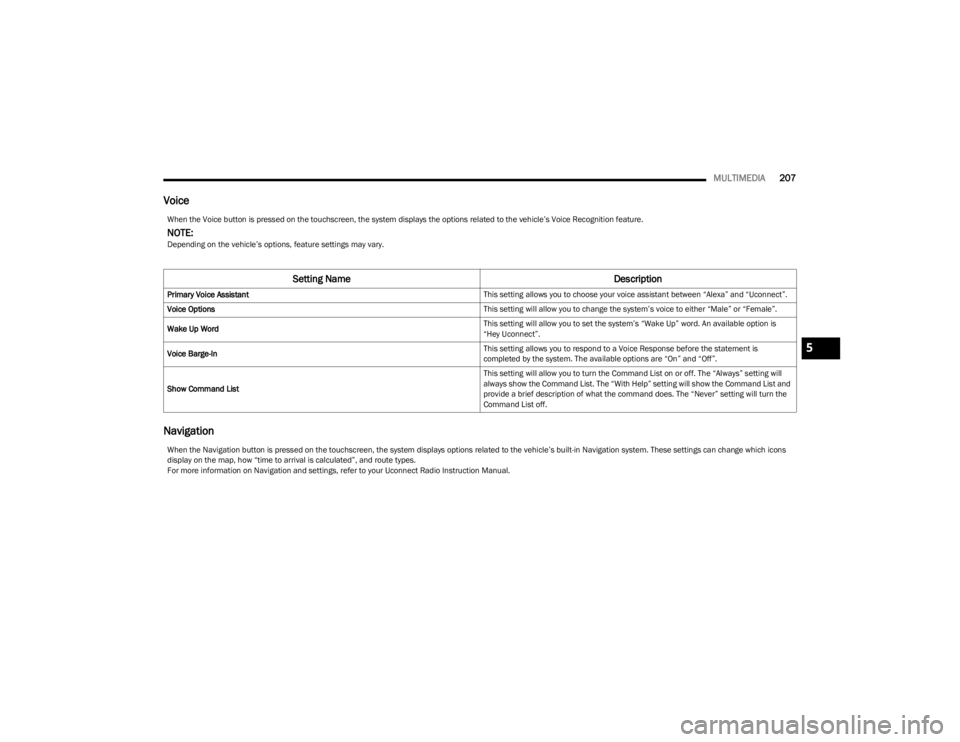
Voice
Navigation
When the Voice button is pressed on the touchscreen, the system displays the options related to the vehicle’s Voice Recognition feature.
NOTE:Depending on the vehicle’s options, feature settings may vary.
Setting Name Description
Primary Voice Assistant This setting allows you to choose your voice assistant between “Alexa” and “Uconnect”.
Voice Options This setting will allow you to change the system’s voice to either “Male” or “Female”.
Wake Up Word This setting will allow you to set the system’s “Wake Up” word. An available option is
“Hey Uconnect”.
Voice Barge-In This setting allows you to respond to a Voice Response before the statement is
completed by the system. The available options are “On” and “Off”.
Show Command List This setting will allow you to turn the Command List on or off. The “Always” setting will
always show the Command List. The “With Help” setting will show the Command List and
provide a brief description of what the command does. The “Never” setting will turn the
Command List off.
When the Navigation button is pressed on the touchscreen, the system displays options related to the vehicle’s built-in Navigation system. These settings can change which icons
display on the map, how “time to arrival is calculated”, and route types.
For more information on Navigation and settings, refer to your Uconnect Radio Instruction Manual.
5
23_WS_OM_EN_USC_t.book Page 207
Page 234 of 396
232MULTIMEDIA
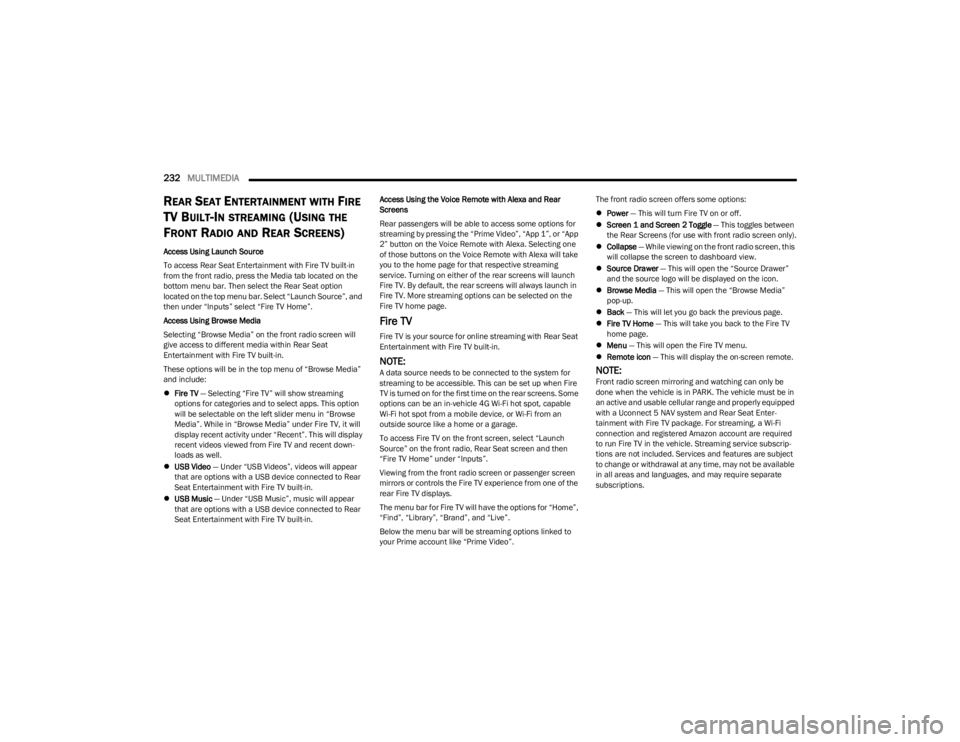
REAR SEAT ENTERTAINMENT WITH FIRE
TV B
UILT-IN STREAMING (USING THE
F
RONT RADIO AND REAR SCREENS)
Access Using Launch Source
To access Rear Seat Entertainment with Fire TV built-in
from the front radio, press the Media tab located on the
bottom menu bar. Then select the Rear Seat option
located on the top menu bar. Select “Launch Source”, and
then under “Inputs” select “Fire TV Home”.
Access Using Browse Media
Selecting “Browse Media” on the front radio screen will
give access to different media within Rear Seat
Entertainment with Fire TV built-in.
These options will be in the top menu of “Browse Media”
and include:
Fire TV — Selecting “Fire TV” will show streaming
options for categories and to select apps. This option
will be selectable on the left slider menu in “Browse
Media”. While in “Browse Media” under Fire TV, it will
display recent activity under “Recent”. This will display
recent videos viewed from Fire TV and recent down -
loads as well.
USB Video — Under “USB Videos”, videos will appear
that are options with a USB device connected to Rear
Seat Entertainment with Fire TV built-in.
USB Music — Under “USB Music”, music will appear
that are options with a USB device connected to Rear
Seat Entertainment with Fire TV built-in. Access Using the Voice Remote with Alexa and Rear
Screens
Rear passengers will be able to access some options for
streaming by pressing the “Prime Video”, “App 1”, or “App
2” button on the Voice Remote with Alexa. Selecting one
of those buttons on the Voice Remote with Alexa will take
you to the home page for that respective streaming
service. Turning on either of the rear screens will launch
Fire TV. By default, the rear screens will always launch in
Fire TV. More streaming options can be selected on the
Fire TV home page.
Fire TV
Fire TV is your source for online streaming with Rear Seat
Entertainment with Fire TV built-in.
NOTE:A data source needs to be connected to the system for
streaming to be accessible. This can be set up when Fire
TV is turned on for the first time on the rear screens. Some
options can be an in-vehicle 4G Wi-Fi hot spot, capable
Wi-Fi hot spot from a mobile device, or Wi-Fi from an
outside source like a home or a garage.
To access Fire TV on the front screen, select “Launch
Source” on the front radio, Rear Seat screen and then
“Fire TV Home” under “Inputs”.
Viewing from the front radio screen or passenger screen
mirrors or controls the Fire TV experience from one of the
rear Fire TV displays.
The menu bar for Fire TV will have the options for “Home”,
“Find”, “Library”, “Brand”, and “Live”.
Below the menu bar will be streaming options linked to
your Prime account like “Prime Video”. The front radio screen offers some options:
Power — This will turn Fire TV on or off.
Screen 1 and Screen 2 Toggle — This toggles between
the Rear Screens (for use with front radio screen only).
Collapse — While viewing on the front radio screen, this
will collapse the screen to dashboard view.
Source Drawer — This will open the “Source Drawer”
and the source logo will be displayed on the icon.
Browse Media — This will open the “Browse Media”
pop-up.
Back — This will let you go back the previous page.
Fire TV Home — This will take you back to the Fire TV
home page.
Menu — This will open the Fire TV menu.
Remote icon — This will display the on-screen remote.NOTE:Front radio screen mirroring and watching can only be
done when the vehicle is in PARK. The vehicle must be in
an active and usable cellular range and properly equipped
with a Uconnect 5 NAV system and Rear Seat Enter -
tainment with Fire TV package. For streaming, a Wi-Fi
connection and registered Amazon account are required
to run Fire TV in the vehicle. Streaming service subscrip -
tions are not included. Services and features are subject
to change or withdrawal at any time, may not be available
in all areas and languages, and may require separate
subscriptions.
23_WS_OM_EN_USC_t.book Page 232
Page 242 of 396
240SAFETY
REAR SEAT REMINDER ALERT (RSRA)
RSRA alerts you of the possible presence of an object,
passenger, or pet in the rear seats through a visual and
auditory notification. The system will activate
automatically if a rear door was opened within 10 minutes
of the ignition being placed in the ON/RUN position. RSRA
does not directly detect objects, passengers, or pets in the
rear seats. When the previous conditions are met, RSRA
displays the message “Check Rear Seat” on the
instrument cluster display and sounds an auditory alert
upon the driver placing the ignition in the OFF position to
exit the vehicle.
To enable or disable RSRA, see
Úpage 197.
DROWSY DRIVER DETECTION (DDD) —
I
F EQUIPPED
DDD detects when the driver is feeling fatigued and warns
the driver to pull over and take a break.
To Activate/Deactivate
DDD can be activated and deactivated through the
Uconnect system by selecting the following in order:
1. “Safety & Driving Assistance”
2. “Drowsy Driver Detection”
System Intervention
Using feedback obtained from the driver’s steering
patterns, any buttons/switches that are pressed, and from
the front camera, the system implements two operating
logics:
The first operating logic takes the driving style into
account, observing the road and detecting to what
extent the driver can continue driving with few lane
crossing events.
The second operating logic measures the time spent
behind the wheel with the vehicle speed above 40 mph
(60 km/h) and below 100 mph (160 km/h).
If the driving style indicates that the driver is unable to
follow the road trajectory and respect the horizontal lane
markings while within the operating speed range of the
system, a pop up will display on the instrument cluster
display to suggest that the driver should stop for a break.
An audible signal will also sound.
If the driver accepts the suggestion provided by the
system by pushing the “OK” button on the left side of the
steering wheel, the message will disappear from the
display.
If the driver does not acknowledge the warning it will be
displayed for 60 seconds and then disappear.
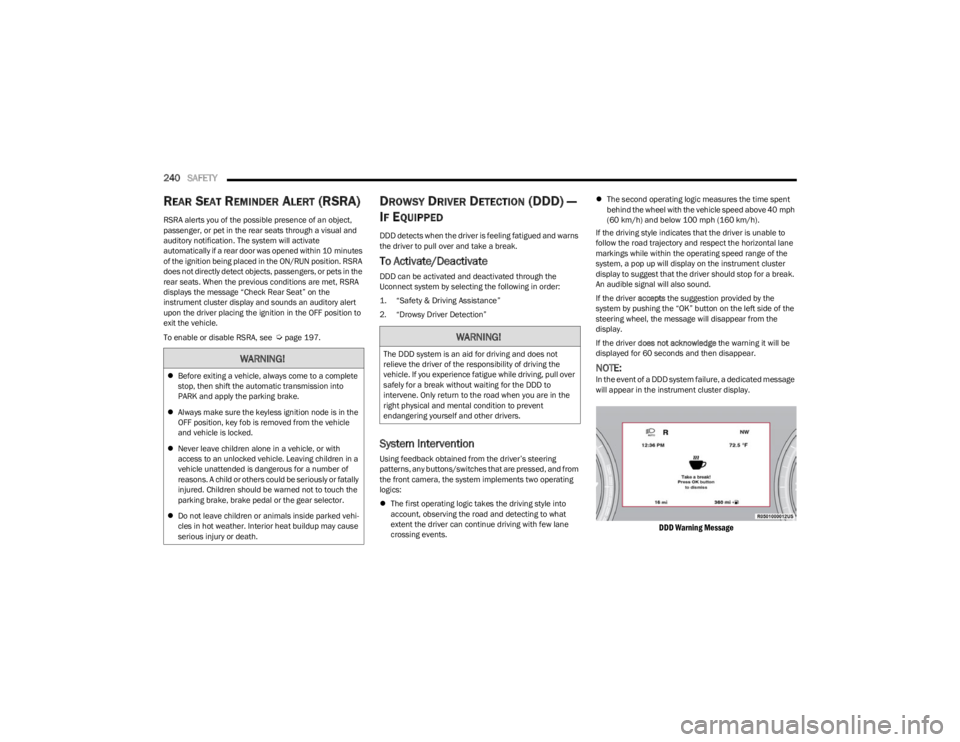
NOTE:In the event of a DDD system failure, a dedicated message
will appear in the instrument cluster display.
DDD Warning Message
WARNING!
Before exiting a vehicle, always come to a complete
stop, then shift the automatic transmission into
PARK and apply the parking brake.
Always make sure the keyless ignition node is in the
OFF position, key fob is removed from the vehicle
and vehicle is locked.
Never leave children alone in a vehicle, or with
access to an unlocked vehicle. Leaving children in a
vehicle unattended is dangerous for a number of
reasons. A child or others could be seriously or fatally
injured. Children should be warned not to touch the
parking brake, brake pedal or the gear selector.
Do not leave children or animals inside parked vehi -
cles in hot weather. Interior heat buildup may cause
serious injury or death.
WARNING!
The DDD system is an aid for driving and does not
relieve the driver of the responsibility of driving the
vehicle. If you experience fatigue while driving, pull over
safely for a break without waiting for the DDD to
intervene. Only return to the road when you are in the
right physical and mental condition to prevent
endangering yourself and other drivers.
23_WS_OM_EN_USC_t.book Page 240
Page 243 of 396
SAFETY241
ELECTRONIC BRAKE CONTROL (EBC)
S
YSTEM
Your vehicle is equipped with an advanced EBC system.
This system includes the Anti-Lock Brake System (ABS),
Brake Assist System (BAS), Electronic Brake Force
Distribution (EBD), Electronic Stability Control (ESC),
Electronic Roll Mitigation (ERM), Hill Start Assist (HSA),
Intersection Collision Assist (ICA), and Traction Control
System (TCS). These systems work together to enhance
both vehicle stability and control in various driving
conditions.
Your vehicle may also be equipped with Dynamic Steering
Torque (DST), Rain Brake Support (RBS), Ready Alert
Braking (RAB), and Trailer Sway Control (TSC).
Brake Assist System (BAS)
The BAS is designed to optimize the vehicle’s braking
capability during emergency braking maneuvers. The
system detects an emergency braking situation by sensing
the rate and amount of brake application and then applies
optimum pressure to the brakes. This can help reduce
braking distances. The BAS complements the Anti-Lock
Brake System (ABS). Applying the brakes very quickly
results in the best BAS assistance. To receive the benefit
of the system, you must apply continuous braking
pressure during the stopping sequence (do not “pump”
the brakes). Do not reduce brake pedal pressure unless
braking is no longer desired. Once the brake pedal is
released, the BAS is deactivated.
Brake System Warning Light
The red Brake System Warning Light will turn on when the
ignition is placed in the ON/RUN mode and may stay on for
as long as four seconds.
If the Brake System Warning Light remains on or comes on
while driving, it indicates that the brake system is not
functioning properly and that immediate service is
required. If the Brake System Warning Light does not
come on when the ignition is placed in the ON/RUN mode,
have the light repaired as soon as possible.
Electronic Brake Force Distribution (EBD)
EBD manages the distribution of the braking torque
between the front and rear axles by limiting braking
pressure to the rear axle. This is done to prevent
overslip of the rear wheels to avoid vehicle instability, and
to prevent the rear axle from entering ABS before the
front axle.
Electronic Roll Mitigation (ERM)
ERM anticipates the potential for wheel lift by monitoring
the driver’s steering wheel input and the speed of the
vehicle. When ERM determines that the rate of change of
the steering wheel angle and vehicle’s speed are
sufficient to potentially cause wheel lift, it then applies the
appropriate brake and may also reduce engine power to
lessen the chance that wheel lift will occur. ERM can only
reduce the chance of wheel lift occurring during severe or
evasive driving maneuvers; it cannot prevent wheel lift
due to other factors, such as road conditions, leaving the
roadway, or striking objects or other vehicles.
NOTE:
ERM is disabled any time the ESC is in “Full Off” mode (if
equipped). See
Úpage 242 for a complete explanation of
the available ESC modes.
WARNING!
The Brake Assist System (BAS) cannot prevent the
natural laws of physics from acting on the vehicle, nor
can it increase the traction afforded by prevailing road
conditions. BAS cannot prevent collisions, including
those resulting from excessive speed in turns, driving
on very slippery surfaces, or hydroplaning. The
capabilities of a BAS-equipped vehicle must never be
exploited in a reckless or dangerous manner, which
could jeopardize the user's safety or the safety of
others.
WARNING!
Many factors, such as vehicle loading, road conditions
and driving conditions, influence the chance that wheel
lift or rollover may occur. ERM cannot prevent all wheel
lift or rollovers, especially those that involve leaving the
roadway or striking objects or other vehicles. The
capabilities of an ERM-equipped vehicle must never be
exploited in a reckless or dangerous manner which
could jeopardize the user's safety or the safety of
others.
6
23_WS_OM_EN_USC_t.book Page 241