stop start JEEP WAGONEER 2023 Owners Manual
[x] Cancel search | Manufacturer: JEEP, Model Year: 2023, Model line: WAGONEER, Model: JEEP WAGONEER 2023Pages: 396, PDF Size: 15.17 MB
Page 6 of 396

4
STARTING AND OPERATING
STARTING THE ENGINE ................................................. 119
Automatic Transmission ........................................... 119
Keyless Enter ‘n Go™ — Ignition .............................. 119
Normal Starting ...................................................... 119AutoPark .................................................................... 120Extended Park Starting............................................. 121
If Engine Fails To Start ............................................. 121
Cold Weather Operation
(Below –22°F Or −30°C) ........................................ 122After Starting ............................................................. 122Turbocharger “Cool Down” —
3.0L Engine Only ....................................................... 122
ENGINE BLOCK HEATER — IF EQUIPPED ..................... 122
ENGINE BREAK-IN RECOMMENDATIONS ..................... 122
PARKING BRAKE ........................................................... 122 Electric Park Brake (EPB) ....................................... 122
AUTOMATIC TRANSMISSION ........................................ 125 Ignition Park Interlock............................................... 126Brake/Transmission Shift Interlock (BTSI)
System ...................................................................... 126
8-Speed Automatic Transmission ........................... 126
FOUR-WHEEL DRIVE OPERATION ................................. 129 Quadra-Trac I Operating Instructions/
Precautions — If Equipped........................................ 129Quadra-Trac II Operating Instructions/
Precautions — If Equipped........................................ 130Shift Positions ........................................................... 130
Shifting Procedures .................................................. 130
Quadra-Drive II System — If Equipped ..................... 131
SELEC-TERRAIN — IF EQUIPPED .................................... 131 Selec-Terrain Mode Selection .................................. 131Instrument Cluster Display Messages ..................... 132 QUADRA-LIFT — IF EQUIPPED ........................................ 132
Description ................................................................ 132Air Suspension Modes.............................................. 134
Instrument Cluster Display Messages .................... 134
Operation................................................................... 135
FUEL SAVER TECHNOLOGY 5.7L AND 6.4L
ONLY — IF EQUIPPED ...................................................... 135
POWER STEERING ........................................................... 135
STOP/START SYSTEM — IF EQUIPPED ......................... 136 Autostop Mode.......................................................... 136
Possible Reasons The Engine Does
Not Autostop ............................................................. 136
To Start The Engine While In Autostop Mode ......... 136
To Manually Turn Off The
Stop/Start System .................................................... 137
To Manually Turn On The
Stop/Start System .................................................... 137
System Malfunction.................................................. 137
CRUISE CONTROL SYSTEMS — IF EQUIPPED .............. 137 Cruise Control ........................................................... 138
Adaptive Cruise Control (ACC).................................. 139
TRAFFIC SIGN ASSIST SYSTEM —
IF EQUIPPED ..................................................................... 146 Activation/Deactivation ............................................ 147
Traffic Sign Assist Modes ......................................... 147
Indications On The Display....................................... 147
ACTIVE DRIVING ASSIST SYSTEM —
IF EQUIPPED ..................................................................... 148 Operation................................................................... 148
Turning Active Driving Assist On Or Off ................... 150
Indications On The Display....................................... 152
System Status ........................................................... 152
System Operation/Limitations................................. 153 PARKSENSE FRONT/REAR PARK
ASSIST SYSTEM ................................................................ 154
ParkSense Sensors ................................................... 154
ParkSense Display .................................................... 154
ParkSense Warning Display...................................... 157Enabling And Disabling ParkSense .......................... 157
Service The ParkSense Park Assist System ............ 157
Cleaning The ParkSense System ............................. 157
ParkSense System Usage Precautions .................... 158
Side Distance Warning System —
If Equipped................................................................. 158
PARKSENSE ACTIVE PARK ASSIST
SYSTEM — IF EQUIPPED .................................................. 160 Enabling And Disabling The ParkSense
Active Park Assist System ......................................... 161
ParkSense Automated Parking —
If Equipped................................................................. 162
Semi-Automatic ParkSense Active
Park Assist — If Equipped ......................................... 165
ACTIVE LANE MANAGEMENT SYSTEM —
IF EQUIPPED......................................................................167 Active Lane Management Operation ....................... 167
Turning Active Lane Management On Or Off ........... 168Active Lane Management Warning Message .......... 168Changing Active Lane Management Status ............ 170
PARKVIEW REAR BACK UP CAMERA ........................... 170 Zoom View ................................................................. 171
Viewing At Speed ....................................................... 171
FAMCAM SYSTEM — IF EQUIPPED ................................171
NIGHT VISION CAMERA SYSTEM —
IF EQUIPPED ....................................................................172 Detection Range ........................................................ 173
Service The Night Vision System .............................. 174
Night Vision System Limitations ............................... 174
23_WS_OM_EN_USC_t.book Page 4
Page 15 of 396
13
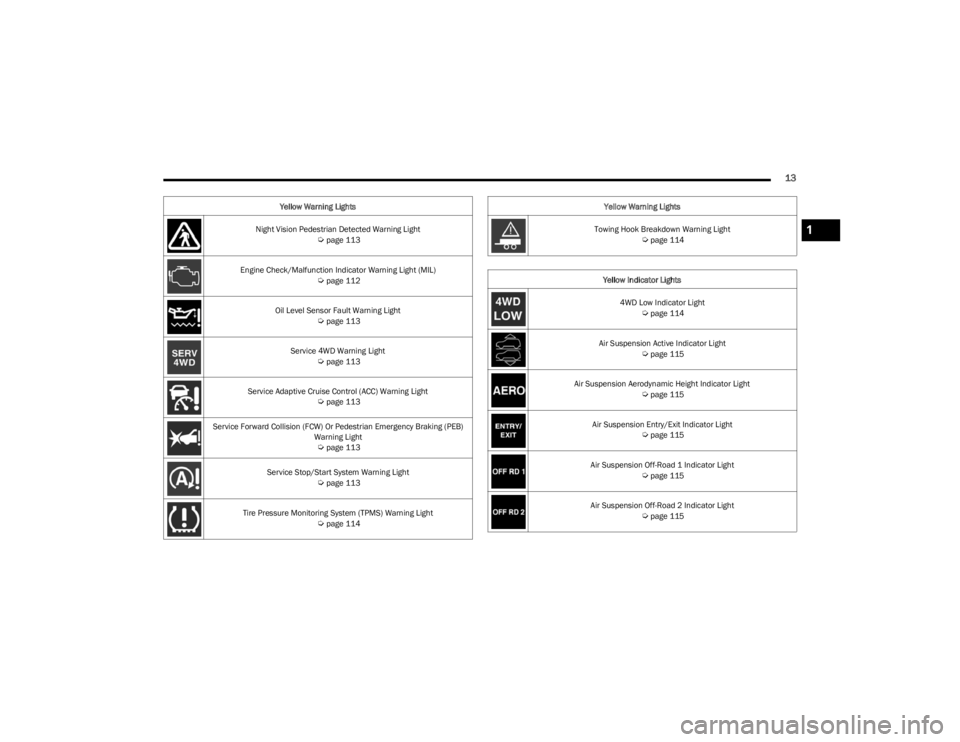
Night Vision Pedestrian Detected Warning Light Úpage 113
Engine Check/Malfunction Indicator Warning Light (MIL)
Úpage 112
Oil Level Sensor Fault Warning Light
Úpage 113
Service 4WD Warning Light
Úpage 113
Service Adaptive Cruise Control (ACC) Warning Light
Úpage 113
Service Forward Collision (FCW) Or Pedestrian Emergency Braking (PEB) Warning Light
Úpage 113
Service Stop/Start System Warning Light
Úpage 113
Tire Pressure Monitoring System (TPMS) Warning Light
Úpage 114
Yellow Warning Lights
Towing Hook Breakdown Warning Light
Úpage 114
Yellow Indicator Lights 4WD Low Indicator Light
Úpage 114
Air Suspension Active Indicator Light
Úpage 115
Air Suspension Aerodynamic Height Indicator Light
Úpage 115
Air Suspension Entry/Exit Indicator Light
Úpage 115
Air Suspension Off-Road 1 Indicator Light
Úpage 115
Air Suspension Off-Road 2 Indicator Light
Úpage 115
Yellow Warning Lights
1
23_WS_OM_EN_USC_t.book Page 13
Page 16 of 396
14
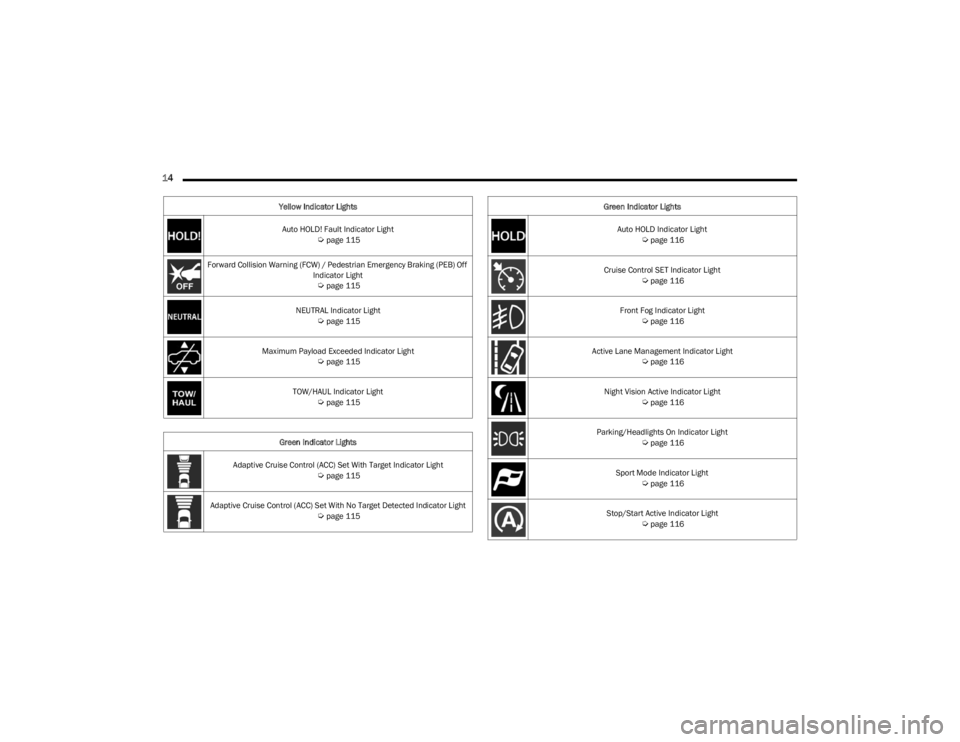
Auto HOLD! Fault Indicator Light Úpage 115
Forward Collision Warning (FCW) / Pedestrian Emergency Braking (PEB) Off Indicator Light
Úpage 115
NEUTRAL Indicator Light
Úpage 115
Maximum Payload Exceeded Indicator Light
Úpage 115
TOW/HAUL Indicator Light
Úpage 115
Green Indicator Lights
Adaptive Cruise Control (ACC) Set With Target Indicator Light
Úpage 115
Adaptive Cruise Control (ACC) Set With No Target Detected Indicator Light
Úpage 115
Yellow Indicator Lights
Auto HOLD Indicator Light
Úpage 116
Cruise Control SET Indicator Light
Úpage 116
Front Fog Indicator Light
Úpage 116
Active Lane Management Indicator Light
Úpage 116
Night Vision Active Indicator Light
Úpage 116
Parking/Headlights On Indicator Light
Úpage 116
Sport Mode Indicator Light
Úpage 116
Stop/Start Active Indicator Light
Úpage 116
Green Indicator Lights
23_WS_OM_EN_USC_t.book Page 14
Page 22 of 396

20GETTING TO KNOW YOUR VEHICLE
Programming And Requesting Additional
Key Fobs
Programming the key fob may be performed by an
authorized dealer.
NOTE:
Once a key fob is programmed to a vehicle, it cannot be
repurposed and reprogrammed to another vehicle.
Only key fobs that are programmed to the vehicle elec -
tronics can be used to start and operate the vehicle.
Duplication of key fobs may be performed at an authorized
dealer. This procedure consists of programming a blank
key fob to the vehicle electronics. A blank key fob is one
that has never been programmed.
NOTE:
When having the Sentry Key Immobilizer system
serviced, bring all vehicle keys with you to an autho -
rized dealer.
Keys must be ordered to the correct key cut to match
the vehicle locks.
SENTRY KEY
The Sentry Key Immobilizer system prevents unauthorized
vehicle operation by disabling the engine. The system
does not need to be armed or activated. Operation is
automatic, regardless of whether the vehicle is locked or
unlocked.
The system uses a key fob, keyless push button ignition
and a Radio Frequency (RF) receiver to prevent
unauthorized vehicle operation. Therefore, only key fobs
that are programmed to the vehicle can be used to start
and operate the vehicle. The system cannot reprogram a
key fob obtained from another vehicle.
After placing the ignition in the ON/RUN position, the
Vehicle Security Light will turn on for three seconds for a
bulb check. If the light remains on after the bulb check, it
indicates that there is a problem with the electronics. In
addition, if the light begins to flash after the bulb check, it
indicates that someone attempted to start the engine with
an invalid key fob. In the event that a valid key fob is used
to start the engine but there is an issue with the vehicle
electronics, the engine will start and shut off after two
seconds.
If the Vehicle Security Light turns on during normal vehicle
operation (vehicle running for longer than 10 seconds), it
indicates that there is a fault in the electronics. Should
this occur, have the vehicle serviced as soon as possible
by an authorized dealer. All of the key fobs provided with your new vehicle have
been programmed to the vehicle electronics
Úpage 382.
NOTE:A key fob that has not been programmed is also
considered an invalid key.
IGNITION SWITCH
KEYLESS ENTER ‘N GO™ IGNITION
This feature allows the driver to operate the ignition switch
with the push of a button as long as the key fob is in the
passenger compartment.
The START/STOP ignition button has several operating
modes that are labeled and will illuminate when in
position. These modes are OFF, ON/RUN, and START.
WARNING!
Always remove the key fobs from the vehicle and lock
all doors when leaving the vehicle unattended.
For vehicles equipped with Keyless Enter ‘n Go™ Igni -
tion, always remember to place the ignition in the
OFF position when exiting the vehicle.
CAUTION!
The Sentry Key Immobilizer system is not compatible
with some aftermarket Remote Start systems. Use of
these systems may result in vehicle starting problems
and loss of security protection.
23_WS_OM_EN_USC_t.book Page 20
Page 23 of 396
GETTING TO KNOW YOUR VEHICLE21
(Continued)
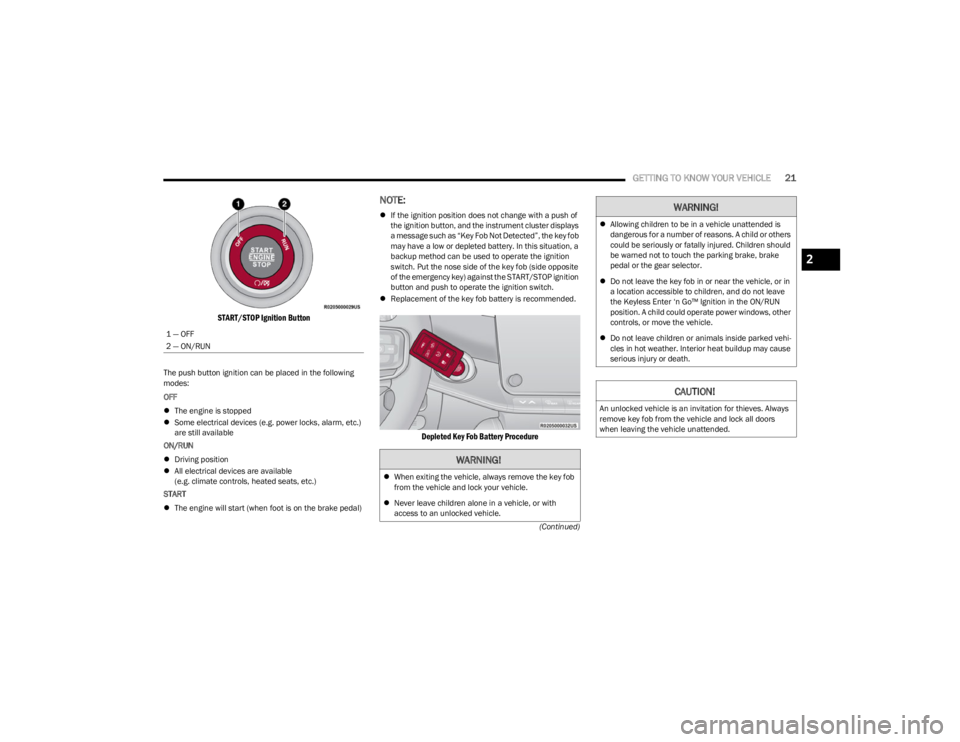
START/STOP Ignition Button
The push button ignition can be placed in the following
modes:
OFF
The engine is stopped
Some electrical devices (e.g. power locks, alarm, etc.)
are still available
ON/RUN
Driving position
All electrical devices are available
(e.g. climate controls, heated seats, etc.)
START
The engine will start (when foot is on the brake pedal)
NOTE:
If the ignition position does not change with a push of
the ignition button, and the instrument cluster displays
a message such as “Key Fob Not Detected”, the key fob
may have a low or depleted battery. In this situation, a
backup method can be used to operate the ignition
switch. Put the nose side of the key fob (side opposite
of the emergency key) against the START/STOP ignition
button and push to operate the ignition switch.
Replacement of the key fob battery is recommended.
Depleted Key Fob Battery Procedure
1 — OFF
2 — ON/RUN
WARNING!
When exiting the vehicle, always remove the key fob
from the vehicle and lock your vehicle.
Never leave children alone in a vehicle, or with
access to an unlocked vehicle.
Allowing children to be in a vehicle unattended is
dangerous for a number of reasons. A child or others
could be seriously or fatally injured. Children should
be warned not to touch the parking brake, brake
pedal or the gear selector.
Do not leave the key fob in or near the vehicle, or in
a location accessible to children, and do not leave
the Keyless Enter ‘n Go™ Ignition in the ON/RUN
position. A child could operate power windows, other
controls, or move the vehicle.
Do not leave children or animals inside parked vehi -
cles in hot weather. Interior heat buildup may cause
serious injury or death.
CAUTION!
An unlocked vehicle is an invitation for thieves. Always
remove key fob from the vehicle and lock all doors
when leaving the vehicle unattended.
WARNING!
2
23_WS_OM_EN_USC_t.book Page 21
Page 25 of 396

GETTING TO KNOW YOUR VEHICLE23
TO EXIT REMOTE START MODE
To drive the vehicle after starting the Remote Start
system, either push and release the unlock button on the
key fob to unlock the doors, or unlock the vehicle using
Keyless Enter ‘n Go™ — Passive Entry via the door
handles, and disarm the Vehicle Security system
(if equipped). Then, prior to the end of the 15 minute
cycle, push and release the START/STOP ignition button.
The Remote Start system will turn the engine off if the
Remote Start button on the key fob is pushed again, or if
the engine is allowed to run for the entire 15 minute cycle.
Once the ignition is placed in the ON/RUN position, the
climate controls will resume previously set operations
(temperature, blower control, etc.).
NOTE:
To avoid unintentional shutdowns, the system will
disable for two seconds after receiving a valid Remote
Start request.
For vehicles equipped with the Keyless Enter ‘n Go™ —
Passive Entry feature, the message “Remote Start
Active — Push Start Button” will display in the instru -
ment cluster display until you push the START/STOP
ignition button.
REMOTE START FRONT DEFROST
A
CTIVATION — IF EQUIPPED
When Remote Start is active, and the outside ambient
temperature is 40°F (4.5°C) or below, the system will
automatically activate front defrost for 15 minutes or less.
The time is dependent on the ambient temperature. Once
the timer expires, the system will automatically adjust the
settings depending on ambient conditions. See “Remote
Start Comfort Systems — If Equipped” in the next section
for detailed operation.
REMOTE START COMFORT SYSTEMS —
I
F EQUIPPED
When Remote Start is activated, the front and rear defrost
will automatically turn on in cold weather. The heated
steering wheel and driver heated seat feature will turn on
if selected in the Comfort menu within Uconnect Settings
Úpage 197. In warm weather, the driver vented seat
feature will automatically turn on when Remote Start is
activated, if programmed in the Comfort menu. The
vehicle will adjust the climate control settings depending
on the outside ambient temperature. Automatic Temperature Control (ATC) — If Equipped
The climate controls will automatically adjust to the
optimal temperature and mode settings depending on the
outside ambient temperature. This will occur until the
ignition is placed in the ON/RUN position where the
climate controls will resume their previous settings.
For more information on ATC and climate control settings,
see
Úpage 64.
NOTE:These features will stay on through the duration of Remote
Start until the ignition is placed in the ON/RUN position.
The climate control setting will change, and exit automatic
operation, if manually adjusted by the driver while the
vehicle is in Remote Start mode. This includes the OFF
button on the climate controls, which will turn the system
off.
REMOTE START WINDSHIELD WIPER
D
E-ICER ACTIVATION — IF EQUIPPED
When Remote Start is active and the outside ambient
temperature is less than 33°F (0.6°C), the Windshield
Wiper De-Icer will activate. Exiting Remote Start will
resume its previous operation. If the Windshield Wiper
De-Icer was active, the timer and operation will continue.
WARNING!
Do not start or run an engine in a closed garage or
confined area. Exhaust gas contains carbon
monoxide which is odorless and colorless. Carbon
monoxide is poisonous and can cause serious injury
or death when inhaled.
Keep key fobs away from children. Operation of the
Remote Start system, windows, door locks or other
controls could cause serious injury or death.
2
23_WS_OM_EN_USC_t.book Page 23
Page 27 of 396

GETTING TO KNOW YOUR VEHICLE25
The Vehicle Security system is designed to protect your
vehicle. However, you can create conditions where the
system will give you a false alarm. If one of the previously
described arming sequences has occurred, the Vehicle
Security system will arm regardless of whether you are in
the vehicle or not. If you remain in the vehicle and open a
door, the alarm will sound. If this occurs, disarm the
Vehicle Security system.
If the Vehicle Security system is armed and the battery
becomes disconnected, the Vehicle Security system will
remain armed when the battery is reconnected; the
exterior lights will flash, and the horn will sound. If this
occurs, disarm the Vehicle Security system.
REARMING OF THE SYSTEM
If something triggers the alarm and no action is taken to
disarm it, the Vehicle Security system will turn the horn off
after a 29 second cycle (with five seconds between cycles
and up to eight cycles if the trigger remains active) and
then rearm itself.
SECURITY SYSTEM MANUAL OVERRIDE
The Vehicle Security system will not arm if you lock the
doors using the manual door lock, or an emergency lock
lever
Úpage 26.
TAMPER ALERT
If something has triggered the Vehicle Security system in
your absence, the horn will sound three times and the
exterior lights will blink three times when you disarm the
Vehicle Security system.
DELUXE VEHICLE SECURITY SYSTEM —
IF EQUIPPED
The Deluxe Vehicle Security system monitors the doors,
hood latch, and liftgate for unauthorized entry and the
ignition switch for unauthorized operation. The system
also includes a dual function intrusion sensor and vehicle
tilt sensor. The intrusion sensor monitors the vehicle
interior for motion. The vehicle tilt sensor monitors the
vehicle for any tilting actions (tow away, tire removal, ferry
transport, etc.).
If a perimeter violation triggers the security system, the
horn will sound for 29 seconds and the exterior lights will
flash followed by approximately five seconds of no activity.
This will continue for eight cycles if no action is taken to
disarm the system.
TO ARM THE SYSTEM
Follow these steps to arm the security system:
1. If any doors, windows, or the sunroof (if equipped)
are open, close them.
2. Make sure the vehicle ignition system is OFF.
3. Perform one of the following methods to lock the vehicle:
Push lock on the interior power door lock switch
with the driver and/or passenger door open.
Touch the lock button on the exterior Passive Entry
door handle with a key fob available in the same
exterior zone
Úpage 167.
Push the lock button on the key fob.
NOTE:
When armed, the interior motion sensor detects move -
ment within the vehicle's interior, including moving
objects (i.e. people and pets) and air currents through
open windows or the sunroof. The windows and
sunroof should be closed, and moving objects should
not be left in the vehicle when the intrusion detection
is armed, otherwise false alarms can occur.
Once the security system is armed, it remains in that
state until you disarm it by following either of the
disarming procedures described. If a power loss occurs
after arming the system, you must disarm the system
after restoring power to prevent alarm activation.
The ultrasonic intrusion sensor (motion detector)
actively monitors your vehicle every time you arm the
Vehicle Security system. If you prefer, you can turn off
the ultrasonic intrusion sensor when arming the
Vehicle Security system. To do so, push the lock button
on the key fob three times within 15 seconds of arming
the system (while the Vehicle Security Light is flashing
rapidly). The vehicle will remain locked but will disable
the alarm in the case of repeated false alarms due to
ambient conditions.
TO DISARM THE SYSTEM
The Vehicle Security system can be disarmed using any of
the following methods:
Push the unlock button on the key fob.
Grab the Passive Entry door handle to unlock the door
Úpage 167.
Cycle the vehicle ignition system out of the OFF position
by pushing the START/STOP ignition button (requires at
least one valid key fob in the vehicle).
2
23_WS_OM_EN_USC_t.book Page 25
Page 50 of 396
48GETTING TO KNOW YOUR VEHICLE
The third row outboard head restraints are not adjustable
or removable, but can be folded for improved visibility
when the vehicle is in REVERSE, and there are no
occupants in the seats.
Press the Headrest Fold button within the
Controls menu of the Uconnect system to
power fold the third row head restraints.
The head restraints will also automatically fold
when the seatbacks are folded forward using the release
handles on the backs of the seats from the cargo area.
NOTE:
The head restraints must be raised manually when
occupying the third row.
Do not fold if there are passengers seated in the third
row seats.
UCONNECT VOICE RECOGNITION
QUICK TIPS — IF EQUIPPED
INTRODUCING VOICE RECOGNITION
Start using Uconnect Voice Recognition with these helpful
quick tips. It provides the key Voice Commands and tips
you need to know to control your vehicle’s Voice
Recognition (VR) system.
BASIC VOICE COMMANDS
The following basic voice commands can be given at any
point while using your Uconnect system.
Push the VR button or say the vehicle’s Wake Up word
“Hey Uconnect”. The factory default Wake Up word is set
to “Hey Uconnect” and can be reprogrammed through the
Uconnect Settings. After the beep, say:
“Cancel ” to stop a current voice session.
“Help ” to hear a list of suggested Voice Commands.
“Repeat ” to listen to the system prompts again.
Notice the visual cues that inform you of your Voice
Recognition system’s status.
GET STARTED
The VR button is used to activate/deactivate your
Voice Recognition system. You can also use the system’s
Wake Up word to activate voice recognition. The Wake Up
word can be set through the Uconnect Settings
Úpage 197.
Helpful hints for using Voice Recognition:
Reduce background noise. Wind noise and passenger
conversations are examples of noise that may impact
recognition.
Speak clearly at a normal pace and volume while facing
straight ahead.
Each time you give a Voice Command, first push the VR
button or say the Wake Up word, wait until after the
beep, then say your Voice Command.
You can interrupt the help message or system prompts
by pushing the VR button and saying a Voice Command
from the current category.
You can also interrupt the help message or system
prompts by speaking. This feature is called “barge-in”
and can be set through the Uconnect Settings
Úpage 197.
WARNING!
All occupants, including the driver, should not
operate a vehicle or sit in a vehicle’s seat until the
head restraints are placed in their proper positions in
order to minimize the risk of neck injury in the event
of a crash.
Head restraints should never be adjusted while the
vehicle is in motion. Driving a vehicle with the head
restraints improperly adjusted or removed could
cause serious injury or death in the event of a
collision.
23_WS_OM_EN_USC_t.book Page 48
Page 51 of 396
GETTING TO KNOW YOUR VEHICLE49
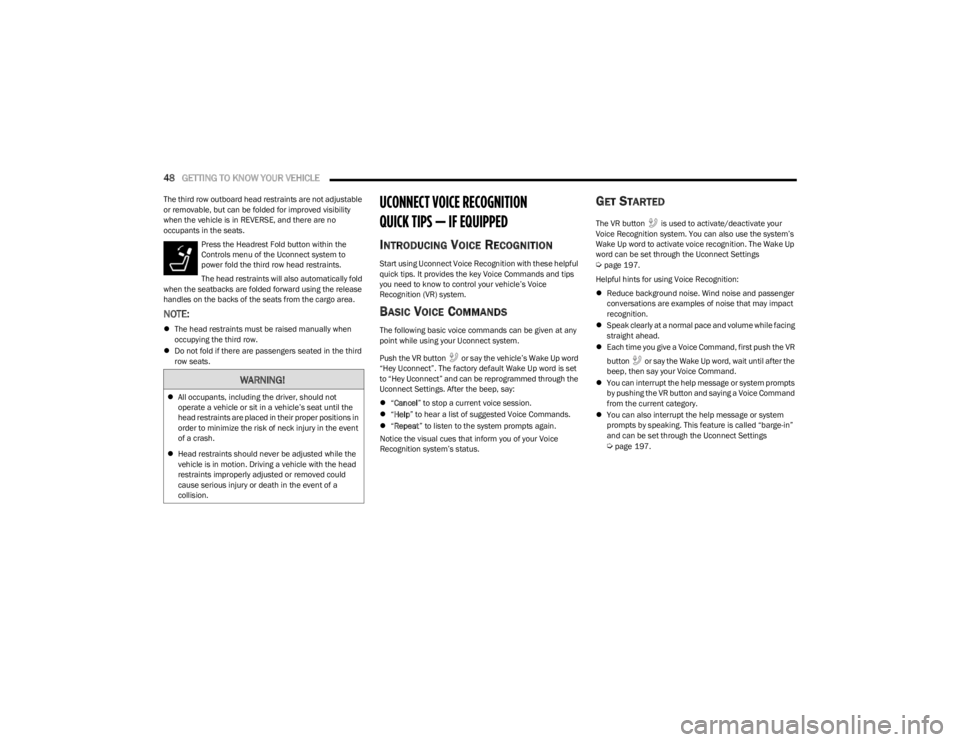
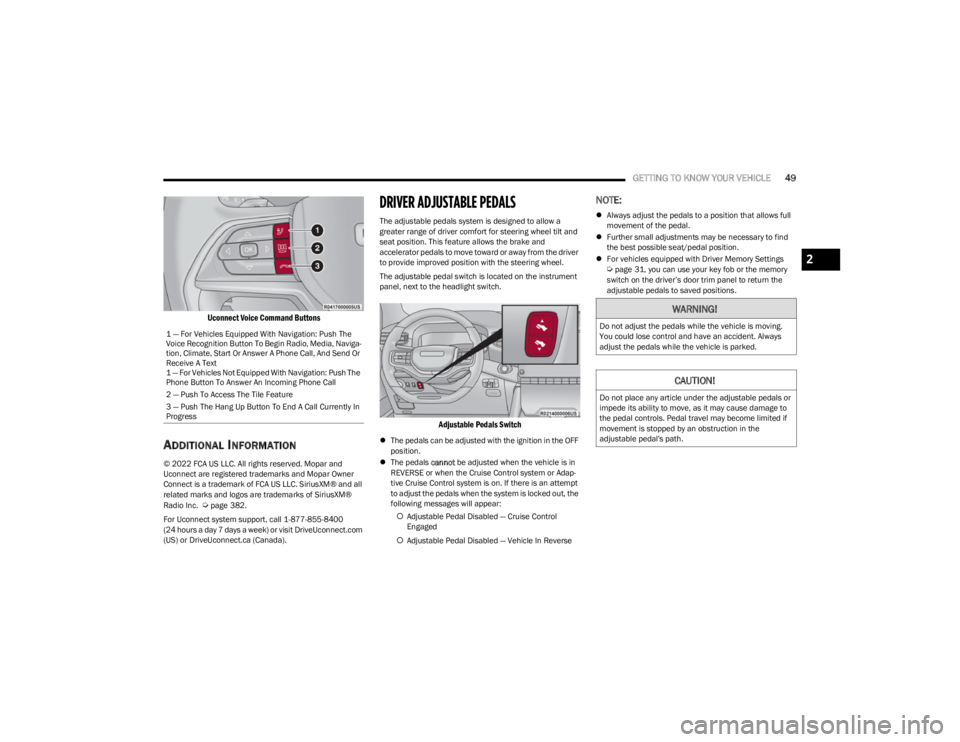
Uconnect Voice Command Buttons
ADDITIONAL INFORMATION
© 2022 FCA US LLC. All rights reserved. Mopar and
Uconnect are registered trademarks and Mopar Owner
Connect is a trademark of FCA US LLC. SiriusXM® and all
related marks and logos are trademarks of SiriusXM®
Radio Inc.
Úpage 382.
For Uconnect system support, call 1-877-855-8400
(24 hours a day 7 days a week) or visit DriveUconnect.com
(US) or DriveUconnect.ca (Canada).
DRIVER ADJUSTABLE PEDALS
The adjustable pedals system is designed to allow a
greater range of driver comfort for steering wheel tilt and
seat position. This feature allows the brake and
accelerator pedals to move toward or away from the driver
to provide improved position with the steering wheel.
The adjustable pedal switch is located on the instrument
panel, next to the headlight switch.
Adjustable Pedals Switch
The pedals can be adjusted with the ignition in the OFF
position.
The pedals cannot be adjusted when the vehicle is in
REVERSE or when the Cruise Control system or Adap -
tive Cruise Control system is on. If there is an attempt
to adjust the pedals when the system is locked out, the
following messages will appear:
Adjustable Pedal Disabled — Cruise Control
Engaged
Adjustable Pedal Disabled — Vehicle In Reverse
NOTE:
Always adjust the pedals to a position that allows full
movement of the pedal.
Further small adjustments may be necessary to find
the best possible seat/pedal position.
For vehicles equipped with Driver Memory Settings
Úpage 31, you can use your key fob or the memory
switch on the driver’s door trim panel to return the
adjustable pedals to saved positions.
1 — For Vehicles Equipped With Navigation: Push The
Voice Recognition Button To Begin Radio, Media, Naviga -
tion, Climate, Start Or Answer A Phone Call, And Send Or
Receive A Text
1 — For Vehicles Not Equipped With Navigation: Push The
Phone Button To Answer An Incoming Phone Call
2 — Push To Access The Tile Feature
3 — Push The Hang Up Button To End A Call Currently In
Progress
WARNING!
Do not adjust the pedals while the vehicle is moving.
You could lose control and have an accident. Always
adjust the pedals while the vehicle is parked.
CAUTION!
Do not place any article under the adjustable pedals or
impede its ability to move, as it may cause damage to
the pedal controls. Pedal travel may become limited if
movement is stopped by an obstruction in the
adjustable pedal's path.
2
23_WS_OM_EN_USC_t.book Page 49
Page 65 of 396

GETTING TO KNOW YOUR VEHICLE63
NOTE:If the vehicle is moving less than 10 mph (16 km/h), delay
times will be doubled.
Windshield Washer Operation
To use the washer, pull the lever rearward toward you and
hold. If the lever is pulled while on the intermittent setting,
the wipers will turn on and operate for several wipe cycles
after the lever is released, and then resume the
intermittent interval previously selected. If the lever is
pulled while the wipers are in the off position, the wipers
will operate several cycles, then turn off.
NOTE:
As a protective measure, the pump will stop if the
switch is held for more than 20 seconds. Once the
switch is released the pump will resume normal
operation.
If the front window washer feature is activated, all of
the front cameras (if equipped) on the vehicle will be
washed as well.
Mist
Use the Mist feature when weather conditions make
occasional usage of the wipers necessary. Push the lever
upward to the MIST position and release for a single
wiping cycle.
NOTE:The Mist feature does not activate the washer pump;
therefore, no washer fluid will be sprayed on the wind -
shield. The washer function must be used in order to spray
the windshield with washer fluid.
For information on wiper care and replacement, see
Úpage 324.
RAIN SENSING WIPERS — IF EQUIPPED
This feature senses rain or snowfall on the windshield and
automatically activates the wipers. Rotate the end of the
windshield wiper lever to one of the four detent positions
to activate this feature.
The sensitivity of the system is adjustable from the
windshield wiper lever. Wiper sensitivity position 1 is the
least sensitive, and wiper sensitivity position 4 is the most
sensitive.
NOTE:
The Rain Sensing feature will not operate when the
wiper switch is in the low or high position.
The Rain Sensing feature may not function properly
when ice or dried saltwater is present on the wind -
shield.
Use of products containing wax or silicone may reduce
rain sensor performance.
The Rain Sensing feature can be turned on and off
through the Uconnect system
Úpage 197.
The Rain Sensing system has protective features for the
wiper blades and arms. It will not operate under the
following conditions:
Low Temperature Wipe Inhibit — The Rain Sensing
feature will not operate when the ignition is first placed
in the ON position, when the vehicle is stationary and
the outside temperature is below 32°F (0°C), unless
the wiper control on the windshield wiper lever is
moved, the vehicle speed becomes greater than 3 mph
(5 km/h) or the outside temperature rises above
freezing.
Neutral Wipe Inhibit — The Rain Sensing feature will not
operate when the ignition is ON, when the transmission
gear selector is in the NEUTRAL position and the
vehicle speed is less than 3 mph (5 km/h), unless the
wiper control on the windshield wiper lever is moved,
the vehicle speed is greater than 3 mph (5 km/h) or
the gear selector is moved out of the NEUTRAL posi -
tion.
Remote Start Mode Inhibit — On vehicles equipped with
the Remote Start system, Rain Sensing wipers are not
operational when the vehicle is in the Remote Start
mode. Once the operator is in the vehicle and has
placed the ignition switch in the ON/RUN position, rain
sensing wiper operation can resume, if it has been
selected, and no other inhibit conditions
(mentioned previously) exist.
WARNING!
Sudden loss of visibility through the windshield could
lead to a collision. You might not see other vehicles or
other obstacles. To avoid sudden icing of the windshield
during freezing weather, warm the windshield with the
defroster before and during windshield washer use.
2
23_WS_OM_EN_USC_t.book Page 63