ECU JEEP WRANGLER 2006 TJ / 2.G Owner's Manual
[x] Cancel search | Manufacturer: JEEP, Model Year: 2006, Model line: WRANGLER, Model: JEEP WRANGLER 2006 TJ / 2.GPages: 368, PDF Size: 14.3 MB
Page 136 of 368

CAUTION!
Do not remove the head impact foam from the side
bars, as damage to the foam may result.
5. To safely store the side bars in your vehicle, use four of
the cinch straps, found in the glove box. Attach the straps
through the footman loops located in the floor behind the
folded rear seat on each side of the vehicle.
WARNING!
You or others could be injured if you carry the side
bars loose in your vehicle. Remove the bars from the
vehicle or securely store them as described or they
may cause personal injury if an accident occurs. See
your authorized dealer for replacement if the cinch
straps are not found in the glove box.
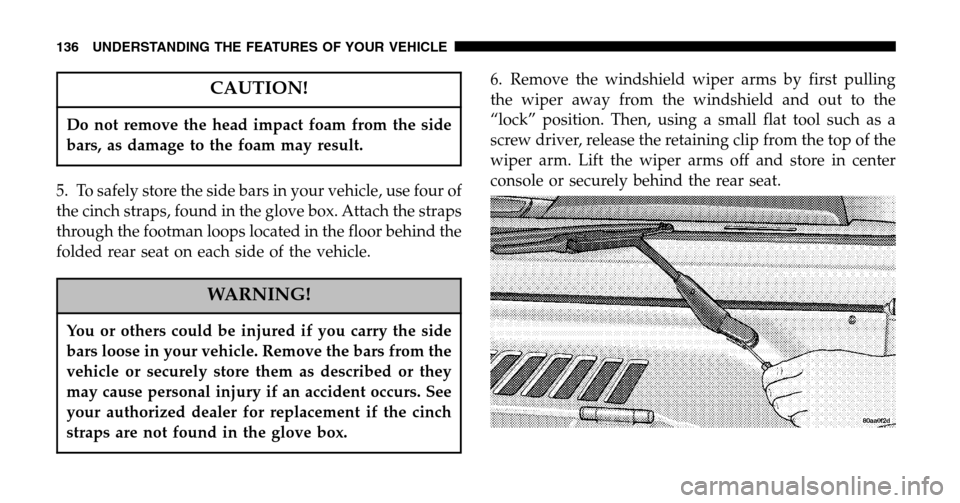
6. Remove the windshield wiper arms by first pulling
the wiper away from the windshield and out to the
“lock” position. Then, using a small flat tool such as a
screw driver, release the retaining clip from the top of the
wiper arm. Lift the wiper arms off and store in center
console or securely behind the rear seat.
136 UNDERSTANDING THE FEATURES OF YOUR VEHICLE
Page 138 of 368

9. Secure the windshield by passing the remaining cinch
strap, found in the glove box, through the footman hoop
on the center of the hood and on the center of the
windshield frame. Tighten the strap to secure the wind-
shield in place.Raising The Windshield And Replacing Side Bars
To raise the windshield, install the windshield wipers,
and install the side bars use these same steps in reverse.
WARNING!
To help protect against personal injury, always in-
stall the side bars when raising the windshield on
your vehicle. If you do not raise the windshield and
install the side bars, you lose the protection these
structural elements provide in some accidents.
138 UNDERSTANDING THE FEATURES OF YOUR VEHICLE
Page 190 of 368

WARNING!
Unintended movement of a vehicle could injure
those in and near the vehicle. As with all vehicles,
you should never exit a vehicle while the engine is
running. Before exiting a vehicle, you should always
shift the vehicle into P (Park), remove the key from
the ignition, and apply the parking brake. Once the
key is removed from the ignition, the transmission
shift lever is locked in the P (Park) position, securing
the vehicle against unwanted movement. Further-
more, you should never leave children unattended
inside a vehicle.
The following indicators should be used to ensure that
you have engaged the transmission shift lever into the P
(Park) position:
•When shifting into P (Park), depress the button on the
shift lever and firmly move the lever all the way
forward until it stops.
•Look at the shift indicator window on the console to
ensure it is in the P (Park) position.
•When engaged in P (Park), you will not be able to
move the shifter rearward without depressing the shift
lever button.
CAUTION!
Before moving the shift lever out of P (Park), you
must turn the ignition from LOCK to ON so the
steering wheel and shift lever are released. Other-
wise, damage to the steering column or shifter could
result.
190 STARTING AND OPERATING
Page 242 of 368

Towing Requirements
To promote proper break-in of your new vehicle drivetrain
components the following guidelines are recommended:
NOTE: Trailer towing requires special rear axle lubri-
cant. Refer to “Fluids, Lubricants, and Genuine Parts” in
Section 7 for more information.
CAUTION!
•Avoid towing a trailer for the first 500 miles (805
km) of vehicle operation. Doing so may damage
your vehicle.
•During the first 500 miles (805 km) of trailer
towing, limit your speed to 50 mph (80 km/h).
Perform the maintenance listed in Section 8 of this
manual. When towing a trailer, never exceed the GAWR,
or GCWR, ratings.
WARNING!
Improper towing can lead to an injury accident.
Follow these guidelines to make your trailer towing
as safe as possible:
Make certain that the load is secured in the trailer
and will not shift during travel. When trailering
cargo that is not fully secured, dynamic load shifts
can occur that may be difficult for the driver to
control. You could lose control of your vehicle and
have an accident.
•When hauling cargo or towing a trailer, do not over-
load your vehicle or trailer. Overloading can cause a
loss of control, poor performance or damage to brakes,
axle, engine, transmission, steering, suspension, chas-
sis structure or tires.
242 STARTING AND OPERATING
Page 258 of 368

9. Finish tightening the lug nuts. Push down on the
wrench while tightening for increased leverage. Alternate
nuts until each nut has been tightened twice. Correct
wheel nut tightness is 130 N·m (95 ft. lbs). If in doubt
about the correct tightness, have them checked with a
torque wrench by your authorized dealer or at a service
station.
10. Remove jack assembly and wheel blocks.
WARNING!
A loose tire or jack, thrown forward in a collision or
hard stop could endanger the occupants of the ve-
hicle. Always stow the jack parts and the spare tire in
the places provided.
11. Secure the tire, jack, and tools in their proper loca-
tions.
JUMP STARTING
WARNING!
To prevent personal injury or damage to clothing, do
not allow battery fluid to contact eyes, skin, or
fabrics. Do not lean over a battery when connecting
jumper cables or allow cable clamps to touch each
other. Keep open flames or sparks away from battery
vent holes. Always wear eye protection when work-
ing with batteries. Do not use a booster battery or
any other booster source that has a greater than
12–volt system, i.e. do not use a 24–volt power
source.
Your vehicle is equipped with a 12–volt battery. If it
becomes necessary to use a booster battery, with jumper
cables, to start the vehicle’s engine because it’s battery is
discharged, the following procedure should be followed:
258 WHAT TO DO IN EMERGENCIES
Page 289 of 368

•Check antifreeze/coolant freeze point in the radiator
and in the coolant recovery bottle. If antifreeze/
coolant needs to be added, contents of coolant recov-
ery bottle must also be protected against freezing.
•If frequent antifreeze/coolant additions are required,
or if the level in the recovery bottle does not drop
when the engine cools, the cooling system should be
pressure tested for leaks.
•Maintain antifreeze/coolant concentration at 50%
HOAT antifreeze/coolant (minimum) and distilled
water for proper corrosion protection of your engine
which contains aluminum components.
•Make sure that the radiator and coolant recovery
bottle hoses are not kinked or obstructed.
•Keep the front of the radiator clean. If your vehicle is
equipped with air conditioning, keep the front of the
condenser clean, also.
•Do not change the thermostat for summer or winter
operation. If replacement is ever necessary, install
ONLY the correct type thermostat. Other designs may
result in unsatisfactory cooling performance, poor gas
mileage, and increased emissions.
Hoses and Vacuum/Vapor Harnesses
Inspect surfaces of hoses and nylon tubing for evidence
of heat and mechanical damage. Hard or soft spots,
brittle rubber, cracking, tears, cuts, abrasions, and exces-
sive swelling indicate deterioration of the rubber.
Pay particular attention to the hoses nearest to high heat
sources such as the exhaust manifold. Inspect hose rout-
ing to be sure hoses do not touch any heat source or
moving component that may cause heat damage or
mechanical wear.
Insure nylon tubing in these areas has not melted or
collapsed. Inspect all hose connections such as clamps
and couplings to make sure they are secure and no leaks
MAINTAINING YOUR VEHICLE 289
7
Page 290 of 368

are present. Components should be replaced immedi-
ately if there is any evidence of degradation that could
cause failure.
Brake System
In order to assure brake system performance, all brake
system components should be inspected periodically.
Refer to the appropriate “Maintenance Schedule” in
Section 8 for suggested service intervals.
WARNING!
Riding the brakes can lead to brake failure and
possibly an accident. Driving with your foot resting
or riding on the brake pedal can result in abnormally
high brake temperatures, excessive lining wear, and
possible brake damage. You wouldn’t have your full
braking capacity in an emergency.
Brake and Power Steering System Hoses
When servicing the vehicle for scheduled maintenance,
inspect surface of hoses for evidence of heat and me-
chanical damage. Hard and brittle rubber, cracking, tears,
cuts, abrasion, and excessive swelling suggest deteriora-
tion of the rubber. Particular attention should be made to
examining those hose surfaces nearest to high heat
sources, such as the exhaust manifold.
Inspect all hose clamps and couplings to make sure they
are secure and no leaks are present.
NOTE: Inspection of brake hoses should be done when-
ever the brake system is serviced and every engine oil
change.
290 MAINTAINING YOUR VEHICLE
Page 302 of 368

Follow These Steps To Remove The Carpet:
1. Unsnap the front and rear floor carpets. A snap is
located on the outboard side of each front seat.
2. Remove the attachment cap from the front footwell
area on both the driver and passenger side. The cap is
removed by pulling it straight out.
3. Remove the front and rear floor carpets.
4. Remove the cargo floor and wheelhouse carpets.
NOTE: If your vehicle is equipped with an Add-A-
Trunk™ it must be removed to be able to remove the
cargo floor and wheelhouse carpets. For Add-A-Trunk™
removal procedure, refer to “Storage” in Section 3 of this
manual.
Follow These Steps To Replace The Carpet:
1. Place the front floor carpets in the vehicle. 2. Attach the carpet to the studs in the footwell and press
on the attachment caps to secure the carpet.
3. Place rear floor carpet in vehicle and snap rear carpet
to front floor carpet.
4. Install wheelhouse carpet followed by the cargo floor
carpet.
5. Reinstall Add-A-Trunk™ if so equipped.
Appearance Care For Fabric Top Models
CAUTION!
To maintain the appearance of your vehicle’s interior
trim and top, follow these precautions:
•Avoid leaving your vehicle unattended with the top
down, as exposure to sun or rain may damage interior
trim.
302 MAINTAINING YOUR VEHICLE