JEEP WRANGLER 2014 JK / 3.G Owners Manual
Manufacturer: JEEP, Model Year: 2014, Model line: WRANGLER, Model: JEEP WRANGLER 2014 JK / 3.GPages: 148, PDF Size: 12.93 MB
Page 91 of 148
EVIC Main Menu
• To step to each main menu feature press and release the MENU button once foreach step. A step from the last item in the list will cause the first item in the
feature list to be displayed. The following features are in the Main menu:• Compass, Outside Temperature, and ECO display
• Digital Speedometer
• Average Fuel Economy
• Distance to Empty
• Elapsed Time
• Vehicle Information
• Coolant Temp
• Oil Pressure
• Transmission Temp
• Oil Life Remaining (Automatic Oil Change Indicator)
• EVIC Units Selection
• System Status
• Personal Settings
• Tire PSI
Compass Calibration
This compass is self-calibrating, which eliminates the need to set the compass
manually. When the vehicle is new, the compass may appear erratic and the EVIC will
display “CAL” until the compass is calibrated.
You may also calibrate the compass by completing one or more 360 degree turns (in
an area free from large metal or metallic objects) until the “CAL” message displayed
in the EVIC turns off. The compass will now function normally.
ECO
• The ECO message will appear in your EVIC display whenever you are driving in a fuel efficient manner.
• This feature allows you to monitor when you are driving in a fuel efficient manner, and it can be used to modify driving habits in order to increase fuel economy.
ELECTRONICS
89
Page 92 of 148
PROGRAMMABLE FEATURES
Electronic Vehicle Information Center (EVIC)
• The EVIC can be used to program the following Personal Settings. Press andrelease the MENU button until Personal Settings displays, then press the DOWN
button
to scroll through the settings. Press the SELECT buttonto change
the setting.
• Language • Illumin Approach
• Auto UNLK On Exit • Hill Start Assist (HSA)
• RKE Unlock • Display Units of Measure In
• Sound Horn With RKE Lock • Nav – Turn by Turn
• Flash Lamp With Lock • Display Fuel Saver
• Headlamp Off Delay • Compass Variance
• Headlamps With Wipers • Calibrate Compass
• Key-Off Power Delay
Key Fob Programmable Features
The following features may also be programmed by using the Key Fob transmitter or
the ignition switch and driver's door lock switch.
NOTE:
Pushing the LOCK button while you are inside the vehicle will activate the Vehicle
Security Alarm. Opening a door with the Vehicle Security Alarm activated will cause
the alarm to sound. Push the UNLOCK button to deactivate the Vehicle Security
Alarm.
Flashing Lamps With Lock
• The turn signal lights flashing, when the doors are locked or unlocked, feature can be turned on or off. To turn this feature on or off:• Press and hold the UNLOCK button for at least 4 seconds, but no longer than
10 seconds. Then, press and hold the LOCK button while still holding the
UNLOCK button.
• Release both buttons at the same time.
ELECTRONICS
90
Page 93 of 148
POWER INVERTER
• A 115 Volt, 150 Watt AC power in-verter is located on the front of the
center console.
• This outlet can power cellular phones, electronics and other low power de-
vices requiring power up to 150 Watts.
• The power inverter switch is located on the instrument panel below the cli-
mate controls. To turn on the power
outlet, press the switch once. The in-
dicator light will illuminate. Press the
switch a second time to turn the power
inverter outlet off.
NOTE:
The power inverter is designed with built-in overload protection. If the power rating
of 150 Watts is exceeded, the power inverter will automatically shut down. Once the
electrical device has been removed from the outlet, the inverter should automatically
reset. If the power rating exceeds approximately 170 Watts, the power inverter may
have to be reset manually. To reset the inverter manually, unplug the device and plug
it in again. To avoid overloading the circuit, check the power ratings on electrical
devices prior to using the inverter.
WARNING!
To Avoid Serious Injury or Death DO NOT:
• insert any objects into the receptacles
• touch with wet hands
Close the lid when not in use. If this outlet is mishandled, it may cause an electric
shock and failure.
ELECTRONICS
91
Page 94 of 148
POWER OUTLETS
• There are three possible 12 Volt Power Outlets in this vehicle.• The front power outlet, located in the lower portion of the instrument panel, is
powered when the key is in the ON or ACC position.
• A second power outlet is located inside the center console bin and is powered directly from the vehicle battery.
• On vehicles equipped with a rear subwoofer, there is a power outlet located in the right rear cargo area.
NOTE: • Do not exceed the maximum power of 160 Watts (13 Amps) at 12 Volts. If the160 Watt (13 Amp) power rating is exceeded the fuse protecting the system will
need to be replaced.
• Power outlets are designed for accessory plugs only. Do not insert any other object in the power outlet as this will damage the outlet and blow the fuse.
Improper use of the power outlet can cause damage not covered by your new
vehicle warranty.
ELECTRONICS
92
Page 95 of 148
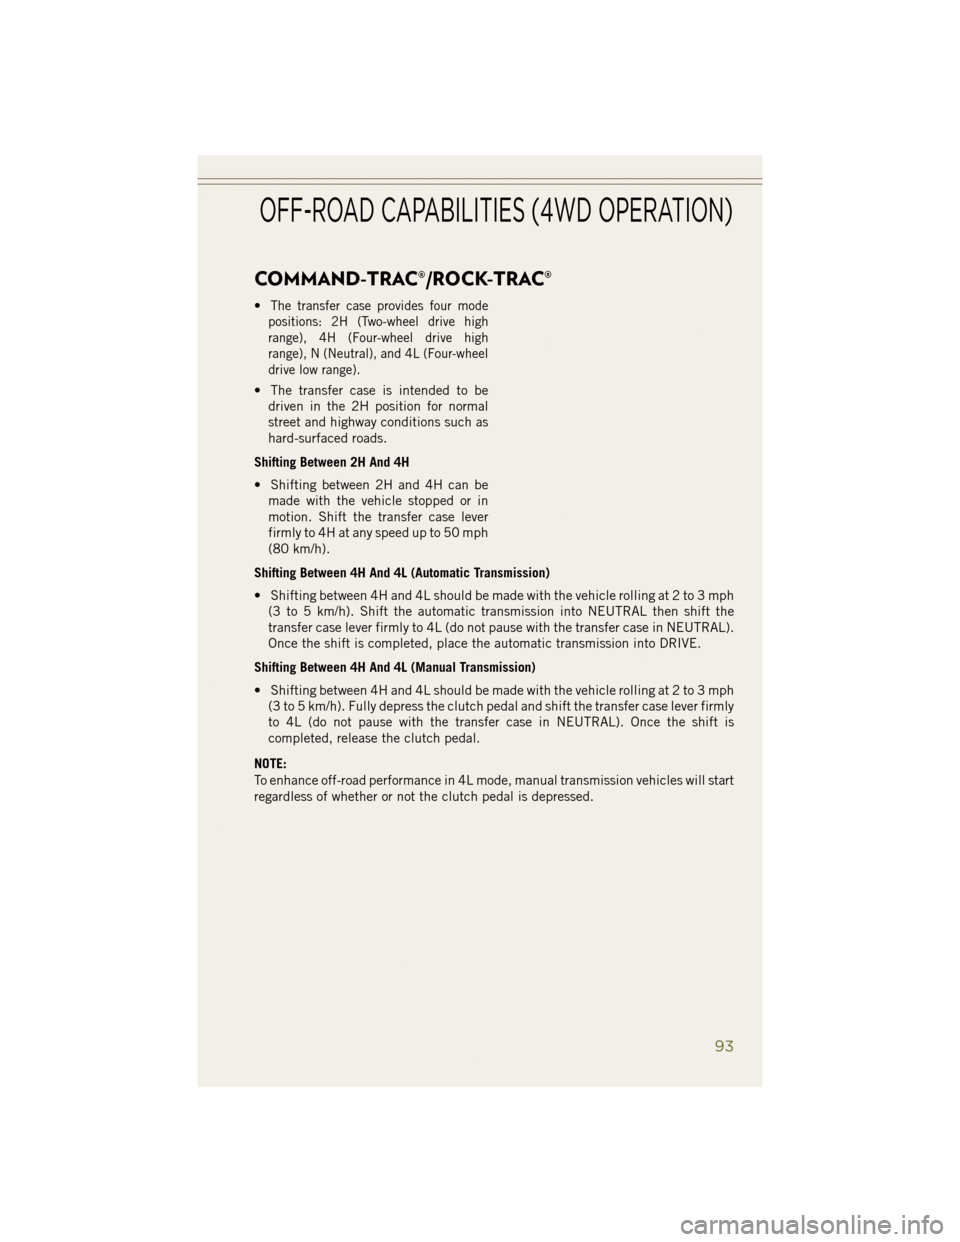
COMMAND-TRAC®/ROCK-TRAC®
•The transfer case provides four mode
positions: 2H (Two-wheel drive high
range), 4H (Four-wheel drive high
range), N (Neutral), and 4L (Four-wheel
drive low range).
• The transfer case is intended to be driven in the 2H position for normal
street and highway conditions such as
hard-surfaced roads.
Shifting Between 2H And 4H
• Shifting between 2H and 4H can be made with the vehicle stopped or in
motion. Shift the transfer case lever
firmly to 4H at any speed up to 50 mph
(80 km/h).
Shifting Between 4H And 4L (Automatic Transmission)
• Shifting between 4H and 4L should be made with the vehicle rolling at 2 to 3 mph (3 to 5 km/h). Shift the automatic transmission into NEUTRAL then shift the
transfer case lever firmly to 4L (do not pause with the transfer case in NEUTRAL).
Once the shift is completed, place the automatic transmission into DRIVE.
Shifting Between 4H And 4L (Manual Transmission)
• Shifting between 4H and 4L should be made with the vehicle rolling at 2 to 3 mph (3 to 5 km/h). Fully depress the clutch pedal and shift the transfer case lever firmly
to 4L (do not pause with the transfer case in NEUTRAL). Once the shift is
completed, release the clutch pedal.
NOTE:
To enhance off-road performance in 4L mode, manual transmission vehicles will start
regardless of whether or not the clutch pedal is depressed.
OFF-ROAD CAPABILITIES (4WD OPERATION)
93
Page 96 of 148
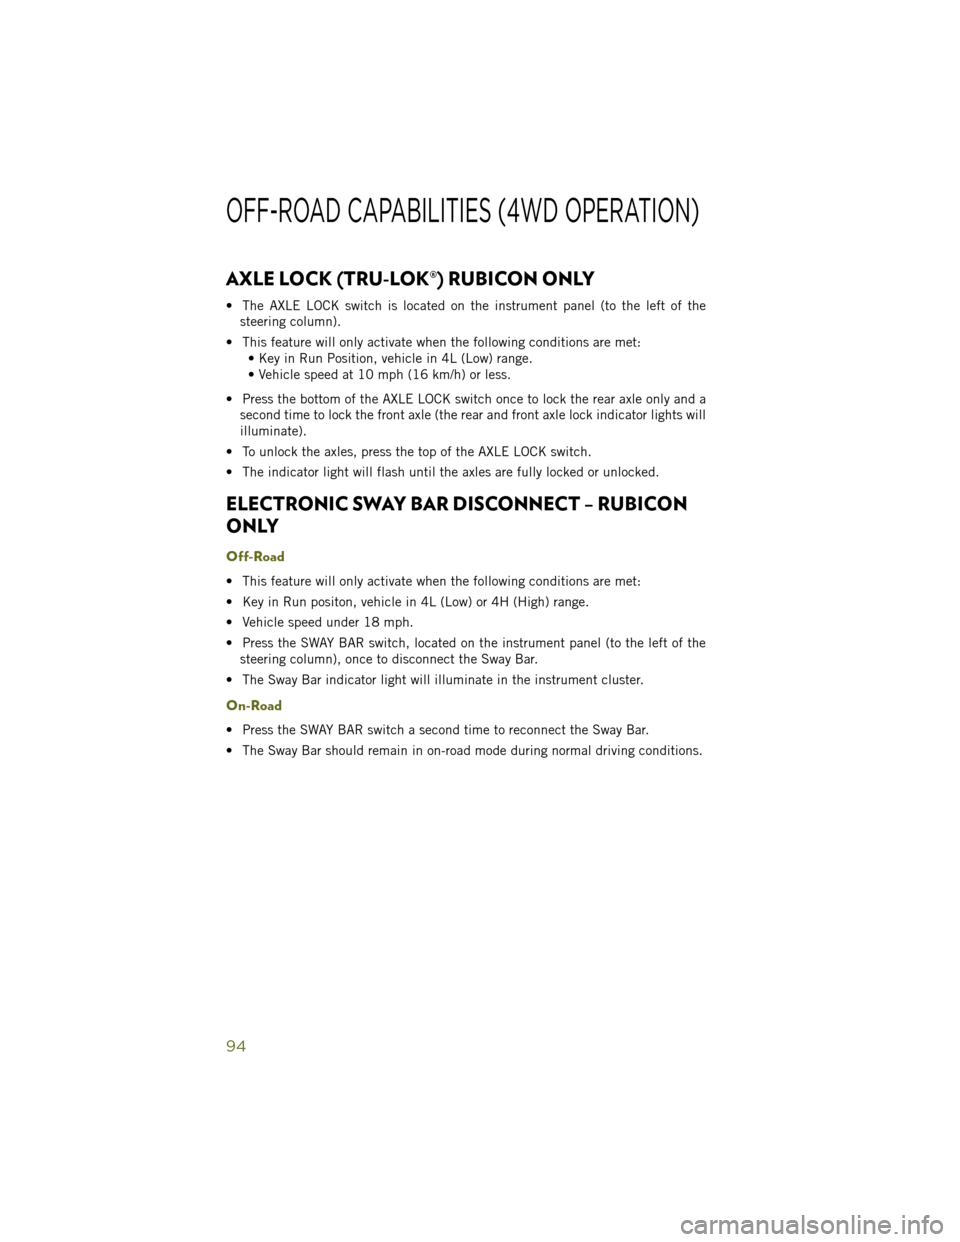
AXLE LOCK (TRU-LOK®) RUBICON ONLY
• The AXLE LOCK switch is located on the instrument panel (to the left of thesteering column).
• This feature will only activate when the following conditions are met: • Key in Run Position, vehicle in 4L (Low) range.
• Vehicle speed at 10 mph (16 km/h) or less.
• Press the bottom of the AXLE LOCK switch once to lock the rear axle only and a second time to lock the front axle (the rear and front axle lock indicator lights will
illuminate).
• To unlock the axles, press the top of the AXLE LOCK switch.
• The indicator light will flash until the axles are fully locked or unlocked.
ELECTRONIC SWAY BAR DISCONNECT – RUBICON
ONLY
Off-Road
• This feature will only activate when the following conditions are met:
• Key in Run positon, vehicle in 4L (Low) or 4H (High) range.
• Vehicle speed under 18 mph.
• Press the SWAY BAR switch, located on the instrument panel (to the left of the steering column), once to disconnect the Sway Bar.
• The Sway Bar indicator light will illuminate in the instrument cluster.
On-Road
• Press the SWAY BAR switch a second time to reconnect the Sway Bar.
• The Sway Bar should remain in on-road mode during normal driving conditions.
OFF-ROAD CAPABILITIES (4WD OPERATION)
94
Page 97 of 148
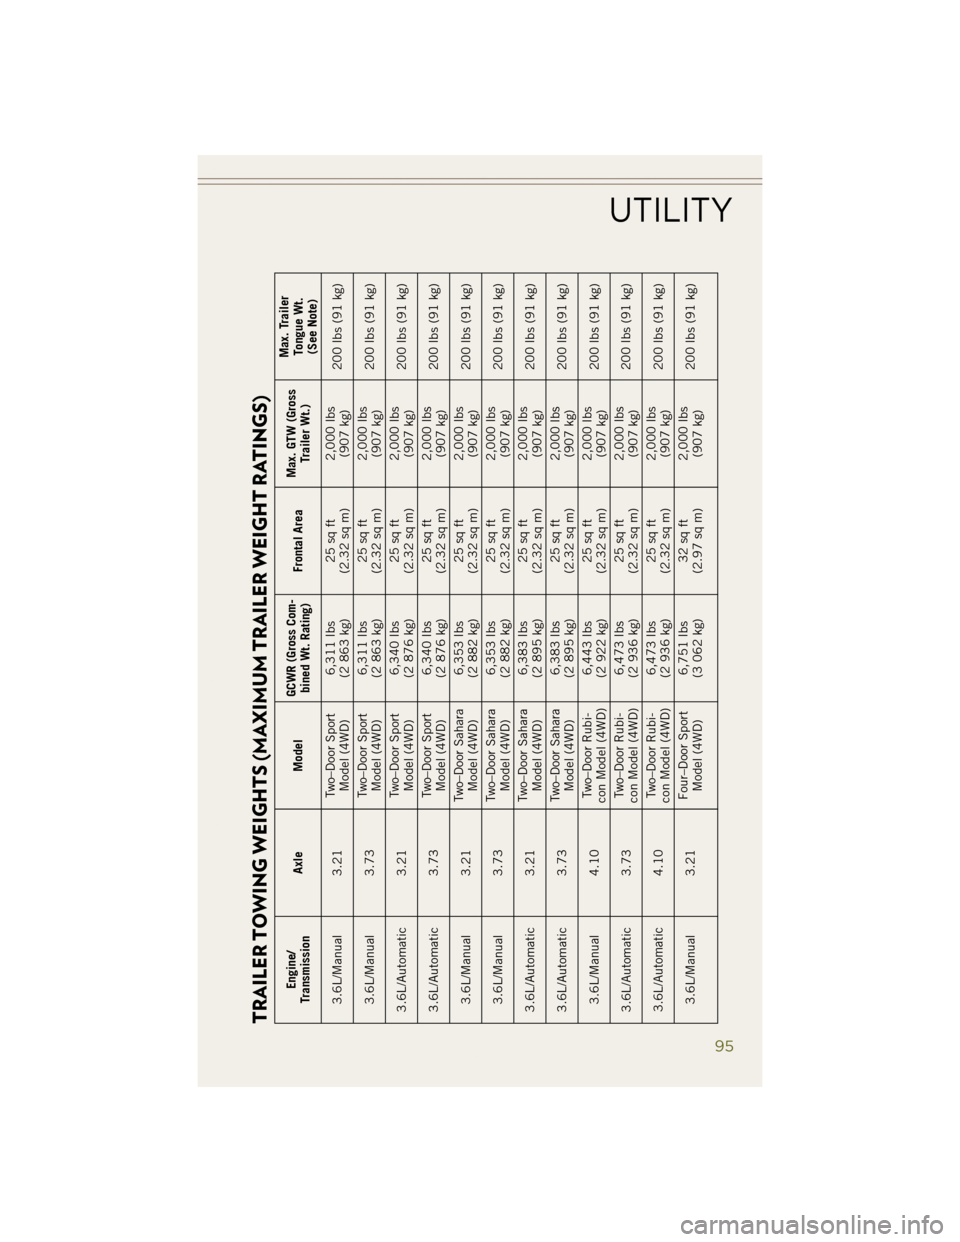
TRAILER TOWING WEIGHTS (MAXIMUM TRAILER WEIGHT RATINGS)
Engine/
Transmission Axle Model GCWR (Gross Com-
bined Wt. Rating) Frontal AreaMax. GTW (Gross
Trailer Wt.) Max. Trailer
Tongue Wt.(See Note)
3.6L/Manual 3.21 Two–Door Sport
Model (4WD) 6,311 lbs
(2 863 kg) 25 sq ft
(2.32 sq m) 2,000 lbs
(907 kg) 200 lbs (91 kg)
3.6L/Manual 3.73 Two–Door Sport
Model (4WD) 6,311 lbs
(2 863 kg) 25 sq ft
(2.32 sq m) 2,000 lbs
(907 kg) 200 lbs (91 kg)
3.6L/Automatic 3.21 Two–Door Sport
Model (4WD) 6,340 lbs
(2 876 kg) 25 sq ft
(2.32 sq m) 2,000 lbs
(907 kg) 200 lbs (91 kg)
3.6L/Automatic 3.73 Two–Door Sport
Model (4WD) 6,340 lbs
(2 876 kg) 25 sq ft
(2.32 sq m) 2,000 lbs
(907 kg) 200 lbs (91 kg)
3.6L/Manual 3.21 Two–Door Sahara
Model (4WD) 6,353 lbs
(2 882 kg) 25 sq ft
(2.32 sq m) 2,000 lbs
(907 kg) 200 lbs (91 kg)
3.6L/Manual 3.73 Two–Door Sahara
Model (4WD) 6,353 lbs
(2 882 kg) 25 sq ft
(2.32 sq m) 2,000 lbs
(907 kg) 200 lbs (91 kg)
3.6L/Automatic 3.21 Two–Door Sahara
Model (4WD) 6,383 lbs
(2 895 kg) 25 sq ft
(2.32 sq m) 2,000 lbs
(907 kg) 200 lbs (91 kg)
3.6L/Automatic 3.73 Two–Door Sahara
Model (4WD) 6,383 lbs
(2 895 kg) 25 sq ft
(2.32 sq m) 2,000 lbs
(907 kg) 200 lbs (91 kg)
3.6L/Manual 4.10 Two–Door Rubi-
con Model (4WD) 6,443 lbs
(2 922 kg) 25 sq ft
(2.32 sq m) 2,000 lbs
(907 kg) 200 lbs (91 kg)
3.6L/Automatic 3.73 T
wo–Door Rubi-
con Model (4WD) 6,473 lbs
(2 936 kg) 25 sq ft
(2.32 sq m) 2,000 lbs
(907 kg) 200 lbs (91 kg)
3.6L/Automatic 4.10 Two–Door Rubi-
con Model (4WD) 6,473 lbs
(2 936 kg) 25 sq ft
(2.32 sq m) 2,000 lbs
(907 kg) 200 lbs (91 kg)
3.6L/Manual 3.21 Four–Door Sport
Model (4WD) 6,751 lbs
(3 062 kg) 32 sq ft
(2.97 sq m) 2,000 lbs
(907 kg) 200 lbs (91 kg)
UTILITY
95
Page 98 of 148
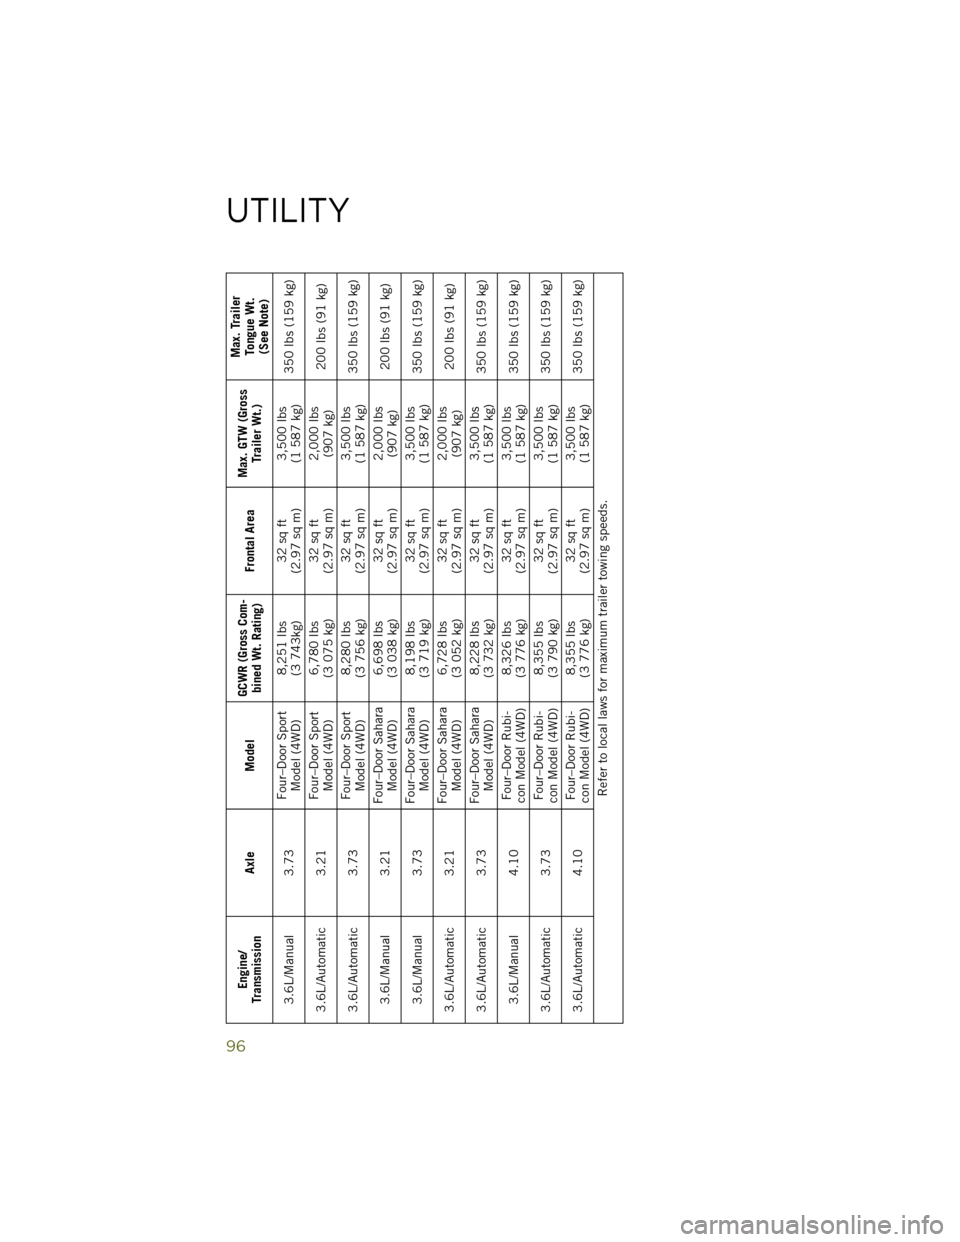
Engine/
Transmission Axle Model GCWR (Gross Com-
bined Wt. Rating) Frontal AreaMax. GTW (Gross
Trailer Wt.) Max. Trailer
Tongue Wt.(See Note)
3.6L/Manual 3.73 Four–Door Sport
Model (4WD) 8,251 lbs
(3 743kg) 32 sq ft
(2.97 sq m) 3,500 lbs
(1 587 kg) 350 lbs (159 kg)
3.6L/Automatic 3.21 Four–Door Sport
Model (4WD) 6,780 lbs
(3 075 kg) 32 sq ft
(2.97 sq m) 2,000 lbs
(907 kg) 200 lbs (91 kg)
3.6L/Automatic 3.73 Four–Door Sport
Model (4WD) 8,280 lbs
(3 756 kg) 32 sq ft
(2.97 sq m) 3,500 lbs
(1 587 kg) 350 lbs (159 kg)
3.6L/Manual 3.21 Four–Door Sahara
Model (4WD) 6,698 lbs
(3 038 kg) 32 sq ft
(2.97 sq m) 2,000 lbs
(907 kg) 200 lbs (91 kg)
3.6L/Manual 3.73 Four–Door Sahara
Model (4WD) 8,198 lbs
(3 719 kg) 32 sq ft
(2.97 sq m) 3,500 lbs
(1 587 kg) 350 lbs (159 kg)
3.6L/Automatic 3.21 Four–Door Sahara
Model (4WD) 6,728 lbs
(3 052 kg) 32 sq ft
(2.97 sq m) 2,000 lbs
(907 kg) 200 lbs (91 kg)
3.6L/Automatic 3.73 Four–Door Sahara
Model (4WD) 8,228 lbs
(3 732 kg) 32 sq ft
(2.97 sq m) 3,500 lbs
(1 587 kg) 350 lbs (159 kg)
3.6L/Manual 4.10 Four–Door Rubi-
con Model (4WD) 8,326 lbs
(3 776 kg) 32 sq ft
(2.97 sq m) 3,500 lbs
(1 587 kg) 350 lbs (159 kg)
3.6L/Automatic 3.73 Four–Door Rubi-
con Model (4WD) 8,355 lbs
(3 790 kg) 32 sq ft
(2.97 sq m) 3,500 lbs
(1 587 kg) 350 lbs (159 kg)
3.6L/Automatic 4.10 Four–Door
Rubi-
con Model (4WD) 8,355 lbs
(3 776 kg) 32 sq ft
(2.97 sq m) 3,500 lbs
(1 587 kg) 350 lbs (159 kg)
Refer to local laws for maximum trailer towing speeds.
UTILITY
96
Page 99 of 148
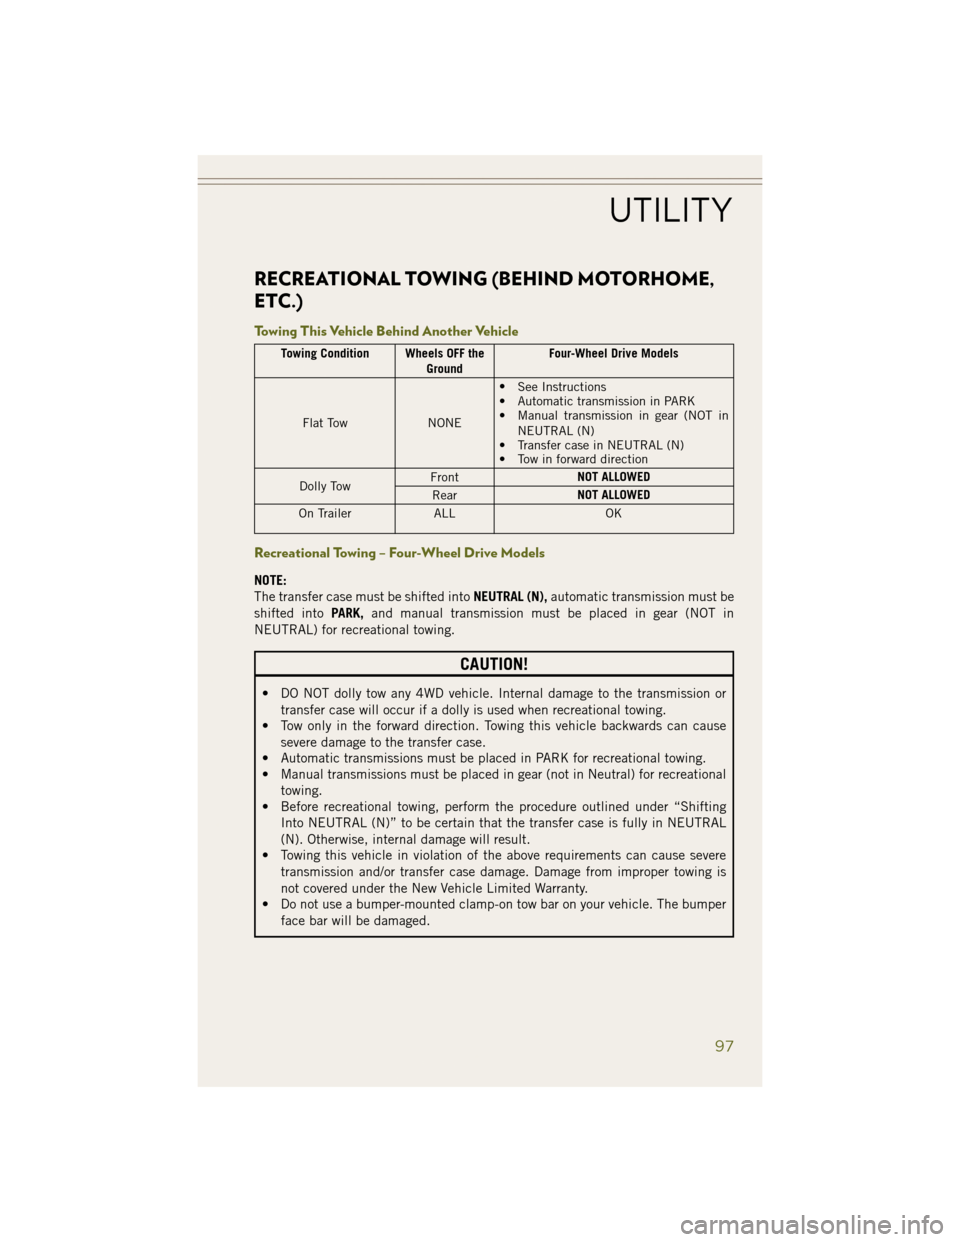
RECREATIONAL TOWING (BEHIND MOTORHOME,
ETC.)
Towing This Vehicle Behind Another Vehicle
Towing Condition Wheels OFF theGroundFour-Wheel Drive Models
Flat Tow NONE•
See Instructions
• Automatic transmission in PARK
• Manual transmission in gear (NOT in
NEUTRAL (N)
• Transfer case in NEUTRAL (N)
• Tow in forward direction
Dolly Tow Front
NOT ALLOWED
Rear NOT ALLOWED
On Trailer ALL OK
Recreational Towing – Four-Wheel Drive Models
NOTE:
The transfer case must be shifted into NEUTRAL (N),automatic transmission must be
shifted into PARK,and manual transmission must be placed in gear (NOT in
NEUTRAL) for recreational towing.
CAUTION!
• DO NOT dolly tow any 4WD vehicle. Internal damage to the transmission or transfer case will occur if a dolly is used when recreational towing.
• Tow only in the forward direction. Towing this vehicle backwards can cause
severe damage to the transfer case.
• Automatic transmissions must be placed in PARK for recreational towing.
• Manual transmissions must be placed in gear (not in Neutral) for recreational
towing.
• Before recreational towing, perform the procedure outlined under “Shifting
Into NEUTRAL (N)” to be certain that the transfer case is fully in NEUTRAL
(N). Otherwise, internal damage will result.
• Towing this vehicle in violation of the above requirements can cause severe
transmission and/or transfer case damage. Damage from improper towing is
not covered under the New Vehicle Limited Warranty.
• Do not use a bumper-mounted clamp-on tow bar on your vehicle. The bumper
face bar will be damaged.
UTILITY
97
Page 100 of 148
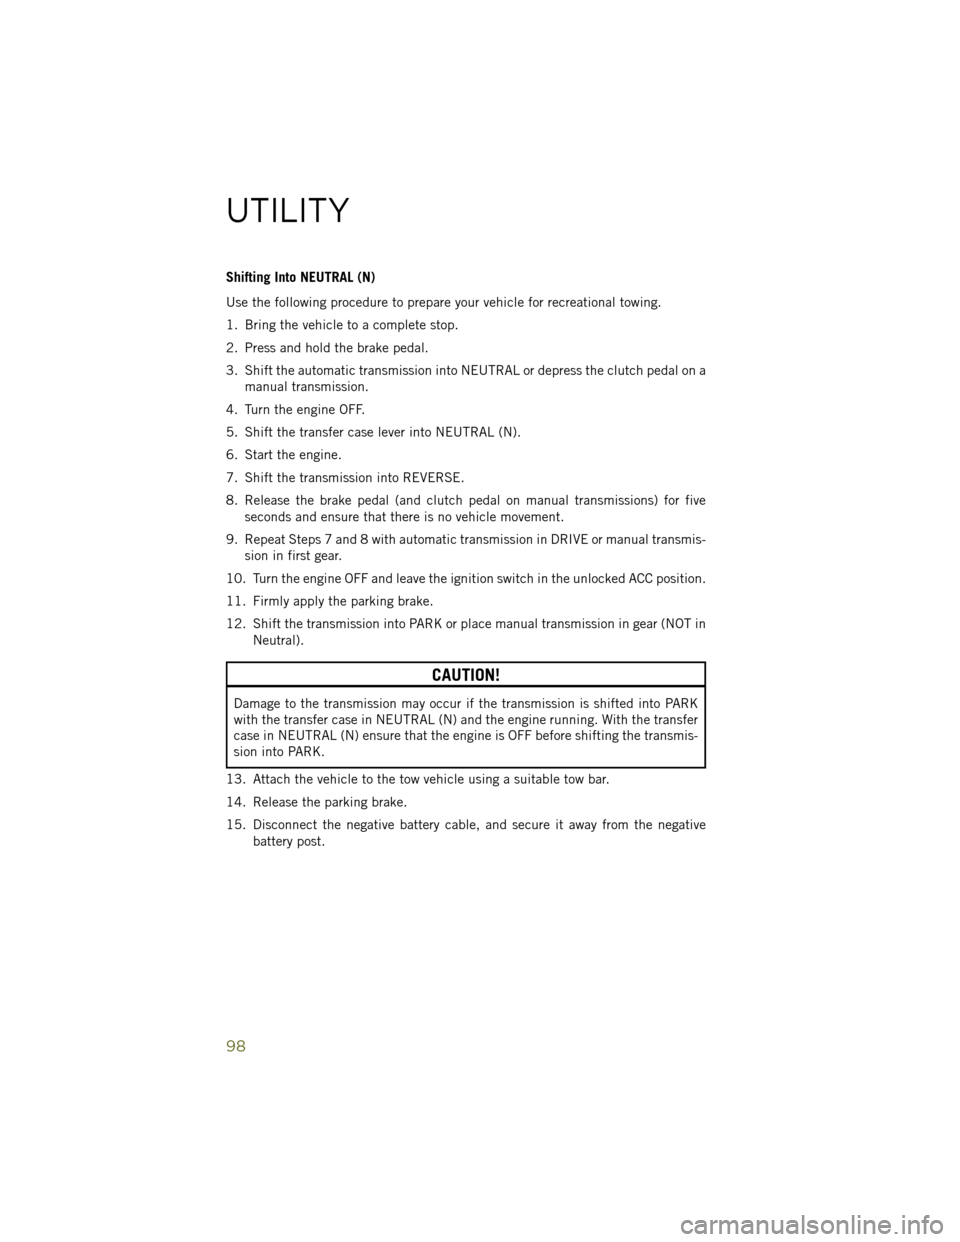
Shifting Into NEUTRAL (N)
Use the following procedure to prepare your vehicle for recreational towing.
1. Bring the vehicle to a complete stop.
2. Press and hold the brake pedal.
3. Shift the automatic transmission into NEUTRAL or depress the clutch pedal on amanual transmission.
4. Turn the engine OFF.
5. Shift the transfer case lever into NEUTRAL (N).
6. Start the engine.
7. Shift the transmission into REVERSE.
8. Release the brake pedal (and clutch pedal on manual transmissions) for five seconds and ensure that there is no vehicle movement.
9. Repeat Steps 7 and 8 with automatic transmission in DRIVE or manual transmis- sion in first gear.
10. Turn the engine OFF and leave the ignition switch in the unlocked ACC position.
11. Firmly apply the parking brake.
12. Shift the transmission into PARK or place manual transmission in gear (NOT in Neutral).
CAUTION!
Damage to the transmission may occur if the transmission is shifted into PARK
with the transfer case in NEUTRAL (N) and the engine running. With the transfer
case in NEUTRAL (N) ensure that the engine is OFF before shifting the transmis-
sion into PARK.
13. Attach the vehicle to the tow vehicle using a suitable tow bar.
14. Release the parking brake.
15. Disconnect the negative battery cable, and secure it away from the negative battery post.
UTILITY
98