weight JEEP WRANGLER 2014 JK / 3.G User Guide
[x] Cancel search | Manufacturer: JEEP, Model Year: 2014, Model line: WRANGLER, Model: JEEP WRANGLER 2014 JK / 3.GPages: 148, PDF Size: 12.93 MB
Page 3 of 148
INTRODUCTION/WELCOME
WELCOME FROM CHRYSLER
GROUP LLC.................. 3
CONTROLS AT A GLANCE
DRIVER COCKPIT .............. 6
INSTRUMENT CLUSTER .......... 8
GETTING STARTED
KEYFOB ................... 10
REMOTE START.............. 11
VEHICLE SECURITY ALARM ....... 11
SEATBELT .................. 12
SUPPLEMENTAL RESTRAINT
SYSTEM (SRS) — AIR BAGS ....... 13
CHILD RESTRAINTS ............ 14
HEAD RESTRAINTS ............. 18
FRONT SEATS ................ 19
REAR SEATS ................. 21
TILT STEERING COLUMN ......... 22
HEATEDSEATS ............... 23
OPERATING YOUR VEHICLE
ENGINE BREAK-IN
RECOMMENDATIONS ........... 24
TURN SIGNAL/LIGHTS LEVER ...... 24
WIPER/WASHER LEVER .......... 26
SPEED CONTROL .............. 27
MANUAL CLIMATE CONTROLS ...... 29
AUTOMATIC TEMPERATURE
CONTROLS (ATC) .............. 30
SUNRIDER
®AND SOFT TOP ....... 31
HARD TOP AND FREEDOM TOP®.... 42
DUAL TOP – IF EQUIPPED ........ 45
WIND BUFFETING ............. 45
ELECTRONICS
YOUR VEHICLE'S SOUND SYSTEM . . . 46
Uconnect®130 ............... 48
Uconnect®130 WITH SiriusXM
SATELLITE RADIO .............. 50
Uconnect
®230 ............... 53
Uconnect®430/430N ........... 56
Uconnect®730N .............. 66
SiriusXM SATELLITE RADIO/TRAVEL
LINK ...................... 77
STEERING WHEEL AUDIO
CONTROLS ................. 81
iPod
®/USB/MP3 CONTROL ........ 81
Uconnect®PHONE ............. 82
Uconnect®VOICE COMMAND ....... 85
Bluetooth®STREAMING AUDIO ..... 88ELECTRONIC VEHICLE INFORMATION
CENTER (EVIC)
............... 88
PROGRAMMABLE FEATURES ....... 90
POWER INVERTER ............. 91
POWER OUTLETS ............. 92
OFF-ROAD CAPABILITIES
(4WD OPERATION)
COMMAND-TRAC®/ROCK-TRAC®..... 93
AXLE LOCK (TRU-LOK®) RUBICON
ONLY ...................... 94
ELECTRONIC SWAY BAR DISCONNECT –
RUBICON ONLY ............... 94
UTILITY
TRAILER TOWING WEIGHTS (MAXIMUM
TRAILER WEIGHT RATINGS) ....... 95
RECREATIONAL TOWING (BEHIND
MOTORHOME, ETC.) ............ 97
WHAT TO DO IN EMERGENCIES
ROADSIDE ASSISTANCE ......... 100
INSTRUMENT CLUSTER WARNING
LIGHTS ................... 100
IF YOUR ENGINE OVERHEATS ..... 105
JACKING AND TIRE CHANGING .... 106
JUMP-STARTING ............. 111
EMERGENCY TOW HOOKS ....... 113
SHIFT LEVER OVERRIDE ........ 114
TOWING A DISABLED VEHICLE .... 114
FREEING A STUCK VEHICLE ...... 115
EVENT DATA RECORDER (EDR) .... 116
MAINTAINING YOUR VEHICLE
OPENING THE HOOD.......... 117
ENGINE COMPARTMENT ........ 118
FLUIDS AND CAPACITIES ........ 119
MAINTENANCE SCHEDULE ...... 121
MAINTENANCE RECORD ........ 126
FUSES .................... 127
TIRE PRESSURES ............ 130
WHEEL AND WHEEL TRIM CARE . . . 131
EXTERIOR BULBS ............ 131
CONSUMER ASSISTANCE
CHRYSLER GROUP LLC CUSTOMER
CENTER.................. 132
CHRYSLER CANADA INC. CUSTOMER
CENTER .................. 132
ASSISTANCE FOR THE HEARING
IMPAIRED ................. 132
PUBLICATIONS ORDERING ....... 132
REPORTING SAFETY DEFECTS IN THE
UNITED STATES .............. 133
TABLE OF CONTENTS
Page 17 of 148
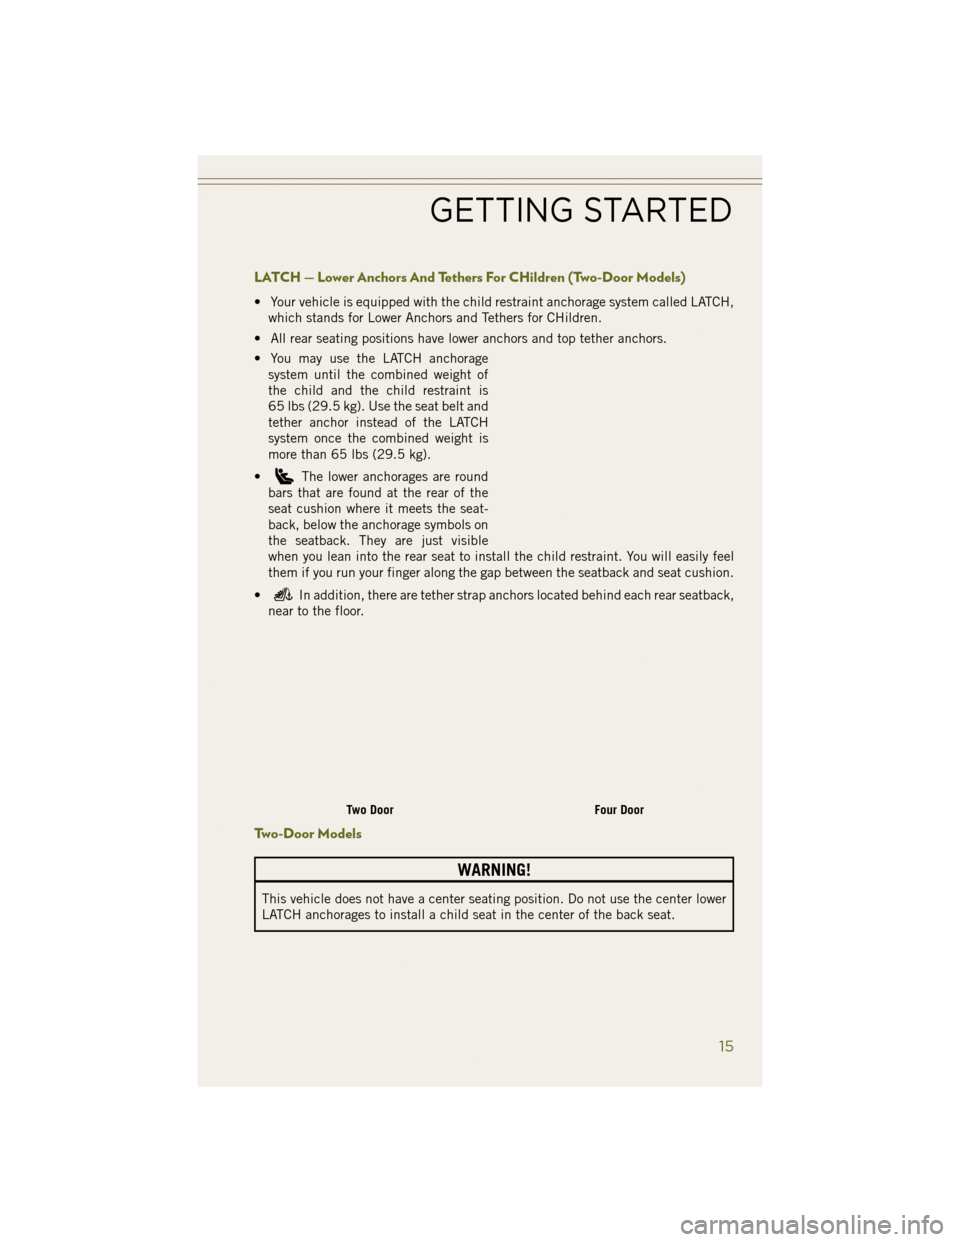
LATCH — Lower Anchors And Tethers For CHildren (Two-Door Models)
• Your vehicle is equipped with the child restraint anchorage system called LATCH,which stands for Lower Anchors and Tethers for CHildren.
• All rear seating positions have lower anchors and top tether anchors.
• You may use the LATCH anchorage system until the combined weight of
the child and the child restraint is
65 lbs (29.5 kg). Use the seat belt and
tether anchor instead of the LATCH
system once the combined weight is
more than 65 lbs (29.5 kg).
•
The lower anchorages are round
bars that are found at the rear of the
seat cushion where it meets the seat-
back, below the anchorage symbols on
the seatback. They are just visible
when you lean into the rear seat to install the child restraint. You will easily feel
them if you run your finger along the gap between the seatback and seat cushion.
•
In addition, there are tether strap anchors located behind each rear seatback,
near to the floor.
Two-Door Models
WARNING!
This vehicle does not have a center seating position. Do not use the center lower
LATCH anchorages to install a child seat in the center of the back seat.
Two DoorFour Door
GETTING STARTED
15
Page 18 of 148
Four-Door Models
• Do not install child restraints with rigid lower attachments in the center seatingposition. Only install this type of child restraint in the outboard seating positions.
Child restraints with flexible, webbing mounted lower attachments can be in-
stalled in any rear seating position. In the center position, the inner anchorages are
19 inches (484 mm) apart.
Installing The Child Restraint Using The LATCH Lower Anchors
NOTE:
Never “share” a LATCH anchorage with two or more child restraints.
1. Loosen the adjusters on the lower straps and on the tether strap of the child seat so that you can more easily attach the hooks or connectors to the vehicle
anchorages.
2. Attach the lower hooks or connectors of the child restraint to the lower anchorages in the selected seating position.
3. If the child restraint has a tether strap, connect it to the top tether anchorage. See below for directions to attach a tether anchor.
4. Tighten all of the straps as you push the child restraint rearward and downward into the seat. Remove slack in the straps according to the child restraint
manufacturer’s instructions.
5. Test that the child restraint is installed tightly by pulling back and forth on the child seat at the belt path. It should not move more than 1 inch (25.4 mm) in any
direction.
Installing The Child Restraint Using The Vehicle Seat Belts
The seat belts in the passenger seating positions are equipped with a Switchable
Automatic Locking Retractor (ALR) that is designed to keep the lap portion of the
seat belt tight around the child restraint. Any seat belt system will loosen with time,
so check the belt occasionally, and pull it tight if necessary.
Tether Weight Limit
Always use the tether anchor when using the seat belt to install a forward facing child
restraint, up to the recommended weight limit of the child restraint.
Installing The Top Tether Strap (With Either Lower Anchors Or Vehicle Seat Belt):
When installing a forward-facing child restraint, always secure the top tether strap,
up to the tether anchor weight limit, whether the child restraint is installed with the
lower anchors or the vehicle seat belt.
GETTING STARTED
16
Page 19 of 148
To Install A Child Seat Using An ALR:
1. Pull enough of the seat belt webbing from the retractor to pass it through the beltpath of the child restraint. Do not twist the belt webbing in the belt path.
2. Slide the latch plate into the buckle until you hear a “click.”
3. Pull on the webbing to make the lap portion tight against the child seat.
4. To lock the seat belt, pull down on the shoulder part of the belt until you have pulled all the seat belt webbing out of the retractor. Then, allow the webbing to
retract back into the retractor. As the webbing retracts, you will hear a clicking
sound. This means the seat belt is now in the Automatic Locking mode.
5. Try to pull the webbing out of the retractor. If it is locked, you should not be able to pull out any webbing. If the retractor is not locked, repeat the last step.
6. Finally, pull up on any extra webbing to tighten the lap portion around the child restraint while you push the child restraint rearward and downward into the
vehicle seat.
7. If the child restraint has a top tether strap and the seating position has a top tether anchorage, connect the tether strap to the anchorage and tighten the tether strap.
See below for directions to attach a tether anchor.
8. Test that the child restraint is installed tightly by pulling back and forth on the child seat at the belt path. It should not move more than 1 inch (25.4 mm) in any
direction.
Installing The Top Tether Strap (With Either Lower Anchors Or Vehicle Seat Belt):
• When installing a forward-facing child restraint, the top tether strap should alwaysto be secured, up to the tether anchor weight limit, whether the child restraint is
installed with the lower anchors or the vehicle seat belt.
1. Route the tether strap to provide the most direct path for the strap between the anchor and the child seat.
2. If your vehicle is equipped with adjustable rear head restraints, raise the head restraint, and where possible, route the tether strap under the head restraint and
between the two posts. If not possible, lower the head restraint and pass the
tether strap around the outboard side of the head restraint.
3. Attach the tether strap hook of the child restraint to the top tether anchorage and remove slack in the tether strap according to the child restraint manufacturer’s
instructions.
GETTING STARTED
17
Page 97 of 148
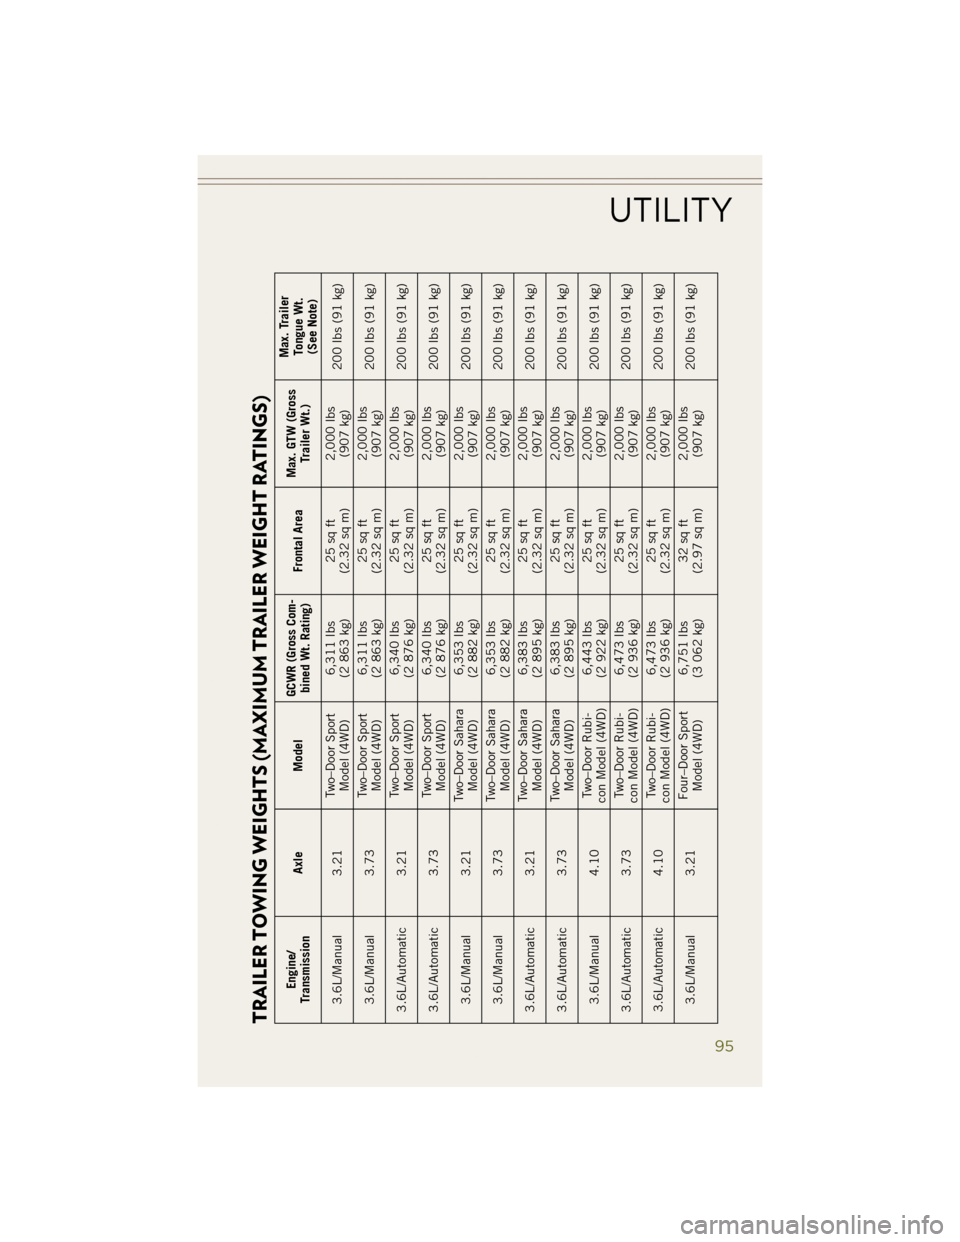
TRAILER TOWING WEIGHTS (MAXIMUM TRAILER WEIGHT RATINGS)
Engine/
Transmission Axle Model GCWR (Gross Com-
bined Wt. Rating) Frontal AreaMax. GTW (Gross
Trailer Wt.) Max. Trailer
Tongue Wt.(See Note)
3.6L/Manual 3.21 Two–Door Sport
Model (4WD) 6,311 lbs
(2 863 kg) 25 sq ft
(2.32 sq m) 2,000 lbs
(907 kg) 200 lbs (91 kg)
3.6L/Manual 3.73 Two–Door Sport
Model (4WD) 6,311 lbs
(2 863 kg) 25 sq ft
(2.32 sq m) 2,000 lbs
(907 kg) 200 lbs (91 kg)
3.6L/Automatic 3.21 Two–Door Sport
Model (4WD) 6,340 lbs
(2 876 kg) 25 sq ft
(2.32 sq m) 2,000 lbs
(907 kg) 200 lbs (91 kg)
3.6L/Automatic 3.73 Two–Door Sport
Model (4WD) 6,340 lbs
(2 876 kg) 25 sq ft
(2.32 sq m) 2,000 lbs
(907 kg) 200 lbs (91 kg)
3.6L/Manual 3.21 Two–Door Sahara
Model (4WD) 6,353 lbs
(2 882 kg) 25 sq ft
(2.32 sq m) 2,000 lbs
(907 kg) 200 lbs (91 kg)
3.6L/Manual 3.73 Two–Door Sahara
Model (4WD) 6,353 lbs
(2 882 kg) 25 sq ft
(2.32 sq m) 2,000 lbs
(907 kg) 200 lbs (91 kg)
3.6L/Automatic 3.21 Two–Door Sahara
Model (4WD) 6,383 lbs
(2 895 kg) 25 sq ft
(2.32 sq m) 2,000 lbs
(907 kg) 200 lbs (91 kg)
3.6L/Automatic 3.73 Two–Door Sahara
Model (4WD) 6,383 lbs
(2 895 kg) 25 sq ft
(2.32 sq m) 2,000 lbs
(907 kg) 200 lbs (91 kg)
3.6L/Manual 4.10 Two–Door Rubi-
con Model (4WD) 6,443 lbs
(2 922 kg) 25 sq ft
(2.32 sq m) 2,000 lbs
(907 kg) 200 lbs (91 kg)
3.6L/Automatic 3.73 T
wo–Door Rubi-
con Model (4WD) 6,473 lbs
(2 936 kg) 25 sq ft
(2.32 sq m) 2,000 lbs
(907 kg) 200 lbs (91 kg)
3.6L/Automatic 4.10 Two–Door Rubi-
con Model (4WD) 6,473 lbs
(2 936 kg) 25 sq ft
(2.32 sq m) 2,000 lbs
(907 kg) 200 lbs (91 kg)
3.6L/Manual 3.21 Four–Door Sport
Model (4WD) 6,751 lbs
(3 062 kg) 32 sq ft
(2.97 sq m) 2,000 lbs
(907 kg) 200 lbs (91 kg)
UTILITY
95
Page 108 of 148
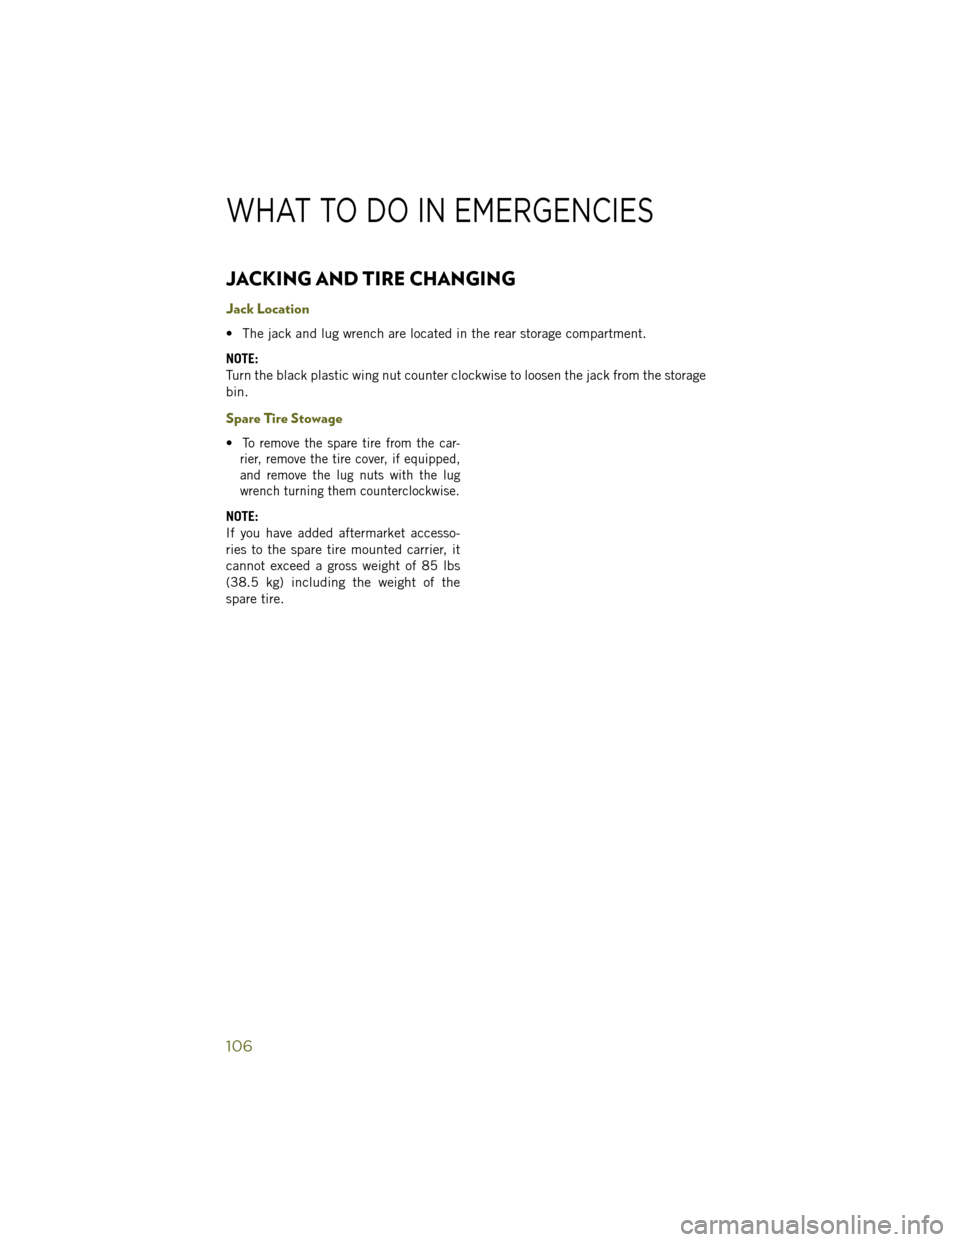
JACKING AND TIRE CHANGING
Jack Location
• The jack and lug wrench are located in the rear storage compartment.
NOTE:
Turn the black plastic wing nut counter clockwise to loosen the jack from the storage
bin.
Spare Tire Stowage
•To remove the spare tire from the car-
rier, remove the tire cover, if equipped,
and remove the lug nuts with the lug
wrench turning them counterclockwise.
NOTE:
If you have added aftermarket accesso-
ries to the spare tire mounted carrier, it
cannot exceed a gross weight of 85 lbs
(38.5 kg) including the weight of the
spare tire.
WHAT TO DO IN EMERGENCIES
106
Page 141 of 148
Phone (Uconnect®) ..........82
Placard, Tire and Loading Information .............130
Power Inverter ...............91
Outlet (Auxiliary Electrical
Outlet) ...............92
Preparation for Jacking ........107
Programmable Electronic Features . .90
Radio Operation ........49, 51, 54
Rain Sensitive Wiper System .....26
Rear Seat, Folding ...........21
Recreational Towing ..........97
Shifting into Transfer Case
Neutral (N) .............98
Shifting out of Transfer Case
Neutral (N) .............99
Remote Keyless Entry (RKE) Arm The Alarm ...........11
Disarm The Alarm .........12
Remote Starting System ........11
Replacement Bulbs ..........131
Reporting Safety Defects .......133
Restraint, Head .............18
Satellite Radio (Uconnect
®studios) . . .50, 52, 54
Schedule, Maintenance .......121
Seat Belt Automatic Locking Retractor
(ALR) ................12
Child Restraints ........12, 14
Energy Management Feature . . .12
Engage The Automatic Locking
Mode ................16
Lap/Shoulder Belts .........12
Seat Belt Pretensioner ......12
Seat Belt Reminder ........12
Seats ...................19
Adjustment .............19
Easy Entry .............20
Heated ...............23
Manual ...............19
Rear Folding ............21
Security Alarm Arm The System ..........11
Disarm The System ........12 Security Alarm
...........11
Shifting Transfer Case, Shifting into Transfer
Case Neutral (N) ..........98
Transfer Case, Shifting out of
Transfer Case Neutral (N) .....99
Shift Lever Override .........114
Signals, Turn ..............25
Sirius Satellite Radio .........77
SIRIUS Travel Link ...........77
Spare Tire ...............106
Speed Control Accel/Decel ............27
Speed Control (Cruise Control) ....27
Starting Remote ...............11
Steering Tilt Column .............22
Steering Wheel Audio Controls ....81
Stuck, Freeing .............115
Supplemental Restraint System - Airbag ................13
Sway Bar Disconnect, Electronic . . .94
Temperature Control, Automatic (ATC).................30
Tilt Steering Column ..........22
Tires Air Pressure ...........130
Changing .............106
Jacking ..............106
Spare Tire .............106
Touchscreen Radio Cleaning Your Touchscreen
Radio ..............62, 73
Tow Hooks, Emergency ........113
Towing ..................95
Disabled Vehicle .........114
Recreational ............
97
Trailer Towing Trailer and Tongue Weight ....95
Trailer Weight ..............95
Turn Signals ...............25
Uconnect
®Voice Command ......85
Vehicle Security Alarm Disarming . .12
Voice Command ............85
INDEX
139