ignition JEEP WRANGLER 2015 JK / 3.G User Guide
[x] Cancel search | Manufacturer: JEEP, Model Year: 2015, Model line: WRANGLER, Model: JEEP WRANGLER 2015 JK / 3.GPages: 156, PDF Size: 23.54 MB
Page 6 of 156
VEHICLES SOLD IN CANADA
With respect to any vehicles sold in Canada, the name Chrysler Group LLC shall be
deemed to be deleted and the name Chrysler Canada Inc. used in substitution (excluding
legal lines).
WARNING!
• Pedals that cannot move freely can cause loss of vehicle control and increase
the risk of serious personal injury.
• Always make sure that objects cannot fall into the driver foot well while the
vehicle is moving. Objects can become trapped under the brake pedal and
accelerator pedal causing a loss of vehicle control.
• Failure to properly follow floor mat installation or mounting can cause inter-
ference with the brake pedal and accelerator pedal operation causing loss of
control of the vehicle.
• Never leave children alone in a vehicle, or with access to an unlocked vehicle.
Allowing children to be in a vehicle unattended is dangerous for a number of
reasons. A child or others could be seriously or fatally injured. Children should
be warned not to touch the parking brake, brake pedal or the shift lever/
transmission gear selector.
• Do not leave the key fob in or near the vehicle, or in a location accessible to
children, and do not leave the ignition of a vehicle equipped with Keyless
Enter-N-Go in the ACC or ON/RUN mode. A child could operate power
windows, other controls, or move the vehicle.
• Never use the “PARK” position as a substitute for the parking brake. Always
apply the parking brake fully when parked to guard against vehicle movement
and possible injury or damage.
• Refer to your Owner's Manual on the DVD for further details.
INTRODUCTION/WELCOME
4
Page 9 of 156
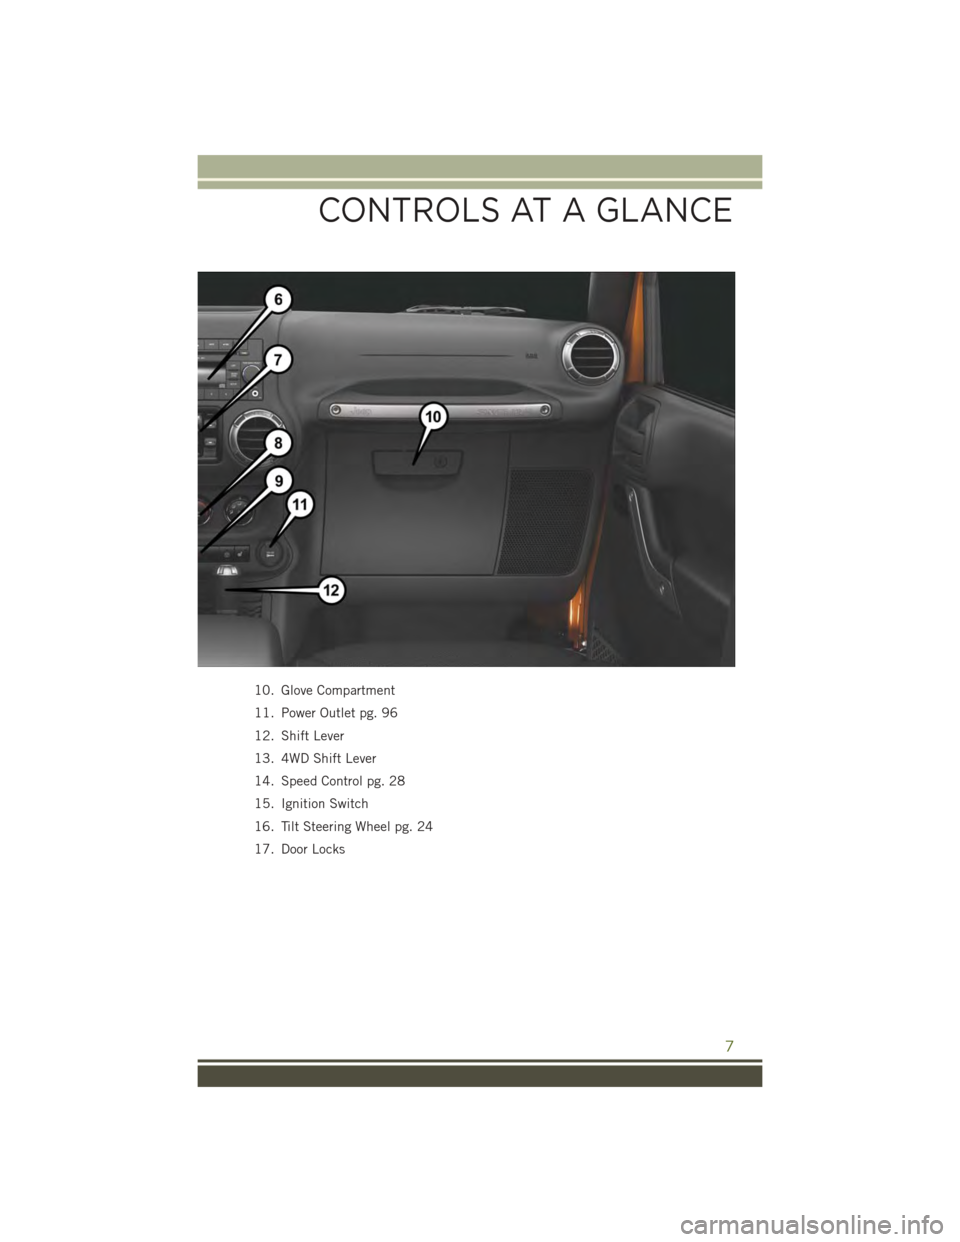
10. Glove Compartment
11. Power Outlet pg. 96
12. Shift Lever
13. 4WD Shift Lever
14. Speed Control pg. 28
15. Ignition Switch
16. Tilt Steering Wheel pg. 24
17. Door Locks
CONTROLS AT A GLANCE
7
Page 12 of 156
KEY FOB
Locking And Unlocking The
Doors/Swing Gate
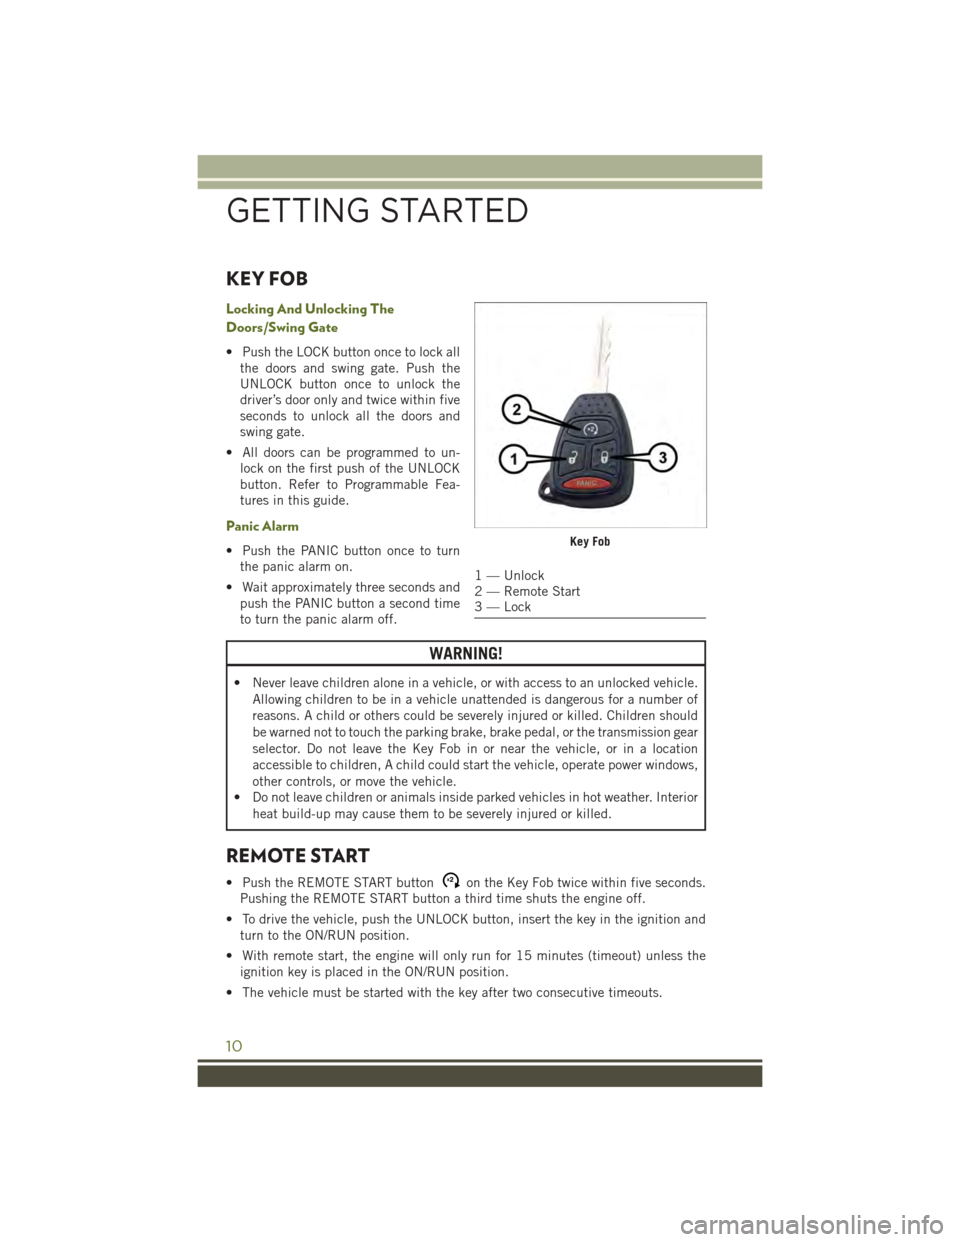
• Push the LOCK button once to lock all
the doors and swing gate. Push the
UNLOCK button once to unlock the
driver’s door only and twice within five
seconds to unlock all the doors and
swing gate.
• All doors can be programmed to un-
lock on the first push of the UNLOCK
button. Refer to Programmable Fea-
tures in this guide.
Panic Alarm
• Push the PANIC button once to turn
the panic alarm on.
• Wait approximately three seconds and
push the PANIC button a second time
to turn the panic alarm off.
WARNING!
• Never leave children alone in a vehicle, or with access to an unlocked vehicle.
Allowing children to be in a vehicle unattended is dangerous for a number of
reasons. A child or others could be severely injured or killed. Children should
be warned not to touch the parking brake, brake pedal, or the transmission gear
selector. Do not leave the Key Fob in or near the vehicle, or in a location
accessible to children, A child could start the vehicle, operate power windows,
other controls, or move the vehicle.
• Do not leave children or animals inside parked vehicles in hot weather. Interior
heat build-up may cause them to be severely injured or killed.
REMOTE START
• Push the REMOTE START buttonx2on the Key Fob twice within five seconds.
Pushing the REMOTE START button a third time shuts the engine off.
• To drive the vehicle, push the UNLOCK button, insert the key in the ignition and
turn to the ON/RUN position.
• With remote start, the engine will only run for 15 minutes (timeout) unless the
ignition key is placed in the ON/RUN position.
• The vehicle must be started with the key after two consecutive timeouts.
Key Fob
1 — Unlock2 — Remote Start3 — Lock
GETTING STARTED
10
Page 13 of 156
WARNING!
• Do not start or run an engine in a closed garage or confined area. Exhaust gas
contains Carbon Monoxide (CO) which is odorless and colorless. Carbon
Monoxide is poisonous and can cause you or others to be severely injured or
killed when inhaled.
• Keep Key Fob transmitters away from children. Operation of the Remote Start
System, windows, door locks or other controls could cause you and others to be
severely injured or killed.
VEHICLE SECURITY ALARM
The Vehicle Security Alarm monitors the vehicle doors for unauthorized entry and the
Keyless Enter-N-Go™ START/STOP button for unauthorized operation. While the
Vehicle Security Alarm is armed, interior switches for door locks and decklid release
are disabled. If something triggers the alarm, the Vehicle Security Alarm will provide
the following audible and visible signals: the horn will pulse, the park lamps and/or
turn signals will flash, and the Vehicle Security Light in the instrument cluster will
flash.
To A r m :
• Lock the door using either the power door lock switch (one door must be open) or
the LOCK button on the Remote Keyless Entry (RKE) transmitter (doors can be
open or closed), and close all doors.
The Vehicle Security Light in the instrument cluster will flash for 16 seconds. This
shows that the Vehicle Security Alarm is arming. During this period, if a door is
opened, the ignition is cycled to ON/RUN, or the power door locks are unlocked in any
manner, the Vehicle Security Alarm will automatically disarm.
NOTE:
• The Vehicle Security Alarm will not arm if you lock the doors with the manual door
lock plungers.
• Once armed, the Vehicle Security Alarm disables the unlock switch on the driver
door trim panel and passenger door trim panel.
To D i s a r m T h e S y s t e m :
• Push the Key Fob UNLOCK button or cycle the ignition to the ON/RUN position.
The Vehicle Security Alarm is designed to protect your vehicle; however, you can
create conditions where the Vehicle Security Alarm will give you a false alarm. If one
of the previously described arming sequences has occurred, the Vehicle Security
Alarm will arm regardless of whether you are in the vehicle or not. If you remain in the
vehicle and open a door, the alarm will sound. If this occurs, disarm the Vehicle
Security Alarm.
GETTING STARTED
11
Page 16 of 156
• The air bags must be ready to inflate for your protection in a collision. The
Occupant Restraint Controller (ORC) monitors the internal circuits and intercon-
necting wiring associated with air bag system electrical components.
• The ORC turns on the Air Bag Warning Light in the instrument panel for
approximately four to eight seconds for a self-check when the ignition switch is
first turned to the ON/RUN position. After the self-check, the Air Bag Warning
Light will turn off. If the ORC detects a malfunction in any part of the system, it
turns on the Air Bag Warning Light, either momentarily or continuously. A single
chime will sound to alert you if the light comes on again after initial startup.
• The ORC monitors the readiness of the electronic parts of the air bag system
whenever the ignition switch is in the START or ON/RUN position. If the ignition
switch is in the OFF position or in the ACC position, the air bag system is not on
and the air bags will not inflate.
• If the Air Bag Warning Light in the instrument panel is not on during the four to
eight seconds when the ignition switch is first turned to the ON/RUN position,
stays on, or turns on while driving, have the vehicle serviced by an authorized
service center immediately.
NOTE:
If the speedometer, tachometer, or any engine related gauges are not working, the
Occupant Restraint Controller (ORC) may also be disabled. In this condition the air
bags may not be ready to inflate for your protection. Have an authorized dealer
service the air bag system immediately.
• After any collision, the vehicle should be taken to an authorized dealer immedi-
ately.
• Do not drive your vehicle after the air bags have deployed. If you are involved in
another collision, the air bags will not be in place to protect you.
• If it is necessary to modify the air bag system for persons with disabilities, contact
your authorized dealer.
• Refer to the Owner's Manual on the DVD for further details regarding the
Supplemental Restraint System (SRS).
GETTING STARTED
14
Page 96 of 156
PROGRAMMABLE FEATURES
Electronic Vehicle Information Center (EVIC)
• The EVIC can be used to program the following Personal Settings. Push the MENU
button until Personal Settings displays, then push the DOWN buttonto scroll
through the settings. Push the SELECT buttonto change the setting.
• Language• Illumin Approach
• Auto UNLK On Exit• Hill Start Assist (HSA)
• RKE Unlock• Display Units of Measure In
•SoundHornWithRKELock•Nav–TurnbyTurn
• Flash Lamp With Lock• Display Fuel Saver
• Headlamp Off Delay• Compass Variance
• Headlamps With Wipers• Calibrate Compass
• Key-Off Power Delay
Key Fob Programmable Features
The following features may also be programmed by using the Key Fob transmitter or
the ignition switch and driver's door lock switch.
NOTE:
Pushing the LOCK button while you are inside the vehicle will activate the Vehicle
Security Alarm. Opening a door with the Vehicle Security Alarm activated will cause
the alarm to sound. Push the UNLOCK button to deactivate the Vehicle Security
Alarm.
Flashing Lamps With Lock
• The turn signal lights flashing, when the doors are locked or unlocked, feature can
be turned on or off. To turn this feature on or off:
• Push and hold the UNLOCK button for at least 4 seconds, but no longer than
10 seconds. Then, push and hold the LOCK button while still holding the
UNLOCK button.
• Release both buttons at the same time.
ELECTRONICS
94
Page 98 of 156
POWER OUTLETS
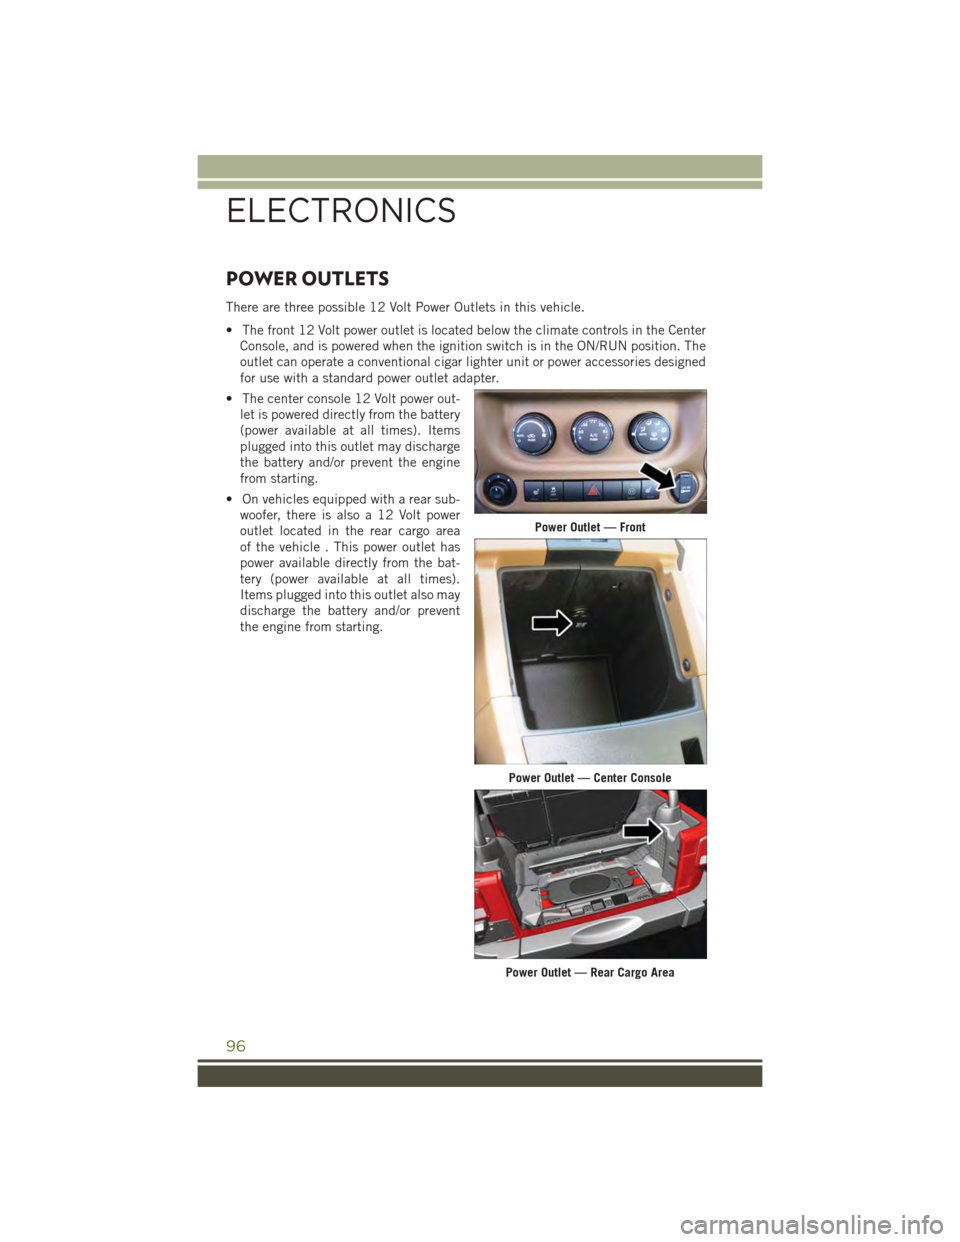
There are three possible 12 Volt Power Outlets in this vehicle.
• The front 12 Volt power outlet is located below the climate controls in the Center
Console, and is powered when the ignition switch is in the ON/RUN position. The
outlet can operate a conventional cigar lighter unit or power accessories designed
for use with a standard power outlet adapter.
• The center console 12 Volt power out-
let is powered directly from the battery
(power available at all times). Items
plugged into this outlet may discharge
the battery and/or prevent the engine
from starting.
• On vehicles equipped with a rear sub-
woofer, there is also a 12 Volt power
outlet located in the rear cargo area
of the vehicle . This power outlet has
power available directly from the bat-
tery (power available at all times).
Items plugged into this outlet also may
discharge the battery and/or prevent
the engine from starting.
Power Outlet — Front
Power Outlet — Center Console
Power Outlet — Rear Cargo Area
ELECTRONICS
96
Page 106 of 156
13. Attach the vehicle to the tow vehicle using a suitable tow bar.
14. Release the parking brake.
Shifting Out of NEUTRAL (N)
Use the following procedure to prepare your vehicle for normal usage.
1. Bring the vehicle to a complete stop, leaving it connected to the tow vehicle.
2. Firmly apply the parking brake.
3. Turn the ignition switch to the LOCK position.
4. Turn the ignition switch to the ON/RUN position, but do not start the engine.
5. Press and hold the brake pedal.
6. Shift the transmission into NEUTRAL.
7. Shift the transfer case lever to the desired position.
NOTE:
When shifting the transfer case out of NEUTRAL (N), the engine should remain OFF
to avoid gear clash.
8. Shift the automatic transmission into PARK, or place manual transmission in
NEUTRAL.
9. Release the brake pedal.
10. Disconnect vehicle from the tow vehicle.
11. Start the engine.
12. Press and hold the brake pedal.
13. Release the parking brake.
14. Shift the transmission into gear, release the brake pedal (and clutch pedal on
manual transmissions), and check that the vehicle operates normally.
UTILITY
104
Page 107 of 156
ROADSIDE ASSISTANCE
Dial toll-free 1-800-521-2779 for U.S. Residents or 1-800-363-4869 for Canadian
Residents.
• Provide your name, vehicle identification number, license plate number, and your
location, including the telephone number from which you are calling.
• Briefly describe the nature of the problem and answer a few simple questions.
• You will be given the name of the service provider and an estimated time of arrival.
If you feel you are in an “unsafe situation”, please let us know. With your consent,
we will contact local police or safety authorities.
INSTRUMENT CLUSTER WARNING LIGHTS
-ElectronicStabilityControl(ESC)Activation/MalfunctionIndicatorLight
If the “ESC Activation/Malfunction Indicator Light” comes on continuously with the
engine running, a malfunction has been detected in the ESC system. If this light
remains on after several ignition cycles, and the vehicle has been driven several miles
(kilometers) at speeds greater than 30 mph (48 km/h), we recommend you drive to
the nearest service center and have the vehicle serviced immediately.
The “ESC Activation/Malfunction Indicator Light” starts to flash as soon as the tires
lose traction and the ESC system becomes active. If the light begins to flash during
acceleration, ease up on the accelerator and apply as little throttle as possible.
Be sure to adapt your speed and driving to the prevailing road conditions. The light
also flashes when TCS is active. To improve the vehicle's traction when starting off in
deep snow, sand or gravel, it may be desirable to switch the ESC system to Partial Off
mode by momentarily pressing the ESC Offswitch.
-TirePressureMonitoringSystem(TPMS)Light
Each tire, including the spare (if provided), should be checked monthly when cold
and inflated to the inflation pressure recommended by the vehicle manufacturer on
the vehicle placard or tire inflation pressure label. (If your vehicle has tires of a
different size than the size indicated on the vehicle placard or tire inflation pressure
label, you should determine the proper tire inflation pressure for those tires.)
As an added safety feature, your vehicle has been equipped with a tire pressure
monitoring system (TPMS) that illuminates a low tire pressure telltale when one or
more of your tires is significantly under-inflated. Accordingly, when the low tire
pressure telltale illuminates, you should stop and check your tires as soon as possible,
and inflate them to the proper pressure. Driving on a significantly under-inflated tire
causes the tire to overheat and can lead to tire failure. Under-inflation also reduces fuel
efficiency and tire tread life, and may affect the vehicle’s handling and stopping ability.
WHAT TO DO IN EMERGENCIES
105
Page 109 of 156
- Engine Temperature Warning Light
This light warns of an overheated engine condition.
If the light turns on and a warning chime sounds while driving, safely pull over and
stop the vehicle. If the A/C system is on, turn it off. Also, shift the transmission into
NEUTRAL and idle the vehicle. If the temperature reading does not return to normal,
turn the engine off immediately.
We recommend that you do not operate the vehicle or engine damage will occur. Have
the vehicle serviced immediately.
WARNING!
A hot engine cooling system is dangerous. You or others could be badly burned by
steam or boiling coolant.
- Brake Warning Light
This light monitors various brake functions, including brake fluid level and parking
brake application. If the brake light turns on it may indicate that the parking brake is
applied, that the brake fluid level is low, or that there is a problem with the anti-lock
brake system reservoir.
If the light remains on when the parking brake has been disengaged, and the fluid
level is at the full mark on the master cylinder reservoir, it indicates a possible brake
hydraulic system malfunction or that a problem with the Brake Booster has been
detected by the Anti-Lock Brake System (ABS)/Electronic Stability Control (ESC)
system. In this case, the light will remain on until the condition has been corrected.
If the problem is related to the brake booster, the ABS pump will run when applying
the brake and a brake pedal pulsation may be felt during each stop.
The dual brake system provides a reserve braking capacity in the event of a failure to
a portion of the hydraulic system. A leak in either half of the dual brake system is
indicated by the Brake Warning Light, which will turn on when the brake fluid level
in the master cylinder has dropped below a specified level. The light will remain on
until the cause is corrected.
Vehicles equipped with the Anti-Lock Brake System (ABS), are also equipped with
Electronic Brake Force Distribution (EBD). In the event of an EBD failure, the Brake
Warning Light will turn on along with the ABS Light. Immediate repair to the ABS
system is required.
Operation of the Brake Warning Light can be checked by turning the ignition switch
from the OFF position to the ON/RUN position. The light should illuminate for
approximately two seconds. The light should then turn off unless the parking brake
is applied or a brake fault is detected. If the light does not illuminate, have the light
inspected by an authorized dealer.
WHAT TO DO IN EMERGENCIES
107