manual radio set JEEP WRANGLER 2015 JK / 3.G User Guide
[x] Cancel search | Manufacturer: JEEP, Model Year: 2015, Model line: WRANGLER, Model: JEEP WRANGLER 2015 JK / 3.GPages: 156, PDF Size: 23.54 MB
Page 61 of 156
3. To adjust the hours, press either the “Hour Forward” or “Hour Backward” button
on the touchscreen.
4. To adjust the minutes, press either the “Minute Forward” or “Minute Backward”
button on the touchscreen.
5. To save the new time setting, press the screen where the word “Save” is displayed.
Menu
• Push the MENU button on the faceplate to access the System Setup menu and the
My Files menu.
• Push the MENU button on the faceplate in an active mode (SAT, CD, AUX, etc.) to
change mode specific settings.
Equalizer, Balance And Fade
Audio Control Menu
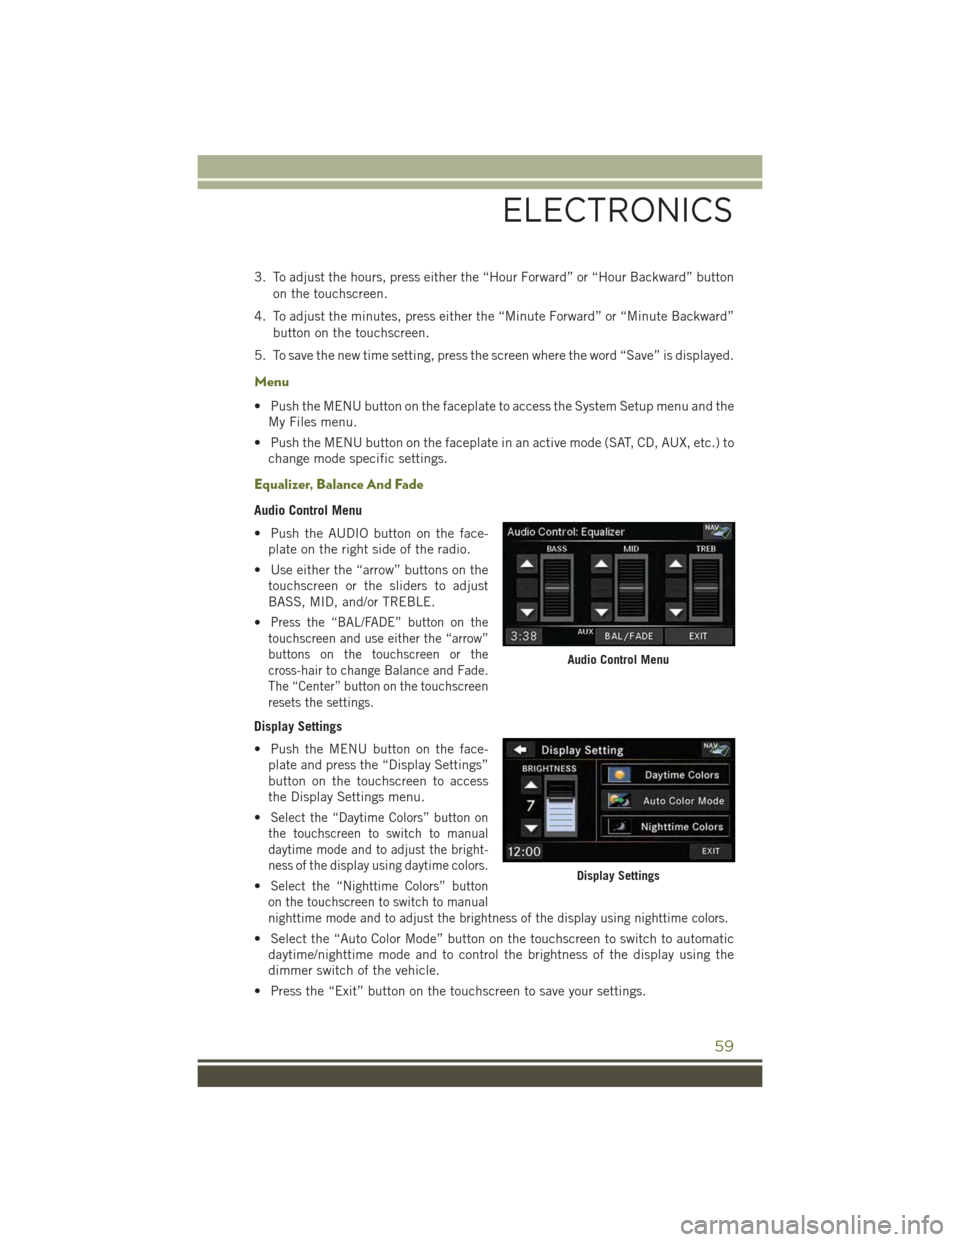
• Push the AUDIO button on the face-
plate on the right side of the radio.
• Use either the “arrow” buttons on the
touchscreen or the sliders to adjust
BASS, MID, and/or TREBLE.
•Press the “BAL/FADE” button on the
touchscreen and use either the “arrow”
buttons on the touchscreen or the
cross-hair to change Balance and Fade.
The “Center” button on the touchscreen
resets the settings.
Display Settings
• Push the MENU button on the face-
plate and press the “Display Settings”
button on the touchscreen to access
the Display Settings menu.
•Select the “Daytime Colors” button on
the touchscreen to switch to manual
daytime mode and to adjust the bright-
ness of the display using daytime colors.
•Select the “Nighttime Colors” button
on the touchscreen to switch to manual
nighttime mode and to adjust the brightness of the display using nighttime colors.
• Select the “Auto Color Mode” button on the touchscreen to switch to automatic
daytime/nighttime mode and to control the brightness of the display using the
dimmer switch of the vehicle.
• Press the “Exit” button on the touchscreen to save your settings.
Audio Control Menu
Display Settings
ELECTRONICS
59
Page 72 of 156
Menu
• Push the MENU button on the faceplate to access the System Setup menu and the
My Files menu.
• Push the MENU button on the faceplate in an active mode (SAT, CD, AUX, etc.) to
change mode specific settings.
Equalizer, Balance And Fade
Audio Control Menu
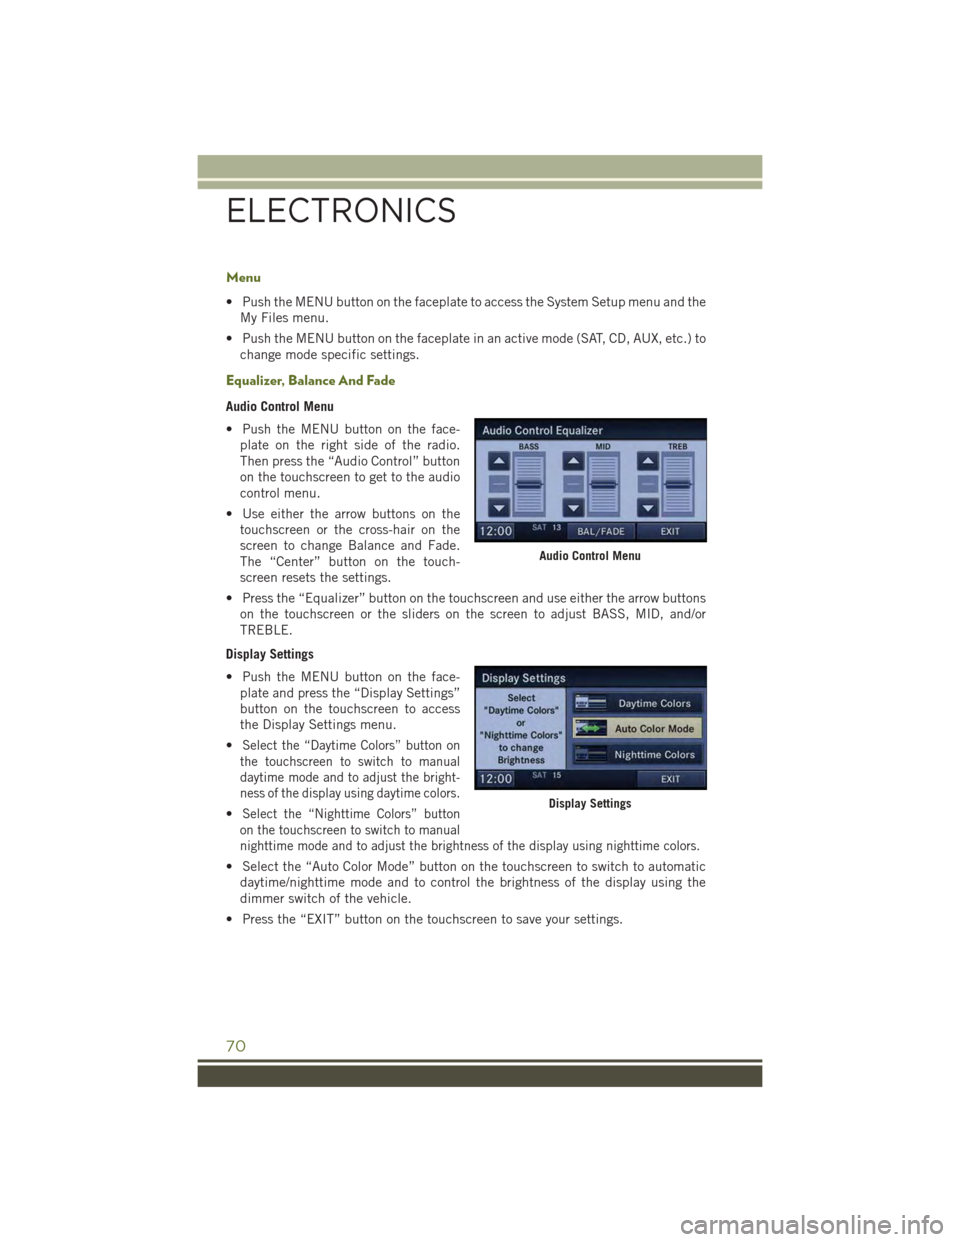
• Push the MENU button on the face-
plate on the right side of the radio.
Then press the “Audio Control” button
on the touchscreen to get to the audio
control menu.
• Use either the arrow buttons on the
touchscreen or the cross-hair on the
screen to change Balance and Fade.
The “Center” button on the touch-
screen resets the settings.
• Press the “Equalizer” button on the touchscreen and use either the arrow buttons
on the touchscreen or the sliders on the screen to adjust BASS, MID, and/or
TREBLE.
Display Settings
• Push the MENU button on the face-
plate and press the “Display Settings”
button on the touchscreen to access
the Display Settings menu.
•Select the “Daytime Colors” button on
the touchscreen to switch to manual
daytime mode and to adjust the bright-
ness of the display using daytime colors.
•Select the “Nighttime Colors” button
on the touchscreen to switch to manual
nighttime mode and to adjust the brightness of the display using nighttime colors.
• Select the “Auto Color Mode” button on the touchscreen to switch to automatic
daytime/nighttime mode and to control the brightness of the display using the
dimmer switch of the vehicle.
• Press the “EXIT” button on the touchscreen to save your settings.
Audio Control Menu
Display Settings
ELECTRONICS
70
Page 73 of 156
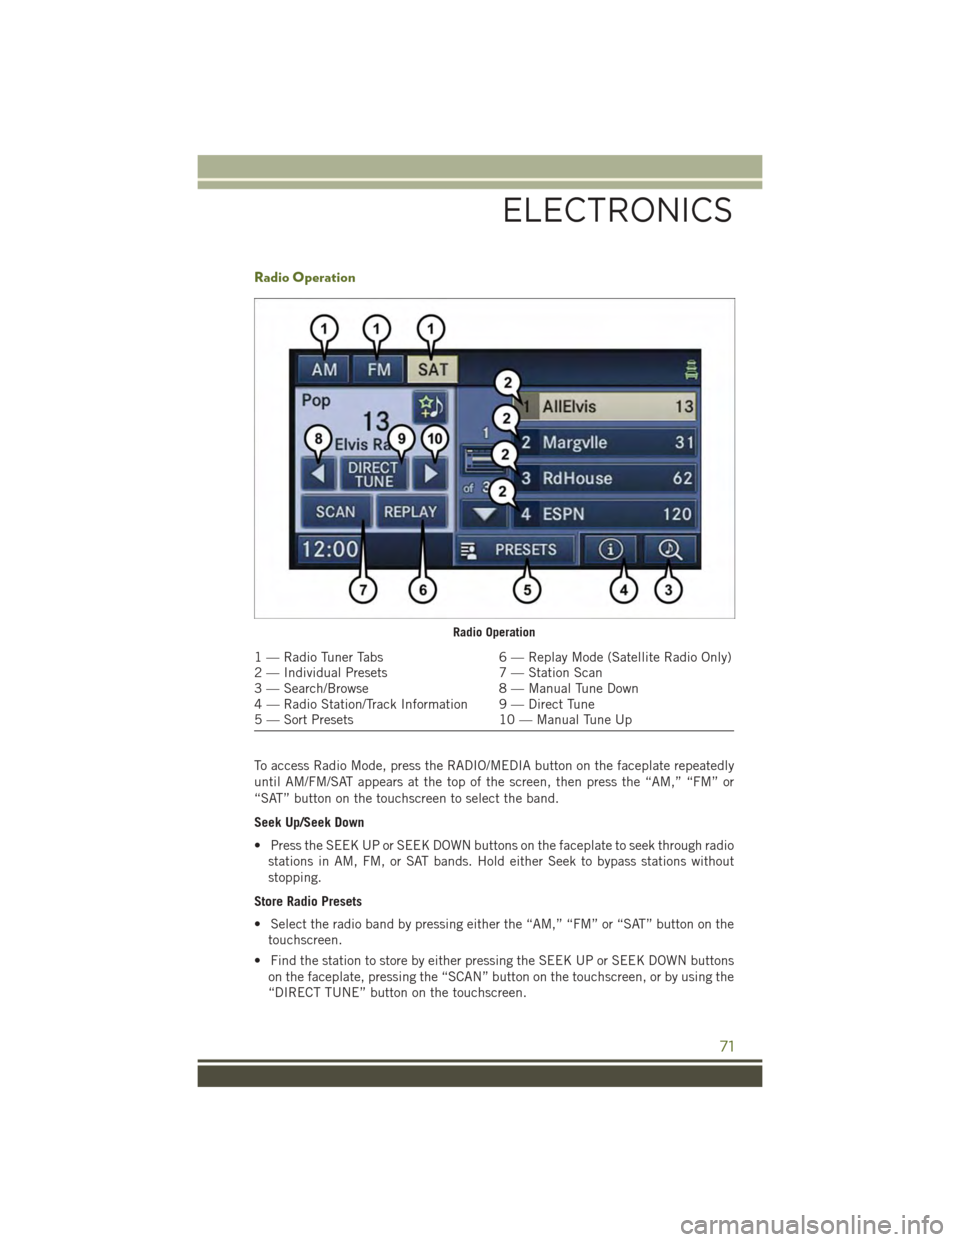
Radio Operation
To access Radio Mode, press the RADIO/MEDIA button on the faceplate repeatedly
until AM/FM/SAT appears at the top of the screen, then press the “AM,” “FM” or
“SAT” button on the touchscreen to select the band.
Seek Up/Seek Down
• Press the SEEK UP or SEEK DOWN buttons on the faceplate to seek through radio
stations in AM, FM, or SAT bands. Hold either Seek to bypass stations without
stopping.
Store Radio Presets
• Select the radio band by pressing either the “AM,” “FM” or “SAT” button on the
touchscreen.
• Find the station to store by either pressing the SEEK UP or SEEK DOWN buttons
on the faceplate, pressing the “SCAN” button on the touchscreen, or by using the
“DIRECT TUNE” button on the touchscreen.
Radio Operation
1 — Radio Tuner Tabs6 — Replay Mode (Satellite Radio Only)2 — Individual Presets7 — Station Scan3 — Search/Browse8 — Manual Tune Down4 — Radio Station/Track Information 9 — Direct Tune5 — Sort Presets10 — Manual Tune Up
ELECTRONICS
71
Page 74 of 156
• Once the station is found, press and hold one of the “PRESETS” buttons on the
touchscreen in the list to the right, until you hear a confirmation beep.
NOTE:
If the Presets are not visible on the right side of the screen, press the “PRESETS”
button on the touchscreen.
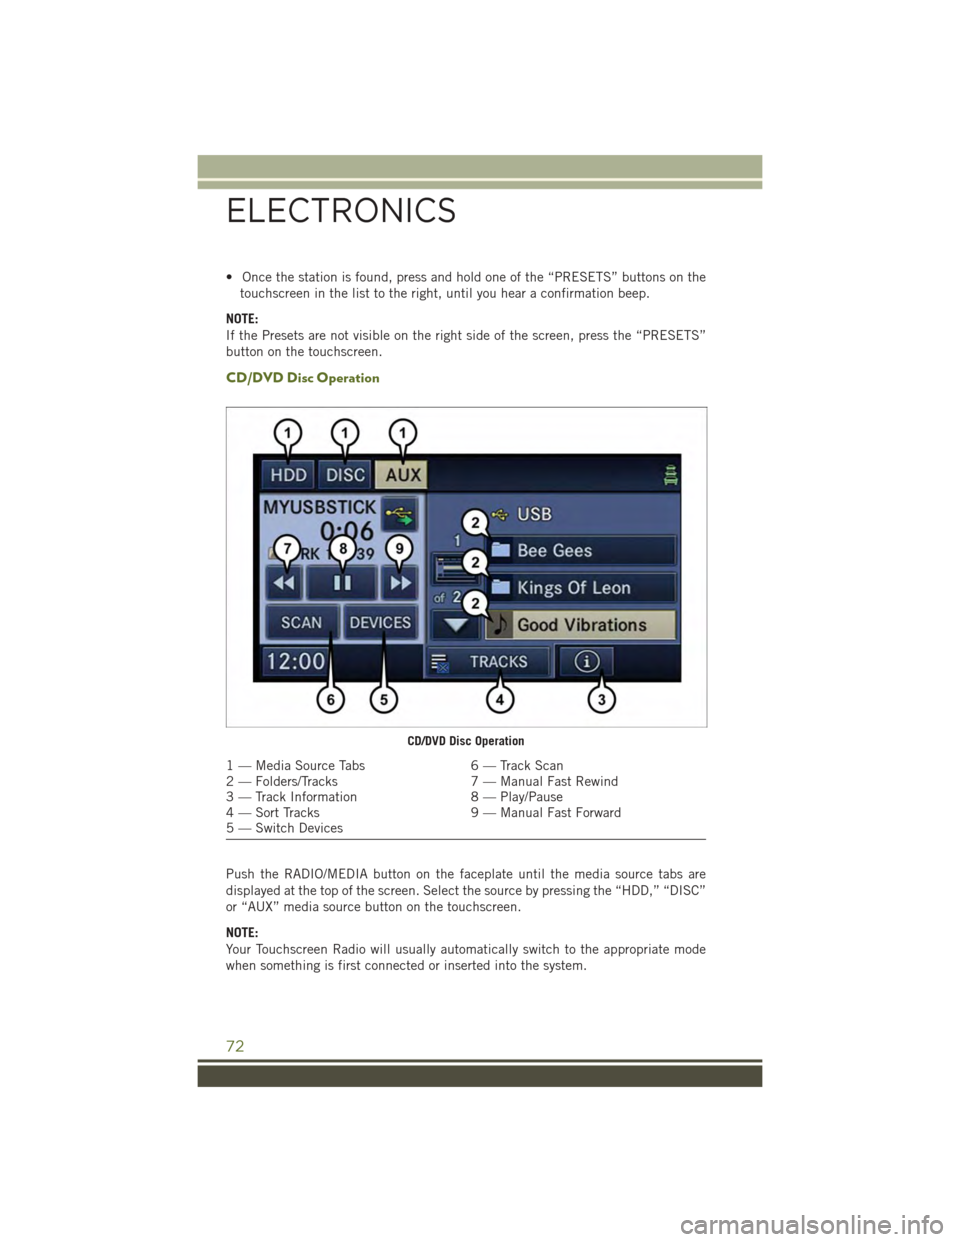
CD/DVD Disc Operation
Push the RADIO/MEDIA button on the faceplate until the media source tabs are
displayed at the top of the screen. Select the source by pressing the “HDD,” “DISC”
or “AUX” media source button on the touchscreen.
NOTE:
Your Touchscreen Radio will usually automatically switch to the appropriate mode
when something is first connected or inserted into the system.
CD/DVD Disc Operation
1 — Media Source Tabs6 — Track Scan2 — Folders/Tracks7 — Manual Fast Rewind3 — Track Information8 — Play/Pause4 — Sort Tracks9 — Manual Fast Forward5 — Switch Devices
ELECTRONICS
72
Page 87 of 156
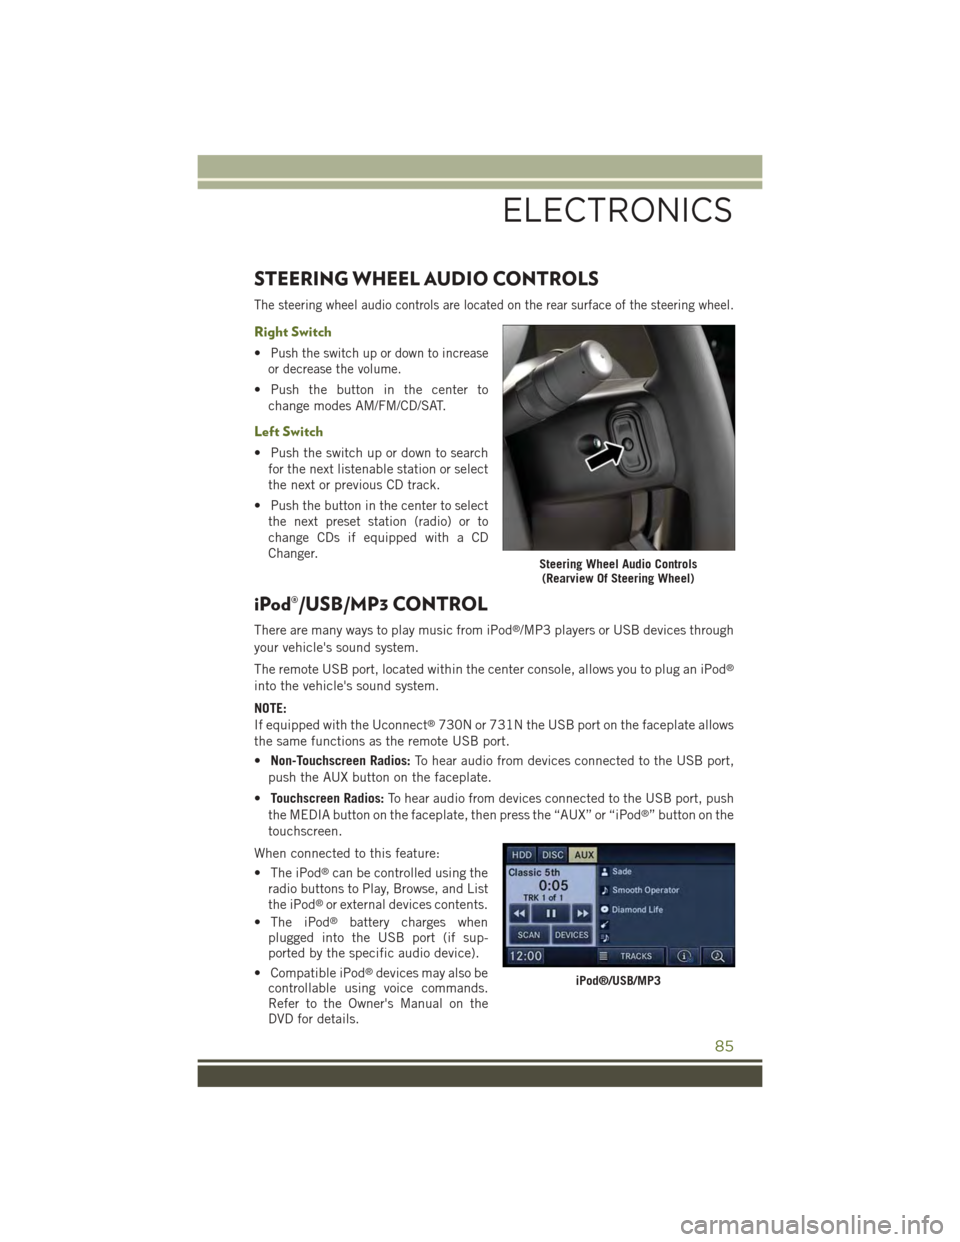
STEERING WHEEL AUDIO CONTROLS
The steering wheel audio controls are located on the rear surface of the steering wheel.
Right Switch
•Push the switch up or down to increase
or decrease the volume.
• Push the button in the center to
change modes AM/FM/CD/SAT.
Left Switch
• Push the switch up or down to search
for the next listenable station or select
the next or previous CD track.
•Push the button in the center to select
the next preset station (radio) or to
change CDs if equipped with a CD
Changer.
iPod®/USB/MP3 CONTROL
There are many ways to play music from iPod®/MP3 players or USB devices through
your vehicle's sound system.
The remote USB port, located within the center console, allows you to plug an iPod®
into the vehicle's sound system.
NOTE:
If equipped with the Uconnect®730N or 731N the USB port on the faceplate allows
the same functions as the remote USB port.
•Non-Touchscreen Radios:To hear audio from devices connected to the USB port,
push the AUX button on the faceplate.
•Touchscreen Radios:To hear audio from devices connected to the USB port, push
the MEDIA button on the faceplate, then press the “AUX” or “iPod®” button on the
touchscreen.
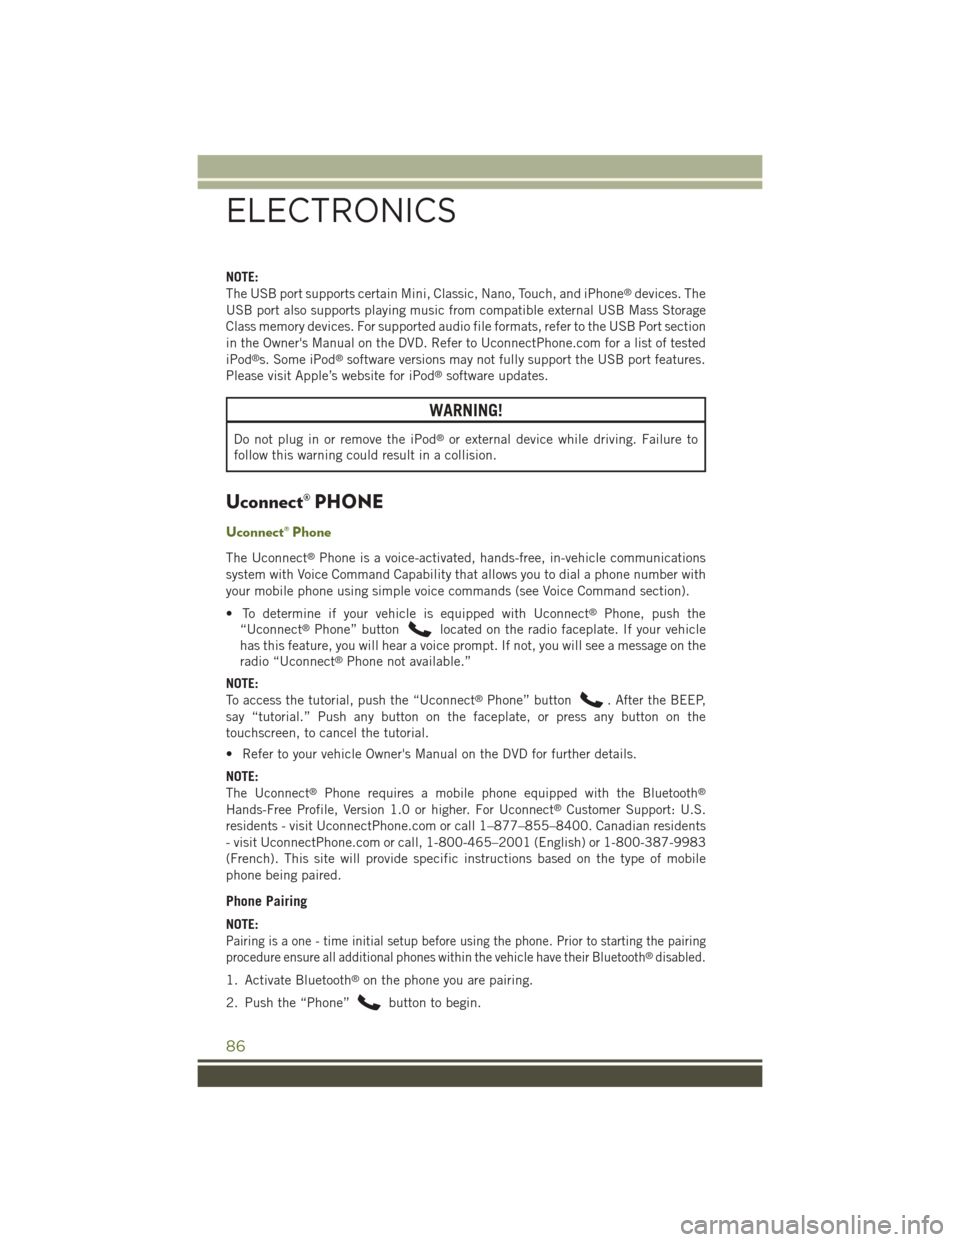
When connected to this feature:
• The iPod®can be controlled using the
radio buttons to Play, Browse, and List
the iPod®or external devices contents.
• The iPod®battery charges whenplugged into the USB port (if sup-ported by the specific audio device).
• Compatible iPod®devices may also becontrollable using voice commands.Refer to the Owner's Manual on theDVD for details.
Steering Wheel Audio Controls(Rearview Of Steering Wheel)
iPod®/USB/MP3
ELECTRONICS
85
Page 88 of 156
NOTE:
The USB port supports certain Mini, Classic, Nano, Touch, and iPhone®devices. The
USB port also supports playing music from compatible external USB Mass Storage
Class memory devices. For supported audio file formats, refer to the USB Port section
in the Owner's Manual on the DVD. Refer to UconnectPhone.com for a list of tested
iPod®s. Some iPod®software versions may not fully support the USB port features.
Please visit Apple’s website for iPod®software updates.
WARNING!
Do not plug in or remove the iPod®or external device while driving. Failure to
follow this warning could result in a collision.
Uconnect® PHONE
Uconnect® Phone
The Uconnect®Phone is a voice-activated, hands-free, in-vehicle communications
system with Voice Command Capability that allows you to dial a phone number with
your mobile phone using simple voice commands (see Voice Command section).
• To determine if your vehicle is equipped with Uconnect®Phone, push the
“Uconnect®Phone” buttonlocated on the radio faceplate. If your vehicle
has this feature, you will hear a voice prompt. If not, you will see a message on the
radio “Uconnect®Phone not available.”
NOTE:
To access the tutorial, push the “Uconnect®Phone” button. After the BEEP,
say “tutorial.” Push any button on the faceplate, or press any button on the
touchscreen, to cancel the tutorial.
• Refer to your vehicle Owner's Manual on the DVD for further details.
NOTE:
The Uconnect®Phone requires a mobile phone equipped with the Bluetooth®
Hands-Free Profile, Version 1.0 or higher. For Uconnect®Customer Support: U.S.
residents - visitUconnectPhone.com or call 1–877–855–8400. Canadian residents
- visit UconnectPhone.com or call, 1-800-465–2001 (English) or 1-800-387-9983
(French). This site will provide specific instructions based on the type of mobile
phone being paired.
Phone Pairing
NOTE:
Pairing is a one - time initial setup before using the phone. Prior to starting the pairing
procedure ensure all additional phones within the vehicle have their Bluetooth®disabled.
1. Activate Bluetooth®on the phone you are pairing.
2. Push the “Phone”button to begin.
ELECTRONICS
86
Page 146 of 156
Head Restraints............20Heated Seats..............25High Beam Indicator.........110High Beam/Low Beam Select(Dimmer) Switch..........27Hood Release.............121
Instrument Cluster............8Instrument Cluster WarningLights . . . . . . . . . . . . . . . .105Instrument Panel Cover.......126Instrument Panel Lens Cleaning . .126Integrated Power Module (Fuses) . .131Interior and Instrument Lights.....7Interior Appearance Care.......126Intermittent Wipers (Delay Wipers)..27Inverter Outlet (115V).........95Inverter, Power.............95iPod®/USB/MP3 Control........85Bluetooth®Streaming Audio . . .92
Jacking Instructions.........113Jack Location.............112Jack Operation.........112, 113Jump Starting.............116
Key Fob . . . . . . . . . . . . . . . . .10Arm The Alarm...........11Disarm The Alarm.........11Key Fob Programmable Features . . .94
Lane Change and Turn Signals . . . .27Lane Change Assist..........27Lap/Shoulder Belts...........12Light Bulbs . . . . . . . . . . . . . .137LightsEngine Temperature Warning . .107Fog . . . . . . . . . . . . . . . .110Four-Wheel Drive Indicator . . .110High Beam Indicator......110Security Alarm..........110Tire Pressure Monitoring(TPMS)..............105Tu r n S i g n a l . . . . . . . . . . . . . 2 7Lubrication, Body...........126
Maintenance Free Battery......126Maintenance, General........126Maintenance Procedures.......126Maintenance Record.........130Maintenance Schedule........126Malfunction Indicator Light(Check Engine) . . . . . . . . . .108Manual TransmissionLubricant Selection.......125Master Cylinder (Brakes).......126Media Center Radio . . . . . . . .55, 58
Navigation.............65,77Navigation System(Uconnect®gps) . . . . . . . . . .65Navigation Voice PromptVolume . . . . . . . . . . . . .65, 77New Vehicle Break-In Period.....26
Octane Rating, Gasoline (Fuel) . . .124Off-Road Driving (Off-Pavement) . .110Oil Change Indicator.........109Oil Change Indicator, Reset.....109Oil, Engine . . . . . . . . . . .124, 126Capacity..............124Change Interval.........126Checking.............126Disposal..............126Filter............124, 126Filter Disposal..........126Materials Added to........126Recommendation.....124, 126Viscosity..........124, 126Oil Filter, Selection..........126Oil Pressure Light...........108OutletPower . . . . . . . . . . . . . . . .96Overheating, Engine.........111
Paint Care . . . . . . . . . . . . . . .126Panic Alarm...............10Phone (Uconnect®)..........86Placard, Tire and LoadingInformation.............134
INDEX
144