air condition JEEP WRANGLER 2020 Owner handbook (in English)
[x] Cancel search | Manufacturer: JEEP, Model Year: 2020, Model line: WRANGLER, Model: JEEP WRANGLER 2020Pages: 276, PDF Size: 4.47 MB
Page 188 of 276
If you notice fluid leakage or transmission
malfunction, visit an authorized dealer im-
mediately to have the transmission fluid level
checked. Operating the vehicle with an im-
proper fluid level can cause severe transmis-
sion damage.
Maintenance-Free Battery
Your vehicle is equipped with a maintenance-
free battery. You will never have to add water,
nor is periodic maintenance required.
WARNING!
• Battery fluid is a corrosive acid solution
and can burn or even blind you. Do not
allow battery fluid to contact your eyes,
skin, or clothing. Do not lean over a
battery when attaching clamps. If acid
splashes in eyes or on skin, flush the
area immediately with large amounts of
water. Refer to “Jump Starting Proce-
dure” in “In Case Of Emergency” for
further information.
• Battery gas is flammable and explosive.
Keep flame or sparks away from the
battery. Do not use a booster battery or
WARNING!
any other booster source with an output
greater than 12 Volts. Do not allow cable
clamps to touch each other.
• Battery posts, terminals, and related ac-
cessories contain lead and lead com-
pounds. Wash hands after handling.
CAUTION!
• It is essential when replacing the cables
on the battery that the positive cable is
attached to the positive post and the
negative cable is attached to the nega-
tive post. Battery posts are marked posi-
tive (+) and negative (-) and are identi-
fied on the battery case. Cable clamps
should be tight on the terminal posts
and free of corrosion.
• If a “fast charger” is used while the
battery is in the vehicle, disconnect both
vehicle battery cables before connecting
the charger to the battery. Do not use
a “fast charger” to provide starting volt-
age.
Air Conditioner Maintenance
For best possible performance, your air con-
ditioner should be checked and serviced by
an authorized dealer at the start of each warm
season. This service should include cleaning
of the condenser fins and a performance test.
Drive belt tension should also be checked at
this time.
WARNING!
• Use only refrigerants and compressor
lubricants approved by the manufac-
turer for your air conditioning system.
Some unapproved refrigerants are flam-
mable and can explode, injuring you.
Other unapproved refrigerants or lubri-
cants can cause the system to fail, re-
quiring costly repairs. Refer to Warranty
Information Book, located in your own-
er’s information kit, for further warranty
information.
• The air conditioning system contains re-
frigerant under high pressure. To avoid
risk of personal injury or damage to the
system, adding refrigerant or any repair
SERVICING AND MAINTENANCE
186
Page 189 of 276
WARNING!
requiring lines to be disconnected
should be done by an experienced tech-
nician.
CAUTION!
Do not use chemical flushes in your air
conditioning system as the chemicals can
damage your air conditioning components.
Such damage is not covered by the New
Vehicle Limited Warranty.
Refrigerant Recovery And Recycling R-134a
— If Equipped
R-134a Air Conditioning Refrigerant is a
hydrofluorocarbon (HFC) that is an ozone-
friendly substance. The manufacturer recom-
mends that air conditioning service be per-
formed by an authorized dealer or other
service facilities using recovery and recycling
equipment.NOTE:
Use only manufacturer approved A/C system
PAG compressor oil and refrigerants.
Refrigerant Recovery And Recycling —
R–1234yf
R–1234yf Air Conditioning Refrigerant is a
hydrofluoroolefin (HFO) that is endorsed by
the Environmental Protection Agency and is
an ozone-friendly substance with a low
global-warming potential. The manufacturer
recommends that air conditioning service be
performed by an authorized dealer using re-
covery and recycling equipment.
NOTE:
Use only manufacturer approved A/C system
PAG compressor oil, and refrigerants.
Air Conditioning Filter Replacement (A/C Air
Filter)
WARNING!
Do not remove the cabin air filter while the
vehicle is running, or while the ignition is
in the ACC or ON/RUN mode. With the
cabin air filter removed and the blower
operating, the blower can contact hands
and may propel dirt and debris into your
eyes, resulting in personal injury.
The A/C air filter is located in the fresh air
inlet behind the glove compartment. Perform
the following procedure to replace the filter:
1. Open the glove compartment and remove
all contents.
2. Push in on the sides of the glove compart-
ment and lower the door.
187
Page 190 of 276
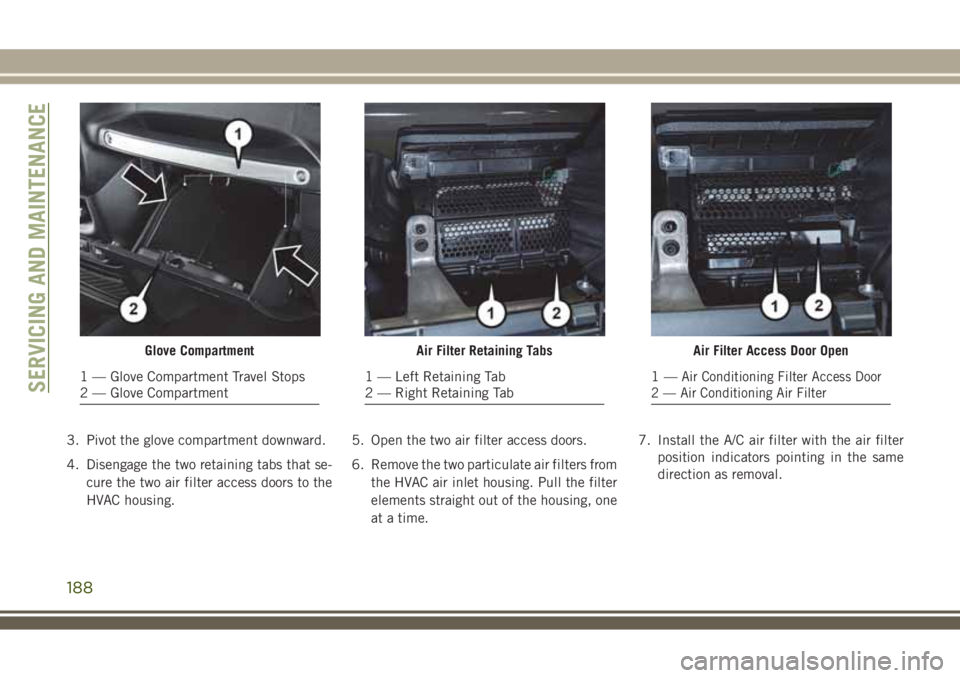
3. Pivot the glove compartment downward.
4. Disengage the two retaining tabs that se-
cure the two air filter access doors to the
HVAC housing.5. Open the two air filter access doors.
6. Remove the two particulate air filters from
the HVAC air inlet housing. Pull the filter
elements straight out of the housing, one
at a time.7. Install the A/C air filter with the air filter
position indicators pointing in the same
direction as removal.
Glove Compartment
1 — Glove Compartment Travel Stops
2 — Glove Compartment
Air Filter Retaining Tabs
1 — Left Retaining Tab
2 — Right Retaining Tab
Air Filter Access Door Open
1—Air Conditioning Filter Access Door
2 — Air Conditioning Air FilterSERVICING AND MAINTENANCE
188
Page 191 of 276
CAUTION!
The cabin air filter is identified with an
arrow to indicate airflow direction through
the filter. Failure to properly install the
filter will result in the need to replace it
more often.
8. Close A/C Air Filter access doors and se-
cure retaining tabs.
9. Rotate the glove compartment door back
into position.
Refer to the “Maintenance Plan” for the
proper maintenance intervals.
DEALER SERVICE
An authorized dealer has the qualified service
personnel, special tools, and equipment to
perform all service operations in an expert
manner. Service Manuals are available which
include detailed service information for your
vehicle. Refer to these Service Manuals be-
fore attempting any procedure yourself.NOTE:
Intentional tampering with emissions control
systems may void your warranty and could
result in civil penalties being assessed
against you.
WARNING!
You can be badly injured working on or
around a motor vehicle. Only do service
work for which you have the knowledge
and the proper equipment. If you have any
doubt about your ability to perform a ser-
vice job, take your vehicle to a competent
mechanic.
Windshield Wiper Blades
Clean the rubber edges of the wiper blades
and the windshield periodically with a sponge
or soft cloth and a mild nonabrasive cleaner.
This will remove accumulations of salt or road
film.Operation of the wipers on dry glass for long
periods may cause deterioration of the wiper
blades. Always use washer fluid when using
the wipers to remove salt or dirt from a dry
windshield.
Avoid using the wiper blades to remove frost
or ice from the windshield. Keep the blade
rubber out of contact with petroleum prod-
ucts such as engine oil, gasoline, etc.
NOTE:
Life expectancy of wiper blades varies de-
pending on geographical area and frequency
of use. Poor performance of blades may be
present with chattering, marks, water lines or
wet spots. If any of these conditions are
present, clean the wiper blades or replace as
necessary.
The wiper blades and wiper arms should be
inspected periodically, not just when wiper
performance problems are experienced. This
inspection should include the following
points:
• Wear Or Uneven Edges
• Foreign Material
189
Page 196 of 276
• Inspect tires for signs of tire wear or visible
damage.
CAUTION!
After inspecting or adjusting the tire pres-
sure, always reinstall the valve stem cap.
This will prevent moisture and dirt from
entering the valve stem, which could dam-
age the valve stem.
Inflation pressures specified on the placard
are always “cold tire inflation pressure”. Cold
tire inflation pressure is defined as the tire
pressure after the vehicle has not been driven
for at least three hours, or driven less than
1 mile (1.6 km) after sitting for a minimum of
three hours. The cold tire inflation pressure
must not exceed the maximum inflation pres-
sure molded into the tire sidewall.
Check tire pressures more often if subject to
a wide range of outdoor temperatures, as tire
pressures vary with temperature changes.Tire pressures change by approximately 1 psi
(7 kPa) per 12°F (7°C) of air temperature
change. Keep this in mind when checking
tire pressure inside a garage, especially in the
Winter.
Example: If garage temperature = 68°F
(20°C) and the outside temperature = 32°F
(0°C) then the cold tire inflation pressure
should be increased by 3 psi (21 kPa), which
equals 1 psi (7 kPa) for every 12°F (7°C) for
this outside temperature condition.
Tire pressure may increase from 2 to 6 psi
(13 to 40 kPa) during operation. DO NOT
reduce this normal pressure build up or your
tire pressure will be too low.
Tire Pressures For High Speed Operation
The manufacturer advocates driving at safe
speeds and within posted speed limits.
Where speed limits or conditions are such
that the vehicle can be driven at high speeds,
maintaining correct tire inflation pressure is
very important. Increased tire pressure and
reduced vehicle loading may be required for
high-speed vehicle operation. Refer to anauthorized tire dealer or original equipment
vehicle dealer for recommended safe operat-
ing speeds, loading and cold tire inflation
pressures.
WARNING!
High speed driving with your vehicle under
maximum load is dangerous. The added
strain on your tires could cause them to
fail. You could have a serious collision. Do
not drive a vehicle loaded to the maximum
capacity at continuous speeds above
75 mph (120 km/h).
Radial Ply Tires
WARNING!
Combining radial ply tires with other types
of tires on your vehicle will cause your
vehicle to handle poorly. The instability
could cause a collision. Always use radial
ply tires in sets of four. Never combine
them with other types of tires.
SERVICING AND MAINTENANCE
194
Page 204 of 276
or more, run the air conditioning system at
idle for about five minutes in the fresh air
and high blower setting. This will ensure
adequate system lubrication to minimize
the possibility of compressor damage when
the system is started again.
BODYWORK
Body And Underbody Maintenance
Cleaning Headlights
Your vehicle is equipped with plastic head-
lights and fog lights that are lighter and less
susceptible to stone breakage than glass
headlights.
Plastic is not as scratch resistant as glass and
therefore different lens cleaning procedures
must be followed.
To minimize the possibility of scratching the
lenses and reducing light output, avoid wip-
ing with a dry cloth. To remove road dirt, wash
with a mild soap solution followed by rinsing.
Do not use abrasive cleaning components,
solvents, steel wool or other aggressive mate-
rial to clean the lenses.
Preserving The Bodywork
Washing
• Wash your vehicle regularly. Always wash
your vehicle in the shade using a mild car
wash soap, and rinse the panels completely
with clear water.
• Use a high quality cleaner wax remove road
film, stains and to protect your paint finish.
Take care never to scratch the paint.
• Avoid using abrasive compounds and power
buffing that may diminish the gloss or thin
out the paint finish.
CAUTION!
• Do not use abrasive or strong cleaning
materials such as steel wool or scouring
powder that will scratch metal and
painted surfaces.
• Use of power washers exceeding
1,200 psi (8,274 kPa) can result in
damage or removal of paint and decals.
Special Care
• If you drive on salted or dusty roads or if you
drive near the ocean, hose off the undercar-
riage at least once a month.
• It is important that the drain holes in the
lower edges of the doors, rocker panels, and
trunk be kept clear and open.
• If you detect any stone chips or scratches in
the paint, touch them up immediately. The
cost of such repairs is considered the re-
sponsibility of the owner.
• If your vehicle is damaged due to a collision
or similar cause that destroys the paint and
protective coating, have your vehicle re-
paired as soon as possible. The cost of such
repairs is considered the responsibility of
the owner.
• If you carry special cargo such as chemi-
cals, fertilizers, de-icer salt, etc., be sure
that such materials are well packaged and
sealed.
• If a lot of driving is done on gravel roads,
consider mud or stone shields behind each
wheel.
SERVICING AND MAINTENANCE
202
Page 207 of 276
If the belts need cleaning, use a mild soap
solution or lukewarm water. Do not remove
the belts from the vehicle to wash them. Dry
with a soft cloth.
Replace the belts if they appear frayed or
worn or if the buckles do not work properly.
WARNING!
A frayed or torn belt could rip apart in a
collision and leave you with no protection.
Inspect the belt system periodically,
checking for cuts, frays, or loose parts.
Damaged parts must be replaced immedi-
ately. Do not disassemble or modify the
system. Seat belt assemblies must be re-
placed after a collision if they have been
damaged (i.e., bent retractor, torn web-
bing, etc.).
Plastic And Coated Parts
Use Mopar Total Clean to clean vinyl
upholstery.
CAUTION!
•Direct contact of air fresheners, insect
repellents, suntan lotions, or hand sanitiz-
ers to the plastic, painted, or decorated
surfaces of the interior may cause perma-
nent damage. Wipe away immediately.
• Damage caused by these type of prod-
ucts may not be covered by your New
Vehicle Limited Warranty.
Cleaning Plastic Instrument Cluster Lenses
The lenses in front of the instruments in this
vehicle are molded in clear plastic. When
cleaning the lenses, care must be taken to
avoid scratching the plastic.
1. Clean with a wet soft cloth. A mild soap
solution may be used, but do not use high
alcohol content or abrasive cleaners. If
soap is used, wipe clean with a clean
damp cloth.
2. Dry with a soft cloth.
Leather Parts
Your leather upholstery can be best preserved
by regular cleaning with a damp soft cloth.
Small particles of dirt can act as an abrasive
and damage the leather upholstery and should
be removed promptly with a damp cloth. Care
should be taken to avoid soaking your leather
upholstery with any liquid. Please do not use
polishes, oils, cleaning fluids, solvents, deter-
gents, or ammonia-based cleaners to clean
your leather upholstery. Application of a
leather conditioner is not required to maintain
the original condition.
NOTE:
If equipped with light colored leather, it tends
to show any foreign material, dirt, and fabric
dye transfer more so than darker colors. The
leather is designed for easy cleaning.
CAUTION!
Do not use Alcohol and Alcohol-based
and/or Ketone based cleaning products to
clean leather seats, as damage to the seat
may result.
205
Page 217 of 276
MULTIMEDIA
CYBERSECURITY............216
RADIO 130.................217
Clock Setting.................218
Equalizer, Balance And Fade.......218
Radio Operation...............218
CD/DISC Operation.............218
Audio Jack Operation............219
UCONNECT 430/430N.......220
Clock Setting.................221
Menu.....................221
Equalizer, Balance And Fade.......222
Radio Operation...............223
CD/DVD Disc Operation..........225
Audio Jack Operation............226Hard Disk Drive (HDD) Operation. . . .226
Cleaning Your Touchscreen Radio. . . .229
Garmin Navigation.............229
Main Navigation Menu...........229
Following Your Route............231
TIPS CONTROLS AND GENERAL
INFORMATION.............232
Steering Wheel Audio Controls......232
Reception Conditions............232
Care And Maintenance...........232
Anti-Theft Protection............232
AUX/USB/MP3 CONTROL — IF
EQUIPPED.................233
UCONNECT PHONE..........234
Phone Pairing................234
Phonebook..................235
Making A Phone Call............236
Receiving A Call — Accept (And End). .236
Mute (Or Unmute) Microphone During
Call......................236
Transfer Ongoing Call Between Handset
And Vehicle..................236
Changing The Volume...........236
UCONNECT VOICE COMMAND. .236
Voice Command Operation.........236
Voice Text Reply..............239
BLUETOOTH STREAMING
AUDIO...................239
MULTIMEDIA
215
Page 234 of 276
TIPS CONTROLS AND
GENERAL INFORMATION
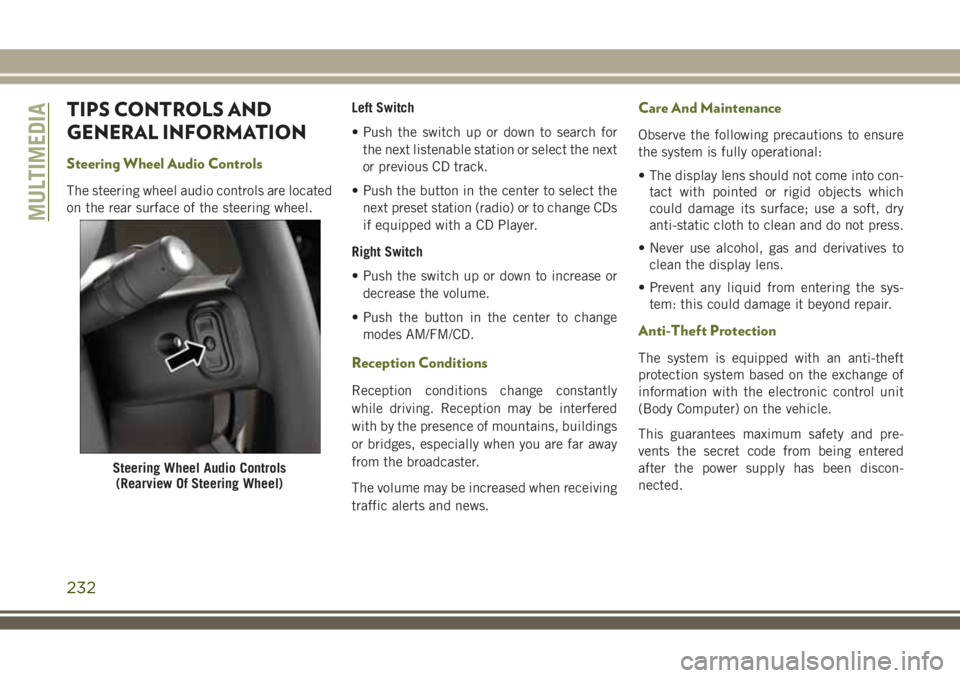
Steering Wheel Audio Controls
The steering wheel audio controls are located
on the rear surface of the steering wheel.Left Switch
• Push the switch up or down to search for
the next listenable station or select the next
or previous CD track.
• Push the button in the center to select the
next preset station (radio) or to change CDs
if equipped with a CD Player.
Right Switch
• Push the switch up or down to increase or
decrease the volume.
• Push the button in the center to change
modes AM/FM/CD.
Reception Conditions
Reception conditions change constantly
while driving. Reception may be interfered
with by the presence of mountains, buildings
or bridges, especially when you are far away
from the broadcaster.
The volume may be increased when receiving
traffic alerts and news.
Care And Maintenance
Observe the following precautions to ensure
the system is fully operational:
• The display lens should not come into con-
tact with pointed or rigid objects which
could damage its surface; use a soft, dry
anti-static cloth to clean and do not press.
• Never use alcohol, gas and derivatives to
clean the display lens.
• Prevent any liquid from entering the sys-
tem: this could damage it beyond repair.
Anti-Theft Protection
The system is equipped with an anti-theft
protection system based on the exchange of
information with the electronic control unit
(Body Computer) on the vehicle.
This guarantees maximum safety and pre-
vents the secret code from being entered
after the power supply has been discon-
nected.
Steering Wheel Audio Controls
(Rearview Of Steering Wheel)
MULTIMEDIA
232
Page 238 of 276
Making A Phone Call
• Push the “Phone” button.
• After the BEEP, say “dial” (or “call” a
name).
• After the BEEP, say number (or name).
Receiving A Call — Accept (And End)
• When an incoming call rings/is announced
on Uconnect, push the “Phone” button
.
• To end a call, push the “Phone” button
.
Mute (Or Unmute) Microphone During
Call
• During a call, push the “Voice Command”
button
.
• After the BEEP, say “mute” (or “mute off”).
Transfer Ongoing Call Between Handset
And Vehicle
• During a call, push the “Voice Command”
button
.
• After the BEEP, say “transfer call.”
Changing The Volume
• Start a dialogue by pushing the “Phone”
button
, then adjust the volume during
a normal call.
• Use the radio ON/OFF VOLUME rotary knob
to adjust the volume to a comfortable level
while the Uconnect system is speaking.
Please note the volume setting for
Uconnect is different than the audio
system.
WARNING!
• Any voice commanded system should be
used only in safe driving conditions fol-
lowing applicable laws regarding phone
use. Your attention should be focused on
safely operating the vehicle. Failure to
do so may result in a collision causing
you and others to be severely injured or
killed.
• In an emergency, to use Uconnect
Phone, your mobile phone must be:
• turned on
• paired to Uconnect Phone
• have network coverage
UCONNECT VOICE
COMMAND
Voice Command Operation
The Uconnect Voice Command system allows
you to control your AM, FM radio, disc player,
HDD, Uconnect Phone, a memo recorder,
and supported portable media devices.
• When you push the “Voice Command”
button
located on the radio faceplate
or steering wheel, you will hear a beep. The
beep is your signal to give a command. If
you do not say a command within a few
seconds, the system presents you with a list
of options. If you ever want to interrupt the
system while it lists options, push the
“Voice Command” button
, listen for
the BEEP, and say your command.
MULTIMEDIA
236