weight JEEP WRANGLER 2020 Owner handbook (in English)
[x] Cancel search | Manufacturer: JEEP, Model Year: 2020, Model line: WRANGLER, Model: JEEP WRANGLER 2020Pages: 276, PDF Size: 4.47 MB
Page 32 of 276
NOTE:
• If either light remains on and does not
flash, or there is a very fast flash rate, check
for a defective outside light bulb. If an
indicator fails to light when the lever is
moved, it would suggest that the indicator
bulb is defective.
• A tone will chime if the turn signals are left
on for more than 1 mile (2 km).
Lane Change Assist — If Equipped
Tap the lever up or down once, without mov-
ing beyond the detent, and the turn signal
(right or left) will flash three times then
automatically turn off.
Lights-On Reminder
If the headlights, parking lights, or cargo
lights are left on after the ignition is turned
OFF, a chime will sound when the driver’s
door is opened.
Headlight Leveling System — If Equipped
Your vehicle may be equipped with a head-
light leveling system. This system allows the
driver to maintain proper headlight beam
position with the road surface regardless of
vehicle load.
The control switch is located in the switch
bank below the climate controls.
To operate, push the control switch until the
indicator next to the appropriate number,
which corresponds to the load listed on the
chart below, illuminates on the switch.
0/1Driver only, or driver
and front passenger.
2All seating positions
occupied, plus an
evenly distributed
load in the luggage
compartment. The
total weight of pas-
sengers and load
does not exceed the
maximum load ca-
pacity of the vehicle.
3Driver, plus an evenly
distributed load in
the luggage compart-
ment. The total
weight of the driver
and load does not
exceed the maximum
load capacity of the
vehicle.
WINDSHIELD WIPERS AND
WASHERS
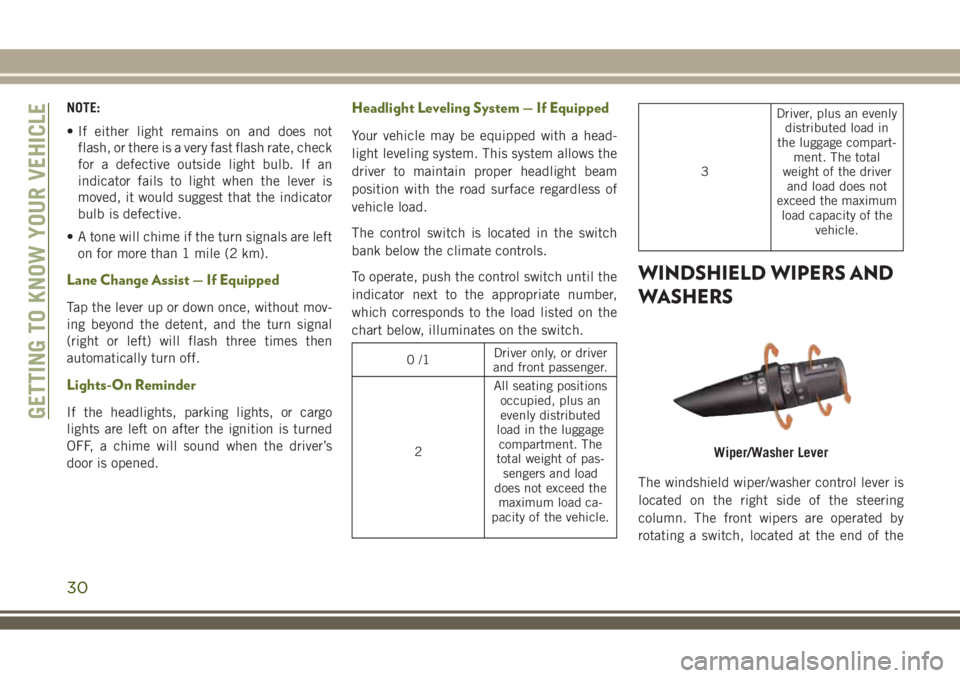
The windshield wiper/washer control lever is
located on the right side of the steering
column. The front wipers are operated by
rotating a switch, located at the end of the
Wiper/Washer Lever
GETTING TO KNOW YOUR VEHICLE
30
Page 78 of 276
WARNING!
Many factors, such as vehicle loading,
road conditions and driving conditions,
influence the chance that wheel lift or
rollover may occur. ERM cannot prevent
all wheel lift or roll overs, especially those
that involve leaving the roadway or striking
objects or other vehicles. The capabilities
of an ERM-equipped vehicle must never
be exploited in a reckless or dangerous
manner which could jeopardize the user's
safety or the safety of others.
Trailer Sway Control (TSC)
TSC uses sensors in the vehicle to recognize
an excessively swaying trailer and will take
the appropriate actions to attempt to stop the
sway. TSC will become active automatically
once an excessively swaying trailer is recog-
nized.NOTE:
TSC cannot stop all trailers from swaying.
Always use caution when towing a trailer and
follow the trailer tongue weight recommenda-
tions. Refer to “Trailer Towing” in “Starting
And Operating” for further information.
When TSC is functioning, the “ESC
Activation/Malfunction Indicator Light” will
flash, the engine power may be reduced and
you may feel the brakes being applied to
individual wheels to attempt to stop the
trailer from swaying. TSC is disabled when
the ESC system is in the “Partial Off” or “Full
Off” modes.WARNING!
If TSC activates while driving, slow the
vehicle down, stop at the nearest safe
location, and adjust the trailer load to
eliminate trailer sway.
Hill Descent Control (HDC) — If Equipped
HDC is only intended for low speed off-road
driving. HDC maintains vehicle speed while
descending hills in off-road driving condi-
tions by applying the brakes when necessary.
The symbol indicates the status
of the Hill Descent Control
(HDC) feature. The lamp will be
on solid when HDC is armed.
HDC can only be armed when the
transfer case is in the “4WD LOW” position
and the vehicle speed is less then 30 mph
(48 km/h). If these conditions are not met
while attempting to use the HDC feature, the
HDC indicator light will flash on/off.
When enabled, HDC senses the terrain and acti-
vates when the vehicle is descending a hill. HDC
speed may be adjusted by the driver to suit the
driving conditions. The speed corresponds to the
transmission gear selected.
Gear Approximate HDC Set
Speed
1st 1 mph (1.5 km/h)
2nd 2.5 mph (4 km/h)
SAFETY
76
Page 102 of 276
ing to crash statistics, children are safer
when properly restrained in the rear seats
rather than in the front.
WARNING!
• NEVER use a rearward facing child re-
straint on a seat protected by an ACTIVE
AIRBAG in front of it, DEATH or SERI-
OUS INJURY to the CHILD can occur.
• Only use a rear-facing child restraint in a
vehicle with a rear seat.
• A deploying passenger front airbag can
cause death or serious injury to a child
12 years or younger, including a child in
a rear-facing child restraint.
• In a collision, an unrestrained child can
become a projectile inside the vehicle.
The force required to hold even an infant
on your lap could become so great that
you could not hold the child, no matter
how strong you are. The child and others
could be badly injured or killed. Any
child riding in your vehicle should be in
a proper restraint for the child’s size.There are different sizes and types of re-
straints for children from newborn size to the
child almost large enough for an adult safety
belt. Children should ride rearward facing as
long as possible; this is the most protected
position for a child in the event of a crash.
Always check the child seat Owner’s Manual
to make sure you have the correct seat for
your child. Carefully read and follow all the
instructions and warnings in the child re-
straint Owner’s Manual and on all the labels
attached to the child restraint.
In Europe, children restraint systems are de-
fined by regulation ECE-R44, which divides
them into five weight groups:
Restraint Group Weight Group
Group 0 up to 10 kg
Group 0+ up to 13 kg
Group 1 9-18 kg
Group 2 15-25 kg
Group 3 22-36 kg
Check the label of your child restraint. All
approved child restraints must include type-
approval data and the control mark on itslabel. The label must be permanently se-
cured to the child restraint system. You
should not remove this label from the child
restraint.
WARNING!
Extreme Hazard! Do not place a rear-
facing child restraint in front of an active
air bag. Refer to visor mounted labels for
information. Deployment of the air bag in
an accident could cause fatal injuries to
the baby regardless of the severity of the
collision. It is advisable to always carry
children in a child restraint system on the
rear seat, which is the most protected
position in the event of a collision.
“Universal” Child Restraint Systems
•The figures in the following sections are
examples of each type of universal child
restraint system. Typical installations are
shown. Always install your child restraint
system according to the child restraint
manufacturer’s instructions, which must be
included with this type of restraint system.
SAFETY
100
Page 106 of 276
belt buckle is latched. A child’s squirming or
slouching can move the belt out of position.
If the shoulder belt contacts the face or neck,
move the child closer to the center of the
vehicle, or use a booster seat to position the
seat belt on the child correctly.
WARNING!
Never allow a child to put the shoulder belt
under an arm or behind their back. In a
crash, the shoulder belt will not protect a
child properly, which may result in serious
injury or death. A child must always wear
both the lap and shoulder portions of the
seat belt correctly.
ISOFIX Restraint SystemYour vehicle is equipped with the child re-
straint anchorage system called ISOFIX. This
system allows ISOFIX-equipped child seats
to be installed without using the vehicle’s
seat belts. The ISOFIX system has two lower
anchorages located at the back of the seat
cushion where it meets the seatback and a
top tether anchorage located behind the seat-
ing position.
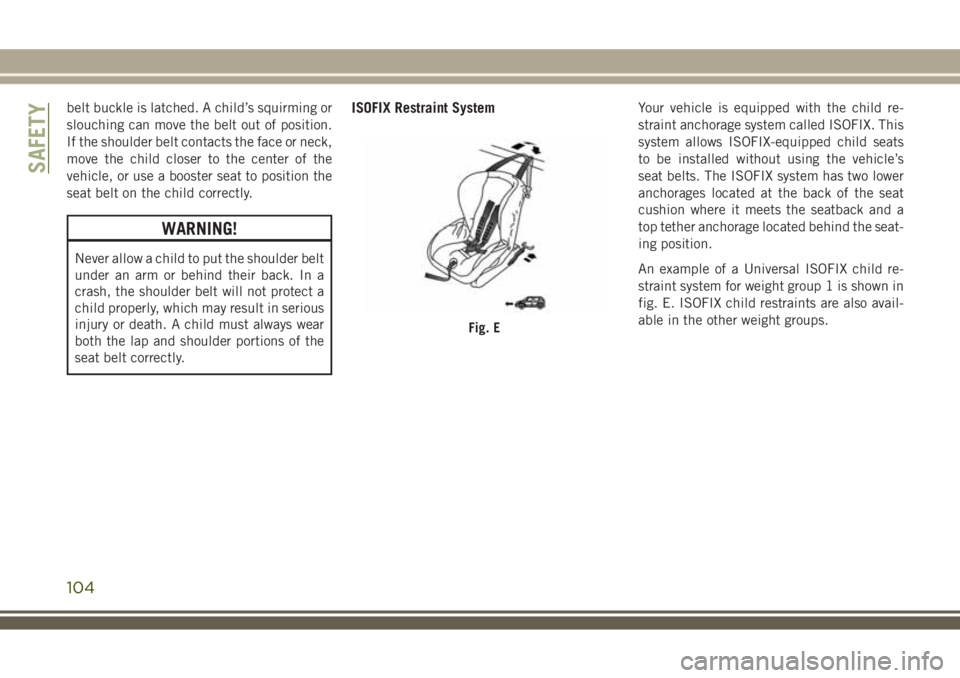
An example of a Universal ISOFIX child re-
straint system for weight group 1 is shown in
fig. E. ISOFIX child restraints are also avail-
able in the other weight groups.
Fig. E
SAFETY
104
Page 118 of 276
TRAILER TOWING...........140
Trailer Towing Weights (Maximum Trailer
Weight Ratings)...............140
RECREATIONAL TOWING (BEHIND
MOTORHOME, ETC.).........142
Towing This Vehicle Behind Another
Vehicle....................142
Recreational Towing — Four-Wheel Drive
Models....................142
STARTING AND OPERATING
116
Page 142 of 276
CAUTION!
• To avoid fuel spillage and overfilling, do
not “top off” the fuel tank after filling.
NOTE:
• When the fuel nozzle “clicks” or shuts off,
the fuel tank is full.
• Tighten the fuel filler cap about 1/4 turn
until you hear one click. This is an indica-
tion that the cap is properly tightened.
• If the fuel filler cap is not tightened prop-
erly, the MIL will come on. Be sure the cap
is tightened every time the vehicle is
refueled.
Loose Fuel Filler Cap Message
After fuel has been added, the vehicle diag-
nostic system can determine if the fuel filler
cap is possibly loose, improperly installed, or
damaged. If the system detects a malfunc-
tion, the “gASCAP” message will display in
the odometer display. Tighten the gas cap
until a "clicking" sound is heard. This is an
indication that the gas cap is properly tight-
ened. Push the odometer reset button to turn
the message off. If the problem persists, the
message will appear the next time the vehicleis started. This might indicate a damaged
cap. If the problem is detected twice in a row,
the system will turn on the MIL. Resolving
the problem will turn the MIL off.
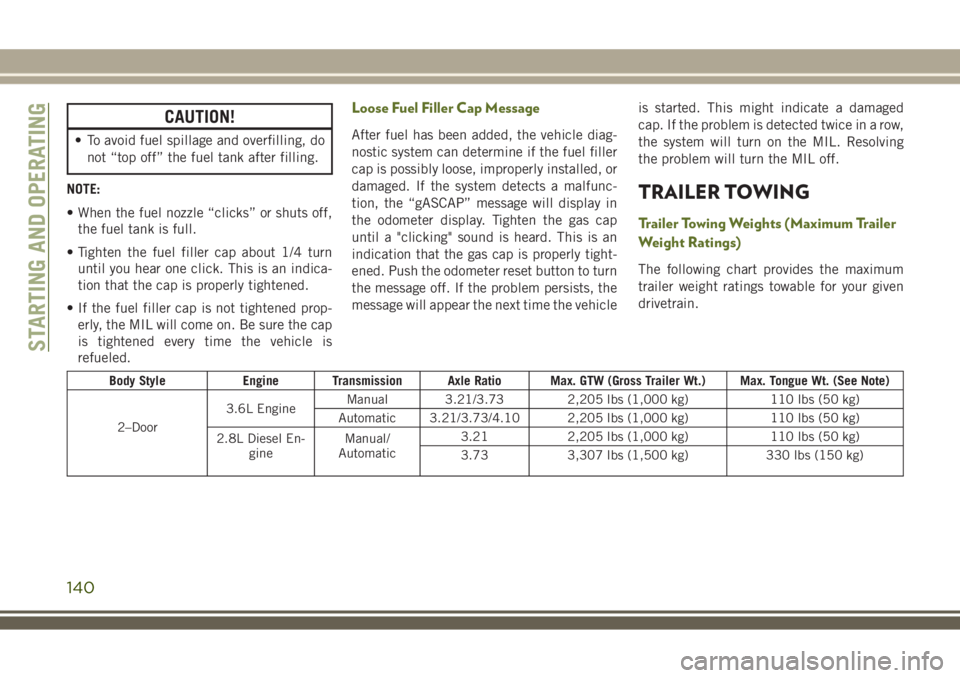
TRAILER TOWING
Trailer Towing Weights (Maximum Trailer
Weight Ratings)
The following chart provides the maximum
trailer weight ratings towable for your given
drivetrain.
Body Style Engine Transmission Axle Ratio Max. GTW (Gross Trailer Wt.) Max. Tongue Wt. (See Note)
2–Door3.6L EngineManual 3.21/3.73 2,205 lbs (1,000 kg) 110 lbs (50 kg)
Automatic 3.21/3.73/4.10 2,205 lbs (1,000 kg) 110 lbs (50 kg)
2.8L Diesel En-
gineManual/
Automatic3.21 2,205 lbs (1,000 kg) 110 lbs (50 kg)
3.73 3,307 lbs (1,500 kg) 330 lbs (150 kg)
STARTING AND OPERATING
140
Page 143 of 276
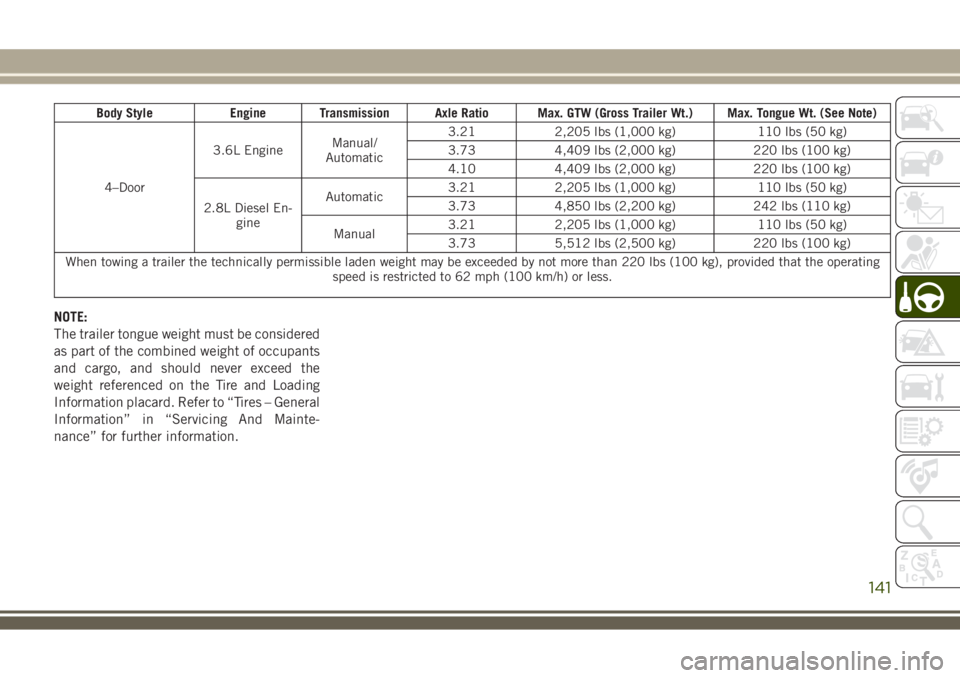
Body Style Engine Transmission Axle Ratio Max. GTW (Gross Trailer Wt.) Max. Tongue Wt. (See Note)
4–Door3.6L EngineManual/
Automatic3.21 2,205 lbs (1,000 kg) 110 lbs (50 kg)
3.73 4,409 lbs (2,000 kg) 220 lbs (100 kg)
4.10 4,409 lbs (2,000 kg) 220 lbs (100 kg)
2.8L Diesel En-
gineAutomatic3.21 2,205 lbs (1,000 kg) 110 lbs (50 kg)
3.73 4,850 lbs (2,200 kg) 242 lbs (110 kg)
Manual3.21 2,205 lbs (1,000 kg) 110 lbs (50 kg)
3.73 5,512 lbs (2,500 kg) 220 lbs (100 kg)
When towing a trailer the technically permissible laden weight may be exceeded by not more than 220 lbs (100 kg), provided that the operating
speed is restricted to 62 mph (100 km/h) or less.
NOTE:
The trailer tongue weight must be considered
as part of the combined weight of occupants
and cargo, and should never exceed the
weight referenced on the Tire and Loading
Information placard. Refer to “Tires – General
Information” in “Servicing And Mainte-
nance” for further information.
141
Page 156 of 276
JACKING AND TIRE
CHANGING
WARNING!
• Do not attempt to change a tire on the
side of the vehicle close to moving traf-
fic. Pull far enough off the road to avoid
the danger of being hit when operating
the jack or changing the wheel.
• Being under a jacked-up vehicle is dan-
gerous. The vehicle could slip off the
jack and fall on you. You could be
crushed. Never put any part of your body
under a vehicle that is on a jack. If you
need to get under a raised vehicle, take
it to a service center where it can be
raised on a lift.
• Never start or run the engine while the
vehicle is on a jack.
• The jack is designed to be used as a tool
for changing tires only. The jack should
not be used to lift the vehicle for service
purposes. The vehicle should be jacked
on a firm level surface only. Avoid ice or
slippery areas.
Jack/Spare Tire Stowage
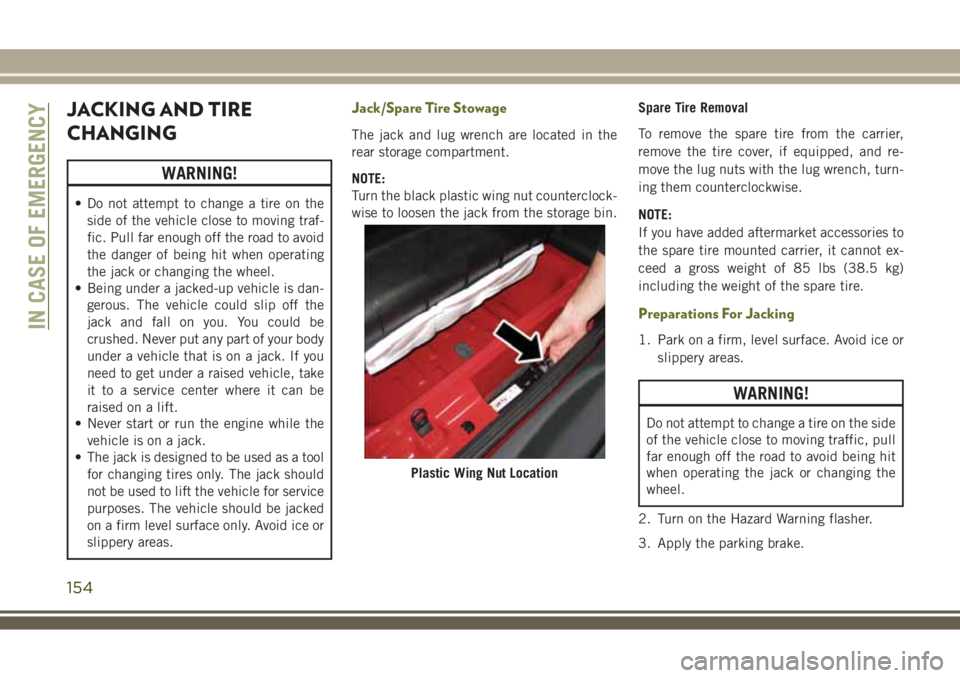
The jack and lug wrench are located in the
rear storage compartment.
NOTE:
Turn the black plastic wing nut counterclock-
wise to loosen the jack from the storage bin.Spare Tire Removal
To remove the spare tire from the carrier,
remove the tire cover, if equipped, and re-
move the lug nuts with the lug wrench, turn-
ing them counterclockwise.
NOTE:
If you have added aftermarket accessories to
the spare tire mounted carrier, it cannot ex-
ceed a gross weight of 85 lbs (38.5 kg)
including the weight of the spare tire.
Preparations For Jacking
1. Park on a firm, level surface. Avoid ice or
slippery areas.
WARNING!
Do not attempt to change a tire on the side
of the vehicle close to moving traffic, pull
far enough off the road to avoid being hit
when operating the jack or changing the
wheel.
2. Turn on the Hazard Warning flasher.
3. Apply the parking brake.
Plastic Wing Nut Location
IN CASE OF EMERGENCY
154
Page 267 of 276
Touchscreen Radio
Cleaning Your Touchscreen Radio . .229
Towing.................140, 165
Disabled Vehicle............165
Guide...................140
Recreational...............142
Weight..................140
Towing Eyes.................167
Towing Vehicle Behind A Motorhome . .142
Trac-Lok Rear Axle.............132
Traction Control................71
Trailer Sway Control (TSC)..........76
Trailer Towing................140
Trailer Towing Guide............140
Trailer Weight................140
Transaxle
Autostick.................128
Transfer Case
Fluid...................211
Four-Wheel-Drive Operation.....129Transmission
Automatic.............127, 184
Fluid...................211
Maintenance..............184
Manual..................123
Shifting.................126
Transporting Pets..............112
Tread Wear Indicators............195
Turn Signals.........29, 64, 148, 149
UCI Connector................233
Uconnect Voice Command.........236
Universal Consumer Interface (UCI)
Connector.................233
Untwisting Procedure, Seat Belt......89
Vehicle Identification Number (VIN) . . .208
Vehicle Modifications/Alterations......4
Vehicle Storage.............37, 201
Voice Command...............236
Voice Prompt Volume
Navigation................229Volume
Navigation Voice Prompt.......
.229
Warning Lights (Instrument Cluster
Description).................61
Warning, Roll Over...............4
Warnings And Cautions............4
Washers, Windshield............183
Washing Vehicle...............202
Wheel And Wheel Trim...........199
Wheel And Wheel Trim Care........199
Wind Buffeting................39
Window Fogging................37
Windows
Power...................38
Windshield Defroster............113
Windshield Washers..........30, 183
Fluid...................183
Windshield Wiper Blades.........189
Windshield Wipers..............30
Wiper Blade Replacement.........189
Wiper, Rear...................32
265