window JEEP WRANGLER 2020 Owner handbook (in English)
[x] Cancel search | Manufacturer: JEEP, Model Year: 2020, Model line: WRANGLER, Model: JEEP WRANGLER 2020Pages: 276, PDF Size: 4.47 MB
Page 10 of 276
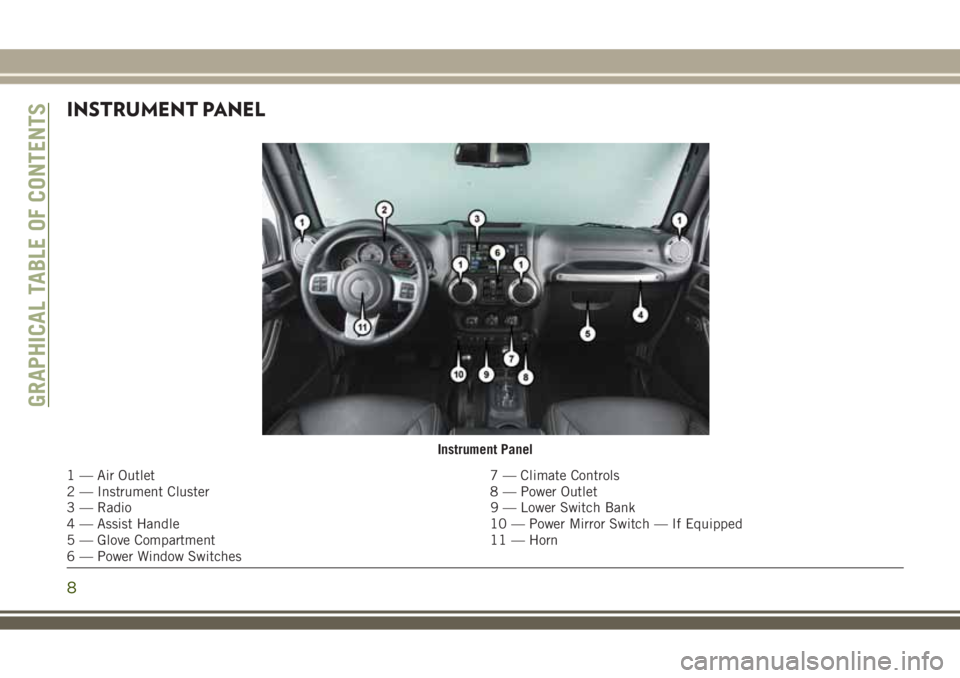
INSTRUMENT PANEL
Instrument Panel
1 — Air Outlet 7 — Climate Controls
2 — Instrument Cluster 8 — Power Outlet
3 — Radio 9 — Lower Switch Bank
4 — Assist Handle 10 — Power Mirror Switch — If Equipped
5 — Glove Compartment 11 — Horn
6 — Power Window Switches
GRAPHICAL TABLE OF CONTENTS
8
Page 11 of 276
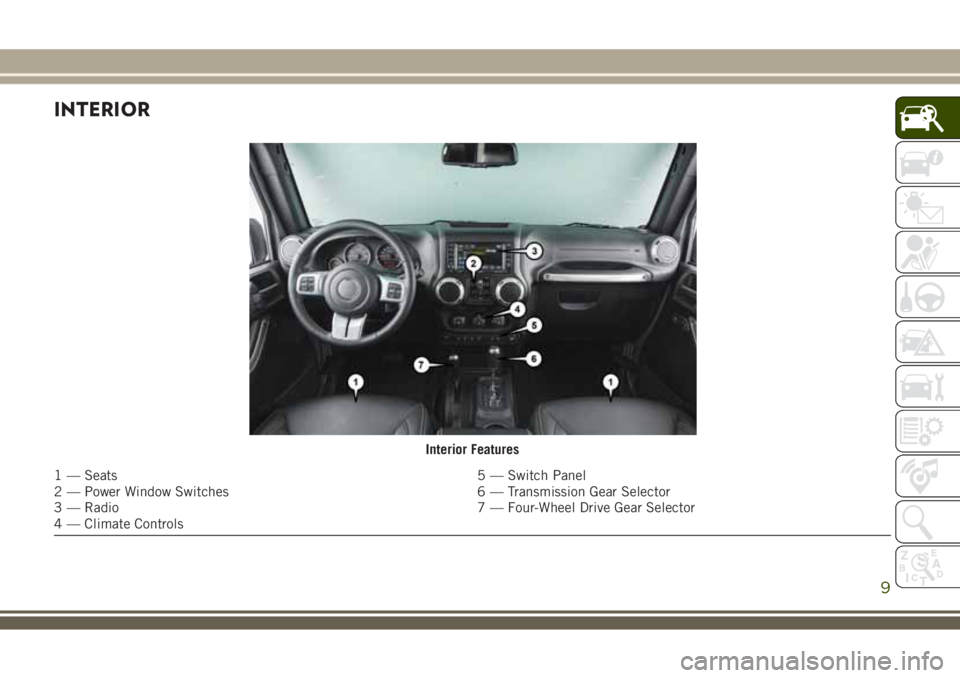
INTERIOR
Interior Features
1 — Seats 5 — Switch Panel
2 — Power Window Switches 6 — Transmission Gear Selector
3 — Radio 7 — Four-Wheel Drive Gear Selector
4 — Climate Controls
9
Page 13 of 276
GETTING TO KNOW YOUR VEHICLE
KEYFOB...................13
KeyFob.....................13
IGNITION SWITCH............13
Ignition Key Removal............13
REMOTE STARTING SYSTEM — IF
EQUIPPED.................14
How To Use Remote Start..........14
Remote Start Abort Message........15
To Enter Remote Start............15
To Exit Remote Start Mode Without Driving
The Vehicle...................16
To Exit Remote Start Mode And Drive The
Vehicle.....................16
SENTRY KEY................16
Replacement Key Fobs...........17
Customer Key Programming........17
VEHICLE SECURITY ALARM — IF
EQUIPPED.................18
Rearming The System............18
To Arm The System.............18
To Disarm The System............18
DOORS....................19
Upper Half Door Window Removal — If
Equipped....................19
Front Door Removal..............19
Rear Door Removal (Four-Door Models) . .20
SEATS ....................21
Heated Seats — If Equipped........21
60/40 Split Folding Rear Seat —
Four Door Models..............22
Front Passenger Easy Entry Seat —
Two Door Models...............23
Tip ‘n Slide Seats — Two Door Models . .24
Removing The Rear Seat — Two Door
Models.....................24
HEAD RESTRAINTS...........25
Front Head Restraints............25
Rear Head Restraints — 2 Door Model . .26
Rear Head Restraints — 4 Door Model . .27
STEERING WHEEL............28
Tilt Steering Column.............28
MIRRORS..................28
Heated Mirrors — If Equipped.......28
EXTERIOR LIGHTS............28
Headlights And Parking Lights.......28
Daytime Running Lights — If Equipped .29
High/Low Beam Switch...........29
Flash-To-Pass.................29
Automatic Headlights — If Equipped . .29
Front Fog Lights...............29
Rear Fog Lights — If Equipped......29
Turn Signals..................29
Lane Change Assist — If Equipped....30
Lights-On Reminder.............30
Headlight Leveling System — If
Equipped...................30
WINDSHIELD WIPERS AND WASH-
ERS ......................30
Windshield Wiper Operation.........31
Rear Window Wiper/Washer — If
Equipped...................32
GETTING TO KNOW YOUR VEHICLE
11
Page 14 of 276
CLIMATE CONTROLS..........33
Automatic Climate Control Overview....33
Automatic Temperature Control (ATC) —
If Equipped..................37
Operating Tips.................37
POWER WINDOWS — IF
EQUIPPED.................38
Wind Buffeting................39
REMOVABLE TOP
INFORMATION..............39
Sunrider And Soft Top............39
Hard Top And Freedom Top.........47
Dual Top — If Equipped...........50
Wind Buffeting................51
HOOD.....................51
Opening The Hood..............51
Closing The Hood...............51
REAR SWING GATE...........51
INTERNAL EQUIPMENT........52
Power Outlets.................52
GETTING TO KNOW YOUR VEHICLE
12
Page 16 of 276
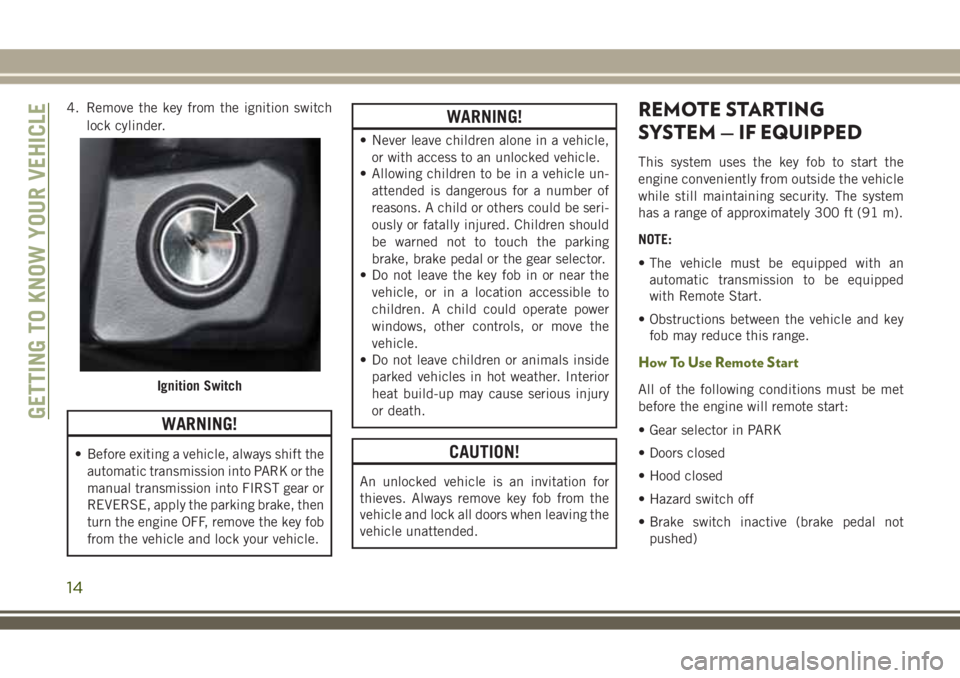
4. Remove the key from the ignition switch
lock cylinder.
WARNING!
• Before exiting a vehicle, always shift the
automatic transmission into PARK or the
manual transmission into FIRST gear or
REVERSE, apply the parking brake, then
turn the engine OFF, remove the key fob
from the vehicle and lock your vehicle.
WARNING!
• Never leave children alone in a vehicle,
or with access to an unlocked vehicle.
• Allowing children to be in a vehicle un-
attended is dangerous for a number of
reasons. A child or others could be seri-
ously or fatally injured. Children should
be warned not to touch the parking
brake, brake pedal or the gear selector.
• Do not leave the key fob in or near the
vehicle, or in a location accessible to
children. A child could operate power
windows, other controls, or move the
vehicle.
• Do not leave children or animals inside
parked vehicles in hot weather. Interior
heat build-up may cause serious injury
or death.
CAUTION!
An unlocked vehicle is an invitation for
thieves. Always remove key fob from the
vehicle and lock all doors when leaving the
vehicle unattended.
REMOTE STARTING
SYSTEM — IF EQUIPPED
This system uses the key fob to start the
engine conveniently from outside the vehicle
while still maintaining security. The system
has a range of approximately 300 ft (91 m).
NOTE:
• The vehicle must be equipped with an
automatic transmission to be equipped
with Remote Start.
• Obstructions between the vehicle and key
fob may reduce this range.
How To Use Remote Start
All of the following conditions must be met
before the engine will remote start:
• Gear selector in PARK
• Doors closed
• Hood closed
• Hazard switch off
• Brake switch inactive (brake pedal not
pushed)Ignition Switch
GETTING TO KNOW YOUR VEHICLE
14
Page 17 of 276
• Ignition key removed from ignition
• Battery at an acceptable charge level
• System not disabled from previous remote
start event
• Vehicle security alarm not active
WARNING!
• Do not start or run an engine in a closed
garage or confined area. Exhaust gas
contains Carbon Monoxide (CO) which is
odorless and colorless. Carbon Monox-
ide is poisonous and can cause serious
injury or death when inhaled.
• Keep key fobs away from children. Op-
eration of the Remote Start System, win-
dows, door locks or other controls could
cause serious injury or death.
Remote Start Abort Message
The following messages will display in the
instrument cluster display if the vehicle fails to
remote start or exits remote start prematurely:
• Remote Start Aborted — Door Open
• Remote Start Aborted — Hood Open
• Remote Start Aborted — Fuel Low
• Remote Start Aborted — Swing Gate Open
• Remote Start Aborted — System Fault
The instrument cluster display message stays
active until the ignition is turned to the ON/
RUN position.
To Enter Remote Start
Push and release the remote start button on
the key fob twice within five seconds. The
vehicle doors will lock, the parking lights will
flash and the horn will chirp twice (if pro-
grammed). Then, the engine will start and the
vehicle will remain in the remote start mode
for a 15-minute cycle.NOTE:
• The park lamps will turn on and remain on
during remote start mode.
• For security, power window operation is
disabled when the vehicle is in the remote
start mode.
• The engine can be started two consecutive
times (two 15-minute cycles) with the key
fob. However, the ignition switch must be
cycled to the ON/RUN position before you
can repeat the start sequence for a third
cycle.
Remote start will also cancel if any of the
following occur:
• The engine stalls or RPM exceeds 2500.
• Any engine warning lamps come on.
• The hood is opened.
• The hazard switch is pushed.
• The transmission is moved out of PARK.
• The brake pedal is pushed.
15
Page 21 of 276
DOORS
CAUTION!
Careless handling and storage of the re-
movable door panels may damage the
seals, causing water to leak into the vehi-
cle’s interior.
Upper Half Door Window Removal — If
Equipped
Grasp the half door window and pull upward.
Upper Half Door Window Installation — If
Equipped
1.Grasp the half door window and line up the
pins with the pockets in the lower door.
2. Push down to ensure the half door window
is fully seated.
Front Door Removal
WARNING!
Do not drive your vehicle on public roads
with the doors removed as you will lose the
WARNING!
protection they can provide. This proce-
dure is furnished for use during off-road
operation only.
NOTE:
Hinge pin can break if overtightened during
door reinstall (Max Torque: 10 N·m / 7.5 ft· lb).
1. Roll down the glass window to prevent any
damage.
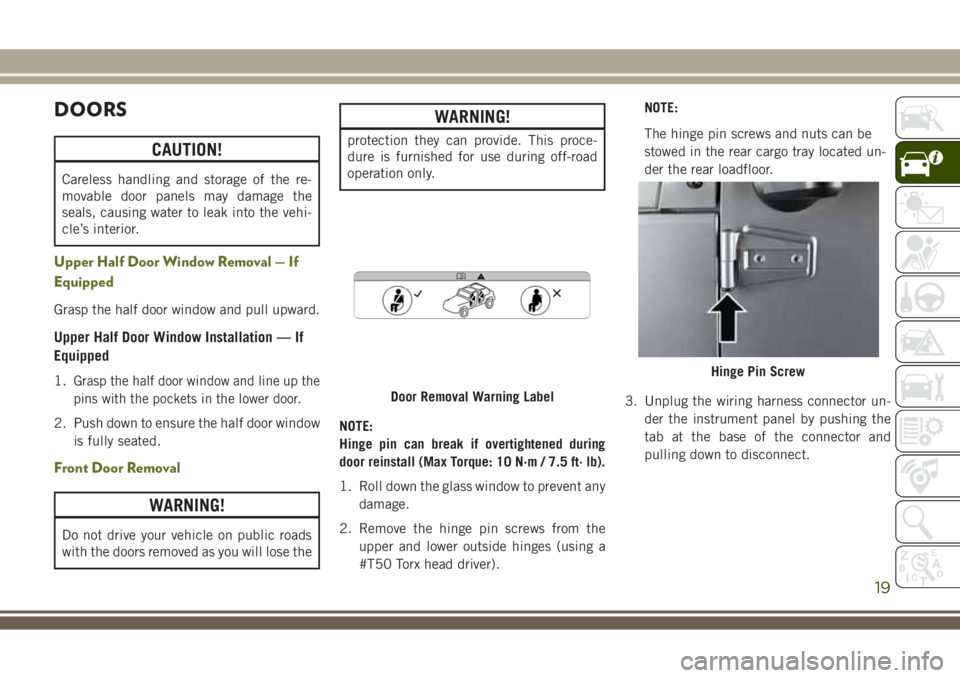
2. Remove the hinge pin screws from the
upper and lower outside hinges (using a
#T50 Torx head driver).NOTE:
The hinge pin screws and nuts can be
stowed in the rear cargo tray located un-
der the rear loadfloor.
3. Unplug the wiring harness connector un-
der the instrument panel by pushing the
tab at the base of the connector and
pulling down to disconnect.
Door Removal Warning Label
Hinge Pin Screw
19
Page 22 of 276
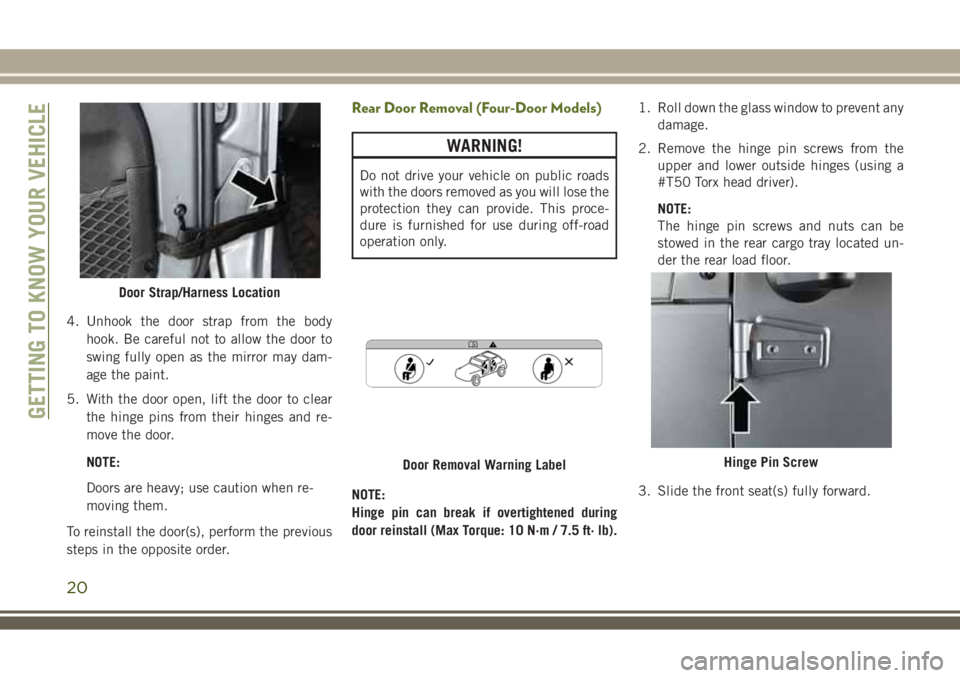
4. Unhook the door strap from the body
hook. Be careful not to allow the door to
swing fully open as the mirror may dam-
age the paint.
5. With the door open, lift the door to clear
the hinge pins from their hinges and re-
move the door.
NOTE:
Doors are heavy; use caution when re-
moving them.
To reinstall the door(s), perform the previous
steps in the opposite order.
Rear Door Removal (Four-Door Models)
WARNING!
Do not drive your vehicle on public roads
with the doors removed as you will lose the
protection they can provide. This proce-
dure is furnished for use during off-road
operation only.
NOTE:
Hinge pin can break if overtightened during
door reinstall (Max Torque: 10 N·m / 7.5 ft· lb).1. Roll down the glass window to prevent any
damage.
2. Remove the hinge pin screws from the
upper and lower outside hinges (using a
#T50 Torx head driver).
NOTE:
The hinge pin screws and nuts can be
stowed in the rear cargo tray located un-
der the rear load floor.
3. Slide the front seat(s) fully forward.
Door Strap/Harness Location
Door Removal Warning LabelHinge Pin Screw
GETTING TO KNOW YOUR VEHICLE
20
Page 30 of 276
STEERING WHEEL
Tilt Steering Column
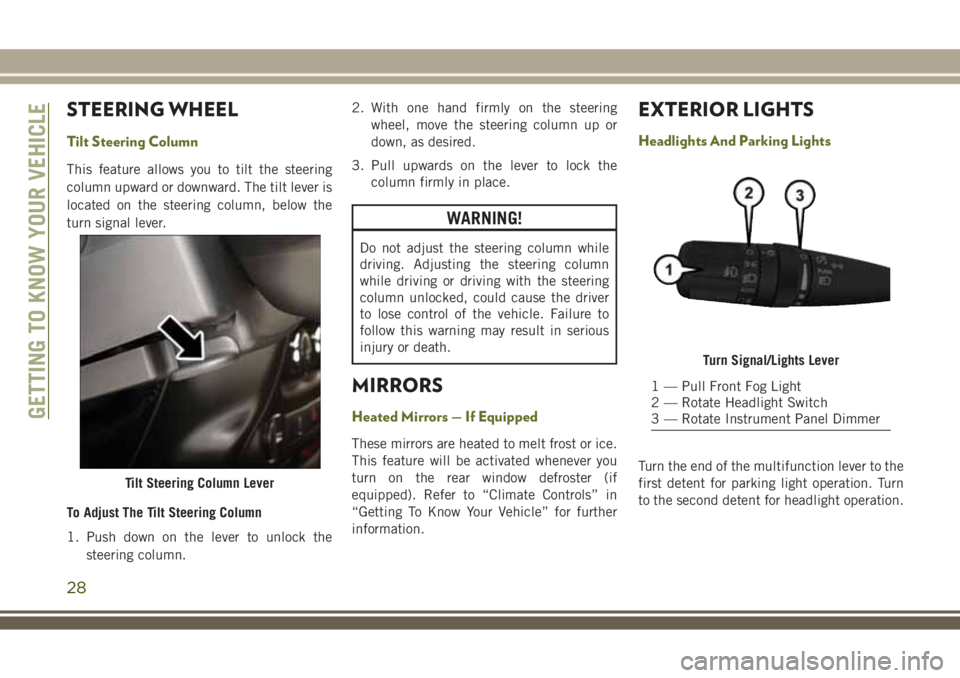
This feature allows you to tilt the steering
column upward or downward. The tilt lever is
located on the steering column, below the
turn signal lever.
To Adjust The Tilt Steering Column
1. Push down on the lever to unlock the
steering column.2. With one hand firmly on the steering
wheel, move the steering column up or
down, as desired.
3. Pull upwards on the lever to lock the
column firmly in place.
WARNING!
Do not adjust the steering column while
driving. Adjusting the steering column
while driving or driving with the steering
column unlocked, could cause the driver
to lose control of the vehicle. Failure to
follow this warning may result in serious
injury or death.
MIRRORS
Heated Mirrors — If Equipped
These mirrors are heated to melt frost or ice.
This feature will be activated whenever you
turn on the rear window defroster (if
equipped). Refer to “Climate Controls” in
“Getting To Know Your Vehicle” for further
information.
EXTERIOR LIGHTS
Headlights And Parking Lights
Turn the end of the multifunction lever to the
first detent for parking light operation. Turn
to the second detent for headlight operation.
Tilt Steering Column Lever
Turn Signal/Lights Lever
1 — Pull Front Fog Light
2 — Rotate Headlight Switch
3 — Rotate Instrument Panel Dimmer
GETTING TO KNOW YOUR VEHICLE
28
Page 33 of 276
lever. For information on using the rear win-
dow wiper/washer, refer to “Rear Window
Wiper/Washer” in this section for more infor-
mation.
Windshield Wiper Operation
Rotate the end of the lever upward to the
second detent past the intermittent settings
for low-speed wiper operation. Rotate the end
of the lever upward to the third detent past
the intermittent settings for high-speed wiper
operation.
CAUTION!
In cold weather, always turn off the wiper
switch and allow the wipers to return to the
park position before turning off the engine.
If the wiper switch is left on and the wipers
freeze to the windshield, damage to the
wiper motor may occur when the vehicle is
restarted.
Intermittent Wiper System
Use the intermittent wiper when weather con-
ditions make a single wiping cycle, with a
variable pause between cycles, desirable. Ro-
tate the end of the lever to the first detent
position for one of five intermittent settings.
The delay cycle can be set anywhere between
1 to 18 seconds.
NOTE:
The wiper delay times depend on vehicle
speed. If the vehicle is moving less than
10 mph (16 km/h), delay times will be
doubled.
Windshield Washers
To use the washer, pull the lever toward you
and hold while spray is desired. If the lever is
pulled while in the delay range, the wiper will
start and continue to operate for two or three
wipe cycles after the lever is released. Then,
the intermittent interval previously selected
will resume.
If the lever is pulled while in the off position,
the wipers will operate for two or three wipe
cycles. Then, the wipers will turn off.
WARNING!
Sudden loss of visibility through the wind-
shield could lead to a collision. You might
not see other vehicles or other obstacles.
To avoid sudden icing of the windshield
during freezing weather, warm the wind-
shield with the defroster before and during
windshield washer use.
Mist Feature
Push down on the wiper lever to activate a
single wipe to clear off road mist or spray
from a passing vehicle. As long as the lever is
held down, the wipers will continue to oper-
ate.
NOTE:
The mist feature does not activate the washer
pump; therefore, no washer fluid will be
sprayed on the windshield. The wash func-
tion must be used in order to spray the
windshield with washer fluid.
31