reset JEEP WRANGLER 2021 Owner handbook (in English)
[x] Cancel search | Manufacturer: JEEP, Model Year: 2021, Model line: WRANGLER, Model: JEEP WRANGLER 2021Pages: 276, PDF Size: 4.47 MB
Page 219 of 276
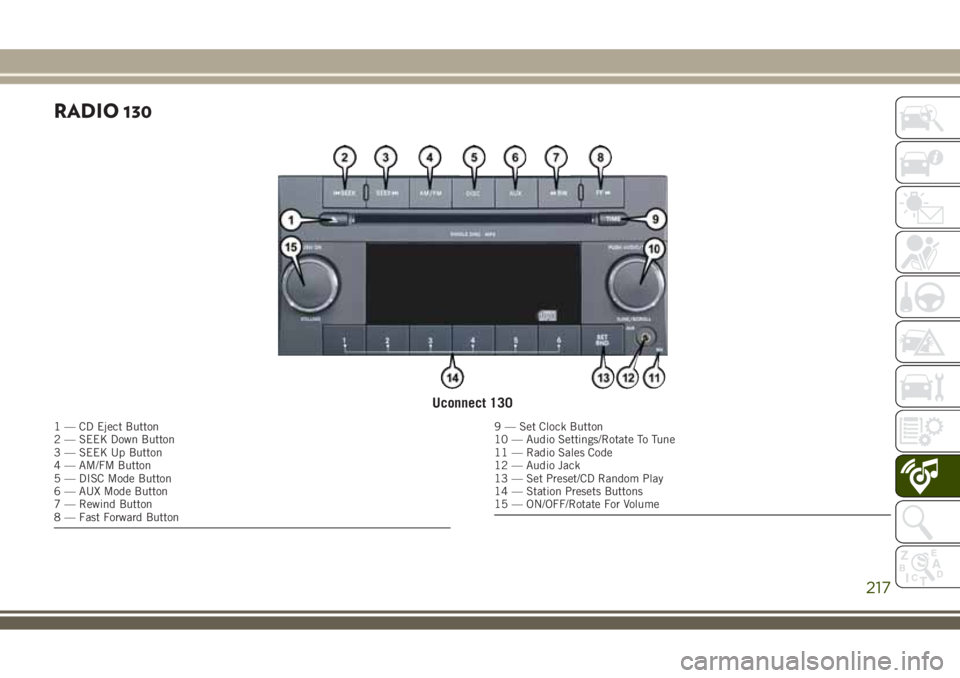
RADIO 130
Uconnect 130
1 — CD Eject Button
2 — SEEK Down Button
3 — SEEK Up Button
4 — AM/FM Button
5 — DISC Mode Button
6 — AUX Mode Button
7 — Rewind Button
8 — Fast Forward Button9 — Set Clock Button
10 — Audio Settings/Rotate To Tune
11 — Radio Sales Code
12 — Audio Jack
13 — Set Preset/CD Random Play
14 — Station Presets Buttons
15 — ON/OFF/Rotate For Volume
217
Page 220 of 276
NOTE:
• Your radio has many features that add to
the comfort and convenience for you and
your passengers.
• Some of these radio features should not be
used when driving because they take your
eyes from the road or your attention from
driving.
Clock Setting
1. Push and hold the TIME button until the
hours blink.
2. Turn the TUNE/SCROLL control knob to
set the hours.
3. Push the TUNE/SCROLL control knob un-
til the minutes begin to blink.
4. Turn the TUNE/SCROLL control knob to
set the minutes.
5. Push the TUNE/SCROLL control knob to
save the changes.
6. Push any button/knob or wait five seconds
to exit.
Equalizer, Balance And Fade
1. Push the TUNE/SCROLL control knob and
“BASS” will display.
2. Rotate the TUNE/SCROLL control knob to
select the desired setting.
3. Continue pushing the TUNE/SCROLL
control knob to display and set “MID
RANGE,” “TREBLE,” “BALANCE” and
“FADE.”
Radio Operation
Seek Up/Down Buttons
• Push the seek up or down button to seek
through radio stations in AM or FM bands.
• Hold either button to bypass stations with-
out stopping.
Store Radio Presets Manually
• Tune to the desired station.
• Push the SET/RND or SET (depending on
the radio) button once and SET 1 will show
in the display. Then select a preset button
(1–6).• A second station may be added to each
push button. Push the SET/RND or SET
(depending on the radio) button twice and
SET 2 will show in the display. Then select
a preset button (1–6).
CD/DISC Operation
Seek Up/Down Buttons
• Push to seek through CD tracks.
• Hold either button to bypass tracks without
stopping.
SET/RND Or RND (Depending On Radio) Button
(Random Play)
• Push this button while the CD is playing to
activate Random Play.
• This feature plays the selections on the CD
in random order to provide an interesting
change of pace.MULTIMEDIA
218
Page 224 of 276
Equalizer, Balance And Fade
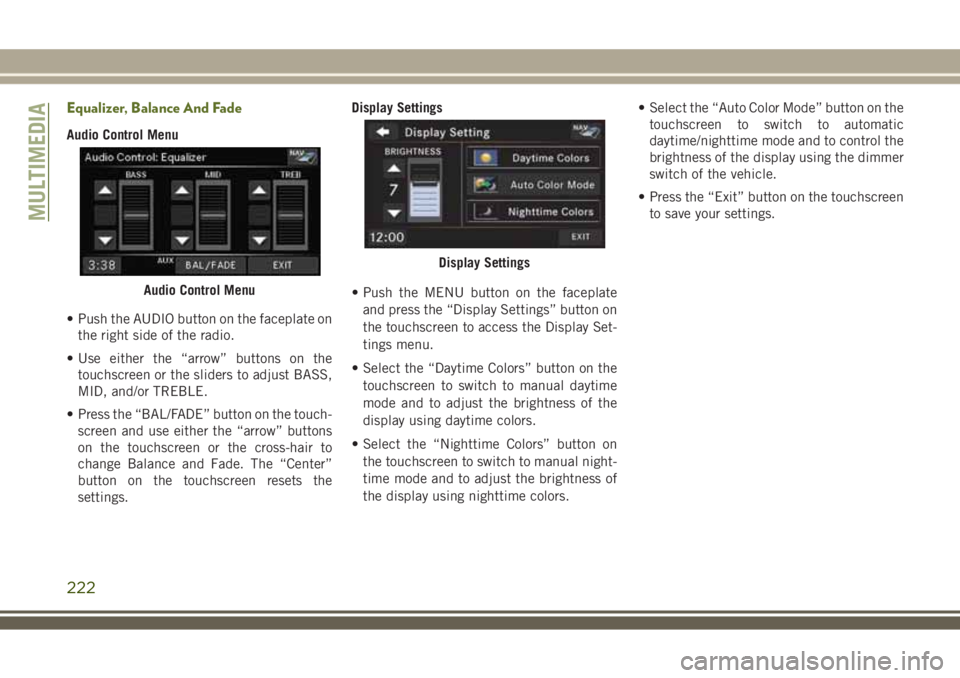
Audio Control Menu
• Push the AUDIO button on the faceplate on
the right side of the radio.
• Use either the “arrow” buttons on the
touchscreen or the sliders to adjust BASS,
MID, and/or TREBLE.
• Press the “BAL/FADE” button on the touch-
screen and use either the “arrow” buttons
on the touchscreen or the cross-hair to
change Balance and Fade. The “Center”
button on the touchscreen resets the
settings.Display Settings
• Push the MENU button on the faceplate
and press the “Display Settings” button on
the touchscreen to access the Display Set-
tings menu.
• Select the “Daytime Colors” button on the
touchscreen to switch to manual daytime
mode and to adjust the brightness of the
display using daytime colors.
• Select the “Nighttime Colors” button on
the touchscreen to switch to manual night-
time mode and to adjust the brightness of
the display using nighttime colors.• Select the “Auto Color Mode” button on the
touchscreen to switch to automatic
daytime/nighttime mode and to control the
brightness of the display using the dimmer
switch of the vehicle.
• Press the “Exit” button on the touchscreen
to save your settings.
Audio Control Menu
Display Settings
MULTIMEDIA
222
Page 225 of 276
Radio Operation
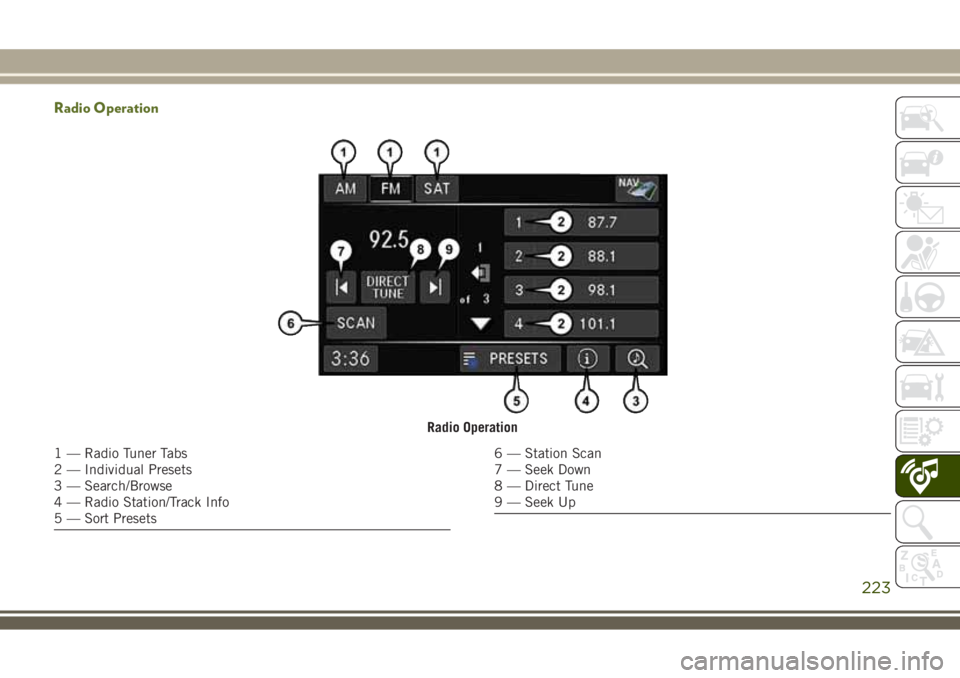
Radio Operation
1 — Radio Tuner Tabs
2 — Individual Presets
3 — Search/Browse
4 — Radio Station/Track Info
5 — Sort Presets6 — Station Scan
7 — Seek Down
8 — Direct Tune
9 — Seek Up
223
Page 226 of 276
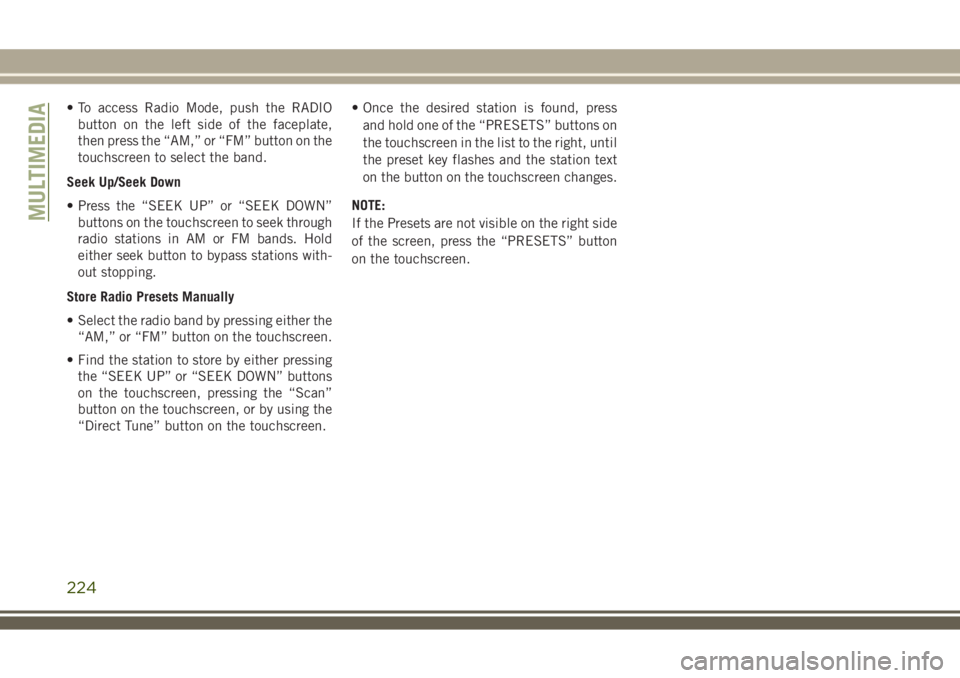
• To access Radio Mode, push the RADIO
button on the left side of the faceplate,
then press the “AM,” or “FM” button on the
touchscreen to select the band.
Seek Up/Seek Down
• Press the “SEEK UP” or “SEEK DOWN”
buttons on the touchscreen to seek through
radio stations in AM or FM bands. Hold
either seek button to bypass stations with-
out stopping.
Store Radio Presets Manually
• Select the radio band by pressing either the
“AM,” or “FM” button on the touchscreen.
• Find the station to store by either pressing
the “SEEK UP” or “SEEK DOWN” buttons
on the touchscreen, pressing the “Scan”
button on the touchscreen, or by using the
“Direct Tune” button on the touchscreen.• Once the desired station is found, press
and hold one of the “PRESETS” buttons on
the touchscreen in the list to the right, until
the preset key flashes and the station text
on the button on the touchscreen changes.
NOTE:
If the Presets are not visible on the right side
of the screen, press the “PRESETS” button
on the touchscreen.
MULTIMEDIA
224
Page 234 of 276
TIPS CONTROLS AND
GENERAL INFORMATION
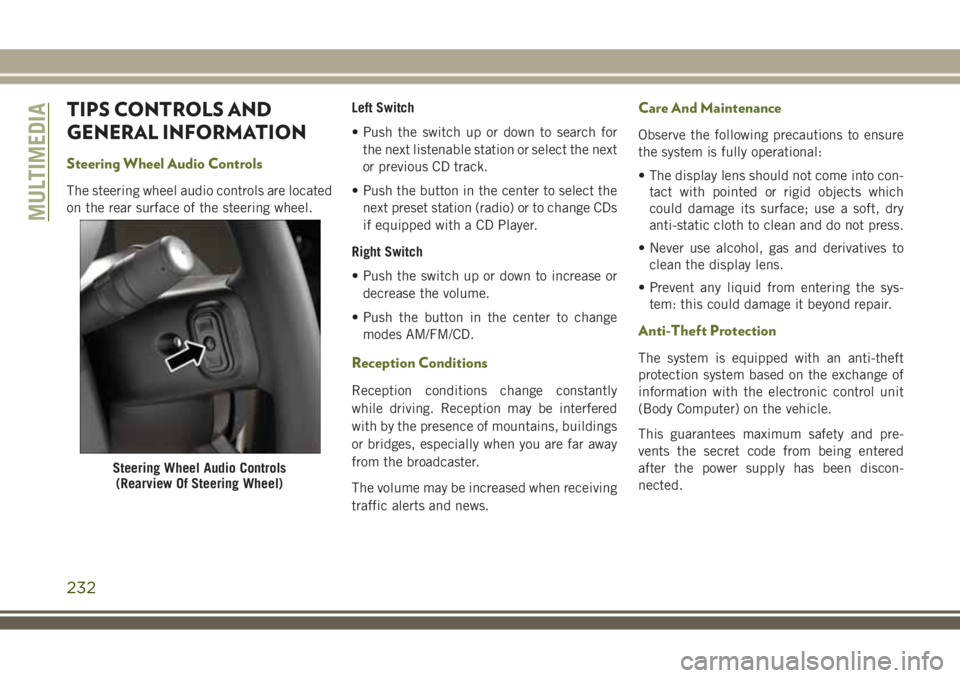
Steering Wheel Audio Controls
The steering wheel audio controls are located
on the rear surface of the steering wheel.Left Switch
• Push the switch up or down to search for
the next listenable station or select the next
or previous CD track.
• Push the button in the center to select the
next preset station (radio) or to change CDs
if equipped with a CD Player.
Right Switch
• Push the switch up or down to increase or
decrease the volume.
• Push the button in the center to change
modes AM/FM/CD.
Reception Conditions
Reception conditions change constantly
while driving. Reception may be interfered
with by the presence of mountains, buildings
or bridges, especially when you are far away
from the broadcaster.
The volume may be increased when receiving
traffic alerts and news.
Care And Maintenance
Observe the following precautions to ensure
the system is fully operational:
• The display lens should not come into con-
tact with pointed or rigid objects which
could damage its surface; use a soft, dry
anti-static cloth to clean and do not press.
• Never use alcohol, gas and derivatives to
clean the display lens.
• Prevent any liquid from entering the sys-
tem: this could damage it beyond repair.
Anti-Theft Protection
The system is equipped with an anti-theft
protection system based on the exchange of
information with the electronic control unit
(Body Computer) on the vehicle.
This guarantees maximum safety and pre-
vents the secret code from being entered
after the power supply has been discon-
nected.
Steering Wheel Audio Controls
(Rearview Of Steering Wheel)
MULTIMEDIA
232
Page 264 of 276
AirBag .............58, 92, 113
Automatic Headlights..........29
Back-Up.................149
Brake Assist Warning..........75
Bulb Replacement.......146, 147
Center Mounted Stop.........149
Cruise...................64
Daytime Running............29
Dimmer Switch, Headlight.......29
Exterior..................114
Fog .................29, 148
Hazard Warning Flasher........146
Headlight Leveling............30
Headlights.............28, 147
Headlight Switch.............28
High Beam................29
High Beam/Low Beam Select.....29
Hill Descent Control Indicator.....76
Instrument Cluster............28
Malfunction Indicator
(Check Engine)..............61
Passing..................29
Rear Fog.................148
Rear Servicing.............149
Rear Tail Lamps............149
Seat Belt Reminder...........60
Security Alarm..............61Service..............146, 147
Side Marker...............149
Tire Pressure Monitoring (TPMS) . . .62
Traction Control.............75
Turn Signal . . .29, 64, 114, 148, 149
Warning (Instrument Cluster
Description)................64
Locking Axle.................132
Lug Nuts...................208
Maintenance Free Battery.........186
Maintenance Schedule.......170, 175
Diesel..................175
Malfunction Indicator Light
(Check Engine)...............61
Manual Transmission........123, 184
Fluid Level Check...........184
Lubricant Selection..........211
Shift Speeds.............
.124
Media Center Radio.............220
Memory Feature (Memory Seat)......21
Memory Seat..................21
Memory Seats And Radio..........21
Mirrors.....................28
Heated...................28
Modifications/Alterations, Vehicle......4
Monitor, Tire Pressure System.......77Mopar.....................212
Mopar Accessories.............212
Navigation..................229
Navigation System (Uconnect GPS) . . .229
Navigation Voice Prompt Volume.....229
New Vehicle Break-In Period.......121
Occupant Restraints.............84
Octane Rating, Gasoline (Fuel)......209
Oil Change Indicator..........58, 176
Oil Change Indicator, Reset.....58, 176
Oil, Engine
Capacity.................210
Change Interval..............58
Dipstick.................182
Pressure Warning Light.........60
Recommendation...........210
Viscosity.................210
Oil Pressure Light...............60
Onboard Diagnostic System.........64
Operating Precautions............64
Operator Manual (Owner's Manual).....4
Outlet
Power...................52
Overheating, Engine............163
INDEX
262
Page 265 of 276
Owner's Manual (Operator Manual).....4
Parking Brake................121
Pets......................112
Phone (Uconnect)..............234
Power
Outlet (Auxiliary Electrical Outlet) . .52
Windows..................38
Power Steering Fluid............211
Pregnant Women And Seat Belts......90
Preparation For Jacking..........154
Pretensioners
Seat Belts.................90
Radial Ply Tires...............194
Radio
Presets...............218, 223
Radio 130
Operating Instructions Radio
Mode...................217
Radio Operation...............218
Rear Seat, Folding..............21
Rear Swing Gate...............51
Rear Wiper/Washer..............32
Recreational Towing.............142
Shifting Into Transfer Case
Neutral (N)...............143Shifting Out Of Transfer Case Neutral (N)
.......................144
Refrigerant..................187
Release, Hood.................51
Reminder, Seat Belt.............85
Remote Control
Starting System.............14
Remote Sound System (Radio)
Controls..................232
Remote Starting System...........14
Replacement Bulbs.............146
Replacement Keys..............17
Replacement Tires.............196
Resetting Oil Change Indicator.......58
Restraint, Head................25
Roll Over Warning................4
Rotation, Tires................201
Safety Checks Inside Vehicle.......113
Safety Checks Outside Vehicle......114
Safety, Exhaust Gas.............112
Safety Tips..................112
Schedule, Maintenance
.......170, 175
Seat Belt
Adjustable Upper Shoulder Belt
Anchorage.................89
Automatic Locking Retractor (ALR) . .90Energy Management Feature......90
Lap/Shoulder Belt Operation......88
Lap/Shoulder Belts............86
Lap/Shoulder Belt Untwisting.....89
Pregnant Women.............90
Seat Belt Pretensioner.........90
Seat Belt Reminder............85
Seat Belt Maintenance...........204
Seat Belt Reminder..............85
Seat Belts................85, 113
Adjustable Shoulder Belt........89
Adjustable Upper Shoulder
Anchorage.................89
Front Seat............85, 86, 88
Inspection................113
Operating Instructions.........88
Pregnant Women.............90
Pretensioners...............90
Rear Seat.................86
Reminder.................60
Untwisting Procedure..........89
Seats......................21
Adjustment................21
Easy Entry..............21, 23
Fold And Tumble Rear.........24
Heated...................21
Memory..................21
263