light JEEP WRANGLER 2021 Owner handbook (in English)
[x] Cancel search | Manufacturer: JEEP, Model Year: 2021, Model line: WRANGLER, Model: JEEP WRANGLER 2021Pages: 276, PDF Size: 4.47 MB
Page 181 of 276
* The actual interval for changing engine oil
and replacing the engine oil filter depends on
the vehicle usage conditions and is signalled
by the warning light or message in the instru-
ment panel. In all cases, never exceed 1 year/
15,000 miles (24,000 km).
** DOT 4 brake fluid is time based only;
mileage intervals do not apply.
WARNING!
• You can be badly injured working on or
around a motor vehicle. Do only service
work for which you have the knowledge
and the right equipment. If you have any
doubt about your ability to perform a
service job, take your vehicle to a com-
petent mechanic.
• Failure to properly inspect and maintain
your vehicle could result in a component
malfunction and effect vehicle handling
and performance. This could cause an
accident.
179
Page 185 of 276
by gently spraying water from a garden hose
vertically down the face of the A/C condenser
(if equipped) or the back of the radiator core.
Check the engine cooling system hoses for
brittle rubber, cracking, tears, cuts, and
tightness of the connection at the coolant
recovery bottle and radiator. Inspect the en-
tire system for leaks. DO NOT REMOVE THE
COOLANT PRESSURE CAP WHEN THE
COOLING SYSTEM IS HOT.
Adding Washer Fluid
The fluid reservoir for the windshield washers
and the rear window washer (if equipped) is
shared. The fluid reservoir is located in the
engine compartment. Be sure to check the
fluid level at regular intervals. Fill the reservoir
with windshield washer solvent only (not radia-
tor antifreeze). When refilling the washer fluid
reservoir, take some washer fluid and apply it to
a cloth or towel and wipe clean the wiper
blades; this will help blade performance.
To prevent freeze-up of your windshield
washer system in cold weather, select a solu-
tion or mixture that meets or exceeds the
temperature range of your climate. This rat-
ing information can be found on most washer
fluid containers.
WARNING!
Commercial windshield washer solvents
are flammable. They could ignite and burn
you. Care must be exercised when filling or
working around the washer solution.
Brake System
In order to assure brake system performance,
all brake system components should be in-
spected periodically. Refer to the “Mainte-
nance Plan” in this section for the proper
maintenance intervals.
WARNING!
Riding the brakes can lead to brake failure
and possibly a collision. Driving with your
foot resting or riding on the brake pedal
WARNING!
can result in abnormally high brake tem-
peratures, excessive lining wear, and pos-
sible brake damage. You would not have
your full braking capacity in an emergency.
Fluid Level Check — Brake Master Cylinder
The fluid level of the master cylinder should
be checked whenever the vehicle is serviced,
or immediately if the brake system warning
light is on. If necessary, add fluid to bring
level within the designated marks on the side
of the reservoir of the brake master cylinder.
Be sure to clean the top of the master cylin-
der area before removing cap. With disc
brakes, fluid level can be expected to fall as
the brake pads wear. Brake fluid level should
be checked when pads are replaced. If the
brake fluid is abnormally low, check the sys-
tem for leaks.
Refer to “Fluids And Lubricants” in “Techni-
cal Specifications” for further information.
183
Page 187 of 276
5. Place the gear selector momentarily into
each gear position (allowing time for the
transmission to fully engage in each posi-
tion), ending with the transmission in
PARK.
6. Remove the dipstick, wipe it clean and
reinsert it until seated.
7. Remove the dipstick again and note the
fluid level on both sides. The fluid level
reading is only valid if there is a solid
coating of oil on both sides of the dipstick.
Note that the holes in the dipstick will be
full of fluid if the actual level is at or above
the hole. The fluid level should be be-
tween the HOT (upper) reference holes on
the dipstick at normal operating tempera-
ture. If the fluid level is low, add fluid
through the dipstick tube to bring it to the
proper level.Do not overfill.Use ONLY the
specified fluid (refer to "Fluids And Lubri-
cants" under “Technical Specifications”
for fluid specifications). After adding any
quantity of oil through the dipstick tube,
wait a minimum of two minutes for the oil
to fully drain into the transmission before
rechecking the fluid level.NOTE:
• The holes in the dipstick will be full of
fluid if the actual level is at or above the
hole.
• If it is necessary to check the transmis-
sion below the operating temperature,
the fluid level should be between the
two COLD (lower) holes on the dipstick
with the fluid at approximately 80°F
(27°C). If the fluid level is correctly
established at 80° F (27°C), it should
be between the HOT (upper) reference
holes when the transmission reaches
180° F (82°C). Remember it is best to
check the level at the normal operating
temperature.
CAUTION!
If the fluid temperature is below 50°F
(10°C) it may not register on the dipstick.
Do not add fluid until the temperature is
elevated enough to produce an accurate
reading. Run the engine at idle, in PARK,
to warm the fluid.8. Reinstall the engine cover and snap it
down securely onto the four mounting
studs.
9. Check for leaks. Release the parking
brake.
NOTE:
To prevent dirt and water from entering the
transmission after checking or replenishing
fluid, make sure that the dipstick cap is
properly reseated. It is normal for the dipstick
cap to spring back slightly from its fully
seated position, as long as its seal remains
engaged in the dipstick tube.
Fluid Level Check — 2.8L Turbo Diesel
Engine
The fluid level is preset at the factory and
does not require adjustment under normal
operating conditions. Routine fluid level
checks are not required, therefore the trans-
mission filler tube is capped and no dipstick
is provided. An authorized dealer can check
your transmission fluid level using a special
service dipstick.
185
Page 198 of 276
worn to the tread wear indicators, the tire
should be replaced. Refer to “Replacement
Tires” in this section for further information.
Life Of Tire
The service life of a tire is dependent upon
varying factors including, but not limited to:
• Driving style.
•
Tire pressure - Improper cold tire inflation
pressures can cause uneven wear patterns to
develop across the tire tread. These abnormal
wear patterns will reduce tread life, resulting
in the need for earlier tire replacement.
• Distance driven.
• Performance tires, tires with a speed rating
of V or higher, and Summer tires typically
have a reduced tread life. Rotation of these
tires per the vehicle scheduled mainte-
nance is highly recommended.
WARNING!
Tires and the spare tire should be replaced
after six years, regardless of the remaining
tread. Failure to follow this warning can
result in sudden tire failure. You could lose
WARNING!
control and have a collision resulting in
serious injury or death.
Keep dismounted tires in a cool, dry place
with as little exposure to light as possible.
Protect tires from contact with oil, grease,
and gasoline.
Replacement Tires
The tires on your new vehicle provide a bal-
ance of many characteristics. They should be
inspected regularly for wear and correct cold
tire inflation pressures. The manufacturer
strongly recommends that you use tires
equivalent to the originals in size, quality and
performance when replacement is needed.
Refer to the paragraph on “Tread Wear Indi-
cators” in this section. Refer to the Tire and
Loading Information placard or the Vehicle
Certification Label for the size designation of
your tire. The Load Index and Speed Symbol
for your tire will be found on the original
equipment tire sidewall.It is recommended to replace the two front
tires or two rear tires as a pair. Replacing just
one tire can seriously affect your vehicle’s
handling. If you ever replace a wheel, make
sure that the wheel’s specifications match
those of the original wheels.
It is recommended you contact an authorized
tire dealer or original equipment dealer with
any questions you may have on tire specifi-
cations or capability. Failure to use equiva-
lent replacement tires may adversely affect
the safety, handling, and ride of your vehicle.
WARNING!
• Do not use a tire, wheel size, load rating,
or speed rating other than that specified
for your vehicle. Some combinations of
unapproved tires and wheels may
change suspension dimensions and per-
formance characteristics, resulting in
changes to steering, handling, and brak-
ing of your vehicle. This can cause un-
predictable handling and stress to steer-
ing and suspension components. You
could lose control and have a collisionSERVICING AND MAINTENANCE
196
Page 204 of 276
or more, run the air conditioning system at
idle for about five minutes in the fresh air
and high blower setting. This will ensure
adequate system lubrication to minimize
the possibility of compressor damage when
the system is started again.
BODYWORK
Body And Underbody Maintenance
Cleaning Headlights
Your vehicle is equipped with plastic head-
lights and fog lights that are lighter and less
susceptible to stone breakage than glass
headlights.
Plastic is not as scratch resistant as glass and
therefore different lens cleaning procedures
must be followed.
To minimize the possibility of scratching the
lenses and reducing light output, avoid wip-
ing with a dry cloth. To remove road dirt, wash
with a mild soap solution followed by rinsing.
Do not use abrasive cleaning components,
solvents, steel wool or other aggressive mate-
rial to clean the lenses.
Preserving The Bodywork
Washing
• Wash your vehicle regularly. Always wash
your vehicle in the shade using a mild car
wash soap, and rinse the panels completely
with clear water.
• Use a high quality cleaner wax remove road
film, stains and to protect your paint finish.
Take care never to scratch the paint.
• Avoid using abrasive compounds and power
buffing that may diminish the gloss or thin
out the paint finish.
CAUTION!
• Do not use abrasive or strong cleaning
materials such as steel wool or scouring
powder that will scratch metal and
painted surfaces.
• Use of power washers exceeding
1,200 psi (8,274 kPa) can result in
damage or removal of paint and decals.
Special Care
• If you drive on salted or dusty roads or if you
drive near the ocean, hose off the undercar-
riage at least once a month.
• It is important that the drain holes in the
lower edges of the doors, rocker panels, and
trunk be kept clear and open.
• If you detect any stone chips or scratches in
the paint, touch them up immediately. The
cost of such repairs is considered the re-
sponsibility of the owner.
• If your vehicle is damaged due to a collision
or similar cause that destroys the paint and
protective coating, have your vehicle re-
paired as soon as possible. The cost of such
repairs is considered the responsibility of
the owner.
• If you carry special cargo such as chemi-
cals, fertilizers, de-icer salt, etc., be sure
that such materials are well packaged and
sealed.
• If a lot of driving is done on gravel roads,
consider mud or stone shields behind each
wheel.
SERVICING AND MAINTENANCE
202
Page 206 of 276
CAUTION!
immediately and thoroughly as the acid
they contain is particularly aggressive.
• Avoid (if at all possible) parking the
vehicle under trees; remove vegetable
resins immediately as, when dried, it
may only be possible to remove them
with abrasive products and/or polishes,
which is highly inadvisable as they could
alter the typical opaqueness of the
paint.
• Do not use pure windshield washer fluid
for cleaning the front windshield and
rear window; dilute it min. 50% with
water. Only use pure windshield washer
fluid when strictly necessary due to out-
side temperature conditions.
Care Of Fabric Top Windows
Your vehicle's fabric top has pliable plastic
windows which can be scratched unless spe-
cial care is taken by following these directions:
1. Never use a dry cloth to remove dust.
Instead,use a microfiber towel or soft cot-
ton cloth moistened with cold or warm,clean water, and wipe across the window,
not up and down.
2. When washing,never use hot wateror any-
thing stronger than a mild soap. Never use
solvents such as alcohol or harsh cleaning
agents.
3. Always rinse thoroughly with cold water,
then wipe with a soft and slightly moist,
clean cloth.
4. When removing frost, snow or ice,never
use a scraper or de-icing chemicals.Use
warm water only if you must clean the
window quickly.
5. Debris (sand, mud/dirt, dust, or salt) from
off-road driving will have a major impact
on zipper operation. Even normal on-road
driving and vehicle washing will eventu-
ally impact window zipper operation. To
maintain ease of use of the window zip-
pers, each window zipper should be
cleaned and lubricated regularly. Before
applying, make sure the zipper teeth are
clear of sand, mud, and other materials.
Clean both sides of the zipper, not justone side. Rinse both zipper halves with
fresh water and allow to dry. Several ap-
plications may be required before the zip-
per comes free.
6. Never paste stickers, gummed labels or
any tape to the windows. Adhesives are
hard to remove and may damage the
windows.
INTERIORS
Seats And Fabric Parts
WARNING!
Do not use volatile solvents for cleaning
purposes. Many are potentially flam-
mable, and if used in closed areas they
may cause respiratory harm.
Seat Belt Maintenance
Do not bleach, dye or clean the belts with
chemical solvents or abrasive cleaners. This
will weaken the fabric. Sun damage can also
weaken the fabric.
SERVICING AND MAINTENANCE
204
Page 207 of 276
If the belts need cleaning, use a mild soap
solution or lukewarm water. Do not remove
the belts from the vehicle to wash them. Dry
with a soft cloth.
Replace the belts if they appear frayed or
worn or if the buckles do not work properly.
WARNING!
A frayed or torn belt could rip apart in a
collision and leave you with no protection.
Inspect the belt system periodically,
checking for cuts, frays, or loose parts.
Damaged parts must be replaced immedi-
ately. Do not disassemble or modify the
system. Seat belt assemblies must be re-
placed after a collision if they have been
damaged (i.e., bent retractor, torn web-
bing, etc.).
Plastic And Coated Parts
Use Mopar Total Clean to clean vinyl
upholstery.
CAUTION!
•Direct contact of air fresheners, insect
repellents, suntan lotions, or hand sanitiz-
ers to the plastic, painted, or decorated
surfaces of the interior may cause perma-
nent damage. Wipe away immediately.
• Damage caused by these type of prod-
ucts may not be covered by your New
Vehicle Limited Warranty.
Cleaning Plastic Instrument Cluster Lenses
The lenses in front of the instruments in this
vehicle are molded in clear plastic. When
cleaning the lenses, care must be taken to
avoid scratching the plastic.
1. Clean with a wet soft cloth. A mild soap
solution may be used, but do not use high
alcohol content or abrasive cleaners. If
soap is used, wipe clean with a clean
damp cloth.
2. Dry with a soft cloth.
Leather Parts
Your leather upholstery can be best preserved
by regular cleaning with a damp soft cloth.
Small particles of dirt can act as an abrasive
and damage the leather upholstery and should
be removed promptly with a damp cloth. Care
should be taken to avoid soaking your leather
upholstery with any liquid. Please do not use
polishes, oils, cleaning fluids, solvents, deter-
gents, or ammonia-based cleaners to clean
your leather upholstery. Application of a
leather conditioner is not required to maintain
the original condition.
NOTE:
If equipped with light colored leather, it tends
to show any foreign material, dirt, and fabric
dye transfer more so than darker colors. The
leather is designed for easy cleaning.
CAUTION!
Do not use Alcohol and Alcohol-based
and/or Ketone based cleaning products to
clean leather seats, as damage to the seat
may result.
205
Page 211 of 276
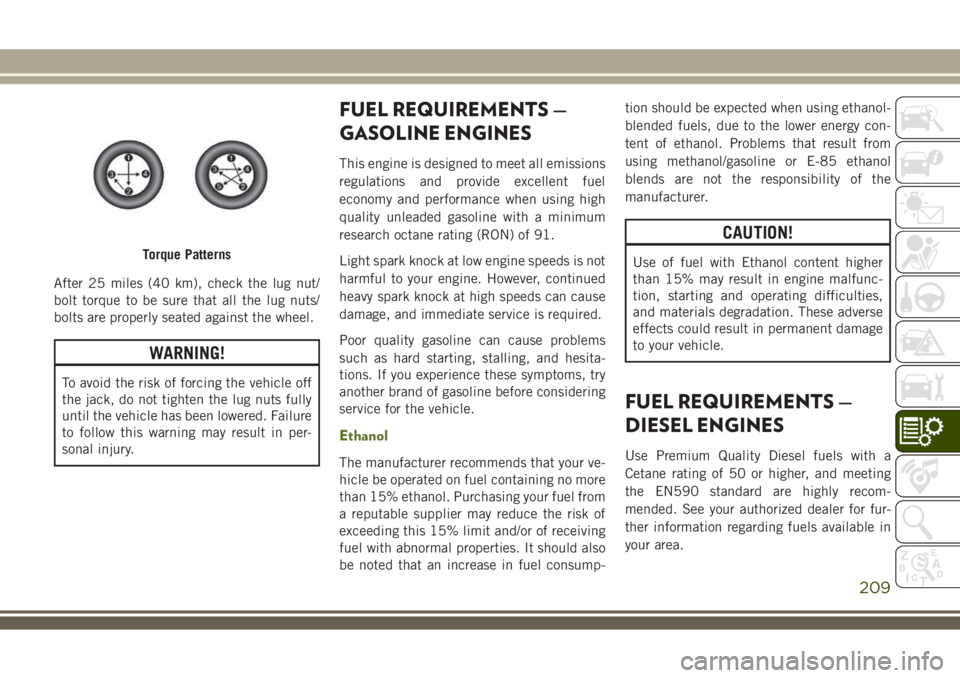
After 25 miles (40 km), check the lug nut/
bolt torque to be sure that all the lug nuts/
bolts are properly seated against the wheel.
WARNING!
To avoid the risk of forcing the vehicle off
the jack, do not tighten the lug nuts fully
until the vehicle has been lowered. Failure
to follow this warning may result in per-
sonal injury.
FUEL REQUIREMENTS —
GASOLINE ENGINES
This engine is designed to meet all emissions
regulations and provide excellent fuel
economy and performance when using high
quality unleaded gasoline with a minimum
research octane rating (RON) of 91.
Light spark knock at low engine speeds is not
harmful to your engine. However, continued
heavy spark knock at high speeds can cause
damage, and immediate service is required.
Poor quality gasoline can cause problems
such as hard starting, stalling, and hesita-
tions. If you experience these symptoms, try
another brand of gasoline before considering
service for the vehicle.
Ethanol
The manufacturer recommends that your ve-
hicle be operated on fuel containing no more
than 15% ethanol. Purchasing your fuel from
a reputable supplier may reduce the risk of
exceeding this 15% limit and/or of receiving
fuel with abnormal properties. It should also
be noted that an increase in fuel consump-tion should be expected when using ethanol-
blended fuels, due to the lower energy con-
tent of ethanol. Problems that result from
using methanol/gasoline or E-85 ethanol
blends are not the responsibility of the
manufacturer.
CAUTION!
Use of fuel with Ethanol content higher
than 15% may result in engine malfunc-
tion, starting and operating difficulties,
and materials degradation. These adverse
effects could result in permanent damage
to your vehicle.
FUEL REQUIREMENTS —
DIESEL ENGINES
Use Premium Quality Diesel fuels with a
Cetane rating of 50 or higher, and meeting
the EN590 standard are highly recom-
mended. See your authorized dealer for fur-
ther information regarding fuels available in
your area.
Torque Patterns
209
Page 214 of 276
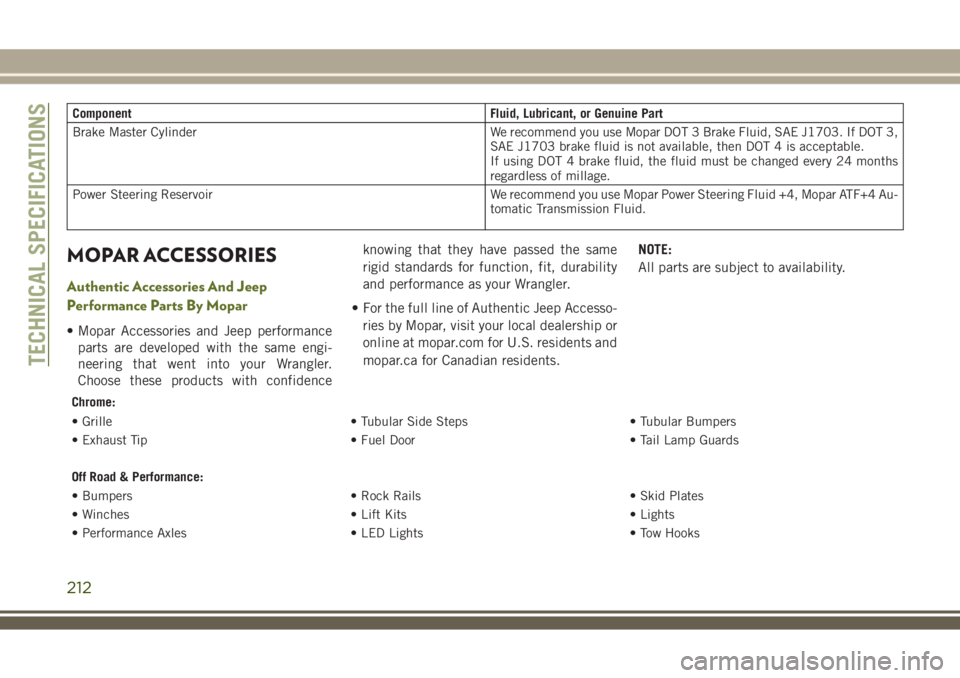
Component Fluid, Lubricant, or Genuine Part
Brake Master Cylinder We recommend you use Mopar DOT 3 Brake Fluid, SAE J1703. If DOT 3,
SAE J1703 brake fluid is not available, then DOT 4 is acceptable.
If using DOT 4 brake fluid, the fluid must be changed every 24 months
regardless of millage.
Power Steering Reservoir We recommend you use Mopar Power Steering Fluid +4, Mopar ATF+4 Au-
tomatic Transmission Fluid.
MOPAR ACCESSORIES
Authentic Accessories And Jeep
Performance Parts By Mopar
• Mopar Accessories and Jeep performance
parts are developed with the same engi-
neering that went into your Wrangler.
Choose these products with confidenceknowing that they have passed the same
rigid standards for function, fit, durability
and performance as your Wrangler.
• For the full line of Authentic Jeep Accesso-
ries by Mopar, visit your local dealership or
online at mopar.com for U.S. residents and
mopar.ca for Canadian residents.NOTE:
All parts are subject to availability.
Chrome:
• Grille • Tubular Side Steps • Tubular Bumpers
• Exhaust Tip • Fuel Door • Tail Lamp Guards
Off Road & Performance:
• Bumpers • Rock Rails • Skid Plates
• Winches • Lift Kits • Lights
• Performance Axles • LED Lights • Tow Hooks
TECHNICAL SPECIFICATIONS
212
Page 261 of 276
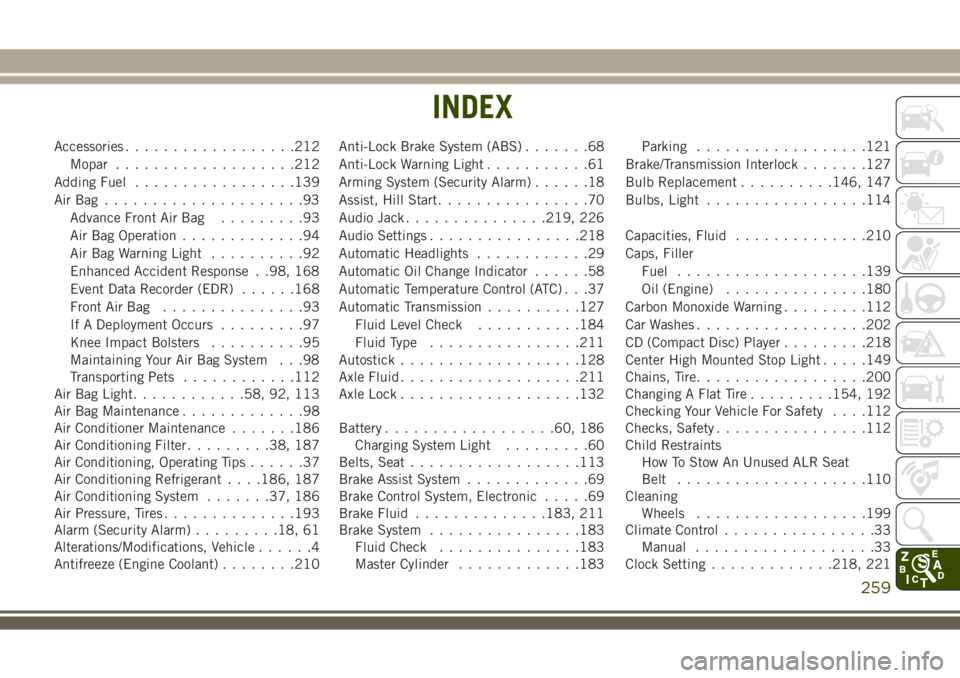
Accessories..................212
Mopar...................212
Adding Fuel.................139
AirBag .....................93
Advance Front Air Bag.........93
Air Bag Operation.............94
Air Bag Warning Light..........92
Enhanced Accident Response . .98, 168
Event Data Recorder (EDR)......168
Front Air Bag...............93
If A Deployment Occurs.........97
Knee Impact Bolsters..........95
Maintaining Your Air Bag System . . .98
Transporting Pets............112
Air Bag Light............58, 92, 113
Air Bag Maintenance.............98
Air Conditioner Maintenance.......186
Air Conditioning Filter.........38, 187
Air Conditioning, Operating Tips......37
Air Conditioning Refrigerant. . . .186, 187
Air Conditioning System.......37, 186
Air Pressure, Tires..............193
Alarm (Security Alarm).........18, 61
Alterations/Modifications, Vehicle......4
Antifreeze (Engine Coolant)........210Anti-Lock Brake System (ABS).......68
Anti-Lock Warning Light...........61
Arming System (Security Alarm)......18
Assist, Hill Start................70
Audio Jack...............219, 226
Audio Settings................218
Automatic Headlights............29
Automatic Oil Change Indicator......58
Automatic Temperature Control (ATC) . . .37
Automatic Transmission..........127
Fluid Level Check...........184
Fluid Type................211
Autostick...................128
Axle Fluid...................211
Axle Lock...................132
Battery..................60, 186
Charging System Light.........60
Belts, Seat
.................
.113
Brake Assist System.............69
Brake Control System, Electronic.....69
Brake Fluid..............183, 211
Brake System................183
Fluid Check...............183
Master Cylinder.............183Parking..................121
Brake/Transmission Interlock.......127
Bulb Replacement..........146, 147
Bulbs, Light.................114
Capacities, Fluid..............210
Caps, Filler
Fuel....................139
Oil (Engine)...............180
Carbon Monoxide Warning.........112
Car Washes..................202
CD (Compact Disc) Player.........218
Center High Mounted Stop Light.....149
Chains, Tire..................200
Changing A Flat Tire.........154, 192
Checking Your Vehicle For Safety. . . .112
Checks, Safety................112
Child Restraints
How To Stow An Unused ALR Seat
Belt....................110
Cleaning
Wheels..................199
Climate Control................33
Manual...................33
Clock Setting.............218, 221
INDEX
259