buttons JEEP WRANGLER 2021 Owner handbook (in English)
[x] Cancel search | Manufacturer: JEEP, Model Year: 2021, Model line: WRANGLER, Model: JEEP WRANGLER 2021Pages: 276, PDF Size: 4.47 MB
Page 39 of 276
Automatic Temperature Control (ATC) —
If Equipped
Automatic Operation
1. Push the AUTO button on the faceplate on
the Automatic Temperature Control (ATC)
Panel.
2. Next, adjust the temperature you would
like the system to maintain by adjusting
the driver and passenger temperature
control buttons. Once the desired tem-
perature is displayed, the system will
achieve and automatically maintain that
comfort level.
3. When the system is set up for your comfort
level, it is not necessary to change the
settings. You will experience the greatest
efficiency by simply allowing the system
to function automatically.
NOTE:
• It is not necessary to move the temperature
settings for cold or hot vehicles. The system
automatically adjusts the temperature,
mode, and blower speed to provide comfort
as quickly as possible.To provide you with maximum comfort in the
Automatic mode during cold start-ups, the
blower fan will remain on low until the engine
warms up. The blower will increase in speed
and transition into Auto mode.
Manual Operation Override
This system offers a full complement of
manual override features. The AUTO symbol
in the front ATC display will be turned off
when the system is being used in the manual
mode.
Operating Tips
Summer Operation
The engine cooling system must be protected
with a high-quality antifreeze coolant to pro-
vide proper corrosion protection and to pro-
tect against engine overheating. OAT coolant
(conforming to MS.90032) is recommended.
Winter Operation
To ensure the best possible heater and de-
froster performance, make sure the engine
cooling system is functioning properly and
the proper amount, type, and concentrationof coolant is used. Use of the Air Recircula-
tion mode during Winter months is not rec-
ommended, because it may cause window
fogging.
Vacation/Storage
Before you store your vehicle, or keep it out of
service (i.e., vacation) for two weeks or more,
run the air conditioning system at idle for
about five minutes, in fresh air with the
blower setting on high. This will ensure ad-
equate system lubrication to minimize the
possibility of compressor damage when the
system is started again.
Window Fogging
Vehicle windows tend to fog on the inside in
mild, rainy, and/or humid weather. To clear
the windows, select Defrost or Mix mode and
increase the front blower speed. Do not use
the Recirculation mode without A/C for long
periods, as fogging may occur.
37
Page 59 of 276
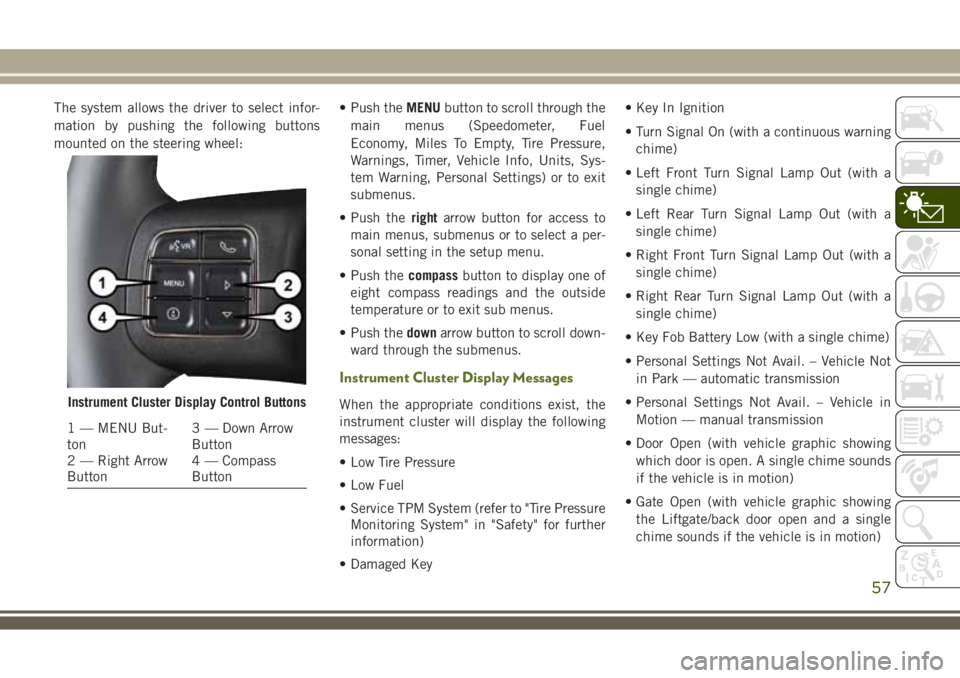
The system allows the driver to select infor-
mation by pushing the following buttons
mounted on the steering wheel:• Push theMENUbutton to scroll through the
main menus (Speedometer, Fuel
Economy, Miles To Empty, Tire Pressure,
Warnings, Timer, Vehicle Info, Units, Sys-
tem Warning, Personal Settings) or to exit
submenus.
• Push therightarrow button for access to
main menus, submenus or to select a per-
sonal setting in the setup menu.
• Push thecompassbutton to display one of
eight compass readings and the outside
temperature or to exit sub menus.
• Push thedownarrow button to scroll down-
ward through the submenus.
Instrument Cluster Display Messages
When the appropriate conditions exist, the
instrument cluster will display the following
messages:
• Low Tire Pressure
• Low Fuel
• Service TPM System (refer to "Tire Pressure
Monitoring System" in "Safety" for further
information)
• Damaged Key• Key In Ignition
• Turn Signal On (with a continuous warning
chime)
• Left Front Turn Signal Lamp Out (with a
single chime)
• Left Rear Turn Signal Lamp Out (with a
single chime)
• Right Front Turn Signal Lamp Out (with a
single chime)
• Right Rear Turn Signal Lamp Out (with a
single chime)
• Key Fob Battery Low (with a single chime)
• Personal Settings Not Avail. – Vehicle Not
in Park — automatic transmission
• Personal Settings Not Avail. – Vehicle in
Motion — manual transmission
• Door Open (with vehicle graphic showing
which door is open. A single chime sounds
if the vehicle is in motion)
• Gate Open (with vehicle graphic showing
the Liftgate/back door open and a single
chime sounds if the vehicle is in motion)Instrument Cluster Display Control Buttons
1 — MENU But-
ton3 — Down Arrow
Button
2 — Right Arrow
Button4 — Compass
Button
57
Page 138 of 276
To Manually Turn Off The Start Stop System
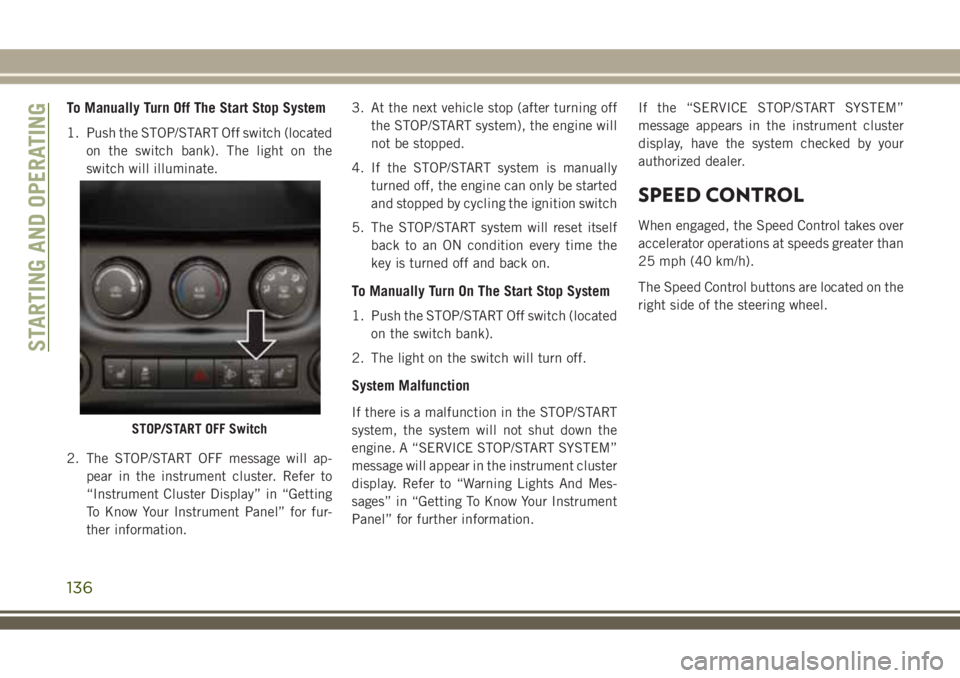
1. Push the STOP/START Off switch (located
on the switch bank). The light on the
switch will illuminate.
2. The STOP/START OFF message will ap-
pear in the instrument cluster. Refer to
“Instrument Cluster Display” in “Getting
To Know Your Instrument Panel” for fur-
ther information.3. At the next vehicle stop (after turning off
the STOP/START system), the engine will
not be stopped.
4. If the STOP/START system is manually
turned off, the engine can only be started
and stopped by cycling the ignition switch
5. The STOP/START system will reset itself
back to an ON condition every time the
key is turned off and back on.
To Manually Turn On The Start Stop System
1. Push the STOP/START Off switch (located
on the switch bank).
2. The light on the switch will turn off.
System Malfunction
If there is a malfunction in the STOP/START
system, the system will not shut down the
engine. A “SERVICE STOP/START SYSTEM”
message will appear in the instrument cluster
display. Refer to “Warning Lights And Mes-
sages” in “Getting To Know Your Instrument
Panel” for further information.If the “SERVICE STOP/START SYSTEM”
message appears in the instrument cluster
display, have the system checked by your
authorized dealer.
SPEED CONTROL
When engaged, the Speed Control takes over
accelerator operations at speeds greater than
25 mph (40 km/h).
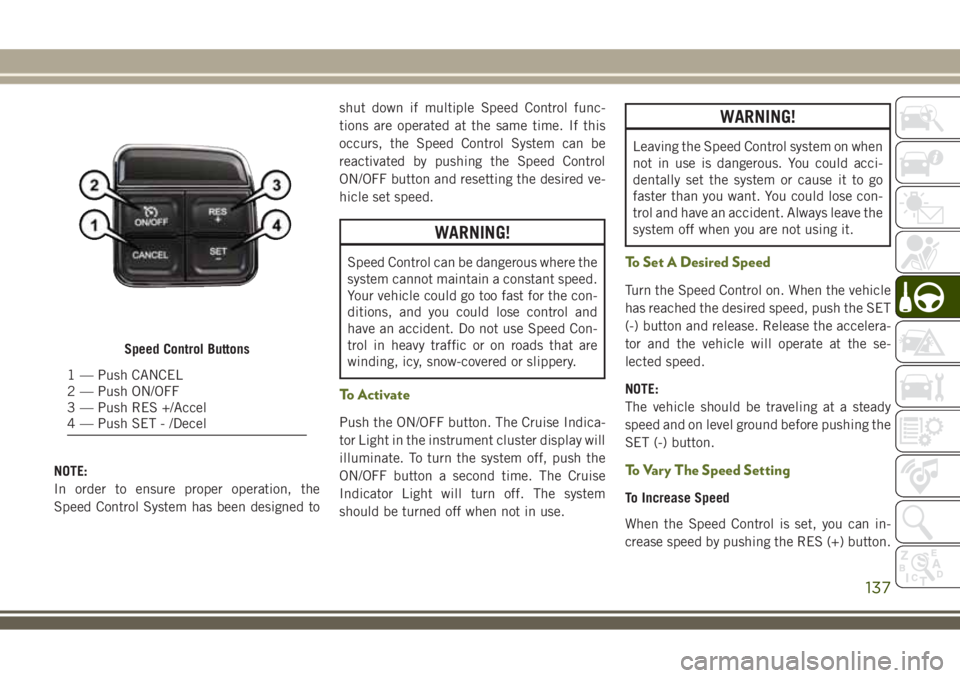
The Speed Control buttons are located on the
right side of the steering wheel.
STOP/START OFF Switch
STARTING AND OPERATING
136
Page 139 of 276
NOTE:
In order to ensure proper operation, the
Speed Control System has been designed toshut down if multiple Speed Control func-
tions are operated at the same time. If this
occurs, the Speed Control System can be
reactivated by pushing the Speed Control
ON/OFF button and resetting the desired ve-
hicle set speed.
WARNING!
Speed Control can be dangerous where the
system cannot maintain a constant speed.
Your vehicle could go too fast for the con-
ditions, and you could lose control and
have an accident. Do not use Speed Con-
trol in heavy traffic or on roads that are
winding, icy, snow-covered or slippery.
To Activate
Push the ON/OFF button. The Cruise Indica-
tor Light in the instrument cluster display will
illuminate. To turn the system off, push the
ON/OFF button a second time. The Cruise
Indicator Light will turn off. The system
should be turned off when not in use.
WARNING!
Leaving the Speed Control system on when
not in use is dangerous. You could acci-
dentally set the system or cause it to go
faster than you want. You could lose con-
trol and have an accident. Always leave the
system off when you are not using it.
To Set A Desired Speed
Turn the Speed Control on. When the vehicle
has reached the desired speed, push the SET
(-) button and release. Release the accelera-
tor and the vehicle will operate at the se-
lected speed.
NOTE:
The vehicle should be traveling at a steady
speed and on level ground before pushing the
SET (-) button.
To Vary The Speed Setting
To Increase Speed
When the Speed Control is set, you can in-
crease speed by pushing the RES (+) button.
Speed Control Buttons
1 — Push CANCEL
2 — Push ON/OFF
3 — Push RES +/Accel
4 — Push SET - /Decel
137
Page 219 of 276
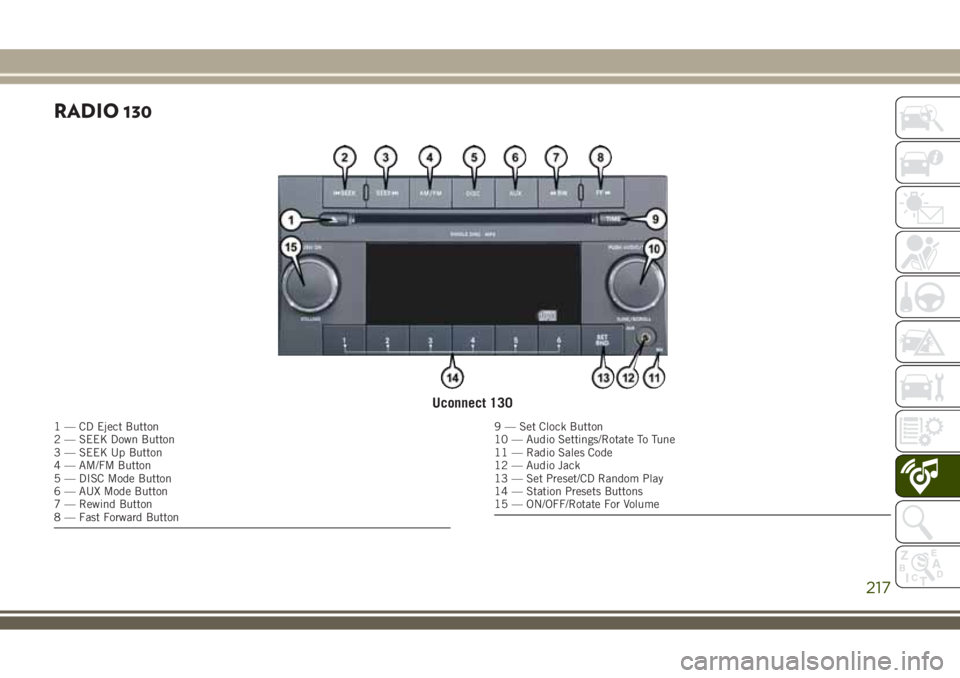
RADIO 130
Uconnect 130
1 — CD Eject Button
2 — SEEK Down Button
3 — SEEK Up Button
4 — AM/FM Button
5 — DISC Mode Button
6 — AUX Mode Button
7 — Rewind Button
8 — Fast Forward Button9 — Set Clock Button
10 — Audio Settings/Rotate To Tune
11 — Radio Sales Code
12 — Audio Jack
13 — Set Preset/CD Random Play
14 — Station Presets Buttons
15 — ON/OFF/Rotate For Volume
217
Page 220 of 276
NOTE:
• Your radio has many features that add to
the comfort and convenience for you and
your passengers.
• Some of these radio features should not be
used when driving because they take your
eyes from the road or your attention from
driving.
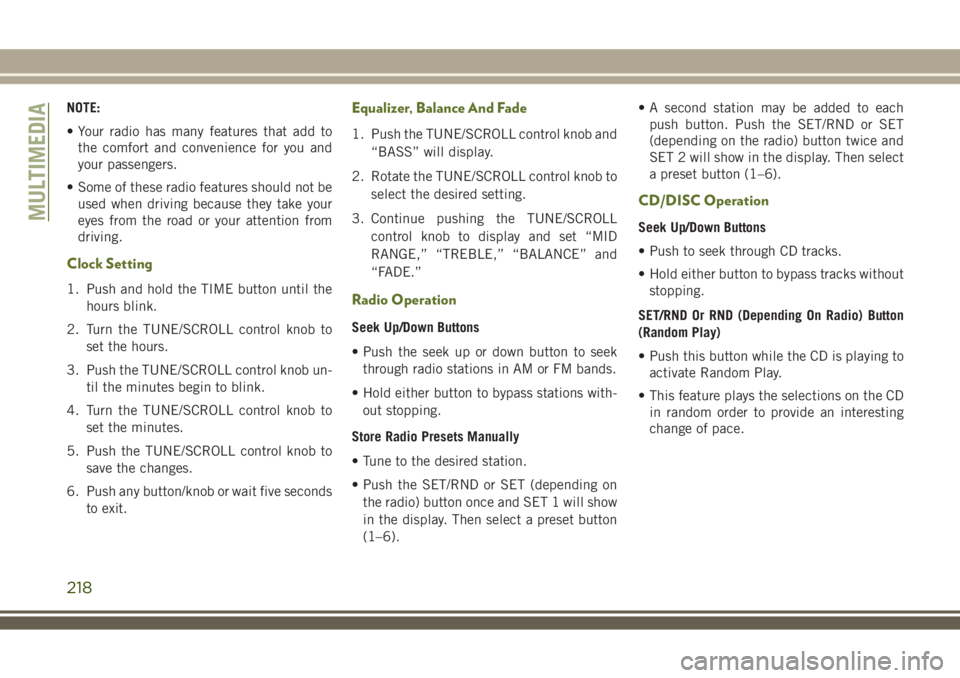
Clock Setting
1. Push and hold the TIME button until the
hours blink.
2. Turn the TUNE/SCROLL control knob to
set the hours.
3. Push the TUNE/SCROLL control knob un-
til the minutes begin to blink.
4. Turn the TUNE/SCROLL control knob to
set the minutes.
5. Push the TUNE/SCROLL control knob to
save the changes.
6. Push any button/knob or wait five seconds
to exit.
Equalizer, Balance And Fade
1. Push the TUNE/SCROLL control knob and
“BASS” will display.
2. Rotate the TUNE/SCROLL control knob to
select the desired setting.
3. Continue pushing the TUNE/SCROLL
control knob to display and set “MID
RANGE,” “TREBLE,” “BALANCE” and
“FADE.”
Radio Operation
Seek Up/Down Buttons
• Push the seek up or down button to seek
through radio stations in AM or FM bands.
• Hold either button to bypass stations with-
out stopping.
Store Radio Presets Manually
• Tune to the desired station.
• Push the SET/RND or SET (depending on
the radio) button once and SET 1 will show
in the display. Then select a preset button
(1–6).• A second station may be added to each
push button. Push the SET/RND or SET
(depending on the radio) button twice and
SET 2 will show in the display. Then select
a preset button (1–6).
CD/DISC Operation
Seek Up/Down Buttons
• Push to seek through CD tracks.
• Hold either button to bypass tracks without
stopping.
SET/RND Or RND (Depending On Radio) Button
(Random Play)
• Push this button while the CD is playing to
activate Random Play.
• This feature plays the selections on the CD
in random order to provide an interesting
change of pace.MULTIMEDIA
218
Page 221 of 276
Audio Jack Operation
The AUX/Audio Jack provides a means to
connect a portable audio device, such as an
MP3 player or an iPod, to the vehicle’s sound
system. This requires the use of a 3.5 mm
stereo audio patch cable.
Pushing the AUX button will change the
mode to auxiliary device if the Audio Jack is
connected, allowing the music from your por-
table device to play through the vehicle's
speakers.
The functions of the portable device are con-
trolled using the device buttons, not the but-
tons on the radio. However, the volume may
be controlled using the radio or portable de-
vice.
219
Page 224 of 276
Equalizer, Balance And Fade
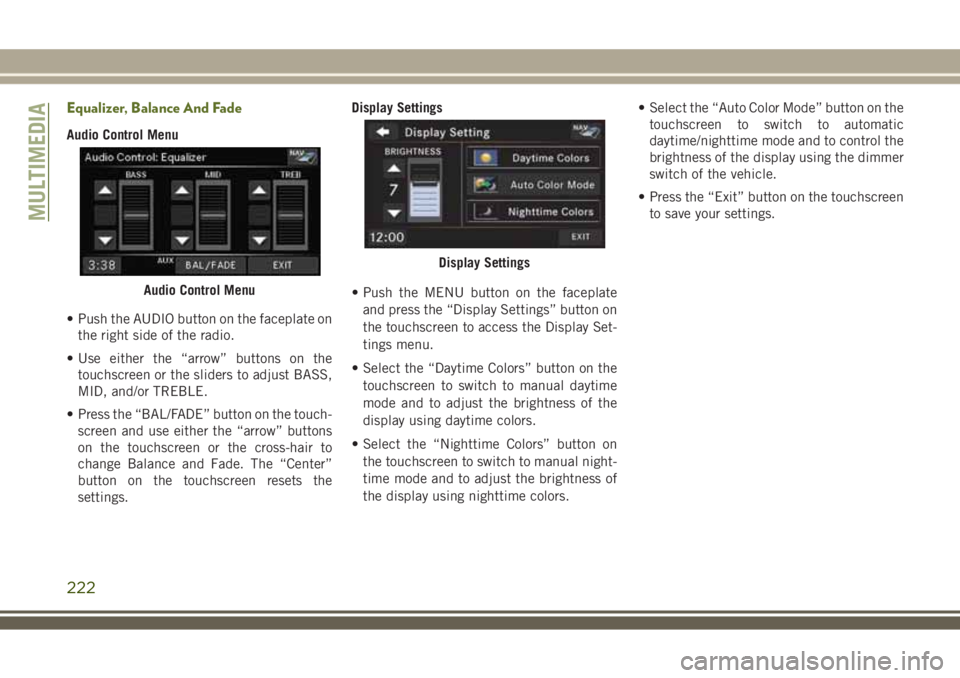
Audio Control Menu
• Push the AUDIO button on the faceplate on
the right side of the radio.
• Use either the “arrow” buttons on the
touchscreen or the sliders to adjust BASS,
MID, and/or TREBLE.
• Press the “BAL/FADE” button on the touch-
screen and use either the “arrow” buttons
on the touchscreen or the cross-hair to
change Balance and Fade. The “Center”
button on the touchscreen resets the
settings.Display Settings
• Push the MENU button on the faceplate
and press the “Display Settings” button on
the touchscreen to access the Display Set-
tings menu.
• Select the “Daytime Colors” button on the
touchscreen to switch to manual daytime
mode and to adjust the brightness of the
display using daytime colors.
• Select the “Nighttime Colors” button on
the touchscreen to switch to manual night-
time mode and to adjust the brightness of
the display using nighttime colors.• Select the “Auto Color Mode” button on the
touchscreen to switch to automatic
daytime/nighttime mode and to control the
brightness of the display using the dimmer
switch of the vehicle.
• Press the “Exit” button on the touchscreen
to save your settings.
Audio Control Menu
Display Settings
MULTIMEDIA
222
Page 226 of 276
• To access Radio Mode, push the RADIO
button on the left side of the faceplate,
then press the “AM,” or “FM” button on the
touchscreen to select the band.
Seek Up/Seek Down
• Press the “SEEK UP” or “SEEK DOWN”
buttons on the touchscreen to seek through
radio stations in AM or FM bands. Hold
either seek button to bypass stations with-
out stopping.
Store Radio Presets Manually
• Select the radio band by pressing either the
“AM,” or “FM” button on the touchscreen.
• Find the station to store by either pressing
the “SEEK UP” or “SEEK DOWN” buttons
on the touchscreen, pressing the “Scan”
button on the touchscreen, or by using the
“Direct Tune” button on the touchscreen.• Once the desired station is found, press
and hold one of the “PRESETS” buttons on
the touchscreen in the list to the right, until
the preset key flashes and the station text
on the button on the touchscreen changes.
NOTE:
If the Presets are not visible on the right side
of the screen, press the “PRESETS” button
on the touchscreen.
MULTIMEDIA
224
Page 228 of 276
• Push the MEDIA button on the faceplate to
display the media source tabs at the top of
the screen. Select the source by pressing
the “HDD,” “DISC” or “AUX” media source
button on the touchscreen.
NOTE:
Your Touchscreen Radio will usually auto-
matically switch to the appropriate mode
when something is first connected or inserted
into the system.
Insert A CD/DVD Disc
• To insert a disc, push the LOAD button on
the faceplate.
• With the printed side upwards, insert the
disc into the disc slot of the radio. The radio
pulls the disc in automatically and closes
the flip screen. The radio selects the appro-
priate mode after the disc is recognized,
and starts playing the first track. The dis-
play shows “Reading...” during this
process.Seek Up/Seek Down
• Push the SEEK UP or SEEK DOWN buttons
on the faceplate to seek through tracks in
Disc Mode. Holding the SEEK UP button on
the touchscreen will fast forward through
the track until the beginning of the track is
reached; if still held it will fast-forward
through the next sequential track(s) (if ran-
dom play mode is not active) until released.
Holding the SEEK DOWN button on the
touchscreen will fast-reverse through the
track until the beginning of the track is
reached; if still held it will fast-reverse
through the next sequential track(s) (if ran-
dom play mode is not active) until released.
Audio Jack Operation
The AUX/Audio Jack provides a means to
connect a portable audio device, such as an
MP3 player or an iPod, to the vehicle’s sound
system. This requires the use of a 3.5 mm
stereo audio patch cable.• Push the MEDIA button on the faceplate
then the “AUX” button on the touchscreen
to change the mode to auxiliary device if
the Audio Jack is connected, allowing the
music from your portable device to play
through the vehicle's speakers.
NOTE:
The functions of the portable device are con-
trolled using the device itself, not the buttons
on the radio. However, the volume may be
controlled using the radio or portable device.
Hard Disk Drive (HDD) Operation
• The Hard Disk Drive (HDD) mode gives you
access to the audio files on the internal
hard disk drive. It functions similar to a CD
player, with the exception that the internal
HDD can hold more tracks.
• It is also possible to import display pictures
to the internal hard disk drive. The pictures
can be displayed on the right half of the
radio screen.
MULTIMEDIA
226