mirror JEEP WRANGLER 2021 Owner handbook (in English)
[x] Cancel search | Manufacturer: JEEP, Model Year: 2021, Model line: WRANGLER, Model: JEEP WRANGLER 2021Pages: 276, PDF Size: 4.47 MB
Page 10 of 276
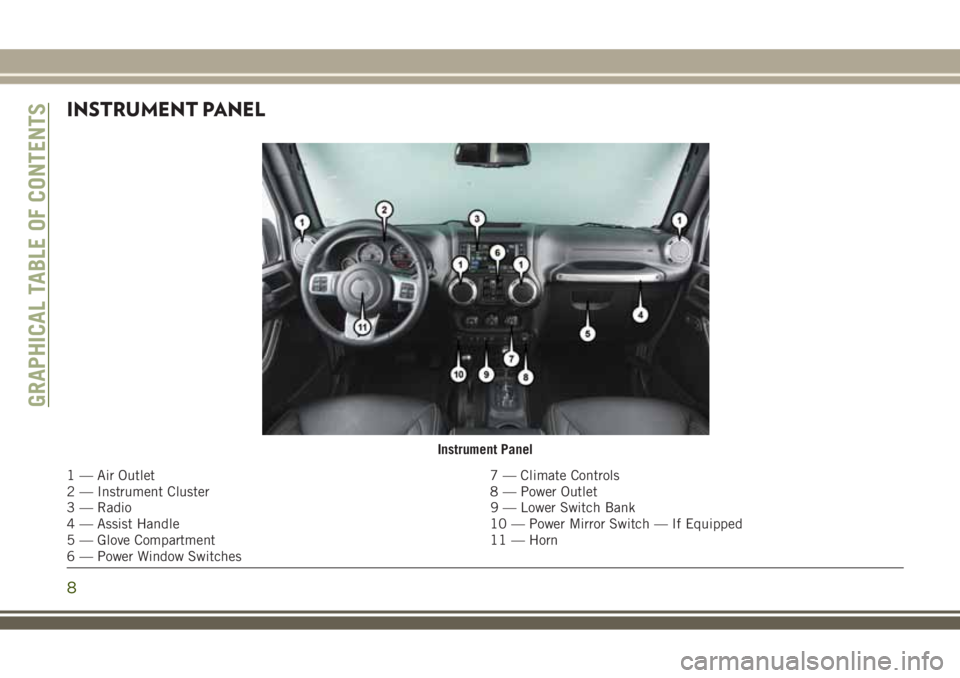
INSTRUMENT PANEL
Instrument Panel
1 — Air Outlet 7 — Climate Controls
2 — Instrument Cluster 8 — Power Outlet
3 — Radio 9 — Lower Switch Bank
4 — Assist Handle 10 — Power Mirror Switch — If Equipped
5 — Glove Compartment 11 — Horn
6 — Power Window Switches
GRAPHICAL TABLE OF CONTENTS
8
Page 13 of 276
GETTING TO KNOW YOUR VEHICLE
KEYFOB...................13
KeyFob.....................13
IGNITION SWITCH............13
Ignition Key Removal............13
REMOTE STARTING SYSTEM — IF
EQUIPPED.................14
How To Use Remote Start..........14
Remote Start Abort Message........15
To Enter Remote Start............15
To Exit Remote Start Mode Without Driving
The Vehicle...................16
To Exit Remote Start Mode And Drive The
Vehicle.....................16
SENTRY KEY................16
Replacement Key Fobs...........17
Customer Key Programming........17
VEHICLE SECURITY ALARM — IF
EQUIPPED.................18
Rearming The System............18
To Arm The System.............18
To Disarm The System............18
DOORS....................19
Upper Half Door Window Removal — If
Equipped....................19
Front Door Removal..............19
Rear Door Removal (Four-Door Models) . .20
SEATS ....................21
Heated Seats — If Equipped........21
60/40 Split Folding Rear Seat —
Four Door Models..............22
Front Passenger Easy Entry Seat —
Two Door Models...............23
Tip ‘n Slide Seats — Two Door Models . .24
Removing The Rear Seat — Two Door
Models.....................24
HEAD RESTRAINTS...........25
Front Head Restraints............25
Rear Head Restraints — 2 Door Model . .26
Rear Head Restraints — 4 Door Model . .27
STEERING WHEEL............28
Tilt Steering Column.............28
MIRRORS..................28
Heated Mirrors — If Equipped.......28
EXTERIOR LIGHTS............28
Headlights And Parking Lights.......28
Daytime Running Lights — If Equipped .29
High/Low Beam Switch...........29
Flash-To-Pass.................29
Automatic Headlights — If Equipped . .29
Front Fog Lights...............29
Rear Fog Lights — If Equipped......29
Turn Signals..................29
Lane Change Assist — If Equipped....30
Lights-On Reminder.............30
Headlight Leveling System — If
Equipped...................30
WINDSHIELD WIPERS AND WASH-
ERS ......................30
Windshield Wiper Operation.........31
Rear Window Wiper/Washer — If
Equipped...................32
GETTING TO KNOW YOUR VEHICLE
11
Page 22 of 276
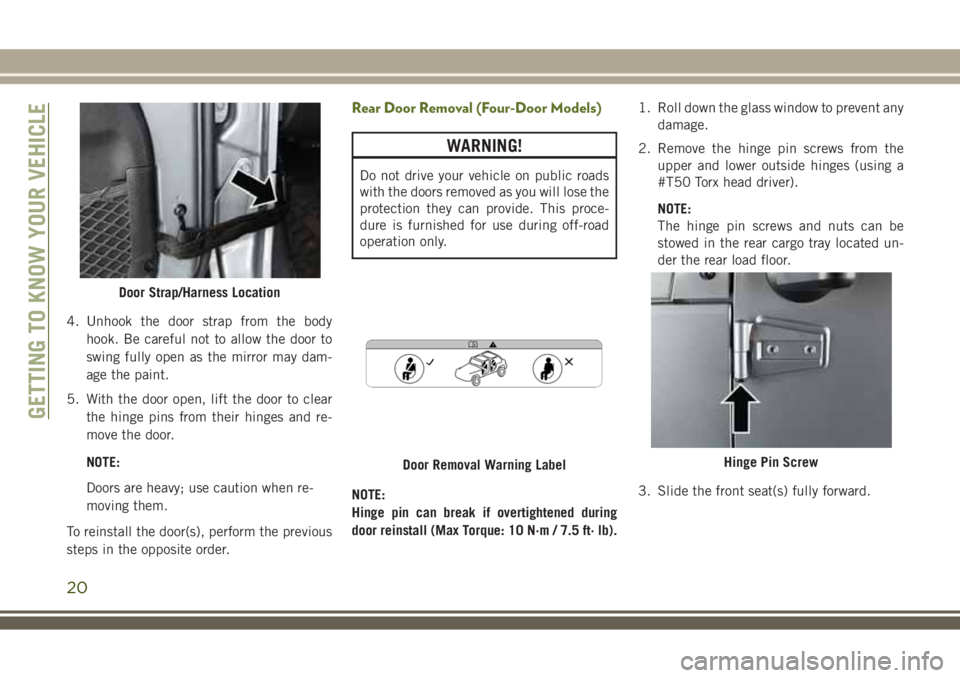
4. Unhook the door strap from the body
hook. Be careful not to allow the door to
swing fully open as the mirror may dam-
age the paint.
5. With the door open, lift the door to clear
the hinge pins from their hinges and re-
move the door.
NOTE:
Doors are heavy; use caution when re-
moving them.
To reinstall the door(s), perform the previous
steps in the opposite order.
Rear Door Removal (Four-Door Models)
WARNING!
Do not drive your vehicle on public roads
with the doors removed as you will lose the
protection they can provide. This proce-
dure is furnished for use during off-road
operation only.
NOTE:
Hinge pin can break if overtightened during
door reinstall (Max Torque: 10 N·m / 7.5 ft· lb).1. Roll down the glass window to prevent any
damage.
2. Remove the hinge pin screws from the
upper and lower outside hinges (using a
#T50 Torx head driver).
NOTE:
The hinge pin screws and nuts can be
stowed in the rear cargo tray located un-
der the rear load floor.
3. Slide the front seat(s) fully forward.
Door Strap/Harness Location
Door Removal Warning LabelHinge Pin Screw
GETTING TO KNOW YOUR VEHICLE
20
Page 30 of 276
STEERING WHEEL
Tilt Steering Column
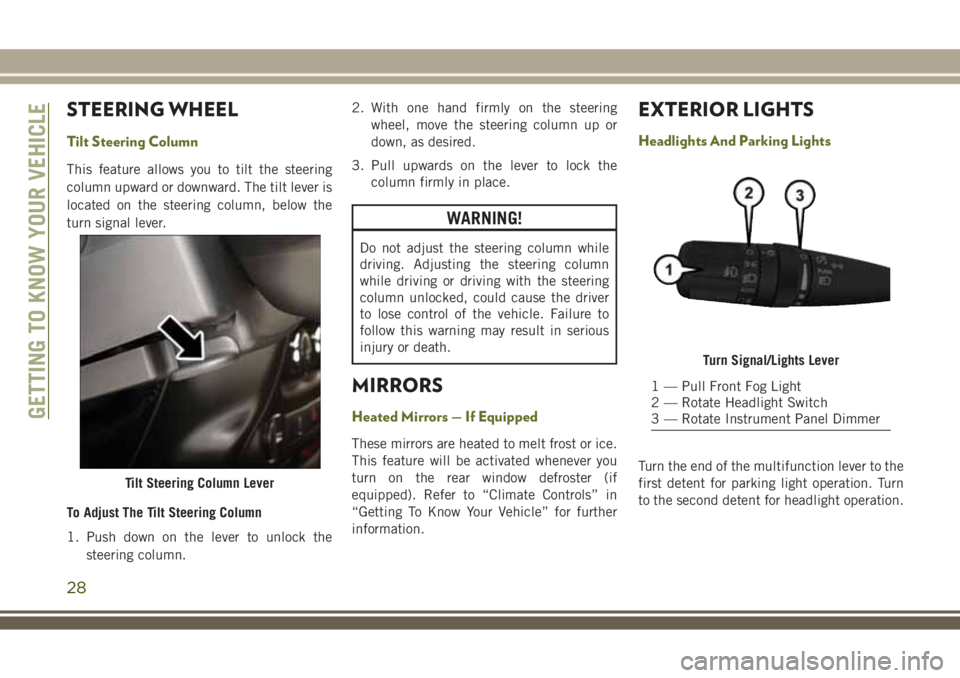
This feature allows you to tilt the steering
column upward or downward. The tilt lever is
located on the steering column, below the
turn signal lever.
To Adjust The Tilt Steering Column
1. Push down on the lever to unlock the
steering column.2. With one hand firmly on the steering
wheel, move the steering column up or
down, as desired.
3. Pull upwards on the lever to lock the
column firmly in place.
WARNING!
Do not adjust the steering column while
driving. Adjusting the steering column
while driving or driving with the steering
column unlocked, could cause the driver
to lose control of the vehicle. Failure to
follow this warning may result in serious
injury or death.
MIRRORS
Heated Mirrors — If Equipped
These mirrors are heated to melt frost or ice.
This feature will be activated whenever you
turn on the rear window defroster (if
equipped). Refer to “Climate Controls” in
“Getting To Know Your Vehicle” for further
information.
EXTERIOR LIGHTS
Headlights And Parking Lights
Turn the end of the multifunction lever to the
first detent for parking light operation. Turn
to the second detent for headlight operation.
Tilt Steering Column Lever
Turn Signal/Lights Lever
1 — Pull Front Fog Light
2 — Rotate Headlight Switch
3 — Rotate Instrument Panel Dimmer
GETTING TO KNOW YOUR VEHICLE
28
Page 36 of 276
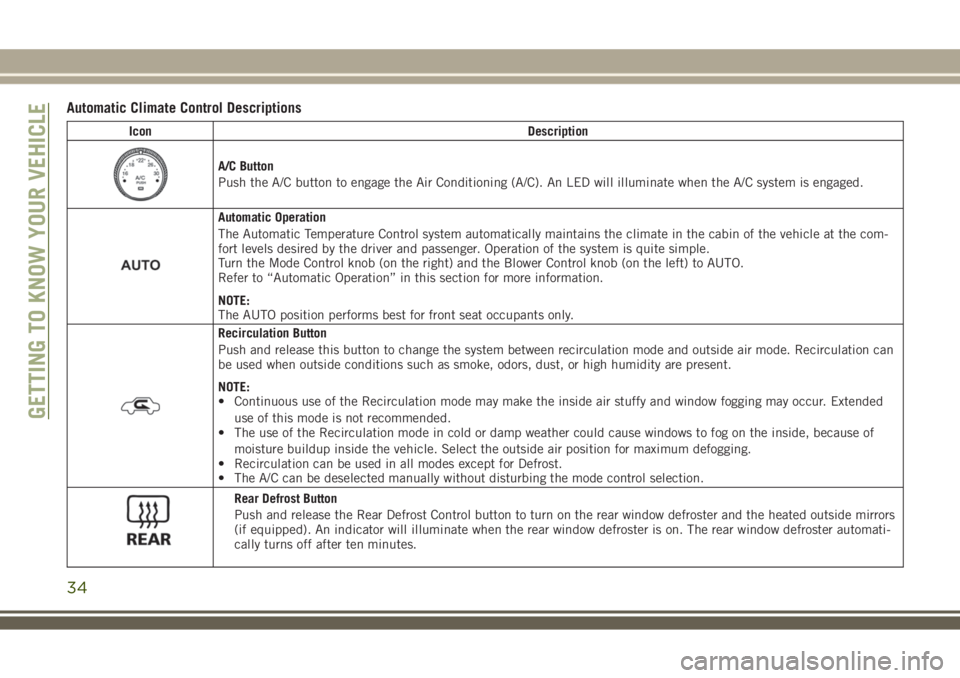
Automatic Climate Control Descriptions
Icon Description
A/C Button
Push the A/C button to engage the Air Conditioning (A/C). An LED will illuminate when the A/C system is engaged.
Automatic Operation
The Automatic Temperature Control system automatically maintains the climate in the cabin of the vehicle at the com-
fort levels desired by the driver and passenger. Operation of the system is quite simple.
Turn the Mode Control knob (on the right) and the Blower Control knob (on the left) to AUTO.
Refer to “Automatic Operation” in this section for more information.
NOTE:
The AUTO position performs best for front seat occupants only.
Recirculation Button
Push and release this button to change the system between recirculation mode and outside air mode. Recirculation can
be used when outside conditions such as smoke, odors, dust, or high humidity are present.
NOTE:
• Continuous use of the Recirculation mode may make the inside air stuffy and window fogging may occur. Extended
use of this mode is not recommended.
• The use of the Recirculation mode in cold or damp weather could cause windows to fog on the inside, because of
moisture buildup inside the vehicle. Select the outside air position for maximum defogging.
• Recirculation can be used in all modes except for Defrost.
• The A/C can be deselected manually without disturbing the mode control selection.
Rear Defrost Button
Push and release the Rear Defrost Control button to turn on the rear window defroster and the heated outside mirrors
(if equipped). An indicator will illuminate when the rear window defroster is on. The rear window defroster automati-
cally turns off after ten minutes.
GETTING TO KNOW YOUR VEHICLE
34
Page 46 of 276
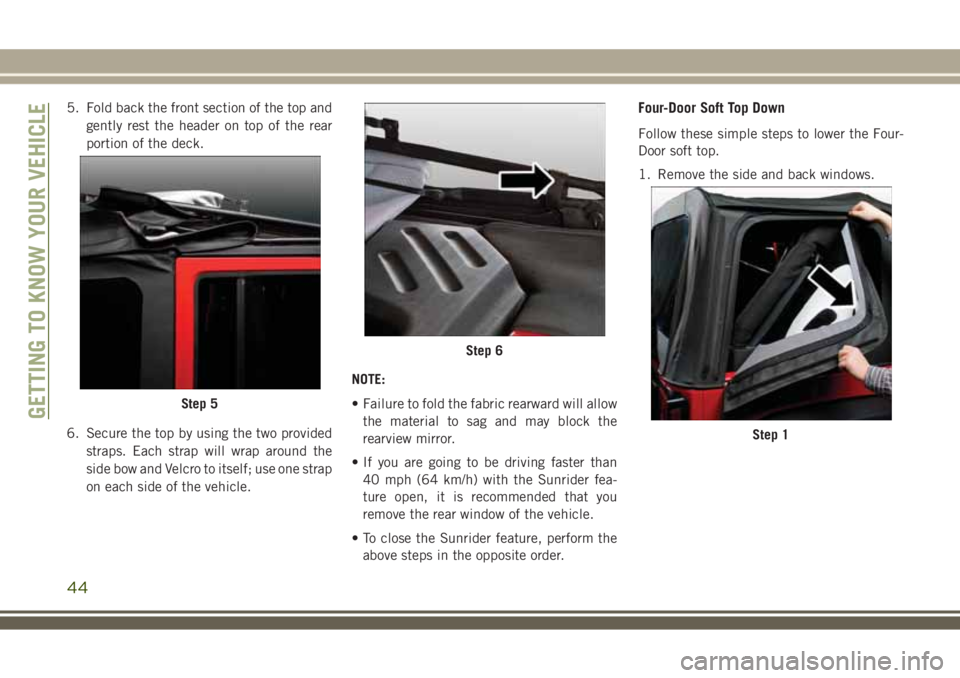
5. Fold back the front section of the top and
gently rest the header on top of the rear
portion of the deck.
6. Secure the top by using the two provided
straps. Each strap will wrap around the
side bow and Velcro to itself; use one strap
on each side of the vehicle.NOTE:
• Failure to fold the fabric rearward will allow
the material to sag and may block the
rearview mirror.
• If you are going to be driving faster than
40 mph (64 km/h) with the Sunrider fea-
ture open, it is recommended that you
remove the rear window of the vehicle.
• To close the Sunrider feature, perform the
above steps in the opposite order.Four-Door Soft Top Down
Follow these simple steps to lower the Four-
Door soft top.
1. Remove the side and back windows.
Step 5
Step 6
Step 1
GETTING TO KNOW YOUR VEHICLE
44
Page 119 of 276
STARTING THE ENGINE
Before starting your vehicle, adjust your seat,
adjust both inside and outside mirrors, and
fasten your seat belts.
WARNING!
• When exiting the vehicle, always remove
the key fob from the ignition and lock
your vehicle.
• Never leave children alone in a vehicle,
or with access to an unlocked vehicle.
• Allowing children to be in a vehicle un-
attended is dangerous for a number of
reasons. A child or others could be seri-
ously or fatally injured. Children should
be warned not to touch the parking
brake, brake pedal or the gear selector.
• Do not leave the key fob in or near the
vehicle, or in a location accessible to
children. A child could operate power
windows, other controls, or move the
vehicle.
• Do not leave children or animals inside
parked vehicles in hot weather. Interior
WARNING!
heat build-up may cause serious injury
or death.
Manual Transmission — If Equipped
Apply the parking brake, place the gear se-
lector in NEUTRAL, and press the clutch
pedal before starting the vehicle. This vehicle
is equipped with a clutch interlocking igni-
tion system. It will not start unless the clutch
pedal is pressed to the floor.
Four-Wheel Drive Models Only
In 4L mode, this vehicle will start regardless
of whether or not the clutch pedal is pressed
to the floor. This feature enhances off-road
performance by allowing the vehicle to start
when in 4L without having to press the clutch
pedal. The “4WD Low Indicator Light” will
illuminate when the transfer case has been
shifted into this mode.
Automatic Transmission — If Equipped
Start the vehicle with the gear selector in the
PARK position (vehicle can also be started in
NEUTRAL). Apply the brake before shifting
to any driving range.
Normal Starting — Gasoline Engine
NOTE:
Normal starting of either a cold or a warm
engine is obtained without pumping or press-
ing the accelerator pedal.
Cycle the ignition switch to the START posi-
tion and release when the engine starts. If the
engine fails to start within 10 seconds, cycle
the ignition switch to the LOCK/OFF position,
wait 10 to 15 seconds, then repeat the “Nor-
mal Starting” procedure.
Extreme Cold Weather (Below –22°F Or
−30°C)
To ensure reliable starting at these tempera-
tures, use of an externally powered electric
engine block heater (available from your au-
thorized dealer) is recommended.
117
Page 154 of 276
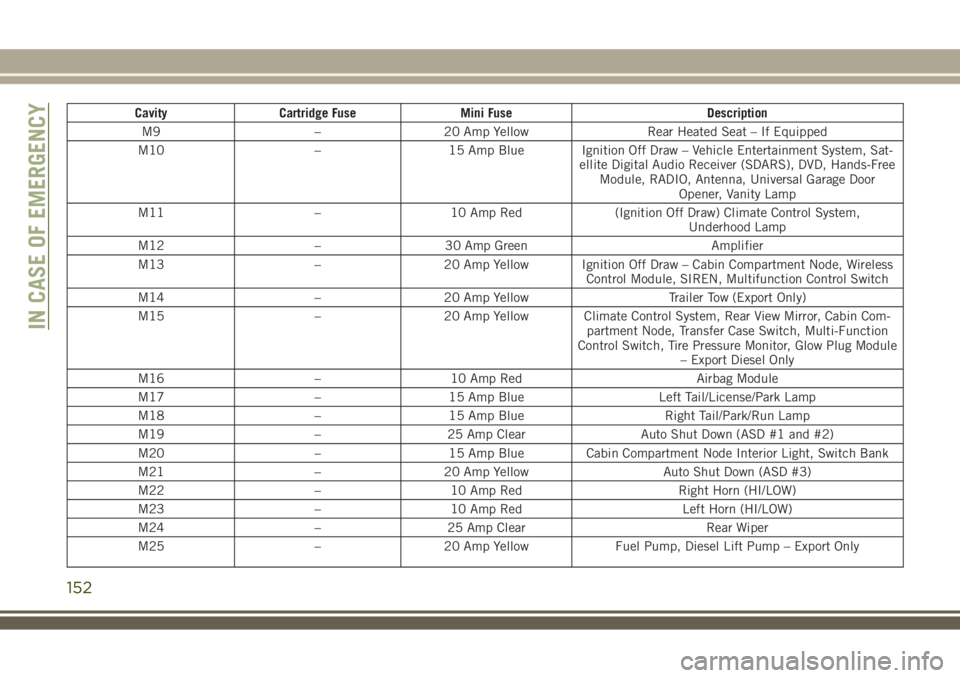
Cavity Cartridge Fuse Mini Fuse Description
M9 – 20 Amp Yellow Rear Heated Seat – If Equipped
M10 – 15 Amp Blue Ignition Off Draw – Vehicle Entertainment System, Sat-
ellite Digital Audio Receiver (SDARS), DVD, Hands-Free
Module, RADIO, Antenna, Universal Garage Door
Opener, Vanity Lamp
M11 – 10 Amp Red (Ignition Off Draw) Climate Control System,
Underhood Lamp
M12 – 30 Amp Green Amplifier
M13 – 20 Amp Yellow Ignition Off Draw – Cabin Compartment Node, Wireless
Control Module, SIREN, Multifunction Control Switch
M14 – 20 Amp Yellow Trailer Tow (Export Only)
M15 – 20 Amp Yellow Climate Control System, Rear View Mirror, Cabin Com-
partment Node, Transfer Case Switch, Multi-Function
Control Switch, Tire Pressure Monitor, Glow Plug Module
– Export Diesel Only
M16 – 10 Amp Red Airbag Module
M17 – 15 Amp Blue Left Tail/License/Park Lamp
M18 – 15 Amp Blue Right Tail/Park/Run Lamp
M19 – 25 Amp Clear Auto Shut Down (ASD #1 and #2)
M20 – 15 Amp Blue Cabin Compartment Node Interior Light, Switch Bank
M21 – 20 Amp Yellow Auto Shut Down (ASD #3)
M22 – 10 Amp Red Right Horn (HI/LOW)
M23 – 10 Amp Red Left Horn (HI/LOW)
M24 – 25 Amp Clear Rear Wiper
M25 – 20 Amp Yellow Fuel Pump, Diesel Lift Pump – Export Only
IN CASE OF EMERGENCY
152
Page 155 of 276
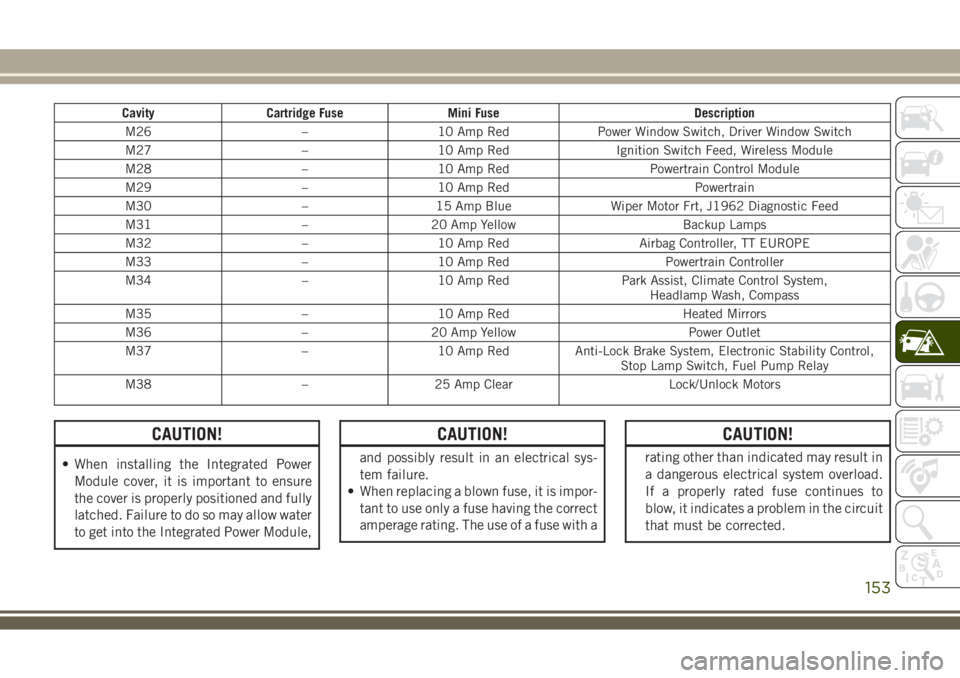
Cavity Cartridge Fuse Mini Fuse Description
M26 – 10 Amp Red Power Window Switch, Driver Window Switch
M27 – 10 Amp Red Ignition Switch Feed, Wireless Module
M28 – 10 Amp Red Powertrain Control Module
M29 – 10 Amp Red Powertrain
M30 – 15 Amp Blue Wiper Motor Frt, J1962 Diagnostic Feed
M31 – 20 Amp Yellow Backup Lamps
M32 – 10 Amp Red Airbag Controller, TT EUROPE
M33 – 10 Amp Red Powertrain Controller
M34 – 10 Amp Red Park Assist, Climate Control System,
Headlamp Wash, Compass
M35 – 10 Amp Red Heated Mirrors
M36 – 20 Amp Yellow Power Outlet
M37 – 10 Amp Red Anti-Lock Brake System, Electronic Stability Control,
Stop Lamp Switch, Fuel Pump Relay
M38 – 25 Amp Clear Lock/Unlock Motors
CAUTION!
• When installing the Integrated Power
Module cover, it is important to ensure
the cover is properly positioned and fully
latched. Failure to do so may allow water
to get into the Integrated Power Module,
CAUTION!
and possibly result in an electrical sys-
tem failure.
• When replacing a blown fuse, it is impor-
tant to use only a fuse having the correct
amperage rating. The use of a fuse with a
CAUTION!
rating other than indicated may result in
a dangerous electrical system overload.
If a properly rated fuse continues to
blow, it indicates a problem in the circuit
that must be corrected.
153
Page 208 of 276
Glass Surfaces
All glass surfaces should be cleaned on a
regular basis with any commercial
household-type glass cleaner. Never use an
abrasive type cleaner. Use caution when
cleaning the inside rear window equipped
with electric defrosters or windows equipped
with radio antennas. Do not use scrapers or
other sharp instruments that may scratch the
elements.
When cleaning the rear view mirror, spray
cleaner on the towel or cloth that you are
using. Do not spray cleaner directly on the
mirror.
SERVICING AND MAINTENANCE
206