child seat JEEP WRANGLER 2023 User Guide
[x] Cancel search | Manufacturer: JEEP, Model Year: 2023, Model line: WRANGLER, Model: JEEP WRANGLER 2023Pages: 396, PDF Size: 25.15 MB
Page 88 of 396
86GETTING TO KNOW YOUR VEHICLE
NOTE:
All hard top removal and installation instructions are
applicable to both two and four door model vehicles.
Images shown are of four door models, and appear -
ance of two door model components may differ.
The left side panel must be removed before removing
the right side panel.
To remove the hard top front panel(s), proceed as follows:
1. Fold down the sun visor against the windshield.
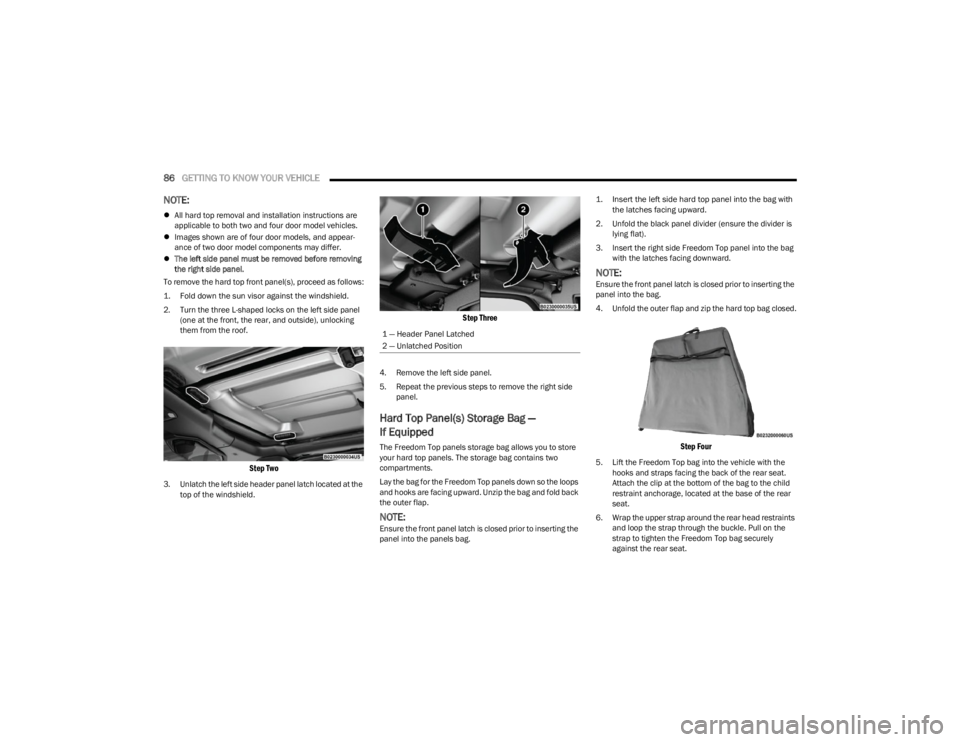
2. Turn the three L-shaped locks on the left side panel (one at the front, the rear, and outside), unlocking
them from the roof.
Step Two
3. Unlatch the left side header panel latch located at the top of the windshield.
Step Three
4. Remove the left side panel.
5. Repeat the previous steps to remove the right side panel.
Hard Top Panel(s) Storage Bag —
If Equipped
The Freedom Top panels storage bag allows you to store
your hard top panels. The storage bag contains two
compartments.
Lay the bag for the Freedom Top panels down so the loops
and hooks are facing upward. Unzip the bag and fold back
the outer flap.
NOTE:Ensure the front panel latch is closed prior to inserting the
panel into the panels bag.
1. Insert the left side hard top panel into the bag with
the latches facing upward.
2. Unfold the black panel divider (ensure the divider is lying flat).
3. Insert the right side Freedom Top panel into the bag with the latches facing downward.
NOTE:Ensure the front panel latch is closed prior to inserting the
panel into the bag.
4. Unfold the outer flap and zip the hard top bag closed.
Step Four
5. Lift the Freedom Top bag into the vehicle with the hooks and straps facing the back of the rear seat.
Attach the clip at the bottom of the bag to the child
restraint anchorage, located at the base of the rear
seat.
6. Wrap the upper strap around the rear head restraints and loop the strap through the buckle. Pull on the
strap to tighten the Freedom Top bag securely
against the rear seat.
1 — Header Panel Latched
2 — Unlatched Position
23_JL_OM_EN_USC_t.book Page 86
Page 94 of 396

92GETTING TO KNOW YOUR VEHICLE
(Continued)
NOTE:
The power top is non-removable. If desired, the rear
quarter windows can be removed and stored in the
provided storage bag
Úpage 93.
The power top will not open in temperatures below
-4°F (-20°C). However, if it is opened at a higher
temperature, it can be closed at temperatures above
-40°F (-40°C).
The power top will not operate at vehicle speeds above
60 mph (96 km/h).
NOTE:A slight pause in audio may be heard when opening and
closing the Power Sliding Top as a result of the Uconnect
system switching between power top Closed and power
top Open audio modes.
Opening And Closing The Power Top
Express Open/Close
Push the open switch and release it within one-half
second and the power top will open automatically from
any position. The power top will open fully and stop
automatically.
Push the close switch and release it within one-half
second and the power top will close automatically from
any position. The power top will close fully and stop
automatically.
During Express Open or Express Close operation, any
other movement of the power top switch will stop the
power top.
Manual Open/Close
To open the power top manually, push and hold the open
switch to the full open position, then release.
To close the power top manually, push and hold the close
switch to the fully closed position, then release.
Any release of the switch during open or close operation
will stop the power top movement. The top will remain in a
partially opened position until the switch is operated and
held again.
Pinch Protect Feature
This feature will detect an obstruction in the opening of
the power top during Express Close operation. If an
obstruction in the path of the power top is detected, the
power top will automatically retract. Remove the
obstruction if this occurs. Next, push the close switch and
release to Express Close.
NOTE:
The Power Sliding Top may reverse motion if closing
during a severe headwind. If this occurs, push and hold
the Power Sliding Top switch again to close the top
completely.
If three consecutive power top close attempts result in
Pinch Protect reversals, Pinch Protect will disable and
the power top must be closed in Manual Mode.
Power Top Maintenance
Use only a non-abrasive cleaner and a soft cloth to clean
the quarter window glass panel. For important information
on cleaning and caring for your vehicle
Úpage 360.
WARNING!
Never leave children unattended in a vehicle, or with
access to an unlocked vehicle. Never leave the key
fob in or near the vehicle, or in a location accessible
to children. Do not leave the Keyless Enter ‘n Go™
Ignition in the ACC or ON/RUN position. Occupants,
particularly unattended children, can become
entrapped by the power top while operating the
power top switch. Such entrapment may result in
serious injury or death.
In a collision, there is a greater risk of being thrown
from a vehicle with an open power top. You could
also be seriously injured or killed. Always fasten your
seat belt properly and make sure all passengers are
also properly secured.
Do not allow small children to operate the power top.
Never allow your fingers, other body parts, or any
object, to project through the power top opening.
Injury may result.
WARNING!
WARNING!
There is no anti-pinch protection when the power top is
almost closed. To avoid personal injury be sure to clear
your arms, hands, fingers and all objects from the top’s
path before closing.
23_JL_OM_EN_USC_t.book Page 92
Page 104 of 396
102GETTING TO KNOW YOUR VEHICLE
CARGO AREA FEATURES
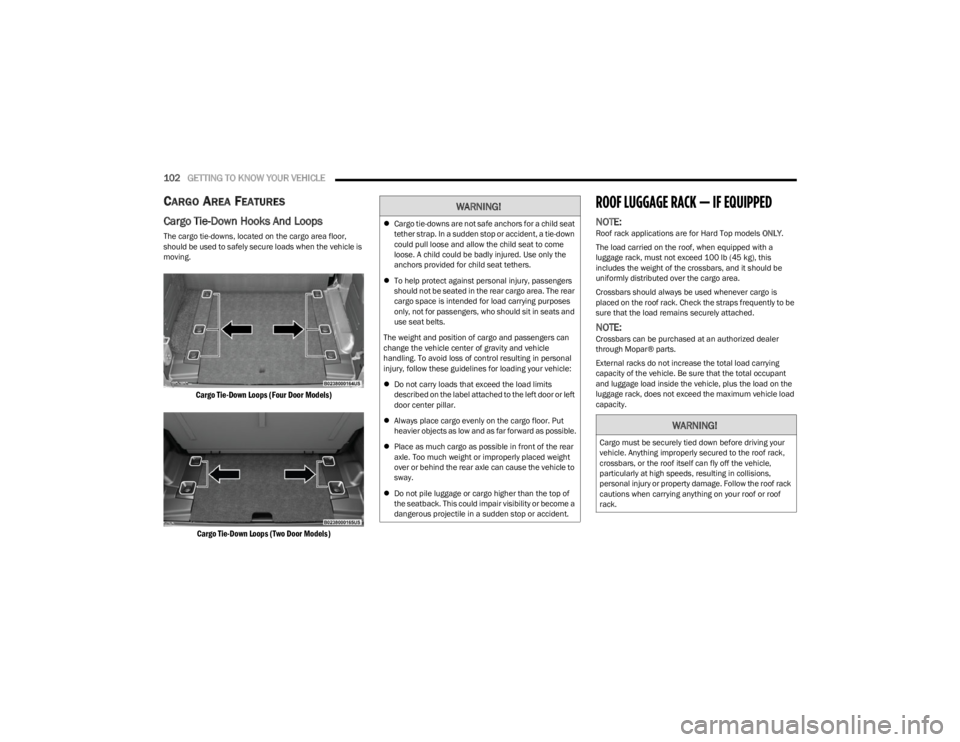
Cargo Tie-Down Hooks And Loops
The cargo tie-downs, located on the cargo area floor,
should be used to safely secure loads when the vehicle is
moving.
Cargo Tie-Down Loops (Four Door Models)
Cargo Tie-Down Loops (Two Door Models)
ROOF LUGGAGE RACK — IF EQUIPPED
NOTE:Roof rack applications are for Hard Top models ONLY.
The load carried on the roof, when equipped with a
luggage rack, must not exceed 100 lb (45 kg), this
includes the weight of the crossbars, and it should be
uniformly distributed over the cargo area.
Crossbars should always be used whenever cargo is
placed on the roof rack. Check the straps frequently to be
sure that the load remains securely attached.
NOTE:Crossbars can be purchased at an authorized dealer
through Mopar® parts.
External racks do not increase the total load carrying
capacity of the vehicle. Be sure that the total occupant
and luggage load inside the vehicle, plus the load on the
luggage rack, does not exceed the maximum vehicle load
capacity.
WARNING!
Cargo tie-downs are not safe anchors for a child seat
tether strap. In a sudden stop or accident, a tie-down
could pull loose and allow the child seat to come
loose. A child could be badly injured. Use only the
anchors provided for child seat tethers.
To help protect against personal injury, passengers
should not be seated in the rear cargo area. The rear
cargo space is intended for load carrying purposes
only, not for passengers, who should sit in seats and
use seat belts.
The weight and position of cargo and passengers can
change the vehicle center of gravity and vehicle
handling. To avoid loss of control resulting in personal
injury, follow these guidelines for loading your vehicle:
Do not carry loads that exceed the load limits
described on the label attached to the left door or left
door center pillar.
Always place cargo evenly on the cargo floor. Put
heavier objects as low and as far forward as possible.
Place as much cargo as possible in front of the rear
axle. Too much weight or improperly placed weight
over or behind the rear axle can cause the vehicle to
sway.
Do not pile luggage or cargo higher than the top of
the seatback. This could impair visibility or become a
dangerous projectile in a sudden stop or accident.
WARNING!
Cargo must be securely tied down before driving your
vehicle. Anything improperly secured to the roof rack,
crossbars, or the roof itself can fly off the vehicle,
particularly at high speeds, resulting in collisions,
personal injury or property damage. Follow the roof rack
cautions when carrying anything on your roof or roof
rack.
23_JL_OM_EN_USC_t.book Page 102
Page 128 of 396
126
STARTING AND OPERATING
STARTING THE ENGINE — GASOLINE
ENGINE (IF EQUIPPED)
Before starting your vehicle, adjust your seat, adjust both
inside and outside mirrors, and fasten your seat belts.
MANUAL TRANSMISSION — IF EQUIPPED
Apply the parking brake, place the gear selector in
NEUTRAL, and press the clutch pedal before starting the
vehicle. This vehicle is equipped with a clutch interlocking
ignition system. It will not start unless the clutch pedal is
pressed to the floor.
Four-Wheel Drive Models Only
In 4L mode, if the vehicle is stalled, the engine will start
regardless of whether or not the clutch pedal is pressed to
the floor. This feature enhances off-road performance by
allowing the vehicle to start when in 4L without having to
press the clutch pedal. The 4L Indicator Light will
illuminate when the transfer case has been shifted into
this mode.
AUTOMATIC TRANSMISSION —
I
F EQUIPPED
Start the vehicle with the gear selector in the PARK
position (vehicle can also be started in NEUTRAL). Apply
the brake before shifting to any driving range.
NORMAL STARTING
To Turn On The Engine Using The ENGINE START/STOP
Button
1. The transmission must be in PARK or NEUTRAL.
2. Press and hold the brake pedal while pushing the
ENGINE START/STOP button once. 3. The system takes over and attempts to start the
vehicle. If the vehicle fails to start, the starter will
disengage automatically after 10 seconds.
4. If you wish to stop the cranking of the engine prior to the engine starting, push the button again.
NOTE:Normal starting of either a cold or a warm engine is
obtained without pumping or pressing the accelerator
pedal.
To Turn Off The Engine Using The ENGINE START/STOP
Button
1. Place the gear selector in PARK, then push and release the ENGINE START/STOP button.
2. The ignition will return to the OFF position.
3. If the gear selector is not in PARK (with vehicle stopped) and the ENGINE START/STOP button is
pushed once, the transmission will automatically
select PARK and the engine will turn off while the
ignition will remain in the ACC position (NOT the OFF
position). Never leave a vehicle out of the PARK
position, or it could roll.
4. If the gear selector is in NEUTRAL, and the vehicle speed is below 5 mph (8 km/h), pushing the START/
STOP button once will turn the engine off. The ignition
will remain in the ACC position.
5. If the vehicle speed is above 5 mph (8 km/h), the ENGINE START/STOP button must be held for two WARNING!
When exiting the vehicle, always remove the key fob
from the ignition and lock your vehicle.
Never leave children alone in a vehicle, or with
access to an unlocked vehicle.
Allowing children to be in a vehicle unattended is
dangerous for a number of reasons. A child or others
could be seriously or fatally injured. Children should
be warned not to touch the parking brake, brake
pedal or the gear selector.
Do not leave the key fob in or near the vehicle, or in
a location accessible to children. A child could
operate power windows, other controls, or move the
vehicle.
Do not leave children or animals inside parked vehi -
cles in hot weather. Interior heat buildup may cause
serious injury or death.
23_JL_OM_EN_USC_t.book Page 126
Page 131 of 396

STARTING AND OPERATING129
(Continued)
AFTER STARTING
The idle speed is controlled automatically and will
decrease as the engine warms up.
STARTING THE ENGINE — DIESEL ENGINE
(IF EQUIPPED)
Before starting your vehicle, adjust your seat, both inside
and outside mirrors, and fasten your seat belts.
The starter is allowed to crank for up to 25-second
intervals. Waiting two minutes between such intervals will
protect the starter from overheating.
NOTE:Engine start up in very low ambient temperature could
result in evident white smoke. This condition will
disappear as the engine warms up.
AUTOMATIC TRANSMISSION
Start the engine with the transmission gear selector in the
PARK (P) position. Apply the brake before shifting to any
driving range.
EXTREME COLD WEATHER
The cartridge block heater clips into the engine block near
the water jacket and transfers heat to the coolant. It
requires a 110–115 Volt AC electrical outlet with a
grounded, three-wire extension cord. Its use is
recommended for environments that routinely fall below
-10°F (-23°C). It should be used when the vehicle has not
been running overnight or longer periods and should be
plugged in for two hours prior to start. Its use is required
for cold starts with temperatures under -20°F (-28°C).
NOTE:The engine block heater and heater cord are
factory-installed options. If your vehicle is not equipped,
heater and heater cords are available from an authorized
Mopar® dealer.
A 12 Volt heater built into the fuel filter housing aids in
preventing fuel gelling. It is controlled by a built-in ther -
mostat.
A Diesel Pre-Heat system both improves engine
starting and reduces the amount of white smoke
generated by a warming engine.
WARNING!
Before exiting a vehicle, always come to a complete
stop, then shift the automatic transmission into
PARK and apply the parking brake.
Always make sure the ignition is in the OFF position,
key fob is removed from the vehicle and vehicle is
locked.
Never leave children alone in a vehicle, or with
access to an unlocked vehicle. Leaving children in a
vehicle unattended is dangerous for a number of
reasons. A child or others could be seriously or fatally
injured. Children should be warned not to touch the
parking brake, brake pedal or the gear selector.
Do not leave the key fob in or near the vehicle, or in
a location accessible to children, and do not leave
the ignition of a vehicle equipped with Keyless
Enter ‘n Go™ in the ACC or ON/RUN position. A child
could operate power windows, other controls, or
move the vehicle.
Do not leave children or animals inside parked vehi -
cles in hot weather. Interior heat buildup may cause
serious injury or death.
CAUTION!
The engine is allowed to crank as long as
25 seconds. If the engine fails to start during this
period, please wait at least two minutes for the
starter to cool before repeating start procedure.
If the Water in Fuel Indicator Light remains on, DO
NOT START engine before you drain the water from
the fuel filters to avoid engine damage
Úpage 321.
WARNING!
4
23_JL_OM_EN_USC_t.book Page 129
Page 263 of 396
SAFETY261
(Continued)
OCCUPANT RESTRAINT SYSTEMS
Some of the most important safety features in your vehicle
are the restraint systems:
OCCUPANT RESTRAINT SYSTEMS
F
EATURES
Seat Belt Systems
Supplemental Restraint Systems (SRS) Air Bags
Child Restraints
Some of the safety features described in this section may
be standard equipment on some models, or may be
optional equipment on others. If you are not sure, ask an
authorized dealer.
IMPORTANT SAFETY PRECAUTIONS
Please pay close attention to the information in this
section. It tells you how to use your restraint system
properly, to keep you and your passengers as safe as
possible.
Here are some simple steps you can take to minimize the
risk of harm from a deploying air bag:
1. Children 12 years old and under should always ride buckled up in the rear seat of a vehicle with a rear
seat.
2. A child who is not big enough to wear the vehicle seat belt properly must be secured in the appropriate child
restraint or belt-positioning booster seat in a rear
seating position
Úpage 277.
3. If a child from 2 to 12 years old (not in a rear-facing child restraint) must ride in the front passenger seat, move the seat as far back as possible and use the
proper child restraint
Úpage 277.
4. Never allow children to slide the shoulder belt behind them or under their arm.
5. You should read the instructions provided with your child restraint to make sure that you are using it
properly.
6. All occupants should always wear their lap and shoulder belts properly.
7. The driver and front passenger seats should be moved back as far as practical to allow the front air
bags room to inflate.
8. Do not lean against the door or window. If your vehicle has side air bags, and deployment occurs, the side air
bags will inflate forcefully into the space between
occupants and the door and occupants could be
injured.
9. If the air bag system in this vehicle needs to be modified to accommodate a disabled person, see
Úpage 377 for customer service contact
information.
SEAT BELT SYSTEMS
Buckle up even though you are an excellent driver, even
on short trips. Someone on the road may be a poor driver
and could cause a collision that includes you. This can
happen far away from home or on your own street.
Research has shown that seat belts save lives, and they
can reduce the seriousness of injuries in a collision. Some
of the worst injuries happen when people are thrown from
the vehicle. Seat belts reduce the possibility of ejection
and the risk of injury caused by striking the inside of the
vehicle. Everyone in a motor vehicle should be belted at all
times.
Enhanced Seat Belt Use Reminder System
(BeltAlert)
Driver And Passenger BeltAlert — If Equipped
BeltAlert is a feature intended to remind the
driver and outboard front seat passenger (if
equipped with outboard front passenger seat
BeltAlert) to buckle their seat belts. The
BeltAlert feature is active whenever the ignition switch is
in the START or ON/RUN position.WARNING!
Never place a rear-facing child restraint in front of an
air bag. A deploying passenger front air bag can
cause death or serious injury to a child 12 years or
younger, including a child in a rear-facing child
restraint.
Never install a rear-facing child restraint in the front
seat of a vehicle. Only use a rear-facing child
restraint in the rear seat. If the vehicle does not have
a rear seat, do not transport a rear-facing child
restraint in that vehicle.
WARNING!
6
23_JL_OM_EN_USC_t.book Page 261
Page 267 of 396
SAFETY265
(Continued)
Seat Belt Extender
If a seat belt is not long enough to fit properly, even when
the webbing is fully extended and the adjustable upper
shoulder belt anchorage (if equipped) is in its lowest
position, an authorized dealer can provide you with a Seat
Belt Extender. The Seat Belt Extender should be used only
if the existing seat belt is not long enough. When the Seat
Belt Extender is not required for a different occupant, it
must be removed.
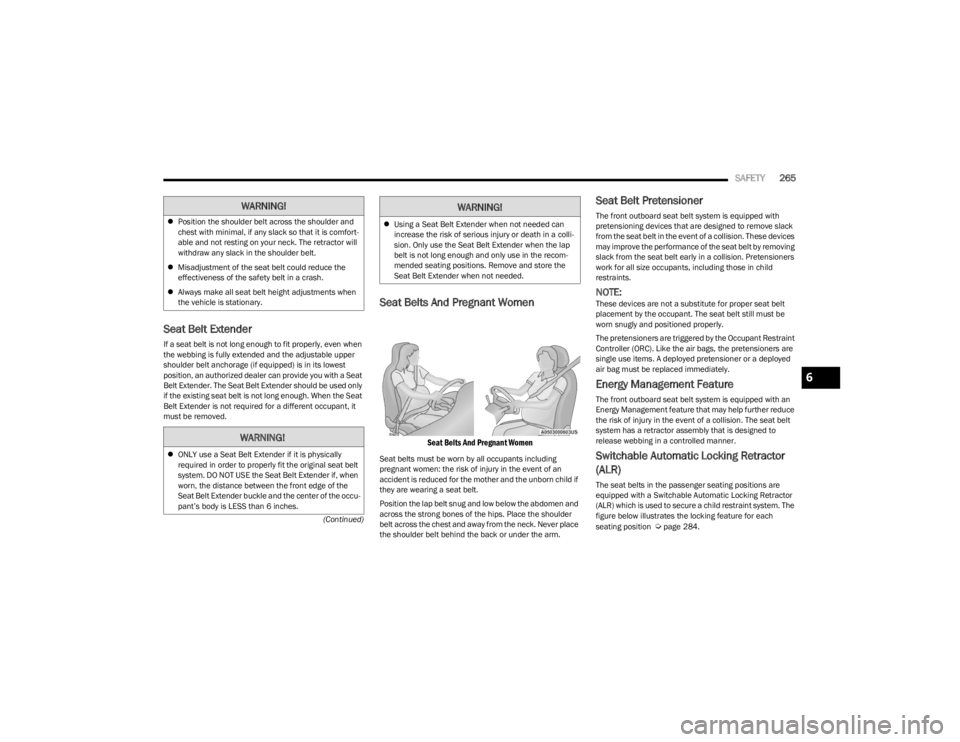
Seat Belts And Pregnant Women
Seat Belts And Pregnant Women
Seat belts must be worn by all occupants including
pregnant women: the risk of injury in the event of an
accident is reduced for the mother and the unborn child if
they are wearing a seat belt.
Position the lap belt snug and low below the abdomen and
across the strong bones of the hips. Place the shoulder
belt across the chest and away from the neck. Never place
the shoulder belt behind the back or under the arm.
Seat Belt Pretensioner
The front outboard seat belt system is equipped with
pretensioning devices that are designed to remove slack
from the seat belt in the event of a collision. These devices
may improve the performance of the seat belt by removing
slack from the seat belt early in a collision. Pretensioners
work for all size occupants, including those in child
restraints.
NOTE:These devices are not a substitute for proper seat belt
placement by the occupant. The seat belt still must be
worn snugly and positioned properly.
The pretensioners are triggered by the Occupant Restraint
Controller (ORC). Like the air bags, the pretensioners are
single use items. A deployed pretensioner or a deployed
air bag must be replaced immediately.
Energy Management Feature
The front outboard seat belt system is equipped with an
Energy Management feature that may help further reduce
the risk of injury in the event of a collision. The seat belt
system has a retractor assembly that is designed to
release webbing in a controlled manner.
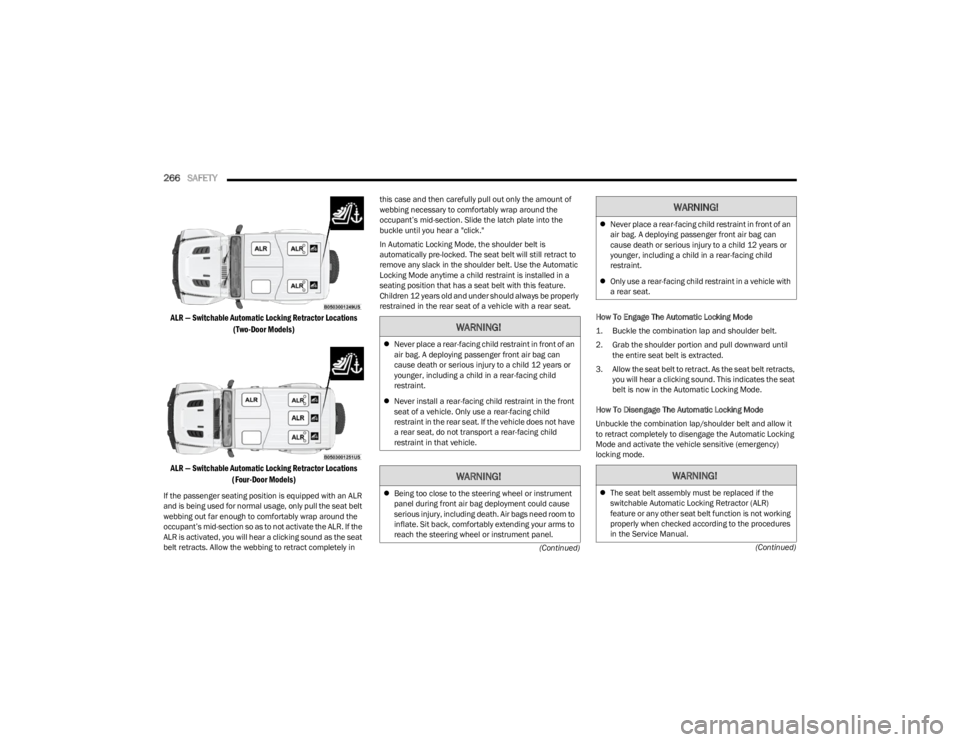
Switchable Automatic Locking Retractor
(ALR)
The seat belts in the passenger seating positions are
equipped with a Switchable Automatic Locking Retractor
(ALR) which is used to secure a child restraint system. The
figure below illustrates the locking feature for each
seating position
Úpage 284.
Position the shoulder belt across the shoulder and
chest with minimal, if any slack so that it is comfort -
able and not resting on your neck. The retractor will
withdraw any slack in the shoulder belt.
Misadjustment of the seat belt could reduce the
effectiveness of the safety belt in a crash.
Always make all seat belt height adjustments when
the vehicle is stationary.
WARNING!
ONLY use a Seat Belt Extender if it is physically
required in order to properly fit the original seat belt
system. DO NOT USE the Seat Belt Extender if, when
worn, the distance between the front edge of the
Seat Belt Extender buckle and the center of the occu -
pant’s body is LESS than 6 inches.
WARNING!
Using a Seat Belt Extender when not needed can
increase the risk of serious injury or death in a colli-
sion. Only use the Seat Belt Extender when the lap
belt is not long enough and only use in the recom -
mended seating positions. Remove and store the
Seat Belt Extender when not needed.
WARNING!
6
23_JL_OM_EN_USC_t.book Page 265
Page 268 of 396
266SAFETY
(Continued)
(Continued)
ALR — Switchable Automatic Locking Retractor Locations
(Two-Door Models)
ALR — Switchable Automatic Locking Retractor Locations (Four-Door Models)
If the passenger seating position is equipped with an ALR
and is being used for normal usage, only pull the seat belt
webbing out far enough to comfortably wrap around the
occupant’s mid-section so as to not activate the ALR. If the
ALR is activated, you will hear a clicking sound as the seat
belt retracts. Allow the webbing to retract completely in this case and then carefully pull out only the amount of
webbing necessary to comfortably wrap around the
occupant’s mid-section. Slide the latch plate into the
buckle until you hear a "click."
In Automatic Locking Mode, the shoulder belt is
automatically pre-locked. The seat belt will still retract to
remove any slack in the shoulder belt. Use the Automatic
Locking Mode anytime a child restraint is installed in a
seating position that has a seat belt with this feature.
Children 12 years old and under should always be properly
restrained in the rear seat of a vehicle with a rear seat.
How To Engage The Automatic Locking Mode
1. Buckle the combination lap and shoulder belt.
2. Grab the shoulder portion and pull downward until the entire seat belt is extracted.
3. Allow the seat belt to retract. As the seat belt retracts, you will hear a clicking sound. This indicates the seat
belt is now in the Automatic Locking Mode.
How To Disengage The Automatic Locking Mode
Unbuckle the combination lap/shoulder belt and allow it
to retract completely to disengage the Automatic Locking
Mode and activate the vehicle sensitive (emergency)
locking mode.
WARNING!
Never place a rear-facing child restraint in front of an
air bag. A deploying passenger front air bag can
cause death or serious injury to a child 12 years or
younger, including a child in a rear-facing child
restraint.
Never install a rear-facing child restraint in the front
seat of a vehicle. Only use a rear-facing child
restraint in the rear seat. If the vehicle does not have
a rear seat, do not transport a rear-facing child
restraint in that vehicle.
WARNING!
Being too close to the steering wheel or instrument
panel during front air bag deployment could cause
serious injury, including death. Air bags need room to
inflate. Sit back, comfortably extending your arms to
reach the steering wheel or instrument panel.
Never place a rear-facing child restraint in front of an
air bag. A deploying passenger front air bag can
cause death or serious injury to a child 12 years or
younger, including a child in a rear-facing child
restraint.
Only use a rear-facing child restraint in a vehicle with
a rear seat.
WARNING!
The seat belt assembly must be replaced if the
switchable Automatic Locking Retractor (ALR)
feature or any other seat belt function is not working
properly when checked according to the procedures
in the Service Manual.
WARNING!
23_JL_OM_EN_USC_t.book Page 266
Page 269 of 396
SAFETY267
SUPPLEMENTAL RESTRAINT SYSTEMS
(SRS)
Some of the safety features described in this section may
be standard equipment on some models, or may be
optional equipment on others. If you are not sure, ask an
authorized dealer.
The air bag system must be ready to protect you in a
collision. The Occupant Restraint Controller (ORC)
monitors the internal circuits and interconnecting wiring
associated with the electrical Air Bag System
Components. Your vehicle may be equipped with the
following Air Bag System Components:
Air Bag System Components
Occupant Restraint Controller (ORC)
Air Bag Warning Light
Steering Wheel and Column
Instrument Panel
Knee Impact Bolsters
Driver and Front Passenger Air Bags
Seat Belt Buckle Switch
Supplemental Side Air Bags
Front and Side Impact Sensors
Seat Belt Pretensioners
Seat Track Position Sensors
Occupant Classification System
Air Bag Warning Light
The Occupant Restraint Controller (ORC)
monitors the readiness of the electronic parts
of the air bag system whenever the ignition
switch is in the START or ON/RUN position. If
the ignition switch is in the OFF position or in the ACC
position, the air bag system is not on and the air bags will
not inflate.
The ORC contains a backup power supply system that may
deploy the air bag system even if the battery loses power
or it becomes disconnected prior to deployment.
The ORC turns on the Air Bag Warning Light in the
instrument panel for approximately four to eight seconds
for a self-check when the ignition switch is first in the ON/
RUN position. After the self-check, the Air Bag Warning
Light will turn off. If the ORC detects a malfunction in any
part of the system, it turns on the Air Bag Warning Light,
either momentarily or continuously. A single chime will
sound to alert you if the light comes on again after initial
startup.
The ORC also includes diagnostics that will illuminate the
instrument panel Air Bag Warning Light if a malfunction is
detected that could affect the air bag system. The
diagnostics also record the nature of the malfunction. While the air bag system is designed to be maintenance
free, if any of the following occurs, have an authorized
dealer service the air bag system immediately.
The Air Bag Warning Light does not come on during the
four to eight seconds when the ignition switch is first in
the ON/RUN position.
The Air Bag Warning Light remains on after the four to
eight-second interval.
The Air Bag Warning Light comes on intermittently or
remains on while driving.
NOTE:If the speedometer, tachometer, or any engine related
gauges are not working, the Occupant Restraint Controller
(ORC) may also be disabled. In this condition the air bags
may not be ready to inflate for your protection. Have an
authorized dealer service the air bag system immediately.
Redundant Air Bag Warning Light
If a fault with the Air Bag Warning Light is
detected, which could affect the Supplemental
Restraint System (SRS), the Redundant Air Bag
Warning Light will illuminate on the instrument
panel. The Redundant Air Bag Warning Light will stay on
Failure to replace the seat belt assembly could
increase the risk of injury in collisions.
Do not use the Automatic Locking Mode to restrain
occupants who are wearing the seat belt or children
who are using booster seats. The locked mode is only
used to install rear-facing or forward-facing child
restraints that have a harness for restraining the
child.
WARNING!
WARNING!
Ignoring the Air Bag Warning Light in your instrument
panel could mean you won’t have the air bag system to
protect you in a collision. If the light does not come on
as a bulb check when the ignition is first turned on,
stays on after you start the vehicle, or if it comes on as
you drive, have an authorized dealer service the air bag
system immediately.
6
23_JL_OM_EN_USC_t.book Page 267
Page 270 of 396
268SAFETY
until the fault is cleared. In addition, a single chime will
sound to alert you that the Redundant Air Bag Warning
Light has come on and a fault has been detected. If the
Redundant Air Bag Warning Light comes on intermittently
or remains on while driving have an authorized dealer
service the vehicle immediately
Úpage 117.
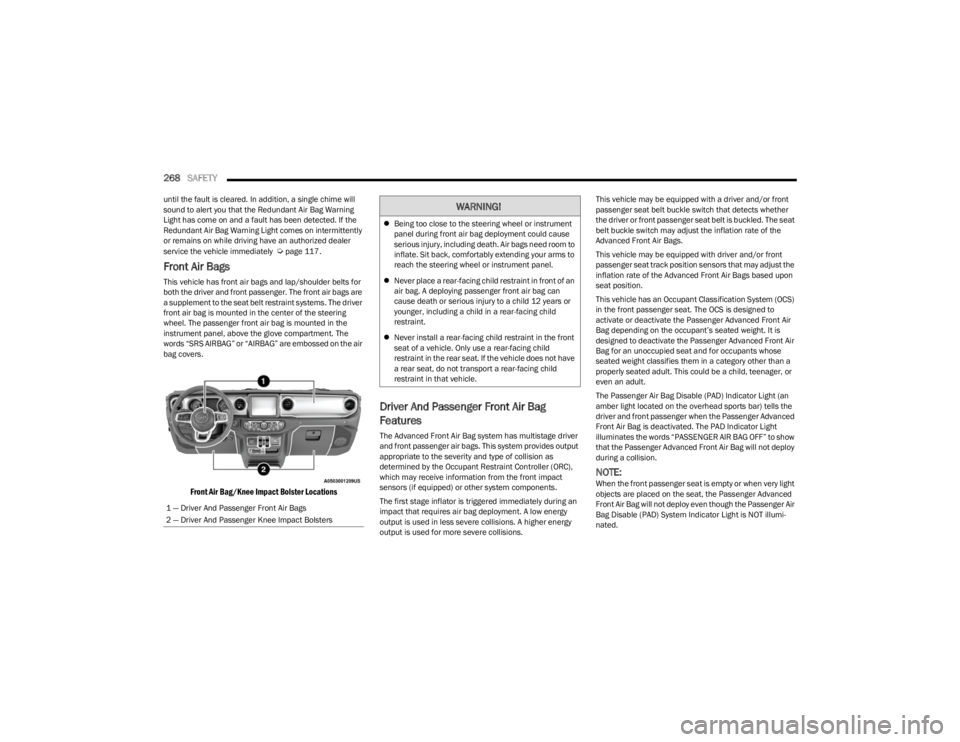
Front Air Bags
This vehicle has front air bags and lap/shoulder belts for
both the driver and front passenger. The front air bags are
a supplement to the seat belt restraint systems. The driver
front air bag is mounted in the center of the steering
wheel. The passenger front air bag is mounted in the
instrument panel, above the glove compartment. The
words “SRS AIRBAG” or “AIRBAG” are embossed on the air
bag covers.
Front Air Bag/Knee Impact Bolster Locations
Driver And Passenger Front Air Bag
Features
The Advanced Front Air Bag system has multistage driver
and front passenger air bags. This system provides output
appropriate to the severity and type of collision as
determined by the Occupant Restraint Controller (ORC),
which may receive information from the front impact
sensors (if equipped) or other system components.
The first stage inflator is triggered immediately during an
impact that requires air bag deployment. A low energy
output is used in less severe collisions. A higher energy
output is used for more severe collisions. This vehicle may be equipped with a driver and/or front
passenger seat belt buckle switch that detects whether
the driver or front passenger seat belt is buckled. The seat
belt buckle switch may adjust the inflation rate of the
Advanced Front Air Bags.
This vehicle may be equipped with driver and/or front
passenger seat track position sensors that may adjust the
inflation rate of the Advanced Front Air Bags based upon
seat position.
This vehicle has an Occupant Classification System (OCS)
in the front passenger seat. The OCS is designed to
activate or deactivate the Passenger Advanced Front Air
Bag depending on the occupant’s seated weight. It is
designed to deactivate the Passenger Advanced Front Air
Bag for an unoccupied seat and for occupants whose
seated weight classifies them in a category other than a
properly seated adult. This could be a child, teenager, or
even an adult.
The Passenger Air Bag Disable (PAD) Indicator Light (an
amber light located on the overhead sports bar) tells the
driver and front passenger when the Passenger Advanced
Front Air Bag is deactivated. The PAD Indicator Light
illuminates the words “PASSENGER AIR BAG OFF” to show
that the Passenger Advanced Front Air Bag will not deploy
during a collision.
NOTE:When the front passenger seat is empty or when very light
objects are placed on the seat, the Passenger Advanced
Front Air Bag will not deploy even though the Passenger Air
Bag Disable (PAD) System Indicator Light is NOT illumi
-
nated.
1 — Driver And Passenger Front Air Bags
2 — Driver And Passenger Knee Impact Bolsters
WARNING!
Being too close to the steering wheel or instrument
panel during front air bag deployment could cause
serious injury, including death. Air bags need room to
inflate. Sit back, comfortably extending your arms to
reach the steering wheel or instrument panel.
Never place a rear-facing child restraint in front of an
air bag. A deploying passenger front air bag can
cause death or serious injury to a child 12 years or
younger, including a child in a rear-facing child
restraint.
Never install a rear-facing child restraint in the front
seat of a vehicle. Only use a rear-facing child
restraint in the rear seat. If the vehicle does not have
a rear seat, do not transport a rear-facing child
restraint in that vehicle.
23_JL_OM_EN_USC_t.book Page 268