stop start JEEP WRANGLER 2023 Workshop Manual
[x] Cancel search | Manufacturer: JEEP, Model Year: 2023, Model line: WRANGLER, Model: JEEP WRANGLER 2023Pages: 396, PDF Size: 25.15 MB
Page 177 of 396
STARTING AND OPERATING175
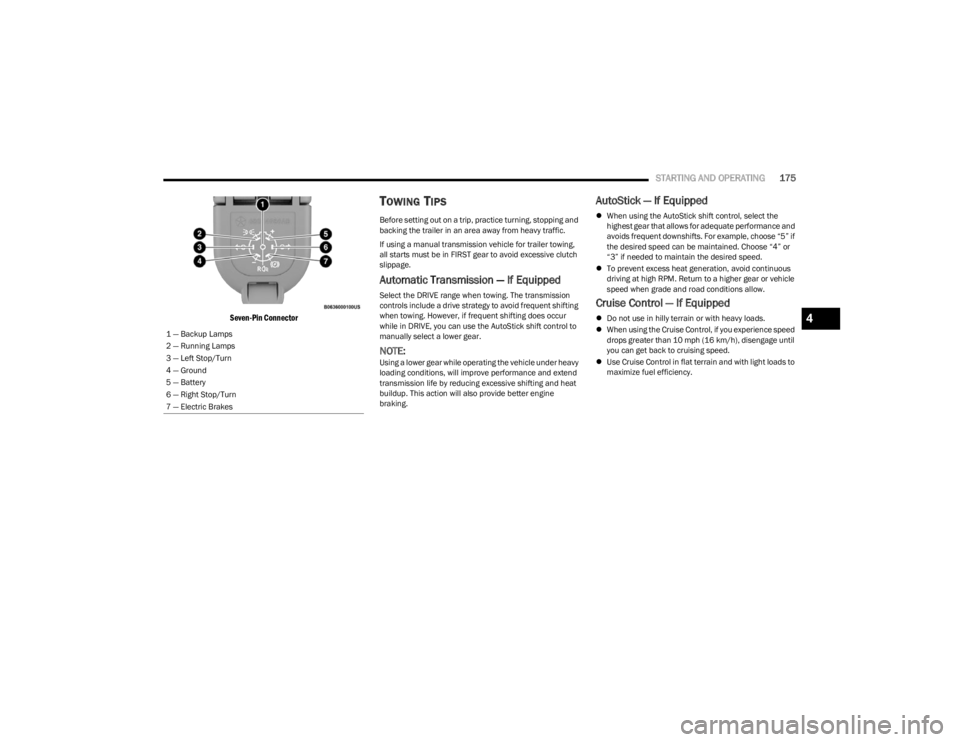
Seven-Pin Connector
TOWING TIPS
Before setting out on a trip, practice turning, stopping and
backing the trailer in an area away from heavy traffic.
If using a manual transmission vehicle for trailer towing,
all starts must be in FIRST gear to avoid excessive clutch
slippage.
Automatic Transmission — If Equipped
Select the DRIVE range when towing. The transmission
controls include a drive strategy to avoid frequent shifting
when towing. However, if frequent shifting does occur
while in DRIVE, you can use the AutoStick shift control to
manually select a lower gear.
NOTE:Using a lower gear while operating the vehicle under heavy
loading conditions, will improve performance and extend
transmission life by reducing excessive shifting and heat
buildup. This action will also provide better engine
braking.
AutoStick — If Equipped
When using the AutoStick shift control, select the
highest gear that allows for adequate performance and
avoids frequent downshifts. For example, choose “5” if
the desired speed can be maintained. Choose “4” or
“3” if needed to maintain the desired speed.
To prevent excess heat generation, avoid continuous
driving at high RPM. Return to a higher gear or vehicle
speed when grade and road conditions allow.
Cruise Control — If Equipped
Do not use in hilly terrain or with heavy loads.
When using the Cruise Control, if you experience speed
drops greater than 10 mph (16 km/h), disengage until
you can get back to cruising speed.
Use Cruise Control in flat terrain and with light loads to
maximize fuel efficiency.
1 — Backup Lamps
2 — Running Lamps
3 — Left Stop/Turn
4 — Ground
5 — Battery
6 — Right Stop/Turn
7 — Electric Brakes4
23_JL_OM_EN_USC_t.book Page 175
Page 179 of 396

STARTING AND OPERATING177
Shifting Into (N) Neutral
Use the following procedure to prepare your vehicle for
recreational towing:
1. Bring the vehicle to a complete stop on level ground.
2. Press and hold the brake pedal. 3. Shift the automatic transmission into NEUTRAL or
press the clutch pedal on a manual transmission.
4. Turn the engine off.
5. Shift the transfer case lever into (N) Neutral.
6. Start the engine.
7. Shift the transmission into REVERSE.
8. Release the brake pedal (and clutch pedal on manual transmissions) for five seconds and ensure that there
is no vehicle movement.
9. Repeat steps seven and eight with automatic transmission in DRIVE or manual transmission in
FIRST gear.
10. Turn the engine off.
11. Firmly apply the parking brake.
12. Shift the transmission into PARK or place manual transmission in gear (NOT in NEUTRAL).
13. Attach the vehicle to the tow vehicle using a suitable tow bar.
14. Release the parking brake.
Shifting Out of (N) Neutral
Use the following procedure to prepare your vehicle for
normal usage.
1. Bring the vehicle to a complete stop, leaving it connected to the tow vehicle.
2. Firmly apply the parking brake.
3. Start the engine.
4. Press and hold the brake pedal.
5. Shift the transmission into NEUTRAL.
6. Turn the engine off.
7. Shift the transfer case lever to the desired position.
NOTE:When shifting the transfer case out of (N) Neutral, the
engine should remain off to avoid gear clash.
8. Shift the automatic transmission into PARK, or place manual transmission in NEUTRAL.
9. Release the brake pedal.
10. Disconnect vehicle from the tow vehicle.
11. Start the engine.
12. Press and hold the brake pedal.
13. Release the parking brake.
14. Shift the transmission into gear, release the brake pedal (and clutch pedal on manual transmissions),
and check that the vehicle operates normally.
Do not use a fascia/bumper-mounted clamp-on tow
bar on your vehicle. The bumper face bar will be
damaged.
WARNING!
You or others could be injured or killed if you leave the
vehicle unattended with the transfer case in the (N)
Neutral position without first fully engaging the parking
brake. The transfer case (N) Neutral position
disengages both the front and rear driveshafts from the
powertrain, and will allow the vehicle to roll, even if the
automatic transmission is in PARK (or manual
transmission is in gear). The parking brake should
always be applied when the driver is not in the vehicle.
CAUTION!
It is necessary to follow these steps to be certain that
the transfer case is fully in (N) Neutral before
recreational towing to prevent damage to internal parts.
CAUTION!
CAUTION!
Damage to the transmission may occur if the
transmission is shifted into PARK with the transfer case
in (N) Neutral and the engine running. With the transfer
case in (N) Neutral ensure that the engine is OFF before
shifting the transmission into PARK.
4
23_JL_OM_EN_USC_t.book Page 177
Page 181 of 396
STARTING AND OPERATING179
(Continued)
The Basics Of Off-Road Driving
You will encounter many types of terrain driving off-road.
You should be familiar with the terrain and area before
proceeding. There are many types of surface conditions:
hard-packed dirt, gravel, rocks, grass, sand, mud, snow
and ice. Every surface has a different effect on your
vehicle's steering, handling and traction. Controlling your
vehicle is one of the keys to successful off-road driving, so
always keep a firm grip on the steering wheel and
maintain a good driving posture. Avoid sudden
accelerations, turns or braking. In most cases, there are
no road signs, posted speed limits or signal lights.
Therefore, you will need to use your own good judgment on
what is safe and what is not. When on a trail, you should
always be looking ahead for surface obstacles and
changes in terrain. The key is to plan your future driving
route while remembering what you are currently driving
over.
NOTE:It is recommended that the Stop/Start system and the
Forward Collision Warning (FCW) system (if equipped) be
disabled during off-road use.
When To Use 4L Range
When off-road driving, shift into 4L for additional traction
and control on slippery or difficult terrain, ascending or
descending steep hills, and to increase low speed pulling
power. This range should be limited to extreme situations
such as deep snow, mud, steep inclines, or sand where
additional low speed pulling power is needed. Vehicle
speeds in excess of 25 mph (40 km/h) should be avoided
when in 4L.
Simultaneous Brake And Throttle
Operation
Many off-road driving conditions require the simultaneous
use of the brake and throttle (two-footed driving). When
climbing rocks, logs, or other stepped objects, using light
brake pressure with light throttle will keep the vehicle from
jerking or lurching. This technique is also used when you
need to stop and restart a vehicle on a steep incline.
Driving In Snow, Mud And Sand
SNOW
In heavy snow or for additional control and traction at
slower speeds, shift the transmission into a low gear and
the transfer case into 4L if necessary. Do not shift to a
lower gear than necessary to maintain headway.
Over-revving the engine can spin the wheels and traction
will be lost. If you start to slow to a stop, try turning your
steering wheel no more than a 1/4 turn quickly back and
forth, while still applying throttle. This will allow the tires to
get fresh traction and help maintain your momentum.
MUD
Deep mud creates a great deal of suction around the tires
and is very difficult to get through. You should use DRIVE,
with the transfer case in the 4L position to maintain your
momentum. If you start to slow to a stop, try turning your
steering wheel no more than a 1/4 turn quickly back and
forth for additional traction. Mud holes pose an increased
threat of vehicle damage and getting stuck. They are
normally full of debris from previous vehicles getting
stuck. As a good practice before entering any mud hole,
get out and determine how deep it is, if there are any
hidden obstacles and if the vehicle can be safely
recovered if stuck.
WARNING!
Always wear your seat belt and firmly tie down cargo.
Unsecured cargo can become projectiles in an
off-road situation.
A malfunctioning catalytic converter can reach higher
temperatures than in normal operating conditions.
This can cause a fire if you drive slowly or park over
flammable substances such as dry plants, wood,
cardboard, etc. This could result in death or serious
injury to the driver, occupants or others.
CAUTION!
Do not use 4L when operating the vehicle on dry
pavement. Driveline hardware damage can result.
WARNING!
CAUTION!
On icy or slippery roads, do not downshift at high engine
RPM or vehicle speeds, because engine braking may
cause skidding and loss of control.
4
23_JL_OM_EN_USC_t.book Page 179
Page 182 of 396
180STARTING AND OPERATING
SAND
Soft sand is very difficult to travel through with full tire
pressure. When crossing soft, sandy spots in a trail,
maintain your vehicle's momentum and do not stop. The
key to driving in soft sand is using the appropriate tire
pressure, accelerating slowly, avoiding abrupt maneuvers
and maintaining the vehicle's momentum. If you are going
to be driving on large soft sandy areas or dunes, reduce
your tire pressure to a minimum of 15 psi (103 kPa) to
allow for a greater tire surface area. Reduced tire pressure
will drastically improve your traction and handling while
driving on the soft sand, but you must return the tires to
normal air pressure before driving on pavement or other
hard surfaces. Be sure you have a way to reinflate the tires
prior to reducing the pressure.
Crossing Obstacles (Rocks And Other
High Points)
While driving off-road, you will encounter many types of
terrain. These varying types of terrain bring different types
of obstacles. Before proceeding, review the path ahead to
determine the correct approach and your ability to safely
recover the vehicle if something goes wrong. Keeping a
firm grip on the steering wheel, bring the vehicle to a
complete stop and then inch the vehicle forward until it
makes contact with the object. Apply the throttle lightly while holding a light brake pressure and ease the vehicle
up and over the object.
USING A SPOTTER
There are many times where it is hard to see the obstacle
or determine the correct path. Determining the correct
path can be extremely difficult when you are confronting
many obstacles. In these cases have someone guide you
over, through, or around the obstacle. Have the person
stand a safe distance in front of you where they can see
the obstacle, watch your tires and undercarriage, and
guide you through.
CROSSING LARGE ROCKS
When approaching large rocks, choose a path which
ensures you drive over the largest of them with your tires.
This will lift your undercarriage over the obstacle. The
tread of the tire is tougher and thicker than the side wall
and is designed to take the abuse. Always look ahead and
make every effort to cross the large rocks with your tires.
CROSSING A RAVINE, GULLY, DITCH,
WASHOUT OR RUT
When crossing a ravine, gully, ditch, washout or a large rut,
the angled approach is the key to maintaining your
vehicle's mobility. Approach these obstacles at a
45-degree angle and let each tire go through the obstacle
independently. You need to use caution when crossing
large obstacles with steep sides. Do not attempt to cross
any large obstacle with steep sides at an angle great
enough to put the vehicle at risk of a rollover. If you get
caught in a rut, dig a small trench to the right or left at a
45-degree angle ahead of the front tires. Use the removed
dirt to fill the rut ahead of the turnout you just created. You
should now be able to drive out following the trench you
just created at a 45-degree angle.
CROSSING LOGS
To cross a log, approach it at a slight angle (approximately
10 to 15 degrees). This allows one front tire to be on top
of the log while the other just starts to climb the log. While
climbing the log, modulate your brake and accelerator to
avoid spinning the log out from under your tires. Then ease
the vehicle off the log using your brakes.
CAUTION!
Reduced tire pressures may cause tire unseating and
total loss of air pressure. To reduce the risk of tire
unseating, while at a reduced tire pressure, reduce your
speed and avoid sharp turns or abrupt maneuvers.
WARNING!
Crossing obstacles can cause abrupt steering system
loading which could cause you to lose control of your
vehicle.
CAUTION!
Never attempt to straddle a rock that is large enough
to strike your axles or undercarriage.
Never attempt to drive over a rock which is large
enough to contact the door sills.
WARNING!
There is an increased risk of rollover when crossing an
obstacle, at any angle, with steep sides.
23_JL_OM_EN_USC_t.book Page 180
Page 184 of 396
182STARTING AND OPERATING
DRIVING ACROSS AN INCLINE
If at all possible, avoid driving across an incline. If it is
necessary, know your vehicle's abilities. Driving across an
incline places more weight on the downhill wheels, which
increases the possibilities of a downhill slide or rollover.
Make sure the surface has good traction with firm and
stable soils. If possible, transverse the incline at an angle
heading slightly up or down.
IF YOU STALL OR BEGIN TO LOSE HEADWAY
If you stall or begin to lose headway while climbing a steep
hill, allow your vehicle to come to a stop and immediately
apply the brake. Restart the engine and shift into
REVERSE. Back slowly down the hill allowing engine
braking to control the descent and apply your brakes, if
necessary, but do not allow the tires to lock.
Driving Through Water
Extreme care should be taken crossing any type of water.
Water crossings should be avoided, if possible, and only
be attempted when necessary in a safe, responsible
manner. Only drive through areas which are designated
and approved. Tread lightly and avoid damage to the
environment. Know your vehicle's abilities and be able to
recover it if something goes wrong. Never stop or shut a
vehicle off when crossing deep water unless you ingested
water into the engine air intake. If the engine stalls, do not
attempt to restart it. Determine if it has ingested water
first. The key to any crossing is low and slow. Shift into
FIRST gear (manual transmission), or DRIVE (automatic
transmission), with the transfer case in the 4L position
and proceed very slowly with a constant slow speed of {3
to 5 mph (5 to 8 km/h) maximum} and light throttle. Keep
the vehicle moving; do not try to accelerate through the
crossing. After crossing any water higher than the bottom
of the axle differentials, inspect all of the vehicle fluids for
signs of water ingestion.
BEFORE YOU CROSS ANY TYPE OF WATER
As you approach any type of water, you need to determine
if you can cross it safely and responsibly. If necessary, get
out and walk through the water or probe it with a stick. You
need to be sure of its depth, approach angle, current and
bottom condition. Be careful of murky or muddy waters;
check for hidden obstacles. Make sure you will not be
intruding on any wildlife, and you can recover the vehicle
if necessary. The key to a safe crossing is the water depth,
current and bottom conditions. On soft bottoms, the
vehicle will sink in, effectively increasing the water level on
the vehicle. Be sure to consider this when determining the
depth and the ability to safely cross.
CROSSING PUDDLES, POOLS, FLOODED
AREAS OR OTHER STANDING WATER
Puddles, pools, flooded or other standing water areas
normally contain murky or muddy waters. These water
types normally contain hidden obstacles and make it
difficult to determine an accurate water depth, approach
angle, and bottom condition. Murky or muddy water holes
are where you want to hook up tow straps prior to entering.
This makes for a faster, cleaner and easier vehicle
recovery. If you are able to determine you can safely cross,
than proceed using the low and slow method.
WARNING!
Driving across an incline increases the risk of a rollover,
which may result in severe injury.
WARNING!
If the engine stalls or you lose headway or cannot make
it to the top of a steep hill or grade, never attempt to
turn around. To do so may result in tipping and rolling
the vehicle, which may result in severe injury. Always
back carefully straight down a hill in REVERSE. Never
back down a hill in NEUTRAL using only the vehicle
brakes. Never drive diagonally across a hill, always drive
straight up or down.
CAUTION!
Water ingestion into the axles, transmission, transfer
case, engine or vehicle interior can occur if you drive
too fast or through too deep of water. Water can
cause permanent damage to engine, driveline or
other vehicle components, and your brakes will be
less effective once wet and/or muddy.
When driving through water, do not exceed 5 mph
(8 km/h). Always check water depth before entering
as a precaution, and check all fluids afterward.
Driving through water may cause damage that may
not be covered by the New Vehicle Limited Warranty.
CAUTION!
Muddy waters can reduce the cooling system
effectiveness by depositing debris onto the radiator.
23_JL_OM_EN_USC_t.book Page 182
Page 204 of 396
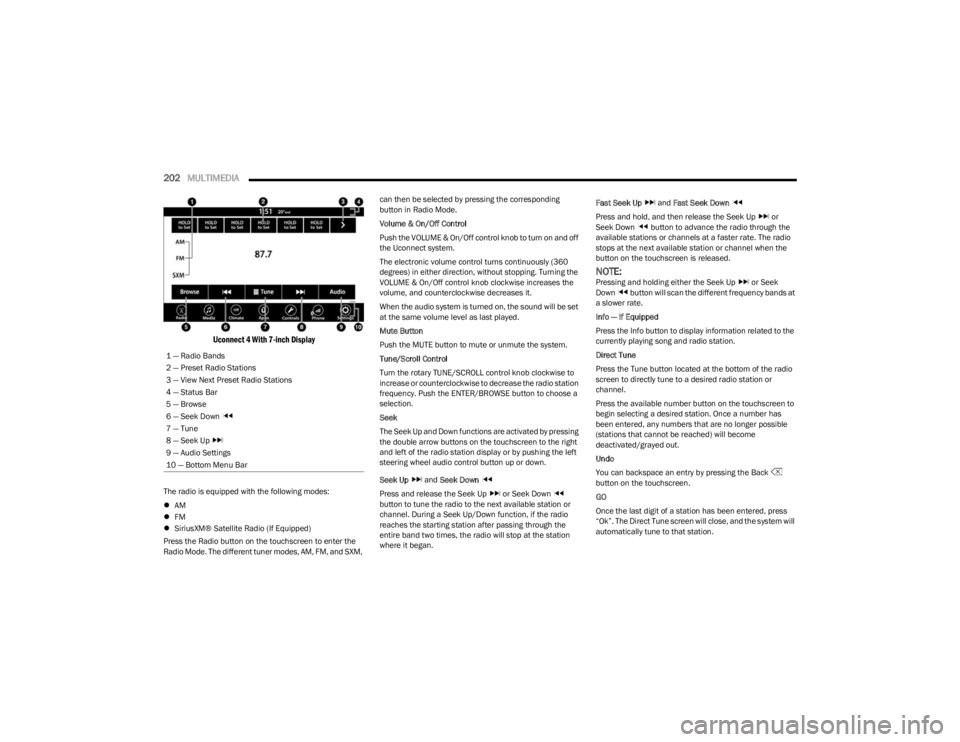
202MULTIMEDIA
Uconnect 4 With 7-inch Display
The radio is equipped with the following modes:
AM
FM
SiriusXM® Satellite Radio (If Equipped)
Press the Radio button on the touchscreen to enter the
Radio Mode. The different tuner modes, AM, FM, and SXM, can then be selected by pressing the corresponding
button in Radio Mode.
Volume & On/Off Control
Push the VOLUME & On/Off control knob to turn on and off
the Uconnect system.
The electronic volume control turns continuously (360
degrees) in either direction, without stopping. Turning the
VOLUME & On/Off control knob clockwise increases the
volume, and counterclockwise decreases it.
When the audio system is turned on, the sound will be set
at the same volume level as last played.
Mute Button
Push the MUTE button to mute or unmute the system.
Tune/Scroll Control
Turn the rotary TUNE/SCROLL control knob clockwise to
increase or counterclockwise to decrease the radio station
frequency. Push the ENTER/BROWSE button to choose a
selection.
Seek
The Seek Up and Down functions are activated by pressing
the double arrow buttons on the touchscreen to the right
and left of the radio station display or by pushing the left
steering wheel audio control button up or down.
Seek Up
and Seek Down
Press and release the Seek Up or Seek Down
button to tune the radio to the next available station or
channel. During a Seek Up/Down function, if the radio
reaches the starting station after passing through the
entire band two times, the radio will stop at the station
where it began. Fast Seek Up
and Fast Seek Down
Press and hold, and then release the Seek Up or
Seek Down button to advance the radio through the
available stations or channels at a faster rate. The radio
stops at the next available station or channel when the
button on the touchscreen is released.
NOTE:Pressing and holding either the Seek Up or Seek
Down button will scan the different frequency bands at
a slower rate.
Info — If Equipped
Press the Info button to display information related to the
currently playing song and radio station.
Direct Tune
Press the Tune button located at the bottom of the radio
screen to directly tune to a desired radio station or
channel.
Press the available number button on the touchscreen to
begin selecting a desired station. Once a number has
been entered, any numbers that are no longer possible
(stations that cannot be reached) will become
deactivated/grayed out.
Undo
You can backspace an entry by pressing the Back
button on the touchscreen.
GO
Once the last digit of a station has been entered, press
“Ok”. The Direct Tune screen will close, and the system will
automatically tune to that station.
1 — Radio Bands
2 — Preset Radio Stations
3 — View Next Preset Radio Stations
4 — Status Bar
5 — Browse
6 — Seek Down
7 — Tune
8 — Seek Up
9 — Audio Settings
10 — Bottom Menu Bar
23_JL_OM_EN_USC_t.book Page 202
Page 238 of 396

236MULTIMEDIA
Google Assistant — If Equipped
With the Google Assistant, you can get help and keep tabs
on your car. Google Assistant is available across your
devices, including Android™ phones, iPhone® devices, or
voice-activated speakers, like Google Home. If you need
assistance, ask Google for help, or for a complete list of
commands by saying: “Hey Google, ask
help with my car.”
Here are a few examples of commands:
“Hey Google, ask
“Hey Google, ask
“Hey Google, ask
Chrysler Drive, Auburn Hills, Michigan to my
“Hey Google, ask
of my
To link your Uconnect account with Google Assistant,
follow these steps:
1. Download and install the Google Assistant app on your smart phone from the App Store® or Google
Play.
2. After installation, log in to the Google Assistant app with your Gmail ID. Verify your account by pressing
the icon in the upper right-hand corner.
3. Press the Discover button in the bottom left corner of the screen. Enter the vehicle brand name.
4. A prompt will appear to link your Uconnect account. Press “Link Uconnect to Google”. 5. Press “Sign In” and enter the email address and
password you created when you activated SiriusXM
Guardian™. There will be additional settings to
confirm on the following screen.
6. Lastly, press “Authorize” to complete the linking process.
Now, you can ask Google Assistant to help you:
Remotely start the engine, or cancel a remote start
Send a destination to your vehicle’s built-in Uconnect
Navigation system
Monitor vehicle vitals, such as tire pressure, fuel level
and oil life
And more!
Family Drive Alerts — If Equipped
Description
Family Drive Alerts help promote safer driving and give you
peace of mind when your loved ones are out on the road.
You can set boundary limits, monitor driving speed, and
pinpoint your vehicle’s location any time, any place. Use
the Vehicle Branded App to set alerts:
Boundary Alert
Receive a notification the moment your vehicle is
driven either out of or into a geographic boundary that
you set.
Curfew Alert
Receive a notification when your car is being driven
outside of the curfew time.
Speed Alert
Receive a notification whenever your car exceeds a
speed limit you set.
Valet Alert
Receive a notification if and when your vehicle is driven
outside a quarter-mile radius of a valet drop-off zone.
SmartWatch Integration — If Equipped
Description
SmartWatch Integration puts the Vehicle Branded App
right on your Apple® Watch or Android™ Wear. To get
started, follow these steps:
1. Download the Vehicle Branded App from the App
Store® or Google Play.
2. Log onto the app from your smartphone using the username and password you created when you first
set up your account.
3. Make sure your watch and smartphone are connected through Bluetooth®.
4. The Vehicle Branded App should appear on your SmartWatch.
Once the app is downloaded on your SmartWatch, you can
enjoy these features:
Lock or unlock your vehicle by tapping the remote lock
button in the app and entering your security PIN.
Remote start or stop your vehicle.
View important vehicle stats, such as fuel level, vehicle
location, tire pressure warning, and more.
23_JL_OM_EN_USC_t.book Page 236
Page 241 of 396

MULTIMEDIA239
5.Can I stop a vehicle that is being driven with the
cancel Remote Vehicle Start command? No. If the
vehicle is in motion, the cancel Remote Vehicle Start
button will not stop the vehicle.
6. Why can’t all mobile devices use the Vehicle Branded
App? The Vehicle Branded App has been designed to
work on most devices with the Apple® and Android™
operating systems. The capabilities of these devices
allow us to remotely command your vehicle. Other
operating systems may be supported in the future.
CONNECTED SERVICES REMOTE HORN
& L
IGHTS FAQS
1.
How long does it take to sound my horn and flash the
lights?
Depending on various conditions, it can take
three minutes or more for the request to get through
to your vehicle.
2. Which is faster, my key fob or the Vehicle Branded
App? Your key fob will sound the horn and flash the
lights quicker; however, its range is limited.
3. How do I turn off the horn and lights after I turn them
on? If you are close enough to the vehicle, you can
use the key fob to turn off the horn and lights by
pressing the red Panic button. Otherwise, Remote
Horn & Lights will continue for a maximum of three
minutes.
4. Why can’t all mobile devices use the Vehicle Branded
App? The Vehicle Branded App has been designed to
work on most devices with the Apple® and Android™
operating systems. The capabilities of these devices
allow us to remotely command your vehicle. Other
operating systems may be supported in the future.
CONNECTED SERVICES ACCOUNT FAQS —
I
F EQUIPPED
1.
How do I register for my SiriusXM Guardian™
account? There are three ways that you can register
your SiriusXM Guardian™ Account:
Push the ASSIST button. A call will be placed to an
agent who can assist in registering your new
account.
Press the Activate Services icon in the Apps menu.
Select the button to speak with an agent, who can
assist in registering your new account.
Press the Activate Services icon in the Apps menu.
Enter your email on the touchscreen and then
follow the prompts from the provided email. You
will receive an email with an activation link that
will be good for 72 hours. Once you click the acti -
vation link, you will be prompted to fill out your
information and accept Terms and Conditions.
Then, you will be directed to the SiriusXM
Guardian™ home page to complete your profile
and demo the remote services.
2. Why do I need an email address? Without an email
address, customers cannot register for SiriusXM
Guardian™. Customers need to register so they can
subscribe to receive additional services and create a
SiriusXM Guardian™ Security PIN for remote
command requests.
3. How do I create a SiriusXM Guardian™ security PIN?
Set up your SiriusXM Guardian™ Security PIN during
the registration process. The SiriusXM Guardian™
Security PIN will be required to authenticate you
when accessing your account via SiriusXM Guardian™ Call or performing any remote services,
such as Remote Door Lock/Unlock, Remote Horn &
Lights, or Remote Vehicle Start.
4. What if I forgot my SiriusXM Guardian™ security PIN?
If you’ve already activated services and forgot your
SiriusXM Guardian™ Security PIN, you can reset the
PIN by selecting Edit Profile on your Owner’s Site.
5. How do I update my SiriusXM Guardian™ payment
account address? Your SiriusXM Guardian™ Payment
Account address can be updated online, or by calling
SiriusXM Guardian™ Customer Care from ASSIST in
your vehicle. To update online: login to your Owner’s
Site, and select Edit Profile > SiriusXM Guardian™
Payment Account.
6. How do I update my SiriusXM Guardian™ profile?
Your name, home address, phone number, email
address and SiriusXM Guardian™ Security PIN can be
updated online on your Owner’s Site. Log in to your
Owner’s Site then select Edit Profile to edit your
personal information. Make your edits and click Save.
7. Can I try features or packages before I buy them?
Your new vehicle purchase may have come with an
included trial period for certain Apps and services.
8. Can I access every App and service while driving? No,
some applications and services are not available
while driving. For your own safety, it is not possible to
use some of the touchscreen features while the
vehicle is in motion (e.g. key pad).
9. What happens when my subscription comes up for
renewal? If you have added a credit card to your
account information, your subscription will be
automatically renewed for a term length in
accordance with the service plan that you have
5
23_JL_OM_EN_USC_t.book Page 239
Page 246 of 396
244
SAFETY
SAFETY FEATURES
ANTI-LOCK BRAKE SYSTEM (ABS)
The ABS provides increased vehicle stability and brake
performance under most braking conditions. The system
automatically prevents wheel lock and enhances vehicle
control during braking.
The ABS performs a self-check cycle to ensure that the
ABS is working properly each time the vehicle is started
and driven. During this self-check, you may hear a slight
clicking sound as well as some related motor noises.
The ABS is activated during braking when the system
detects one or more wheels are beginning to lock. Road
conditions such as ice, snow, gravel, bumps, railroad
tracks, loose debris, or panic stops may increase the
likelihood of ABS activation(s).
You also may experience the following normal
characteristics when the ABS activates:
ABS motor noise or clicking sounds (you may continue
to hear for a short time after the stop)
Brake pedal pulsations
A slight drop of the brake pedal at the end of the stop
The ABS is designed to function with the Original
Equipment Manufacturer (OEM) tires. Modification may
result in degraded ABS performance.
Anti-Lock Brake System (ABS) Warning
Light
The yellow ABS Warning Light will turn on when the ignition
is placed in the ON/RUN mode and may stay on for as long
as four seconds.
If the ABS Warning Light remains on or comes on while
driving, it indicates that the anti-lock portion of the brake
system is not functioning and that service is required.
However, the conventional brake system will continue to
operate normally if the ABS Warning Light is on.
If the ABS Warning Light is on, the brake system should be
serviced as soon as possible to restore the benefits of
Anti-Lock Brakes. If the ABS Warning Light does not come
on when the ignition is placed in the ON/RUN mode, have
the light repaired as soon as possible.
REAR SEAT REMINDER ALERT (RSRA) —
I
F EQUIPPED
RSRA alerts you through a visual and auditory notification
of the possible presence of an object, passenger, or pet in
the rear seats if a rear door was opened up to 10 minutes
before the ignition was placed in the ON/RUN position.
RSRA does not directly detect objects, passengers, or pets
in the rear seats. When the previous conditions are met,
RSRA displays the message “Check Rear Seat” on the
instrument cluster display and sounds an auditory alert
upon the driver placing the ignition in the OFF position to
exit the vehicle.
WARNING!
The ABS contains sophisticated electronic equip -
ment that may be susceptible to interference caused
by improperly installed or high output radio transmit -
ting equipment. This interference can cause possible
loss of anti-lock braking capability. Installation of
such equipment should be performed by qualified
professionals.
Pumping of the Anti-Lock Brakes will diminish their
effectiveness and may lead to a collision. Pumping
makes the stopping distance longer. Just press firmly
on your brake pedal when you need to slow down or
stop.
The ABS cannot prevent the natural laws of physics
from acting on the vehicle, nor can it increase
braking or steering efficiency beyond that afforded
by the condition of the vehicle brakes and tires or the
traction afforded.
The ABS cannot prevent collisions, including those
resulting from excessive speed in turns, following
another vehicle too closely, or hydroplaning.
The capabilities of an ABS equipped vehicle must
never be exploited in a reckless or dangerous
manner that could jeopardize the user’s safety or the
safety of others.
23_JL_OM_EN_USC_t.book Page 244
Page 247 of 396

SAFETY245
To enable or disable RSRA, see Úpage 184.
ELECTRONIC BRAKE CONTROL (EBC)
S
YSTEM
If applicable, refer to the “Hybrid Supplement” for
additional information.
Your vehicle is equipped with an advanced Electronic
Brake Control (EBC) system. This system includes
Anti-Lock Brake System (ABS), Brake Assist System (BAS),
Electronic Brake Force Distribution (EBD), Electronic Roll
Mitigation (ERM), Electronic Stability Control (ESC), Hill
Start Assist (HSA), and Traction Control System (TCS). These systems work together to enhance both vehicle
stability and control in various driving conditions.
Your vehicle may also be equipped with Hill Descent
Control (HDC), Rain Brake Support (RBS), Ready Alert
Braking (RAB), and Trailer Sway Control (TSC).
Brake System Warning Light
The red Brake System Warning Light will turn on when the
ignition is placed in the ON/RUN mode and may stay on for
as long as four seconds.
If the Brake System Warning Light remains on or comes on
while driving, it indicates that the brake system is not
functioning properly and that immediate service is
required. If the Brake System Warning Light does not
come on when the ignition is placed in the ON/RUN mode,
have the light repaired as soon as possible.
Brake Assist System (BAS)
The BAS is designed to optimize the vehicle’s braking
capability during emergency braking maneuvers. The
system detects an emergency braking situation by sensing
the rate and amount of brake application and then applies
optimum pressure to the brakes. This can help reduce
braking distances. The BAS complements the Anti-Lock
Brake System (ABS). Applying the brakes very quickly
results in the best BAS assistance. To receive the benefit
of the system, you must apply continuous braking
pressure during the stopping sequence (do not “pump”
the brakes). Do not reduce brake pedal pressure unless
braking is no longer desired. Once the brake pedal is
released, the BAS is deactivated.
Electronic Brake Force Distribution (EBD)
EBD manages the distribution of the braking torque
between the front and rear axles by limiting braking
pressure to the rear axle. This is done to prevent overslip
of the rear wheels to avoid vehicle instability, and to
prevent the rear axle from entering ABS before the front
axle.
Electronic Roll Mitigation (ERM)
ERM anticipates the potential for wheel lift by monitoring
the driver’s steering wheel input and the speed of the
vehicle. When ERM determines that the rate of change of
the steering wheel angle and vehicle’s speed are
sufficient to potentially cause wheel lift, it then applies the
appropriate brake and may also reduce engine power to
lessen the chance that wheel lift will occur. ERM can only
reduce the chance of wheel lift occurring during severe or
evasive driving maneuvers; it cannot prevent wheel lift
due to other factors, such as road conditions, leaving the
roadway, or striking objects or other vehicles.
WARNING!
Before exiting a vehicle, always come to a complete
stop, then shift the automatic transmission into
PARK and apply the parking brake.
Always make sure the keyless ignition node is in the
OFF position, key fob is removed from the vehicle
and vehicle is locked.
Never leave children alone in a vehicle, or with
access to an unlocked vehicle. Leaving children in a
vehicle unattended is dangerous for a number of
reasons. A child or others could be seriously or fatally
injured. Children should be warned not to touch the
parking brake, brake pedal or the gear selector.
Do not leave children or animals inside parked vehi -
cles in hot weather. Interior heat buildup may cause
serious injury or death.
WARNING!
The Brake Assist System (BAS) cannot prevent the natu -
ral laws of physics from acting on the vehicle, nor can it
increase the traction afforded by prevailing road condi -
tions. BAS cannot prevent collisions, including those
resulting from excessive speed in turns, driving on very
slippery surfaces, or hydroplaning. The capabilities of a
BAS-equipped vehicle must never be exploited in a
reckless or dangerous manner, which could jeopardize
the user's safety or the safety of others.
6
23_JL_OM_EN_USC_t.book Page 245