audio JEEP WRANGLER 2023 Owners Manual
[x] Cancel search | Manufacturer: JEEP, Model Year: 2023, Model line: WRANGLER, Model: JEEP WRANGLER 2023Pages: 396, PDF Size: 25.15 MB
Page 6 of 396
4
NORMAL OPERATION — DIESEL ENGINE ..................... 130
Cold Weather Precautions........................................ 131Engine Idling .............................................................. 131Stopping The Engine ................................................. 132
Cooling System Tips — Automatic Transmission..... 132
ENGINE BREAK-IN RECOMMENDATIONS —
GASOLINE ENGINE (IF EQUIPPED) ................................ 133
ENGINE BREAK-IN RECOMMENDATIONS — DIESEL
ENGINE (IF EQUIPPED) .................................................... 133
PARKING BRAKE ............................................................. 133
MANUAL TRANSMISSION — IF EQUIPPED .................... 134 Shifting....................................................................... 135
Downshifting.............................................................. 136
AUTOMATIC TRANSMISSION — IF EQUIPPED .............. 137 Ignition Park Interlock............................................... 137Brake/Transmission Shift Interlock (BTSI)
System ...................................................................... 138
8–Speed Automatic Transmission .......................... 138
FOUR–WHEEL DRIVE OPERATION ............................... 140 Four-Position Transfer Case — If Equipped ............ 141Five-Position Transfer Case — If Equipped .............. 142
Trac-Lok Rear Axle — If Equipped ............................ 144
Axle Lock (Tru-Lok) Front And Rear — If Equipped ... 144
Axle Lock (Tru-Lok) Rear Only — If Equipped .......... 144
Electronic Sway Bar Disconnect — If Equipped ...... 145
Off Road+ — If Equipped........................................... 146
ELECTRO-HYDRAULIC POWER STEERING .................... 146
STOP/START SYSTEM — AUTOMATIC TRANSMISSION
(IF EQUIPPED) .................................................................. 147 Autostop Mode .......................................................... 147
Possible Reasons The Engine Does Not Autostop.. 148
To Start The Engine While In Autostop Mode.......... 148
To Manually Turn Off The Stop/Start System ......... 148
To Manually Turn On The Stop/Start System.......... 149
System Malfunction .................................................. 149 STOP/START SYSTEM — MANUAL TRANSMISSION
(IF EQUIPPED) .................................................................. 149
Autostop Mode.......................................................... 149
Possible Reasons The Engine Does Not
Autostop .................................................................... 150
To Start The Engine While In Autostop Mode ......... 150
To Manually Turn Off The Stop/Start System ......... 150
To Manually Turn On The Stop/Start System ......... 151
System Malfunction.................................................. 151
CRUISE CONTROL SYSTEMS — IF EQUIPPED ............. 151 Cruise Control ........................................................... 151
Adaptive Cruise Control (ACC).................................. 152
PARKSENSE REAR PARK ASSIST — IF EQUIPPED ...... 160 ParkSense Sensors .................................................. 160ParkSense Warning Display ..................................... 160
ParkSense Display.................................................... 160
Enabling And Disabling ParkSense ......................... 162
Service The ParkSense Rear Park Assist System... 162
Cleaning The ParkSense System ............................. 163ParkSense System Usage Precautions ................... 163
PARKVIEW REAR BACK UP CAMERA ........................... 163
TRAILCAM SYSTEM — IF EQUIPPED .............................. 164
REFUELING THE VEHICLE — GASOLINE ENGINE
(IF EQUIPPED) .................................................................. 165 Fuel Filler Cap ........................................................... 165
Loose Fuel Filler Cap Message ............................... 166
REFUELING THE VEHICLE — DIESEL ENGINE
(IF EQUIPPED) .................................................................. 166 Avoid Using Contaminated Fuel............................... 167
Bulk Fuel Storage — Diesel Fuel .............................. 167
Diesel Exhaust Fluid ................................................. 167
VEHICLE LOADING ........................................................... 169 Certification Label..................................................... 169 TRAILER TOWING ............................................................170
Common Towing Definitions..................................... 170
Trailer Hitch Classification ........................................ 172Trailer Towing Weights (Maximum Trailer Weight
Ratings) ..................................................................... 172
Trailer And Tongue Weight........................................ 173Towing Requirements ............................................... 173Towing Tips ................................................................ 175
RECREATIONAL TOWING (BEHIND MOTORHOME) ...... 176 Towing This Vehicle Behind Another Vehicle ........... 176Recreational Towing — Four-Wheel Drive Models ... 176
DRIVING TIPS ....................................................................178 On-Road Driving Tips ................................................. 178
Off-Road Driving Tips................................................. 178
MULTIMEDIA
UCONNECT SYSTEMS ......................................................184
CYBERSECURITY ..............................................................184
UCONNECT SETTINGS ......................................................184 Customer Programmable Features ......................... 184
UCONNECT INTRODUCTION ............................................ 197 System Overview ...................................................... 197Drag & Drop Menu Bar ............................................. 200Safety And General Information ............................... 200
UCONNECT MODES .......................................................... 201 Steering Wheel Audio Controls ................................ 201Radio Mode .............................................................. 201
Media Mode .............................................................. 210
Phone Mode ............................................................. 212
23_JL_OM_EN_USC_t.book Page 4
Page 94 of 396
92GETTING TO KNOW YOUR VEHICLE
(Continued)
NOTE:
The power top is non-removable. If desired, the rear
quarter windows can be removed and stored in the
provided storage bag
Úpage 93.
The power top will not open in temperatures below
-4°F (-20°C). However, if it is opened at a higher
temperature, it can be closed at temperatures above
-40°F (-40°C).
The power top will not operate at vehicle speeds above
60 mph (96 km/h).
NOTE:A slight pause in audio may be heard when opening and
closing the Power Sliding Top as a result of the Uconnect
system switching between power top Closed and power
top Open audio modes.
Opening And Closing The Power Top
Express Open/Close
Push the open switch and release it within one-half
second and the power top will open automatically from
any position. The power top will open fully and stop
automatically.
Push the close switch and release it within one-half
second and the power top will close automatically from
any position. The power top will close fully and stop
automatically.
During Express Open or Express Close operation, any
other movement of the power top switch will stop the
power top.
Manual Open/Close
To open the power top manually, push and hold the open
switch to the full open position, then release.
To close the power top manually, push and hold the close
switch to the fully closed position, then release.
Any release of the switch during open or close operation
will stop the power top movement. The top will remain in a
partially opened position until the switch is operated and
held again.
Pinch Protect Feature
This feature will detect an obstruction in the opening of
the power top during Express Close operation. If an
obstruction in the path of the power top is detected, the
power top will automatically retract. Remove the
obstruction if this occurs. Next, push the close switch and
release to Express Close.
NOTE:
The Power Sliding Top may reverse motion if closing
during a severe headwind. If this occurs, push and hold
the Power Sliding Top switch again to close the top
completely.
If three consecutive power top close attempts result in
Pinch Protect reversals, Pinch Protect will disable and
the power top must be closed in Manual Mode.
Power Top Maintenance
Use only a non-abrasive cleaner and a soft cloth to clean
the quarter window glass panel. For important information
on cleaning and caring for your vehicle
Úpage 360.
WARNING!
Never leave children unattended in a vehicle, or with
access to an unlocked vehicle. Never leave the key
fob in or near the vehicle, or in a location accessible
to children. Do not leave the Keyless Enter ‘n Go™
Ignition in the ACC or ON/RUN position. Occupants,
particularly unattended children, can become
entrapped by the power top while operating the
power top switch. Such entrapment may result in
serious injury or death.
In a collision, there is a greater risk of being thrown
from a vehicle with an open power top. You could
also be seriously injured or killed. Always fasten your
seat belt properly and make sure all passengers are
also properly secured.
Do not allow small children to operate the power top.
Never allow your fingers, other body parts, or any
object, to project through the power top opening.
Injury may result.
WARNING!
WARNING!
There is no anti-pinch protection when the power top is
almost closed. To avoid personal injury be sure to clear
your arms, hands, fingers and all objects from the top’s
path before closing.
23_JL_OM_EN_USC_t.book Page 92
Page 114 of 396
112GETTING TO KNOW YOUR INSTRUMENT PANEL
INSTRUMENT CLUSTER DISPLAY
S
ELECTABLE ITEMS
The instrument cluster display can be used to view the
following main menu items:
NOTE:Depending on the vehicles options, feature settings may
vary.
Speedometer
Push and release the up or down arrow button
until the speedometer menu icon is displayed in the
instrument cluster display. Push and release the OK
button to toggle between MPH and km/h.
Vehicle Info
Push and release the up or down arrow button
until the Vehicle Info menu icon is displayed in the
instrument cluster display. Push and release the left or
right arrow button to scroll through the information
submenus and push and release the OK button to select
or reset the resettable submenus.
Off Road
Push and release the up or down arrow button
until the Off Road menu icon is displayed in the instrument
cluster display. Push and release the left or right
arrow button to scroll through the information submenus.
Drivetrain
Front Wheel Angle: displays the graphical and
numerical value of calculated average front wheel
angle from the steering wheel orientation.
Transfer Case Lock Status: displays “Lock”
graphic only during 4WD High, 4WD High Part
Time, 4WD Low status.
Axle Lock And Sway Bar Status (If Equipped):
displays front and rear or rear only axle locker
graphic, and sway bar connection graphic with text
message (connected or disconnected).
Pitch And Roll
Displays the pitch and roll of the vehicle in the
graphic with the angle number on the screen.
NOTE:When vehicle speed becomes too high to display the pitch
and roll, “- -” will display in place of the numbers, and the
graphic will be greyed out. A message indicating the
necessary speed for the feature to become available will
also display.
Driver Assist — If Equipped
The Driver Assist menu displays the status of the ACC
systems.
Push and release the up or down arrow button
until the Driver Assist menu is displayed in the instrument
cluster display.
Adaptive Cruise Control (ACC) Feature — If Equipped
The instrument cluster display displays the current ACC
system settings. The information displayed depends on
ACC system status.
Push the ACC ON/OFF button (located on the steering
wheel) until one of the following displays in the instrument
cluster display:
Adaptive Cruise Control Off
When ACC is deactivated, the display will read “Adaptive
Cruise Control Off.”
Adaptive Cruise Control Ready
When ACC is activated but the vehicle speed setting has
not been selected, the display will read “Adaptive Cruise
Control Ready.”
Speedometer
Driver Assist — If
EquippedStop/Start
Vehicle Info Fuel Economy Audio
Off Road Trip Info Messages
Screen Setup Phone Call
Status — If
Equipped
Tire PressureSingle Gauge
Submenu — If
EquippedCritical Level
Logic — If
Equipped
Oil Life Diesel Exhaust
Fluid Level — If
EquippedCoolant
Temperature
Oil Pressure Oil Temperature Transmission
Temperature —
Automatic
Transmission
Only
Battery Voltage
23_JL_OM_EN_USC_t.book Page 112
Page 115 of 396
GETTING TO KNOW YOUR INSTRUMENT PANEL113
Push the SET + or the SET - button (located on the steering
wheel), and the following will display in the instrument
cluster display.
ACC SET
When ACC is set, the set speed will display in the
instrument cluster.
The ACC screen may display once again if any of the
following ACC activity occurs:
System Cancel
Driver Override
System Off
ACC Proximity Warning
ACC Unavailable Warning
NOTE:
The instrument cluster display will return to the last
display selected after five seconds of no ACC display
activity
Úpage 152.
Fuel Economy
Push and release the up or down arrow button
until the Fuel Economy icon is highlighted in the
instrument cluster display. Push and hold the OK button to
reset average fuel economy feature.
Toggle left or right to select a display with or
without Current Fuel Economy Information.
Range – The display shows the estimated distance (mi
or km) that can be traveled with the fuel remaining in
the tank. When the Range value is less than 10 miles
(16 kilometers), the Range display will change to a
“LOW” message. Adding a significant amount of fuel to
the vehicle will turn off the “LOW” message and a new Range value will display. Range cannot be reset
through the
OK button.
NOTE:Significant changes in driving style or vehicle loading will
greatly affect the actual drivable distance of the vehicle,
regardless of the Range displayed value.
Average – The display shows the average fuel economy
(MPG, L/100 km, or km/L) since the last reset.
Current – This display shows the current fuel economy
(MPG, L/100 km, km/L) while driving.
Trip Info
Push and release the up or down arrow button
until the Trip icon/title is highlighted in the instrument
cluster display, then push and release the left or
right arrow button to select Trip A or Trip B.
The Trip A and Trip B information will display the following:
Distance
Average Fuel Economy
Elapsed Time
Hold the OK button to reset all the information.
Stop/Start — If Equipped
Push and release the up or down arrow button
until the Stop/Start icon/title is highlighted in the
instrument cluster display. The screen will display the
Stop/Start status.
Audio
Push and release the up or down arrow button
until the Audio Menu icon/title is highlighted in the
instrument cluster display. This menu will display the
audio source information, including the Song name, Artist
name, and audio source with an accompanying graphic.
Messages
Push and release the up or down arrow button
until the Messages Menu item is highlighted. This feature
shows the number of stored warning messages. Pushing
the right arrow button will allow you to see what the
stored messages are.
When no messages are present, a “No Stored Messages”
will display.
Screen Setup
Push and release the up or down arrow button
until the Screen Setup Menu Icon/Title is highlighted in
the instrument cluster display. Push and release the OK
button to enter the submenus and follow the prompts on
the screen as needed. The Screen Setup feature allows
you to change what information is displayed in the
instrument cluster as well as the location that information
is displayed.
NOTE:Based upon equipment options and current vehicle
status, some of the features may not be available.
3
23_JL_OM_EN_USC_t.book Page 113
Page 116 of 396
114GETTING TO KNOW YOUR INSTRUMENT PANEL
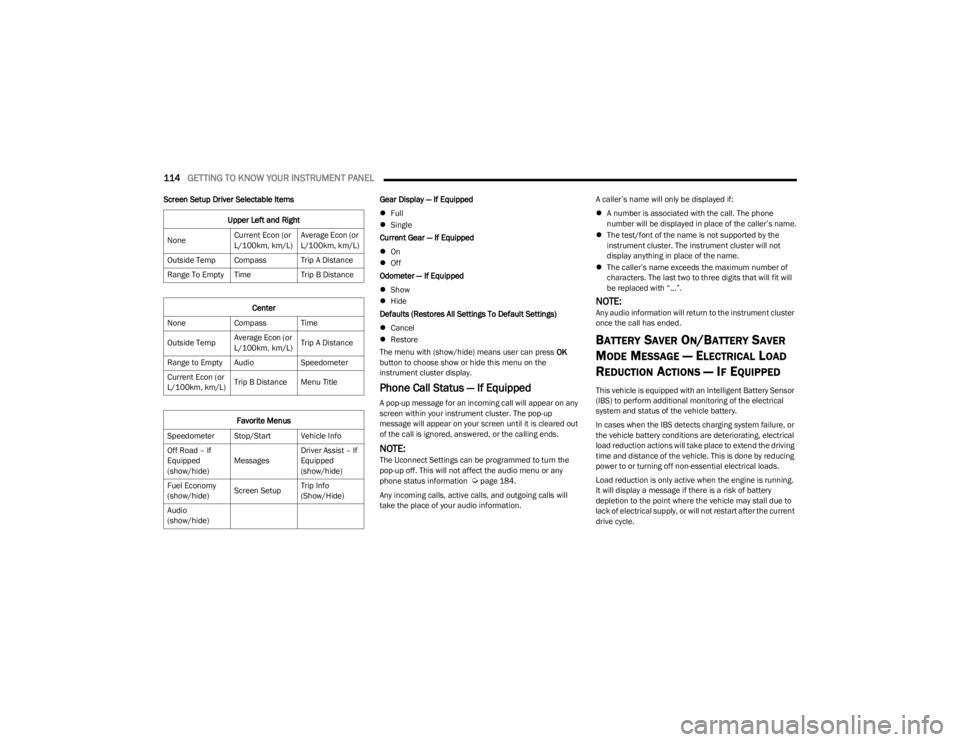
Screen Setup Driver Selectable Items Gear Display — If Equipped
Full
Single
Current Gear — If Equipped
On
Off
Odometer — If Equipped
Show
Hide
Defaults (Restores All Settings To Default Settings)
Cancel
Restore
The menu with (show/hide) means user can press OK
button to choose show or hide this menu on the
instrument cluster display.
Phone Call Status — If Equipped
A pop-up message for an incoming call will appear on any
screen within your instrument cluster. The pop-up
message will appear on your screen until it is cleared out
of the call is ignored, answered, or the calling ends.
NOTE:The Uconnect Settings can be programmed to turn the
pop-up off. This will not affect the audio menu or any
phone status information
Úpage 184.
Any incoming calls, active calls, and outgoing calls will
take the place of your audio information. A caller’s name will only be displayed if:
A number is associated with the call. The phone
number will be displayed in place of the caller’s name.
The test/font of the name is not supported by the
instrument cluster. The instrument cluster will not
display anything in place of the name.
The caller’s name exceeds the maximum number of
characters. The last two to three digits that will fit will
be replaced with “...”.
NOTE:Any audio information will return to the instrument cluster
once the call has ended.
BATTERY SAVER ON/BATTERY SAVER
M
ODE MESSAGE — ELECTRICAL LOAD
R
EDUCTION ACTIONS — IF EQUIPPED
This vehicle is equipped with an Intelligent Battery Sensor
(IBS) to perform additional monitoring of the electrical
system and status of the vehicle battery.
In cases when the IBS detects charging system failure, or
the vehicle battery conditions are deteriorating, electrical
load reduction actions will take place to extend the driving
time and distance of the vehicle. This is done by reducing
power to or turning off non-essential electrical loads.
Load reduction is only active when the engine is running.
It will display a message if there is a risk of battery
depletion to the point where the vehicle may stall due to
lack of electrical supply, or will not restart after the current
drive cycle.
Upper Left and Right
None Current Econ (or
L/100km, km/L)Average Econ (or
L/100km, km/L)
Outside Temp Compass Trip A Distance
Range To Empty Time Trip B Distance
Center
None Compass Time
Outside Temp Average Econ (or
L/100km, km/L)Trip A Distance
Range to Empty Audio Speedometer
Current Econ (or
L/100km, km/L) Trip B Distance Menu Title
Favorite Menus
Speedometer Stop/Start Vehicle Info
Off Road – If
Equipped
(show/hide) MessagesDriver Assist – If
Equipped
(show/hide)
Fuel Economy
(show/hide) Screen SetupTrip Info
(Show/Hide)
Audio
(show/hide)
23_JL_OM_EN_USC_t.book Page 114
Page 117 of 396
GETTING TO KNOW YOUR INSTRUMENT PANEL115
When load reduction is activated, the message “Battery
Saver On” or “Battery Saver Mode” will appear in the
instrument cluster display.
These messages indicate the vehicle battery has a low
state of charge and continues to lose electrical charge at
a rate that the charging system cannot sustain.
NOTE:
The charging system is independent from load reduc -
tion. The charging system performs a diagnostic on the
charging system continuously.
If the Battery Charge Warning Light is on it may indicate
a problem with the charging system
Úpage 117.
The electrical loads that may be switched off (if equipped),
and vehicle functions which can be effected by load
reduction:
Heated Seat/Vented Seats/Heated Wheel
Rear Defroster And Heated Mirrors
HVAC System
150W Power Inverter System
Audio and Telematics System
Loss of the battery charge may indicate one or more of the
following conditions:
The charging system cannot deliver enough electrical
power to the vehicle system because the electrical
loads are larger than the capability of the charging
system. The charging system is still functioning prop -
erly.
Turning on all possible vehicle electrical loads (e.g.
HVAC to max settings, exterior and interior lights, over -
loaded power outlets +12 Volt, 150W, USB ports)
during certain driving conditions (city driving, towing,
frequent stopping).
Installing options like additional lights, upfitter elec -
trical accessories, audio systems, alarms and similar
devices.
Unusual driving cycles (short trips separated by long
parking periods).
The vehicle was parked for an extended period of time
(weeks, months).
The battery was recently replaced and was not charged
completely.
The battery was discharged by an electrical load left on
when the vehicle was parked.
The battery was used for an extended period with the
engine not running to supply radio, lights, chargers,
+12 Volt portable appliances like vacuum cleaner’s,
game consoles and similar devices.
What to do when an electrical load reduction action
message is present (“Battery Saver On” or “Battery Saver
Mode”)
During a trip:
Reduce power to unnecessary loads if possible:
Turn off redundant lights (interior or exterior)
Check what may be plugged in to power outlets
+12 Volt, 150W, USB ports
Check HVAC settings (blower, temperature)
Check the audio settings (volume)
After a trip:
Check if any aftermarket equipment was installed
(additional lights, upfitter electrical accessories, audio
systems, alarms) and review specifications if any (load
and Ignition Off Draw currents).
Evaluate the latest driving cycles (distance, driving
time and parking time).
The vehicle should have service performed if the
message is still present during consecutive trips and
the evaluation of the vehicle and driving pattern did not
help to identify the cause.
DIESEL DISPLAYS
When the appropriate conditions exist, the following
messages display in the instrument cluster display:
Exhaust Filter Nearing Full Safely Drive at Consistent
Speeds to Clear
Exhaust Filter Full – Power Reduced See Dealer
Exhaust System Service Required – See Dealer
Exhaust System – Filter XX% Full Service Required See
Dealer
Exhaust System Regeneration in Process Continue
Driving
Exhaust System – Regeneration Completed
DIESEL PARTICULATE FILTER (DPF)
M
ESSAGES
This engine meets all required diesel engine emissions
standards. To achieve these emissions standards, your
vehicle is equipped with a state-of-the-art engine and
exhaust system. These systems are seamlessly integrated
into your vehicle and managed by the Powertrain Control
Module (PCM). The PCM manages engine combustion to
allow the exhaust system’s catalyst to trap and burn
Particulate Matter (PM) pollutants, with no input or
interaction on your part.
3
23_JL_OM_EN_USC_t.book Page 115
Page 164 of 396
162STARTING AND OPERATING
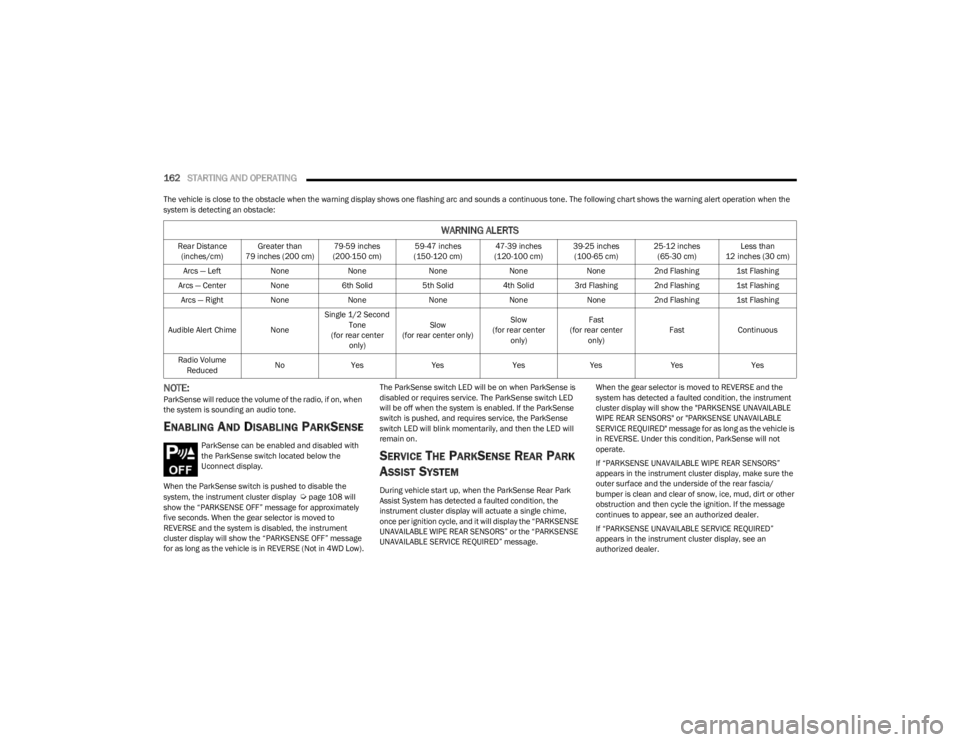
The vehicle is close to the obstacle when the warning display shows one flashing arc and sounds a continuous tone. The following chart shows the warning alert operation when the
system is detecting an obstacle:
NOTE:ParkSense will reduce the volume of the radio, if on, when
the system is sounding an audio tone.
ENABLING AND DISABLING PARKSENSE
ParkSense can be enabled and disabled with
the ParkSense switch located below the
Uconnect display.
When the ParkSense switch is pushed to disable the
system, the instrument cluster display
Úpage 108 will
show the “PARKSENSE OFF” message for approximately
five seconds. When the gear selector is moved to
REVERSE and the system is disabled, the instrument
cluster display will show the “PARKSENSE OFF” message
for as long as the vehicle is in REVERSE (Not in 4WD Low). The ParkSense switch LED will be on when ParkSense is
disabled or requires service. The ParkSense switch LED
will be off when the system is enabled. If the ParkSense
switch is pushed, and requires service, the ParkSense
switch LED will blink momentarily, and then the LED will
remain on.
SERVICE THE PARKSENSE REAR PARK
A
SSIST SYSTEM
During vehicle start up, when the ParkSense Rear Park
Assist System has detected a faulted condition, the
instrument cluster display will actuate a single chime,
once per ignition cycle, and it will display the “PARKSENSE
UNAVAILABLE WIPE REAR SENSORS” or the “PARKSENSE
UNAVAILABLE SERVICE REQUIRED” message. When the gear selector is moved to REVERSE and the
system has detected a faulted condition, the instrument
cluster display will show the "PARKSENSE UNAVAILABLE
WIPE REAR SENSORS" or "PARKSENSE UNAVAILABLE
SERVICE REQUIRED" message for as long as the vehicle is
in REVERSE. Under this condition, ParkSense will not
operate.
If “PARKSENSE UNAVAILABLE WIPE REAR SENSORS”
appears in the instrument cluster display, make sure the
outer surface and the underside of the rear fascia/
bumper is clean and clear of snow, ice, mud, dirt or other
obstruction and then cycle the ignition. If the message
continues to appear, see an authorized dealer.
If “PARKSENSE UNAVAILABLE SERVICE REQUIRED”
appears in the instrument cluster display, see an
authorized dealer.
WARNING ALERTS
Rear Distance
(inches/cm) Greater than
79 inches (200 cm) 79-59 inches
(200-150 cm) 59-47 inches
(150-120 cm) 47-39 inches
(120-100 cm) 39-25 inches
(100-65 cm) 25-12 inches
(65-30 cm) Less than
12 inches (30 cm)
Arcs — Left NoneNone NoneNoneNone2nd Flashing 1st Flashing
Arcs — Center None6th Solid 5th Solid4th Solid 3rd Flashing 2nd Flashing 1st Flashing
Arcs — Right NoneNone NoneNoneNone2nd Flashing 1st Flashing
Audible Alert Chime None Single 1/2 Second
Tone
(for rear center only) Slow
(for rear center only) Slow
(for rear center only) Fast
(for rear center only) Fast
Continuous
Radio Volume Reduced No
Yes YesYesYes YesYes
23_JL_OM_EN_USC_t.book Page 162
Page 189 of 396
MULTIMEDIA187
Units
Voice
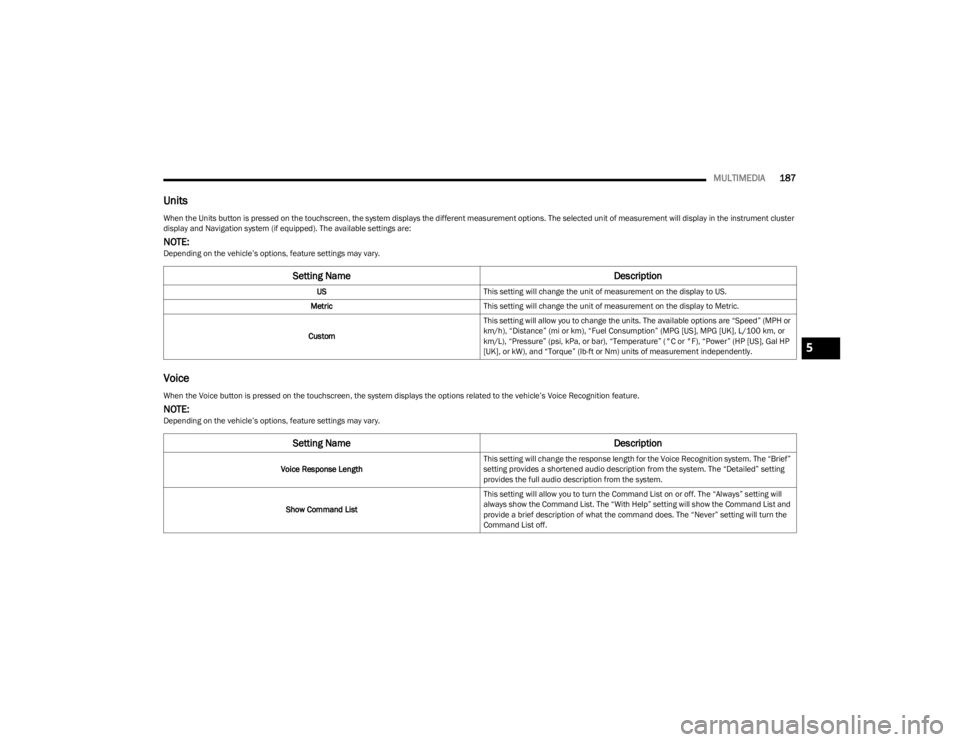
When the Units button is pressed on the touchscreen, the system displays the different measurement options. The selected unit of measurement will display in the instrument cluster
display and Navigation system (if equipped). The available settings are:
NOTE:Depending on the vehicle’s options, feature settings may vary.
Setting Name Description
USThis setting will change the unit of measurement on the display to US.
Metric This setting will change the unit of measurement on the display to Metric.
Custom This setting will allow you to change the units. The available options are “Speed” (MPH or
km/h), “Distance” (mi or km), “Fuel Consumption” (MPG [US], MPG [UK], L/100 km, or
km/L), “Pressure” (psi, kPa, or bar), “Temperature” (°C or °F), “Power” (HP [US], Gal HP
[UK], or kW), and “Torque” (lb-ft or Nm) units of measurement independently.
When the Voice button is pressed on the touchscreen, the system displays the options related to the vehicle’s Voice Recognition feature.
NOTE:Depending on the vehicle’s options, feature settings may vary.
Setting Name
Description
Voice Response LengthThis setting will change the response length for the Voice Recognition system. The “Brief”
setting provides a shortened audio description from the system. The “Detailed” setting
provides the full audio description from the system.
Show Command List This setting will allow you to turn the Command List on or off. The “Always” setting will
always show the Command List. The “With Help” setting will show the Command List and
provide a brief description of what the command does. The “Never” setting will turn the
Command List off.
5
23_JL_OM_EN_USC_t.book Page 187
Page 196 of 396
194MULTIMEDIA
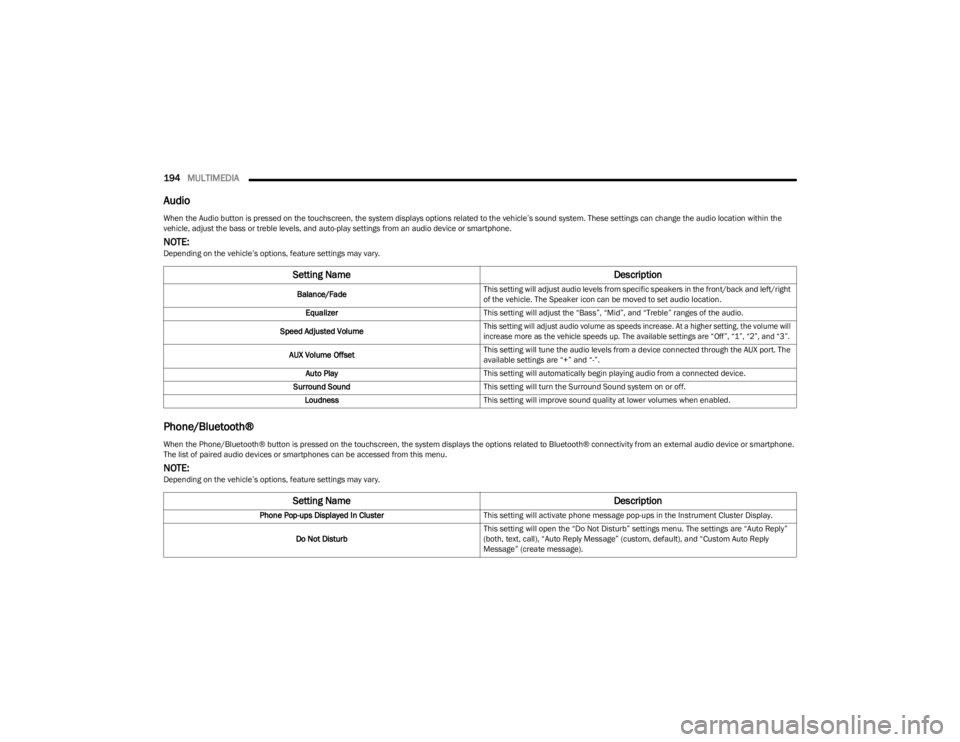
Audio
Phone/Bluetooth®
When the Audio button is pressed on the touchscreen, the system displays options related to the vehicle’s sound system. These settings can change the audio location within the
vehicle, adjust the bass or treble levels, and auto-play settings from an audio device or smartphone.
NOTE:Depending on the vehicle’s options, feature settings may vary.
Setting Name Description
Balance/FadeThis setting will adjust audio levels from specific speakers in the front/back and left/right
of the vehicle. The Speaker icon can be moved to set audio location.
Equalizer This setting will adjust the “Bass”, “Mid”, and “Treble” ranges of the audio.
Speed Adjusted Volume
This setting will adjust audio volume as speeds increase. At a higher setting, the volume will
increase more as the vehicle speeds up. The available settings are “Off”, “1”, “2”, and “3”.
AUX Volume Offset This setting will tune the audio levels from a device connected through the AUX port. The
available settings are “+” and “-”.
Auto Play This setting will automatically begin playing audio from a connected device.
Surround Sound This setting will turn the Surround Sound system on or off.
Loudness This setting will improve sound quality at lower volumes when enabled.
When the Phone/Bluetooth® button is pressed on the touchscreen, the system displays the options related to Bluetooth® connectivity from an external audio device or smartphone.
The list of paired audio devices or smartphones can be accessed from this menu.
NOTE:Depending on the vehicle’s options, feature settings may vary.
Setting Name Description
Phone Pop-ups Displayed In ClusterThis setting will activate phone message pop-ups in the Instrument Cluster Display.
Do Not Disturb This setting will open the “Do Not Disturb” settings menu. The settings are “Auto Reply”
(both, text, call), “Auto Reply Message” (custom, default), and “Custom Auto Reply
Message” (create message).
23_JL_OM_EN_USC_t.book Page 194
Page 197 of 396
MULTIMEDIA195
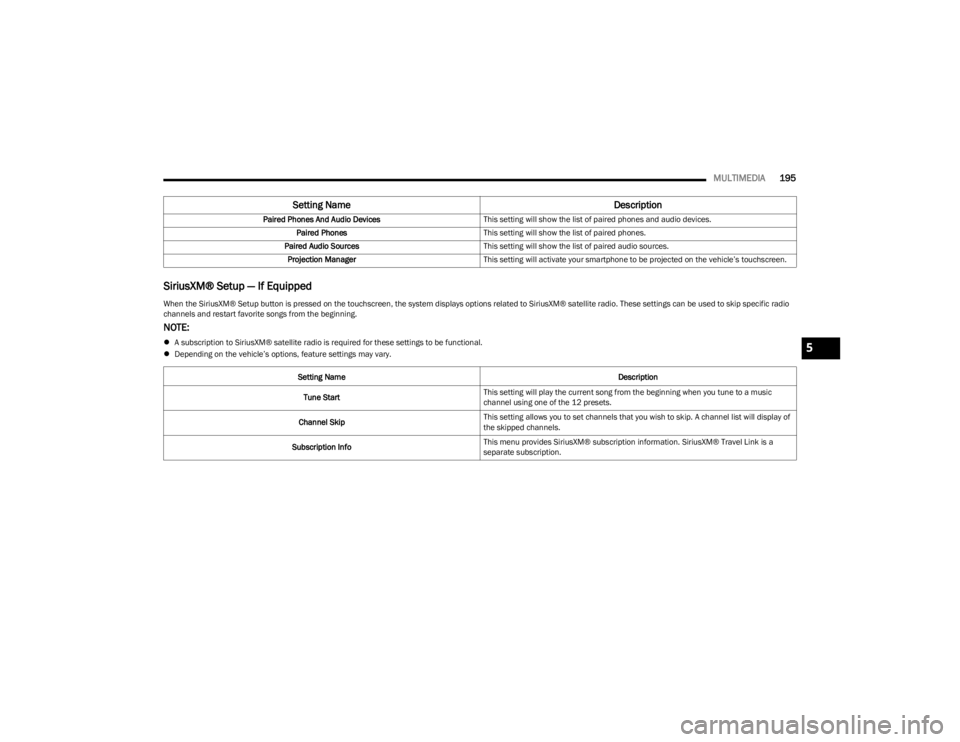
SiriusXM® Setup — If Equipped
Paired Phones And Audio Devices This setting will show the list of paired phones and audio devices.
Paired Phones This setting will show the list of paired phones.
Paired Audio Sources This setting will show the list of paired audio sources.
Projection Manager This setting will activate your smartphone to be projected on the vehicle’s touchscreen.
Setting Name Description
When the SiriusXM® Setup button is pressed on the touchscreen, the system displays options related to SiriusXM® satellite radio. These settings can be used to skip specific radio
channels and restart favorite songs from the beginning.
NOTE:
A subscription to SiriusXM® satellite radio is required for these settings to be functional.
Depending on the vehicle’s options, feature settings may vary.
Setting Name Description
Tune Start This setting will play the current song from the beginning when you tune to a music
channel using one of the 12 presets.
Channel Skip This setting allows you to set channels that you wish to skip. A channel list will display of
the skipped channels.
Subscription Info This menu provides SiriusXM® subscription information. SiriusXM® Travel Link is a
separate subscription.5
23_JL_OM_EN_USC_t.book Page 195