reset JEEP WRANGLER UNLIMITED 2018 Owner handbook (in English)
[x] Cancel search | Manufacturer: JEEP, Model Year: 2018, Model line: WRANGLER UNLIMITED, Model: JEEP WRANGLER UNLIMITED 2018Pages: 348, PDF Size: 6.5 MB
Page 271 of 348
CAUTION!
Do NOT attach any object to the touchscreen,
doing so can result in damage to the touch-
screen.
Clock Setting
To start the clock setting procedure:
1. Press the “Settings” button on the face-
plate, then press the “Clock and Date”
button.
2. Press the “Set Time” button on the
touchscreen.
3. Press the “Up” or “Down” arrows to adjust
the hours or minutes, then select the
“AM” or “PM” button on the touchscreen.
You can also select 12hr or 24hr format by
pressing the desired button on the
touchscreen.
4. Once the time is set, press the “Done”
button on the touchscreen to exit the time
screen.NOTE:
In the Clock Setting Menu you can also select
“Display Clock”. Display Clock turns the
clock display in the status bar on or off.
Audio Setting
1. Press the “Settings” button on the
faceplate.
2. Scroll down and press the “Audio” button
on the touchscreen to open the Audio
menu.
3. The Audio Menu shows the following op-
tions for you to customize your audio
settings.
Equalizer
Press the “Equalizer” button on the touch-
screen to adjust the Bass, Mid and Treble.
Use the “+” or “-” button on the touchscreen
to adjust the equalizer to your desired set-
tings.
Balance/Fade
Press the “Balance/Fade” button on the
touchscreen to adjust the sound from thespeakers. Use the arrow buttons on the
touchscreen to adjust the sound level from
the front and rear or right and left side speak-
ers. Press the center “C” button on the touch-
screen to reset the balance and fade to the
factory setting.
Speed Adjusted Volume — If Equipped
Press the “Speed Adjusted Volume” button
on the touchscreen to select between OFF, 1,
2 or 3. This will decrease the radio volume
relative to a decrease in vehicle speed.
Loudness — If Equipped
Press the “Loudness” button on the touch-
screen to select the Loudness feature. When
this feature is activated it improves sound
quality at lower volumes.
Surround Sound — If Equipped
Press the “Surround Sound” button on the
touchscreen, select On or Off followed by
pressing the back arrow button on the touch-
screen. When this feature is activated, it
provides simulated surround sound mode.
269
Page 272 of 348
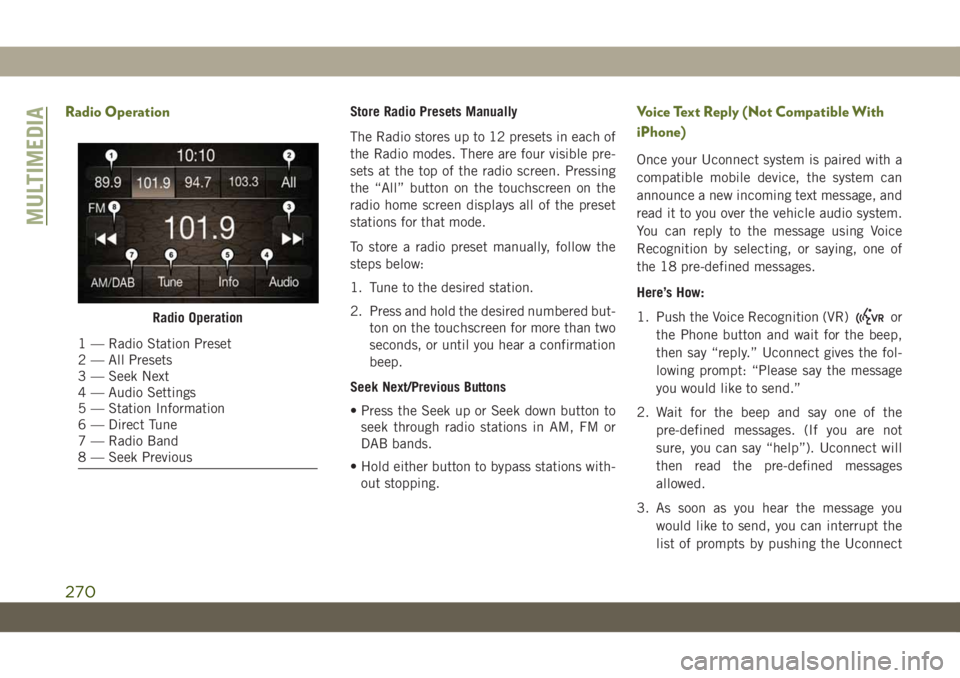
Radio OperationStore Radio Presets Manually
The Radio stores up to 12 presets in each of
the Radio modes. There are four visible pre-
sets at the top of the radio screen. Pressing
the “All” button on the touchscreen on the
radio home screen displays all of the preset
stations for that mode.
To store a radio preset manually, follow the
steps below:
1. Tune to the desired station.
2. Press and hold the desired numbered but-
ton on the touchscreen for more than two
seconds, or until you hear a confirmation
beep.
Seek Next/Previous Buttons
• Press the Seek up or Seek down button to
seek through radio stations in AM, FM or
DAB bands.
• Hold either button to bypass stations with-
out stopping.Voice Text Reply (Not Compatible With
iPhone)
Once your Uconnect system is paired with a
compatible mobile device, the system can
announce a new incoming text message, and
read it to you over the vehicle audio system.
You can reply to the message using Voice
Recognition by selecting, or saying, one of
the 18 pre-defined messages.
Here’s How:
1. Push the Voice Recognition (VR)
or
the Phone button and wait for the beep,
then say “reply.” Uconnect gives the fol-
lowing prompt: “Please say the message
you would like to send.”
2. Wait for the beep and say one of the
pre-defined messages. (If you are not
sure, you can say “help”). Uconnect will
then read the pre-defined messages
allowed.
3. As soon as you hear the message you
would like to send, you can interrupt the
list of prompts by pushing the UconnectRadio Operation
1 — Radio Station Preset
2 — All Presets
3 — Seek Next
4 — Audio Settings
5 — Station Information
6 — Direct Tune
7 — Radio Band
8 — Seek Previous
MULTIMEDIA
270
Page 276 of 348
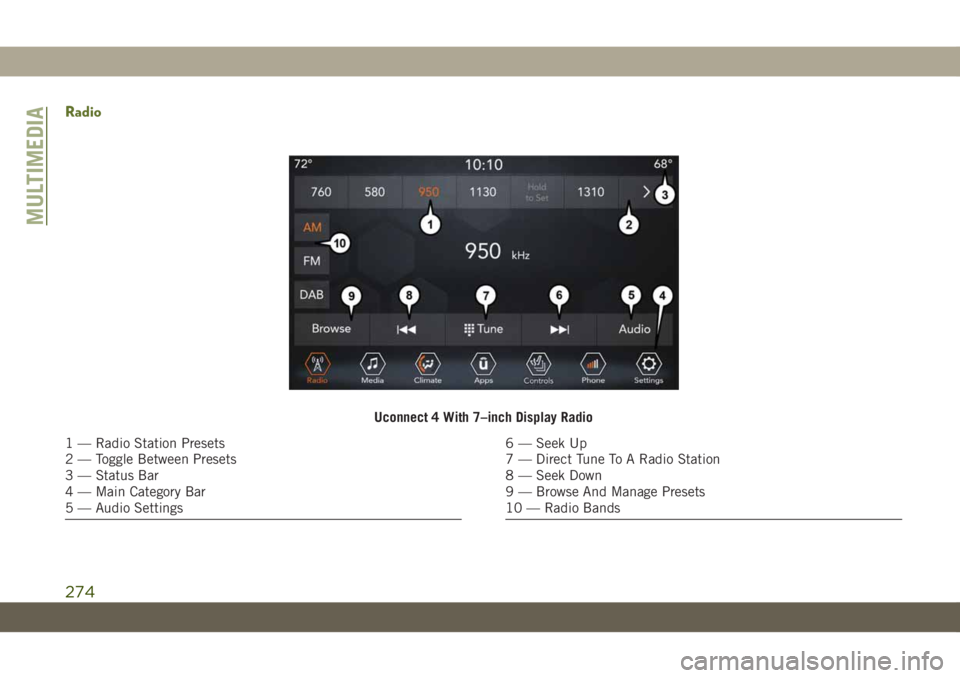
Radio
Uconnect 4 With 7–inch Display Radio
1 — Radio Station Presets
2 — Toggle Between Presets
3 — Status Bar
4 — Main Category Bar
5 — Audio Settings6 — Seek Up
7 — Direct Tune To A Radio Station
8 — Seek Down
9 — Browse And Manage Presets
10 — Radio Bands
MULTIMEDIA
274
Page 277 of 348
WARNING!
ALWAYS drive safely with your hands on
the wheel. You have full responsibility and
assume all risks related to the use of the
Uconnect features and applications in this
vehicle. Only use Uconnect when it is safe
to do so. Failure to do so may result in an
accident involving serious injury or death.
• To access the Radio mode, press the “Ra-
dio” button on the touchscreen.
Selecting Radio Stations
• Press the desired radio band (AM, FM or
DAB) button on the touchscreen.
Seek Up/Seek Down
• Press the Seek up or down arrow buttons on
the touchscreen for less than two seconds
to seek through radio stations.
• Press and hold either arrow button on the
touchscreen for more than two seconds to
bypass stations without stopping. The radio
will stop at the next listenable station once
the arrow button on the touchscreen is
released.Direct Tune
• Tune directly to a radio station by pressing
the “Tune” button on the screen, and en-
tering the desired station number.
Store Radio Presets Manually
Your radio can store 36 total preset stations,
12 presets per band (AM, FM and DAB). They
are shown at the top of your radio screen. To
see the 12 preset stations per band, press the
arrow button on the touchscreen at the top
right of the screen to toggle between the two
sets of six presets.
To store a radio preset manually, follow the
steps below:
1. Tune to the desired station.
2. Press and hold the desired numbered but-
ton on the touchscreen for more than two
seconds or until you hear a confirmation
beep.
Android Auto — If Equipped
NOTE:
Feature availability depends on your carrier
and mobile phone manufacturer. Some
Android Auto features may or may not be
available in every region and/or language.
Android Auto is a feature of your Uconnect
system, and your Android 5.0 Lollipop, or
higher, powered smartphone with a data plan,
that allows you to project your smartphone
and a number of its apps onto the touch-
screen radio display. Android Auto automati-
cally brings you useful information, and orga-
nizes it into simple cards that appear just
when they are needed. Android Auto can be
used with Google's best-in-class speech tech-
nology, the steering wheel controls, the knobs
and buttons on your radio faceplate, and the
radio display’s touchscreen to control many
of your apps. To use Android Auto follow the
following steps:
1. Download the Android Auto app from the
Google Play store on your Android-
powered smartphone.
275
Page 282 of 348

Radio
Uconnect 4C/4C NAV With 8.4–inch Display Radio
1 — Radio Station Presets
2 — Toggle Between Presets
3 — Status Bar
4 — View Small Navigation Map
5 — Main Category Bar
6 — Audio Settings7 — Seek Up
8 — Direct Tune To A Radio Station
9 — Seek Down
10 — Browse And Manage Presets
11 — Radio Bands
MULTIMEDIA
280
Page 283 of 348
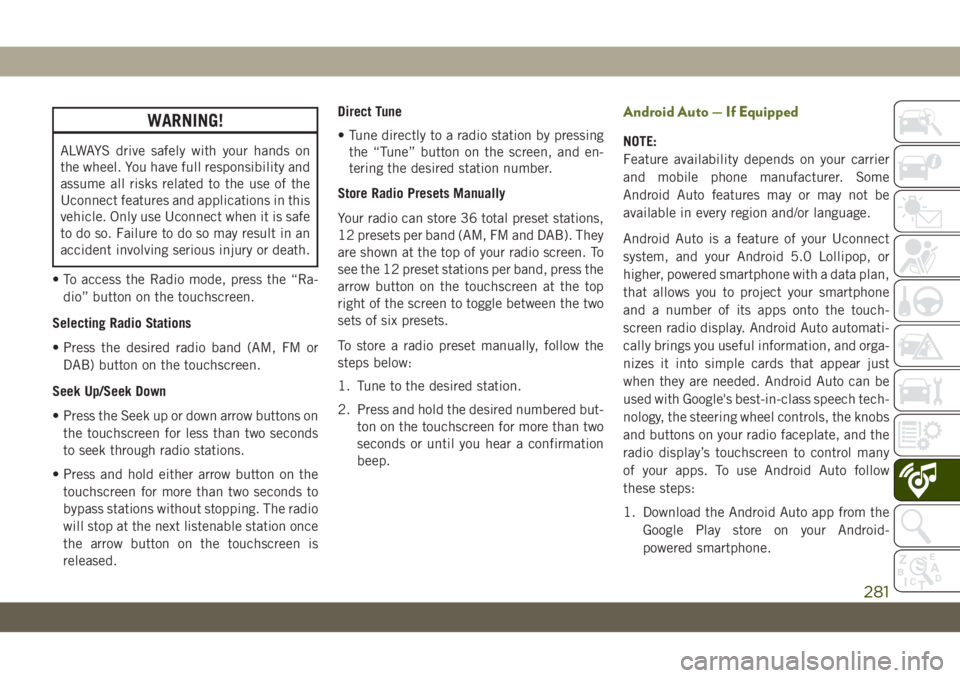
WARNING!
ALWAYS drive safely with your hands on
the wheel. You have full responsibility and
assume all risks related to the use of the
Uconnect features and applications in this
vehicle. Only use Uconnect when it is safe
to do so. Failure to do so may result in an
accident involving serious injury or death.
• To access the Radio mode, press the “Ra-
dio” button on the touchscreen.
Selecting Radio Stations
• Press the desired radio band (AM, FM or
DAB) button on the touchscreen.
Seek Up/Seek Down
• Press the Seek up or down arrow buttons on
the touchscreen for less than two seconds
to seek through radio stations.
• Press and hold either arrow button on the
touchscreen for more than two seconds to
bypass stations without stopping. The radio
will stop at the next listenable station once
the arrow button on the touchscreen is
released.Direct Tune
• Tune directly to a radio station by pressing
the “Tune” button on the screen, and en-
tering the desired station number.
Store Radio Presets Manually
Your radio can store 36 total preset stations,
12 presets per band (AM, FM and DAB). They
are shown at the top of your radio screen. To
see the 12 preset stations per band, press the
arrow button on the touchscreen at the top
right of the screen to toggle between the two
sets of six presets.
To store a radio preset manually, follow the
steps below:
1. Tune to the desired station.
2. Press and hold the desired numbered but-
ton on the touchscreen for more than two
seconds or until you hear a confirmation
beep.
Android Auto — If Equipped
NOTE:
Feature availability depends on your carrier
and mobile phone manufacturer. Some
Android Auto features may or may not be
available in every region and/or language.
Android Auto is a feature of your Uconnect
system, and your Android 5.0 Lollipop, or
higher, powered smartphone with a data plan,
that allows you to project your smartphone
and a number of its apps onto the touch-
screen radio display. Android Auto automati-
cally brings you useful information, and orga-
nizes it into simple cards that appear just
when they are needed. Android Auto can be
used with Google's best-in-class speech tech-
nology, the steering wheel controls, the knobs
and buttons on your radio faceplate, and the
radio display’s touchscreen to control many
of your apps. To use Android Auto follow
these steps:
1. Download the Android Auto app from the
Google Play store on your Android-
powered smartphone.
281
Page 296 of 348
Finding Points Of Interest
1. From the main Navigation menu, press
the “Where To?” button on the touch-
screen, then press the “Points of Interest”
button on the touchscreen.
2. Select a category and then a subcategory,
if necessary.
3. Select your destination and then select
“Route To” and then press the “GO!”
button on the touchscreen.
Finding A Place By Spelling The Name
• From the Main Navigation Menu press the
“Where to?” button on the touchscreen,
press the “POI” button on the touchscreen,
then press the “Spell Name” button on the
touchscreen.
• Enter the name of your destination.
• Press the “List” button on the touchscreen.
• Select your destination and then select
“Route To” and then press the “GO!” but-
ton on the touchscreen.
One-Step Voice Destination Entry
• Enter a navigation destination without tak-
ing your hands off the wheel.
• Just push the Uconnect Voice Command
button on the steering wheel, wait for
the beep and say something like, "Find
Address," followed by the address.
NOTE:
Destination entry is not available while your
vehicle is in motion. However, you can also
use Voice Commands to enter an address
while moving. Refer to “Uconnect Voice Rec-
ognition Quick Tips” in this section for fur-
ther information.
Setting Your Home Location
• To add a Home location, press the “Nav”
button on the touchscreen in the menu bar
to access the Navigation system and the
Main Navigation menu.
• Press the “Home” button on the touch-
screen. You can add a Home location by
either selecting “Spell City,” “Spell
Street,” or “Select Country.” Select County
is automatically filled out based on your
state.• Once you have entered your Home location,
select the “Save Home” button located on
the lower left-hand side of your touch-
screen.
• To delete a saved Home location (or other
saved locations), so you can save a new
Home location, press the “Nav” button on
the touchscreen, and in the “Where To”
screen, press “Edit Where To” and then
press the “Home” button on the touch-
screen. Under the Manage screen press the
“Reset Location” button. A confirmation
screen will appear asking if you “Are you
sure you want to reset this location?” Press
“Reset” to confirm the deletion. Set a new
Home location by following the previous
instructions.Home
• A Home location must be saved in the
system. From the Main Navigation menu,
press the “Home” button on the
touchscreen.
MULTIMEDIA
294
Page 309 of 348
• Perform a factory reset on your mobile
phone. Refer to your mobile phone manu-
facturer or cellular provider for instruc-
tions. This should only be done as a last
resort.
Mobile Phone won’t pair to system:
• Delete pairing history in mobile phone and
Uconnect system; usually found in phone’s
Bluetooth connection settings.
• Verify you are selecting “Uconnect” in the
discovered Bluetooth devices on your mo-
bile phone.
• If your vehicle system generates a pin code
the default is 0000.
• Perform a hard reset in the mobile phone by
removing the battery (if removable — see
your mobile phone’s owner manual). This
should only be done as a last resort.
Mobile Phonebook didn’t download:
• Check “Do not ask again,” then accept the
“phonebook download” request on your
mobile phone.
• Up to 5,000 contact names with four num-
bers per contact will transfer to the
Uconnect 4C/4C NAV system phonebook.• Up to 2,000 contact names with six num-
bers per contact will transfer to the
Uconnect 4 system phonebook.
Can’t make a conference call:
• CDMA (Code-Division Multiple Access) car-
riers do not support conference calling.
Refer to your mobile phone user’s manual
for further information.
Making calls while connected to AUX:
• Plugging in your mobile phone to AUX while
connected to Bluetooth will disable Hands-
Free Calling. Do not make calls while your
mobile phone is plugged into the AUX jack.
UCONNECT VOICE
RECOGNITION QUICK TIPS
Introducing Uconnect
Start using Uconnect Voice Recognition with
these helpful quick tips. It provides the key
Voice Commands and tips you need to know
to control your Uconnect 3, Uconnect 4, or
Uconnect 4/4C NAV system.
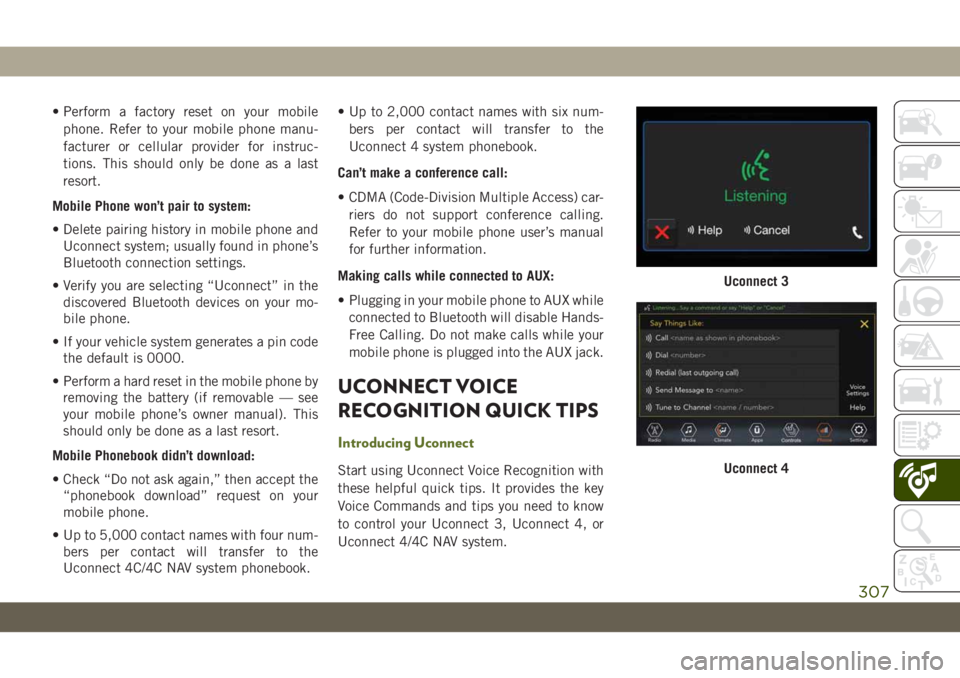
Uconnect 3
Uconnect 4
307
Page 341 of 348
Low Tire Pressure System..........94
Lug Nuts...................246
Maintenance..................54
Maintenance Free Battery.........221
Maintenance Schedule.......208, 213
Malfunction Indicator Light (Check
Engine)...................71
Manual Park Release............200
Memory Feature (Memory Seats)......26
Memory Seat..................26
Memory Seats And Radio..........26
Mirrors.....................35
Heated...................35
Modifications/Alterations
Vehicle....................3
Monitor, Tire Pressure System.......94
Mopar Accessories.............262
Navigation..................292
New Vehicle Break-In Period.......146
Occupant Restraints.............99
Octane Rating, Gasoline (Fuel) . .252, 259
Oil, Engine..................259
Capacity.................257
Dipstick..................220Filter....................259
Pressure Warning Light.........69
Recommendation............257
Viscosity.................257
Oil Pressure Light...............69
Onboard Diagnostic System.........78
Operating Precautions............78
Operator Manual
Owner's Manual...............2
Overheating, Engine............199
Paddle Shifters...............149
ParkSense System, Rear..........163
Passenger Airbag Disable.........111
Passive Entry..................18
Personalized Main Menu......273, 279
Pets......................136
Phonebook..................304
Phone (Uconnect)..............297
Pairing
..................300
Placard, Tire And Loading Information .226
Power
Inverter...................59
Windows..................46
Power Sliding Top...............54
Operation..................54
Pinch Protect...............54Power Steering Fluid............261
Pregnant Women And Seat Belts.....106
Preparation For Jacking..........191
Pretensioners
Seat Belts................106
Radial Ply Tires...............232
Radio
Presets...........270, 274, 280
Radio Operation........268, 272, 278
Radio Screens.............272, 278
Raising.....................47
Raising The Soft Top.............47
Rear Camera.................165
Rear Cross Path................93
Rear ParkSense System..........163
Rear Swing Gate...............57
Rear Wiper/Washer..............38
Recreational Towing.............171
Shifting Into Transfer Case Neutral
(N) .....................172
Shifting Out Of Transfer Case Neutral
(N) .....................173
Release, Hood.................56
Reminder, Seat Belt............100
Remote Control
Starting System..............16
339