JEEP WRANGLER UNLIMITED 2019 Owner handbook (in English)
Manufacturer: JEEP, Model Year: 2019, Model line: WRANGLER UNLIMITED, Model: JEEP WRANGLER UNLIMITED 2019Pages: 348, PDF Size: 6.5 MB
Page 181 of 348
Halogen Front Fog Lamp
NOTE:
We advise referring to an authorized dealer
for service.
1. Reach under the vehicle to access the
back of the front fog lamp.
2.
Disconnect the wire harness connector from
the front fog lamp connector receptacle.
3. Firmly grasp the bulb by the two latch
features and squeeze them together to
unlock the bulb from the back of the front
fog lamp housing.
4. Pull the bulb straight out from the keyed
opening in the housing and then connect
the replacement bulb.
CAUTION!
Do not touch the new bulb with your fin-
gers. Oil contamination will severely
shorten bulb life. If the bulb comes in
contact with any oily surface, clean the
bulb with rubbing alcohol.LED Front Fog Lamp
Please see an authorized dealer for service.
Rear Tail, Stop, Turn Signal, And Backup
Lamp
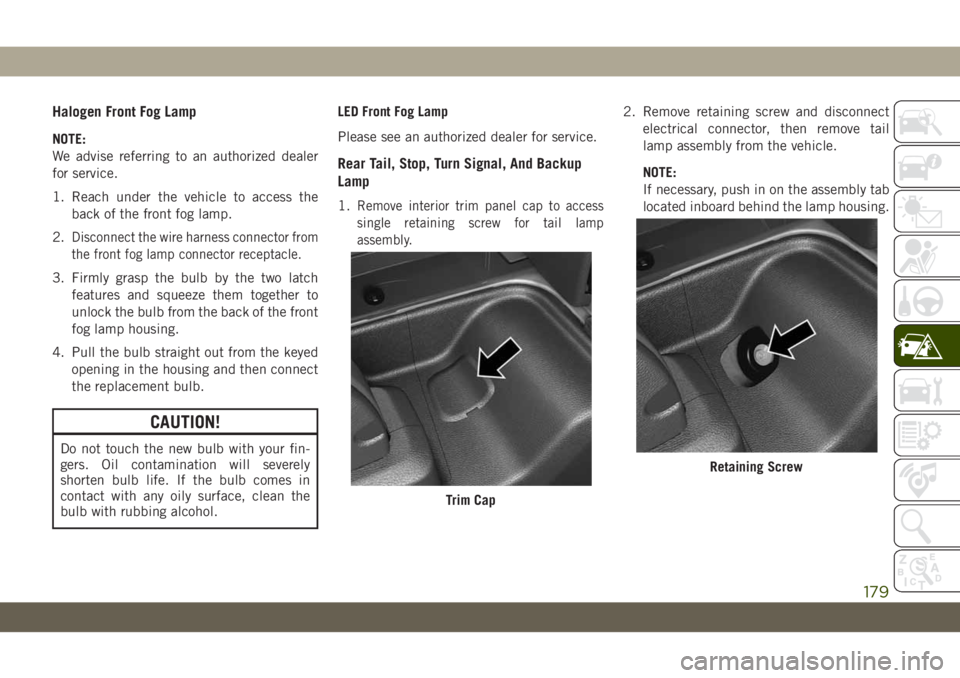
1.Remove interior trim panel cap to access
single retaining screw for tail lamp
assembly.
2. Remove retaining screw and disconnect
electrical connector, then remove tail
lamp assembly from the vehicle.
NOTE:
If necessary, push in on the assembly tab
located inboard behind the lamp housing.
Trim Cap
Retaining Screw
179
Page 182 of 348
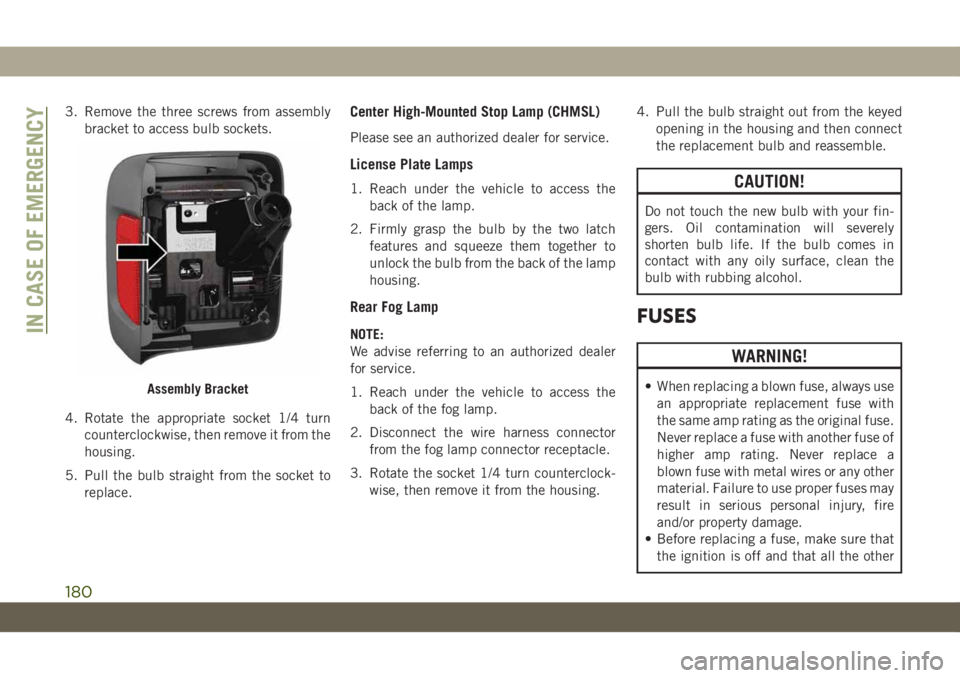
3. Remove the three screws from assembly
bracket to access bulb sockets.
4. Rotate the appropriate socket 1/4 turn
counterclockwise, then remove it from the
housing.
5. Pull the bulb straight from the socket to
replace.Center High-Mounted Stop Lamp (CHMSL)
Please see an authorized dealer for service.
License Plate Lamps
1. Reach under the vehicle to access the
back of the lamp.
2. Firmly grasp the bulb by the two latch
features and squeeze them together to
unlock the bulb from the back of the lamp
housing.
Rear Fog Lamp
NOTE:
We advise referring to an authorized dealer
for service.
1. Reach under the vehicle to access the
back of the fog lamp.
2. Disconnect the wire harness connector
from the fog lamp connector receptacle.
3. Rotate the socket 1/4 turn counterclock-
wise, then remove it from the housing.4. Pull the bulb straight out from the keyed
opening in the housing and then connect
the replacement bulb and reassemble.
CAUTION!
Do not touch the new bulb with your fin-
gers. Oil contamination will severely
shorten bulb life. If the bulb comes in
contact with any oily surface, clean the
bulb with rubbing alcohol.
FUSES
WARNING!
ŌĆó When replacing a blown fuse, always use
an appropriate replacement fuse with
the same amp rating as the original fuse.
Never replace a fuse with another fuse of
higher amp rating. Never replace a
blown fuse with metal wires or any other
material. Failure to use proper fuses may
result in serious personal injury, fire
and/or property damage.
ŌĆó Before replacing a fuse, make sure that
the ignition is off and that all the otherAssembly Bracket
IN CASE OF EMERGENCY
180
Page 183 of 348
WARNING!
services are switched off and/or disen-
gaged.
ŌĆó If the replaced fuse blows again, contact
an authorized dealer.
ŌĆó If a general protection fuse for safety
systems (air bag system, braking sys-
tem), power unit systems (engine sys-
tem, gearbox system) or steering system
blows, contact an authorized dealer.
CAUTION!
If it is necessary to wash the engine com-
partment, take care not to directly hit the
CAUTION!
fuse box, and the windshield wiper motors
with water.
General Information
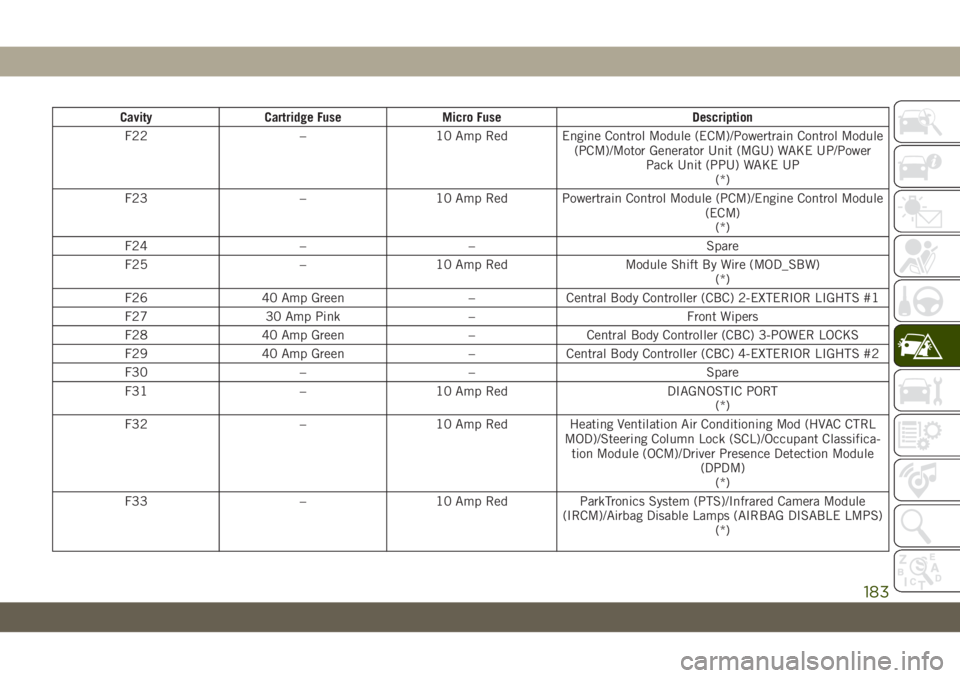
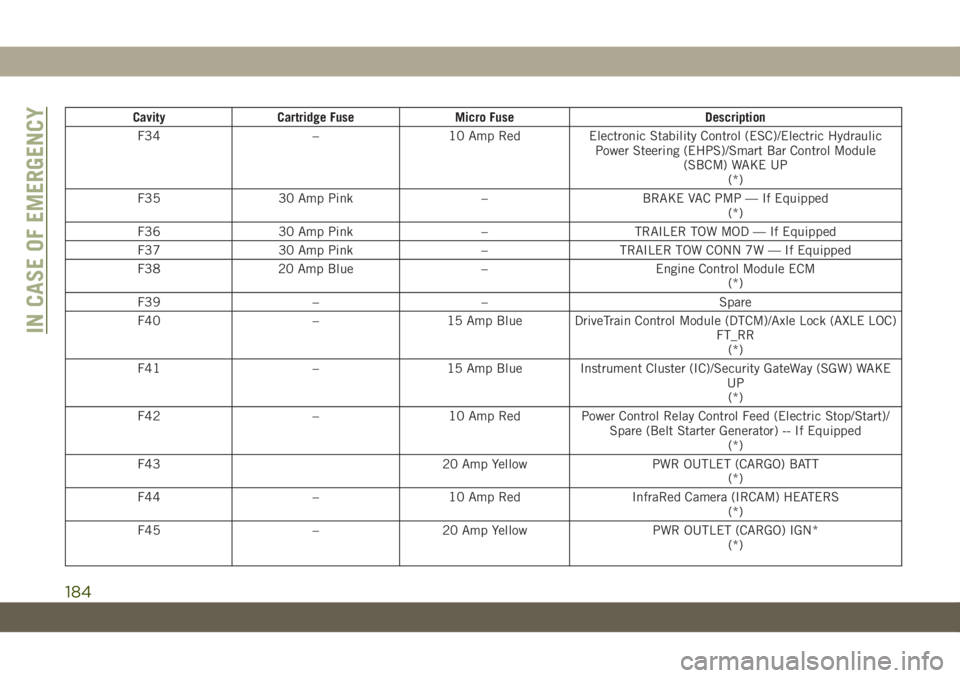
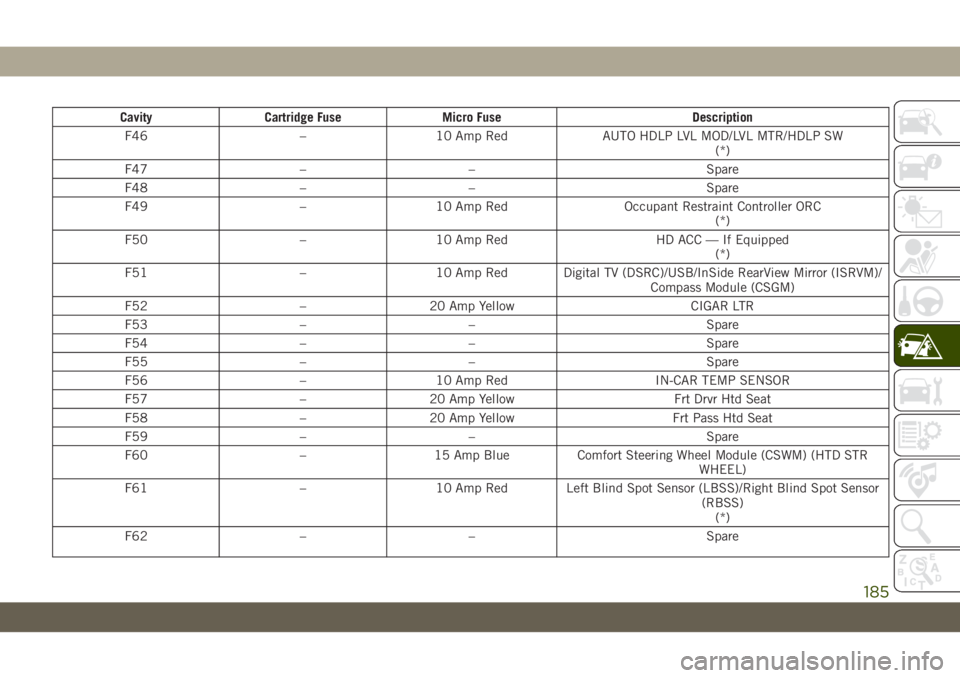
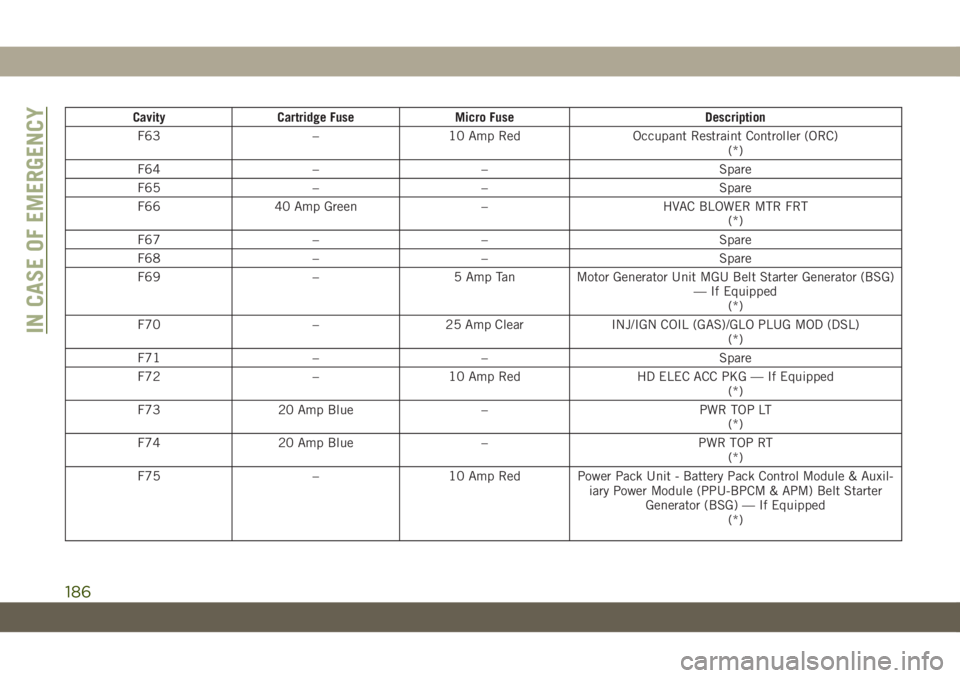
The fuses protect electrical systems against
excessive current.
When a device does not work, you must check
the fuse element inside the blade fuse for a
break/melt.
Also, please be aware that when using power
outlets for extended periods of time with the
engine off may result in vehicle battery dis-
charge.
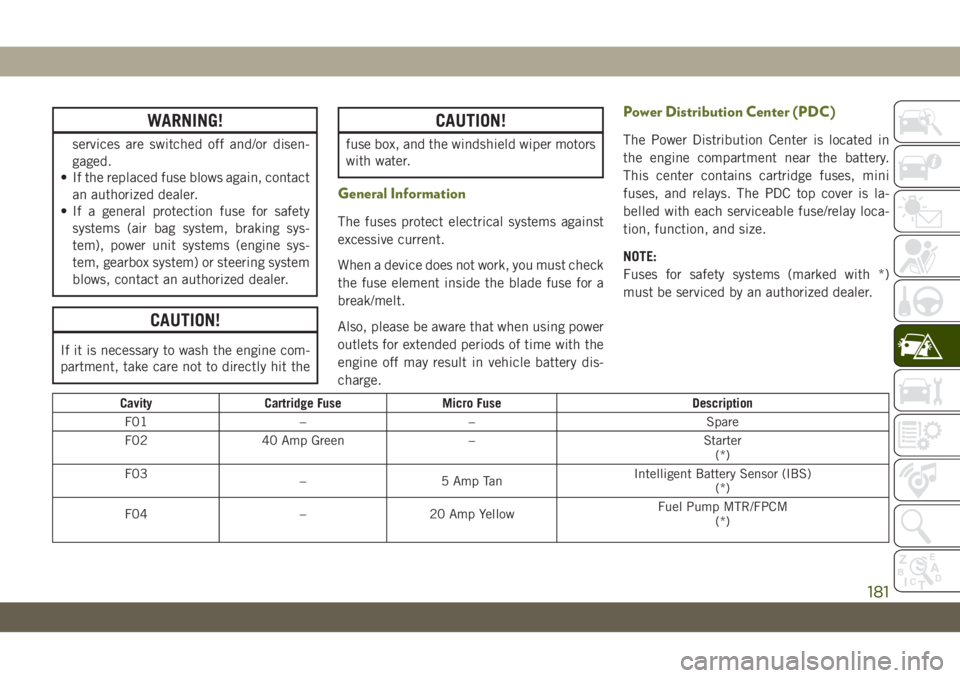
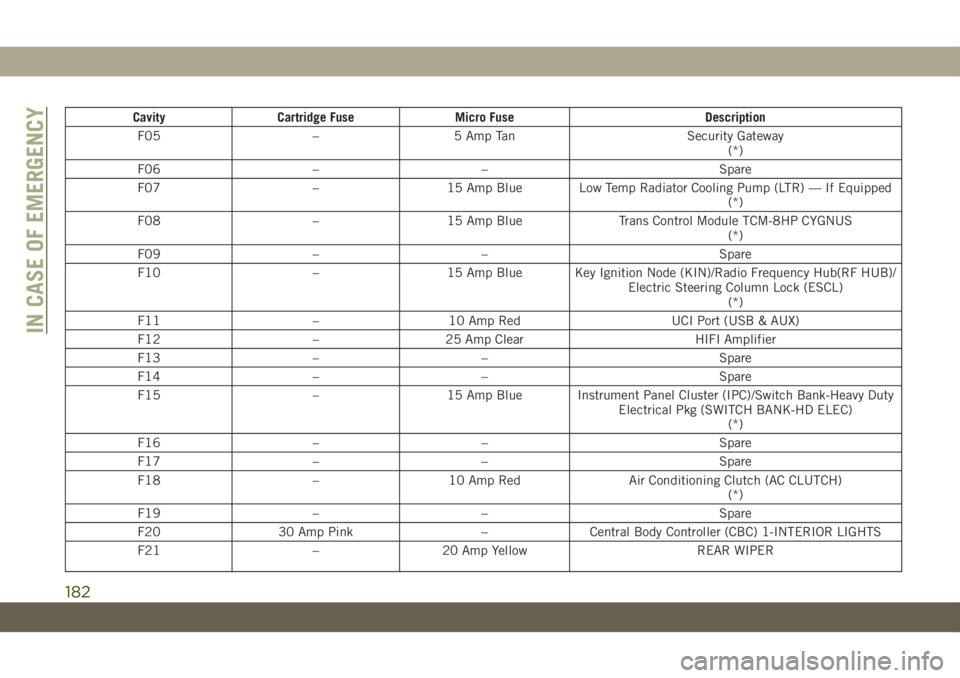
Power Distribution Center (PDC)
The Power Distribution Center is located in
the engine compartment near the battery.
This center contains cartridge fuses, mini
fuses, and relays. The PDC top cover is la-
belled with each serviceable fuse/relay loca-
tion, function, and size.
NOTE:
Fuses for safety systems (marked with *)
must be serviced by an authorized dealer.
Cavity Cartridge Fuse Micro Fuse Description
F01 ŌĆō ŌĆō Spare
F02 40 Amp Green ŌĆō Starter
(*)
F03
ŌĆō 5 Amp TanIntelligent Battery Sensor (IBS)
(*)
F04 ŌĆō 20 Amp YellowFuel Pump MTR/FPCM
(*)
181
Page 184 of 348
Cavity Cartridge Fuse Micro Fuse Description
F05 ŌĆō 5 Amp Tan Security Gateway
(*)
F06 ŌĆō ŌĆō Spare
F07 ŌĆō 15 Amp Blue Low Temp Radiator Cooling Pump (LTR) ŌĆö If Equipped
(*)
F08 ŌĆō 15 Amp Blue Trans Control Module TCM-8HP CYGNUS
(*)
F09 ŌĆō ŌĆō Spare
F10 ŌĆō 15 Amp Blue Key Ignition Node (KIN)/Radio Frequency Hub(RF HUB)/
Electric Steering Column Lock (ESCL)
(*)
F11 ŌĆō 10 Amp Red UCI Port (USB & AUX)
F12 ŌĆō 25 Amp Clear HIFI Amplifier
F13 ŌĆō ŌĆō Spare
F14 ŌĆō ŌĆō Spare
F15 ŌĆō 15 Amp Blue Instrument Panel Cluster (IPC)/Switch Bank-Heavy Duty
Electrical Pkg (SWITCH BANK-HD ELEC)
(*)
F16 ŌĆō ŌĆō Spare
F17 ŌĆō ŌĆō Spare
F18 ŌĆō 10 Amp Red Air Conditioning Clutch (AC CLUTCH)
(*)
F19 ŌĆō ŌĆō Spare
F20 30 Amp Pink ŌĆō Central Body Controller (CBC) 1-INTERIOR LIGHTS
F21 ŌĆō 20 Amp Yellow REAR WIPER
IN CASE OF EMERGENCY
182
Page 185 of 348
Cavity Cartridge Fuse Micro Fuse Description
F22 ŌĆō 10 Amp Red Engine Control Module (ECM)/Powertrain Control Module
(PCM)/Motor Generator Unit (MGU) WAKE UP/Power
Pack Unit (PPU) WAKE UP
(*)
F23 ŌĆō 10 Amp Red Powertrain Control Module (PCM)/Engine Control Module
(ECM)
(*)
F24 ŌĆō ŌĆō Spare
F25 ŌĆō 10 Amp Red Module Shift By Wire (MOD_SBW)
(*)
F26 40 Amp Green ŌĆō Central Body Controller (CBC) 2-EXTERIOR LIGHTS #1
F27 30 Amp Pink ŌĆō Front Wipers
F28 40 Amp Green ŌĆō Central Body Controller (CBC) 3-POWER LOCKS
F29 40 Amp Green ŌĆō Central Body Controller (CBC) 4-EXTERIOR LIGHTS #2
F30 ŌĆō ŌĆō Spare
F31 ŌĆō 10 Amp Red DIAGNOSTIC PORT
(*)
F32 ŌĆō 10 Amp Red Heating Ventilation Air Conditioning Mod (HVAC CTRL
MOD)/Steering Column Lock (SCL)/Occupant Classifica-
tion Module (OCM)/Driver Presence Detection Module
(DPDM)
(*)
F33 ŌĆō 10 Amp Red ParkTronics System (PTS)/Infrared Camera Module
(IRCM)/Airbag Disable Lamps (AIRBAG DISABLE LMPS)
(*)
183
Page 186 of 348
Cavity Cartridge Fuse Micro Fuse Description
F34 ŌĆō 10 Amp Red Electronic Stability Control (ESC)/Electric Hydraulic
Power Steering (EHPS)/Smart Bar Control Module
(SBCM) WAKE UP
(*)
F35 30 Amp Pink ŌĆō BRAKE VAC PMP ŌĆö If Equipped
(*)
F36 30 Amp Pink ŌĆō TRAILER TOW MOD ŌĆö If Equipped
F37 30 Amp Pink ŌĆō TRAILER TOW CONN 7W ŌĆö If Equipped
F38 20 Amp Blue ŌĆō Engine Control Module ECM
(*)
F39 ŌĆō ŌĆō Spare
F40 ŌĆō 15 Amp Blue DriveTrain Control Module (DTCM)/Axle Lock (AXLE LOC)
FT_RR
(*)
F41 ŌĆō 15 Amp Blue Instrument Cluster (IC)/Security GateWay (SGW) WAKE
UP
(*)
F42 ŌĆō 10 Amp Red Power Control Relay Control Feed (Electric Stop/Start)/
Spare (Belt Starter Generator) -- If Equipped
(*)
F43 20 Amp Yellow PWR OUTLET (CARGO) BATT
(*)
F44 ŌĆō 10 Amp Red InfraRed Camera (IRCAM) HEATERS
(*)
F45 ŌĆō 20 Amp Yellow PWR OUTLET (CARGO) IGN*
(*)
IN CASE OF EMERGENCY
184
Page 187 of 348
Cavity Cartridge Fuse Micro Fuse Description
F46 ŌĆō 10 Amp Red AUTO HDLP LVL MOD/LVL MTR/HDLP SW
(*)
F47 ŌĆō ŌĆō Spare
F48 ŌĆō ŌĆō Spare
F49 ŌĆō 10 Amp Red Occupant Restraint Controller ORC
(*)
F50 ŌĆō 10 Amp Red HD ACC ŌĆö If Equipped
(*)
F51 ŌĆō 10 Amp Red Digital TV (DSRC)/USB/InSide RearView Mirror (ISRVM)/
Compass Module (CSGM)
F52 ŌĆō 20 Amp Yellow CIGAR LTR
F53 ŌĆō ŌĆō Spare
F54 ŌĆō ŌĆō Spare
F55 ŌĆō ŌĆō Spare
F56 ŌĆō 10 Amp Red IN-CAR TEMP SENSOR
F57 ŌĆō 20 Amp Yellow Frt Drvr Htd Seat
F58 ŌĆō 20 Amp Yellow Frt Pass Htd Seat
F59 ŌĆō ŌĆō Spare
F60 ŌĆō 15 Amp Blue Comfort Steering Wheel Module (CSWM) (HTD STR
WHEEL)
F61 ŌĆō 10 Amp Red Left Blind Spot Sensor (LBSS)/Right Blind Spot Sensor
(RBSS)
(*)
F62 ŌĆō ŌĆō Spare
185
Page 188 of 348
Cavity Cartridge Fuse Micro Fuse Description
F63 ŌĆō 10 Amp Red Occupant Restraint Controller (ORC)
(*)
F64 ŌĆō ŌĆō Spare
F65 ŌĆō ŌĆō Spare
F66 40 Amp Green ŌĆō HVAC BLOWER MTR FRT
(*)
F67 ŌĆō ŌĆō Spare
F68 ŌĆō ŌĆō Spare
F69 ŌĆō 5 Amp Tan Motor Generator Unit MGU Belt Starter Generator (BSG)
ŌĆö If Equipped
(*)
F70 ŌĆō 25 Amp Clear INJ/IGN COIL (GAS)/GLO PLUG MOD (DSL)
(*)
F71 ŌĆō ŌĆō Spare
F72 ŌĆō 10 Amp Red HD ELEC ACC PKG ŌĆö If Equipped
(*)
F73 20 Amp Blue ŌĆō PWR TOP LT
(*)
F74 20 Amp Blue ŌĆō PWR TOP RT
(*)
F75 ŌĆō 10 Amp Red Power Pack Unit - Battery Pack Control Module & Auxil-
iary Power Module (PPU-BPCM & APM) Belt Starter
Generator (BSG) ŌĆö If Equipped
(*)
IN CASE OF EMERGENCY
186
Page 189 of 348
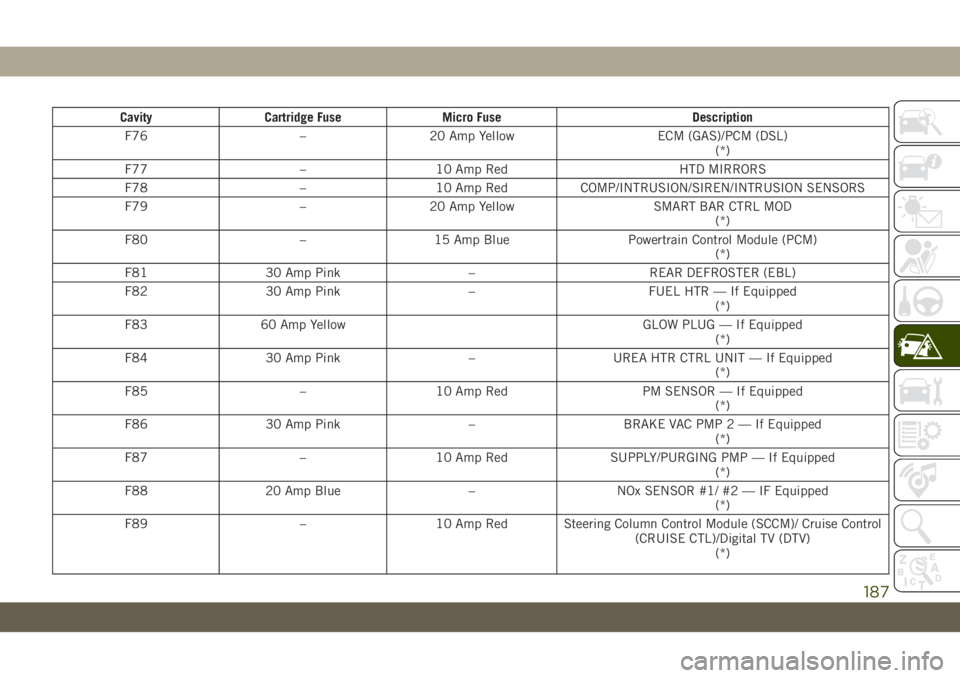
Cavity Cartridge Fuse Micro Fuse Description
F76 ŌĆō 20 Amp Yellow ECM (GAS)/PCM (DSL)
(*)
F77 ŌĆō 10 Amp Red HTD MIRRORS
F78 ŌĆō 10 Amp Red COMP/INTRUSION/SIREN/INTRUSION SENSORS
F79 ŌĆō 20 Amp Yellow SMART BAR CTRL MOD
(*)
F80 ŌĆō 15 Amp Blue Powertrain Control Module (PCM)
(*)
F81 30 Amp Pink ŌĆō REAR DEFROSTER (EBL)
F82 30 Amp Pink ŌĆō FUEL HTR ŌĆö If Equipped
(*)
F83 60 Amp Yellow GLOW PLUG ŌĆö If Equipped
(*)
F84 30 Amp Pink ŌĆō UREA HTR CTRL UNIT ŌĆö If Equipped
(*)
F85 ŌĆō 10 Amp Red PM SENSOR ŌĆö If Equipped
(*)
F86 30 Amp Pink ŌĆō BRAKE VAC PMP2ŌĆöIfEquipped
(*)
F87 ŌĆō 10 Amp Red SUPPLY/PURGING PMP ŌĆö If Equipped
(*)
F88 20 Amp Blue ŌĆō NOx SENSOR #1/ #2 ŌĆö IF Equipped
(*)
F89 ŌĆō 10 Amp Red Steering Column Control Module (SCCM)/ Cruise Control
(CRUISE CTL)/Digital TV (DTV)
(*)
187
Page 190 of 348
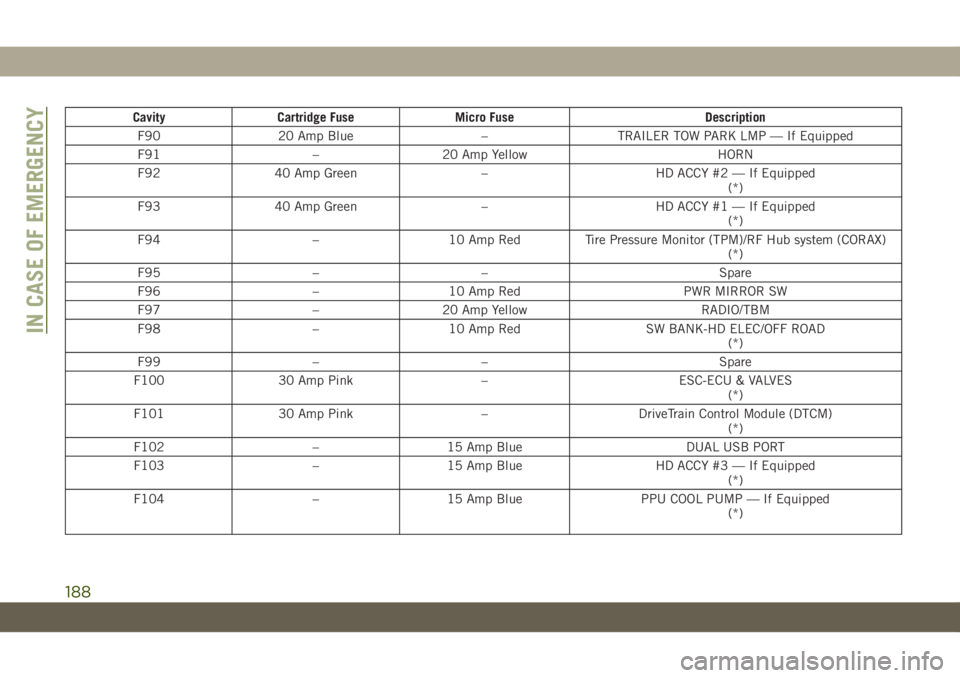
Cavity Cartridge Fuse Micro Fuse Description
F90 20 Amp Blue ŌĆō TRAILER TOW PARK LMP ŌĆö If Equipped
F91 ŌĆō 20 Amp Yellow HORN
F92 40 Amp Green ŌĆō HD ACCY #2 ŌĆö If Equipped
(*)
F93 40 Amp Green ŌĆō HD ACCY #1 ŌĆö If Equipped
(*)
F94 ŌĆō 10 Amp Red Tire Pressure Monitor (TPM)/RF Hub system (CORAX)
(*)
F95 ŌĆō ŌĆō Spare
F96 ŌĆō 10 Amp Red PWR MIRROR SW
F97 ŌĆō 20 Amp Yellow RADIO/TBM
F98 ŌĆō 10 Amp Red SW BANK-HD ELEC/OFF ROAD
(*)
F99 ŌĆō ŌĆō Spare
F100 30 Amp Pink ŌĆō ESC-ECU & VALVES
(*)
F101 30 Amp Pink ŌĆō DriveTrain Control Module (DTCM)
(*)
F102 ŌĆō 15 Amp Blue DUAL USB PORT
F103 ŌĆō 15 Amp Blue HD ACCY #3 ŌĆö If Equipped
(*)
F104 ŌĆō 15 Amp Blue PPU COOL PUMP ŌĆö If Equipped
(*)
IN CASE OF EMERGENCY
188