JEEP WRANGLER UNLIMITED 2019 Owner handbook (in English)
Manufacturer: JEEP, Model Year: 2019, Model line: WRANGLER UNLIMITED, Model: JEEP WRANGLER UNLIMITED 2019Pages: 348, PDF Size: 6.5 MB
Page 291 of 348
Right Switch
• Push the switch up or down to increase or
decrease the volume.
• Push the button in the center to mute the
radio.
Reception Conditions
Reception conditions change constantly
while driving. Reception may be interfered
with by the presence of mountains, buildings
or bridges, especially when you are far away
from the broadcaster.
The volume may be increased when receiving
traffic alerts and news.
Care And Maintenance
Observe the following precautions to ensure
the system is fully operational:
• The display lens should not come into con-
tact with pointed or rigid objects which
could damage its surface; use a soft, dry,
anti-static cloth to clean and do not press.• Never use alcohol, gas and derivatives to
clean the display lens.
• Prevent any liquid from entering the sys-
tem: this could damage it beyond repair.
Anti-Theft Protection
The system is equipped with an anti-theft
protection system based on the exchange of
information with the electronic control unit
(Body Computer) on the vehicle. This guaran-
tees maximum safety.
If the check has a positive outcome, the
system will start to operate. See an autho-
rized dealer for further information.
AUX/USB/MP3 CONTROL —
IF EQUIPPED
The Media Hub is located on the Instrument
Panel, below the Climate Controls. Behind
the Media Hub access door contains one AUXport, a Type C USB Port and one standard
USB Port. Both USB Ports allow you to play
music from iPod/MP3 players or USB devices
through your vehicle’s sound system.
The Smart Charging USB ports provide power
to your device up to an hour after the vehicle
is turned off.
NOTE:
• The Type C USB port is the primary media
port for the radio. Two devices can be
plugged in at the same time and both ports
provide charging capabilities, but only one
port can transfer data to the head unit at a
time.
• Both ports share a single data connection.
However, the user cannot switch between
Type A or Type C.
289
Page 292 of 348
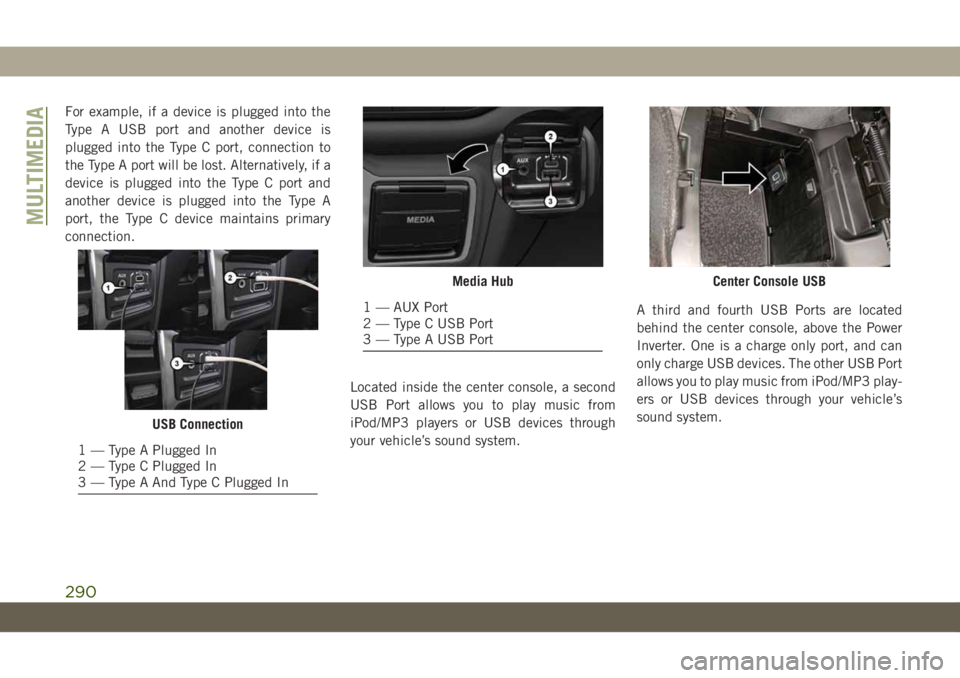
For example, if a device is plugged into the
Type A USB port and another device is
plugged into the Type C port, connection to
the Type A port will be lost. Alternatively, if a
device is plugged into the Type C port and
another device is plugged into the Type A
port, the Type C device maintains primary
connection.
Located inside the center console, a second
USB Port allows you to play music from
iPod/MP3 players or USB devices through
your vehicle’s sound system.A third and fourth USB Ports are located
behind the center console, above the Power
Inverter. One is a charge only port, and can
only charge USB devices. The other USB Port
allows you to play music from iPod/MP3 play-
ers or USB devices through your vehicle’s
sound system.
USB Connection
1 — Type A Plugged In
2 — Type C Plugged In
3 — Type A And Type C Plugged In
Media Hub
1 — AUX Port
2 — Type C USB Port
3 — Type A USB Port
Center Console USB
MULTIMEDIA
290
Page 293 of 348
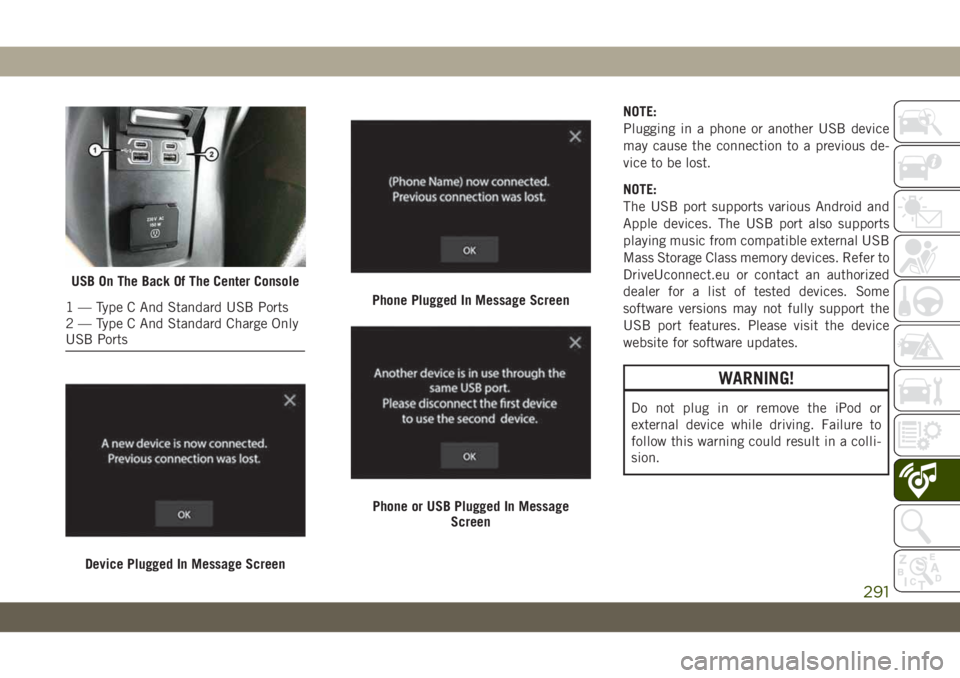
NOTE:
Plugging in a phone or another USB device
may cause the connection to a previous de-
vice to be lost.
NOTE:
The USB port supports various Android and
Apple devices. The USB port also supports
playing music from compatible external USB
Mass Storage Class memory devices. Refer to
DriveUconnect.eu or contact an authorized
dealer for a list of tested devices. Some
software versions may not fully support the
USB port features. Please visit the device
website for software updates.
WARNING!
Do not plug in or remove the iPod or
external device while driving. Failure to
follow this warning could result in a colli-
sion.
USB On The Back Of The Center Console
1 — Type C And Standard USB Ports
2 — Type C And Standard Charge Only
USB Ports
Device Plugged In Message Screen
Phone Plugged In Message Screen
Phone or USB Plugged In Message
Screen
291
Page 294 of 348
NAVIGATION — IF
EQUIPPED
• The information in the section below is only
applicable if you have the 4C NAV system.
Press the “Nav” button on the touchscreen in
the menu bar to access the Navigation sys-
tem.
Changing The Navigation Voice Prompt
Volume
1. Press the “Settings” button on the touch-
screen in the lower right area of the
screen.
2. In the Settings menu, press the “Guid-
ance” button on the touchscreen.
3. In the Guidance menu, adjust the Nav
Volume by pressing the “+” or “–” buttons
on the touchscreen.
MULTIMEDIA
292
Page 295 of 348
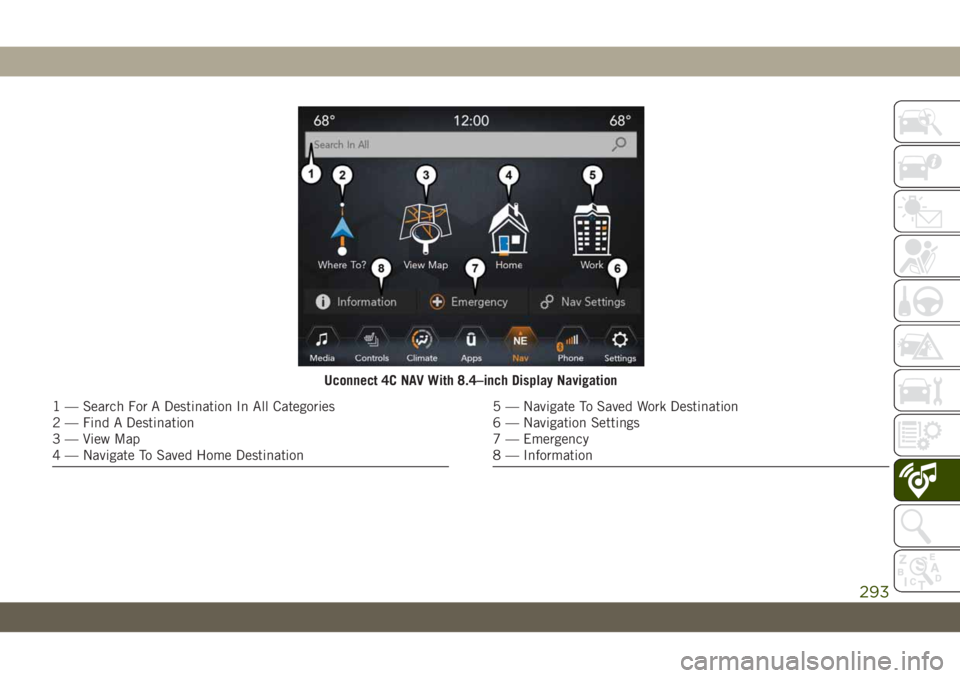
Uconnect 4C NAV With 8.4–inch Display Navigation
1 — Search For A Destination In All Categories
2 — Find A Destination
3 — View Map
4 — Navigate To Saved Home Destination5 — Navigate To Saved Work Destination
6 — Navigation Settings
7 — Emergency
8 — Information
293
Page 296 of 348
Finding Points Of Interest
1. From the main Navigation menu, press
the “Where To?” button on the touch-
screen, then press the “Points of Interest”
button on the touchscreen.
2. Select a category and then a subcategory,
if necessary.
3. Select your destination and then select
“Route To” and then press the “GO!”
button on the touchscreen.
Finding A Place By Spelling The Name
• From the Main Navigation Menu press the
“Where to?” button on the touchscreen,
press the “POI” button on the touchscreen,
then press the “Spell Name” button on the
touchscreen.
• Enter the name of your destination.
• Press the “List” button on the touchscreen.
• Select your destination and then select
“Route To” and then press the “GO!” but-
ton on the touchscreen.
One-Step Voice Destination Entry
• Enter a navigation destination without tak-
ing your hands off the wheel.
• Just push the Uconnect Voice Command
button on the steering wheel, wait for
the beep and say something like, "Find
Address," followed by the address.
NOTE:
Destination entry is not available while your
vehicle is in motion. However, you can also
use Voice Commands to enter an address
while moving. Refer to “Uconnect Voice Rec-
ognition Quick Tips” in this section for fur-
ther information.
Setting Your Home Location
• To add a Home location, press the “Nav”
button on the touchscreen in the menu bar
to access the Navigation system and the
Main Navigation menu.
• Press the “Home” button on the touch-
screen. You can add a Home location by
either selecting “Spell City,” “Spell
Street,” or “Select Country.” Select County
is automatically filled out based on your
state.• Once you have entered your Home location,
select the “Save Home” button located on
the lower left-hand side of your touch-
screen.
• To delete a saved Home location (or other
saved locations), so you can save a new
Home location, press the “Nav” button on
the touchscreen, and in the “Where To”
screen, press “Edit Where To” and then
press the “Home” button on the touch-
screen. Under the Manage screen press the
“Reset Location” button. A confirmation
screen will appear asking if you “Are you
sure you want to reset this location?” Press
“Reset” to confirm the deletion. Set a new
Home location by following the previous
instructions.Home
• A Home location must be saved in the
system. From the Main Navigation menu,
press the “Home” button on the
touchscreen.
MULTIMEDIA
294
Page 297 of 348
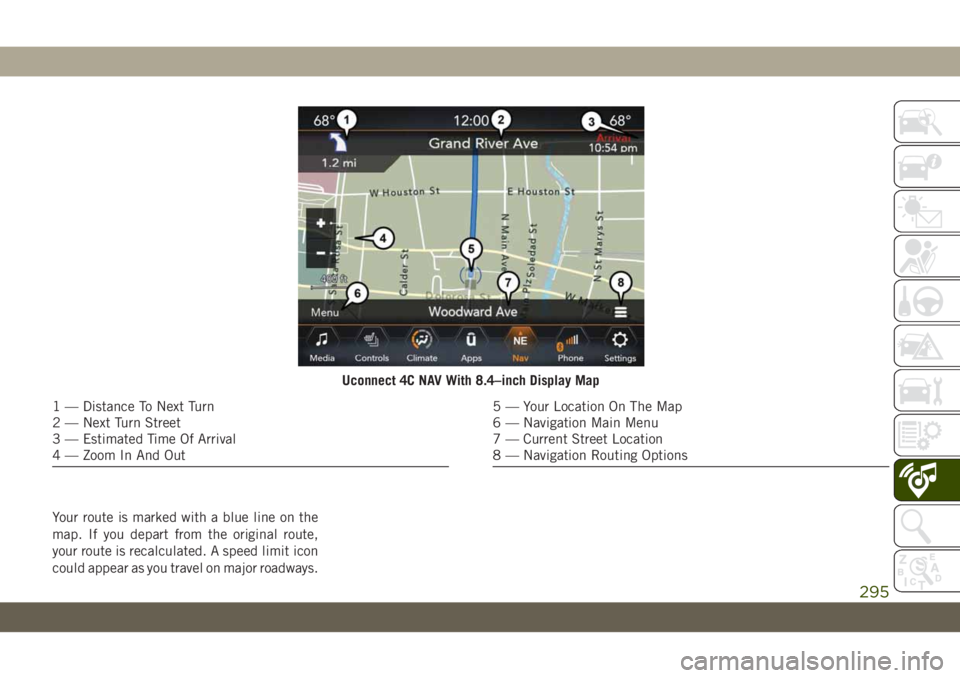
Your route is marked with a blue line on the
map. If you depart from the original route,
your route is recalculated. A speed limit icon
could appear as you travel on major roadways.
Uconnect 4C NAV With 8.4–inch Display Map
1 — Distance To Next Turn
2 — Next Turn Street
3 — Estimated Time Of Arrival
4 — Zoom In And Out5 — Your Location On The Map
6 — Navigation Main Menu
7 — Current Street Location
8 — Navigation Routing Options
295
Page 298 of 348
Adding A Stop
• To add a stop you must be navigating a
route.
• Press the “Menu” button on the touch-
screen to return to the Main Navigation
menu.• Press the “Where To?” button on the touch-
screen, then search for the extra stop.
When another location has been selected,
you can choose to cancel your previous
route, add as the first destination or add as
the last destination.
• Press the desired selection and press the
“GO!” button on the touchscreen.
Taking A Detour
• To take a detour you must be navigating a
route.• Press the “Detour” button on the
touchscreen.
NOTE:
If the route you are currently taking is the
only reasonable option, the device may not
calculate a detour. For more information, see
your Uconnect Owner's Manual Supplement.
Map Update
To update your map, please refer to
www.maps.mopar.eu, or contact an autho-
rized dealer.
MULTIMEDIA
296
Page 299 of 348
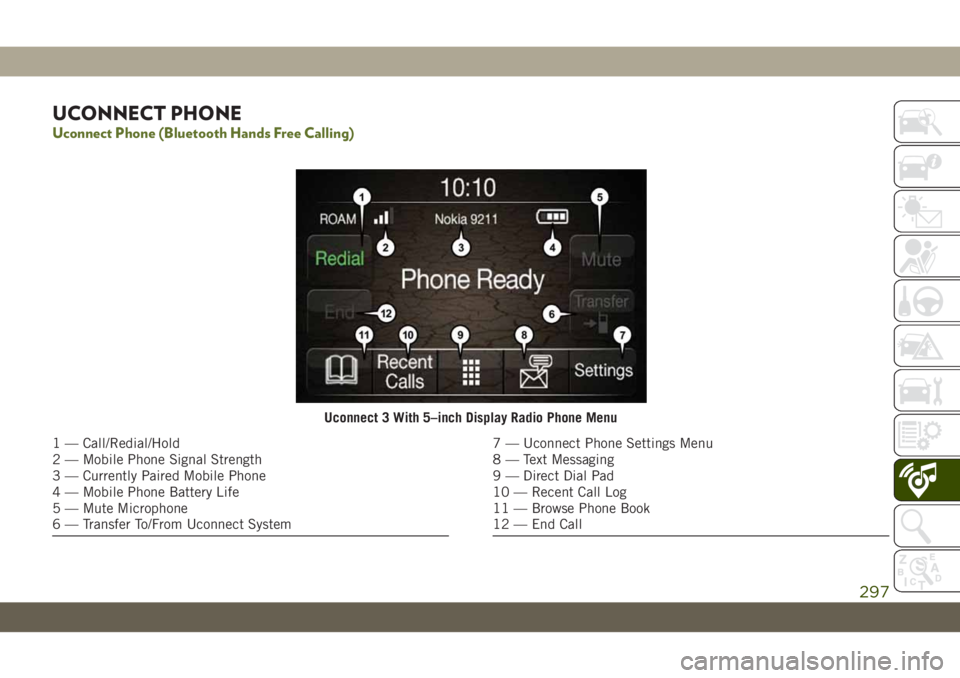
UCONNECT PHONE
Uconnect Phone (Bluetooth Hands Free Calling)
Uconnect 3 With 5–inch Display Radio Phone Menu
1 — Call/Redial/Hold
2 — Mobile Phone Signal Strength
3 — Currently Paired Mobile Phone
4 — Mobile Phone Battery Life
5 — Mute Microphone
6 — Transfer To/From Uconnect System7 — Uconnect Phone Settings Menu
8 — Text Messaging
9 — Direct Dial Pad
10 — Recent Call Log
11 — Browse Phone Book
12 — End Call
297
Page 300 of 348
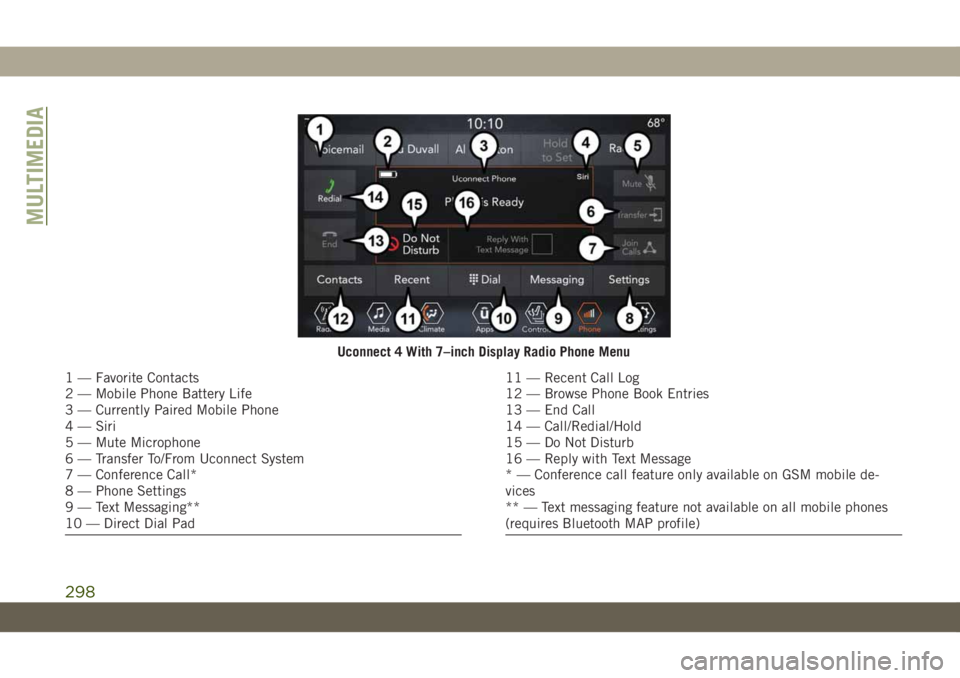
Uconnect 4 With 7–inch Display Radio Phone Menu
1 — Favorite Contacts
2 — Mobile Phone Battery Life
3 — Currently Paired Mobile Phone
4 — Siri
5 — Mute Microphone
6 — Transfer To/From Uconnect System
7 — Conference Call*
8 — Phone Settings
9 — Text Messaging**
10 — Direct Dial Pad11 — Recent Call Log
12 — Browse Phone Book Entries
13 — End Call
14 — Call/Redial/Hold
15 — Do Not Disturb
16 — Reply with Text Message
* — Conference call feature only available on GSM mobile de-
vices
** — Text messaging feature not available on all mobile phones
(requires Bluetooth MAP profile)
MULTIMEDIA
298