engine overheat JEEP WRANGLER UNLIMITED 2019 Owner handbook (in English)
[x] Cancel search | Manufacturer: JEEP, Model Year: 2019, Model line: WRANGLER UNLIMITED, Model: JEEP WRANGLER UNLIMITED 2019Pages: 348, PDF Size: 6.5 MB
Page 29 of 348
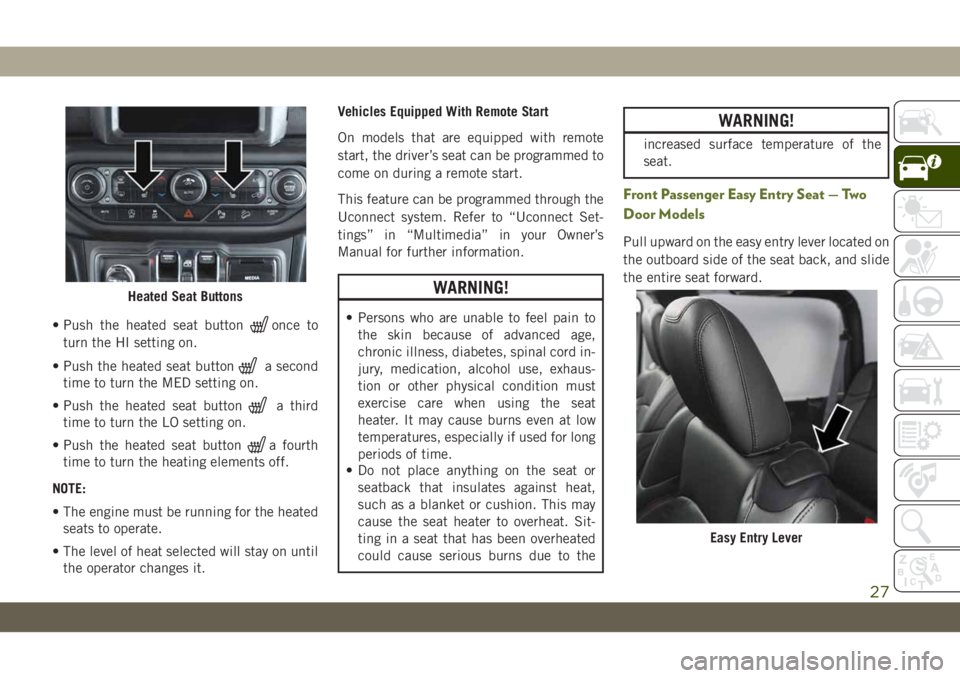
• Push the heated seat buttononce to
turn the HI setting on.
• Push the heated seat button
a second
time to turn the MED setting on.
• Push the heated seat button
a third
time to turn the LO setting on.
• Push the heated seat button
a fourth
time to turn the heating elements off.
NOTE:
• The engine must be running for the heated
seats to operate.
• The level of heat selected will stay on until
the operator changes it.Vehicles Equipped With Remote Start
On models that are equipped with remote
start, the driver’s seat can be programmed to
come on during a remote start.
This feature can be programmed through the
Uconnect system. Refer to “Uconnect Set-
tings” in “Multimedia” in your Owner’s
Manual for further information.
WARNING!
• Persons who are unable to feel pain to
the skin because of advanced age,
chronic illness, diabetes, spinal cord in-
jury, medication, alcohol use, exhaus-
tion or other physical condition must
exercise care when using the seat
heater. It may cause burns even at low
temperatures, especially if used for long
periods of time.
• Do not place anything on the seat or
seatback that insulates against heat,
such as a blanket or cushion. This may
cause the seat heater to overheat. Sit-
ting in a seat that has been overheated
could cause serious burns due to the
WARNING!
increased surface temperature of the
seat.
Front Passenger Easy Entry Seat — Two
Door Models
Pull upward on the easy entry lever located on
the outboard side of the seat back, and slide
the entire seat forward.
Heated Seat Buttons
Easy Entry Lever
27
Page 36 of 348
WARNING!
Do not adjust the steering column while
driving. Adjusting the steering column
while driving or driving with the steering
column unlocked, could cause the driver
to lose control of the vehicle. Failure to
follow this warning may result in serious
injury or death.
Heated Steering Wheel — If Equipped
The steering wheel contains a heating ele-
ment that helps warm your hands in cold
weather. The heated steering wheel has only
one temperature setting. Once the heated
steering wheel has been turned on, it will stay
on until the operator turns it off. The heated
steering wheel may not turn on when it is
already warm.
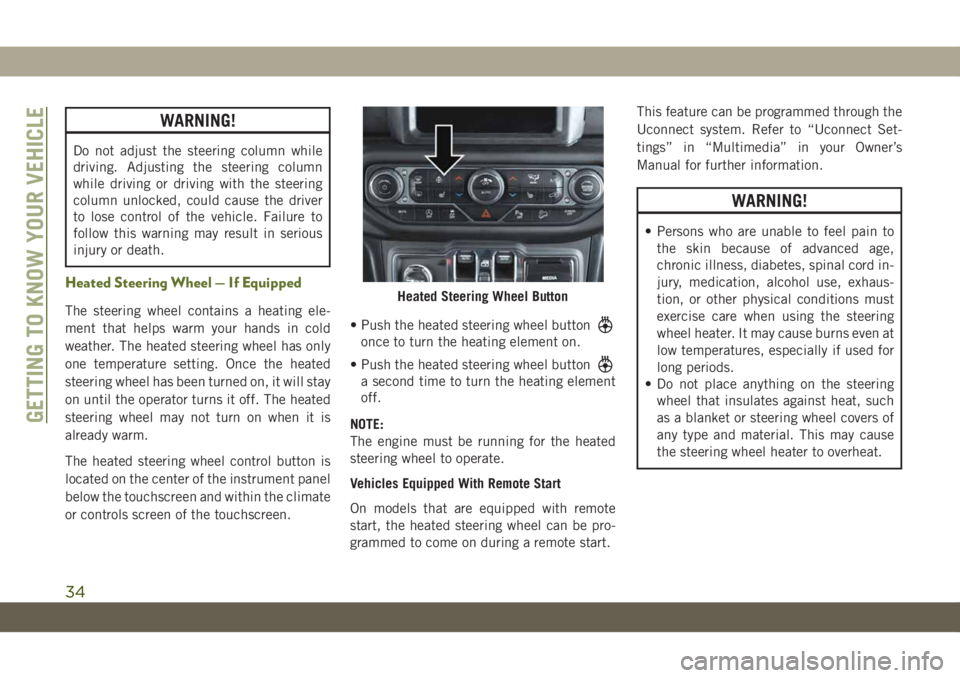
The heated steering wheel control button is
located on the center of the instrument panel
below the touchscreen and within the climate
or controls screen of the touchscreen.• Push the heated steering wheel button
once to turn the heating element on.
• Push the heated steering wheel button
a second time to turn the heating element
off.
NOTE:
The engine must be running for the heated
steering wheel to operate.
Vehicles Equipped With Remote Start
On models that are equipped with remote
start, the heated steering wheel can be pro-
grammed to come on during a remote start.This feature can be programmed through the
Uconnect system. Refer to “Uconnect Set-
tings” in “Multimedia” in your Owner’s
Manual for further information.
WARNING!
• Persons who are unable to feel pain to
the skin because of advanced age,
chronic illness, diabetes, spinal cord in-
jury, medication, alcohol use, exhaus-
tion, or other physical conditions must
exercise care when using the steering
wheel heater. It may cause burns even at
low temperatures, especially if used for
long periods.
• Do not place anything on the steering
wheel that insulates against heat, such
as a blanket or steering wheel covers of
any type and material. This may cause
the steering wheel heater to overheat.
Heated Steering Wheel Button
GETTING TO KNOW YOUR VEHICLE
34
Page 47 of 348
Manual Operation Override
This system offers a full complement of
manual override features. The AUTO symbol
in the front ATC display will be turned off
when the system is being used in the manual
mode.
Operating Tips
Summer Operation
The engine cooling system must be protected
with a high-quality antifreeze coolant to pro-
vide proper corrosion protection and to pro-
tect against engine overheating. OAT coolant
(conforming to MS.90032) is recommended.
Winter Operation
To ensure the best possible heater and de-
froster performance, make sure the engine
cooling system is functioning properly and
the proper amount, type, and concentration
of coolant is used. Use of the Air Recircula-
tion mode during Winter months is not rec-
ommended, because it may cause window
fogging.
Vacation/Storage
Before you store your vehicle, or keep it out of
service (i.e., vacation) for two weeks or more,
run the air conditioning system at idle for
about five minutes, in fresh air with the
blower setting on high. This will ensure ad-
equate system lubrication to minimize the
possibility of compressor damage when the
system is started again.
Window Fogging
Vehicle windows tend to fog on the inside in
mild, rainy, and/or humid weather. To clear
the windows, select Defrost or Mix mode and
increase the front blower speed. Do not use
the Recirculation mode without A/C for long
periods, as fogging may occur.
CAUTION!
Failure to follow these cautions can cause
damage to the heating elements:
• Use care when washing the inside of
the rear window. Do not use abrasive
window cleaners on the interior surface
of the window. Use a soft cloth and a
CAUTION!
mild washing solution, wiping parallel
to the heating elements. Labels can be
peeled off after soaking with warm
water.
• Do not use scrapers, sharp instru-
ments, or abrasive window cleaners on
the interior surface of the window.
• Keep all objects a safe distance from
the window.
Outside Air Intake
Make sure the air intake, located directly in
front of the windshield, is free of obstruc-
tions, such as leaves. Leaves collected in the
air intake may reduce airflow, and if they
enter the plenum, they could plug the water
drains. In Winter months, make sure the air
intake is clear of ice, slush, and snow.
Cabin Air Filter
The climate control system filters out dust
and pollen from the air. Contact an autho-
rized dealer to service your cabin air filter,
and to have it replaced when needed.
45
Page 70 of 348
— Battery Charge Warning Light
This warning light will illuminate when the
battery is not charging properly. If it stays on
while the engine is running, there may be a
malfunction with the charging system. Con-
tact an authorized dealer as soon as possible.
This indicates a possible problem with the
electrical system or a related component.
— Door Open Warning Light
This indicator will illuminate when a door is
ajar/open and not fully closed.
NOTE:
If the vehicle is moving, there will also be a
single chime.
— Electric Power Steering Fault
Warning Light
This warning light will turn on when there's a
fault with the EPS (Electric Power Steering)
system. Refer to “Power Steering” in “Start-
ing And Operating” in the Owner’s Manual for
further information.
WARNING!
Continued operation with reduced assist
could pose a safety risk to yourself and
others. Service should be obtained as soon
as possible.
— Electronic Throttle Control (ETC)
Warning Light
This warning light will illuminate to indicate
a problem with the Electronic Throttle Con-
trol (ETC) system. If a problem is detected
while the vehicle is running, the light will
either stay on or flash depending on the
nature of the problem. Cycle the ignition
when the vehicle is safely and completely
stopped and the transmission is placed in the
PARK position. The light should turn off. If
the light remains on with the vehicle running,
your vehicle will usually be drivable; however,
see an authorized dealer for service as soon
as possible.
NOTE:
This light may turn on if the accelerator and
brake pedals are pressed at the same time.If the light continues to flash when the ve-
hicle is running, immediate service is re-
quired and you may experience reduced per-
formance, an elevated/rough idle, or engine
stall and your vehicle may require towing.
The light will come on when the ignition is
placed in the ON/RUN or ACC/ON/RUN posi-
tion and remain on briefly as a bulb check. If
the light does not come on during starting,
have the system checked by an authorized
dealer.
— Engine Coolant Temperature Warn-
ing Light
This warning light warns of an overheated
engine condition. If the engine coolant tem-
perature is too high, this indicator will illumi-
nate and a single chime will sound. If the
temperature reaches the upper limit, a con-
tinuous chime will sound for four minutes or
until the engine is able to cool: whichever
comes first.
If the light turns on while driving, safely pull
over and stop the vehicle. If the A/C system is
on, turn it off. Also, shift the transmission
GETTING TO KNOW YOUR INSTRUMENT PANEL
68
Page 71 of 348
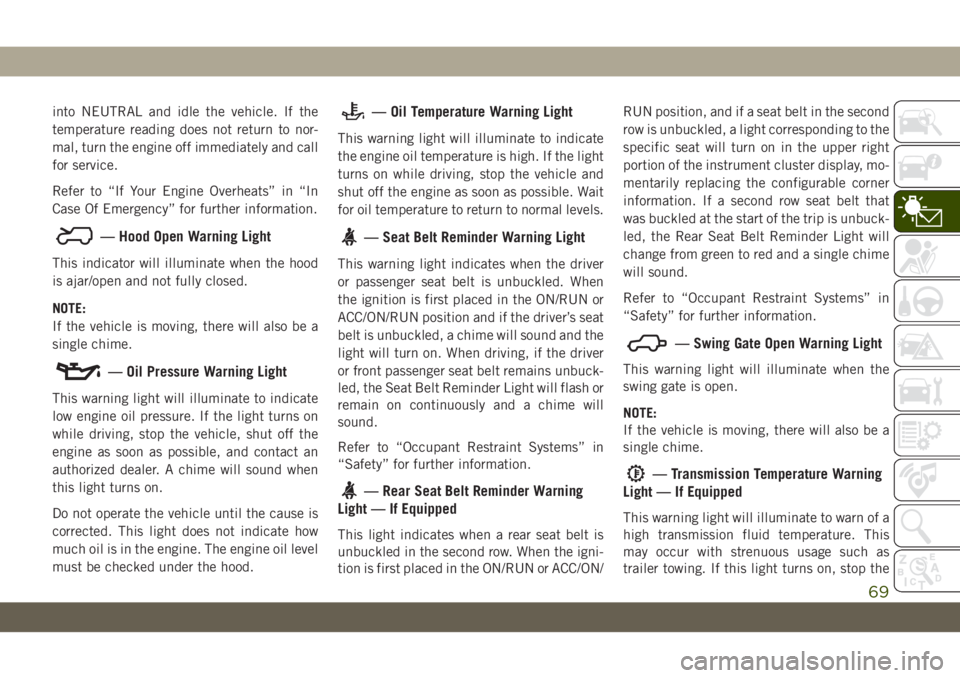
into NEUTRAL and idle the vehicle. If the
temperature reading does not return to nor-
mal, turn the engine off immediately and call
for service.
Refer to “If Your Engine Overheats” in “In
Case Of Emergency” for further information.
— Hood Open Warning Light
This indicator will illuminate when the hood
is ajar/open and not fully closed.
NOTE:
If the vehicle is moving, there will also be a
single chime.
— Oil Pressure Warning Light
This warning light will illuminate to indicate
low engine oil pressure. If the light turns on
while driving, stop the vehicle, shut off the
engine as soon as possible, and contact an
authorized dealer. A chime will sound when
this light turns on.
Do not operate the vehicle until the cause is
corrected. This light does not indicate how
much oil is in the engine. The engine oil level
must be checked under the hood.
— Oil Temperature Warning Light
This warning light will illuminate to indicate
the engine oil temperature is high. If the light
turns on while driving, stop the vehicle and
shut off the engine as soon as possible. Wait
for oil temperature to return to normal levels.
— Seat Belt Reminder Warning Light
This warning light indicates when the driver
or passenger seat belt is unbuckled. When
the ignition is first placed in the ON/RUN or
ACC/ON/RUN position and if the driver’s seat
belt is unbuckled, a chime will sound and the
light will turn on. When driving, if the driver
or front passenger seat belt remains unbuck-
led, the Seat Belt Reminder Light will flash or
remain on continuously and a chime will
sound.
Refer to “Occupant Restraint Systems” in
“Safety” for further information.
— Rear Seat Belt Reminder Warning
Light — If Equipped
This light indicates when a rear seat belt is
unbuckled in the second row. When the igni-
tion is first placed in the ON/RUN or ACC/ON/RUN position, and if a seat belt in the second
row is unbuckled, a light corresponding to the
specific seat will turn on in the upper right
portion of the instrument cluster display, mo-
mentarily replacing the configurable corner
information. If a second row seat belt that
was buckled at the start of the trip is unbuck-
led, the Rear Seat Belt Reminder Light will
change from green to red and a single chime
will sound.
Refer to “Occupant Restraint Systems” in
“Safety” for further information.
— Swing Gate Open Warning Light
This warning light will illuminate when the
swing gate is open.
NOTE:
If the vehicle is moving, there will also be a
single chime.
— Transmission Temperature Warning
Light — If Equipped
This warning light will illuminate to warn of a
high transmission fluid temperature. This
may occur with strenuous usage such as
trailer towing. If this light turns on, stop the
69
Page 152 of 348
• You can start out, from a stop, in first or
second gear (or third gear, in 4LO range).
Tapping (+) (at a stop) will allow starting in
second gear. Starting out in second or third
gear can be helpful in snowy or icy condi-
tions.
• If a requested downshift would cause the
engine to over-speed, that shift will not
occur.
• The system will ignore attempts to upshift
at too low of a vehicle speed.
• Holding the gear selector in the (-) position
will downshift the transmission to the low-
est gear possible at the current speed.
• Transmission shifting will be more notice-
able when AutoStick is enabled.
• The system may revert to automatic shift
mode if a fault or overheat condition is
detected.
NOTE:
When Hill Descent Control is enabled,
AutoStick is not active.To disengage AutoStick mode, return the gear
selector to the DRIVE position. You can shift
in or out of the AutoStick position at any time
without taking your foot off the accelerator
pedal.
WARNING!
Do not downshift for additional engine
braking on a slippery surface. The drive
wheels could lose their grip and the ve-
hicle could skid, causing a collision or
personal injury.
FOUR–WHEEL DRIVE
OPERATION
WARNING!
Failure to engage a transfer case position
completely can cause transfer case dam-
age or loss of power and vehicle control.
You could have a collision. Do not drive the
vehicle unless the transfer case is fully
engaged.
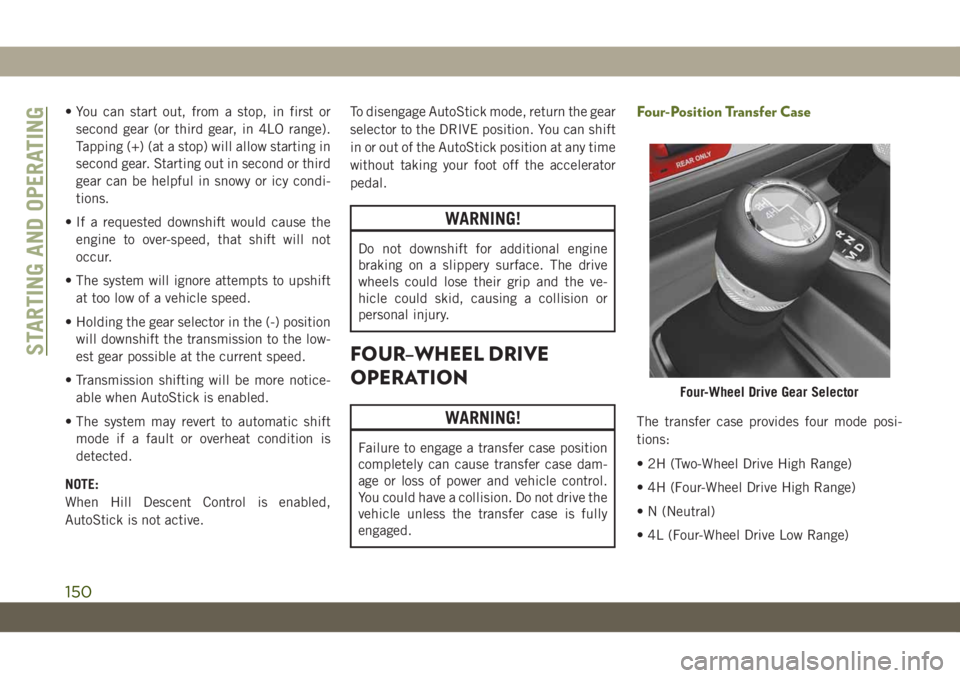
Four-Position Transfer Case
The transfer case provides four mode posi-
tions:
• 2H (Two-Wheel Drive High Range)
• 4H (Four-Wheel Drive High Range)
• N (Neutral)
• 4L (Four-Wheel Drive Low Range)
Four-Wheel Drive Gear Selector
STARTING AND OPERATING
150
Page 177 of 348
IN CASE OF EMERGENCY
HAZARD WARNING FLASHERS .176
BULB REPLACEMENT........176
Replacement Bulbs............176
Bulb Replacement.............178
FUSES...................180
General Information.............181
Power Distribution Center (PDC).....181
JACKING AND TIRE CHANGING. .189
Jack Location................190
Spare Tire Removal.............190Preparations For Jacking.........191
Jacking Instructions............191
Road Tire Installation............194
Declaration Of Conformance.......194
Jack Usage Precautions..........196
JUMP STARTING............196
Preparations For Jump Start........197
Jump Starting Procedure..........198
IF YOUR ENGINE OVERHEATS . .199
MANUAL PARK RELEASE.....200FREEING A STUCK VEHICLE . . .201
TOWING A DISABLED VEHICLE.202
Without The Key Fob............203
Four–Wheel Drive Models.........203
Tow Eye Usage................203
ENHANCED ACCIDENT RESPONSE
SYSTEM (EARS)............205
EVENT DATA RECORDER
(EDR)....................205
IN CASE OF EMERGENCY
175
Page 201 of 348
4. Disconnect the opposite end of the posi-
tive(+)jumper cable from the remote
positive(+)post of the discharged
vehicle.
5. Reinstall the protective cover over the
remote positive(+)post of the discharged
vehicle.
If frequent jump starting is required to start
your vehicle you should have the battery and
charging system tested at an authorized
dealer.
CAUTION!
Accessories plugged into the vehicle
power outlets draw power from the vehi-
cle’s battery, even when not in use (i.e.,
cellular devices, etc.). Eventually, if
plugged in long enough without engine
operation, the vehicle’s battery will dis-
charge sufficiently to degrade battery life
and/or prevent the engine from starting.
IF YOUR ENGINE
OVERHEATS
In any of the following situations, you can
reduce the potential for overheating by taking
the appropriate action.
• On the highways — slow down.
• In city traffic — while stopped, shift trans-
mission into NEUTRAL, but do not increase
engine idle speed.
CAUTION!
Driving with a hot cooling system could
damage your vehicle. If the temperature
gauge reads HOT (H), pull over and stop
the vehicle. Idle the vehicle with the air
conditioner turned off until the pointer
drops back into the normal range. If the
pointer remains on HOT (H), and you hear
continuous chimes, turn the engine off
immediately and call for service.NOTE:
There are steps that you can take to slow
down an impending overheat condition:
• If your air conditioner (A/C) is on, turn it off.
The A/C system adds heat to the engine
cooling system and turning the A/C off can
help remove this heat.
• You can also turn the temperature control to
maximum heat, the mode control to floor
and the blower control to high. This allows
the heater core to act as a supplement to
the radiator and aids in removing heat from
the engine cooling system.WARNING!
You or others can be badly burned by hot
engine coolant (antifreeze) or steam from
your radiator. If you see or hear steam
coming from under the hood, do not open
the hood until the radiator has had time to
cool. Never try to open a cooling system
pressure cap when the radiator or coolant
bottle is hot.
199
Page 203 of 348
To Reset The Manual Park Release:
1. Pull upward on the tether strap, releasing
it from the “locked” position.
2. Lower the Manual Park Release lever
downward and to the right, into its original
position.
3. Tuck the tether strap into the base of the
console, and reinstall the cover.
FREEING A STUCK VEHICLE
If your vehicle becomes stuck in mud, sand or
snow, it can often be moved using a rocking
motion. Turn the steering wheel right and left
to clear the area around the front wheels. For
vehicles with automatic transmission, push
and hold the lock button on the gear selector.
Then, shift back and forth between DRIVE
and REVERSE, while gently pressing the ac-
celerator. Use the least amount of accelerator
pedal pressure that will maintain the rocking
motion, without spinning the wheels or racing
the engine.NOTE:
• For vehicles with automatic transmission:
Shifts between DRIVE and REVERSE can
only be achieved at wheel speeds of 5 mph
(8 km/h) or less. Whenever the transmis-
sion remains in NEUTRAL for more than
2 seconds, you must press the brake pedal
to engage DRIVE or REVERSE.
• Push the "ESC Off" switch, to place the
Electronic Stability Control (ESC) system in
"Partial Off" mode, before rocking the ve-
hicle. Refer to “Electronic Brake Control
System” in “Safety” in your Owner’s
Manual for further details. Once the vehicle
has been freed, push the "ESC Off" switch
again to restore "ESC On" mode.
WARNING!
Fast spinning tires can be dangerous.
Forces generated by excessive wheel
speeds may cause damage, or even failure,
of the axle and tires. A tire could explode
and injure someone. Do not spin your ve-
hicle's wheels faster than 30 mph
(48 km/h) or for longer than 30 seconds
continuously without stopping when you
WARNING!
are stuck and do not let anyone near a
spinning wheel, no matter what the speed.
CAUTION!
• Racing the engine or spinning the
wheels may lead to transmission over-
heating and failure. Allow the engine to
idle with the transmission in NEUTRAL
for at least one minute after every five
rocking-motion cycles. This will mini-
mize overheating and reduce the risk of
clutch or transmission failure during
prolonged efforts to free a stuck vehicle.
• When “rocking” a stuck vehicle by shift-
ing between DRIVE/SECOND GEAR and
REVERSE, do not spin the wheels faster
than 15 mph (24 km/h), or drivetrain
damage may result.
• Revving the engine or spinning the
wheels too fast may lead to transmission
overheating and failure. It can also dam-
age the tires. Do not spin the wheels
above 30 mph (48 km/h) while in gear
(no transmission shifting occurring).
201
Page 339 of 348
Jump Starting..............196
Oil..................257, 259
Oil Filler Cap...............217
Oil Selection...............257
Overheating...............199
Starting..................142
Enhanced Accident Response
Feature...............119, 205
Exhaust Gas Cautions...........137
Exhaust System...............137
Exterior Lights.............35, 139
Fabric Care..................240
Fabric Top..................240
Filters
Air Conditioning..............45
Engine Oil................259
Flashers
Hazard Warning.............176
Turn Signal............178, 179
Turn Signals.............76, 139
Flash-To-Pass.................36
Fluid, Brake.................261
Fluid Capacities...............257
Fluid Leaks..................139
Fluid Level Checks
Brake...................224Engine Oil................220
Fluids And Lubricants...........259
Fog Lights.............36, 74, 179
Fog Light Service..............179
Fold And Tumble Rear Seat.........29
Fold-Flat Seats................26
Folding Rear Seats..............28
Four-Way Hazard Flasher..........176
Four Wheel Drive..............150
Operation.................150
Shifting..................150
Systems..................150
Four Wheel Drive Operation
. . . .150, 153
Freedom Panels................51
Freeing A Stuck Vehicle..........201
Fuel......................252
Adding..................166
Additives.................253
Consumption...............262
Filler Cap (Gas Cap).......166, 167
Gasoline.................252
Materials Added.............253
Octane Rating...........252, 259
Requirements..............257
Specifications..............259
Tank Capacity..............257
Fueling....................166Fuses.....................180
Gas Cap (Fuel Filler Cap)......166, 167
Gasoline (Fuel)................252
Gasoline Particulate Filter (GPF)......60
General Information.............288
Glass Cleaning................243
Hard Top....................51
Hazard Warning Flasher..........176
Headlights
Automatic.................36
Bulb Replacement...........178
Cleaning.................239
High Beam/Low Beam Select Switch .35
Leveling...................37
Lights On Reminder...........37
Passing...................36
Replacing.................178
Head Restraints................30
Heated Mirrors.................35
High Beam/Low Beam Select (Dimmer)
Switch....................35
Hill Descent Control.............89
Hill Descent Control Indicator.......89
Hill Start Assist................84
Hood Prop...................56
337