window JEEP WRANGLER UNLIMITED 2019 Owner handbook (in English)
[x] Cancel search | Manufacturer: JEEP, Model Year: 2019, Model line: WRANGLER UNLIMITED, Model: JEEP WRANGLER UNLIMITED 2019Pages: 348, PDF Size: 6.5 MB
Page 10 of 348
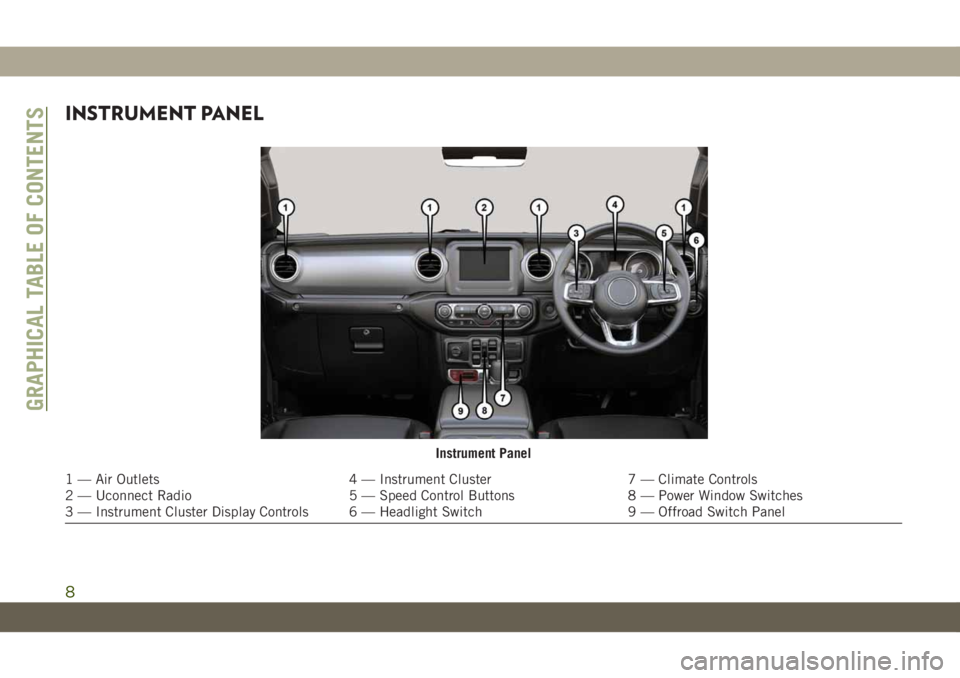
INSTRUMENT PANEL
Instrument Panel
1 — Air Outlets 4 — Instrument Cluster 7 — Climate Controls
2 — Uconnect Radio 5 — Speed Control Buttons 8 — Power Window Switches
3 — Instrument Cluster Display Controls 6 — Headlight Switch 9 — Offroad Switch Panel
GRAPHICAL TABLE OF CONTENTS
8
Page 13 of 348
GETTING TO KNOW YOUR VEHICLE
KEYS .....................13
KeyFob.....................13
IGNITION SWITCH............15
Keyless Enter-N-Go — Ignition.......15
REMOTE STARTING SYSTEM — IF
EQUIPPED.................16
How To Use Remote Start..........16
To Enter Remote Start Mode........17
VEHICLE SECURITY ALARM — IF
EQUIPPED..................17
To Arm The System.............17
To Disarm The System............18
DOORS....................18
Keyless Enter-N-Go — Passive Entry (If
Equipped)...................18
Child-Protection Door Lock System — Rear
Doors......................21
Front Door Removal.............22
Rear Door Removal (Four-Door Models) . .24
SEATS ....................26
Heated Seats — If Equipped........26Front Passenger Easy Entry Seat — Two
Door Models..................27
60/40 Split Folding Rear Seat — Four Door
Models.....................28
Fold And Tumble Rear Seat — Two Door
Models.....................29
HEAD RESTRAINTS...........30
Front Head Restraints............30
Rear Head Restraints — Two Door
Models.....................31
Rear Head Restraints — Four Door
Models.....................32
STEERING WHEEL............33
Tilt/Telescoping Steering Column......33
Heated Steering Wheel — If Equipped . .34
MIRRORS..................35
Heated Mirrors — If Equipped.......35
EXTERIOR LIGHTS...........35
Headlight Switch...............35
Daytime Running Lights — If Equipped .35
High/Low Beam Switch...........35
Flash-To-Pass.................36Automatic Headlights — If Equipped . . .36
Front And Rear Fog Lights — If
Equipped...................36
Turn Signals..................36
Lane Change Assist — If Equipped....37
Lights-On Reminder.............37
Headlight Leveling System — If
Equipped...................37
WINDSHIELD WIPERS AND WASH-
ERS ......................37
Windshield Wiper Operation.........38
CLIMATE CONTROLS..........39
Automatic Climate Controls Overview . . .39
Climate Control Functions..........44
Automatic Temperature Control (ATC) — If
Equipped....................44
Operating Tips................45
POWER WINDOWS — IF
EQUIPPED.................46
Auto-Down Feature..............46
Wind Buffeting................47
GETTING TO KNOW YOUR VEHICLE
11
Page 18 of 348
WARNING!
could operate power windows, other con-
trols, or move the vehicle.
• Do not leave children or animals inside
parked vehicles in hot weather. Interior
heat build-up may cause serious injury
or death.
CAUTION!
An unlocked vehicle is an invitation for
thieves. Always remove key fob from the
vehicle and lock all doors when leaving the
vehicle unattended.
NOTE:
Refer to "Starting The Engine," in "Starting
And Operating" in the Owner’s Manual for
further information.
REMOTE STARTING
SYSTEM — IF EQUIPPED
This system uses the key fob to
start the engine conveniently from
outside the vehicle while still main-
taining security. The system has a
range of 328 ft (100 m).
The Remote Starting System also activates
the Climate Control, vented seats (if
equipped) in temperatures above 80° F
(26.7° C), and the heated seats (if
equipped), and heated steering wheel (if
equipped) in temperatures below 40° F
(4.4° C). Refer to “Heated Seats” in “Getting
To Know Your Vehicle” in the Owner’s Manual
for further information.
NOTE:
• The vehicle must be equipped with an
automatic transmission to be equipped
with Remote Start.
• Obstructions between the vehicle and key
fob may reduce this range.
How To Use Remote Start
• Push Remote Start button on the key fob
twice within five seconds. Pushing the Re-
mote Start button a third time shuts the
engine off.
• To drive the vehicle, push unlock button,
and place the ignition in the ON/RUN po-
sition.
• With remote start, the engine will only run
for 15 minutes (timeout) unless the igni-
tion key is placed in the ON/RUN position.
• The vehicle must be started with the key
after two consecutive timeouts.
All of the following conditions must be met
before the engine will remote start:
• Gear Selector in PARK
• Doors closed
• Hood closed
• Swing Gate closed
• Hazard switch off
• Brake switch inactive (brake pedal not
pushed)
• Battery at an acceptable charge level
GETTING TO KNOW YOUR VEHICLE
16
Page 19 of 348
• System not disabled from previous remote
start event
• Vehicle alarm system indicator flashing
• Ignition in STOP/OFF position
• Fuel level meets minimum requirement
• All removable doors must not be removed
• Malfunction indicator light not illuminated
WARNING!
• Do not start or run an engine in a closed
garage or confined area. Exhaust gas
contains Carbon Monoxide (CO) which
is odorless and colorless. Carbon Mon-
oxide is poisonous and can cause seri-
ous injury or death when inhaled.
• Keep key fobs away from children. Op-
eration of the Remote Start System,
windows, door locks or other controls
could cause serious injury or death.
To Enter Remote Start Mode
Push and release the Remote Start button on
the key fob twice within five seconds. The
vehicle doors will lock, the turn signals will
flash twice, and the horn will chirp twice.
Then the engine will start, and the vehicle
will remain in the Remote Start mode for a
15-minute cycle.
NOTE:
• If an engine fault is present or fuel level is
low, the vehicle will start and then shut
down in 10 seconds.
• The park lamps will turn on and remain on
during Remote Start mode.
• For security, power window operation is
disabled when the vehicle is in the Remote
Start mode.
• The engine can be started two consecutive
times (two 15-minute cycles) with the key
fob. However, the ignition must be placed
in the ON/RUN position before you can
repeat the start sequence for a third cycle.
VEHICLE SECURITY ALARM
— IF EQUIPPED
The vehicle security alarm monitors the ve-
hicle doors for unauthorized entry and the
ignition switch for unauthorized operation.
When the alarm is activated, the interior
switches for door locks are disabled. The
vehicle security alarm provides both audible
and visible signals. If something triggers the
alarm, the vehicle security alarm will provide
the following audible and visible signals: the
horn will pulse, the park lamps and/or turn
signals will flash, and the vehicle security
light in the instrument cluster will flash.
To Arm The System
Follow these steps to arm the vehicle security
alarm:
1. Make sure the vehicle’s ignition is cycled
to the “OFF” position (refer to "Starting
The Engine" in "Starting And Operating"
for further information).
17
Page 24 of 348
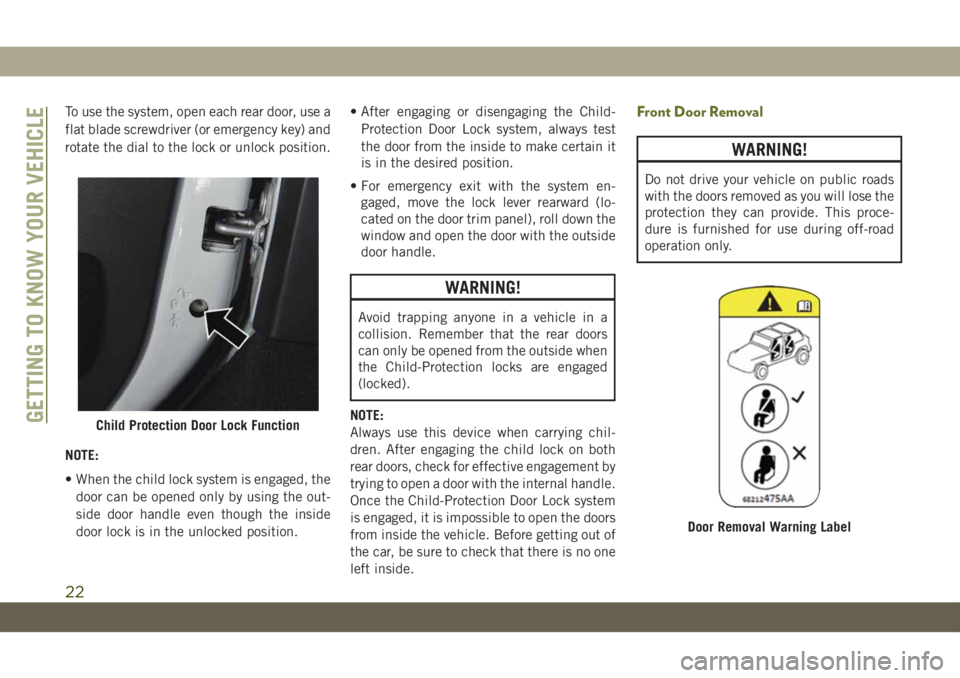
To use the system, open each rear door, use a
flat blade screwdriver (or emergency key) and
rotate the dial to the lock or unlock position.
NOTE:
• When the child lock system is engaged, the
door can be opened only by using the out-
side door handle even though the inside
door lock is in the unlocked position.• After engaging or disengaging the Child-
Protection Door Lock system, always test
the door from the inside to make certain it
is in the desired position.
• For emergency exit with the system en-
gaged, move the lock lever rearward (lo-
cated on the door trim panel), roll down the
window and open the door with the outside
door handle.
WARNING!
Avoid trapping anyone in a vehicle in a
collision. Remember that the rear doors
can only be opened from the outside when
the Child-Protection locks are engaged
(locked).
NOTE:
Always use this device when carrying chil-
dren. After engaging the child lock on both
rear doors, check for effective engagement by
trying to open a door with the internal handle.
Once the Child-Protection Door Lock system
is engaged, it is impossible to open the doors
from inside the vehicle. Before getting out of
the car, be sure to check that there is no one
left inside.
Front Door Removal
WARNING!
Do not drive your vehicle on public roads
with the doors removed as you will lose the
protection they can provide. This proce-
dure is furnished for use during off-road
operation only.
Child Protection Door Lock Function
Door Removal Warning Label
GETTING TO KNOW YOUR VEHICLE
22
Page 25 of 348
WARNING!
• All occupants must wear seat belts dur-
ing off-road operation with doors re-
moved. Refer to “Off-Road Driving Tips”
in “Starting And Operating” in the Own-
er’s Manual for further information.
• Do not store detached doors inside of the
vehicle, as they may cause personal in-
jury in the event of an accident.
NOTE:
•Doors are heavy; use caution when removing
them.
•Hinge pin can break if overtightened during
door reinstall (Max Torque: 7.5 ft· lb /
10 N·m). Refer to “Off-Road Driving Tips” in
“Starting And Operating” in the Owner’s
Manual for further information.
1. Roll down the glass window to prevent any
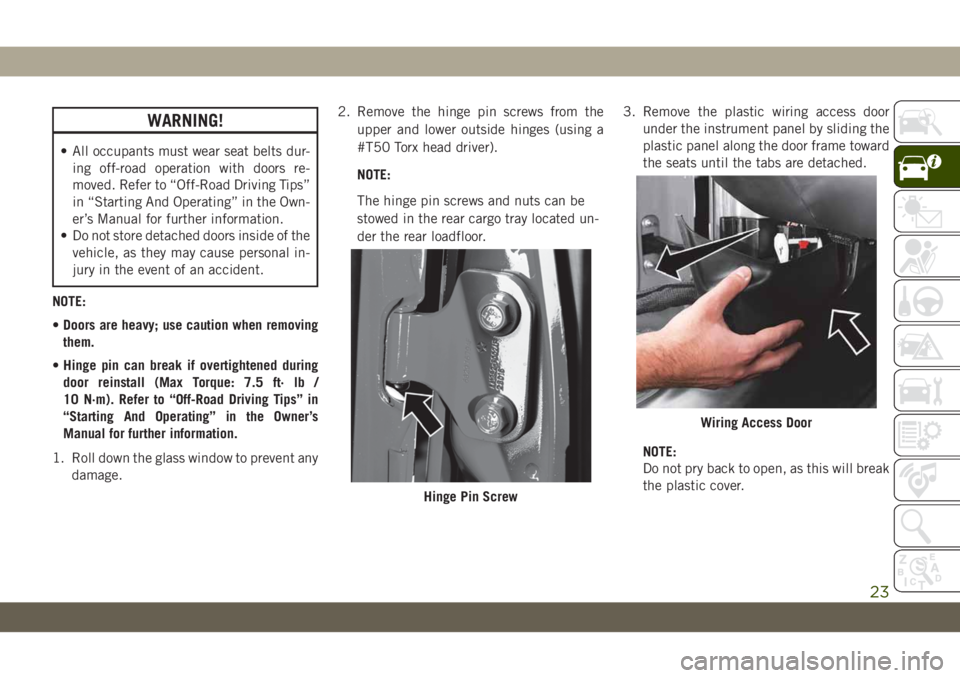
damage.2. Remove the hinge pin screws from the
upper and lower outside hinges (using a
#T50 Torx head driver).
NOTE:
The hinge pin screws and nuts can be
stowed in the rear cargo tray located un-
der the rear loadfloor.3. Remove the plastic wiring access door
under the instrument panel by sliding the
plastic panel along the door frame toward
the seats until the tabs are detached.
NOTE:
Do not pry back to open, as this will break
the plastic cover.
Hinge Pin Screw
Wiring Access Door
23
Page 27 of 348
WARNING!
• All occupants must wear seat belts dur-
ing off-road operation with doors re-
moved. Refer to “Off-Road Driving Tips”
in “Starting And Operating” in the Own-
er’s Manual for further information.
• Do not store detached doors inside of the
vehicle, as they may cause personal in-
jury in the event of an accident.NOTE:
•Doors are heavy; use caution when removing
them.
•Hinge pin can break if overtightened during
door reinstall (Max Torque: 7.5 ft· lb /
10 N·m). Refer to “Off-Road Driving Tips” in
“Starting And Operating” in the Owner’s
Manual for further information.
1. Roll down the glass window to prevent any
damage.
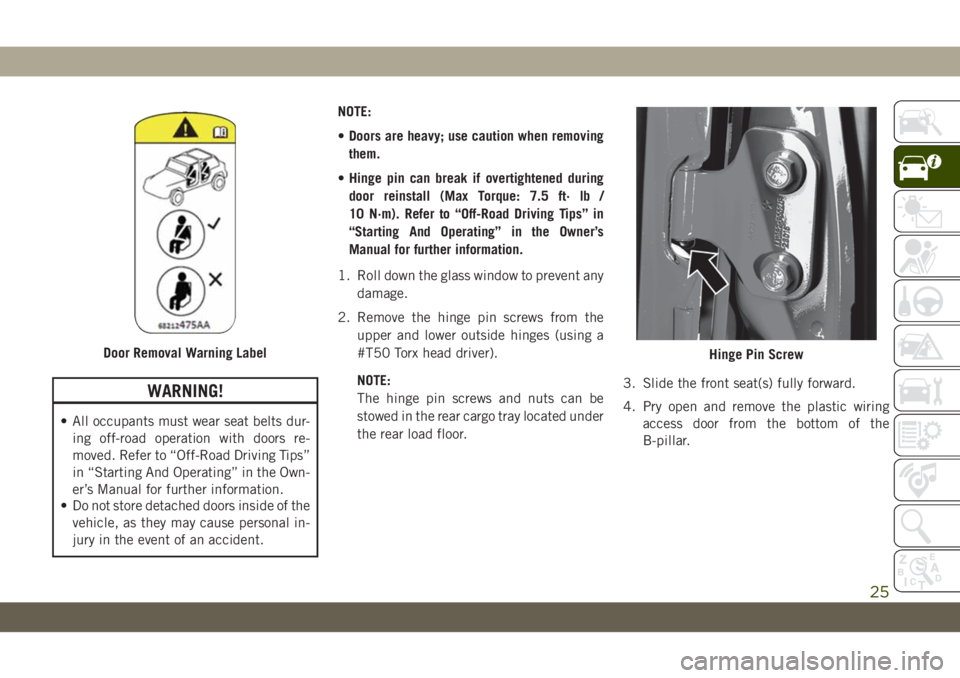
2. Remove the hinge pin screws from the
upper and lower outside hinges (using a
#T50 Torx head driver).
NOTE:
The hinge pin screws and nuts can be
stowed in the rear cargo tray located under
the rear load floor.3. Slide the front seat(s) fully forward.
4. Pry open and remove the plastic wiring
access door from the bottom of the
B-pillar.
Door Removal Warning LabelHinge Pin Screw
25
Page 37 of 348
MIRRORS
Heated Mirrors — If Equipped
These mirrors are heated to melt frost or ice.
This feature will be activated whenever you
turn on the rear window defroster (if
equipped). Refer to “Climate Controls” in
“Getting To Know Your Vehicle” for further
information.
EXTERIOR LIGHTS
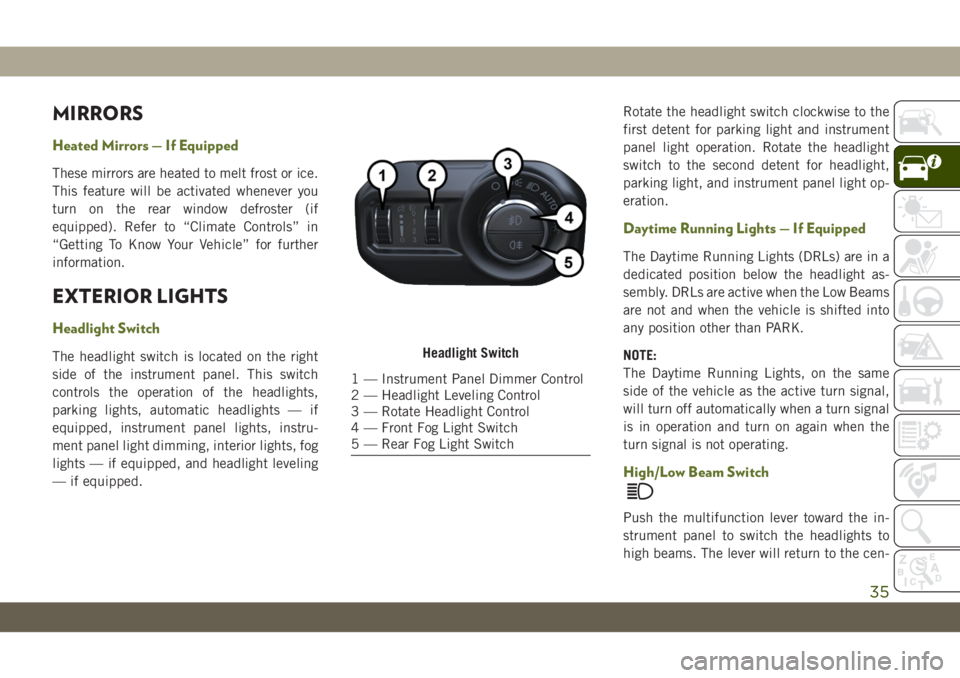
Headlight Switch
The headlight switch is located on the right
side of the instrument panel. This switch
controls the operation of the headlights,
parking lights, automatic headlights — if
equipped, instrument panel lights, instru-
ment panel light dimming, interior lights, fog
lights — if equipped, and headlight leveling
— if equipped.Rotate the headlight switch clockwise to the
first detent for parking light and instrument
panel light operation. Rotate the headlight
switch to the second detent for headlight,
parking light, and instrument panel light op-
eration.
Daytime Running Lights — If Equipped
The Daytime Running Lights (DRLs) are in a
dedicated position below the headlight as-
sembly. DRLs are active when the Low Beams
are not and when the vehicle is shifted into
any position other than PARK.
NOTE:
The Daytime Running Lights, on the same
side of the vehicle as the active turn signal,
will turn off automatically when a turn signal
is in operation and turn on again when the
turn signal is not operating.
High/Low Beam Switch
Push the multifunction lever toward the in-
strument panel to switch the headlights to
high beams. The lever will return to the cen-
Headlight Switch
1 — Instrument Panel Dimmer Control
2 — Headlight Leveling Control
3 — Rotate Headlight Control
4 — Front Fog Light Switch
5 — Rear Fog Light Switch
35
Page 39 of 348
Lane Change Assist — If Equipped
Tap the multifunction lever up or down once,
without moving beyond the detent, and the
turn signal (right or left) will flash three times
then automatically turn off.
Lights-On Reminder
If the headlights, parking lights, or cargo
lights are left on after the ignition is turned
OFF, a chime will sound when the driver’s
door is opened.
Headlight Leveling System — If Equipped
Your vehicle may be equipped with a head-
light leveling system. This system allows the
driver to maintain proper headlight beam
position with the road surface regardless of
vehicle load.
The control switch is located on the instru-
ment panel next to the dimmer control.
To operate, rotate the control switch until the
appropriate number, which corresponds to
the load listed on the chart, aligns with the
indicator line on the switch.
0/1Driver only, or driver and
front passenger.
2All seating positions occu-
pied, plus an evenly dis-
tributed load in the lug-
gage compartment. The
total weight of passengers
and load does not exceed
the maximum load capacity
of the vehicle.
3Driver, plus an evenly dis-
tributed load in the lug-
gage compartment. The
total weight of the driver
and load does not exceed
the maximum load capacity
of the vehicle.
WINDSHIELD WIPERS AND
WASHERS
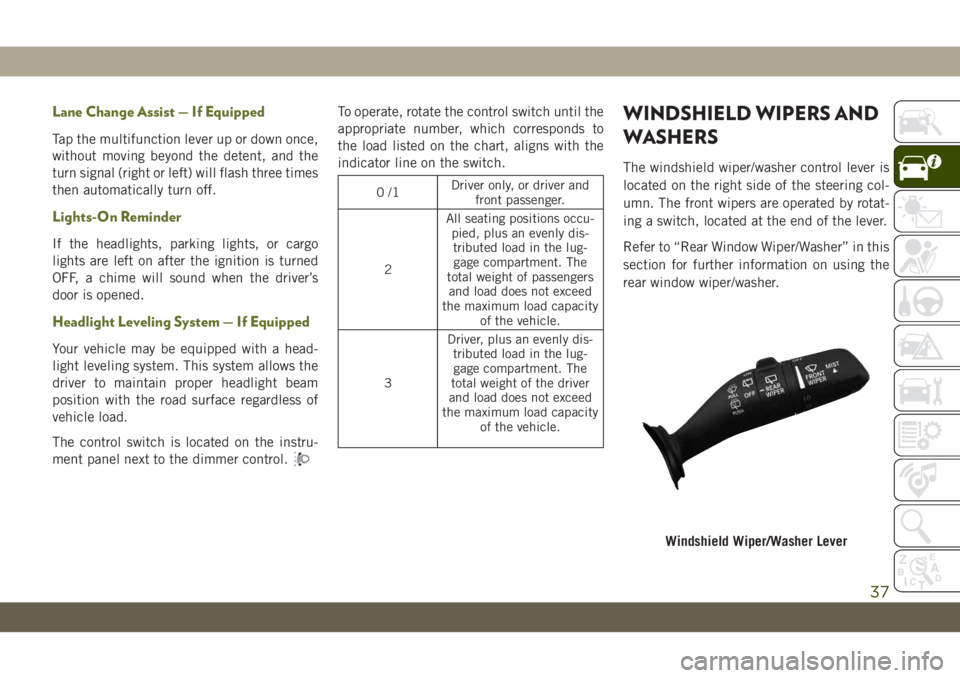
The windshield wiper/washer control lever is
located on the right side of the steering col-
umn. The front wipers are operated by rotat-
ing a switch, located at the end of the lever.
Refer to “Rear Window Wiper/Washer” in this
section for further information on using the
rear window wiper/washer.
Windshield Wiper/Washer Lever
37
Page 40 of 348
Windshield Wiper Operation
Rotate the end of the lever upward to the
second detent past the intermittent settings
for low-speed wiper operation. Rotate the end
of the lever upward to the third detent past
the intermittent settings for high-speed wiper
operation.
CAUTION!
In cold weather, always turn off the wiper
switch and allow the wipers to return to the
park position before turning off the en-
gine. If the wiper switch is left on and the
wipers freeze to the windshield, damage to
the wiper motor may occur when the ve-
hicle is restarted.
NOTE:
Do not operate the windshield wipers with the
blades lifted from the windshield.
Intermittent Wiper System
Use the intermittent wiper when weather
conditions make a single wiping cycle, with a
variable pause between cycles, desirable. Ro-tate the end of the lever to the first detent
position for one of four intermittent settings.
The delay cycle can be set anywhere between
1 to 18 seconds.
NOTE:
The wiper delay times depend on vehicle
speed. If the vehicle is moving less than
10 mph (16 km/h), delay times will be
doubled.
Windshield Washers
To use the washer, pull the lever toward you
and hold while spray is desired. If the lever is
pulled while in the delay range, the wiper will
start and continue to operate for two or three
wipe cycles after the lever is released. Then,
the intermittent interval previously selected
will resume.
If the lever is pulled while in the off position,
the wipers will operate for two or three wipe
cycles. Then, the wipers will turn off.
WARNING!
Sudden loss of visibility through the wind-
shield could lead to a collision. You might
WARNING!
not see other vehicles or other obstacles.
To avoid sudden icing of the windshield
during freezing weather, warm the wind-
shield with the defroster before and during
windshield washer use.
Mist Feature
Push upward on the wiper lever to activate a
single wipe to clear off road mist or spray
from a passing vehicle. As long as the lever is
held up, the wipers will continue to operate.
NOTE:
The mist feature does not activate the washer
pump; therefore, no washer fluid will be
sprayed on the windshield. The wash func-
tion must be used in order to spray the
windshield with washer fluid.
Rear Window Wiper/Washer — If Equipped
A rotary switch on the center portion of the
windshield wiper/washer lever controls the
operation of the rear wiper/washer function.
GETTING TO KNOW YOUR VEHICLE
38