JEEP WRANGLER UNLIMITED 2020 Owner handbook (in English)
Manufacturer: JEEP, Model Year: 2020, Model line: WRANGLER UNLIMITED, Model: JEEP WRANGLER UNLIMITED 2020Pages: 330, PDF Size: 9.16 MB
Page 191 of 330
189
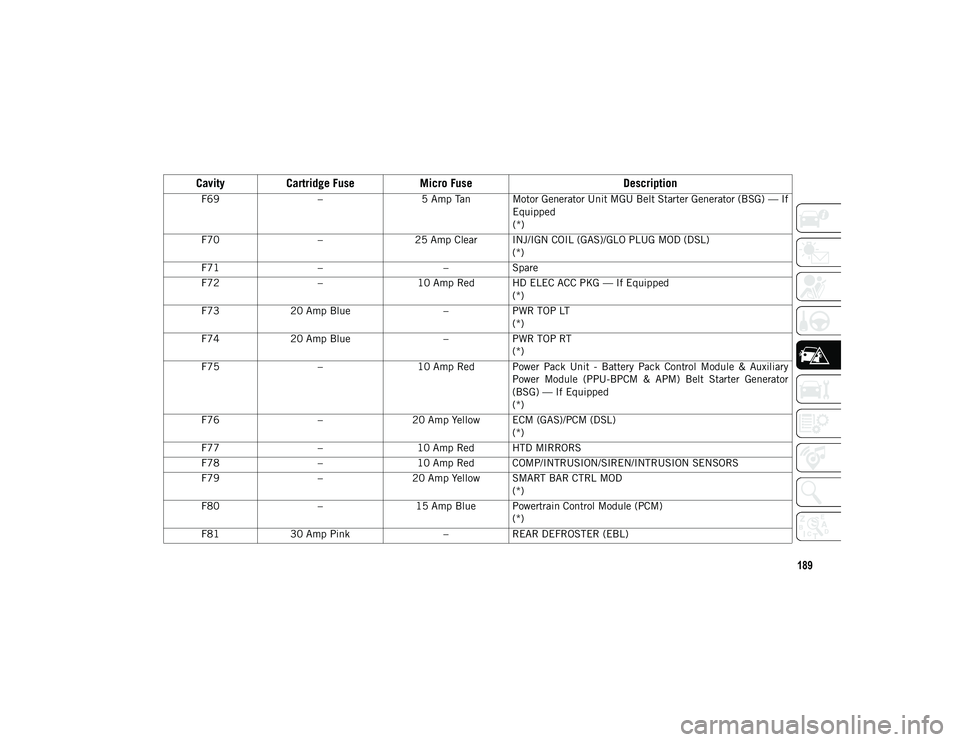
F69–5 Amp Tan Motor Generator Unit MGU Belt Starter Generator (BSG) — If
Equipped
(*)
F70 –25 Amp Clear INJ/IGN COIL (GAS)/GLO PLUG MOD (DSL)
(*)
F71 – –Spare
F72 –10 Amp Red HD ELEC ACC PKG — If Equipped
(*)
F73 20 Amp Blue –PWR TOP LT
(*)
F74 20 Amp Blue –PWR TOP RT
(*)
F75 –10 Amp Red Power Pack Unit - Battery Pack Control Module & Auxiliary
Power Module (PPU-BPCM & APM) Belt Starter Generator
(BSG) — If Equipped
(*)
F76 –20 Amp Yellow ECM (GAS)/PCM (DSL)
(*)
F77 –10 Amp Red HTD MIRRORS
F78 –10 Amp Red COMP/INTRUSION/SIREN/INTRUSION SENSORS
F79 –20 Amp Yellow SMART BAR CTRL MOD
(*)
F80 –15 Amp Blue Powertrain Control Module (PCM)
(*)
F81 30 Amp Pink –REAR DEFROSTER (EBL)
Cavity Cartridge Fuse Micro Fuse Description
2020_JEEP_JL_WRANGLER_UG_RHD_UK.book Page 189
Page 192 of 330
IN CASE OF EMERGENCY
190
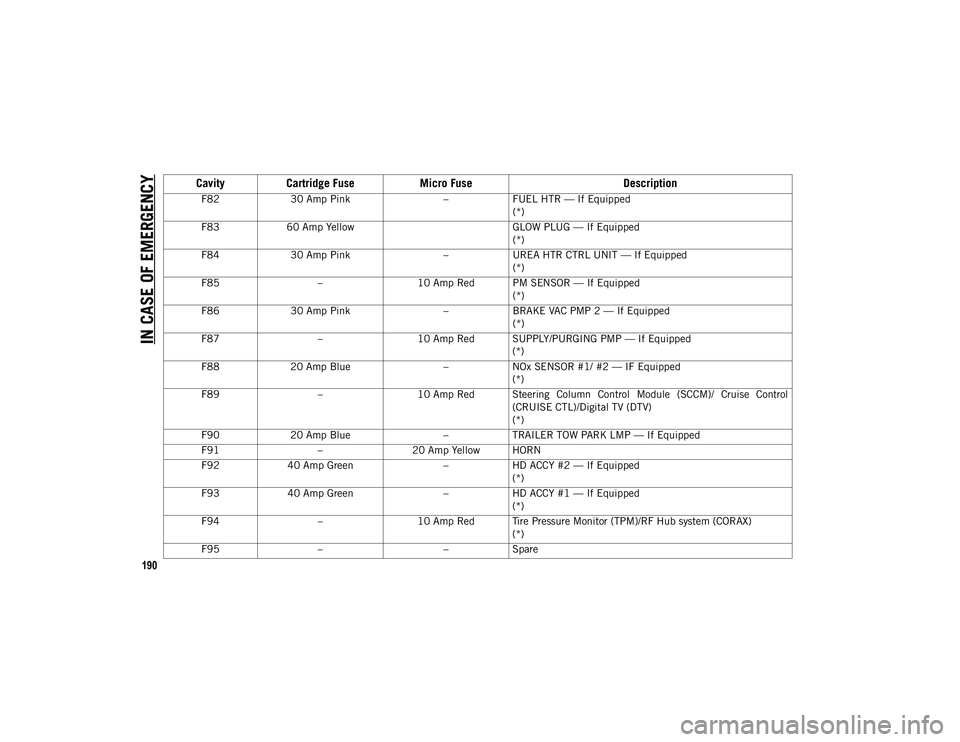
F8230 Amp Pink –FUEL HTR — If Equipped
(*)
F83 60 Amp Yellow GLOW PLUG — If Equipped
(*)
F84 30 Amp Pink –UREA HTR CTRL UNIT — If Equipped
(*)
F85 –10 Amp Red PM SENSOR — If Equipped
(*)
F86 30 Amp Pink –BRAKE VAC PMP 2 — If Equipped
(*)
F87 –10 Amp Red SUPPLY/PURGING PMP — If Equipped
(*)
F88 20 Amp Blue –NOx SENSOR #1/ #2 — IF Equipped
(*)
F89 –10 Amp Red Steering Column Control Module (SCCM)/ Cruise Control
(CRUISE CTL)/Digital TV (DTV)
(*)
F90 20 Amp Blue –TRAILER TOW PARK LMP — If Equipped
F91 –20 Amp Yellow HORN
F92 40 Amp Green –HD ACCY #2 — If Equipped
(*)
F93 40 Amp Green –HD ACCY #1 — If Equipped
(*)
F94 –10 Amp Red Tire Pressure Monitor (TPM)/RF Hub system (CORAX)
(*)
F95 – –Spare
Cavity Cartridge Fuse Micro Fuse Description
2020_JEEP_JL_WRANGLER_UG_RHD_UK.book Page 190
Page 193 of 330
191
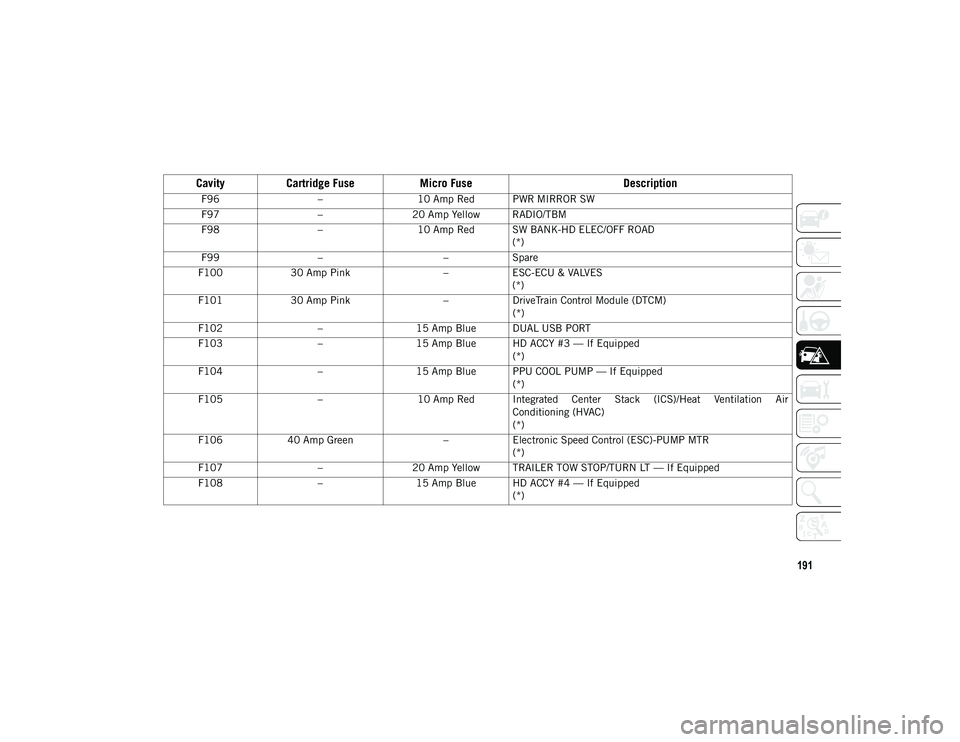
F96–10 Amp Red PWR MIRROR SW
F97 –20 Amp Yellow RADIO/TBM
F98 –10 Amp Red SW BANK-HD ELEC/OFF ROAD
(*)
F99 – –Spare
F100 30 Amp Pink –ESC-ECU & VALVES
(*)
F101 30 Amp Pink –DriveTrain Control Module (DTCM)
(*)
F102 –15 Amp Blue DUAL USB PORT
F103 –15 Amp Blue HD ACCY #3 — If Equipped
(*)
F104 –15 Amp Blue PPU COOL PUMP — If Equipped
(*)
F105 –10 Amp Red Integrated Center Stack (ICS)/Heat Ventilation Air
Conditioning (HVAC)
(*)
F106 40 Amp Green –Electronic Speed Control (ESC)-PUMP MTR
(*)
F107 –20 Amp Yellow TRAILER TOW STOP/TURN LT — If Equipped
F108 –15 Amp Blue HD ACCY #4 — If Equipped
(*)
CavityCartridge Fuse Micro Fuse Description
2020_JEEP_JL_WRANGLER_UG_RHD_UK.book Page 191
Page 194 of 330
IN CASE OF EMERGENCY
192
(Continued)
JACKING AND TIRE
CHANGING
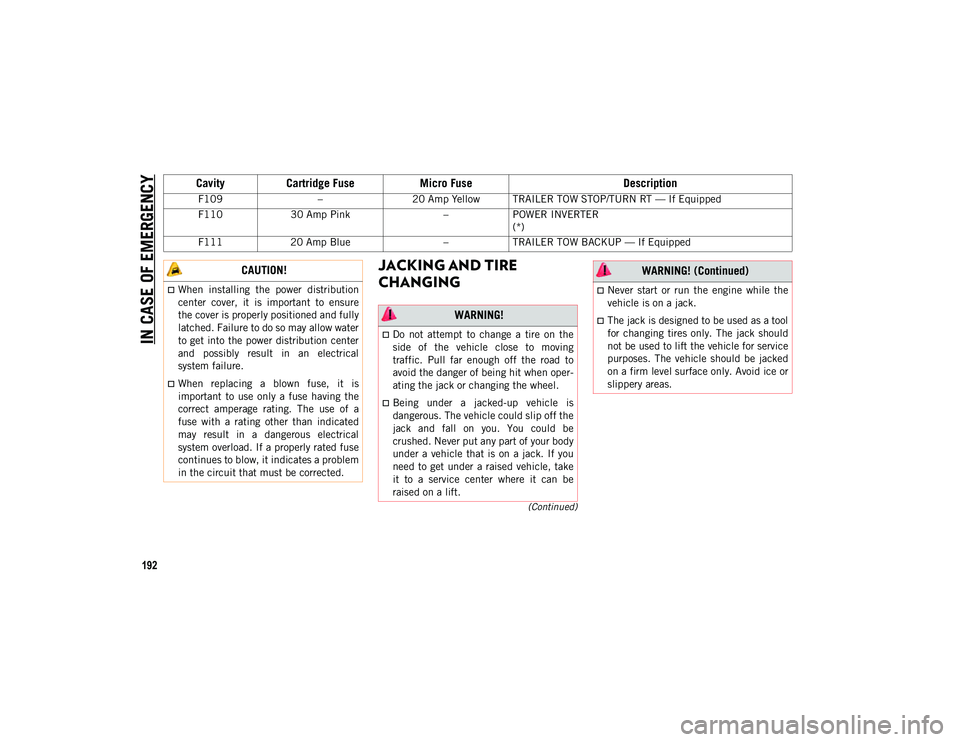
F109–20 Amp Yellow TRAILER TOW STOP/TURN RT — If Equipped
F110 30 Amp Pink –POWER INVERTER
(*)
F111 20 Amp Blue –TRAILER TOW BACKUP — If Equipped
Cavity Cartridge Fuse Micro Fuse Description
CAUTION!
When installing the power distribution
center cover, it is important to ensure
the cover is properly positioned and fully
latched. Failure to do so may allow water
to get into the power distribution center
and possibly result in an electrical
system failure.
When replacing a blown fuse, it is
important to use only a fuse having the
correct amperage rating. The use of a
fuse with a rating other than indicated
may result in a dangerous electrical
system overload. If a properly rated fuse
continues to blow, it indicates a problem
in the circuit that must be corrected.
WARNING!
Do not attempt to change a tire on the
side of the vehicle close to moving
traffic. Pull far enough off the road to
avoid the danger of being hit when oper-
ating the jack or changing the wheel.
Being under a jacked-up vehicle is
dangerous. The vehicle could slip off the
jack and fall on you. You could be
crushed. Never put any part of your body
under a vehicle that is on a jack. If you
need to get under a raised vehicle, take
it to a service center where it can be
raised on a lift.
Never start or run the engine while the
vehicle is on a jack.
The jack is designed to be used as a tool
for changing tires only. The jack should
not be used to lift the vehicle for service
purposes. The vehicle should be jacked
on a firm level surface only. Avoid ice or
slippery areas.
WARNING! (Continued)
2020_JEEP_JL_WRANGLER_UG_RHD_UK.book Page 192
Page 195 of 330
193
Jack Location
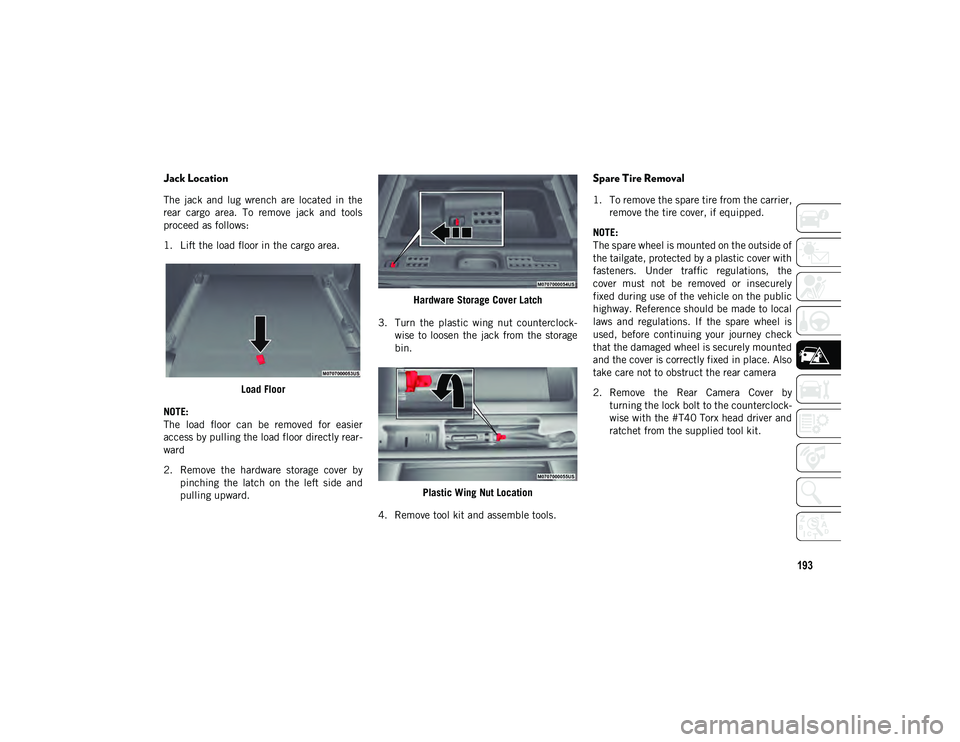
The jack and lug wrench are located in the
rear cargo area. To remove jack and tools
proceed as follows:
1. Lift the load floor in the cargo area.Load Floor
NOTE:
The load floor can be removed for easier
access by pulling the load floor directly rear -
ward
2. Remove the hardware storage cover by pinching the latch on the left side and
pulling upward. Hardware Storage Cover Latch
3. Turn the plastic wing nut counterclock -
wise to loosen the jack from the storage
bin.
Plastic Wing Nut Location
4. Remove tool kit and assemble tools.
Spare Tire Removal
1. To remove the spare tire from the carrier, remove the tire cover, if equipped.
NOTE:
The spare wheel is mounted on the outside of
the tailgate, protected by a plastic cover with
fasteners. Under traffic regulations, the
cover must not be removed or insecurely
fixed during use of the vehicle on the public
highway. Reference should be made to local
laws and regulations. If the spare wheel is
used, before continuing your journey check
that the damaged wheel is securely mounted
and the cover is correctly fixed in place. Also
take care not to obstruct the rear camera
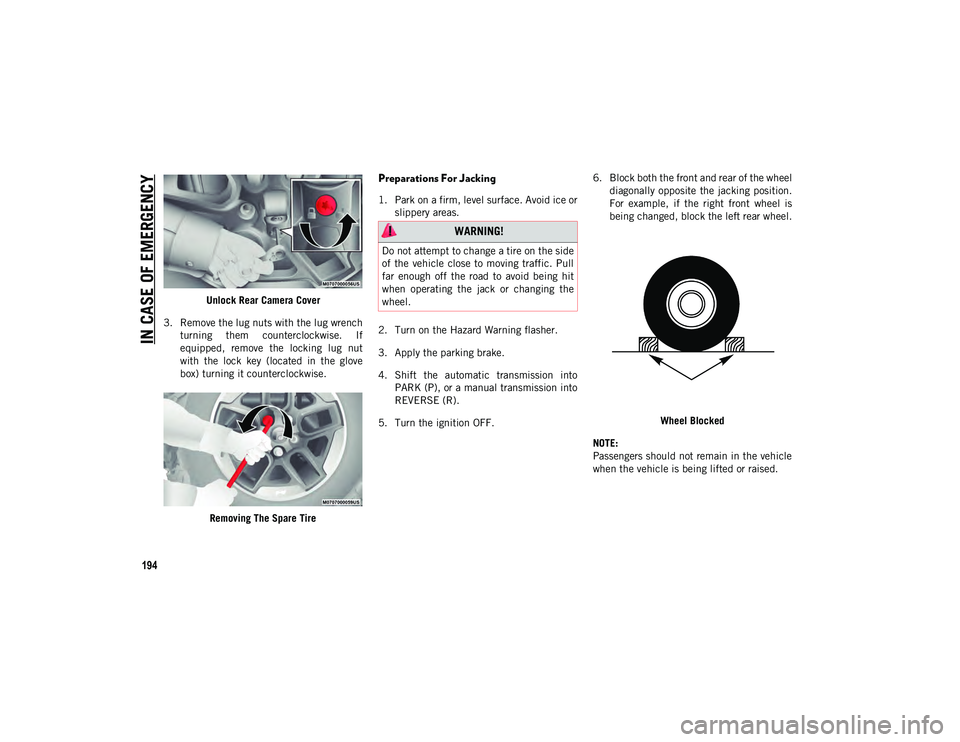
2. Remove the Rear Camera Cover by turning the lock bolt to the counterclock -
wise with the #T40 Torx head driver and
ratchet from the supplied tool kit.
2020_JEEP_JL_WRANGLER_UG_RHD_UK.book Page 193
Page 196 of 330
IN CASE OF EMERGENCY
194
Unlock Rear Camera Cover
3. Remove the lug nuts with the lug wrench turning them counterclockwise. If
equipped, remove the locking lug nut
with the lock key (located in the glove
box) turning it counterclockwise.
Removing The Spare Tire
Preparations For Jacking
1. Park on a firm, level surface. Avoid ice orslippery areas.
2. Turn on the Hazard Warning flasher.
3. Apply the parking brake.
4. Shift the automatic transmission into PARK (P), or a manual transmission into
REVERSE (R).
5. Turn the ignition OFF. 6. Block both the front and rear of the wheel
diagonally opposite the jacking position.
For example, if the right front wheel is
being changed, block the left rear wheel.
Wheel Blocked
NOTE:
Passengers should not remain in the vehicle
when the vehicle is being lifted or raised.
WARNING!
Do not attempt to change a tire on the side
of the vehicle close to moving traffic. Pull
far enough off the road to avoid being hit
when operating the jack or changing the
wheel.
2020_JEEP_JL_WRANGLER_UG_RHD_UK.book Page 194
Page 197 of 330
195
(Continued)
Jacking Instructions
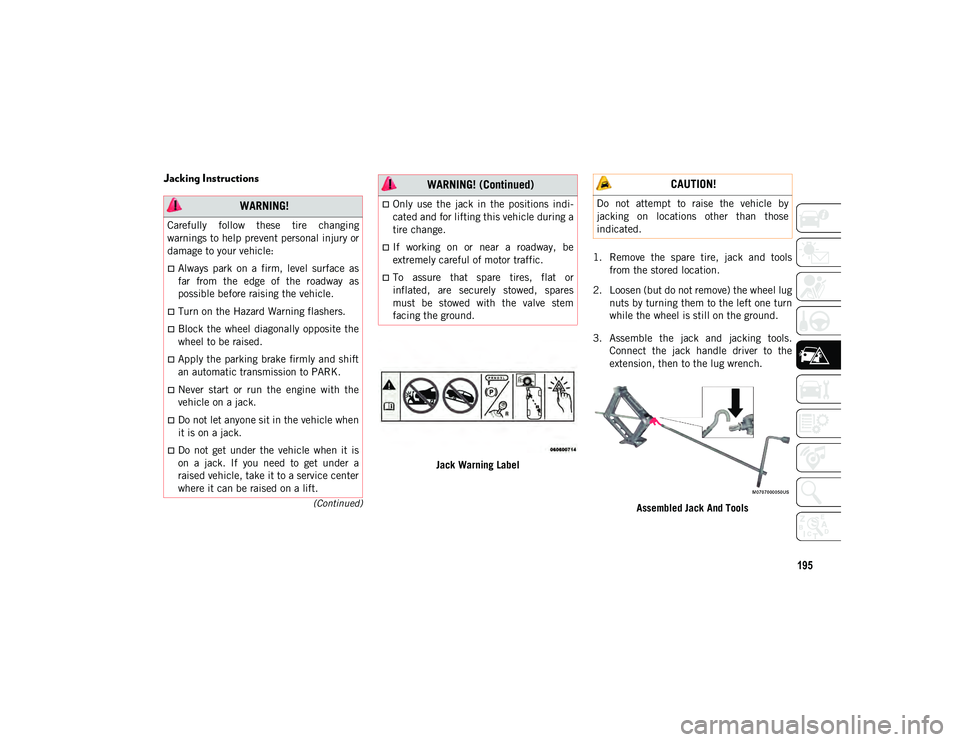
Jack Warning Label1. Remove the spare tire, jack and tools
from the stored location.
2. Loosen (but do not remove) the wheel lug nuts by turning them to the left one turn
while the wheel is still on the ground.
3. Assemble the jack and jacking tools. Connect the jack handle driver to the
extension, then to the lug wrench.
Assembled Jack And Tools
WARNING!
Carefully follow these tire changing
warnings to help prevent personal injury or
damage to your vehicle:
Always park on a firm, level surface as
far from the edge of the roadway as
possible before raising the vehicle.
Turn on the Hazard Warning flashers.
Block the wheel diagonally opposite the
wheel to be raised.
Apply the parking brake firmly and shift
an automatic transmission to PARK.
Never start or run the engine with the
vehicle on a jack.
Do not let anyone sit in the vehicle when
it is on a jack.
Do not get under the vehicle when it is
on a jack. If you need to get under a
raised vehicle, take it to a service center
where it can be raised on a lift.
Only use the jack in the positions indi -
cated and for lifting this vehicle during a
tire change.
If working on or near a roadway, be
extremely careful of motor traffic.
To assure that spare tires, flat or
inflated, are securely stowed, spares
must be stowed with the valve stem
facing the ground.
WARNING! (Continued) CAUTION!
Do not attempt to raise the vehicle by
jacking on locations other than those
indicated.
2020_JEEP_JL_WRANGLER_UG_RHD_UK.book Page 195
Page 198 of 330
IN CASE OF EMERGENCY
196
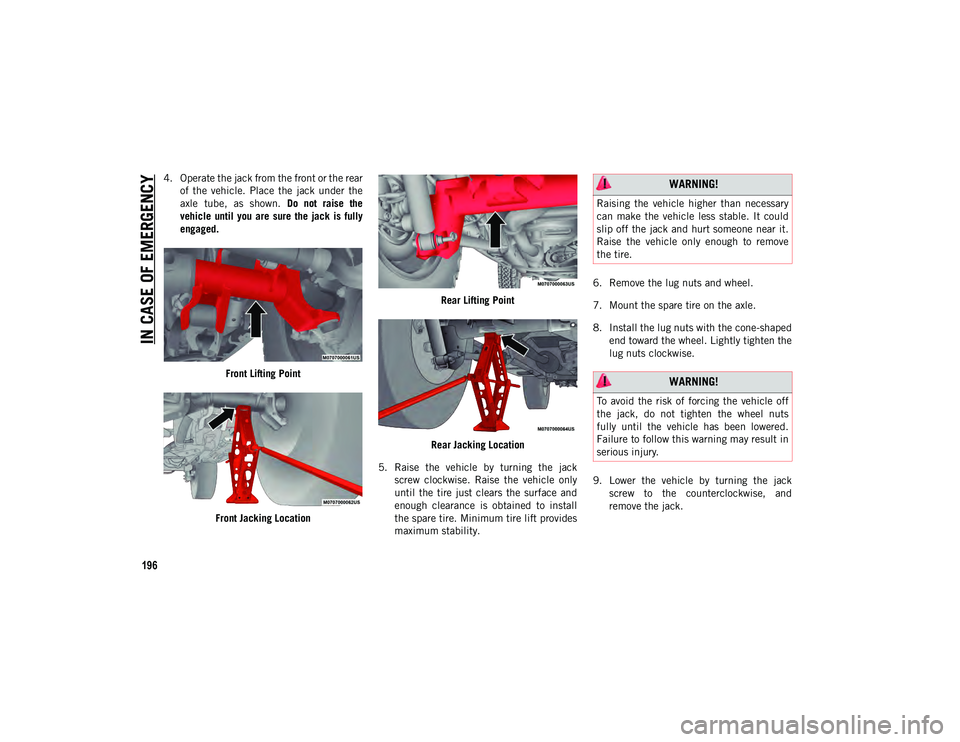
4. Operate the jack from the front or the rearof the vehicle. Place the jack under the
axle tube, as shown. Do not raise the
vehicle until you are sure the jack is fully
engaged.
Front Lifting Point
Front Jacking Location Rear Lifting Point
Rear Jacking Location
5. Raise the vehicle by turning the jack screw clockwise. Raise the vehicle only
until the tire just clears the surface and
enough clearance is obtained to install
the spare tire. Minimum tire lift provides
maximum stability. 6. Remove the lug nuts and wheel.
7. Mount the spare tire on the axle.
8. Install the lug nuts with the cone-shaped
end toward the wheel. Lightly tighten the
lug nuts clockwise.
9. Lower the vehicle by turning the jack screw to the counterclockwise, and
remove the jack. WARNING!
Raising the vehicle higher than necessary
can make the vehicle less stable. It could
slip off the jack and hurt someone near it.
Raise the vehicle only enough to remove
the tire.
WARNING!
To avoid the risk of forcing the vehicle off
the jack, do not tighten the wheel nuts
fully until the vehicle has been lowered.
Failure to follow this warning may result in
serious injury.
2020_JEEP_JL_WRANGLER_UG_RHD_UK.book Page 196
Page 199 of 330
197
10. Finish tightening the lug nuts. Pushdown on the wrench while tightening for
increased leverage. Alternate nuts until
each nut has been tightened twice. Refer
to “Wheel And Tire Torque Specifica -
tions” in “Technical Specifications” for
correct lug nut torque.
11. After 25 miles (40 km), check the lug nut torque with a torque wrench to
ensure that all lug nuts are properly
seated against the wheel.
12. Remove the jack assembly and wheel blocks.
13. Secure the jack and tools in their proper locations.
14. Secure the damaged wheel/tire on the spare tire carrier. Torque down lug nuts
and locking lug nut.
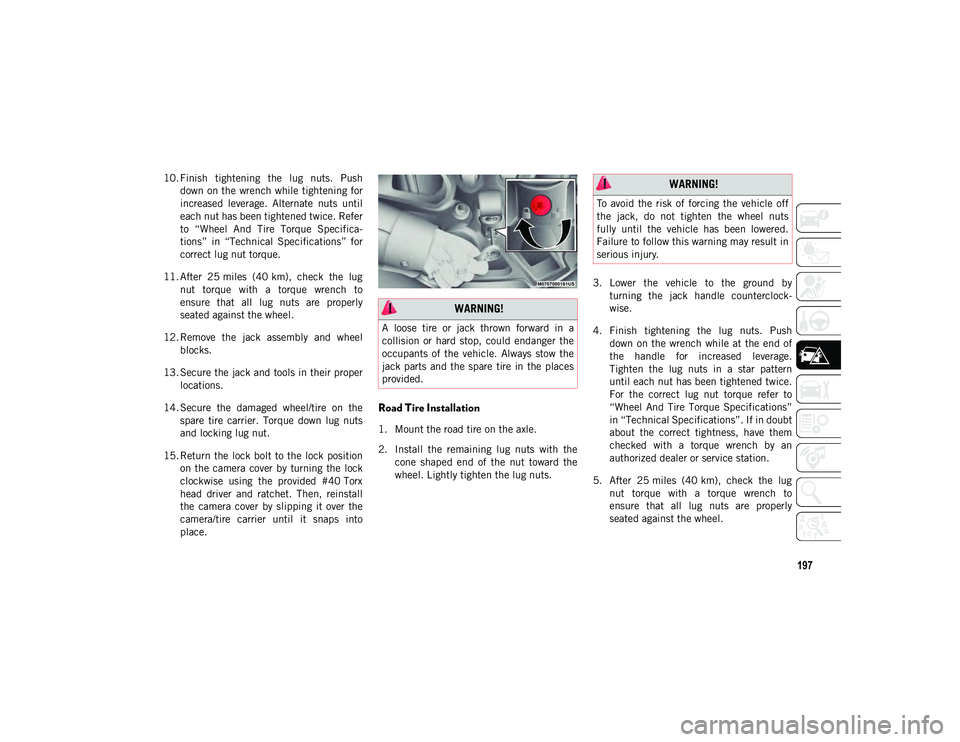
15. Return the lock bolt to the lock position on the camera cover by turning the lock
clockwise using the provided #40 Torx
head driver and ratchet. Then, reinstall
the camera cover by slipping it over the
camera/tire carrier until it snaps into
place.
Road Tire Installation
1. Mount the road tire on the axle.
2. Install the remaining lug nuts with thecone shaped end of the nut toward the
wheel. Lightly tighten the lug nuts. 3. Lower the vehicle to the ground by
turning the jack handle counterclock -
wise.
4. Finish tightening the lug nuts. Push down on the wrench while at the end of
the handle for increased leverage.
Tighten the lug nuts in a star pattern
until each nut has been tightened twice.
For the correct lug nut torque refer to
“Wheel And Tire Torque Specifications”
in “Technical Specifications”. If in doubt
about the correct tightness, have them
checked with a torque wrench by an
authorized dealer or service station.
5. After 25 miles (40 km), check the lug nut torque with a torque wrench to
ensure that all lug nuts are properly
seated against the wheel.
WARNING!
A loose tire or jack thrown forward in a
collision or hard stop, could endanger the
occupants of the vehicle. Always stow the
jack parts and the spare tire in the places
provided.
WARNING!
To avoid the risk of forcing the vehicle off
the jack, do not tighten the wheel nuts
fully until the vehicle has been lowered.
Failure to follow this warning may result in
serious injury.
2020_JEEP_JL_WRANGLER_UG_RHD_UK.book Page 197
Page 200 of 330
IN CASE OF EMERGENCY
198
Declaration Of Conformance
1. The undersigned, FlexNGate, repre-
senting the manufacturer, herewith
declares that the machinery described
below fulfills all relevant provisions of:
The EC-directive 2006/42/EC on
Machinery
2. Description of machinery.
a) Generic Denomination: Vehicle Jack
b) Function: Lifting Vehicle 3. Manufacturers (1):
FlexNGate Seeburn, a division of Ventra
Group Co
P.O. Box 1170, 65 Industrial Road,
Tottenham, ON CANADA L0G 1W0
4. Manufacturers (2):
FlexNGate Querétaro Ventramex, S.A. de C.V
Av. Manantiales No. 3
Parque Industrial Bernardo Quintana, El
Marqués Querétaro C.P. 76249 – Mexico
5. Legal Person authorized to compile the technical file:
FlexNGate – Barcelona
Avda de la Riera, 7-9
Sant Just Desvern, Barcelona, SPAIN
08960 6. References to harmonized standards:
PF-90065
7. Done at: Bradford, ON CANADA
8. Date: 10/02/2017
FlexNGate Representative
d)
Vehicle Model c) Model
Code f)
Working Load e) Jack
Type
Jeep
Wrangler JL 1000 kg
Max FGLF2
2020_JEEP_JL_WRANGLER_UG_RHD_UK.book Page 198