tow JEEP WRANGLER UNLIMITED 2021 Owner handbook (in English)
[x] Cancel search | Manufacturer: JEEP, Model Year: 2021, Model line: WRANGLER UNLIMITED, Model: JEEP WRANGLER UNLIMITED 2021Pages: 330, PDF Size: 9.16 MB
Page 9 of 330
7
TRAILER TOWING ................................ 175
Trailer Towing Weights
(Maximum Trailer Weight Ratings)..... 175
RECREATIONAL TOWING (BEHIND
MOTORHOME, ETC.) ............................. 176
Towing This Vehicle Behind
Another Vehicle ............................ 176 Recreational Towing — Four-Wheel
Drive Models ................................ 176
IN CASE OF EMERGENCY
HAZARD WARNING FLASHERS............... 179
BULB REPLACEMENT............................ 179
Replacement Bulbs ...................... 179
Bulb Replacement ........................ 181
FUSES ............................................... 183
General Information ...................... 183
Power Distribution Center (PDC) .... 184
JACKING AND TIRE CHANGING .............. 192
Jack Location .............................. 193
Spare Tire Removal ...................... 193
Preparations For Jacking .............. 194
Jacking Instructions ...................... 195
Road Tire Installation.................... 197
Declaration Of Conformance .......... 198
Jack Usage Precautions................. 200
JUMP STARTING .................................. 201
Preparations For Jump Start .......... 201
Jump Starting Procedure ............... 202
IF YOUR ENGINE OVERHEATS ...............204
MANUAL PARK RELEASE .....................204
FREEING A STUCK VEHICLE ..................206
TOWING A DISABLED VEHICLE ..............207
Four–Wheel Drive Models .............. 208
Without The Key Fob .................... 208
Tow Eye Usage............................. 208
ENHANCED ACCIDENT RESPONSE
SYSTEM (EARS) ..................................209
EVENT DATA RECORDER (EDR) ..............209
SERVICING AND MAINTENANCE
SCHEDULED SERVICING .......................210
Scheduled Servicing —
Gasoline Engine ........................... 210 Scheduled Servicing —
Diesel Engine............................... 216
ENGINE COMPARTMENT .......................221
2.0L Gasoline Engine .................. 221
3.6L Gasoline Engine .................. 222
2.2L Diesel Engine ....................... 223
Checking Oil Level —
Gasoline Engine .......................... 224 Adding Washer Fluid .................... 224
Maintenance-Free Battery ............ 225
Pressure Washing ......................... 225
DEALER SERVICE .................................226
Windshield Wiper Blades ...............226
Exhaust System ...........................228
Cooling System .............................229
Brake System ..............................230
Automatic Transmission ................231
RAISING THE VEHICLE ..........................232 TIRES .................................................232
Tires — General Information .........232
Tire Types ....................................237
Spare Tires — If Equipped ............237
Wheel And Wheel Trim Care ..........239
Tire Chains And Traction Devices ..... 240
Tire Rotation Recommendations ....241
STORING THE VEHICLE .........................241
BODYWORK .........................................242
Body And Underbody
Maintenance ................................242 Preserving The Bodywork ...............243
INTERIORS ..........................................245
Seats And Fabric Parts ..................245
Plastic And Coated Parts ...............246
Leather Parts ................................246
Glass Surfaces .............................246
2020_JEEP_JL_WRANGLER_UG_RHD_UK.book Page 7
Page 24 of 330
GETTING TO KNOW YOUR VEHICLE
22
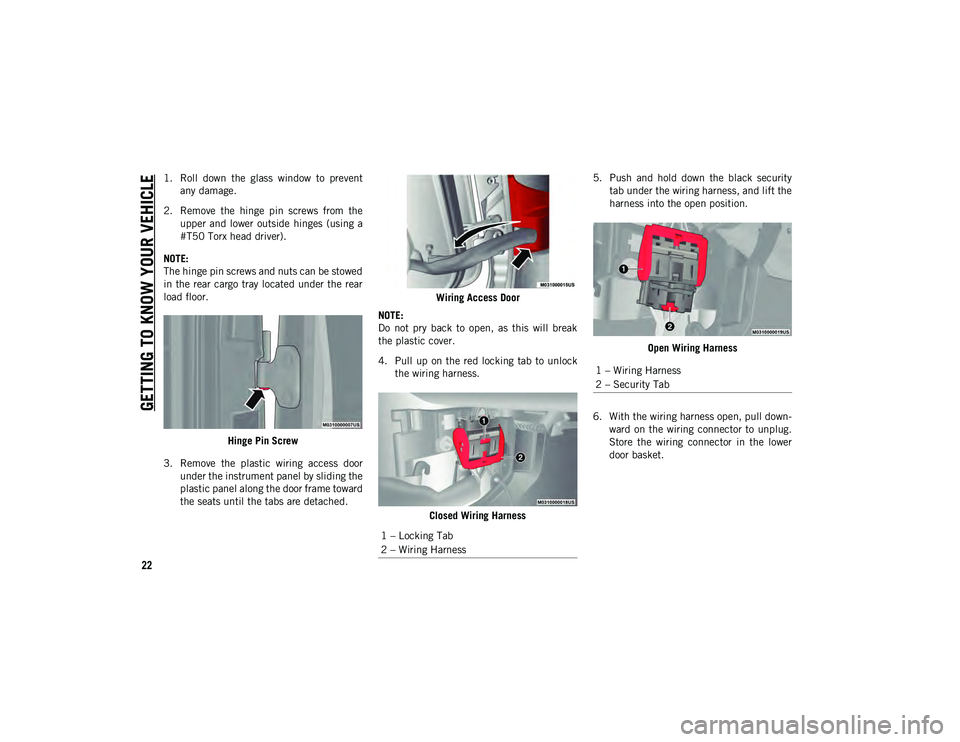
1. Roll down the glass window to preventany damage.
2. Remove the hinge pin screws from the upper and lower outside hinges (using a
#T50 Torx head driver).
NOTE:
The hinge pin screws and nuts can be stowed
in the rear cargo tray located under the rear
load floor.
Hinge Pin Screw
3. Remove the plastic wiring access door under the instrument panel by sliding the
plastic panel along the door frame toward
the seats until the tabs are detached. Wiring Access Door
NOTE:
Do not pry back to open, as this will break
the plastic cover.
4. Pull up on the red locking tab to unlock the wiring harness.
Closed Wiring Harness 5. Push and hold down the black security
tab under the wiring harness, and lift the
harness into the open position.
Open Wiring Harness
6. With the wiring harness open, pull down -
ward on the wiring connector to unplug.
Store the wiring connector in the lower
door basket.
1 – Locking Tab
2 – Wiring Harness
1 – Wiring Harness
2 – Security Tab
2020_JEEP_JL_WRANGLER_UG_RHD_UK.book Page 22
Page 26 of 330
GETTING TO KNOW YOUR VEHICLE
24
NOTE:
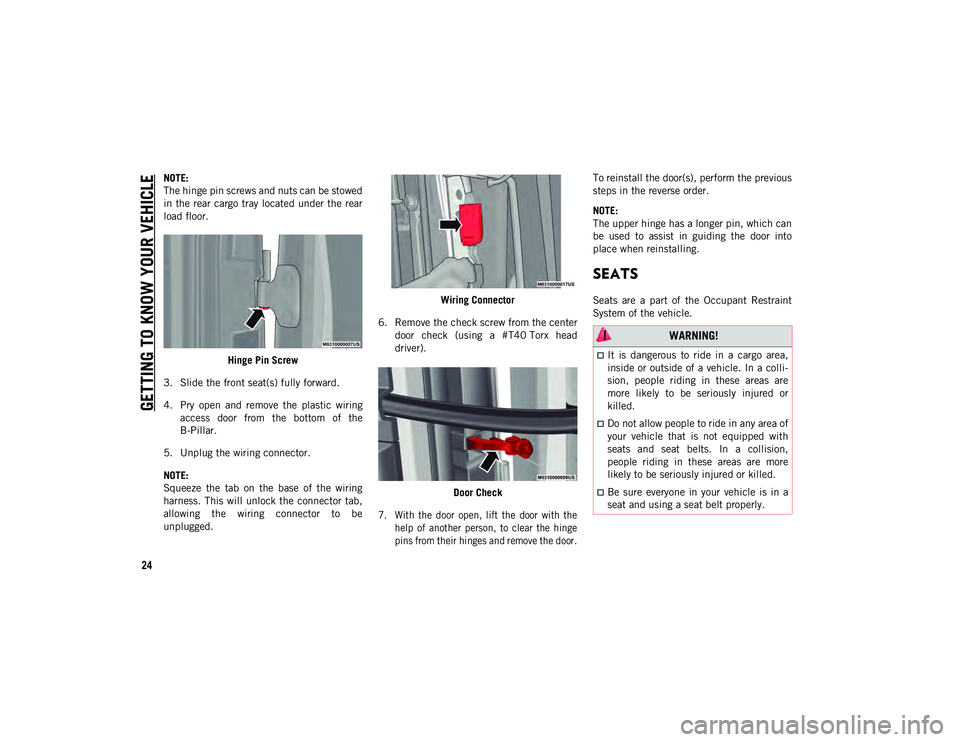
The hinge pin screws and nuts can be stowed
in the rear cargo tray located under the rear
load floor.Hinge Pin Screw
3. Slide the front seat(s) fully forward.
4. Pry open and remove the plastic wiring access door from the bottom of the
B-Pillar.
5. Unplug the wiring connector.
NOTE:
Squeeze the tab on the base of the wiring
harness. This will unlock the connector tab,
allowing the wiring connector to be
unplugged. Wiring Connector
6. Remove the check screw from the center door check (using a #T40 Torx head
driver).
Door Check
7. With the door open, lift the door with the help of another person, to clear the hinge
pins from their hinges and remove the door.
To reinstall the door(s), perform the previous
steps in the reverse order.
NOTE:
The upper hinge has a longer pin, which can
be used to assist in guiding the door into
place when reinstalling.
SEATS
Seats are a part of the Occupant Restraint
System of the vehicle.
WARNING!
It is dangerous to ride in a cargo area,
inside or outside of a vehicle. In a colli
-
sion, people riding in these areas are
more likely to be seriously injured or
killed.
Do not allow people to ride in any area of
your vehicle that is not equipped with
seats and seat belts. In a collision,
people riding in these areas are more
likely to be seriously injured or killed.
Be sure everyone in your vehicle is in a
seat and using a seat belt properly.
2020_JEEP_JL_WRANGLER_UG_RHD_UK.book Page 24
Page 31 of 330
29
(Continued)
Front Head RestraintNOTE:
Do not reposition the head restraint 180
degrees to the incorrect position in an
attempt to gain additional clearance to the
back of the head.
Rear Head Restraints — Two Door Models
The rear seat is equipped with non-adjust
-
able, but foldable head restraints.
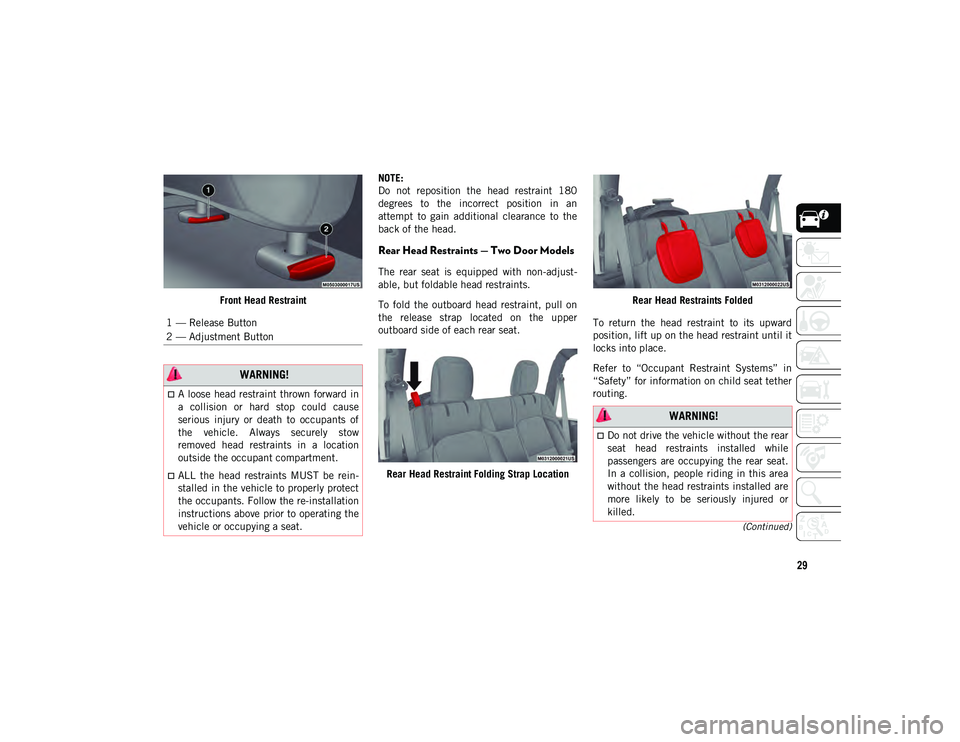
To fold the outboard head restraint, pull on
the release strap located on the upper
outboard side of each rear seat.
Rear Head Restraint Folding Strap Location Rear Head Restraints Folded
To return the head restraint to its upward
position, lift up on the head restraint until it
locks into place.
Refer to “Occupant Restraint Systems” in
“Safety” for information on child seat tether
routing.
1 — Release Button
2 — Adjustment Button
WARNING!
A loose head restraint thrown forward in
a collision or hard stop could cause
serious injury or death to occupants of
the vehicle. Always securely stow
removed head restraints in a location
outside the occupant compartment.
ALL the head restraints MUST be rein
-
stalled in the vehicle to properly protect
the occupants. Follow the re-installation
instructions above prior to operating the
vehicle or occupying a seat.
WARNING!
Do not drive the vehicle without the rear
seat head restraints installed while
passengers are occupying the rear seat.
In a collision, people riding in this area
without the head restraints installed are
more likely to be seriously injured or
killed.
2020_JEEP_JL_WRANGLER_UG_RHD_UK.book Page 29
Page 32 of 330
GETTING TO KNOW YOUR VEHICLE
30
Rear Head Restraints — Four Door Models
The rear seat is equipped with nonadjust-
able, but foldable, outboard head restraints,
as well as an adjustable, removable center
head restraint.
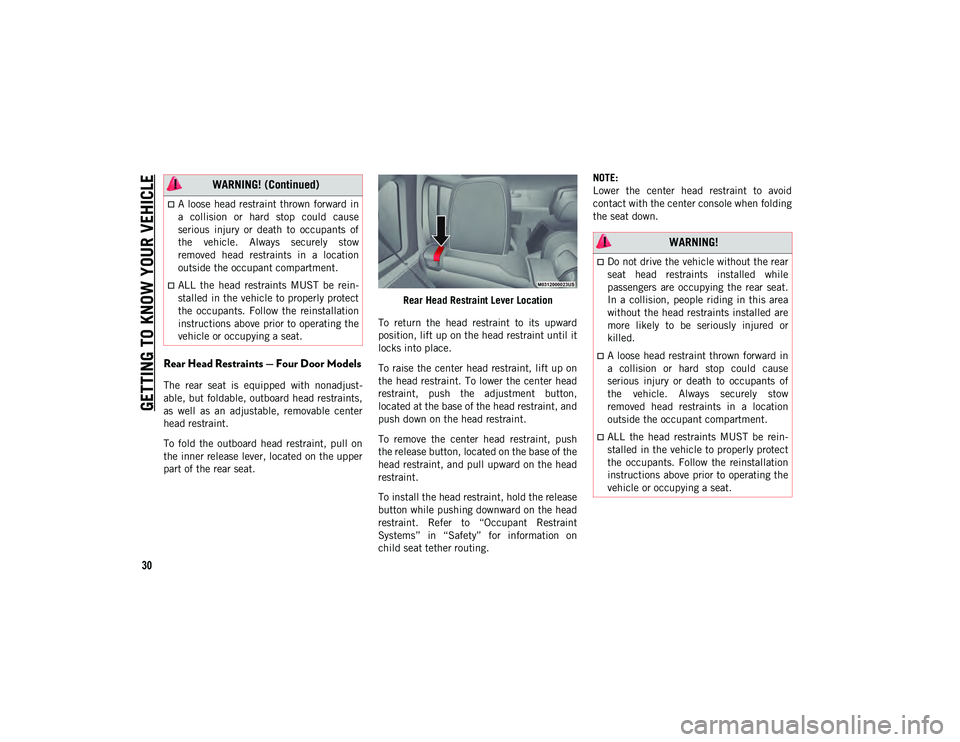
To fold the outboard head restraint, pull on
the inner release lever, located on the upper
part of the rear seat. Rear Head Restraint Lever Location
To return the head restraint to its upward
position, lift up on the head restraint until it
locks into place.
To raise the center head restraint, lift up on
the head restraint. To lower the center head
restraint, push the adjustment button,
located at the base of the head restraint, and
push down on the head restraint.
To remove the center head restraint, push
the release button, located on the base of the
head restraint, and pull upward on the head
restraint.
To install the head restraint, hold the release
button while pushing downward on the head
restraint. Refer to “Occupant Restraint
Systems” in “Safety” for information on
child seat tether routing. NOTE:
Lower the center head restraint to avoid
contact with the center console when folding
the seat down.
A loose head restraint thrown forward in
a collision or hard stop could cause
serious injury or death to occupants of
the vehicle. Always securely stow
removed head restraints in a location
outside the occupant compartment.
ALL the head restraints MUST be rein
-
stalled in the vehicle to properly protect
the occupants. Follow the reinstallation
instructions above prior to operating the
vehicle or occupying a seat.
WARNING! (Continued)
WARNING!
Do not drive the vehicle without the rear
seat head restraints installed while
passengers are occupying the rear seat.
In a collision, people riding in this area
without the head restraints installed are
more likely to be seriously injured or
killed.
A loose head restraint thrown forward in
a collision or hard stop could cause
serious injury or death to occupants of
the vehicle. Always securely stow
removed head restraints in a location
outside the occupant compartment.
ALL the head restraints MUST be rein -
stalled in the vehicle to properly protect
the occupants. Follow the reinstallation
instructions above prior to operating the
vehicle or occupying a seat.
2020_JEEP_JL_WRANGLER_UG_RHD_UK.book Page 30
Page 33 of 330
31
STEERING WHEEL
Tilt/Telescoping Steering Column
This feature allows you to tilt the steering
column upward or downward. It also allows
you to lengthen or shorten the steering
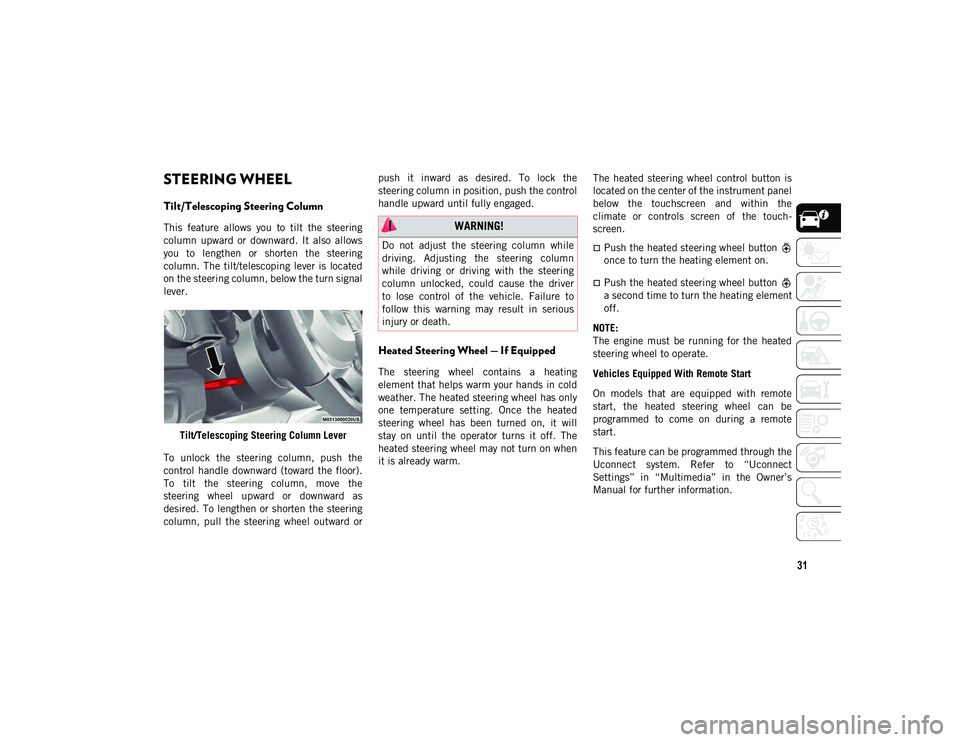
column. The tilt/telescoping lever is located
on the steering column, below the turn signal
lever.Tilt/Telescoping Steering Column Lever
To unlock the steering column, push the
control handle downward (toward the floor).
To tilt the steering column, move the
steering wheel upward or downward as
desired. To lengthen or shorten the steering
column, pull the steering wheel outward or push it inward as desired. To lock the
steering column in position, push the control
handle upward until fully engaged.
Heated Steering Wheel — If Equipped
The steering wheel contains a heating
element that helps warm your hands in cold
weather. The heated steering wheel has only
one temperature setting. Once the heated
steering wheel has been turned on, it will
stay on until the operator turns it off. The
heated steering wheel may not turn on when
it is already warm.
The heated steering wheel control button is
located on the center of the instrument panel
below the touchscreen and within the
climate or controls screen of the touch
-
screen.
Push the heated steering wheel button
once to turn the heating element on.
Push the heated steering wheel button
a second time to turn the heating element
off.
NOTE:
The engine must be running for the heated
steering wheel to operate.
Vehicles Equipped With Remote Start
On models that are equipped with remote
start, the heated steering wheel can be
programmed to come on during a remote
start.
This feature can be programmed through the
Uconnect system. Refer to “Uconnect
Settings” in “Multimedia” in the Owner’s
Manual for further information.
WARNING!
Do not adjust the steering column while
driving. Adjusting the steering column
while driving or driving with the steering
column unlocked, could cause the driver
to lose control of the vehicle. Failure to
follow this warning may result in serious
injury or death.
2020_JEEP_JL_WRANGLER_UG_RHD_UK.book Page 31
Page 34 of 330
GETTING TO KNOW YOUR VEHICLE
32
EXTERIOR LIGHTS
Headlight Switch
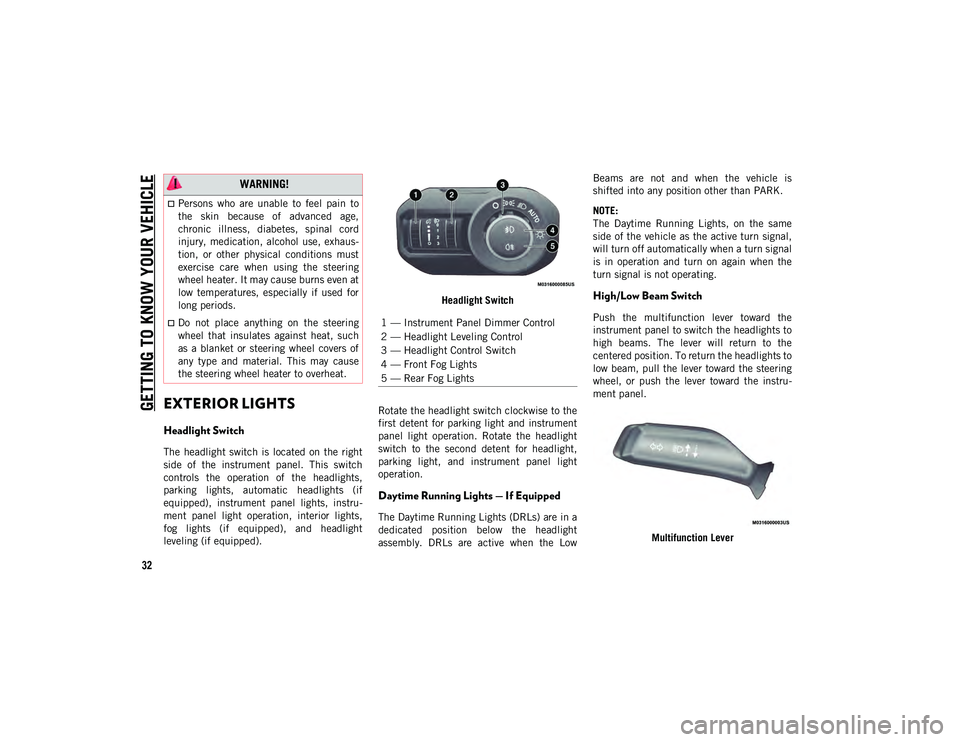
The headlight switch is located on the right
side of the instrument panel. This switch
controls the operation of the headlights,
parking lights, automatic headlights (if
equipped), instrument panel lights, instru-
ment panel light operation, interior lights,
fog lights (if equipped), and headlight
leveling (if equipped). Headlight Switch
Rotate the headlight switch clockwise to the
first detent for parking light and instrument
panel light operation. Rotate the headlight
switch to the second detent for headlight,
parking light, and instrument panel light
operation.
Daytime Running Lights — If Equipped
The Daytime Running Lights (DRLs) are in a
dedicated position below the headlight
assembly. DRLs are active when the Low Beams are not and when the vehicle is
shifted into any position other than PARK.
NOTE:
The Daytime Running Lights, on the same
side of the vehicle as the active turn signal,
will turn off automatically when a turn signal
is in operation and turn on again when the
turn signal is not operating.
High/Low Beam Switch
Push the multifunction lever toward the
instrument panel to switch the headlights to
high beams. The lever will return to the
centered position. To return the headlights to
low beam, pull the lever toward the steering
wheel, or push the lever toward the instru
-
ment panel.
Multifunction Lever
WARNING!
Persons who are unable to feel pain to
the skin because of advanced age,
chronic illness, diabetes, spinal cord
injury, medication, alcohol use, exhaus-
tion, or other physical conditions must
exercise care when using the steering
wheel heater. It may cause burns even at
low temperatures, especially if used for
long periods.
Do not place anything on the steering
wheel that insulates against heat, such
as a blanket or steering wheel covers of
any type and material. This may cause
the steering wheel heater to overheat.1 — Instrument Panel Dimmer Control
2 — Headlight Leveling Control
3 — Headlight Control Switch
4 — Front Fog Lights
5 — Rear Fog Lights
2020_JEEP_JL_WRANGLER_UG_RHD_UK.book Page 32
Page 35 of 330
33
Automatic High Beam — If Equipped
The Automatic High Beam Headlamp Control
system provides increased forward lighting at
night by automating high beam control
through the use of a digital camera mounted
on the vehicle’s header. This camera detects
vehicle specific light and automatically
switches from high beams to low beams until
the approaching vehicle is out of view.
NOTE:
The Automatic High Beam Headlamp
Control can be turned on or off by selecting
“ON” under “Auto High Beam” within your
Uconnect settings, as well as turning the
headlight switch to the AUTO position and
placing the multifunction lever in the high
beam position. Refer to “Uconnect Settings”
in “Multimedia” in the Owner’s Manual for
further information.
Broken, muddy, or obstructed headlights
and taillights of vehicles in the field of
view will cause headlights to remain on
longer (closer to the vehicle). Also, dirt,
film, and other obstructions on the wind-
shield or camera lens will cause the
system to function improperly.
Flash-To-Pass
You can signal another vehicle with your
headlights by lightly pulling the multifunc -
tion lever toward you. This will cause the
high beam headlights to turn on, and remain
on, until the lever is released.
Automatic Headlights — If Equipped
This system automatically turns the head -
lights on or off according to ambient light
levels. To turn the system on, rotate the
headlight switch clockwise to the last detent
for automatic headlight operation. When the
system is on, the headlight time delay
feature is also on. This means the headlights
will stay on for up to 90 seconds after you
place the ignition into the OFF position. To
turn the automatic system off, move the
headlight switch out of the AUTO position.
NOTE:
The engine must be running before the head -
lights will come on in the automatic mode.
Front And Rear Fog Lights — If Equipped
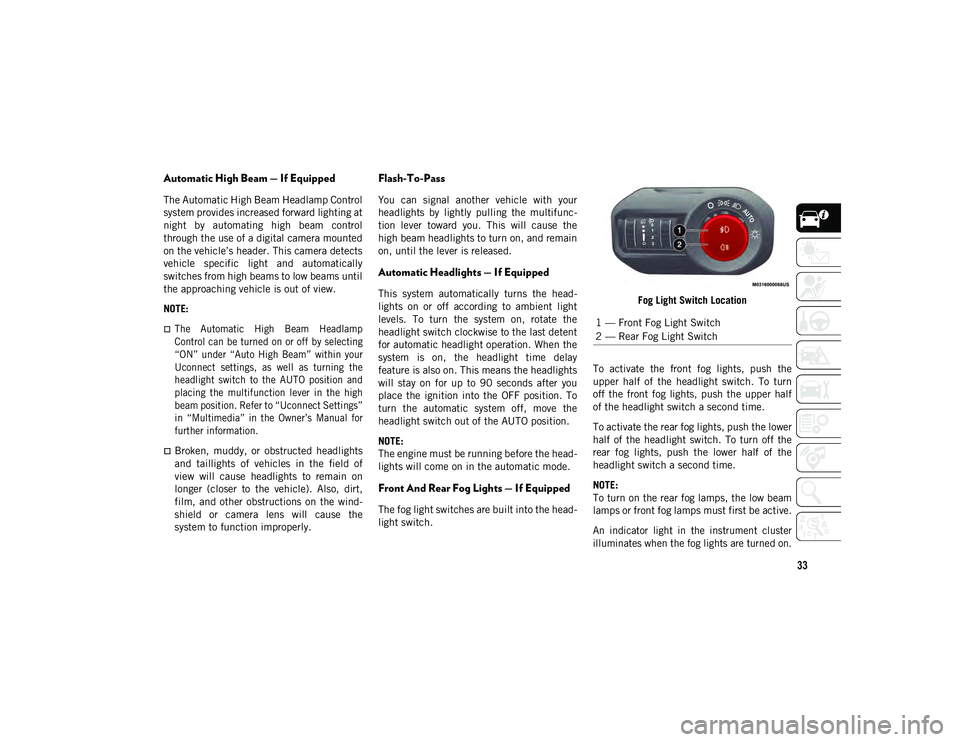
The fog light switches are built into the head -
light switch. Fog Light Switch Location
To activate the front fog lights, push the
upper half of the headlight switch. To turn
off the front fog lights, push the upper half
of the headlight switch a second time.
To activate the rear fog lights, push the lower
half of the headlight switch. To turn off the
rear fog lights, push the lower half of the
headlight switch a second time.
NOTE:
To turn on the rear fog lamps, the low beam
lamps or front fog lamps must first be active.
An indicator light in the instrument cluster
illuminates when the fog lights are turned on.
1 — Front Fog Light Switch
2 — Rear Fog Light Switch
2020_JEEP_JL_WRANGLER_UG_RHD_UK.book Page 33
Page 37 of 330
35
WINDSHIELD WIPERS AND
WASHERS
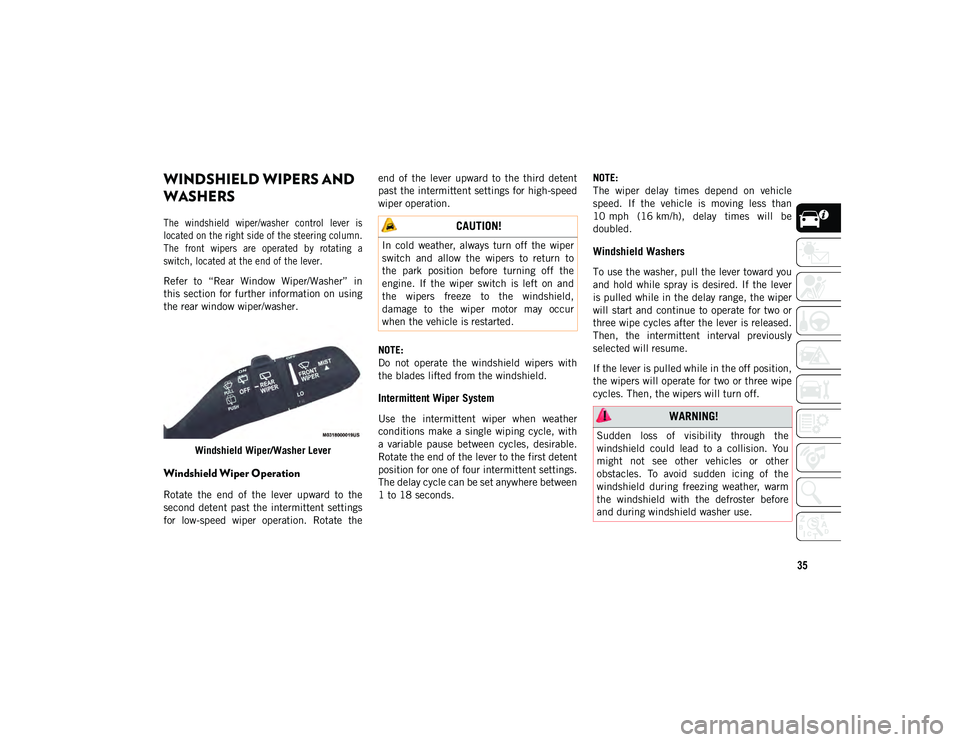
The windshield wiper/washer control lever is
located on the right side of the steering column.
The front wipers are operated by rotating a
switch, located at the end of the lever.
Refer to “Rear Window Wiper/Washer” in
this section for further information on using
the rear window wiper/washer.Windshield Wiper/Washer Lever
Windshield Wiper Operation
Rotate the end of the lever upward to the
second detent past the intermittent settings
for low-speed wiper operation. Rotate the end of the lever upward to the third detent
past the intermittent settings for high-speed
wiper operation.
NOTE:
Do not operate the windshield wipers with
the blades lifted from the windshield.
Intermittent Wiper System
Use the intermittent wiper when weather
conditions make a single wiping cycle, with
a variable pause between cycles, desirable.
Rotate the end of the lever to the first detent
position for one of four intermittent settings.
The delay cycle can be set anywhere between
1 to 18 seconds.
NOTE:
The wiper delay times depend on vehicle
speed. If the vehicle is moving less than
10 mph (16 km/h), delay times will be
doubled.
Windshield Washers
To use the washer, pull the lever toward you
and hold while spray is desired. If the lever
is pulled while in the delay range, the wiper
will start and continue to operate for two or
three wipe cycles after the lever is released.
Then, the intermittent interval previously
selected will resume.
If the lever is pulled while in the off position,
the wipers will operate for two or three wipe
cycles. Then, the wipers will turn off.
CAUTION!
In cold weather, always turn off the wiper
switch and allow the wipers to return to
the park position before turning off the
engine. If the wiper switch is left on and
the wipers freeze to the windshield,
damage to the wiper motor may occur
when the vehicle is restarted.
WARNING!
Sudden loss of visibility through the
windshield could lead to a collision. You
might not see other vehicles or other
obstacles. To avoid sudden icing of the
windshield during freezing weather, warm
the windshield with the defroster before
and during windshield washer use.
2020_JEEP_JL_WRANGLER_UG_RHD_UK.book Page 35
Page 38 of 330
GETTING TO KNOW YOUR VEHICLE
36
Mist Feature
Push upward on the wiper lever to activate a
single wipe to clear off road mist or spray
from a passing vehicle. As long as the lever
is held up, the wipers will continue to
operate.
NOTE:
The mist feature does not activate the
washer pump; therefore, no washer fluid will
be sprayed on the windshield. The wash
function must be used in order to spray the
windshield with washer fluid.
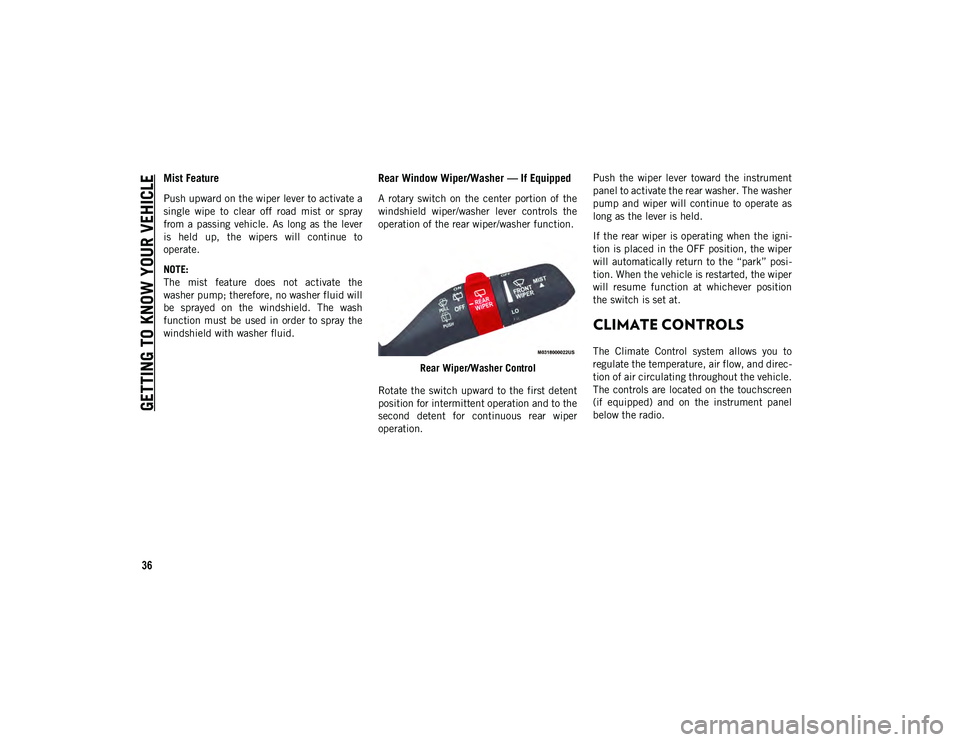
Rear Window Wiper/Washer — If Equipped
A rotary switch on the center portion of the
windshield wiper/washer lever controls the
operation of the rear wiper/washer function.Rear Wiper/Washer Control
Rotate the switch upward to the first detent
position for intermittent operation and to the
second detent for continuous rear wiper
operation. Push the wiper lever toward the instrument
panel to activate the rear washer. The washer
pump and wiper will continue to operate as
long as the lever is held.
If the rear wiper is operating when the igni
-
tion is placed in the OFF position, the wiper
will automatically return to the “park” posi -
tion. When the vehicle is restarted, the wiper
will resume function at whichever position
the switch is set at.
CLIMATE CONTROLS
The Climate Control system allows you to
regulate the temperature, air flow, and direc -
tion of air circulating throughout the vehicle.
The controls are located on the touchscreen
(if equipped) and on the instrument panel
below the radio.
2020_JEEP_JL_WRANGLER_UG_RHD_UK.book Page 36