JEEP YJ 1995 Service And Repair Manual
Manufacturer: JEEP, Model Year: 1995, Model line: YJ, Model: JEEP YJ 1995Pages: 2158, PDF Size: 81.9 MB
Page 121 of 2158
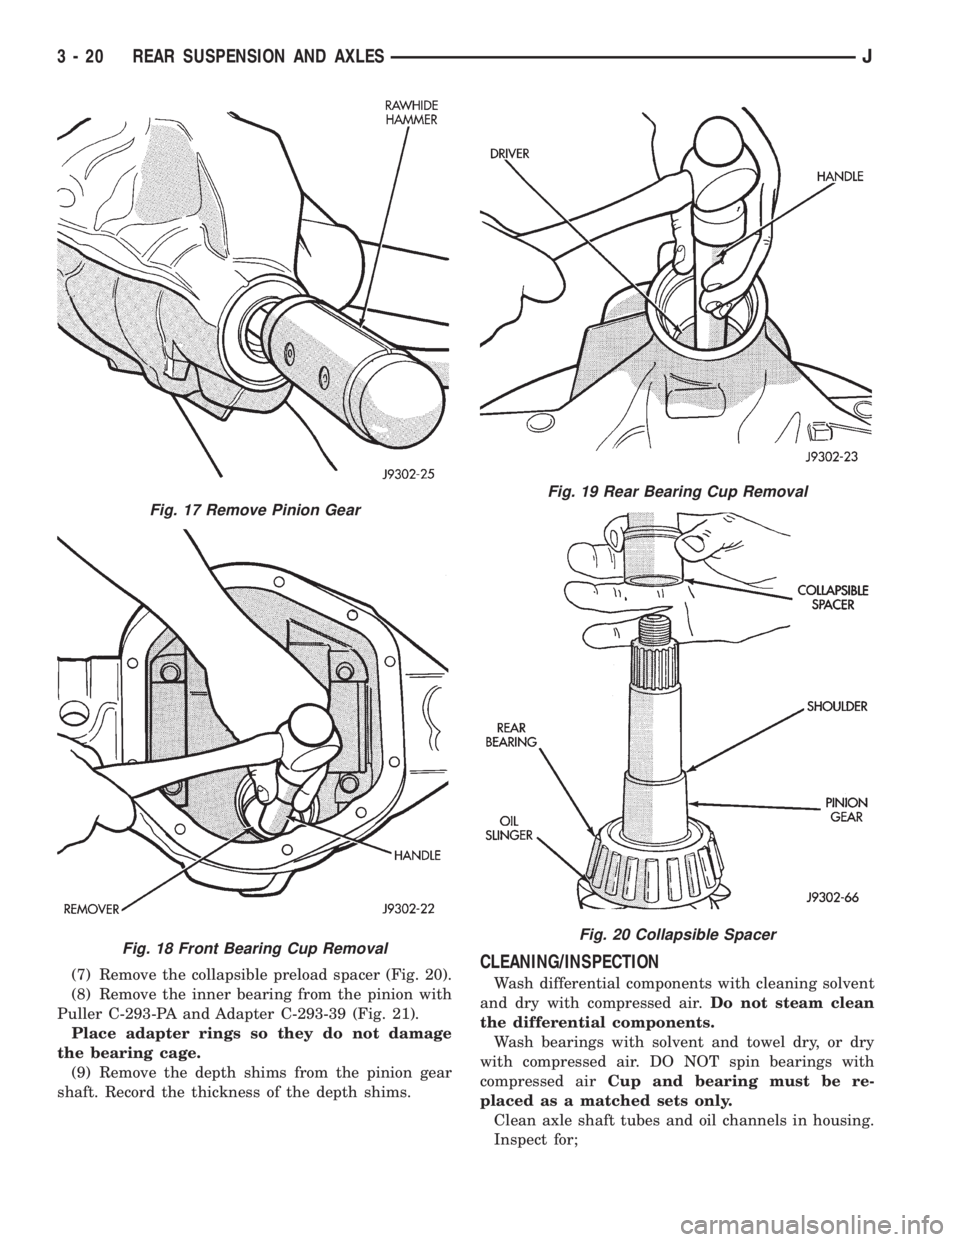
(7) Remove the collapsible preload spacer (Fig. 20).
(8) Remove the inner bearing from the pinion with
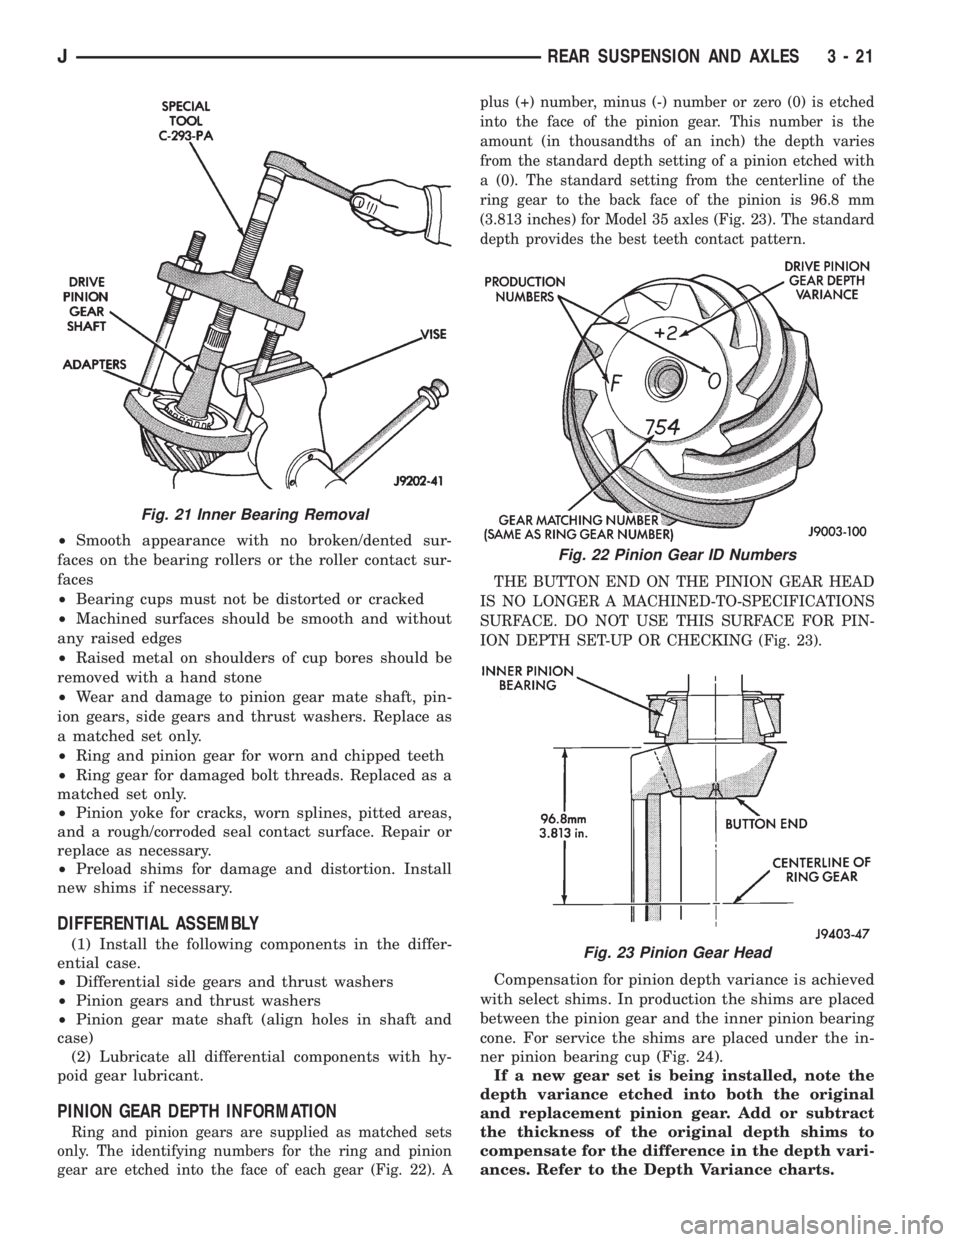
Puller C-293-PA and Adapter C-293-39 (Fig. 21).
Place adapter rings so they do not damage
the bearing cage.
(9) Remove the depth shims from the pinion gear
shaft. Record the thickness of the depth shims.CLEANING/INSPECTION
Wash differential components with cleaning solvent
and dry with compressed air.Do not steam clean
the differential components.
Wash bearings with solvent and towel dry, or dry
with compressed air. DO NOT spin bearings with
compressed airCup and bearing must be re-
placed as a matched sets only.
Clean axle shaft tubes and oil channels in housing.
Inspect for;
Fig. 17 Remove Pinion Gear
Fig. 18 Front Bearing Cup Removal
Fig. 19 Rear Bearing Cup Removal
Fig. 20 Collapsible Spacer
3 - 20 REAR SUSPENSION AND AXLESJ
Page 122 of 2158
²Smooth appearance with no broken/dented sur-
faces on the bearing rollers or the roller contact sur-
faces
²Bearing cups must not be distorted or cracked
²Machined surfaces should be smooth and without
any raised edges
²Raised metal on shoulders of cup bores should be
removed with a hand stone
²Wear and damage to pinion gear mate shaft, pin-
ion gears, side gears and thrust washers. Replace as
a matched set only.
²Ring and pinion gear for worn and chipped teeth
²Ring gear for damaged bolt threads. Replaced as a
matched set only.
²Pinion yoke for cracks, worn splines, pitted areas,
and a rough/corroded seal contact surface. Repair or
replace as necessary.
²Preload shims for damage and distortion. Install
new shims if necessary.
DIFFERENTIAL ASSEMBLY
(1) Install the following components in the differ-
ential case.
²Differential side gears and thrust washers
²Pinion gears and thrust washers
²Pinion gear mate shaft (align holes in shaft and
case)
(2) Lubricate all differential components with hy-
poid gear lubricant.
PINION GEAR DEPTH INFORMATION
Ring and pinion gears are supplied as matched sets
only. The identifying numbers for the ring and pinion
gear are etched into the face of each gear (Fig. 22). Aplus (+) number, minus (-) number or zero (0) is etched
into the face of the pinion gear. This number is the
amount (in thousandths of an inch) the depth varies
from the standard depth setting of a pinion etched with
a (0). The standard setting from the centerline of the
ring gear to the back face of the pinion is 96.8 mm
(3.813 inches) for Model 35 axles (Fig. 23). The standard
depth provides the best teeth contact pattern.
THE BUTTON END ON THE PINION GEAR HEAD
IS NO LONGER A MACHINED-TO-SPECIFICATIONS
SURFACE. DO NOT USE THIS SURFACE FOR PIN-
ION DEPTH SET-UP OR CHECKING (Fig. 23).
Compensation for pinion depth variance is achieved
with select shims. In production the shims are placed
between the pinion gear and the inner pinion bearing
cone. For service the shims are placed under the in-
ner pinion bearing cup (Fig. 24).
If a new gear set is being installed, note the
depth variance etched into both the original
and replacement pinion gear. Add or subtract
the thickness of the original depth shims to
compensate for the difference in the depth vari-
ances. Refer to the Depth Variance charts.
Fig. 21 Inner Bearing Removal
Fig. 22 Pinion Gear ID Numbers
Fig. 23 Pinion Gear Head
JREAR SUSPENSION AND AXLES 3 - 21
Page 123 of 2158
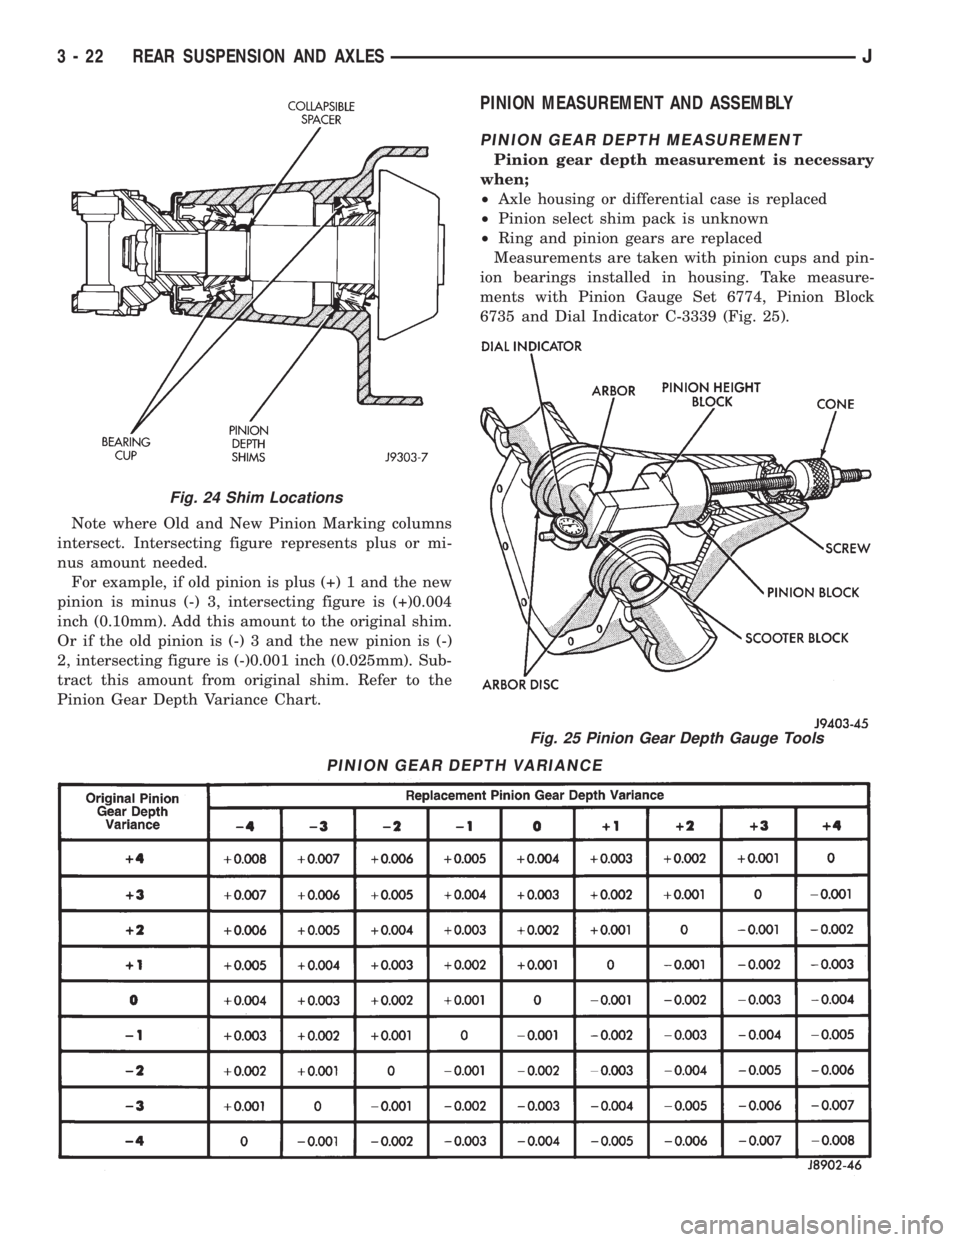
Note where Old and New Pinion Marking columns
intersect. Intersecting figure represents plus or mi-
nus amount needed.
For example, if old pinion is plus (+) 1 and the new
pinion is minus (-) 3, intersecting figure is (+)0.004
inch (0.10mm). Add this amount to the original shim.
Or if the old pinion is (-) 3 and the new pinion is (-)
2, intersecting figure is (-)0.001 inch (0.025mm). Sub-
tract this amount from original shim. Refer to the
Pinion Gear Depth Variance Chart.
PINION MEASUREMENT AND ASSEMBLY
PINION GEAR DEPTH MEASUREMENT
Pinion gear depth measurement is necessary
when;
²Axle housing or differential case is replaced
²Pinion select shim pack is unknown
²Ring and pinion gears are replaced
Measurements are taken with pinion cups and pin-
ion bearings installed in housing. Take measure-
ments with Pinion Gauge Set 6774, Pinion Block
6735 and Dial Indicator C-3339 (Fig. 25).
Fig. 24 Shim Locations
PINION GEAR DEPTH VARIANCE
Fig. 25 Pinion Gear Depth Gauge Tools
3 - 22 REAR SUSPENSION AND AXLESJ
Page 124 of 2158
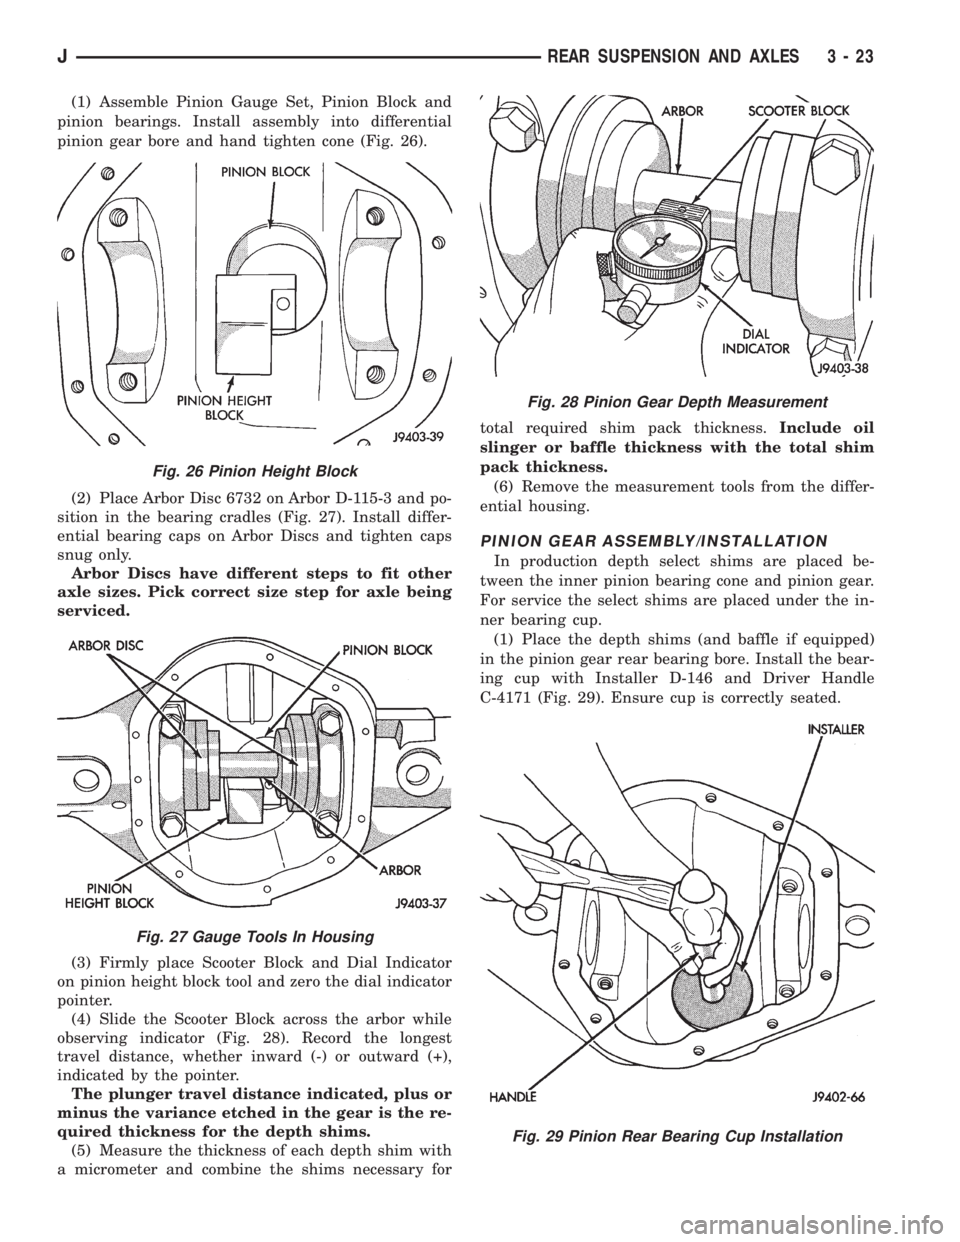
(1) Assemble Pinion Gauge Set, Pinion Block and
pinion bearings. Install assembly into differential
pinion gear bore and hand tighten cone (Fig. 26).
(2) Place Arbor Disc 6732 on Arbor D-115-3 and po-
sition in the bearing cradles (Fig. 27). Install differ-
ential bearing caps on Arbor Discs and tighten caps
snug only.
Arbor Discs have different steps to fit other
axle sizes. Pick correct size step for axle being
serviced.
(3) Firmly place Scooter Block and Dial Indicator
on pinion height block tool and zero the dial indicator
pointer.
(4) Slide the Scooter Block across the arbor while
observing indicator (Fig. 28). Record the longest
travel distance, whether inward (-) or outward (+),
indicated by the pointer.
The plunger travel distance indicated, plus or
minus the variance etched in the gear is the re-
quired thickness for the depth shims.
(5) Measure the thickness of each depth shim with
a micrometer and combine the shims necessary fortotal required shim pack thickness.Include oil
slinger or baffle thickness with the total shim
pack thickness.
(6) Remove the measurement tools from the differ-
ential housing.
PINION GEAR ASSEMBLY/INSTALLATION
In production depth select shims are placed be-
tween the inner pinion bearing cone and pinion gear.
For service the select shims are placed under the in-
ner bearing cup.
(1) Place the depth shims (and baffle if equipped)
in the pinion gear rear bearing bore. Install the bear-
ing cup with Installer D-146 and Driver Handle
C-4171 (Fig. 29). Ensure cup is correctly seated.
Fig. 26 Pinion Height Block
Fig. 27 Gauge Tools In Housing
Fig. 28 Pinion Gear Depth Measurement
Fig. 29 Pinion Rear Bearing Cup Installation
JREAR SUSPENSION AND AXLES 3 - 23
Page 125 of 2158
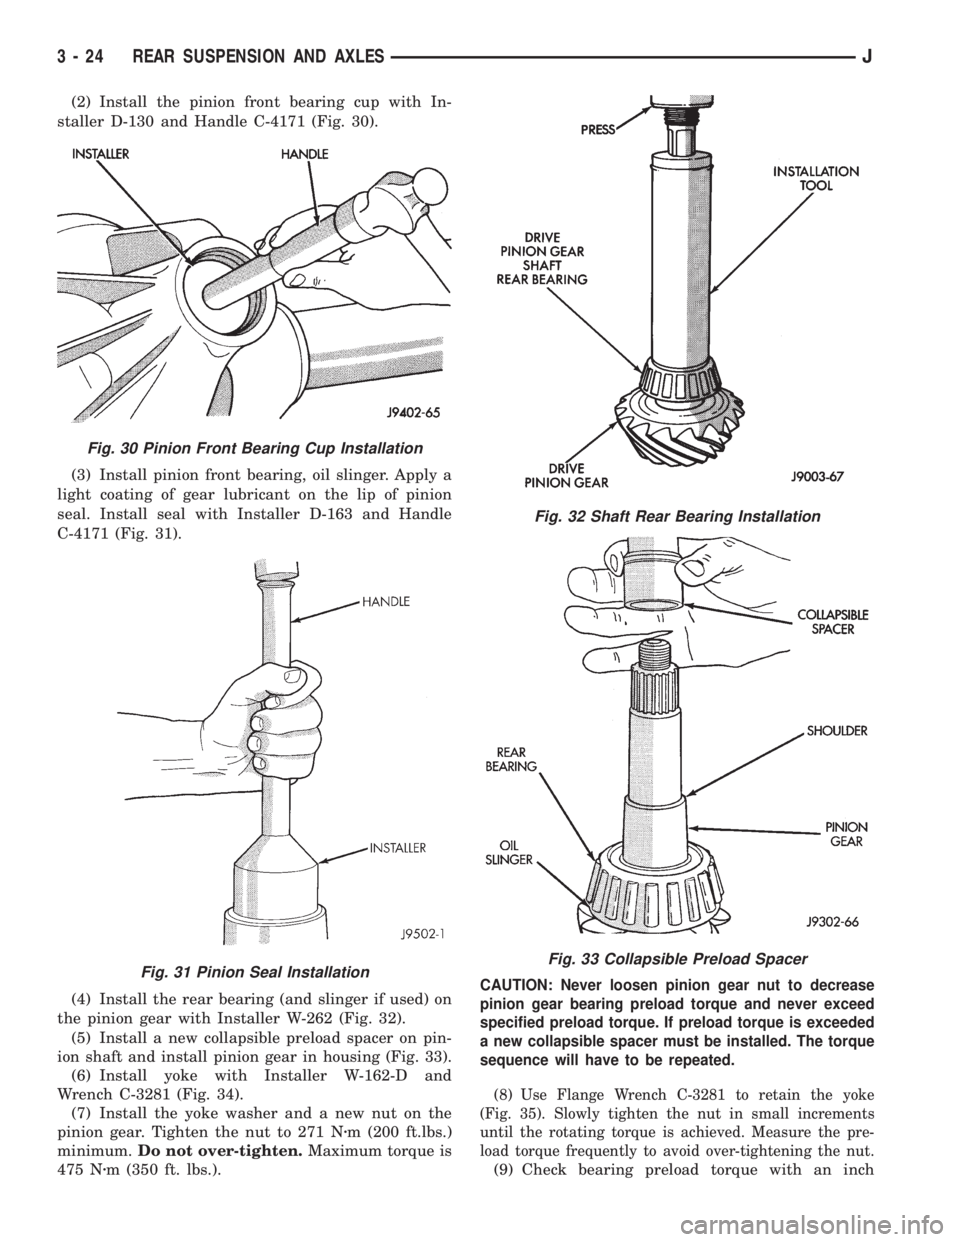
(2) Install the pinion front bearing cup with In-
staller D-130 and Handle C-4171 (Fig. 30).
(3) Install pinion front bearing, oil slinger. Apply a
light coating of gear lubricant on the lip of pinion
seal. Install seal with Installer D-163 and Handle
C-4171 (Fig. 31).
(4) Install the rear bearing (and slinger if used) on
the pinion gear with Installer W-262 (Fig. 32).
(5) Install a new collapsible preload spacer on pin-
ion shaft and install pinion gear in housing (Fig. 33).
(6) Install yoke with Installer W-162-D and
Wrench C-3281 (Fig. 34).
(7) Install the yoke washer and a new nut on the
pinion gear. Tighten the nut to 271 Nzm (200 ft.lbs.)
minimum.Do not over-tighten.Maximum torque is
475 Nzm (350 ft. lbs.).
CAUTION: Never loosen pinion gear nut to decrease
pinion gear bearing preload torque and never exceed
specified preload torque. If preload torque is exceeded
a new collapsible spacer must be installed. The torque
sequence will have to be repeated.
(8) Use Flange Wrench C-3281 to retain the yoke
(Fig. 35). Slowly tighten the nut in small increments
until the rotating torque is achieved. Measure the pre-
load torque frequently to avoid over-tightening the nut.
(9) Check bearing preload torque with an inch
Fig. 30 Pinion Front Bearing Cup Installation
Fig. 31 Pinion Seal Installation
Fig. 32 Shaft Rear Bearing Installation
Fig. 33 Collapsible Preload Spacer
3 - 24 REAR SUSPENSION AND AXLESJ
Page 126 of 2158
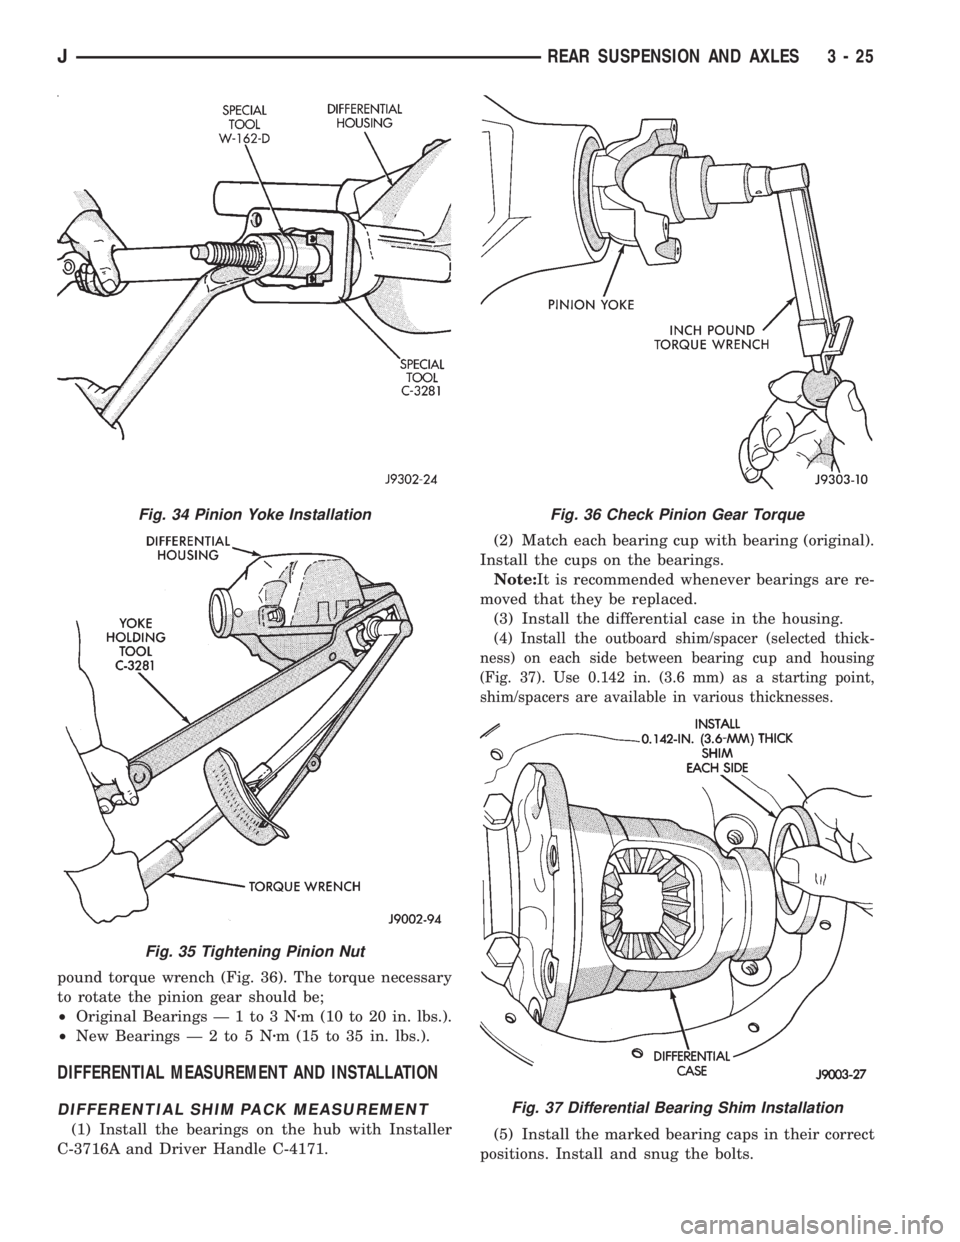
pound torque wrench (Fig. 36). The torque necessary
to rotate the pinion gear should be;
²Original Bearings Ð 1 to 3 Nzm (10 to 20 in. lbs.).
²New BearingsÐ2to5Nzm (15 to 35 in. lbs.).
DIFFERENTIAL MEASUREMENT AND INSTALLATION
DIFFERENTIAL SHIM PACK MEASUREMENT
(1) Install the bearings on the hub with Installer
C-3716A and Driver Handle C-4171.(2) Match each bearing cup with bearing (original).
Install the cups on the bearings.
Note:It is recommended whenever bearings are re-
moved that they be replaced.
(3) Install the differential case in the housing.
(4) Install the outboard shim/spacer (selected thick-
ness) on each side between bearing cup and housing
(Fig. 37). Use 0.142 in. (3.6 mm) as a starting point,
shim/spacers are available in various thicknesses.
(5) Install the marked bearing caps in their correct
positions. Install and snug the bolts.
Fig. 34 Pinion Yoke Installation
Fig. 35 Tightening Pinion Nut
Fig. 36 Check Pinion Gear Torque
Fig. 37 Differential Bearing Shim Installation
JREAR SUSPENSION AND AXLES 3 - 25
Page 127 of 2158
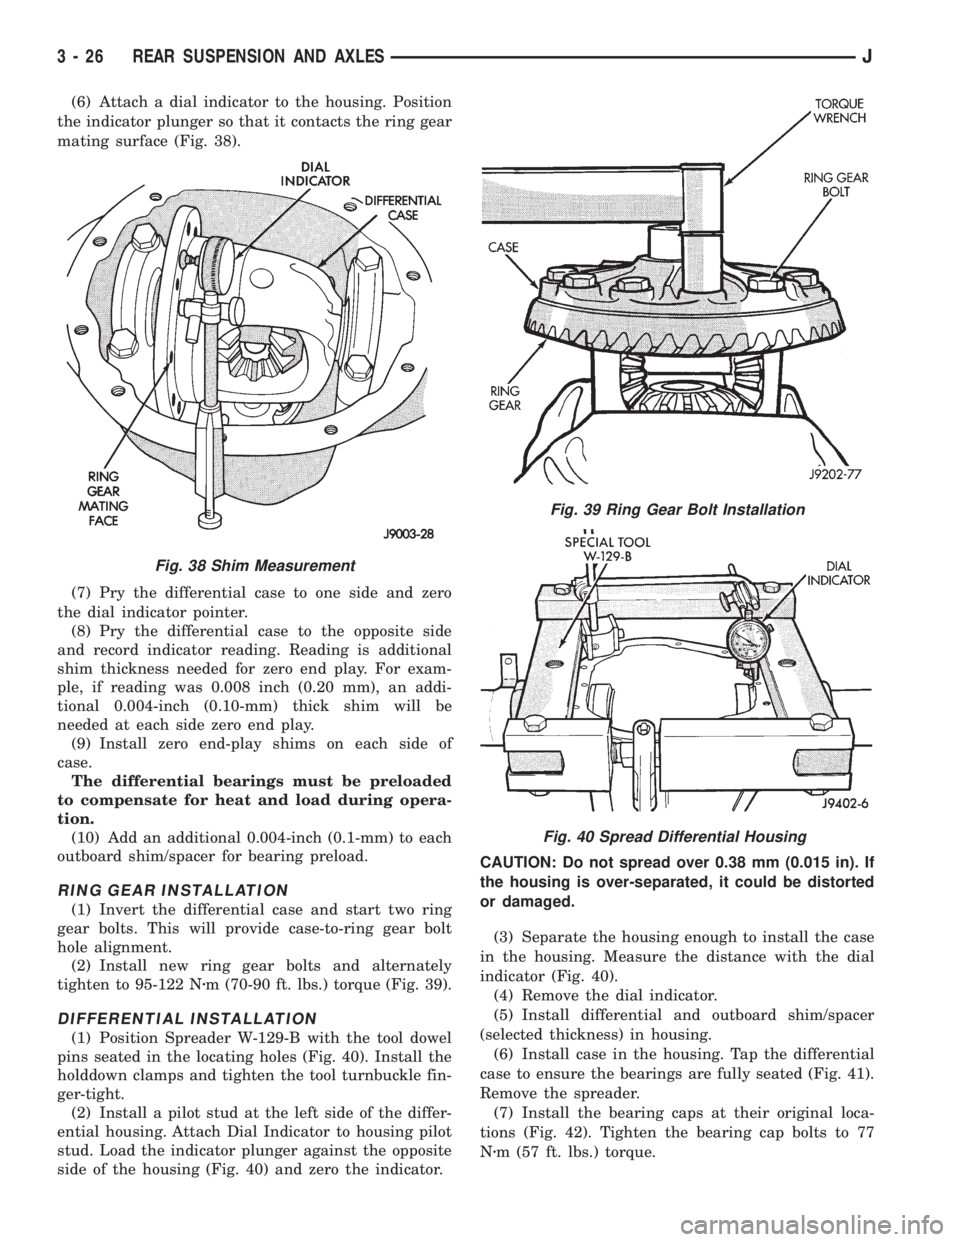
(6) Attach a dial indicator to the housing. Position
the indicator plunger so that it contacts the ring gear
mating surface (Fig. 38).
(7) Pry the differential case to one side and zero
the dial indicator pointer.
(8) Pry the differential case to the opposite side
and record indicator reading. Reading is additional
shim thickness needed for zero end play. For exam-
ple, if reading was 0.008 inch (0.20 mm), an addi-
tional 0.004-inch (0.10-mm) thick shim will be
needed at each side zero end play.
(9) Install zero end-play shims on each side of
case.
The differential bearings must be preloaded
to compensate for heat and load during opera-
tion.
(10) Add an additional 0.004-inch (0.1-mm) to each
outboard shim/spacer for bearing preload.
RING GEAR INSTALLATION
(1) Invert the differential case and start two ring
gear bolts. This will provide case-to-ring gear bolt
hole alignment.
(2) Install new ring gear bolts and alternately
tighten to 95-122 Nzm (70-90 ft. lbs.) torque (Fig. 39).
DIFFERENTIAL INSTALLATION
(1) Position Spreader W-129-B with the tool dowel
pins seated in the locating holes (Fig. 40). Install the
holddown clamps and tighten the tool turnbuckle fin-
ger-tight.
(2) Install a pilot stud at the left side of the differ-
ential housing. Attach Dial Indicator to housing pilot
stud. Load the indicator plunger against the opposite
side of the housing (Fig. 40) and zero the indicator.CAUTION: Do not spread over 0.38 mm (0.015 in). If
the housing is over-separated, it could be distorted
or damaged.
(3) Separate the housing enough to install the case
in the housing. Measure the distance with the dial
indicator (Fig. 40).
(4) Remove the dial indicator.
(5) Install differential and outboard shim/spacer
(selected thickness) in housing.
(6) Install case in the housing. Tap the differential
case to ensure the bearings are fully seated (Fig. 41).
Remove the spreader.
(7) Install the bearing caps at their original loca-
tions (Fig. 42). Tighten the bearing cap bolts to 77
Nzm (57 ft. lbs.) torque.
Fig. 38 Shim Measurement
Fig. 39 Ring Gear Bolt Installation
Fig. 40 Spread Differential Housing
3 - 26 REAR SUSPENSION AND AXLESJ
Page 128 of 2158
BACKLASH AND CONTACT PATTERN ANALYSIS
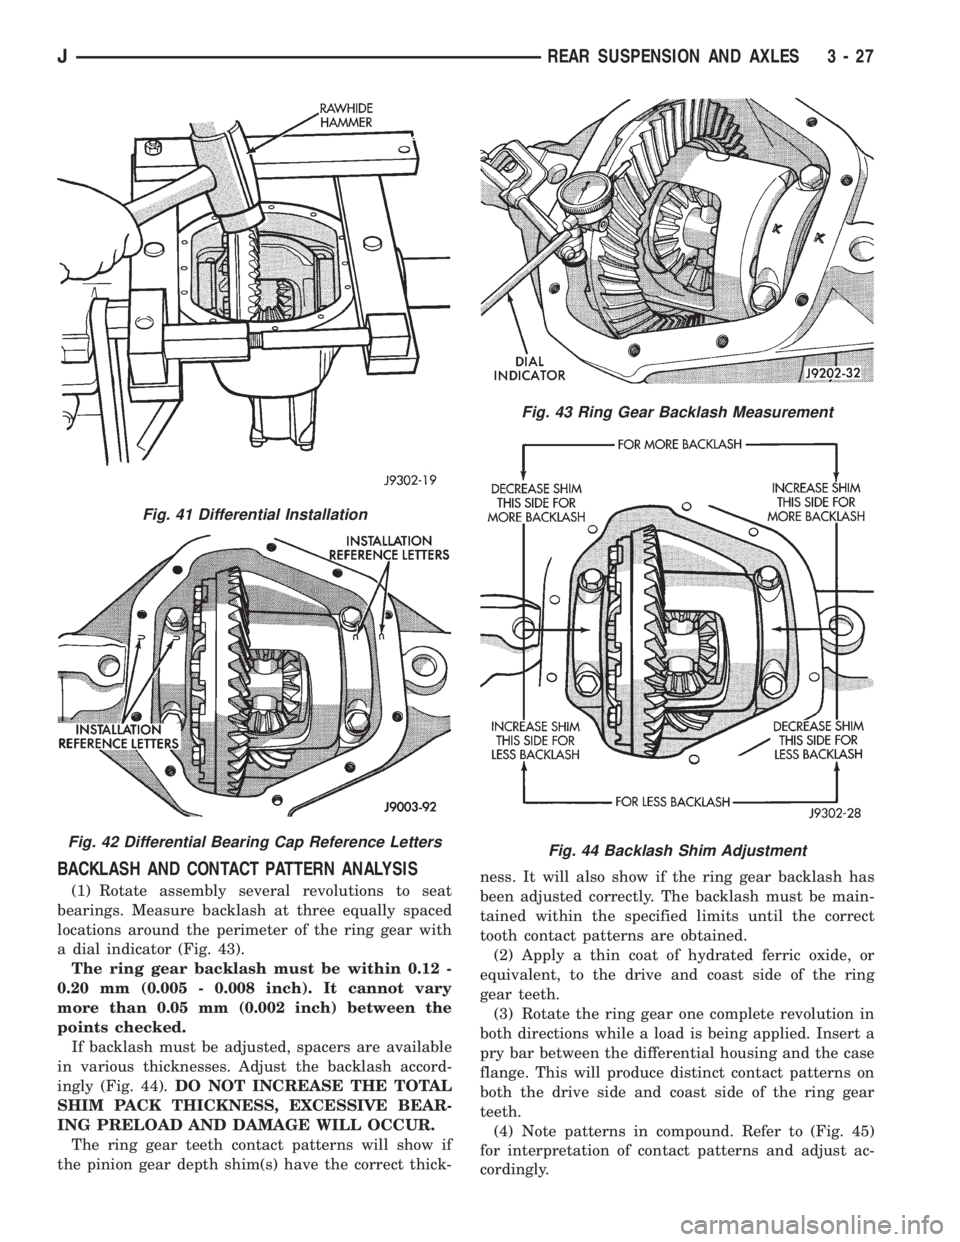
(1) Rotate assembly several revolutions to seat
bearings. Measure backlash at three equally spaced
locations around the perimeter of the ring gear with
a dial indicator (Fig. 43).
The ring gear backlash must be within 0.12 -
0.20 mm (0.005 - 0.008 inch). It cannot vary
more than 0.05 mm (0.002 inch) between the
points checked.
If backlash must be adjusted, spacers are available
in various thicknesses. Adjust the backlash accord-
ingly (Fig. 44).DO NOT INCREASE THE TOTAL
SHIM PACK THICKNESS, EXCESSIVE BEAR-
ING PRELOAD AND DAMAGE WILL OCCUR.
The ring gear teeth contact patterns will show if
the pinion gear depth shim(s) have the correct thick-ness. It will also show if the ring gear backlash has
been adjusted correctly. The backlash must be main-
tained within the specified limits until the correct
tooth contact patterns are obtained.
(2) Apply a thin coat of hydrated ferric oxide, or
equivalent, to the drive and coast side of the ring
gear teeth.
(3) Rotate the ring gear one complete revolution in
both directions while a load is being applied. Insert a
pry bar between the differential housing and the case
flange. This will produce distinct contact patterns on
both the drive side and coast side of the ring gear
teeth.
(4) Note patterns in compound. Refer to (Fig. 45)
for interpretation of contact patterns and adjust ac-
cordingly.
Fig. 41 Differential Installation
Fig. 42 Differential Bearing Cap Reference Letters
Fig. 43 Ring Gear Backlash Measurement
Fig. 44 Backlash Shim Adjustment
JREAR SUSPENSION AND AXLES 3 - 27
Page 129 of 2158
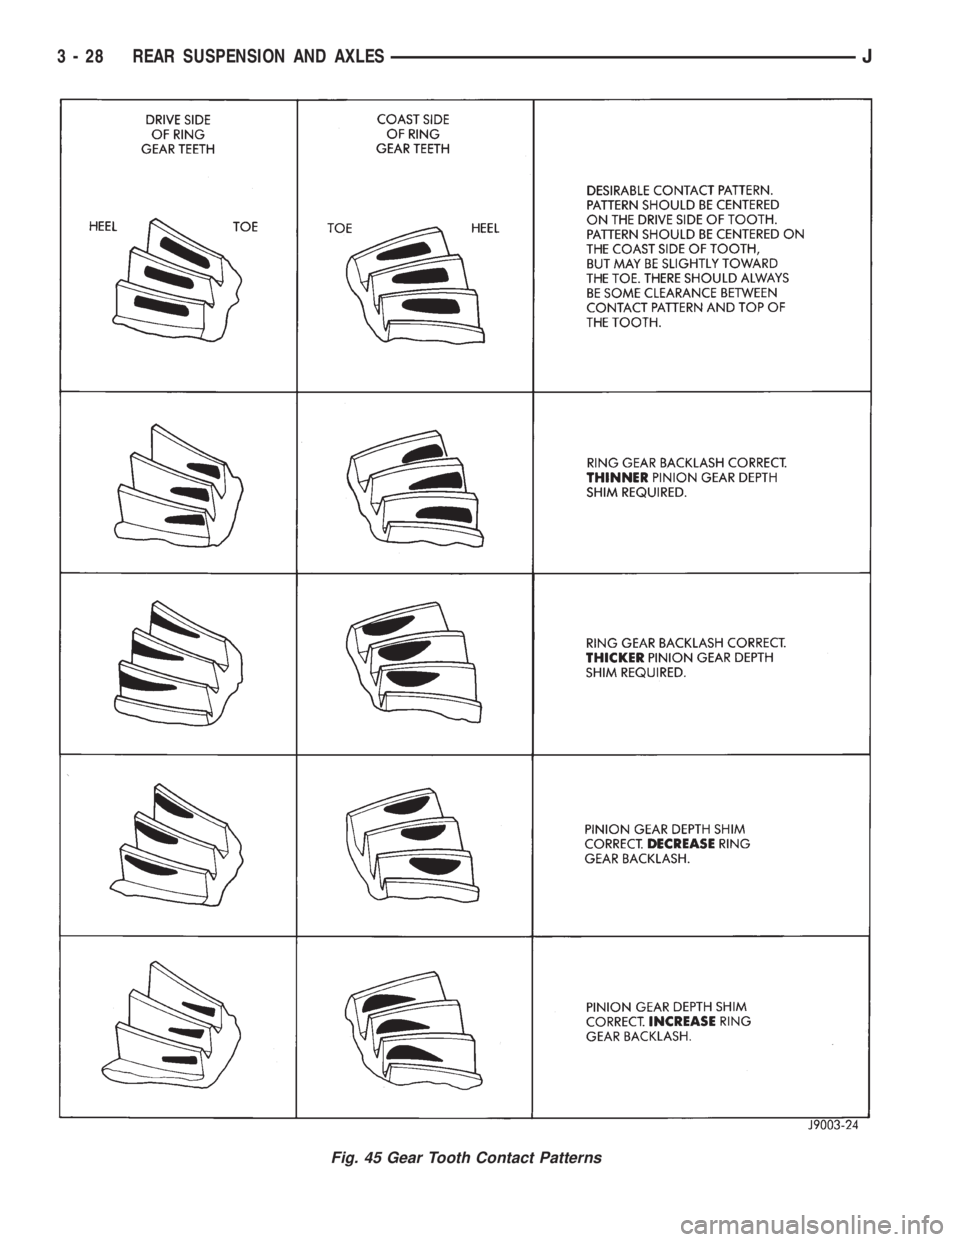
Fig. 45 Gear Tooth Contact Patterns
3 - 28 REAR SUSPENSION AND AXLESJ
Page 130 of 2158
FINAL ASSEMBLY
(1) Install the axle shafts. Refer to Axle Shaft In-
stallation within this group.
(2) Scrape the residual sealant from the housing
and cover mating surfaces. Clean the mating surfaces
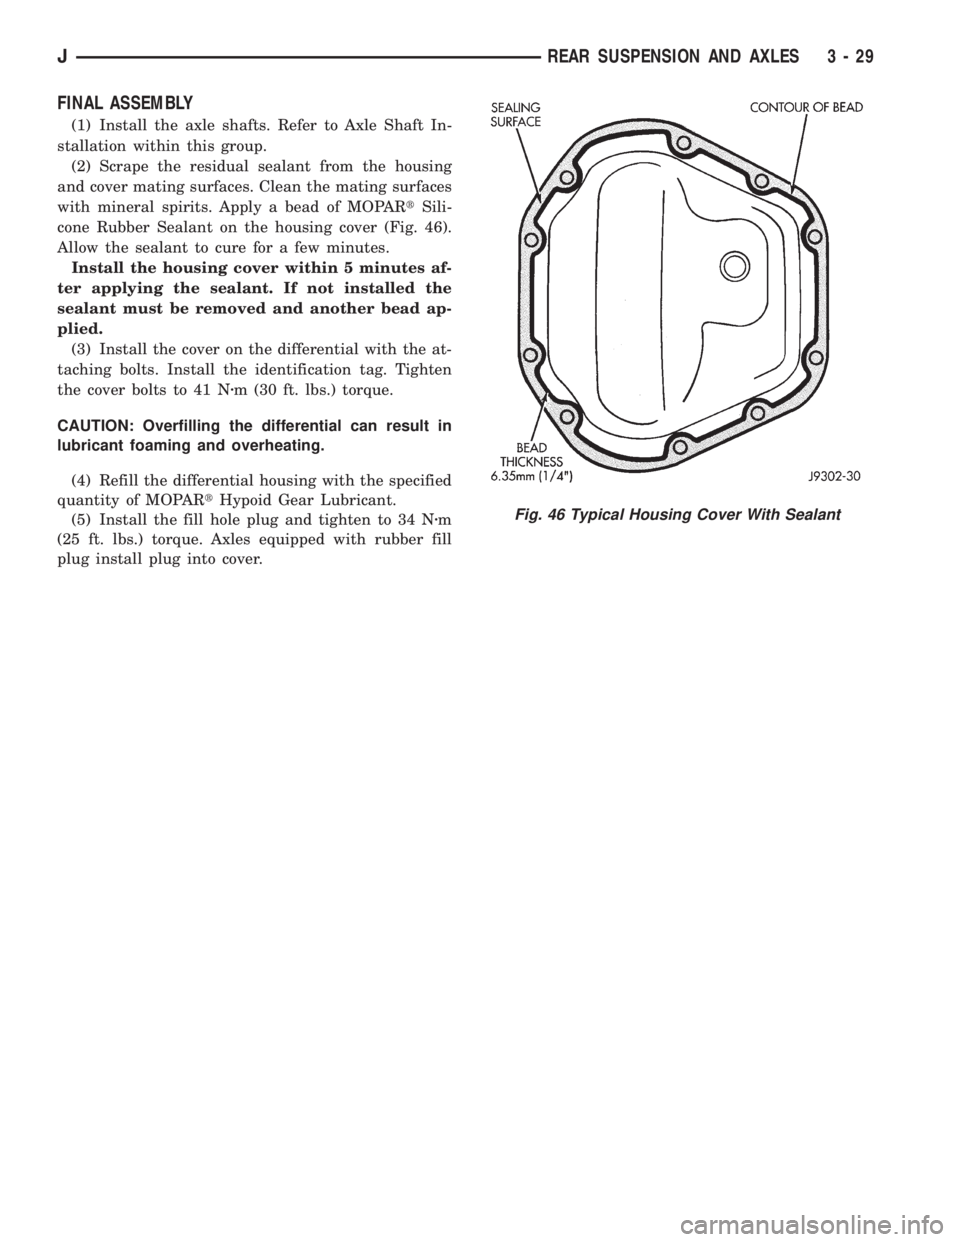
with mineral spirits. Apply a bead of MOPARtSili-
cone Rubber Sealant on the housing cover (Fig. 46).
Allow the sealant to cure for a few minutes.
Install the housing cover within 5 minutes af-
ter applying the sealant. If not installed the
sealant must be removed and another bead ap-
plied.
(3) Install the cover on the differential with the at-
taching bolts. Install the identification tag. Tighten
the cover bolts to 41 Nzm (30 ft. lbs.) torque.
CAUTION: Overfilling the differential can result in
lubricant foaming and overheating.
(4) Refill the differential housing with the specified
quantity of MOPARtHypoid Gear Lubricant.
(5) Install the fill hole plug and tighten to 34 Nzm
(25 ft. lbs.) torque. Axles equipped with rubber fill
plug install plug into cover.
Fig. 46 Typical Housing Cover With Sealant
JREAR SUSPENSION AND AXLES 3 - 29