JEEP YJ 1995 Service And Manual PDF
Manufacturer: JEEP, Model Year: 1995, Model line: YJ, Model: JEEP YJ 1995Pages: 2158, PDF Size: 81.9 MB
Page 61 of 2158
wheels. Secure the steering wheel with the front
wheels in the straight-ahead position. Turn off the
engine.
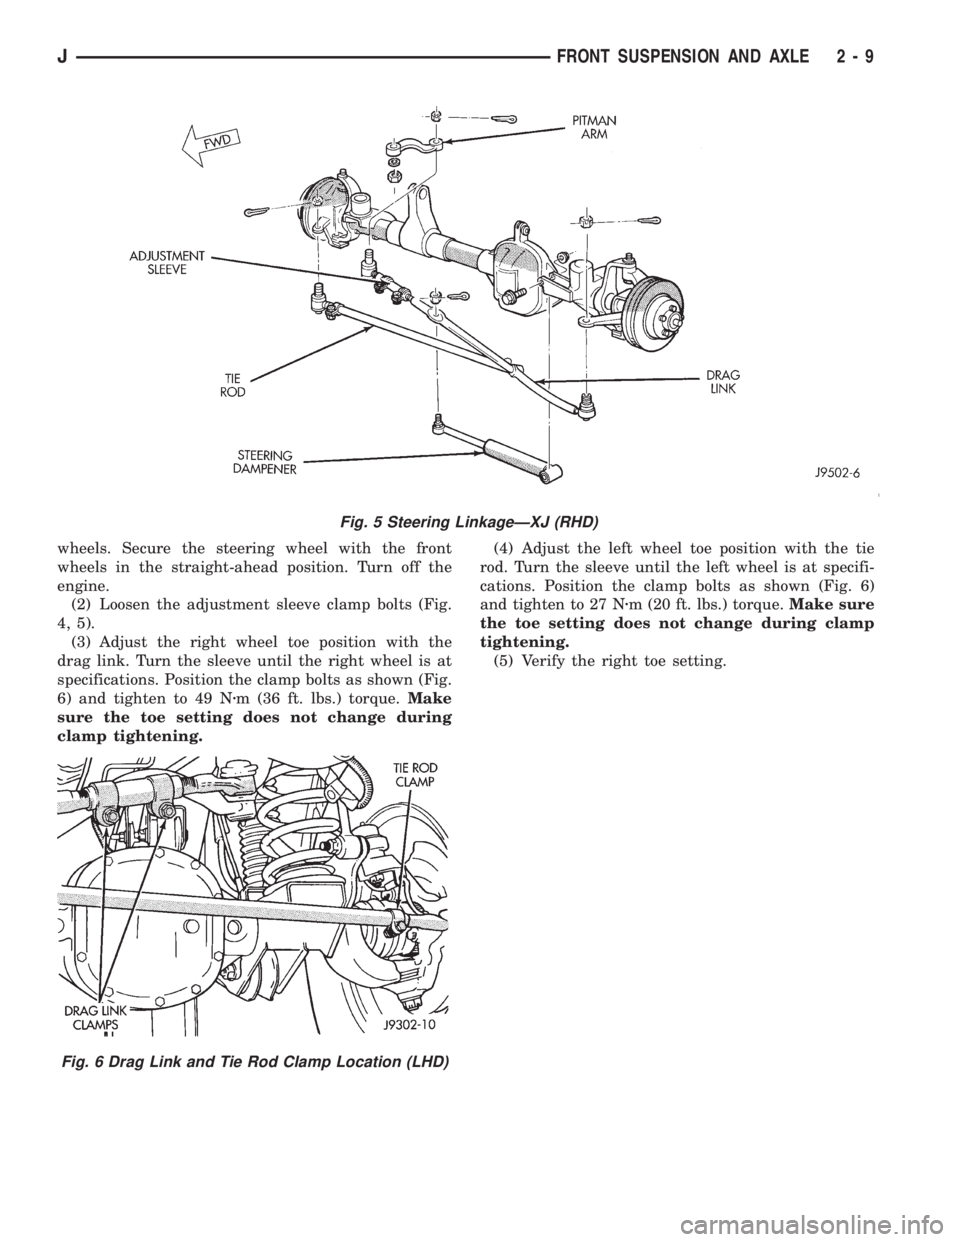
(2) Loosen the adjustment sleeve clamp bolts (Fig.
4, 5).
(3) Adjust the right wheel toe position with the
drag link. Turn the sleeve until the right wheel is at
specifications. Position the clamp bolts as shown (Fig.
6) and tighten to 49 Nzm (36 ft. lbs.) torque.Make
sure the toe setting does not change during
clamp tightening.(4) Adjust the left wheel toe position with the tie
rod. Turn the sleeve until the left wheel is at specifi-
cations. Position the clamp bolts as shown (Fig. 6)
and tighten to 27 Nzm (20 ft. lbs.) torque.Make sure
the toe setting does not change during clamp
tightening.
(5) Verify the right toe setting.
Fig. 5 Steering LinkageÐXJ (RHD)
Fig. 6 Drag Link and Tie Rod Clamp Location (LHD)
JFRONT SUSPENSION AND AXLE 2 - 9
Page 62 of 2158
TOE POSITIONÐYJ VEHICLES
The wheel toe position should be the final front
wheel alignment adjustment. In all instances follow
the equipment manufacturer's recommended proce-
dure.
(1) Start the engine if equipped with power steer-
ing. Turn wheels both ways before straightening the
wheels. Secure the steering wheel with the front
wheels in the straight-ahead position. Turn off the
engine.
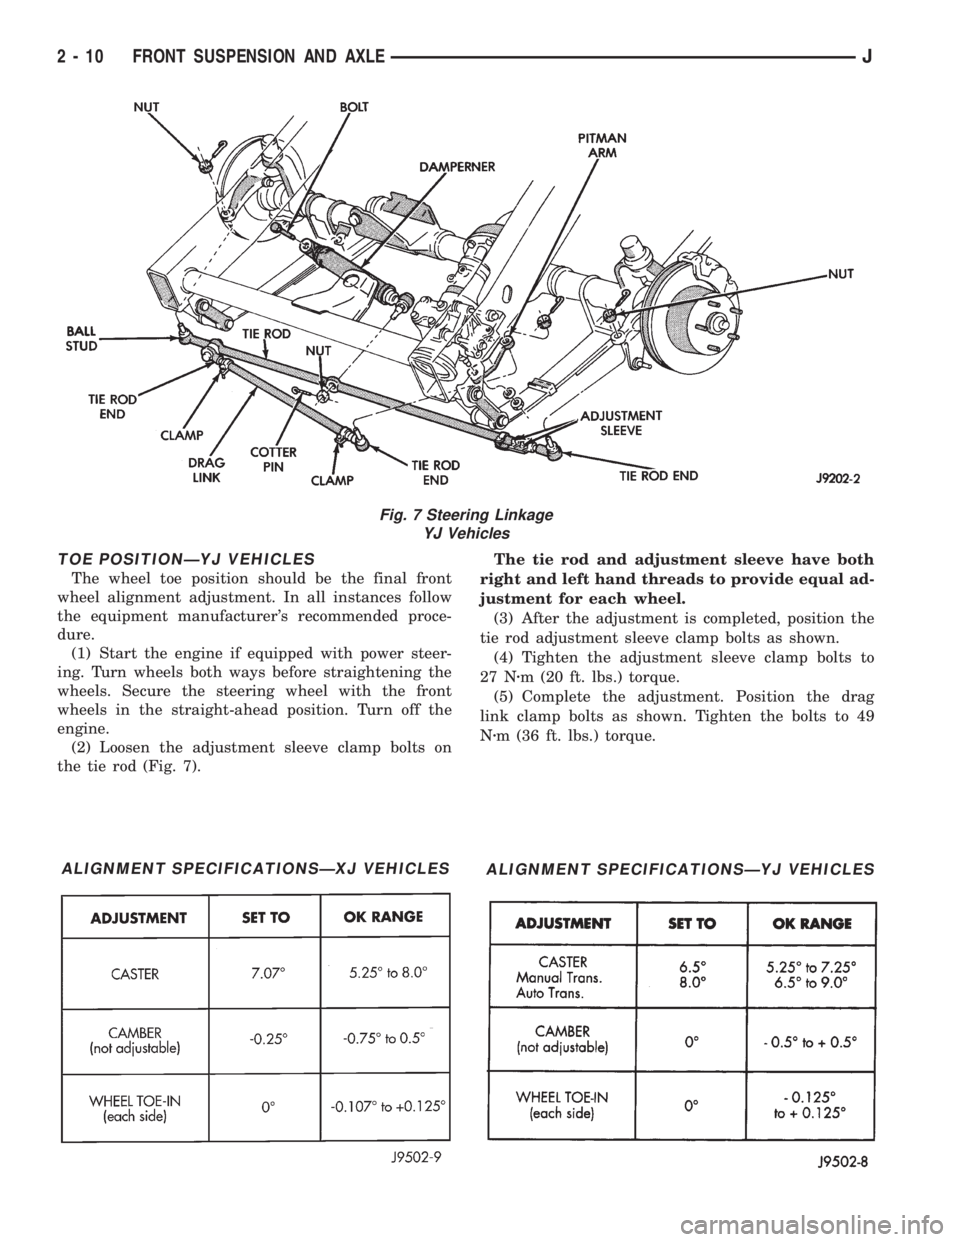
(2) Loosen the adjustment sleeve clamp bolts on
the tie rod (Fig. 7).The tie rod and adjustment sleeve have both
right and left hand threads to provide equal ad-
justment for each wheel.
(3) After the adjustment is completed, position the
tie rod adjustment sleeve clamp bolts as shown.
(4) Tighten the adjustment sleeve clamp bolts to
27 Nzm (20 ft. lbs.) torque.
(5) Complete the adjustment. Position the drag
link clamp bolts as shown. Tighten the bolts to 49
Nzm (36 ft. lbs.) torque.
Fig. 7 Steering Linkage
YJ Vehicles
ALIGNMENT SPECIFICATIONSÐXJ VEHICLESALIGNMENT SPECIFICATIONSÐYJ VEHICLES
2 - 10 FRONT SUSPENSION AND AXLEJ
Page 63 of 2158
XJ FRONT SUSPENSION
INDEX
page page
Axle Bushing Replacement.................. 12
Coil Spring.............................. 14
Lower Suspension Arm..................... 13
Service Information........................ 11
Shock Absorber.......................... 13Spring and Shock Diagnosis................. 13
Stabilizer Bar............................ 11
Track Bar............................... 11
Upper Suspension Arm..................... 12
SERVICE INFORMATION
Periodic lubrication of the steering system and sus-
pension components is required. Refer to Group 0,
Lubrication And Maintenance for the service inter-
val.
CAUTION: Suspension components with rubber
bushings should be tightened with the vehicle at
normal height. It is important to have the springs
supporting the weight of the vehicle when the fas-
teners are torqued. If springs are not at their normal
ride position, vehicle ride comfort could be affected
and premature bushing wear may occur. Rubber
bushings must never be lubricated.
TRACK BAR
REMOVAL
(1) Raise and support the vehicle.
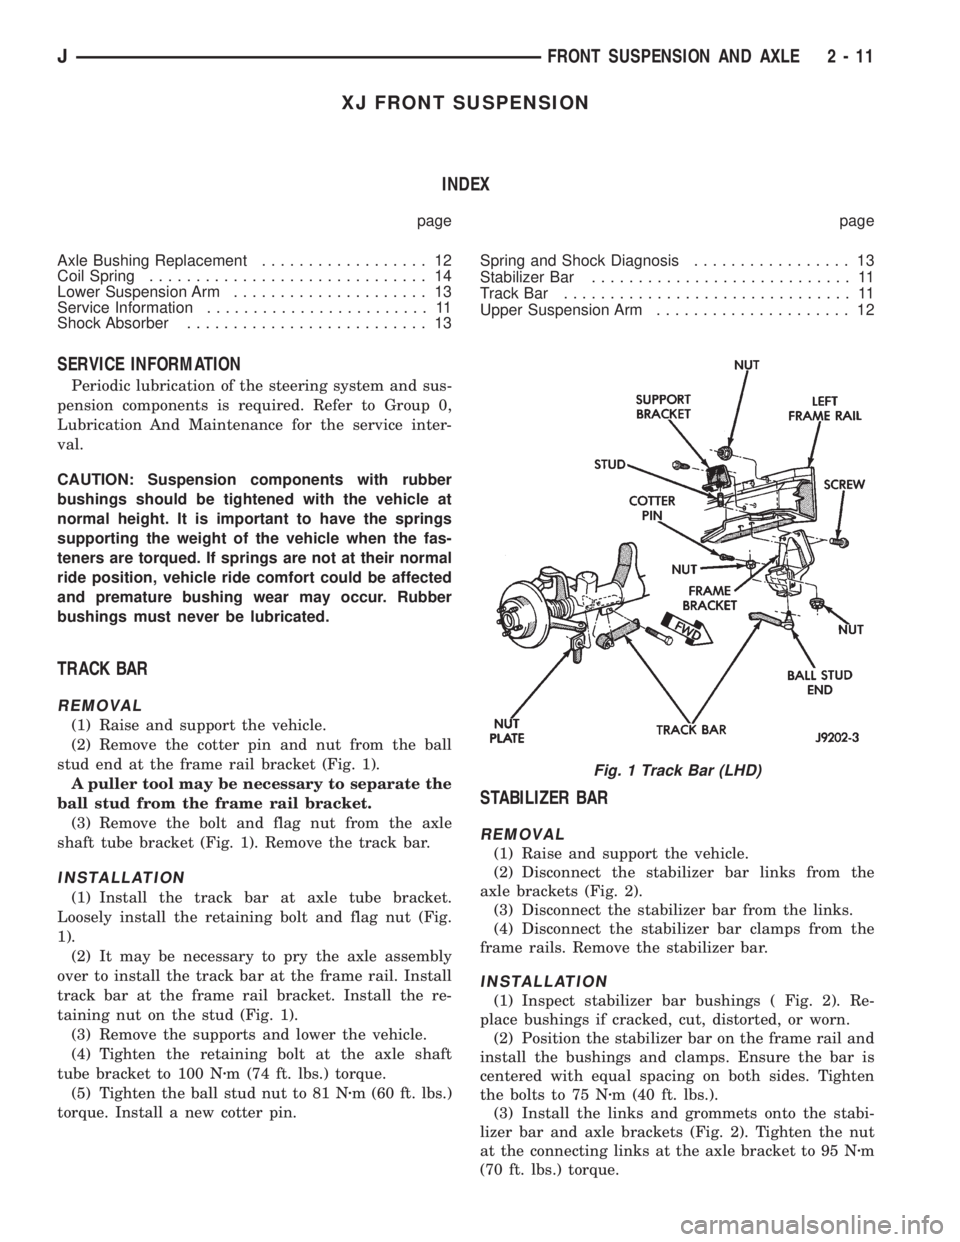
(2) Remove the cotter pin and nut from the ball
stud end at the frame rail bracket (Fig. 1).
A puller tool may be necessary to separate the
ball stud from the frame rail bracket.
(3) Remove the bolt and flag nut from the axle
shaft tube bracket (Fig. 1). Remove the track bar.
INSTALLATION
(1) Install the track bar at axle tube bracket.
Loosely install the retaining bolt and flag nut (Fig.
1).
(2) It may be necessary to pry the axle assembly
over to install the track bar at the frame rail. Install
track bar at the frame rail bracket. Install the re-
taining nut on the stud (Fig. 1).
(3) Remove the supports and lower the vehicle.
(4) Tighten the retaining bolt at the axle shaft
tube bracket to 100 Nzm (74 ft. lbs.) torque.
(5) Tighten the ball stud nut to 81 Nzm (60 ft. lbs.)
torque. Install a new cotter pin.
STABILIZER BAR
REMOVAL
(1) Raise and support the vehicle.
(2) Disconnect the stabilizer bar links from the
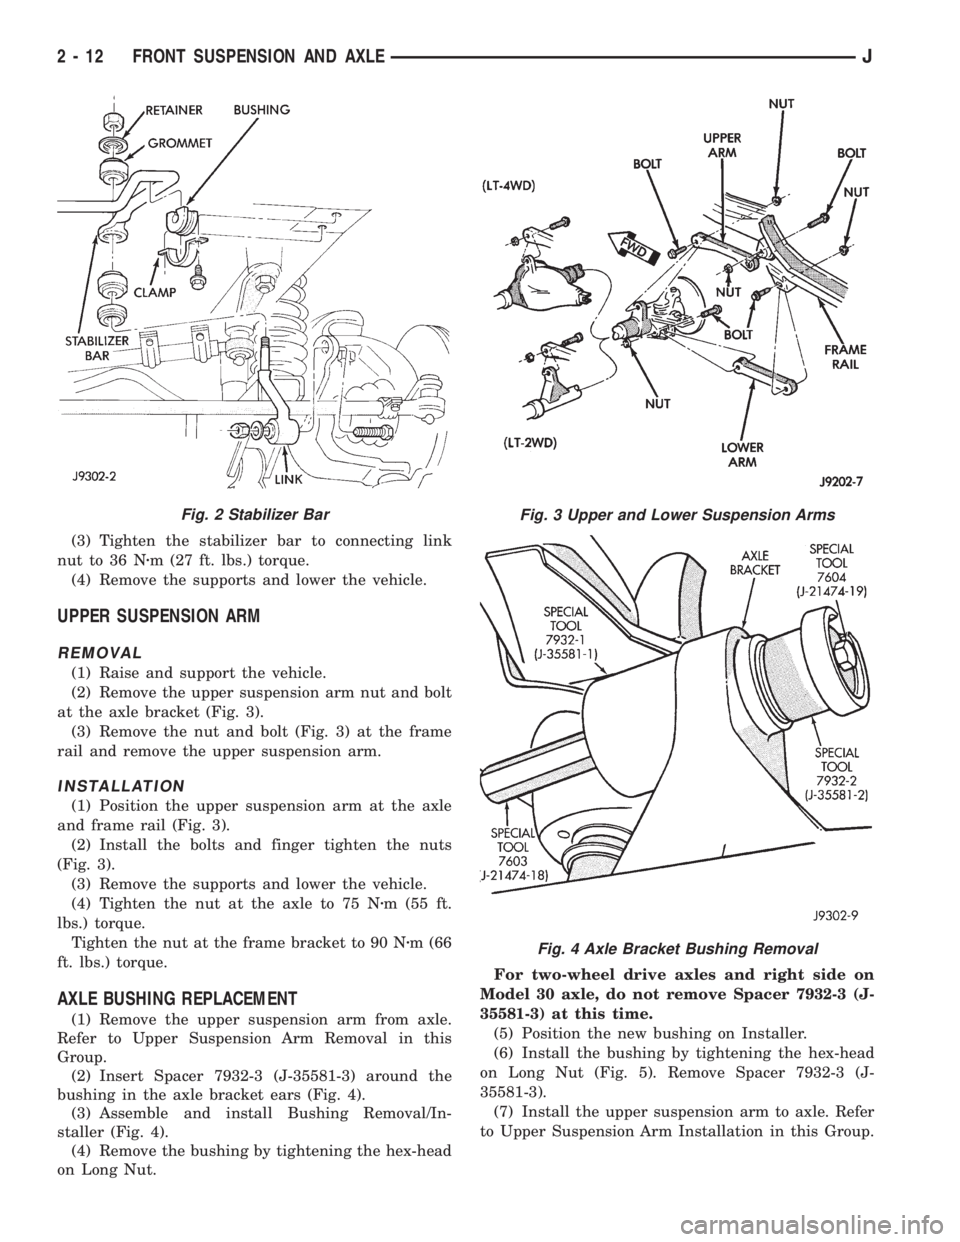
axle brackets (Fig. 2).
(3) Disconnect the stabilizer bar from the links.
(4) Disconnect the stabilizer bar clamps from the
frame rails. Remove the stabilizer bar.
INSTALLATION
(1) Inspect stabilizer bar bushings ( Fig. 2). Re-
place bushings if cracked, cut, distorted, or worn.
(2) Position the stabilizer bar on the frame rail and
install the bushings and clamps. Ensure the bar is
centered with equal spacing on both sides. Tighten
the bolts to 75 Nzm (40 ft. lbs.).
(3) Install the links and grommets onto the stabi-
lizer bar and axle brackets (Fig. 2). Tighten the nut
at the connecting links at the axle bracket to 95 Nzm
(70 ft. lbs.) torque.
Fig. 1 Track Bar (LHD)
JFRONT SUSPENSION AND AXLE 2 - 11
Page 64 of 2158
(3) Tighten the stabilizer bar to connecting link
nut to 36 Nzm (27 ft. lbs.) torque.
(4) Remove the supports and lower the vehicle.
UPPER SUSPENSION ARM
REMOVAL
(1) Raise and support the vehicle.
(2) Remove the upper suspension arm nut and bolt
at the axle bracket (Fig. 3).
(3) Remove the nut and bolt (Fig. 3) at the frame
rail and remove the upper suspension arm.
INSTALLATION
(1) Position the upper suspension arm at the axle
and frame rail (Fig. 3).
(2) Install the bolts and finger tighten the nuts
(Fig. 3).
(3) Remove the supports and lower the vehicle.
(4) Tighten the nut at the axle to 75 Nzm (55 ft.
lbs.) torque.
Tighten the nut at the frame bracket to 90 Nzm (66
ft. lbs.) torque.
AXLE BUSHING REPLACEMENT
(1) Remove the upper suspension arm from axle.
Refer to Upper Suspension Arm Removal in this
Group.
(2) Insert Spacer 7932-3 (J-35581-3) around the
bushing in the axle bracket ears (Fig. 4).
(3) Assemble and install Bushing Removal/In-
staller (Fig. 4).
(4) Remove the bushing by tightening the hex-head
on Long Nut.For two-wheel drive axles and right side on
Model 30 axle, do not remove Spacer 7932-3 (J-
35581-3) at this time.
(5) Position the new bushing on Installer.
(6) Install the bushing by tightening the hex-head
on Long Nut (Fig. 5). Remove Spacer 7932-3 (J-
35581-3).
(7) Install the upper suspension arm to axle. Refer
to Upper Suspension Arm Installation in this Group.
Fig. 2 Stabilizer BarFig. 3 Upper and Lower Suspension Arms
Fig. 4 Axle Bracket Bushing Removal
2 - 12 FRONT SUSPENSION AND AXLEJ
Page 65 of 2158
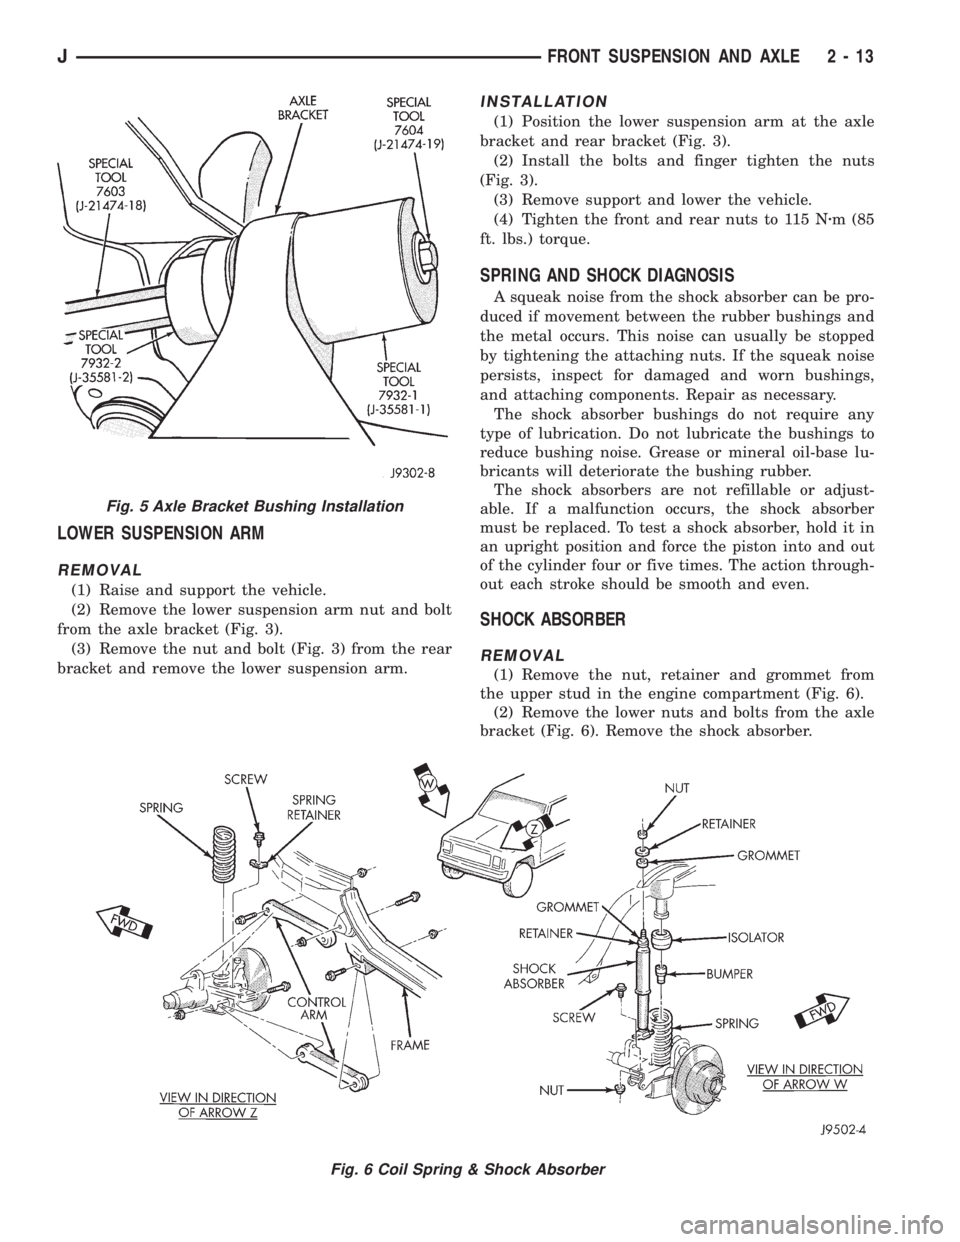
LOWER SUSPENSION ARM
REMOVAL
(1) Raise and support the vehicle.
(2) Remove the lower suspension arm nut and bolt
from the axle bracket (Fig. 3).
(3) Remove the nut and bolt (Fig. 3) from the rear
bracket and remove the lower suspension arm.
INSTALLATION
(1) Position the lower suspension arm at the axle
bracket and rear bracket (Fig. 3).
(2) Install the bolts and finger tighten the nuts
(Fig. 3).
(3) Remove support and lower the vehicle.
(4) Tighten the front and rear nuts to 115 Nzm (85
ft. lbs.) torque.
SPRING AND SHOCK DIAGNOSIS
A squeak noise from the shock absorber can be pro-
duced if movement between the rubber bushings and
the metal occurs. This noise can usually be stopped
by tightening the attaching nuts. If the squeak noise
persists, inspect for damaged and worn bushings,
and attaching components. Repair as necessary.
The shock absorber bushings do not require any
type of lubrication. Do not lubricate the bushings to
reduce bushing noise. Grease or mineral oil-base lu-
bricants will deteriorate the bushing rubber.
The shock absorbers are not refillable or adjust-
able. If a malfunction occurs, the shock absorber
must be replaced. To test a shock absorber, hold it in
an upright position and force the piston into and out
of the cylinder four or five times. The action through-
out each stroke should be smooth and even.
SHOCK ABSORBER
REMOVAL
(1) Remove the nut, retainer and grommet from
the upper stud in the engine compartment (Fig. 6).
(2) Remove the lower nuts and bolts from the axle
bracket (Fig. 6). Remove the shock absorber.
Fig. 6 Coil Spring & Shock Absorber
Fig. 5 Axle Bracket Bushing Installation
JFRONT SUSPENSION AND AXLE 2 - 13
Page 66 of 2158
INSTALLATION
(1) Position the lower retainer and grommet on the
upper stud. Insert the shock absorber through the
shock tower hole.
(2) Install the lower bolts and nuts. Tighten nuts
to 23 Nzm (17 ft. lbs.) torque.
(3) Install the upper grommet and retainer on the
stud in the engine compartment. Install the nut and
tighten to 10 Nzm (8 ft. lbs.) torque.
COIL SPRING
REMOVAL
(1) Raise and support the vehicle. Position a hy-
draulic jack under the axle to support it.
(2) Remove the wheel if necessary.
(3) Mark and disconnect the front propeller shaft
from the axle.
(4) Disconnect the lower suspension arms from the
axle (Fig. 6).
(5) Disconnect the stabilizer bar link and shock ab-
sorber from the axle.
(6) Disconnect the track bar from the frame rail
bracket.(7) Disconnect the drag link from the pitman arm.
(8) Lower the axle until the spring is free from the
upper mount. Remove the coil spring clip (Fig. 6) and
remove the spring.
(9) Pull jounce bumper out of mount.
INSTALLATION
(1) Install jounce bumper into mount.
(2) Position the coil spring on the axle pad. Install
the spring clip and bolt (Fig. 6). Tighten bolt to 21
Nzm (16 ft. lbs.) torque.
(3) Raise the axle into position until the spring
seats in the upper mount.
(4) Connect the stabilizer bar links and shock ab-
sorbers to the axle bracket. Connect the track bar to
the frame rail bracket.
(5) Install the lower suspension arms to the axle.
DO NOT TIGHTEN AT THIS TIME.
(6) Install the front propeller shaft to the axle.
(7) Remove the supports and lower the vehicle.
(8) Tighten lower suspension arms nuts to 115 Nzm
(85 ft. lbs.) torque.
2 - 14 FRONT SUSPENSION AND AXLEJ
Page 67 of 2158
YJ FRONT SUSPENSION
INDEX
page page
Leaf Spring.............................. 16
Leaf Spring Eye Bushing Replacement......... 17
Service Information........................ 15
Shock Absorber.......................... 16Spring and Shock Diagnosis................. 15
Stabilizer Bar............................ 15
Track Bar............................... 15
SERVICE INFORMATION
Periodic lubrication of the steering system and sus-
pension components is required. Refer to Group 0,
Lubrication And Maintenance for the service inter-
val.
CAUTION: Suspension components with rubber
bushings should be tightened with the vehicle at
normal height. It is important to have the springs
supporting the weight of the vehicle when the fas-
teners are torqued. If springs are not at their normal
ride position, vehicle ride comfort could be affected
and premature bushing wear may occur. Rubber
bushings must never be lubricated.
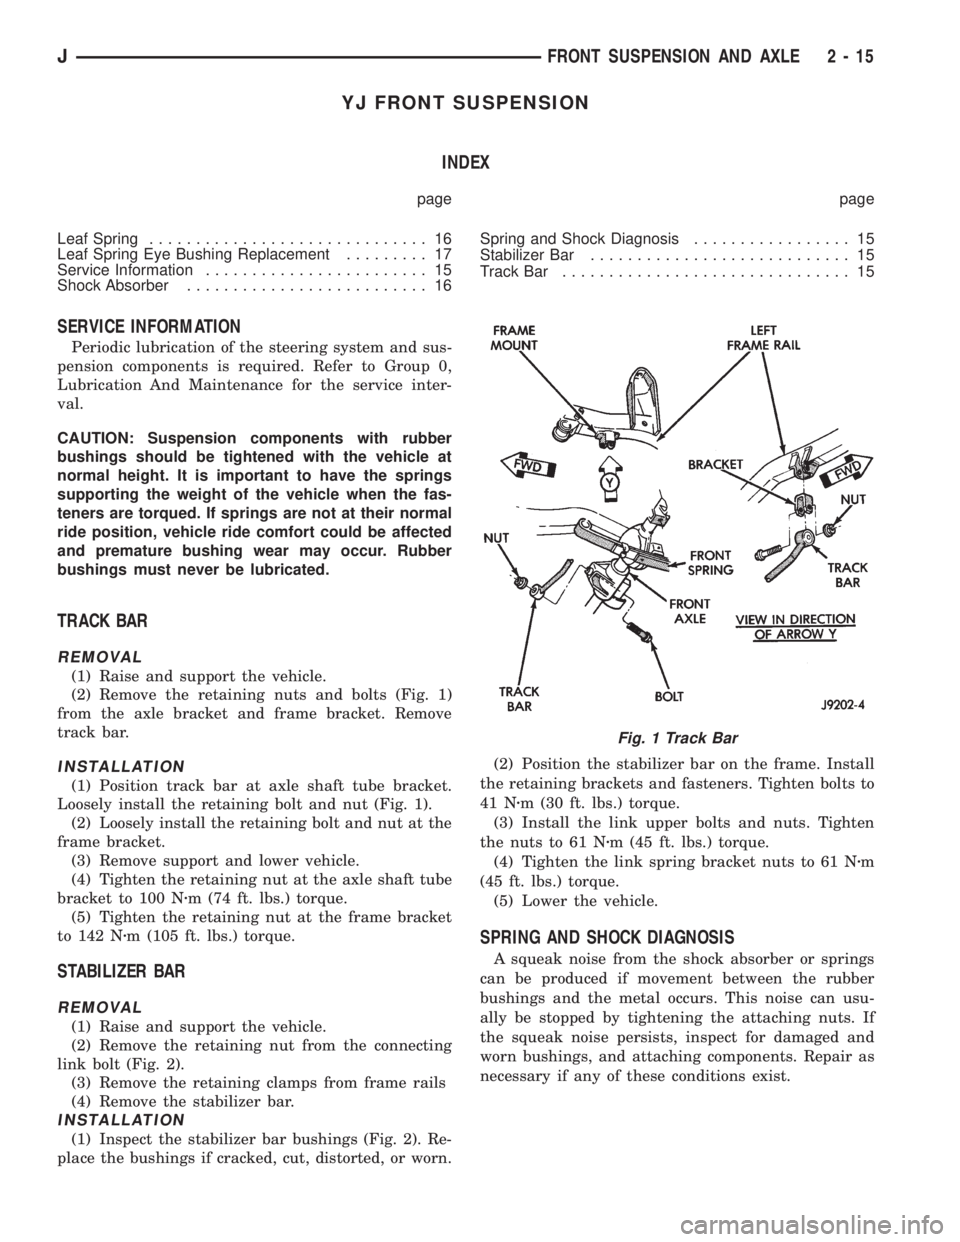
TRACK BAR
REMOVAL
(1) Raise and support the vehicle.
(2) Remove the retaining nuts and bolts (Fig. 1)
from the axle bracket and frame bracket. Remove
track bar.
INSTALLATION
(1) Position track bar at axle shaft tube bracket.
Loosely install the retaining bolt and nut (Fig. 1).
(2) Loosely install the retaining bolt and nut at the
frame bracket.
(3) Remove support and lower vehicle.
(4) Tighten the retaining nut at the axle shaft tube
bracket to 100 Nzm (74 ft. lbs.) torque.
(5) Tighten the retaining nut at the frame bracket
to 142 Nzm (105 ft. lbs.) torque.
STABILIZER BAR
REMOVAL
(1) Raise and support the vehicle.
(2) Remove the retaining nut from the connecting
link bolt (Fig. 2).
(3) Remove the retaining clamps from frame rails
(4) Remove the stabilizer bar.
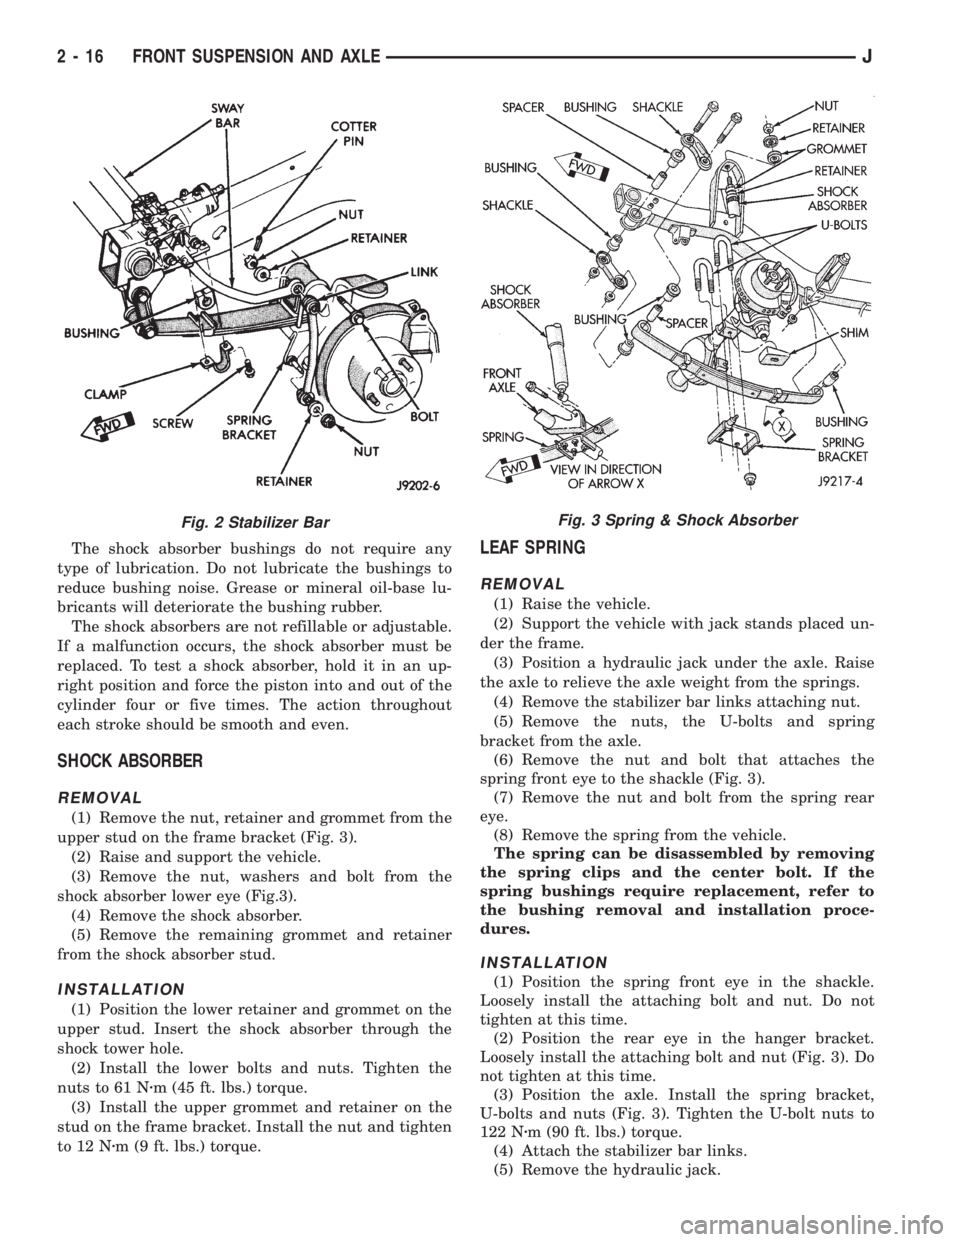
INSTALLATION
(1) Inspect the stabilizer bar bushings (Fig. 2). Re-
place the bushings if cracked, cut, distorted, or worn.(2) Position the stabilizer bar on the frame. Install
the retaining brackets and fasteners. Tighten bolts to
41 Nzm (30 ft. lbs.) torque.
(3) Install the link upper bolts and nuts. Tighten
the nuts to 61 Nzm (45 ft. lbs.) torque.
(4) Tighten the link spring bracket nuts to 61 Nzm
(45 ft. lbs.) torque.
(5) Lower the vehicle.
SPRING AND SHOCK DIAGNOSIS
A squeak noise from the shock absorber or springs
can be produced if movement between the rubber
bushings and the metal occurs. This noise can usu-
ally be stopped by tightening the attaching nuts. If
the squeak noise persists, inspect for damaged and
worn bushings, and attaching components. Repair as
necessary if any of these conditions exist.
Fig. 1 Track Bar
JFRONT SUSPENSION AND AXLE 2 - 15
Page 68 of 2158
The shock absorber bushings do not require any
type of lubrication. Do not lubricate the bushings to
reduce bushing noise. Grease or mineral oil-base lu-
bricants will deteriorate the bushing rubber.
The shock absorbers are not refillable or adjustable.
If a malfunction occurs, the shock absorber must be
replaced. To test a shock absorber, hold it in an up-
right position and force the piston into and out of the
cylinder four or five times. The action throughout
each stroke should be smooth and even.
SHOCK ABSORBER
REMOVAL
(1) Remove the nut, retainer and grommet from the
upper stud on the frame bracket (Fig. 3).
(2) Raise and support the vehicle.
(3) Remove the nut, washers and bolt from the
shock absorber lower eye (Fig.3).
(4) Remove the shock absorber.
(5) Remove the remaining grommet and retainer
from the shock absorber stud.
INSTALLATION
(1) Position the lower retainer and grommet on the
upper stud. Insert the shock absorber through the
shock tower hole.
(2) Install the lower bolts and nuts. Tighten the
nuts to 61 Nzm (45 ft. lbs.) torque.
(3) Install the upper grommet and retainer on the
stud on the frame bracket. Install the nut and tighten
to 12 Nzm (9 ft. lbs.) torque.
LEAF SPRING
REMOVAL
(1) Raise the vehicle.
(2) Support the vehicle with jack stands placed un-
der the frame.
(3) Position a hydraulic jack under the axle. Raise
the axle to relieve the axle weight from the springs.
(4) Remove the stabilizer bar links attaching nut.
(5) Remove the nuts, the U-bolts and spring
bracket from the axle.
(6) Remove the nut and bolt that attaches the
spring front eye to the shackle (Fig. 3).
(7) Remove the nut and bolt from the spring rear
eye.
(8) Remove the spring from the vehicle.
The spring can be disassembled by removing
the spring clips and the center bolt. If the
spring bushings require replacement, refer to
the bushing removal and installation proce-
dures.
INSTALLATION
(1) Position the spring front eye in the shackle.
Loosely install the attaching bolt and nut. Do not
tighten at this time.
(2) Position the rear eye in the hanger bracket.
Loosely install the attaching bolt and nut (Fig. 3). Do
not tighten at this time.
(3) Position the axle. Install the spring bracket,
U-bolts and nuts (Fig. 3). Tighten the U-bolt nuts to
122 Nzm (90 ft. lbs.) torque.
(4) Attach the stabilizer bar links.
(5) Remove the hydraulic jack.
Fig. 2 Stabilizer BarFig. 3 Spring & Shock Absorber
2 - 16 FRONT SUSPENSION AND AXLEJ
Page 69 of 2158
(6) Remove the support stands and lower the vehi-
cle.
(7) Tighten the front shackle plate nut (Fig. 3) to
135 Nzm (100 ft. lbs.) torque.
(8) Tighten the rear eye bracket nut to 142 Nzm
(105 ft. lbs.) torque.
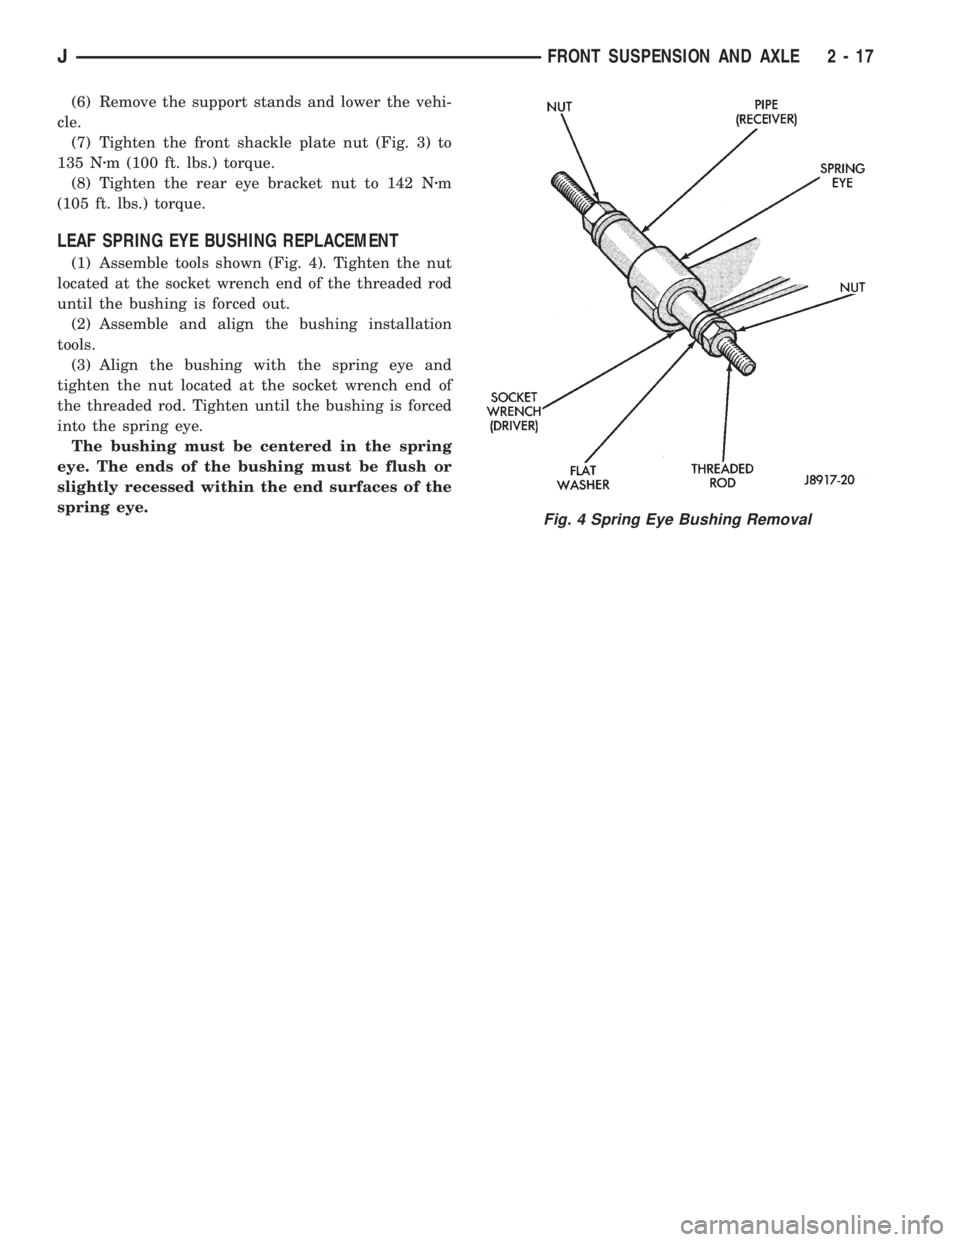
LEAF SPRING EYE BUSHING REPLACEMENT
(1) Assemble tools shown (Fig. 4). Tighten the nut
located at the socket wrench end of the threaded rod
until the bushing is forced out.
(2) Assemble and align the bushing installation
tools.
(3) Align the bushing with the spring eye and
tighten the nut located at the socket wrench end of
the threaded rod. Tighten until the bushing is forced
into the spring eye.
The bushing must be centered in the spring
eye. The ends of the bushing must be flush or
slightly recessed within the end surfaces of the
spring eye.
Fig. 4 Spring Eye Bushing Removal
JFRONT SUSPENSION AND AXLE 2 - 17
Page 70 of 2158
AXLE NOISE/VIBRATION DIAGNOSIS
INDEX
page page
Driveline Snap........................... 19
Gear and Bearing Noise.................... 18
General Information....................... 18Low Speed Knock......................... 19
Vibration................................ 19
GENERAL INFORMATION
Axle bearing problem conditions are usually caused
by:
²Insufficient or incorrect lubricant
²Foreign matter/water contamination
²Incorrect bearing preload torque adjustment
²Incorrect backlash (to tight)
When serviced, the bearings must be cleaned thor-
oughly. They should be dried with lint-free shop tow-
els.Never dry bearings with compressed air.
This will overheat them and brinell the bearing
surfaces. This will result in noisy operation af-
ter repair.
Axle gear problem conditions are usually the result
of:
²Insufficient lubrication
²Incorrect or contaminated lubricant
²Overloading (excessive engine torque) or exceeding
vehicle weight capacity
²Incorrect clearance or backlash adjustment
Insufficient lubrication is usually the result of a
housing cover leak. It can also be from worn axle
shaft or pinion gear seals. Check for cracks or porous
areas in the housing or tubes.
Using the wrong lubricant will cause overheating
and gear failure. Gear tooth cracking and bearing
spalling are indicators of this.
Axle component breakage is most often the result
of:
²Severe overloading
²Insufficient lubricant
²Incorrect lubricant
²Improperly tightened components
Overloading occurs when towing heavier than rec-
ommended loads. Component breakage can occur
when the wheels are spun excessively. Incorrect lu-
bricant quantity contributes to breakage. Loose dif-
ferential components can also cause breakage.
Incorrect bearing preload or gear backlash will not
result in component breakage. Mis-adjustment will
produce enough noise to cause service repair before a
failure occurs. If a mis-adjustment condition is not
corrected, component failure can result.
Excessive bearing preload may not be noisy. This
condition will cause high temperature which can re-
sult in bearing failure.
GEAR AND BEARING NOISE
GEAR NOISE
Axle gear noise can be caused by insufficient lubri-
cant. Incorrect backlash, tooth contact, or worn/dam-
aged gears can cause noise.
Gear noise usually happens at a specific speed
range. The range is 30 to 40 mph, or above 50 mph.
The noise can also occur during a specific type of
driving condition. These conditions are acceleration,
deceleration, coast, or constant load.
When road testing, accelerate the vehicle to the
speed range where the noise is the greatest. Shift
out-of-gear and coast through the peak-noise range.
If the noise stops or changes greatly, check for insuf-
ficient lubricant. Incorrect ring gear backlash, or
gear damage can cause noise changes.
Differential side and pinion gears can be checked
by turning the vehicle. They usually do not cause
noise in straight-ahead driving. These gears are
loaded during vehicle turns. If noise does occur dur-
ing vehicle turns, the side or pinion gears could be
worn or damaged. A worn pinion gear mate shaft can
also cause a snapping or a knocking noise.
BEARING NOISE
The axle shaft, differential and pinion gear bear-
ings can all produce noise when worn or damaged.
Bearing noise can be either a whining, or a growling
sound.
Pinion gear bearings have a constant-pitch noise.
This noise changes only with vehicle speed. Pinion
bearing noise will be higher because it rotates at a
faster rate. Drive the vehicle and load the differen-
tial. If bearing noise occurs the pinion rear bearing is
the source of the noise. If the bearing noise is heard
during a coast, front bearing is the source.
Worn, damaged differential bearings usually pro-
duce a low pitch noise. Differential bearing noise is
similar to pinion bearing. The pitch of differential
bearing noise is also constant and varies only with
vehicle speed.
2 - 18 FRONT SUSPENSION AND AXLEJ