KIA AMANTI 2009 Owners Manual
Manufacturer: KIA, Model Year: 2009, Model line: AMANTI, Model: KIA AMANTI 2009Pages: 321, PDF Size: 23.77 MB
Page 291 of 321
741
Maintenance
BULB REPLACEMENT Use only the bulbs of the specifiedwattage.
Headlight bulb replacement ✽
✽ NOTICEAfter heavy, driving rain or washing,
headlight and taillight lenses could
appear frosty. This condition is caused by
the temperature difference between the
lamp inside and outside. This is similar
to the condensation on your windows
inside your vehicle during the rain and
doesn’t indicate a problem with your
vehicle. If the water leaks into the lamp
bulb circuitry, have the vehicle checked
by an Authorized Kia Dealer.
WARNING
- Working on
the lights
Prior to working on the light, firmly
apply the parking brake and ensure
that the ignition switch is turned to
the “LOCK” position to avoid sud-
den movement of the vehicle and
burning your fingers or receiving an
electric shock.
CAUTION
If you don’t have necessary tools,
the correct bulbs and the expertise,consult an Authorized Kia Dealer. In many cases, it is difficult to replacevehicle light bulbs because otherparts of the vehicle must beremoved before you can get the bulb. Especially if you must removethe front bumper to replace the lightbulbs in the front of the vehicle. This may result in damage to thevehicle.
OGH056016
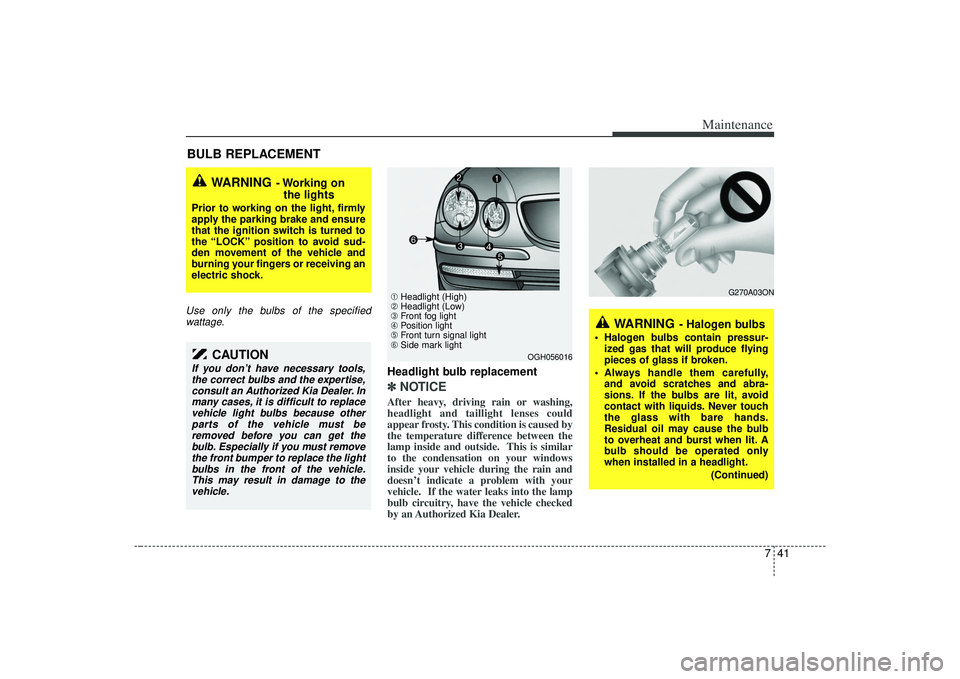
➀ Headlight (High)
➁ Headlight (Low)
➂ Front fog light
➃ Position light
➄ Front turn signal light
\b Side mark light
WARNING
- Halogen bulbs
Halogen bulbs contain pressur-
ized gas that will produce flying
pieces of glass if broken.
Always handle them carefully, and avoid scratches and abra-
sions. If the bulbs are lit, avoid
contact with liquids. Never touch
the glass with bare hands.
Residual oil may cause the bulb
to overheat and burst when lit. A
bulb should be operated only
when installed in a headlight.
(Continued)
G270A03ON
Page 292 of 321
Maintenance42
7
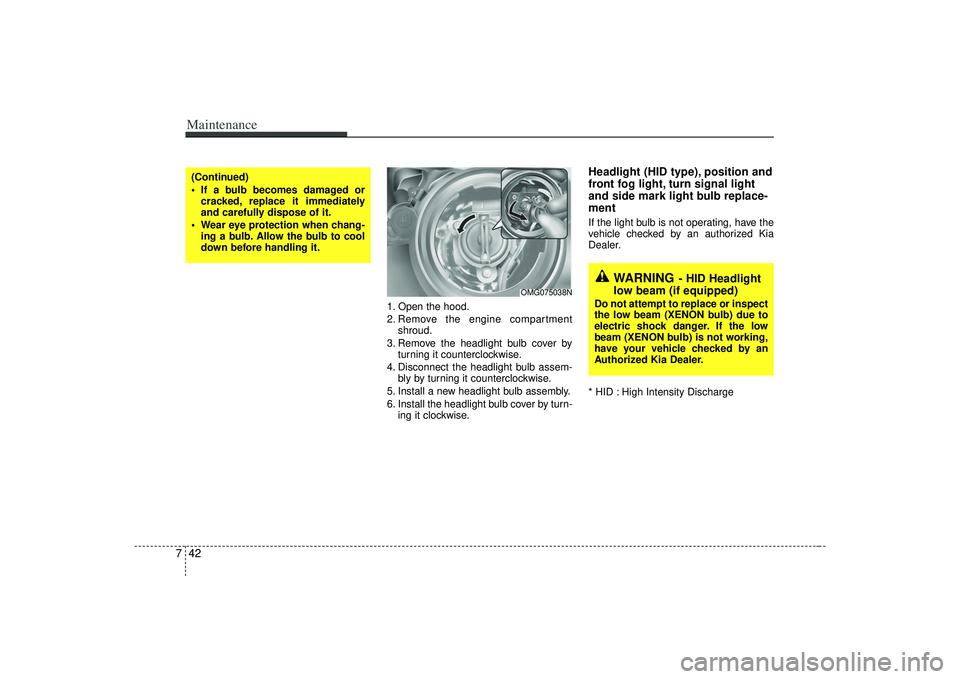
1. Open the hood.
2. Remove the engine compartment
shroud.
3. Remove the headlight bulb cover by turning it counterclockwise.
4. Disconnect the headlight bulb assem- bly by turning it counterclockwise.
5. Install a new headlight bulb assembly.
6. Install the headlight bulb cover by turn- ing it clockwise.
Headlight (HID type), position and
front fog light, turn signal light
and side mark light bulb replace-
mentIf the light bulb is not operating, have the
vehicle checked by an authorized Kia
Dealer.
* HID : High Intensity Discharge
(Continued)
If a bulb becomes damaged orcracked, replace it immediately
and carefully dispose of it.
Wear eye protection when chang- ing a bulb. Allow the bulb to cool
down before handling it.
OMG075038N
WARNING
- HID Headlight
low beam (if equipped)
Do not attempt to replace or inspect
the low beam (XENON bulb) due to
electric shock danger. If the low
beam (XENON bulb) is not working,
have your vehicle checked by an
Authorized Kia Dealer.
Page 293 of 321
743
Maintenance
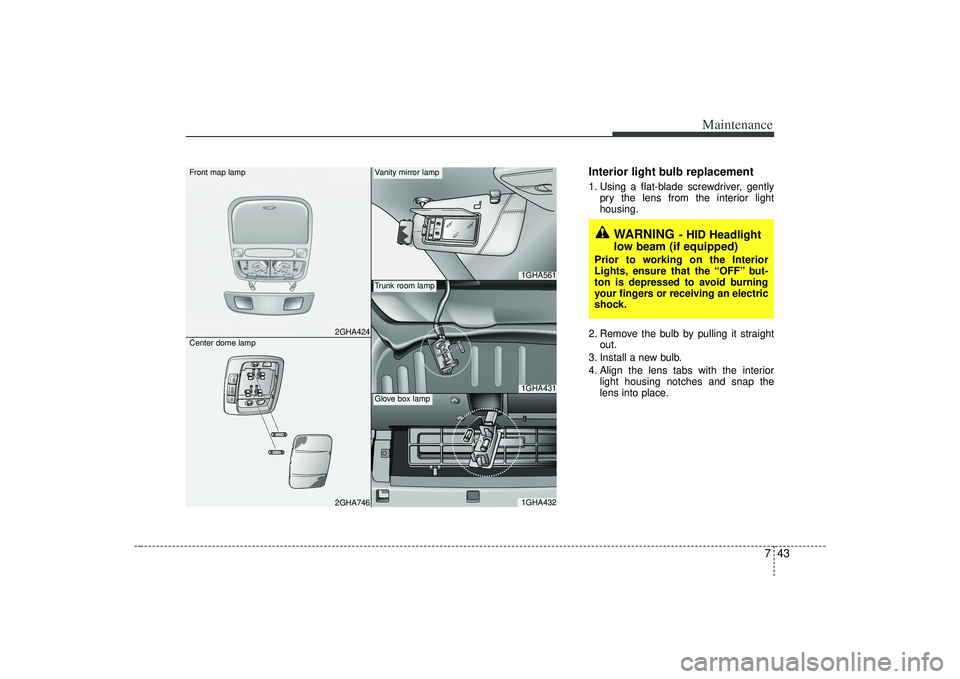
Interior light bulb replacement1. Using a flat-blade screwdriver, gentlypry the lens from the interior light
housing.
2. Remove the bulb by pulling it straight out.
3. Install a new bulb.
4. Align the lens tabs with the interior light housing notches and snap the
lens into place.
2GHA424
OFFDOORON
2GHA746
1GHA5611GHA4311GHA432
Front map lamp
Center dome lamp
Vanity mirror lampTrunk room lampGlove box lamp
WARNING
- HID Headlight
low beam (if equipped)
Prior to working on the Interior
Lights, ensure that the “OFF” but-
ton is depressed to avoid burning
your fingers or receiving an electric
shock.
Page 294 of 321
Maintenance44
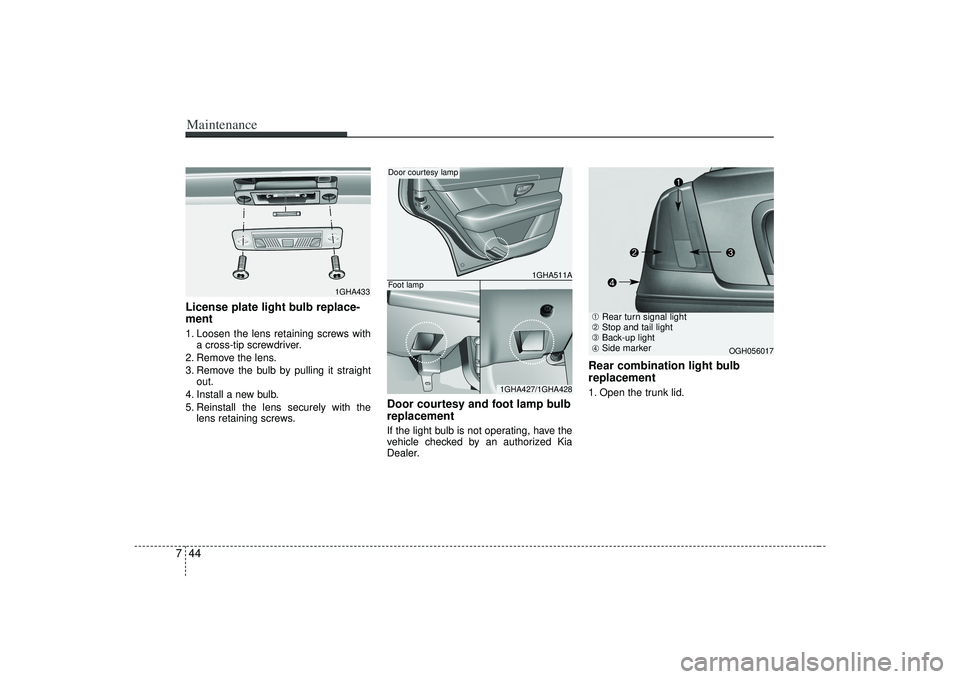
7License plate light bulb replace-
ment 1. Loosen the lens retaining screws with
a cross-tip screwdriver.
2. Remove the lens.
3. Remove the bulb by pulling it straight out.
4. Install a new bulb.
5. Reinstall the lens securely with the lens retaining screws.
Door courtesy and foot lamp bulb
replacementIf the light bulb is not operating, have the
vehicle checked by an authorized Kia
Dealer.
Rear combination light bulb
replacement1. Open the trunk lid.
1GHA433
1GHA511A
1GHA427/1GHA428
Door courtesy lampFoot lamp
➀ Rear turn signal light
➁ Stop and tail light
➂ Back-up light
➃ Side marker
OGH056017
Page 295 of 321
745
Maintenance
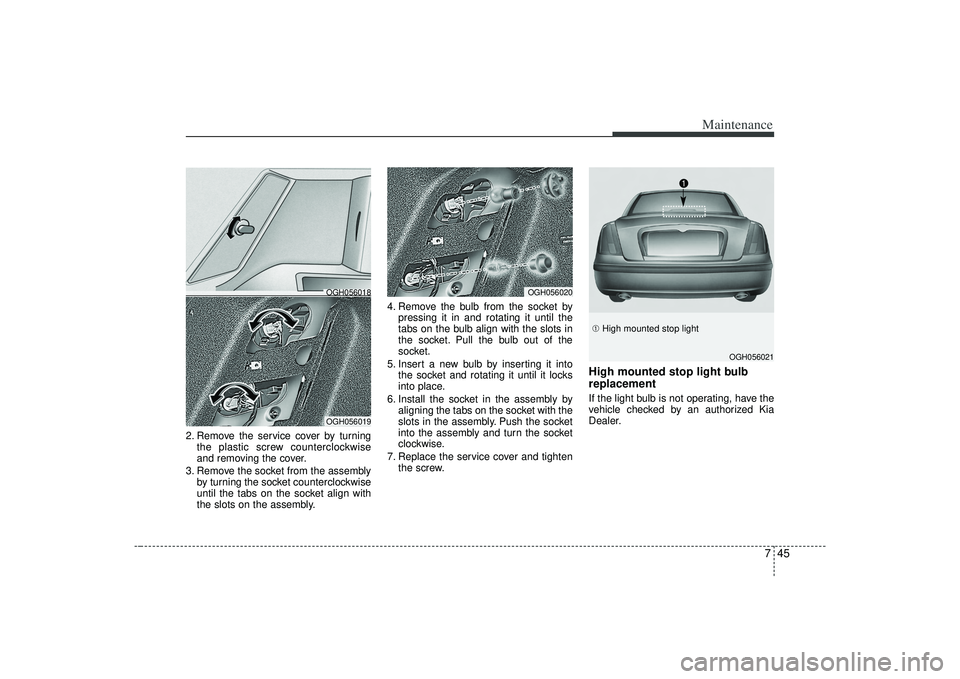
2. Remove the service cover by turningthe plastic screw counterclockwise
and removing the cover.
3. Remove the socket from the assembly by turning the socket counterclockwise
until the tabs on the socket align with
the slots on the assembly. 4. Remove the bulb from the socket by
pressing it in and rotating it until the
tabs on the bulb align with the slots in
the socket. Pull the bulb out of the
socket.
5. Insert a new bulb by inserting it into the socket and rotating it until it locks
into place.
6. Install the socket in the assembly by aligning the tabs on the socket with the
slots in the assembly. Push the socket
into the assembly and turn the socket
clockwise.
7. Replace the service cover and tighten the screw.
High mounted stop light bulb
replacementIf the light bulb is not operating, have the
vehicle checked by an authorized Kia
Dealer.
OGH056020
OGH056019OGH056018
➀ High mounted stop light
OGH056021
Page 296 of 321
Maintenance46
7LUBRICANT SPECIFICATIONS Recommended lubricants To help achieve proper engine and pow-
ertrain performance and durability, use
only lubricants of the proper quality. The
correct lubricants also help promote
engine efficiency that results in improved
fuel economy.
Engine oils labeled Energy Conserving
Oil are now available. Along with other
additional benefits, they contribute to fuel
economy by reducing the amount of fuel
necessary to overcome engine friction.
Often, these improvements are difficult to
measure in everyday driving, but in a
year’s time, they can offer significant cost
and energy savings.
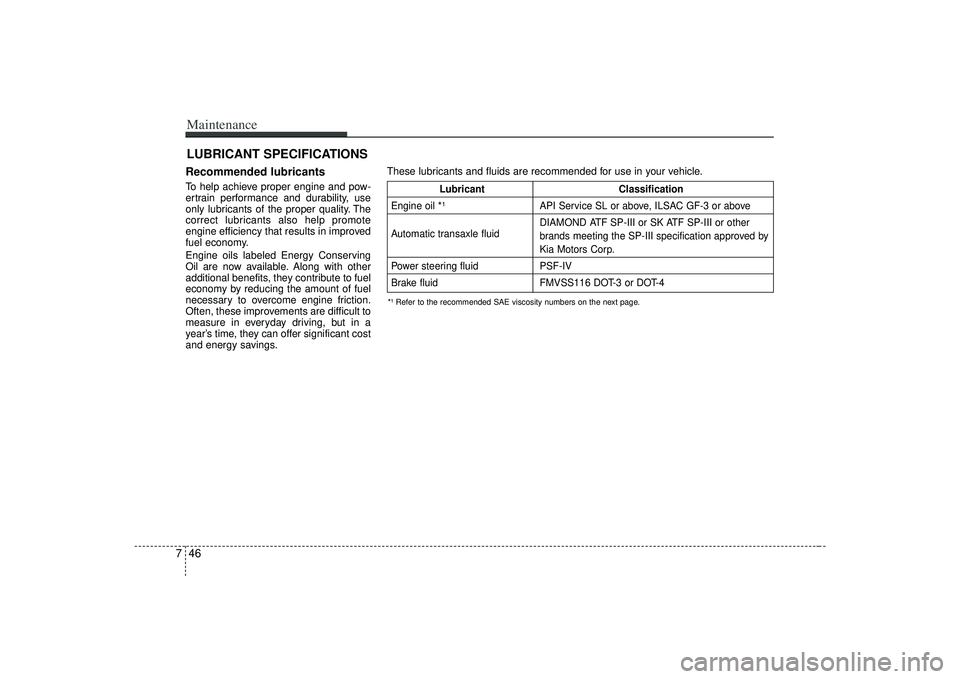
*¹ Refer to the recommended SAE viscosity numbers on the next page.These lubricants and fluids are recommended for use in your vehicle.
Lubricant Classification
Engine oil *¹
API Service SL or above, ILSAC GF-3 or above
Automatic transaxle fluid DIAMOND ATF SP-III or SK ATF SP-III or other
brands meeting the SP-III specification approved by
Kia Motors Corp.
Power steering fluid PSF-IV
Brake fluid FMVSS116 DOT-3 or DOT-4
Page 297 of 321
747
Maintenance
Recommended SAE viscosity
number Engine oil viscosity (thickness) has an
effect on fuel economy and cold weather
operating (starting and oil flow). Lower
viscosity engine oils can provide better
fuel economy and cold weather perform-
ance, however, higher viscosity engine
oils are required for satisfactory lubrica-
tion in hot weather. Using oils of any vis-
cosity other than those recommended
could result in engine damage.
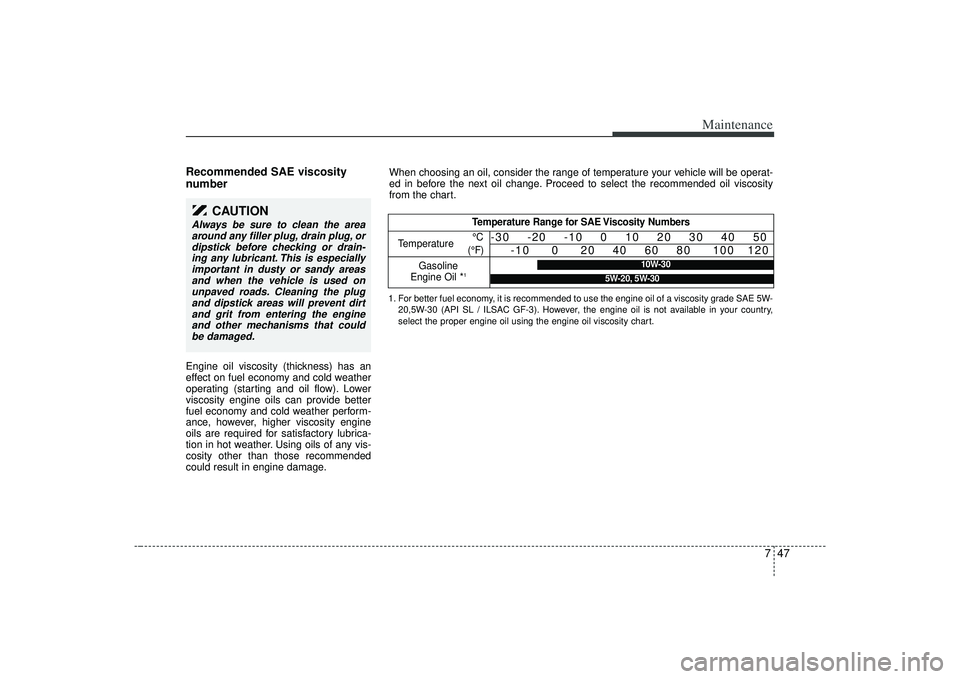
When choosing an oil, consider the range of temperature your vehicle will be operat-
ed in before the next oil change. Proceed to select the recommended oil viscosity
from the chart.
Temperature Range for SAE Viscosity Numbers
TemperatureGasoline
Engine Oil *
1°C
(°F)
-30 -20 -10 0 10 20 30 40 50 -10 0 20 40 60 80 100 120
1. For better fuel economy, it is recommended to use the engine oil of a viscosity grade SAE 5W-
20,5W-30 (API SL / ILSAC GF-3). However, the engine oil is not available in your country,
select the proper engine oil using the engine oil viscosity chart.
10W-30
5W-20, 5W-30
CAUTION
Always be sure to clean the areaaround any filler plug, drain plug, or dipstick before checking or drain-ing any lubricant. This is especiallyimportant in dusty or sandy areasand when the vehicle is used on unpaved roads. Cleaning the plugand dipstick areas will prevent dirt and grit from entering the engineand other mechanisms that couldbe damaged.
Page 298 of 321
Maintenance48
7EXTERIOR CARE Exterior general caution It is very important to follow the label
directions when using any chemical
cleaner or polish. Read all warning and
caution statements that appear on the
label.Finish maintenanceWashing To help protect your vehicle’s finish from
rust and deterioration, wash it thoroughly
and frequently at least once a month with
lukewarm or cold water.
If you use your vehicle for off-road driv-
ing, you should wash it after each off-
road trip. Pay special attention to the
removal of any accumulation of salt, dirt,
mud, and other foreign materials. Make
sure the drain holes in the lower edges of
the doors and rocker panels are kept
clear and clean. Insects, tar, tree sap, bird droppings,
industrial pollution and similar deposits
can damage your vehicle’s finish if not
removed immediately.
Even prompt washing with plain water
may not completely remove all these
deposits. A mild soap, safe for use on
painted surfaces, may be used.
After washing, rinse the vehicle thor-
oughly with lukewarm or cold water. Do
not allow soap to dry on the finish.
CAUTION
Do not use strong soap, chemical
detergents or hot water, and do not wash the vehicle in direct sunlightor when the body of the vehicle is warm.
WARNING
After washing the vehicle, test the
brakes while driving slowly to see if
they have been affected by water. If
braking performance is impaired,
dry the brakes by applying them
lightly while maintaining a slow for-
ward speed.
CAUTION
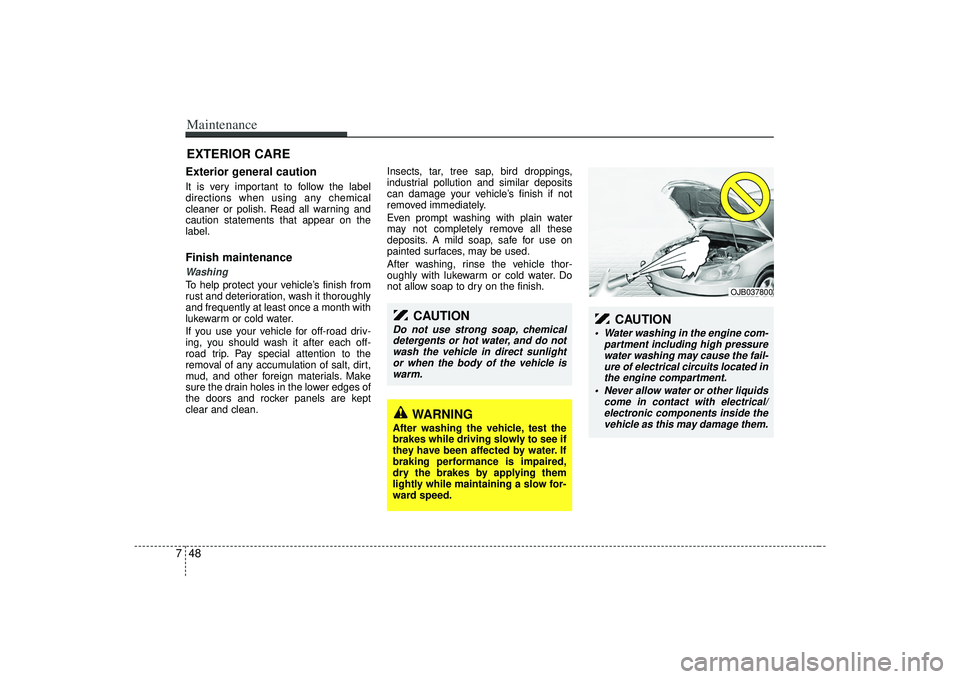
Water washing in the engine com- partment including high pressurewater washing may cause the fail-ure of electrical circuits located in the engine compartment.
Never allow water or other liquids come in contact with electrical/electronic components inside thevehicle as this may damage them.
OJB037800
Page 299 of 321
749
Maintenance
WaxingWax the vehicle when water will no
longer bead on the paint.
Always wash and dry the vehicle before
waxing. Use a good quality liquid or
paste wax, and follow the manufacturer’s
instructions. Wax all metal trim to protect
it and to maintain its luster.Removing oil, tar, and similar materials
with a spot remover will usually strip the
wax from the finish. Be sure to re-wax
these areas even if the rest of the vehicle
does not yet need waxing.✽ ✽NOTICE• Wiping dust or dirt off the body with
a dry cloth will scratch the finish.
• Do not use steel wool, abrasive clean- ers, or strong detergents containing
highly alkaline or caustic agents on
chrome-plated or anodized aluminum
parts. This may result in damage to
the protective coating and cause dis-
coloration or paint deterioration.
Finish damage repair Deep scratches or stone chips in the
painted surface must be repaired
promptly. Exposed metal will quickly rust
and may develop into a major repair
expense.✽ ✽ NOTICEIf your vehicle is damaged and requires
any metal repair or replacement, be sure
the body shop applies anti-corrosion
materials to the parts repaired or
replaced.
Bright-metal maintenance To remove road tar and insects, use a
tar remover, not a scraper or other
sharp object.
To protect the surfaces of bright-metal parts from corrosion, apply a coating of
wax or chrome preservative and rub to
a high luster.
During winter weather or in coastal areas, cover the bright metal parts with
a heavier coating of wax or preserva-
tive. If necessary, coat the parts with
non-corrosive petroleum jelly or other
protective compound.
Page 300 of 321
Maintenance50
7Underbody maintenanceCorrosive materials used for ice and
snow removal and dust control may col-
lect on the underbody. If these materials
are not removed, accelerated rusting can
occur on underbody parts such as the
fuel lines, frame, floor pan and exhaust
system, even though they have been
treated with rust protection.
Thoroughly flush the vehicle underbody
and wheel openings with lukewarm or
cold water once a month, after off-road
driving and at the end of each winter. Pay
special attention to these areas because
it is difficult to see all the mud and dirt. It
will do more harm than good to wet down
the road grime without removing it. The
lower edges of doors, rocker panels, and
frame members have drain holes that
should not be allowed to clog with dirt;
trapped water in these areas can cause
rusting.
Aluminum wheel maintenance The aluminum wheels are coated with a
clear protective finish.
Do not use any abrasive cleaner, pol-
ishing compound, solvent, or wire
brushes on aluminum wheels. They
may scratch or damage the finish.
Use only a mild soap or neutral deter- gent, and rinse thoroughly with water.
Also, be sure to clean the wheels after
driving on salted roads. This helps pre-
vent corrosion.
Avoid washing the wheels with high- speed car wash brushes.
Do not use any acid detergent. It may damage and corrode the aluminum
wheels coated with a clear protective
finish.
WARNING
After washing the vehicle, test the
brakes while driving slowly to see if
they have been affected by water. If
braking performance is impaired,
dry the brakes by applying them
lightly while maintaining a slow for-
ward speed.