KIA Borrego 2010 1.G Owner's Manual
Manufacturer: KIA, Model Year: 2010, Model line: Borrego, Model: KIA Borrego 2010 1.GPages: 461, PDF Size: 12.25 MB
Page 291 of 461
4211
Features of your vehicle
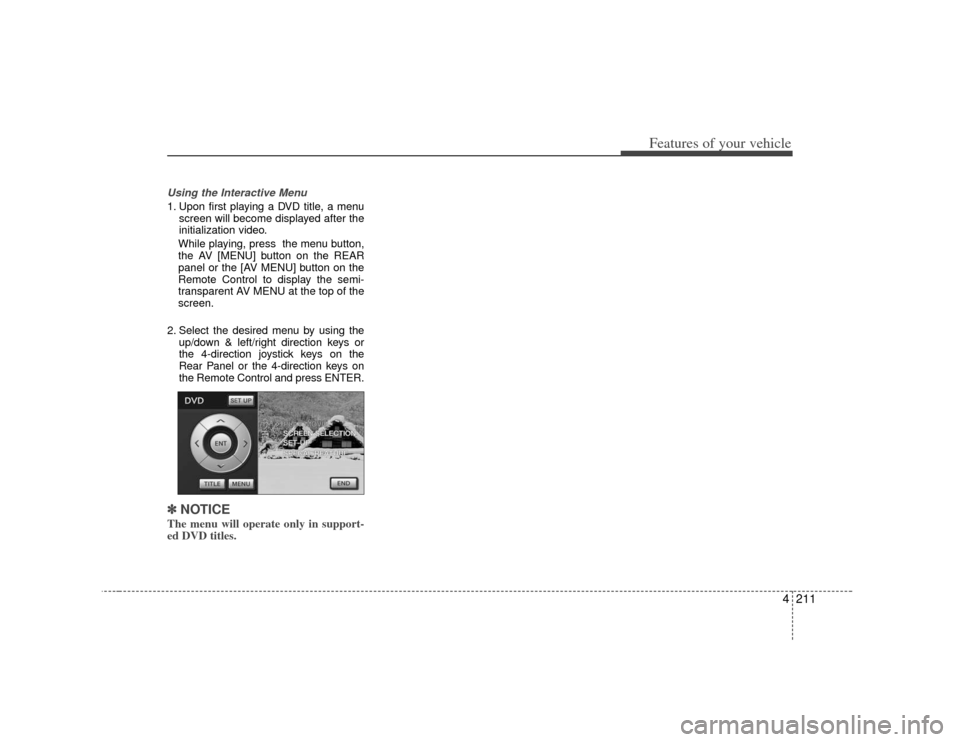
Using the Interactive Menu 1. Upon first playing a DVD title, a menuscreen will become displayed after the
initialization video.
While playing, press the menu button,
the AV [MENU] button on the REAR
panel or the [AV MENU] button on the
Remote Control to display the semi-
transparent AV MENU at the top of the
screen.
2. Select the desired menu by using the up/down & left/right direction keys or
the 4-direction joystick keys on the
Rear Panel or the 4-direction keys on
the Remote Control and press ENTER.✽ ✽NOTICEThe menu will operate only in support-
ed DVD titles.
Page 292 of 461
![KIA Borrego 2010 1.G Owners Manual Features of your vehicle212
4USB modeStarting USB mode by use of Rear
panel 1. Press the [MODE] button on the REAR panel to display the MODE selection
screen.
2. If the key on the joystick located at KIA Borrego 2010 1.G Owners Manual Features of your vehicle212
4USB modeStarting USB mode by use of Rear
panel 1. Press the [MODE] button on the REAR panel to display the MODE selection
screen.
2. If the key on the joystick located at](/img/2/2914/w960_2914-291.png)
Features of your vehicle212
4USB modeStarting USB mode by use of Rear
panel 1. Press the [MODE] button on the REAR panel to display the MODE selection
screen.
2. If the key on the joystick located at the far right-side of the REAR panel is
moved in any direction, the select area
will become displayed on the button of
the most recently operated mode.
3. Select the AUX mode button.
4. Select the MUSIC button on the AUX mode screen.
5. The USB will begin playing.
✽ ✽ NOTICERefer to the MP3 mode section in
Chapter 5 for additional USB related
operational instructions.
iPod
®mode
iPod
®is a trademark of Apple Inc.
Starting iPod mode by use of Rear
panel 1. Press the [MODE] button on the REAR panel to display the MODE selection
screen.
2. If the key on the joystick located at the far right-side of the REAR panel is
moved in any direction, the select area
will become displayed on the button of
the most recently operated mode.
3. Select the AUX mode button.
4. Select the iPod button on the AUX mode screen.
5. The iPod will begin playing.
Page 293 of 461

4213
Features of your vehicle
✽
✽NOTICERefer to the MP3 mode section in
Chapter 5 for additional USB related
operational instructions.
1. Refer to the MP3 mode section in
Chapter 5 for additional iPod related
operational instructions.
2. Some iPod devices may not play if the communication protocol is not sup-
ported by the device. (Supported
iPods : mini, 4G Photo, Nano, 5G).
3. The search and song order on the iPod device may differ with the search and
song order of the AV system.
4. RESET the iPod in the case of errors which occur due to malfunctions on
the iPod device. (Refer to the iPod
manual)
CAUTION
1. In order to operate the iPod with
the AV system buttons, a sepa-rately sold iPod connector cable must be used.❈Please refrain from using the PCcable in the package as the device may not properly operate.
2. When connecting the iPod cable, push the end of the JACK underthe terminal so that it does not cause interference with the com-munication.
3. Having the iPod cable connected even when there is no iPod canconvert the device into AUX mode causing an occurrence ofnoise. Please make sure toremove the iPod cable when an iPod device is not being used.
Page 294 of 461

Features of your vehicle214
4AUX mode (auxiliary device input)✽
✽
NOTICEThe AUX1/AUX2 mode will operate only
when an auxiliary AUDIO & VIDEO
player (camcorder, vehicle VCR, etc.) is
connected and operating.Starting AUX mode by use of Rear
panel 1. Press the [MODE] button on the REAR panel to display the MODE selection
screen.
2. If the key on the joystick located at the far right-side of the REAR panel is
moved in any direction, the select area
will become displayed on the button of
the most recently operated mode.
3. Select the AUX button.
4. Select the AUX1 or AUX2 button in the AUX mode screen.
5. The AUX1, AUX2 will begin playing.
✽ ✽ NOTICEIf the auxiliary device connector jack is
removed while in AUX mode, the previ-
ous mode will automatically be dis-
played.
Pressing the AUX1, AUX2 button while
the auxiliary device is not is not connect-
ed or with only the VIDEO jack connect-
ed will display a "The device is not prop-
erly connected" message.
CAUTION
1. Having the auxiliary cable con-
nected even when there is noauxiliary device can convert thedevice into AUX mode and cause noise.
Please make sure to remove the auxiliary cable when an auxiliary device is not being used.
2. Connecting an auxiliary device to the cigarette jack and playingthrough the screen of the devicemay cause an occurrence ofnoise.
If such noise occurs, remove the power cable from the cigarette jack.
Page 295 of 461
4215
Features of your vehicle
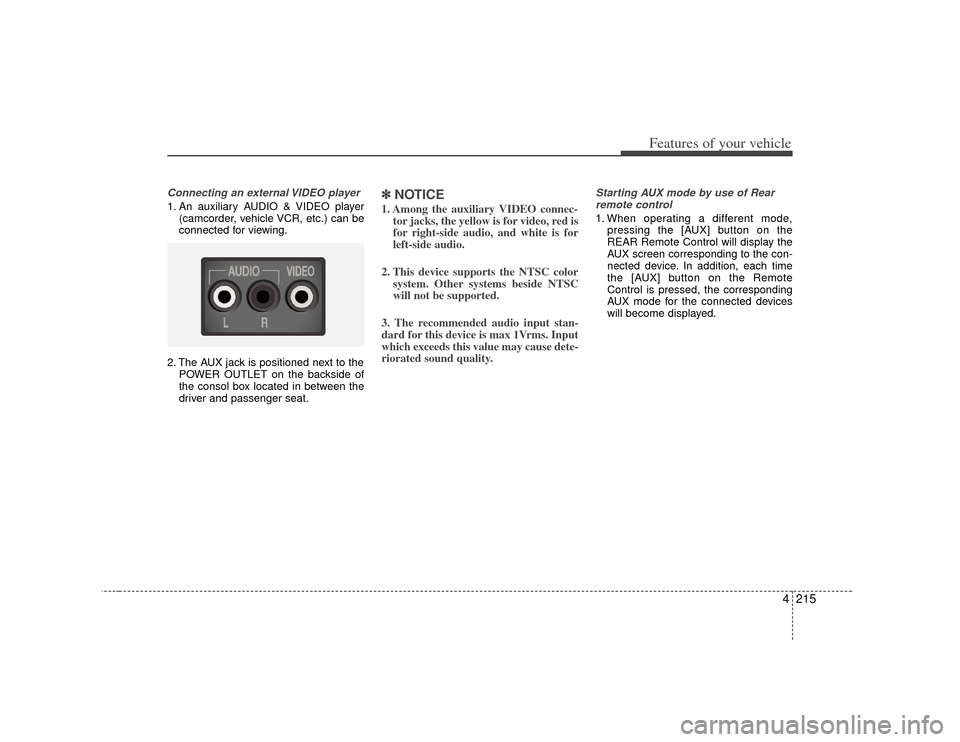
Connecting an external VIDEO player1. An auxiliary AUDIO & VIDEO player(camcorder, vehicle VCR, etc.) can be
connected for viewing.
2. The AUX jack is positioned next to the POWER OUTLET on the backside of
the consol box located in between the
driver and passenger seat.
✽ ✽NOTICE1. Among the auxiliary VIDEO connec-
tor jacks, the yellow is for video, red is
for right-side audio, and white is for
left-side audio.
2. This device supports the NTSC color system. Other systems beside NTSC
will not be supported.
3. The recommended audio input stan-
dard for this device is max 1Vrms. Input
which exceeds this value may cause dete-
riorated sound quality.
Starting AUX mode by use of Rear remote control 1. When operating a different mode, pressing the [AUX] button on the
REAR Remote Control will display the
AUX screen corresponding to the con-
nected device. In addition, each time
the [AUX] button on the Remote
Control is pressed, the corresponding
AUX mode for the connected devices
will become displayed.
Page 296 of 461

Features of your vehicle216
4DVD language codeCODE NATION CODE NATION CODE NATION CODE NATION0101
0102
0106
0113
0118
0119
0125
0126
0201
0205
0207
0208
0209
0214
0215
0218
0301
0315
0319
0325
0401
0405
0426
0512
0514
0515
0519
0520
0521
0601
0609
0610
0615
0618 0625
0701
0704
0712
0714
0721
0801
0809
0818
0821
0825
0901
0905
0911
0914
0919
0920
0923
1009
1001
1022
1101
1111
1112
1113
1114
1115
1119
1121
1125
1201
1214
1215
1220 1222
1307
1309
1311
1312
1314
1315
1318
1319
1320
1325
1401
1405
1412
1415
1503
1513
1518
1601
1612
1619
1620
1721
1813
1814
1815
1821
1823
1901
1904
1907
1908
1909
19111912
1913
1914
1915
1917
1918
1919
1920
1921
1922
1923
2001
2005
2007
2008
2009
2011
2012
2014
2015
2018
2019
2020
2023
2111
2118
2126
2209
2215
2315
2408
2515
2608
2621
Latvian
Malagasy Maori
Macedonian MalayalamMongolianMoldavian MarathiMalay
Maltese
Burmese Nauru
Nepali Dutch
Norwegian OccitanOromo Oriya
Punjabi Polish
Pushto
Portuguese Quechua
Romance Kirundi
Romanian Russian
Kinyarwan
da Sanskrit Sindhi
Sangho
Croation
Sinhalese Slovak Slovenian
Samoan ShonaSomal
Albanian Serbian Swati
Sesotho
Sundanese SwedishSwahili Tamil
Telugu Tajik Thai
Tigrinya
Turkmen Tagalog Tswana Tonga
Turkish
Tsonga Tatar Twi
Ukrainian Urdu
Uzbek
Vietnamese Volapuk Wolo
Xhosa
Yoruba
Chinese Zulu
Afar
Abkhazian Afrikaans Amharic Arabic
Assamese Aymara
Azerbaijani Bashkir
Belarusian Bulgarian Bihari
Bislama Bengali
Tibetan Breton
Catalan
Corsican CzechWelsh
Danish
German Bhutani Greek
English
Esperanto Spanish
Estonian BasqueP
ersian
Finnish Fijian
Faroese French Frisian
Irish
Scots
Gallegan GuaraniGujarati Hausa Hindi
Croatian
Hungarian Armenian
Interlingua
Interlingue Inupiak
Indonesian Icelandic Italian
Hebrew Yiddish
Japanese Javanese Georgian Kazakh
Greenlandic Cambodian KannadaKorean
Kashmiri KurdishKirghiz Latin
Lingala
Laotian
Lithuanian
Page 297 of 461
4217
Features of your vehicle
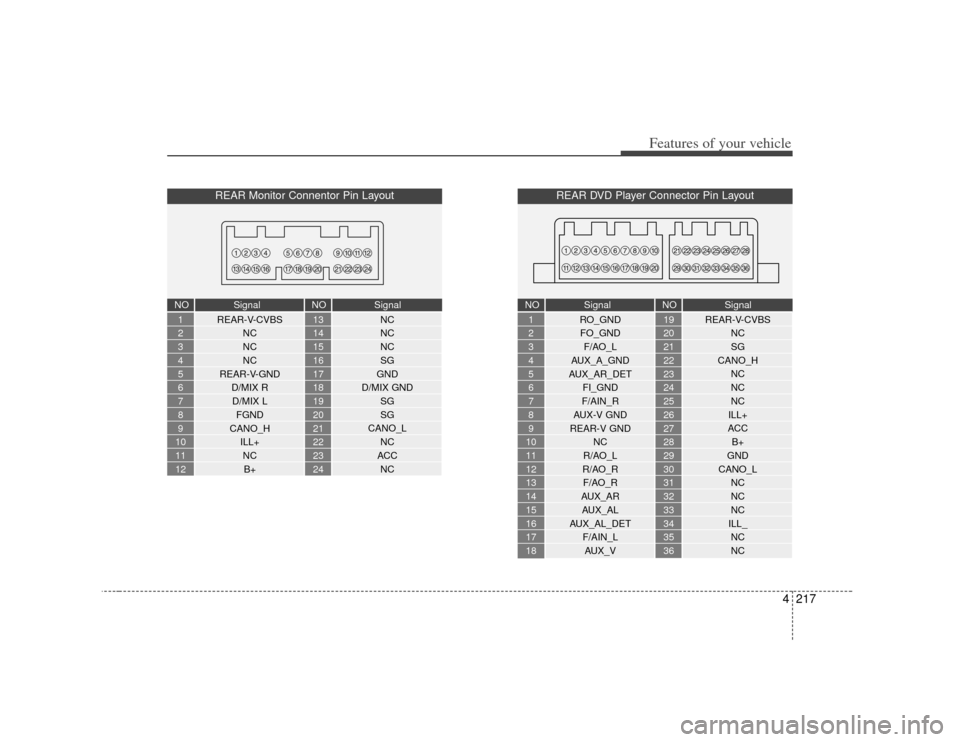
REAR Monitor Connentor Pin LayoutREAR-V-CVBSNC
NC
NC
REAR-V-GND D/MIX RD/MIX L FGND
CANO_H ILL+NCB+ NC
NC
NC
SG
GND
D/MIX GND SG
SG
CANO_L NC
ACC NC
1
2
3
4
5
6
7
8
9
10
11
12
13
14
15
16
17
18
19
20
21
22
23
24
NO Signal NO Signal
REAR DVD Player Connector Pin Layout
RO_GND
FO_GND F/AO_L
AUX_A_GND
AUX_AR_DET FI_GND
F/AIN_R
AUX-V GND
REAR-V GND NC
R/AO_L
R/AO_R F/AO_R
AUX_AR AUX_AL
AUX_AL_DET F/AIN_LAUX_V REAR-V-CVBS
NC
SG
CANO_H NC
NC
NC
ILL+
ACC B+
GND
CANO_L NC
NC
NC
ILL_ NC
NC
1
2
3
4
5
6
7
8
9
10
11
12
13
14
15
16
17
18
19
20
21
22
23
24
25
26
27
28
29
30
31
32
33
34
35
36
NO Signal NO Signal
Page 298 of 461
Features of your vehicle218
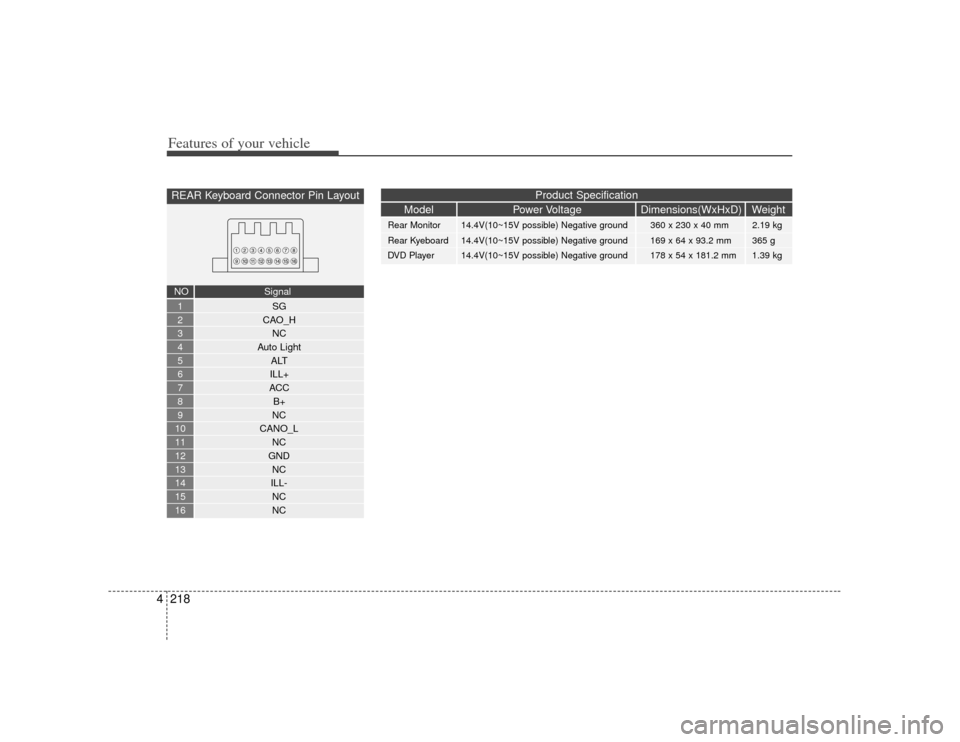
4REAR Keyboard Connector Pin Layout
SG
CAO_H NC
Auto Light ALT
ILL+
ACC B+
NC
CANO_L NC
GND NC
ILL- NC
NC
1
2
3
4
5
6
7
8
9
10
11
12
13
14
15
16NO Signal
Model Power Voltage Dimensions(WxHxD) Weight
Rear Monitor 14.4V(10~15V possible) Negative ground 360 x 230 x 40 mm 2.19 kg
Rear Kyeboard 14.4V(10~15V possible) Negative ground 169 x 64 x 93.2 mm 365 g
DVD Player 14.4V(10~15V possible) Negative ground 178 x 54 x 181.2 mm 1.39 kg
Product Specification
Page 299 of 461
5
Before driving / 5-3
Key positions / 5-4
ENGINE START/STOP button / 5-6
Starting the engine / 5-9
Automatic transmission / 5-12
Four wheel drive (4WD) / 5-18
Brake system / 5-27
Cruise control system / 5-39
Economical operation / 5-45
Special driving conditions / 5-47
Winter driving / 5-51
Trailer towing / 5-54
Vehicle load limit / 5-63
Vehicle weight / 5-68
Driving your vehicle
Page 300 of 461
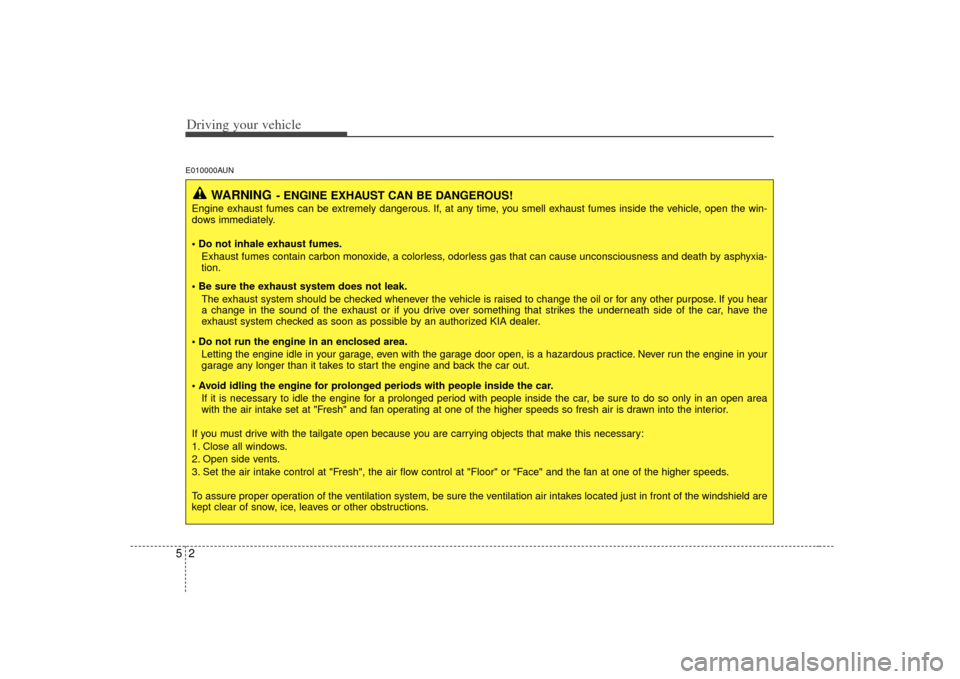
Driving your vehicle25E010000AUN
WARNING
- ENGINE EXHAUST CAN BE DANGEROUS!
Engine exhaust fumes can be extremely dangerous. If, at any time, you smell exhaust fumes inside the vehicle, open the win-
dows immediately.
• Do not inhale exhaust fumes.Exhaust fumes contain carbon monoxide, a colorless, odorless gas that can cause unconsciousness and death by asphyxia-
tion.
The exhaust system should be checked whenever the vehicle is raised to change the oil or for any other purpose. If you hear
a change in the sound of the exhaust or if you drive over something that strikes the underneath side of the car, have the
exhaust system checked as soon as possible by an authorized KIA dealer.
Letting the engine idle in your garage, even with the garage door open, is a hazardous practice. Never run the engine in your
garage any longer than it takes to start the engine and back the car out.
If it is necessary to idle the engine for a prolonged period with people inside the car, be sure to do so only in an open area
with the air intake set at "Fresh" and fan operating at one of the higher speeds so fresh air is drawn into the interior.
If you must drive with the tailgate open because you are carrying objects that make this necessary:
1. Close all windows.
2. Open side vents.
3. Set the air intake control at "Fresh", the air flow control at "Floor" or "Face" and the fan at one of the higher speeds.
To assure proper operation of the ventilation system, be sure the ventilation air intakes located just in front of the windshie ld are
kept clear of snow, ice, leaves or other obstructions.