clock KIA BORREGO 2017 User Guide
[x] Cancel search | Manufacturer: KIA, Model Year: 2017, Model line: BORREGO, Model: KIA BORREGO 2017Pages: 548, PDF Size: 36.78 MB
Page 421 of 548
717
What to do in an emergency
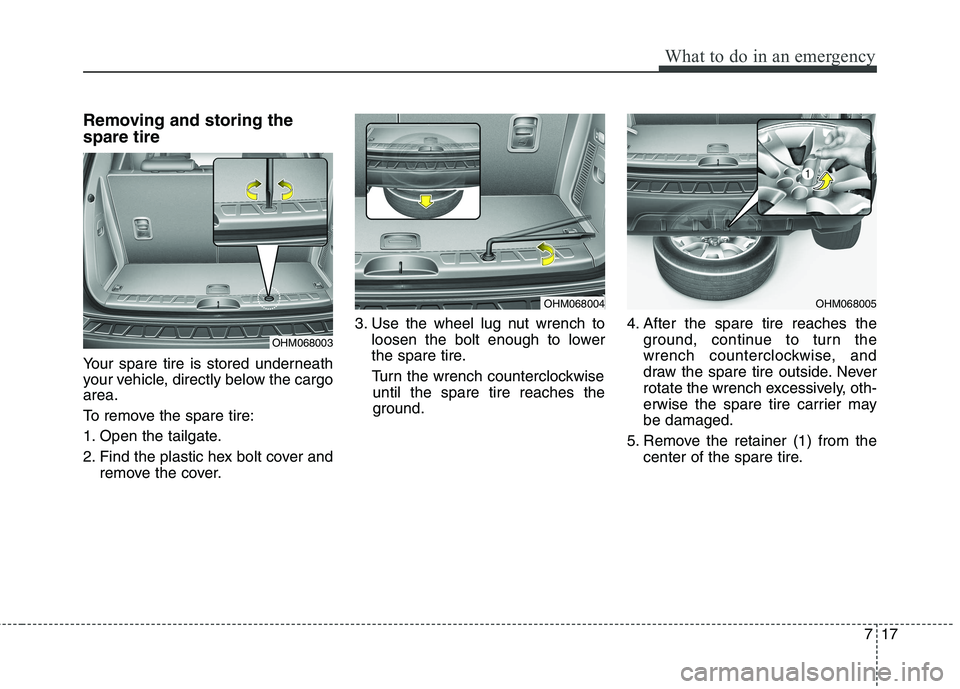
Removing and storing the spare tire
Your spare tire is stored underneath
your vehicle, directly below the cargoarea.
To remove the spare tire:
1. Open the tailgate.
2. Find the plastic hex bolt cover andremove the cover. 3. Use the wheel lug nut wrench to
loosen the bolt enough to lower
the spare tire.
Turn the wrench counterclockwise until the spare tire reaches the
ground. 4. After the spare tire reaches the
ground, continue to turn the
wrench counterclockwise, and
draw the spare tire outside. Never
rotate the wrench excessively, oth-
erwise the spare tire carrier maybe damaged.
5. Remove the retainer (1) from the center of the spare tire.
OHM068003
OHM068004OHM068005
Page 422 of 548
What to do in an emergency
18
7
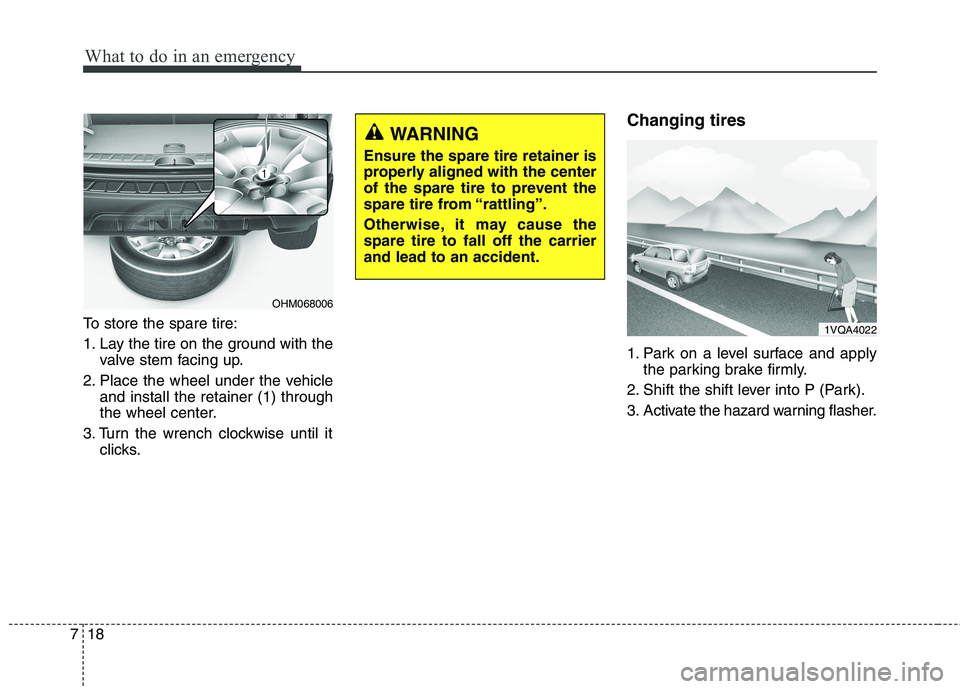
To store the spare tire:
1. Lay the tire on the ground with the
valve stem facing up.
2. Place the wheel under the vehicle and install the retainer (1) through
the wheel center.
3. Turn the wrench clockwise until it clicks. Changing tires
1. Park on a level surface and apply
the parking brake firmly.
2. Shift the shift lever into P (Park).
3. Activate the hazard warning flasher.
OHM068006
WARNING
Ensure the spare tire retainer is
properly aligned with the center
of the spare tire to prevent the
spare tire from “rattling”.
Otherwise, it may cause the spare tire to fall off the carrierand lead to an accident.
1VQA4022
Page 423 of 548
719
What to do in an emergency
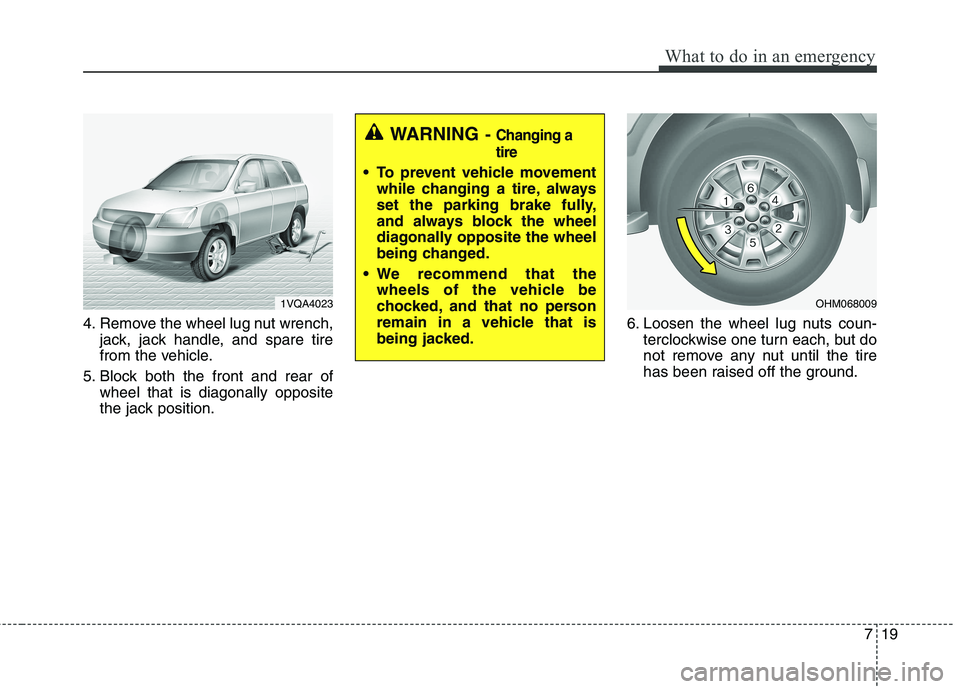
4. Remove the wheel lug nut wrench,jack, jack handle, and spare tire
from the vehicle.
5. Block both the front and rear of wheel that is diagonally opposite
the jack position. 6. Loosen the wheel lug nuts coun-
terclockwise one turn each, but do
not remove any nut until the tire
has been raised off the ground.
1VQA4023
WARNING - Changing a tire
To prevent vehicle movement
while changing a tire, always
set the parking brake fully,
and always block the wheel
diagonally opposite the wheel
being changed.
We recommend that the wheels of the vehicle be
chocked, and that no person
remain in a vehicle that is
being jacked.
OHM068009
Page 424 of 548
What to do in an emergency
20
7
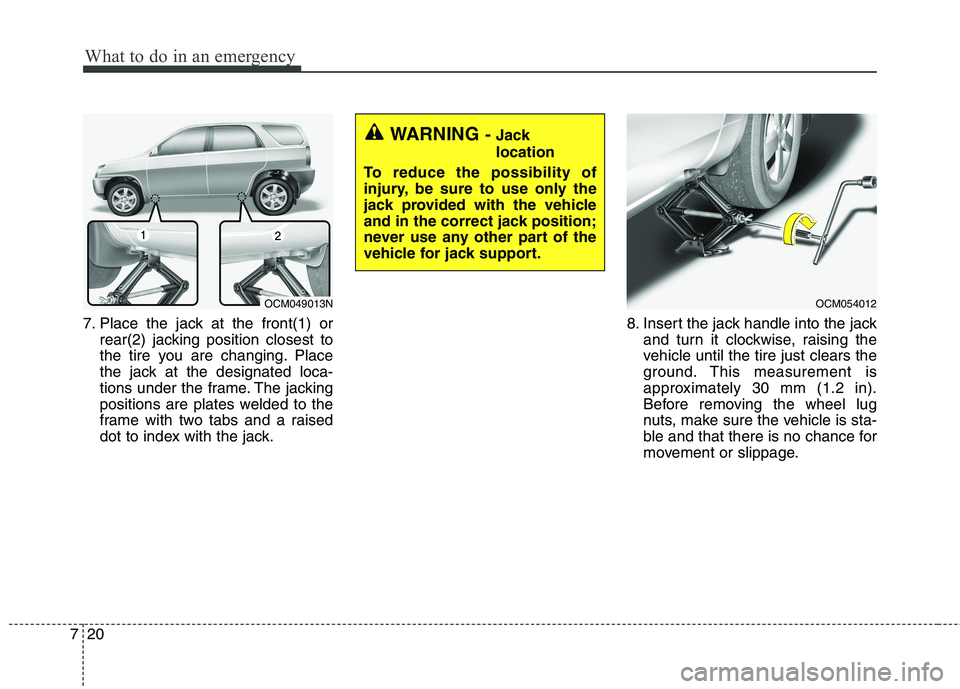
7. Place the jack at the front(1) or
rear(2) jacking position closest to
the tire you are changing. Place
the jack at the designated loca-
tions under the frame. The jacking
positions are plates welded to the
frame with two tabs and a raised
dot to index with the jack. 8. Insert the jack handle into the jack
and turn it clockwise, raising the
vehicle until the tire just clears the
ground. This measurement is
approximately 30 mm (1.2 in).
Before removing the wheel lug
nuts, make sure the vehicle is sta-
ble and that there is no chance for
movement or slippage.
WARNING - Jack location
To reduce the possibility of
injury, be sure to use only the
jack provided with the vehicle
and in the correct jack position;
never use any other part of the
vehicle for jack support.
OCM054012OCM049013N
Page 425 of 548
721
What to do in an emergency
9. Loosen the wheel nuts andremove them with your fingers. Slide the wheel off the studs and
lay it flat so it cannot roll away. To
put the wheel on the hub, pick up
the spare tire, line up the holeswith the studs and slide the wheelonto them.
If this is difficult, tip the wheelslightly and get the top hole in thewheel lined up with the top stud.
Then jiggle the wheel back and
forth until the wheel can be slid
over the other studs. 10. To reinstall the wheel, hold it on
the studs, put the wheel nuts onthe studs and tighten them finger
tight. Jiggle the tire to be sure it iscompletely seated, then tighten
the nuts as much as possible
with your fingers again.
11. Lower the vehicle to the ground by turning the wheel nut wrench
counterclockwise.
WARNING
Wheels may have sharp edges.
Handle them carefully to avoid
possible severe injury. Before
putting the wheel into place, besure that there is nothing on the
hub or wheel (such as mud, tar,
gravel, etc.) that interferes with
the wheel from fitting solidly
against the hub.
If there is, remove it. If there is not good contact on the mount-ing surface between the wheel
and hub, the wheel nuts couldcome loose and cause the loss
of a wheel. Loss of a wheel may
result in loss of control of the
vehicle. This may cause serious
injury or death.
Page 460 of 548
Maintenance
24
8
ENGINE COOLANT
The high-pressure cooling system
has a reservoir filled with year round
antifreeze coolant. The reservoir is
filled at the factory.
Check the antifreeze protection and
coolant level at least once a year, atthe beginning of the winter season,
and before traveling to a colder cli-
mate. Checking the coolant level
WARNING
Removing radiator cap
Never attempt to remove the radiator cap while the engine
is operating or hot. Doing somight lead to cooling system
and engine damage. Also, hotcoolant or steam could cause
serious personal injury.
Turn the engine off and wait until it cools down. Use
extreme care when removing
the radiator cap. Wrap a thick
towel around it, and turn it
counterclockwise slowly to
the first stop. Step back while
the pressure is released fromthe cooling system.
(Continued)
(Continued)When you are sure all the pressure has been released,
press down on the cap, using
a thick towel, and continue
turning counterclockwise to
remove it.
Even if the engine is not oper- ating, do not remove the radi-ator cap or the drain plugwhile the engine and radiator
are hot. Hot coolant and
steam may still blow out
under pressure, causing seri-
ous injury.
CAUTION
When the engine overheats
from low engine coolant, sud-denly adding engine coolantmay cause cracks in theengine. To prevent damage, add engine coolant slowly insmall quantities.
Do not drive with no engine coolant. It may cause waterpump failure and engine seizure, etc.
Page 492 of 548
Maintenance
56
8
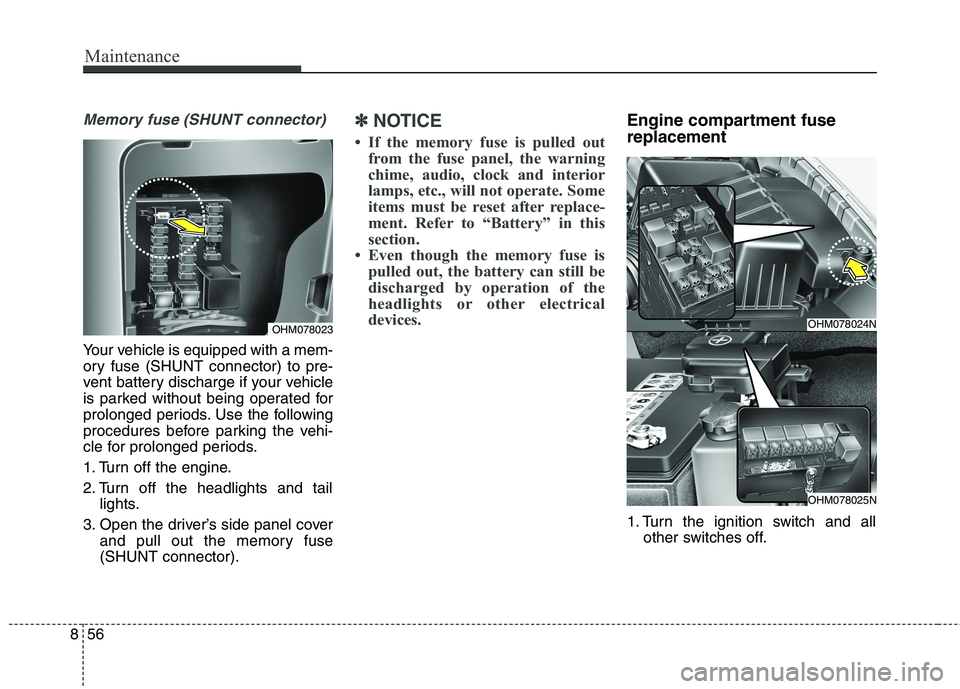
Memory fuse (SHUNT connector)
Your vehicle is equipped with a mem-
ory fuse (SHUNT connector) to pre-
vent battery discharge if your vehicle
is parked without being operated for
prolonged periods. Use the following
procedures before parking the vehi-
cle for prolonged periods.
1. Turn off the engine.
2. Turn off the headlights and tail
lights.
3. Open the driver’s side panel cover and pull out the memory fuse (SHUNT connector).
✽✽ NOTICE
If the memory fuse is pulled out from the fuse panel, the warning
chime, audio, clock and interior
lamps, etc., will not operate. Some
items must be reset after replace-
ment. Refer to “Battery” in this
section.
Even though the memory fuse is pulled out, the battery can still be
discharged by operation of the
headlights or other electrical
devices.Engine compartment fuse replacement
1. Turn the ignition switch and all other switches off.
OHM078023OHM078024N
OHM078025N
Page 507 of 548
871
Maintenance
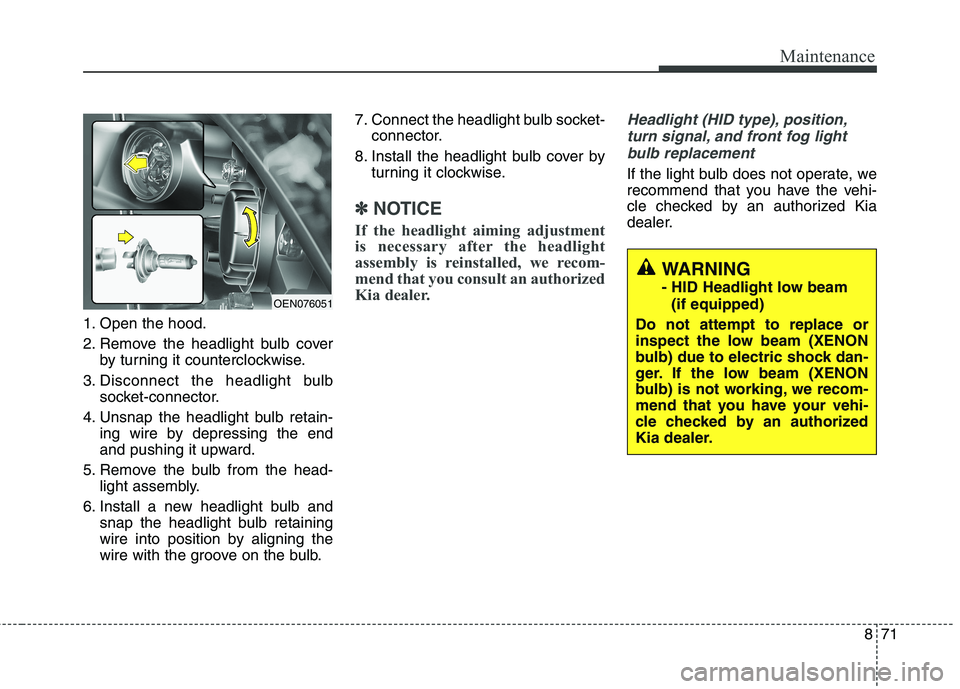
1. Open the hood.
2. Remove the headlight bulb coverby turning it counterclockwise.
3. Disconnect the headlight bulb socket-connector.
4. Unsnap the headlight bulb retain- ing wire by depressing the end
and pushing it upward.
5. Remove the bulb from the head- light assembly.
6. Install a new headlight bulb and snap the headlight bulb retaining
wire into position by aligning the
wire with the groove on the bulb. 7. Connect the headlight bulb socket-
connector.
8. Install the headlight bulb cover by turning it clockwise.
✽✽ NOTICE
If the headlight aiming adjustment
is necessary after the headlight
assembly is reinstalled, we recom-
mend that you consult an authorized
Kia dealer.
Headlight (HID type), position, turn signal, and front fog light bulb replacement
If the light bulb does not operate, we
recommend that you have the vehi-
cle checked by an authorized Kia
dealer.
OEN076051
WARNING
- HID Headlight low beam (if equipped)
Do not attempt to replace or
inspect the low beam (XENON
bulb) due to electric shock dan-
ger. If the low beam (XENON
bulb) is not working, we recom-
mend that you have your vehi-
cle checked by an authorized
Kia dealer.
Page 509 of 548
873
Maintenance
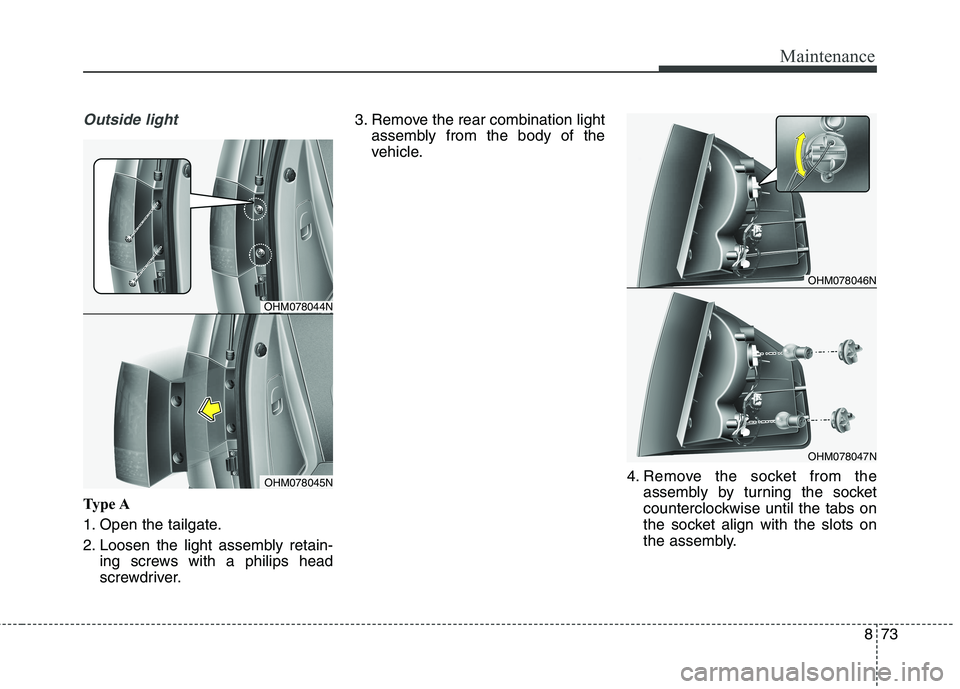
Outside light
Type A
1. Open the tailgate.
2. Loosen the light assembly retain-ing screws with a philips head
screwdriver. 3. Remove the rear combination light
assembly from the body of the
vehicle.
4. Remove the socket from theassembly by turning the socket
counterclockwise until the tabs on
the socket align with the slots on
the assembly.
OHM078044N
OHM078045N
OHM078046N
OHM078047N
Page 510 of 548
Maintenance
74
8
5. Remove the bulb from the socket
by pressing it in and rotating it
counterclockwise until the tabs on
the bulb align with the slots in the
socket. Pull the bulb out of the
socket.
6. Insert a new bulb by inserting it into the socket and rotating it until
it locks into place.
7. Install the socket in the assembly by aligning the tabs on the socket
with the slots in the assembly.
Push the socket into the assembly
and turn the socket clockwise.
8. Reinstall the light assembly to the body of the vehicle.
Type B
If the light bulb does not operate, we
recommend that you have the vehi-
cle checked by an authorized Kia
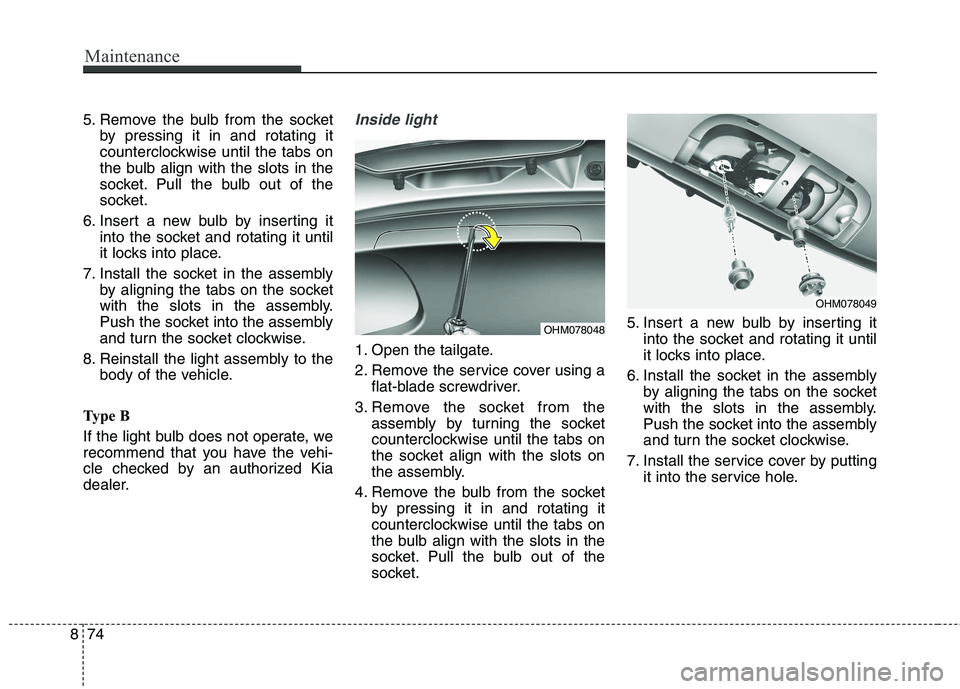
dealer.Inside light
1. Open the tailgate.
2. Remove the service cover using a flat-blade screwdriver.
3. Remove the socket from the assembly by turning the socket
counterclockwise until the tabs on
the socket align with the slots on
the assembly.
4. Remove the bulb from the socket by pressing it in and rotating it
counterclockwise until the tabs on
the bulb align with the slots in the
socket. Pull the bulb out of the
socket. 5. Insert a new bulb by inserting it
into the socket and rotating it until
it locks into place.
6. Install the socket in the assembly by aligning the tabs on the socket
with the slots in the assembly.
Push the socket into the assembly
and turn the socket clockwise.
7. Install the service cover by putting it into the service hole.
OHM078048
OHM078049