ECU KIA BORREGO 2017 Owner's Guide
[x] Cancel search | Manufacturer: KIA, Model Year: 2017, Model line: BORREGO, Model: KIA BORREGO 2017Pages: 548, PDF Size: 36.78 MB
Page 241 of 548

Features of your vehicle
152
4
Roof rack (if equipped)
If the vehicle has a roof rack, you can
load cargo on top of your vehicle. Crossbars and fixing components
needed to install the roof rack on
your vehicle may be obtained from
an authorized Kia dealer or other
qualified shop.✽✽
NOTICE
The crossbars (if equipped) should be placed in the proper load carry-
ing positions prior to placing items
onto the roof rack.
If the vehicle is equipped with a sunroof, be sure not to position
cargo onto the roof rack in such a
way that it could interfere with
sunroof operation.
When the roof rack is not being used to carry cargo, the crossbars
may need to be repositioned if
wind noise is detected.
EXTERIOR FEATURES
CAUTION
When carrying cargo on the
roof rack, take the necessaryprecautions to make sure thecargo does not damage theroof of the vehicle.
When carrying large objects on the roof rack, make surethey do not exceed the overallroof length or width.
When you are carrying cargo on the roof rack, do not operatethe sunroof (if equipped).
OHM046140
WARNING
The following specification is the maximum weight that can
be loaded onto the roof rack.
Distribute the load as evenly as
possible across the crossbars
(if equipped) and roof rack and
secure the load firmly.
Loading cargo or luggage in
excess of the specified weight
limit on the roof rack may
damage your vehicle.
The vehicle center of gravity will be higher when items are
loaded onto the roof rack.
Avoid sudden starts, braking,
sharp turns, abrupt maneu-
vers or high speeds that may
result in loss of vehicle con-
trol or rollover resulting in anaccident.
(Continued)
ROOF 100 kg (220 lbs.)
RACK EVENLY DISTRIBUTED
Page 242 of 548
4153
Features of your vehicle
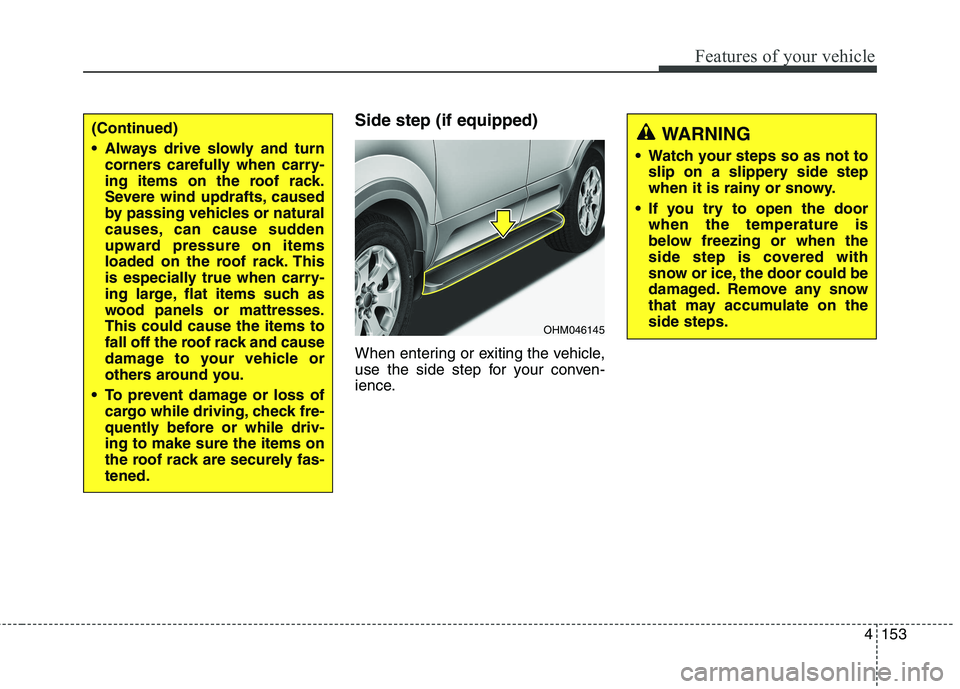
Side step (if equipped)
When entering or exiting the vehicle,
use the side step for your conven-
ience.(Continued)
Always drive slowly and turncorners carefully when carry-
ing items on the roof rack.
Severe wind updrafts, caused
by passing vehicles or natural
causes, can cause sudden
upward pressure on items
loaded on the roof rack. This
is especially true when carry-
ing large, flat items such as
wood panels or mattresses.This could cause the items to
fall off the roof rack and cause
damage to your vehicle or
others around you.
To prevent damage or loss of cargo while driving, check fre-
quently before or while driv-ing to make sure the items on
the roof rack are securely fas-tened.
OHM046145
WARNING
Watch your steps so as not to slip on a slippery side step
when it is rainy or snowy.
If you try to open the door when the temperature is
below freezing or when the
side step is covered with
snow or ice, the door could be
damaged. Remove any snow
that may accumulate on theside steps.
Page 283 of 548
![KIA BORREGO 2017 Owners Guide Audio system
41
5
Bluetooth®Wireless Technology
(Type-1)
When No Devices have been Paired
➀ Press the [PHONE]button or the
[CALL] button on the steering
wheel controls. The following
screen is KIA BORREGO 2017 Owners Guide Audio system
41
5
Bluetooth®Wireless Technology
(Type-1)
When No Devices have been Paired
➀ Press the [PHONE]button or the
[CALL] button on the steering
wheel controls. The following
screen is](/img/2/57934/w960_57934-282.png)
Audio system
41
5
Bluetooth®Wireless Technology
(Type-1)
When No Devices have been Paired
➀ Press the [PHONE]button or the
[CALL] button on the steering
wheel controls. The following
screen is displayed.
➁ Press the [OK] button to enter the
Pair Phone screen. Device : Name of device as shown
when searching from your
Bluetooth®Wireless Technology
device
Passkey : Passkey used to pair the device
➂ From your
Bluetooth®Wireless
Technology device (i.e. Mobile
Phone), search and select yourcar audio system.
❈ SSP : Secure Simple Pairing
Non SSP supported device : ➃ After a few moments, a screen is
displayed where the passkey is entered.
Enter the passkey “0000” to pair
your
Bluetooth®Wireless Technology
device with the car audio system. SSP supported device : ➃
After a few moments, a screen is dis-
played 6 digits passkey.
Check the passkey on your
Bluetooth®Wireless Technology
device and confirm.
➄ Once pairing is complete, the fol-
lowing screen is displayed.
Some phones (i.e., iPhone ®
, Android
and Blackberry phones) may offer an
option to allow acceptance of all futureBluetooth ®
connection requests by
default. Visit http://www.kia.com/#/blue-
tooth for additional information on pair-
ing your Bluetooth ®
-enabled mobile
phone, and to view a phone compatibil-ity list.
Page 290 of 548
![KIA BORREGO 2017 Owners Guide Audio system
548
Bluetooth®Wireless Technology
(Type-2)
When No Devices have been Paired
➀ Press the [PHONE]button or the
[CALL] button on the steering
wheel controls. The following
screen is d KIA BORREGO 2017 Owners Guide Audio system
548
Bluetooth®Wireless Technology
(Type-2)
When No Devices have been Paired
➀ Press the [PHONE]button or the
[CALL] button on the steering
wheel controls. The following
screen is d](/img/2/57934/w960_57934-289.png)
Audio system
548
Bluetooth®Wireless Technology
(Type-2)
When No Devices have been Paired
➀ Press the [PHONE]button or the
[CALL] button on the steering
wheel controls. The following
screen is displayed.
➁ Press the [OK] button to enter the
Pair Phone screen. Vehicle Name : Name of device as
shown when searching from your
Bluetooth®Wireless Technology
device
Passkey : Passkey used to pair the device
➂ From your
Bluetooth®Wireless
Technology device (i.e. Mobile
Phone), search and select yourcar audio system.
❈ SSP : Secure Simple Pairing
Non SSP supported device : ➃ After a few moments, a screen is
displayed where the passkey is entered.
Enter the passkey “0000” to pair
your
Bluetooth®Wireless Technology
device with the car audio system. SSP supported device : ➃
After a few moments, a screen is dis-
played 6 digits passkey.
Check the passkey on your
Bluetooth®Wireless Technology
device and confirm.
➄ Once pairing is complete, the fol-
lowing screen is displayed.
Some phones (i.e., iPhone ®
, Android
and Blackberry phones) may offer an
option to allow acceptance of all futureBluetooth ®
connection requests by
default. Visit http://www.kia.com/#/blue-
tooth for additional information on pair-
ing your Bluetooth ®
-enabled mobile
phone, and to view a phone compatibil-ity list.
Page 300 of 548
Audio system
558
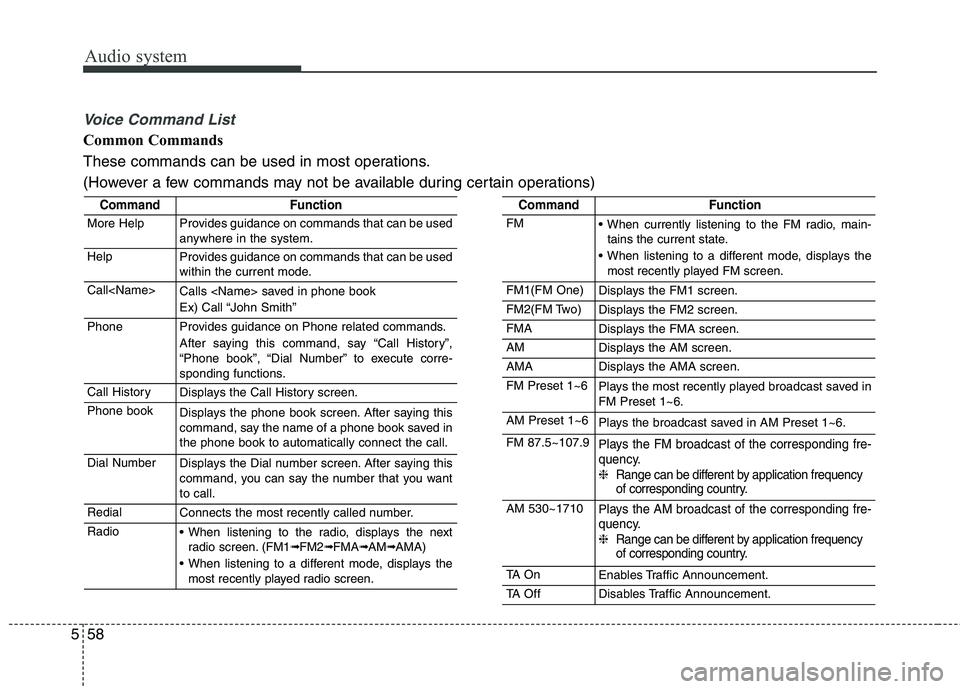
Voice Command List
Common Commands
These commands can be used in most operations.
(However a few commands may not be available during certain operations)
CommandFunction
More HelpProvides guidance on commands that can be used
anywhere in the system.
HelpProvides guidance on commands that can be used
within the current mode.
Call
Ex) Call “John Smith”
PhoneProvides guidance on Phone related commands.
After saying this command, say “Call History”,
“Phone book”, “Dial Number” to execute corre-
sponding functions.
Call HistoryDisplays the Call History screen.
Phone bookDisplays the phone book screen. After saying this
command, say the name of a phone book saved inthe phone book to automatically connect the call.
Dial NumberDisplays the Dial number screen. After saying this
command, you can say the number that you wantto call.
RedialConnects the most recently called number.
Radio When listening to the radio, displays the nextradio screen. (FM1➟FM2➟FMA➟AM➟AMA)
When listening to a different mode, displays the most recently played radio screen.
CommandFunction
FM When currently listening to the FM radio, main-tains the current state.
When listening to a different mode, displays the most recently played FM screen.
FM1(FM One)Displays the FM1 screen.
FM2(FM Two)Displays the FM2 screen.
FMADisplays the FMA screen.
AMDisplays the AM screen.
AMADisplays the AMA screen.
FM Preset 1~6Plays the most recently played broadcast saved in FM Preset 1~6.
AM Preset 1~6Plays the broadcast saved in AM Preset 1~6.
FM 87.5~107.9Plays the FM broadcast of the corresponding fre-
quency. ❈ Range can be different by application frequency
of corresponding country.
AM 530~1710Plays the AM broadcast of the corresponding fre-
quency. ❈ Range can be different by application frequency
of corresponding country.
TA O nEnables Traffic Announcement.
TA OffDisables Traffic Announcement.
Page 343 of 548
619
Driving your vehicle
D (Drive)
This is the normal forward driving
position. The transaxle will automati-cally shift through a 5 (or 8)-gear
sequence, providing the best fuel
economy and power.
For extra power when passing anoth-
er vehicle or climbing grades,
depress the accelerator fully, at which
time the transmission will automati-
cally downshift to the next lower gear.
✽✽NOTICE
Always come to a complete stop
before shifting into D (Drive).
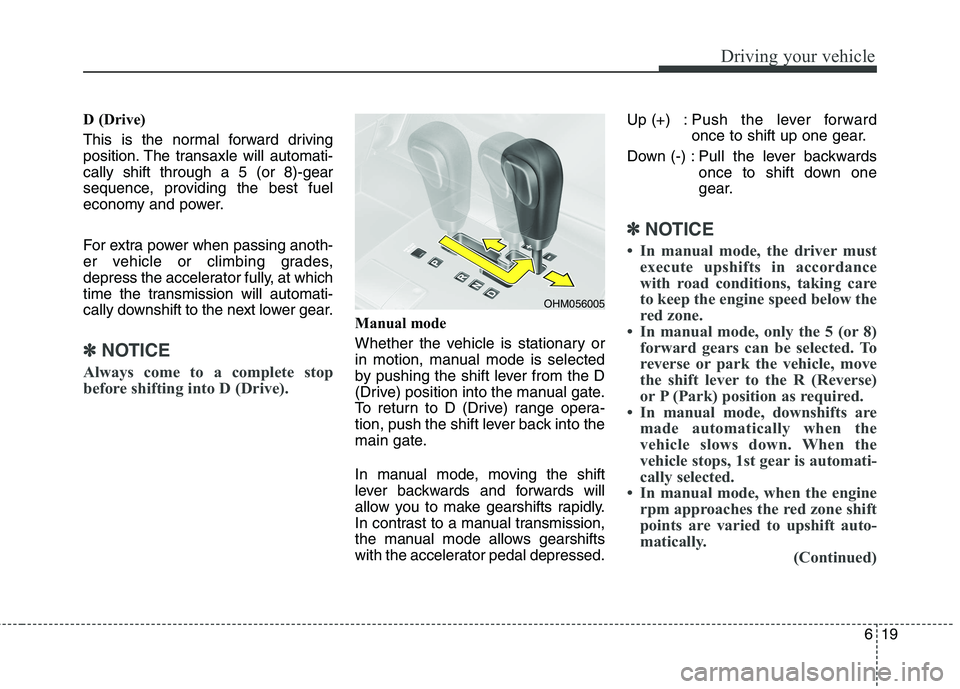
Manual mode
Whether the vehicle is stationary or
in motion, manual mode is selected
by pushing the shift lever from the D
(Drive) position into the manual gate.
To return to D (Drive) range opera-
tion, push the shift lever back into the
main gate.
In manual mode, moving the shift
lever backwards and forwards will
allow you to make gearshifts rapidly.
In contrast to a manual transmission,
the manual mode allows gearshifts
with the accelerator pedal depressed. Up (+) : Push the lever forward
once to shift up one gear.
Down (-) : Pull the lever backwards once to shift down one
gear.
✽✽NOTICE
In manual mode, the driver must execute upshifts in accordance
with road conditions, taking care
to keep the engine speed below the
red zone.
In manual mode, only the 5 (or 8) forward gears can be selected. To
reverse or park the vehicle, move
the shift lever to the R (Reverse)
or P (Park) position as required.
In manual mode, downshifts are made automatically when the
vehicle slows down. When the
vehicle stops, 1st gear is automati-
cally selected.
In manual mode, when the engine rpm approaches the red zone shift
points are varied to upshift auto-
matically. (Continued)
OHM056005
Page 344 of 548
Driving your vehicle
20
6
(Continued)
To maintain the required levels of
vehicle performance and safety,
the system may not execute cer-
tain gearshifts when the shift lever
is operated.
When driving on a slippery road, push the shift lever forward into
the +(up) position. This causes the
transaxle to shift into the 2nd (or
3rd) gear which is better for
smooth driving on a slippery road.
Push the shift lever to the -(down)
side to shift back to the 1st gear.Shift lock system
For your safety, the automatic
transaxle has a shift lock system
which prevents shifting the transaxle
from P (Park) or N (Neutral) into R
(Reverse) unless the brake pedal isdepressed.
To shift the transaxle from P (Park) or
N (Neutral) into R (Reverse):
1. Depress and hold the brake pedal.
2. Start the engine or turn the ignition switch to the ON position.
3. Move the shift lever.
If the brake pedal is repeatedly depressed and released with the shift
lever in the P (Park) position, a chat-
tering noise near the shift lever may
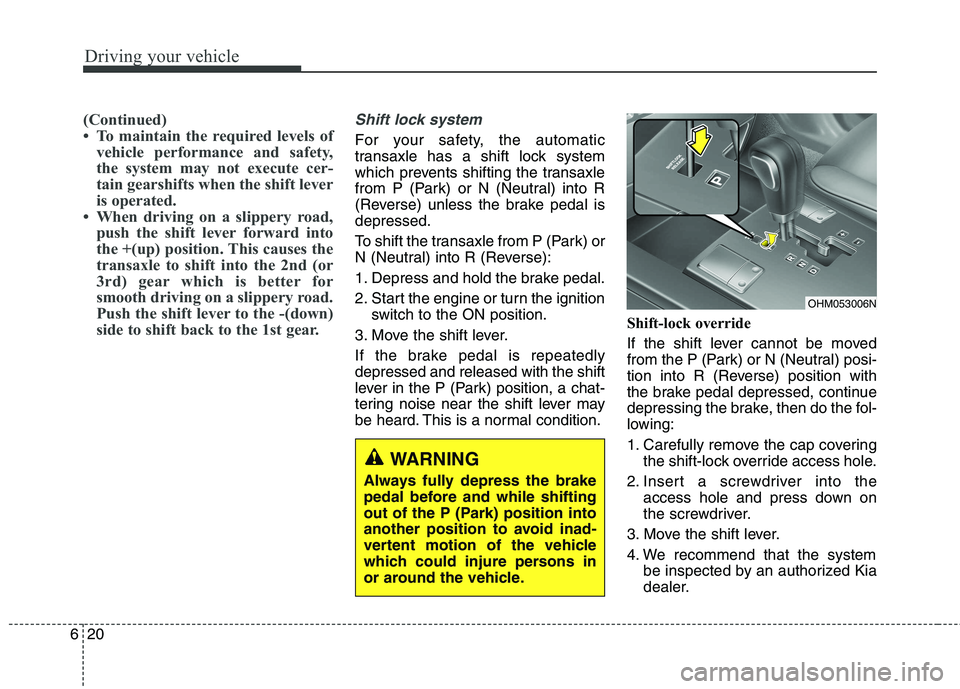
be heard. This is a normal condition. Shift-lock override
If the shift lever cannot be moved
from the P (Park) or N (Neutral) posi-
tion into R (Reverse) position with
the brake pedal depressed, continue
depressing the brake, then do the fol-
lowing:
1. Carefully remove the cap covering
the shift-lock override access hole.
2. Insert a screwdriver into the access hole and press down on
the screwdriver.
3. Move the shift lever.
4. We recommend that the system be inspected by an authorized Kia
dealer.
WARNING
Always fully depress the brake
pedal before and while shifting
out of the P (Park) position into
another position to avoid inad-
vertent motion of the vehicle
which could injure persons in
or around the vehicle.
OHM053006N
Page 361 of 548

637
Driving your vehicle
Check the brake warning light by
turning the ignition switch ON (do not
start the engine). This light will be
illuminated when the parking brake is
applied with the ignition switch in the
START or ON position.
Before driving, be sure the parking
brake is fully released and the brake
warning light is off.
If the brake warning light remains on
after the parking brake is released
while the engine is running, there
may be a malfunction in the brake
system. Immediate attention is nec-
essary.If at all possible, cease driving the
vehicle immediately. If that is not pos-
sible, use extreme caution while
operating the vehicle and only con-
tinue to drive the vehicle until you
can reach a safe location or repair
shop.
WARNING
To prevent unintentional movement when stopped and
leaving the vehicle, do not use
the shift lever instead of the
parking brake. Set the parkingbrake AND make sure the shift
lever is securely positioned in
1st (First) gear or in P (Park).
Never allow anyone who is unfamiliar with the vehicle to
touch the parking brake. If theparking brake is released
unintentionally, serious injury
may occur.
All vehicles should always have the parking brake fully
engaged when parking to
avoid inadvertent movement
of the vehicle which can injureoccupants or pedestrians.
WK-23_TF
Page 408 of 548

What to do in an emergency
4
7
IF THE ENGINE WILL NOT START
If engine doesn't turn over or
turns over slowly
1. If your vehicle has an automatic transaxle, be sure the shift lever is
in N (Neutral) or P (Park) and the
emergency brake is set.
2. Check the battery connections to be sure they are clean and tight.
3. Turn on the interior light. If the light dims or goes out when you oper-
ate the starter, the battery is dis-charged.
4. Check the starter connections to be sure they are securely tight-ened.
5. Do not push or pull the vehicle to start it. See instructions for "Jump
starting". If engine turns over normally
but does not start
1. Check the fuel level.
2. With the ignition switch in the
LOCK position, check all connec-
tors at the ignition coils and spark
plugs. Reconnect any that may be
disconnected or loose.
3. Check the fuel line in the engine compartment.
4. If the engine still does not start, we recommend that you call an
authorized Kia dealer.
WARNING
If the engine will not start, do
not push or pull the vehicle to
start it. This could result in acollision or cause other dam-
age. In addition, push or pull
starting may cause the catalytic
converter to be overloaded and
create a fire hazard.
Page 420 of 548
What to do in an emergency
16
7
IF YOU HAVE A FLAT TIRE (WITH SPARE TIRE)
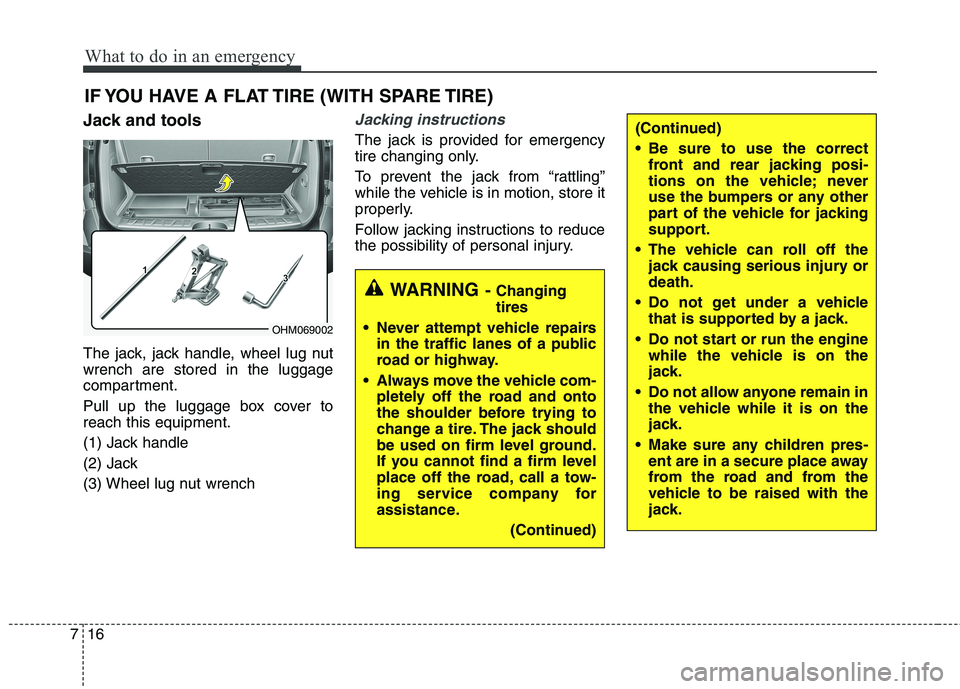
Jack and tools
The jack, jack handle, wheel lug nut wrench are stored in the luggage
compartment.
Pull up the luggage box cover to reach this equipment.
(1) Jack handle
(2) Jack
(3) Wheel lug nut wrench
Jacking instructions
The jack is provided for emergency
tire changing only.
To prevent the jack from “rattling”
while the vehicle is in motion, store it
properly.
Follow jacking instructions to reduce
the possibility of personal injury.
OHM069002
WARNING - Changing tires
Never attempt vehicle repairs in the traffic lanes of a public
road or highway.
Always move the vehicle com- pletely off the road and onto
the shoulder before trying to
change a tire. The jack should
be used on firm level ground.
If you cannot find a firm level
place off the road, call a tow-
ing service company for
assistance.
(Continued)
(Continued)
Be sure to use the correctfront and rear jacking posi-
tions on the vehicle; never
use the bumpers or any other
part of the vehicle for jacking
support.
The vehicle can roll off the jack causing serious injury ordeath.
Do not get under a vehicle that is supported by a jack.
Do not start or run the engine while the vehicle is on the
jack.
Do not allow anyone remain in the vehicle while it is on the
jack.
Make sure any children pres- ent are in a secure place away
from the road and from the
vehicle to be raised with the
jack.