KIA Cadenza 2014 1.G Owner's Guide
Manufacturer: KIA, Model Year: 2014, Model line: Cadenza, Model: KIA Cadenza 2014 1.GPages: 415, PDF Size: 5.09 MB
Page 21 of 415
37
Safety features of your vehicle
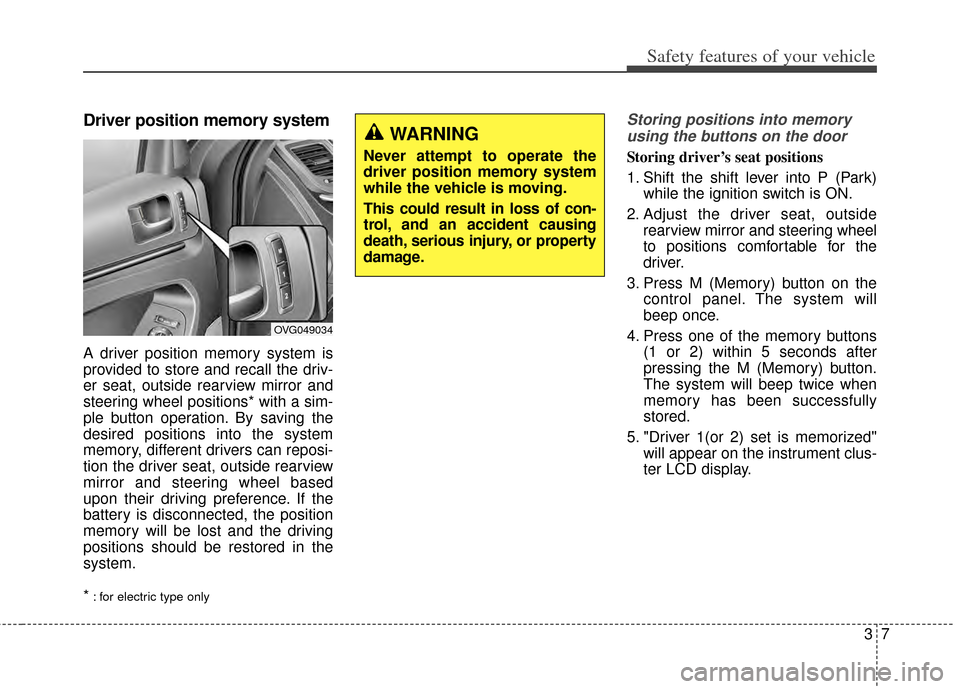
Driver position memory system
A driver position memory system is
provided to store and recall the driv-
er seat, outside rearview mirror and
steering wheel positions* with a sim-
ple button operation. By saving the
desired positions into the system
memory, different drivers can reposi-
tion the driver seat, outside rearview
mirror and steering wheel based
upon their driving preference. If the
battery is disconnected, the position
memory will be lost and the driving
positions should be restored in the
system.
*
: for electric type only
Storing positions into memoryusing the buttons on the door
Storing driver’s seat positions
1. Shift the shift lever into P (Park) while the ignition switch is ON.
2. Adjust the driver seat, outside rearview mirror and steering wheel
to positions comfortable for the
driver.
3. Press M (Memory) button on the control panel. The system will
beep once.
4. Press one of the memory buttons (1 or 2) within 5 seconds after
pressing the M (Memory) button.
The system will beep twice when
memory has been successfully
stored.
5. "Driver 1(or 2) set is memorized" will appear on the instrument clus-
ter LCD display.
OVG049034
WARNING
Never attempt to operate the
driver position memory system
while the vehicle is moving.
This could result in loss of con-
trol, and an accident causing
death, serious injury, or property
damage.
Page 22 of 415
Safety features of your vehicle
83
Recalling positions from memory
1. The shift lever should be in P(Park) when :
- The ignition switch is in ON or engine is running.
- It is less than 20 minutes after the driver's door is opened with the
ignition switch in OFF or ACC.
- It is less than 30 seconds after the driver's door is closed with
the ignition switch in OFF or
ACC.
2. To recall the position in memory, press the desired memory button
(1 or 2). The system will beep
once, then the driver seat, outside
rearview mirror and steering
wheel will automatically adjust to
the stored positions.
3. "Driver 1 (or 2) set is changed" will appear on the instrument cluster
LCD display. Adjusting the control switch for the
driver seat while the system is recall-
ing the stored position will cause the
movement to stop and move in the
direction that the control switch is
moved.Easy access function
With the shift lever in the P position,
the system will move the driver's seat
automatically as follows:
• It will move the driver’s seat rear-
ward when the engine start/stop
button is turned to the OFF position.
It will move the driver’s seat forward when the engine start/stop button is
turned to the ACC or START posi-
tion.
You can activate or deactivate this
feature. Refer to "User settings" in
chapter 4.
WARNING
Use caution when recalling
adjustment memory while sitting
in the vehicle. Push the seat
position control knob to the
desired position immediately if
the seat moves too far in any
direction.
Page 23 of 415
39
Safety features of your vehicle
Headrest (for front seat)
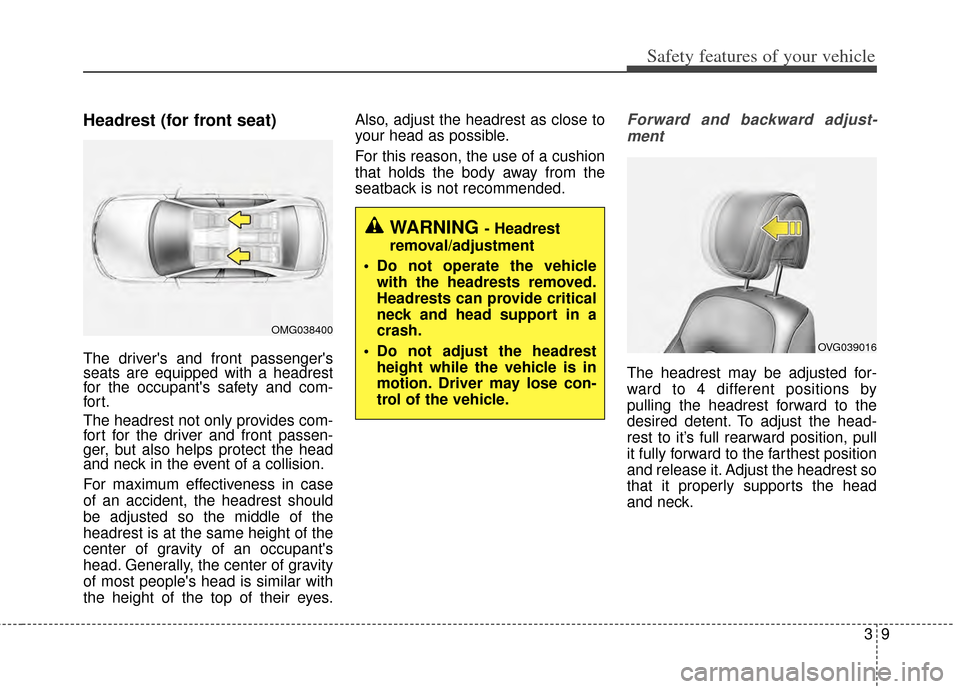
The driver's and front passenger's
seats are equipped with a headrest
for the occupant's safety and com-
for t.
The headrest not only provides com-
fort for the driver and front passen-
ger, but also helps protect the head
and neck in the event of a collision.
For maximum effectiveness in case
of an accident, the headrest should
be adjusted so the middle of the
headrest is at the same height of the
center of gravity of an occupant's
head. Generally, the center of gravity
of most people's head is similar with
the height of the top of their eyes.Also, adjust the headrest as close to
your head as possible.
For this reason, the use of a cushion
that holds the body away from the
seatback is not recommended.
Forward and backward adjust-
ment
The headrest may be adjusted for-
ward to 4 different positions by
pulling the headrest forward to the
desired detent. To adjust the head-
rest to it’s full rearward position, pull
it fully forward to the farthest position
and release it. Adjust the headrest so
that it properly supports the head
and neck.
OMG038400
WARNING - Headrest
removal/adjustment
Do not operate the vehicle with the headrests removed.
Headrests can provide critical
neck and head support in a
crash.
Do not adjust the headrest height while the vehicle is in
motion. Driver may lose con-
trol of the vehicle.
OVG039016
Page 24 of 415
Safety features of your vehicle
10
3
Adjusting the height up and down
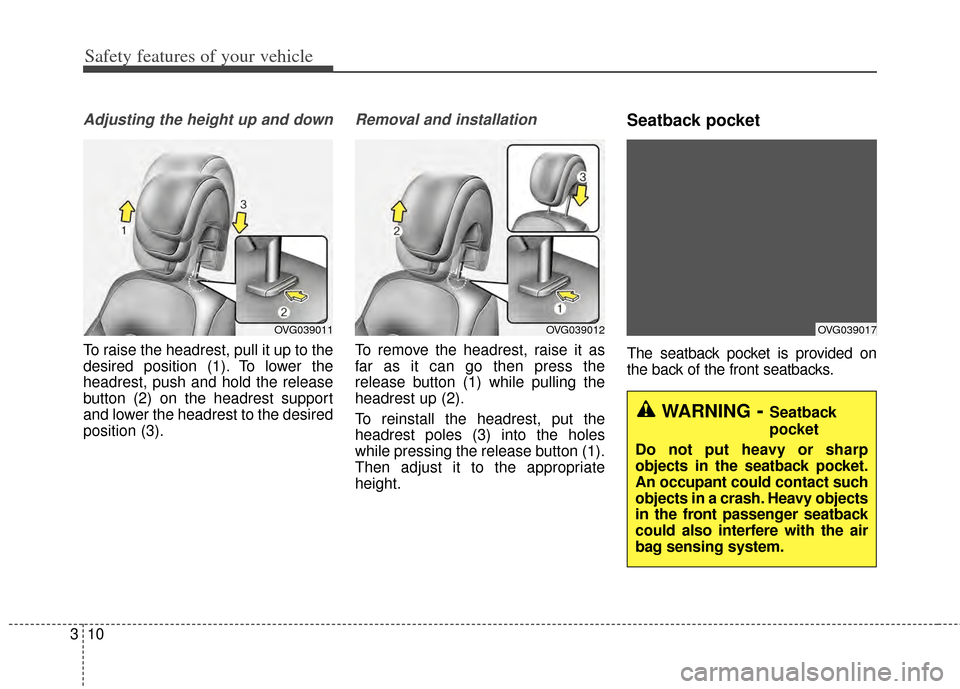
To raise the headrest, pull it up to the
desired position (1). To lower the
headrest, push and hold the release
button (2) on the headrest support
and lower the headrest to the desired
position (3).
Removal and installation
To remove the headrest, raise it as
far as it can go then press the
release button (1) while pulling the
headrest up (2).
To reinstall the headrest, put the
headrest poles (3) into the holes
while pressing the release button (1).
Then adjust it to the appropriate
height.
Seatback pocket
The seatback pocket is provided on
the back of the front seatbacks.
OVG039012OVG039011
WARNING- Seatback
pocket
Do not put heavy or sharp
objects in the seatback pocket.
An occupant could contact such
objects in a crash. Heavy objects
in the front passenger seatback
could also interfere with the air
bag sensing system.
OVG039017
Page 25 of 415
311
Safety features of your vehicle
Rear seat adjustment
Headrest (for rear seat)
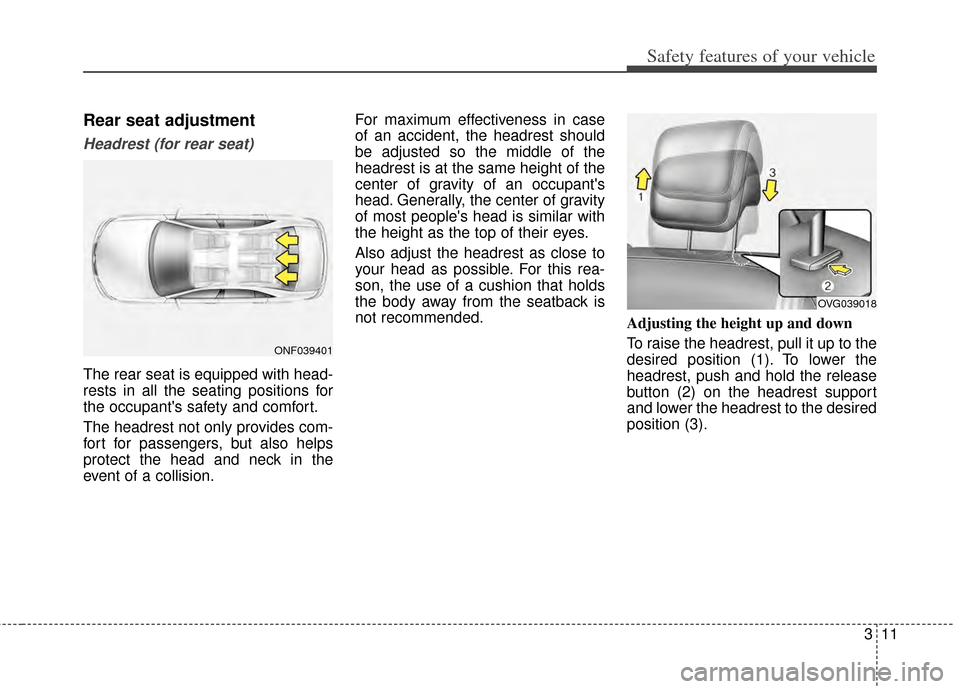
The rear seat is equipped with head-
rests in all the seating positions for
the occupant's safety and comfort.
The headrest not only provides com-
fort for passengers, but also helps
protect the head and neck in the
event of a collision.For maximum effectiveness in case
of an accident, the headrest should
be adjusted so the middle of the
headrest is at the same height of the
center of gravity of an occupant's
head. Generally, the center of gravity
of most people's head is similar with
the height as the top of their eyes.
Also adjust the headrest as close to
your head as possible. For this rea-
son, the use of a cushion that holds
the body away from the seatback is
not recommended.
Adjusting the height up and down
To raise the headrest, pull it up to the
desired position (1). To lower the
headrest, push and hold the release
button (2) on the headrest support
and lower the headrest to the desired
position (3).
ONF039401
OVG039018
Page 26 of 415
Safety features of your vehicle
12
3
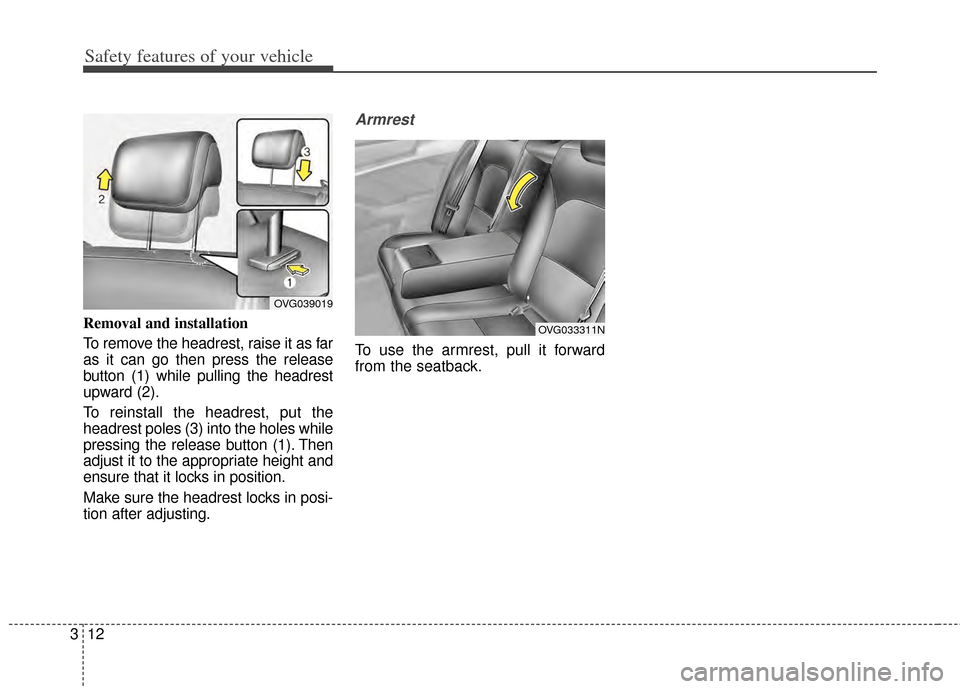
Removal and installation
To remove the headrest, raise it as far
as it can go then press the release
button (1) while pulling the headrest
upward (2).
To reinstall the headrest, put the
headrest poles (3) into the holes while
pressing the release button (1). Then
adjust it to the appropriate height and
ensure that it locks in position.
Make sure the headrest locks in posi-
tion after adjusting.
Armrest
To use the armrest, pull it forward
from the seatback.
OVG039019
OVG033311N
Page 27 of 415
313
Safety features of your vehicle
Seat belt restraint system
Seat belts are designed to bear upon
the bony structure of the body, and
should be worn low across the
pelvis, chest and shoulders as appli-
cable. wearing the lap section of the
belt across the abdominal area must
be avoided.
Seat belts should be adjusted as
firmly as possible, consistent with
comfort, to provide the protection for
which they have been designed.
A slack belt will greatly reduce the
protection afforded to the wearer.
Care should be taken to avoid con-
tamination of the webbing with pol-
ishes, oils and chemicals, and partic-
ularly battery acid. Cleaning may
safely be carried out using mild soap
and water. The belt should be
replaced if webbing becomes frayed,
contaminated or damaged.
For maximum restraint system pro-tection, the seat belts must always
be used whenever the vehicle is
moving. A properly positioned
shoulder belt should be positioned
midway over your shoulder across
your collarbone. Never allow children to ride in the
front passenger seat. See child
restraint system section for further
discussion.
SEAT BELTS
WARNING- Shoulder belt
Never wear the shoulder belt
under your arm or behind your
back. An improperly positioned
shoulder belt cannot protect the
occupant in a crash.
WARNING- Damaged seat belt
Replace the entire seat belt
assembly if any part of the web-
bing or hardware is damaged as
you can no longer be sure that a
damaged seat belt will provide
protection in a crash.
WARNING- Twisted seat belt
Make sure your seat belt is not
twisted when worn. A twisted
seat belt may not properly pro-
tect you in an accident and
could even cut into your body.
WARNING - Seat belt buckle
Do not allow foreign material
(gum, crumbs, coins, etc.) to
obstruct the seat belt buckle.
This may prevent the seat belt
from fastening securely.
Page 28 of 415
Safety features of your vehicle
14
3
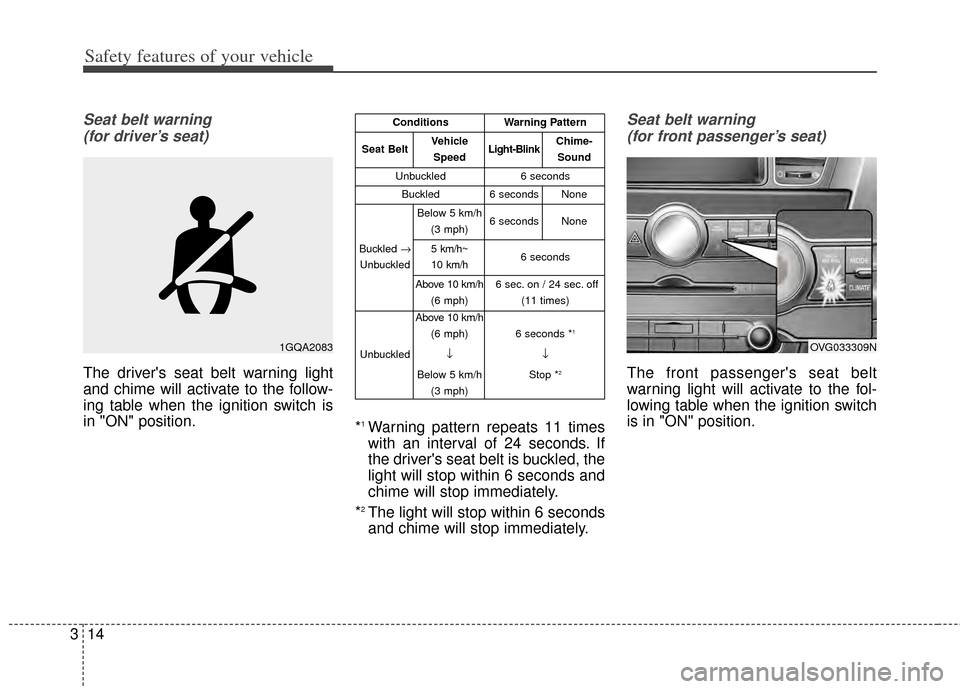
Seat belt warning
(for driver’s seat)
The driver's seat belt warning light
and chime will activate to the follow-
ing table when the ignition switch is
in "ON" position. *
1Warning pattern repeats 11 times
with an interval of 24 seconds. If
the driver's seat belt is buckled, the
light will stop within 6 seconds and
chime will stop immediately.
*
2The light will stop within 6 seconds
and chime will stop immediately.
Seat belt warning (for front passenger’s seat)
The front passenger's seat belt
warning light will activate to the fol-
lowing table when the ignition switch
is in "ON" position.
1GQA2083OVG033309N
ConditionsWarning Pattern
Seat BeltVehicle
SpeedLight-BlinkChime-Sound
Unbuckled6 seconds
Buckled6 secondsNone
Buckled →
Unbuckled
Below 5 km/h (3 mph)6 secondsNone
5 km/h~
10 km/h6 seconds
Above 10 km/h (6 mph)6 sec. on / 24 sec. off (11 times)
Unbuckled
Above 10 km/h(6 mph)
↓
Below 5 km/h (3 mph)
6 seconds *1
↓
Stop *
2
Page 29 of 415
315
Safety features of your vehicle
*1The seat belt warning light will go
off if the vehicle speed decreases
below 5 km/h (3 mph). If the vehi-
cle speed increases above 5 km/h
(3 mph), the warning light will blink
again. You can find the front passenger's
seat belt warning light on the cen-
ter fascia panel.
Although the front passenger seat is not occupied, the seat belt warn-
ing light will blink for 6 seconds.
The seat belt warning light can blink when a briefcase or purse is
placed on the front passenger
seat.
Seat belt - Driver's 3-point system
with emergency locking retractor
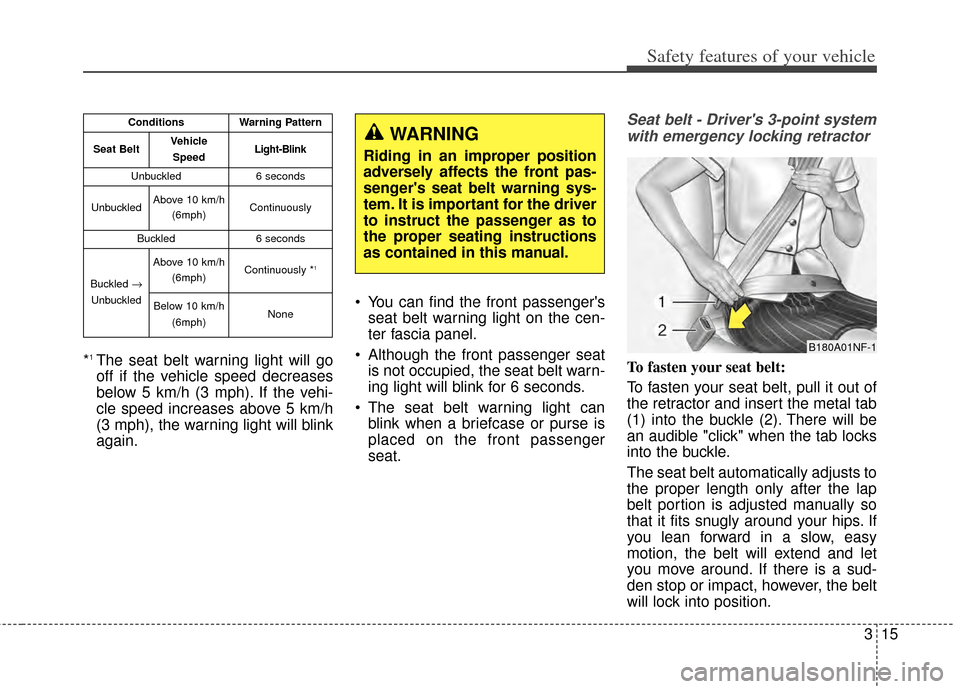
To fasten your seat belt:
To fasten your seat belt, pull it out of
the retractor and insert the metal tab
(1) into the buckle (2). There will be
an audible "click" when the tab locks
into the buckle.
The seat belt automatically adjusts to
the proper length only after the lap
belt portion is adjusted manually so
that it fits snugly around your hips. If
you lean forward in a slow, easy
motion, the belt will extend and let
you move around. If there is a sud-
den stop or impact, however, the belt
will lock into position.
ConditionsWarning Pattern
Seat BeltVehicle
SpeedLight-Blink
Unbuckled6 seconds
UnbuckledAbove 10 km/h (6mph)Continuously
Buckled6 seconds
Buckled →
Unbuckled
Above 10 km/h (6mph)Continuously *1
Below 10 km/h
(6mph)None
B180A01NF-1
WARNING
Riding in an improper position
adversely affects the front pas-
senger's seat belt warning sys-
tem. It is important for the driver
to instruct the passenger as to
the proper seating instructions
as contained in this manual.
Page 30 of 415
Safety features of your vehicle
16
3
It will also lock if you try to lean for-
ward too quickly.
If you are unable to pull out the seat
belt from the retractor, firmly pull the
belt out and release it. Then you will
be able to pull the belt out smoothly.
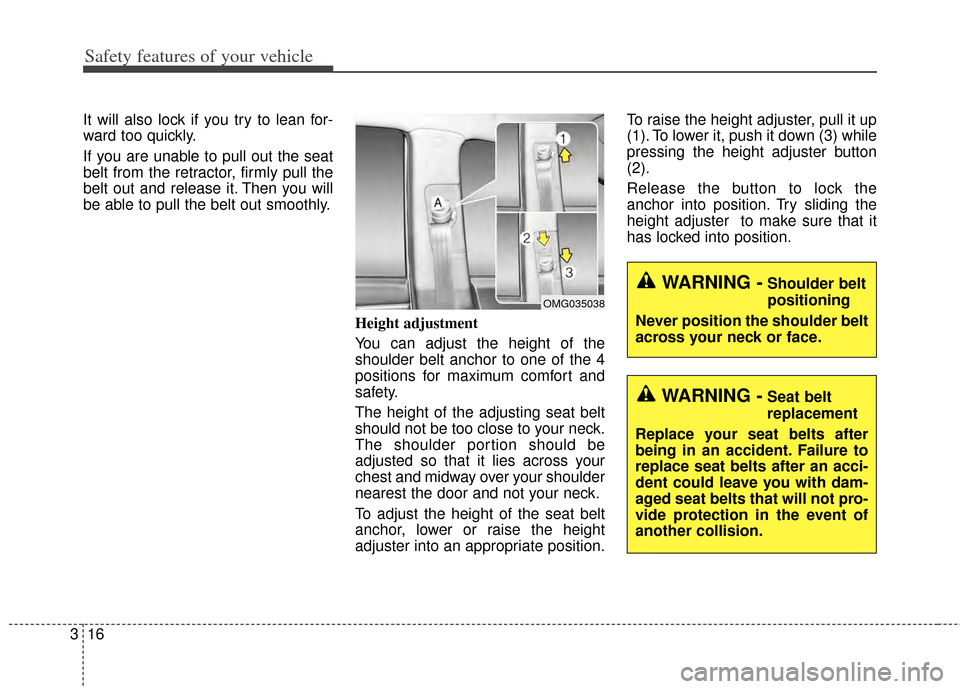
Height adjustment
You can adjust the height of the
shoulder belt anchor to one of the 4
positions for maximum comfort and
safety.
The height of the adjusting seat belt
should not be too close to your neck.
The shoulder portion should be
adjusted so that it lies across your
chest and midway over your shoulder
nearest the door and not your neck.
To adjust the height of the seat belt
anchor, lower or raise the height
adjuster into an appropriate position.To raise the height adjuster, pull it up
(1). To lower it, push it down (3) while
pressing the height adjuster button
(2).
Release the button to lock the
anchor into position. Try sliding the
height adjuster to make sure that it
has locked into position.
WARNING -Shoulder belt
positioning
Never position the shoulder belt
across your neck or face.
WARNING -Seat belt
replacement
Replace your seat belts after
being in an accident. Failure to
replace seat belts after an acci-
dent could leave you with dam-
aged seat belts that will not pro-
vide protection in the event of
another collision.
OMG035038