lock KIA CADENZA 2017 Owners Manual
[x] Cancel search | Manufacturer: KIA, Model Year: 2017, Model line: CADENZA, Model: KIA CADENZA 2017Pages: 500, PDF Size: 10.37 MB
Page 14 of 500

Your vehicle at a glance
42
INTERIOR OVERVIEW
1. Door lock/unlock button.........................4-17
2. Power window switches ........................4-31
3. Central door lock switch ........................4-18
4. Power window lock button .....................4-34
5. Outside rearview mirror control switch..4-62
6. Outside rearview mirror folding button ..4-63
7. Fuel filler lid release button ...................4-37
8. Trunk lid release button................4-20, 4-21
9. ESC OFF button ...................................5-31
10. Instrument panel illumination control switch ......................................4-65
11. BSD On/OFF button............................5-76
12. Lane departure warning system button ................................................4-105
13. Steering wheel ....................................4-47
14. Steering wheel tilt control....................4-48
15. Inner fuse panel ..................................7-58
16. Brake pedal .........................................5-17
17. Parking brake pedal ............................5-19
18. Hood release lever ..............................4-35
19. Seat .......................................................3-4
OYG016003N❈ The actual shape may differ from the illustration.
Page 22 of 500

Safety features of your vehicle
63
WARNING- Driver’s seat
Never attempt to adjust the seat while the vehicle is mov-
ing. This could result in loss
of control of your vehicle.
Do not allow anything to inter- fere with the normal position
of the seatback. Storing items
against the seatback could
result in serious or fatal injury
in a sudden stop or collision.
Sit as far back as possible from the steering wheel while still
maintaining comfortable con-
trol of the your vehicle. A dis-
tance of at least 10" from your
chest to the steering wheel is
recommended. Failure to do so
can result in air bag inflation
injuries to the driver.
WARNING- Unexpected
Seat Movement
After adjusting a manual seat,
always check that it is locked by
shifting your weight to the front
and back. Sudden or unexpect-
ed movement of the driver's
seat could cause you to lose
control of the vehicle.
WARNING - Rear seatbacks
Always lock the rear seatback
before driving. Failure to do so
could result in passengers or
objects being thrown forward
injuring vehicle occupants.
WARNING- Luggage and Cargo
Do not stack pile or stack lug-
gage or cargo higher than the
seatback in the cargo area. In an
accident the cargo could strike
and injury a passenger. If
objects are large, heavy or must
be piled, they must be secured
in the cargo area.
WARNING- Cargo Area
Do not allow passengers to ride
in the cargo area under any cir-
cumstance. The cargo area is
solely for the purpose of trans-
porting luggage or cargo.
Page 29 of 500

313
Safety features of your vehicle
✽
✽
NOTICE
If you recline the seatback towards
the front with the headrest and seat
cushion raised, the headrest may
come in contact with the sunvisor or
other parts of the vehicle.
Removal and reinstallation
To remove the headrest:
1. Recline the seatback (2) with the
recline lever or switch (1).
2. Raise headrest as far as it can go.
3. Press the headrest release button
(3) while pulling the headrest up (4). To reinstall the headrest :
1. Put the headrest poles (2) into the
holes while pressing the release
button (1) or switch(1).
2. Recline the seatback (4) with the recline lever or switch (3).
3. Adjust the headrest to the appro- priate height.
OYG036015
OYFH034205
WARNING - Headrest
Removal
NEVER allow anyone to ride in a
seat with the headrest removed.
Headrests can provide critical
neck and head support in a
crash.
OYG036017
WARNING- Headrest Reinstallation
To reduce the risk of injury to
the head or neck, always make
sure the headrest is locked into
position and adjusted properly
after reinstalling.
Page 31 of 500
315
Safety features of your vehicle
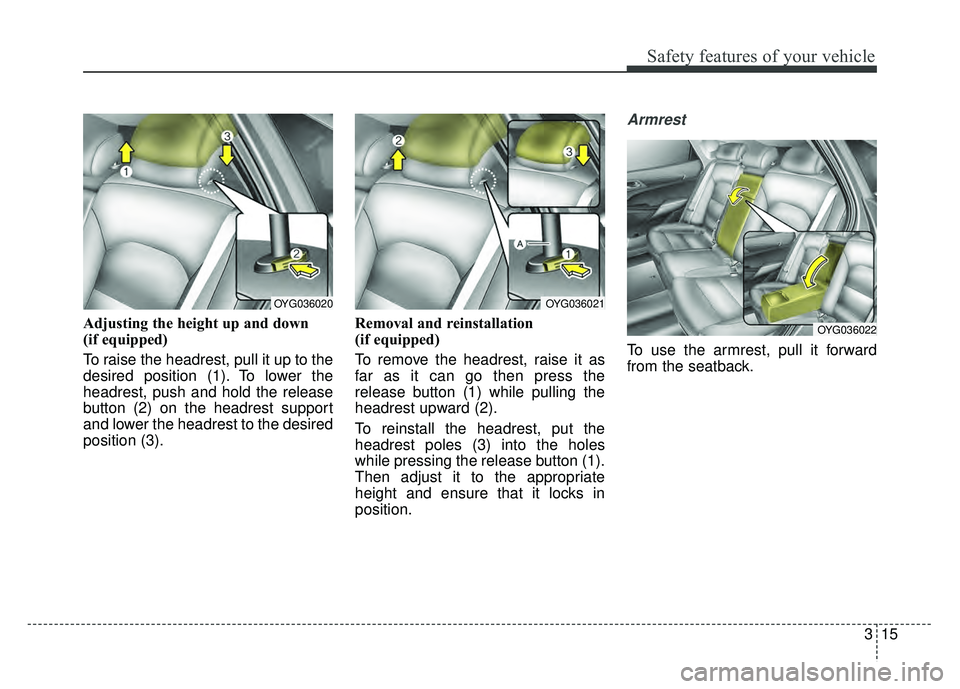
Adjusting the height up and down
(if equipped)
To raise the headrest, pull it up to the
desired position (1). To lower the
headrest, push and hold the release
button (2) on the headrest support
and lower the headrest to the desired
position (3).Removal and reinstallation
(if equipped)
To remove the headrest, raise it as
far as it can go then press the
release button (1) while pulling the
headrest upward (2).
To reinstall the headrest, put the
headrest poles (3) into the holes
while pressing the release button (1).
Then adjust it to the appropriate
height and ensure that it locks in
position.
Armrest
To use the armrest, pull it forward
from the seatback.
OYG036020OYG036021
OYG036022
Page 37 of 500
321
Safety features of your vehicle
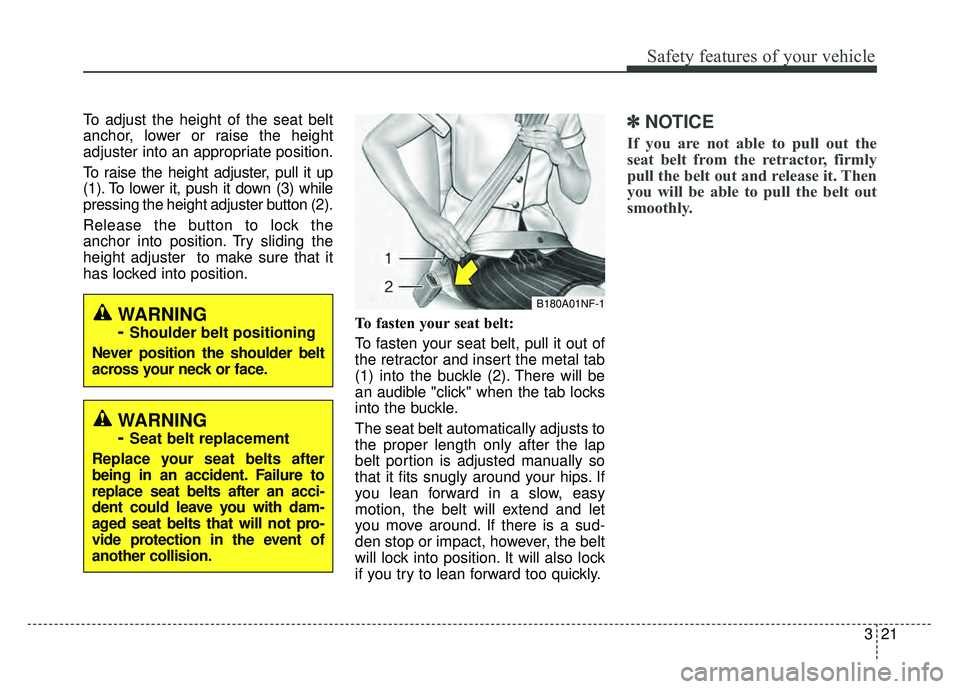
To adjust the height of the seat belt
anchor, lower or raise the height
adjuster into an appropriate position.
To raise the height adjuster, pull it up
(1). To lower it, push it down (3) while
pressing the height adjuster button (2).
Release the button to lock the
anchor into position. Try sliding the
height adjuster to make sure that it
has locked into position.To fasten your seat belt:
To fasten your seat belt, pull it out of
the retractor and insert the metal tab
(1) into the buckle (2). There will be
an audible "click" when the tab locks
into the buckle.
The seat belt automatically adjusts to
the proper length only after the lap
belt portion is adjusted manually so
that it fits snugly around your hips. If
you lean forward in a slow, easy
motion, the belt will extend and let
you move around. If there is a sud-
den stop or impact, however, the belt
will lock into position. It will also lock
if you try to lean forward too quickly.✽ ✽NOTICE
If you are not able to pull out the
seat belt from the retractor, firmly
pull the belt out and release it. Then
you will be able to pull the belt out
smoothly.
B180A01NF-1WARNING
-
Shoulder belt positioning
Never position the shoulder belt
across your neck or face.
WARNING
-
Seat belt replacement
Replace your seat belts after
being in an accident. Failure to
replace seat belts after an acci-
dent could leave you with dam-
aged seat belts that will not pro-
vide protection in the event of
another collision.
Page 38 of 500
Safety features of your vehicle
22
3
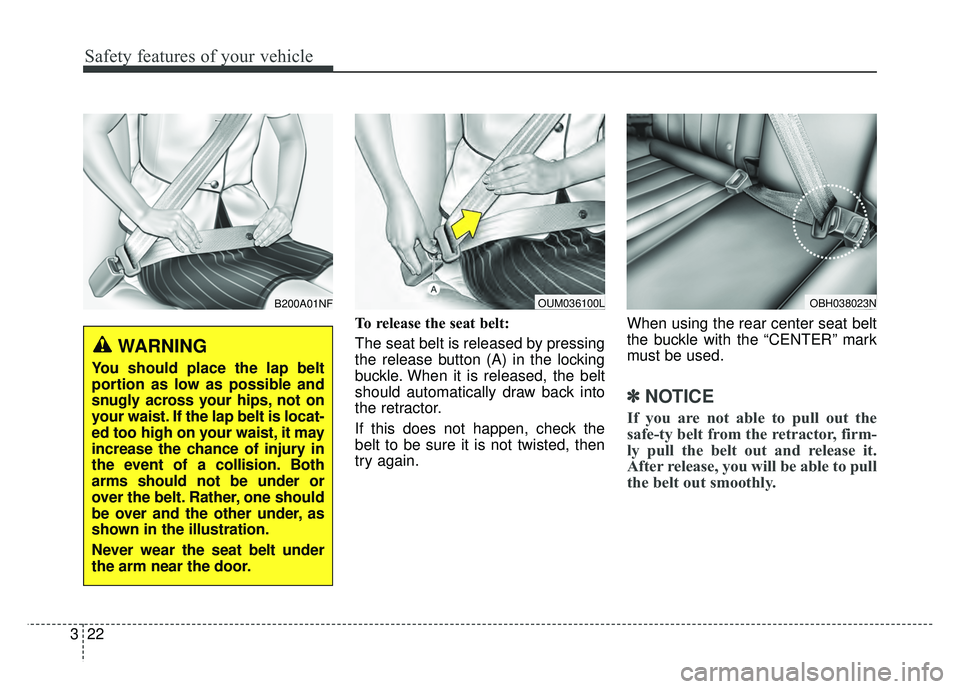
To release the seat belt:
The seat belt is released by pressing
the release button (A) in the locking
buckle. When it is released, the belt
should automatically draw back into
the retractor.
If this does not happen, check the
belt to be sure it is not twisted, then
try again. When using the rear center seat belt
the buckle with the “CENTER” mark
must be used.
✽ ✽
NOTICE
If you are not able to pull out the
safe-ty belt from the retractor, firm-
ly pull the belt out and release it.
After release, you will be able to pull
the belt out smoothly.
B200A01NF
WARNING
You should place the lap belt
portion as low as possible and
snugly across your hips, not on
your waist. If the lap belt is locat-
ed too high on your waist, it may
increase the chance of injury in
the event of a collision. Both
arms should not be under or
over the belt. Rather, one should
be over and the other under, as
shown in the illustration.
Never wear the seat belt under
the arm near the door.
OUM036100LOBH038023N
Page 39 of 500
323
Safety features of your vehicle
Pre-tensioner seat belt
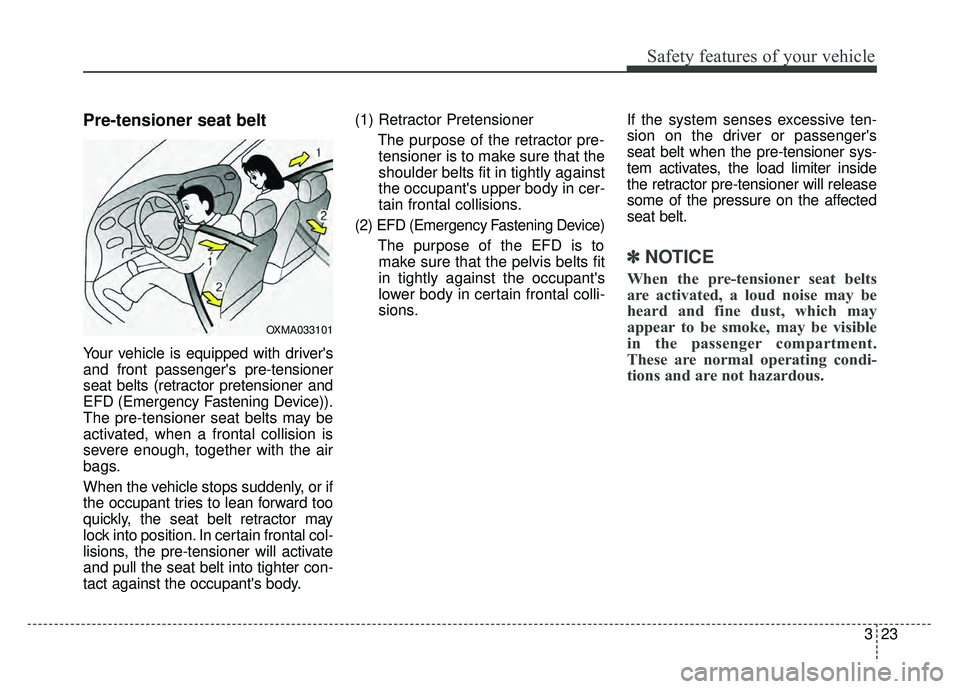
Your vehicle is equipped with driver's
and front passenger's pre-tensioner
seat belts (retractor pretensioner and
EFD (Emergency Fastening Device)).
The pre-tensioner seat belts may be
activated, when a frontal collision is
severe enough, together with the air
bags.
When the vehicle stops suddenly, or if
the occupant tries to lean forward too
quickly, the seat belt retractor may
lock into position. In certain frontal col-
lisions, the pre-tensioner will activate
and pull the seat belt into tighter con-
tact against the occupant's body.(1) Retractor Pretensioner
The purpose of the retractor pre-tensioner is to make sure that the
shoulder belts fit in tightly against
the occupant's upper body in cer-
tain frontal collisions.
(2) EFD (Emergency Fastening Device)
The purpose of the EFD is tomake sure that the pelvis belts fit
in tightly against the occupant's
lower body in certain frontal colli-
sions. If the system senses excessive ten-
sion on the driver or passenger's
seat belt when the pre-tensioner sys-
tem activates, the load limiter inside
the retractor pre-tensioner will release
some of the pressure on the affected
seat belt.✽ ✽
NOTICE
When the pre-tensioner seat belts
are activated, a loud noise may be
heard and fine dust, which may
appear to be smoke, may be visible
in the passenger compartment.
These are normal operating condi-
tions and are not hazardous.
OXMA033101
Page 52 of 500
Safety features of your vehicle
36
3
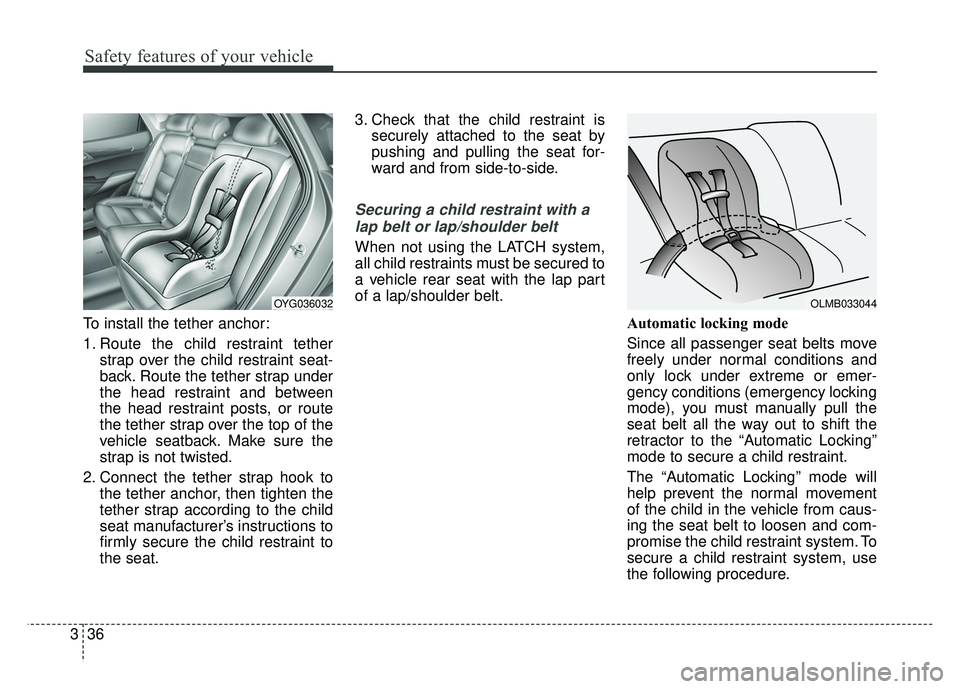
To install the tether anchor:
1. Route the child restraint tether
strap over the child restraint seat-
back. Route the tether strap under
the head restraint and between
the head restraint posts, or route
the tether strap over the top of the
vehicle seatback. Make sure the
strap is not twisted.
2. Connect the tether strap hook to the tether anchor, then tighten the
tether strap according to the child
seat manufacturer’s instructions to
firmly secure the child restraint to
the seat. 3. Check that the child restraint is
securely attached to the seat by
pushing and pulling the seat for-
ward and from side-to-side.
Securing a child restraint with a
lap belt or lap/shoulder belt
When not using the LATCH system,
all child restraints must be secured to
a vehicle rear seat with the lap part
of a lap/shoulder belt.
Automatic locking mode
Since all passenger seat belts move
freely under normal conditions and
only lock under extreme or emer-
gency conditions (emergency locking
mode), you must manually pull the
seat belt all the way out to shift the
retractor to the “Automatic Locking”
mode to secure a child restraint.
The “Automatic Locking” mode will
help prevent the normal movement
of the child in the vehicle from caus-
ing the seat belt to loosen and com-
promise the child restraint system. To
secure a child restraint system, use
the following procedure.
OYG036032OLMB033044
Page 53 of 500
337
Safety features of your vehicle
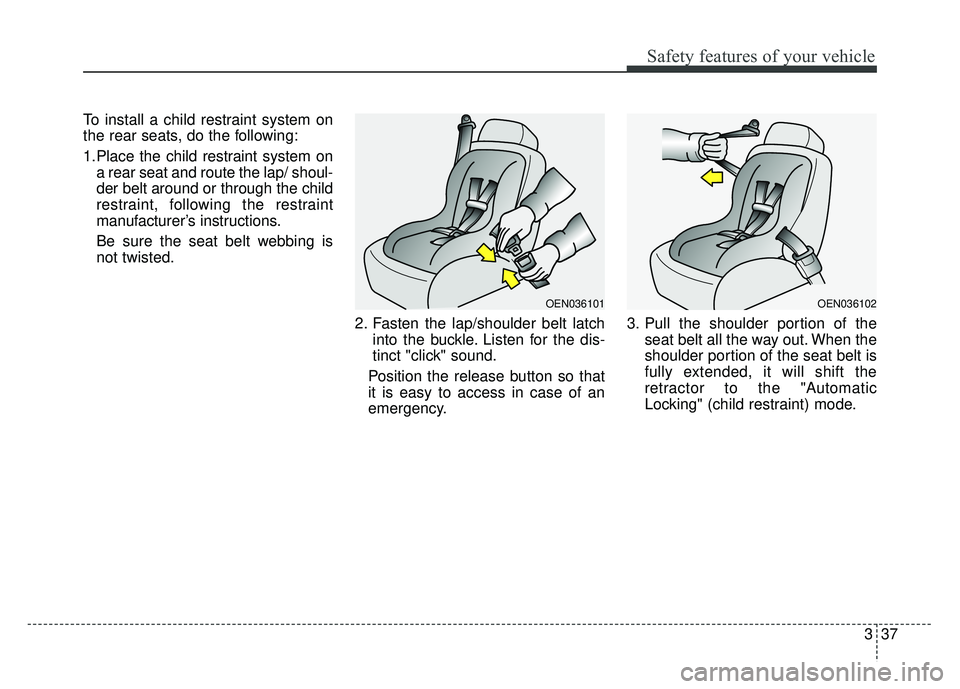
To install a child restraint system on
the rear seats, do the following:
1.Place the child restraint system ona rear seat and route the lap/ shoul-
der belt around or through the child
restraint, following the restraint
manufacturer’s instructions.
Be sure the seat belt webbing is
not twisted.
2. Fasten the lap/shoulder belt latchinto the buckle. Listen for the dis-
tinct "click" sound.
Position the release button so that
it is easy to access in case of an
emergency. 3. Pull the shoulder portion of the
seat belt all the way out. When the
shoulder portion of the seat belt is
fully extended, it will shift the
retractor to the "Automatic
Locking" (child restraint) mode.
OEN036101OEN036102
Page 54 of 500
Safety features of your vehicle
38
3
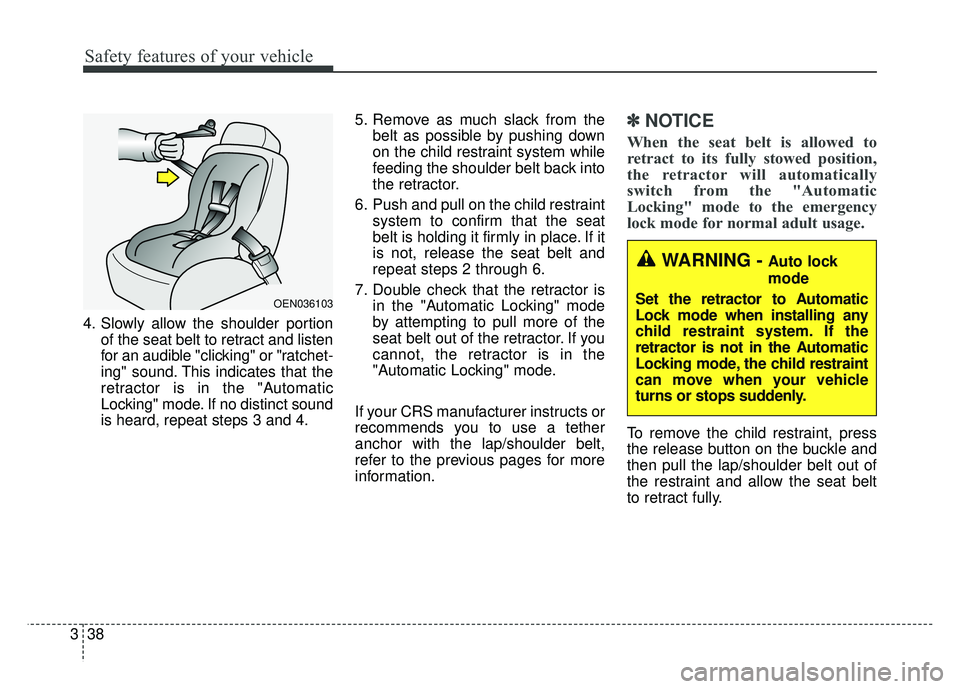
4. Slowly allow the shoulder portion
of the seat belt to retract and listen
for an audible "clicking" or "ratchet-
ing" sound. This indicates that the
retractor is in the "Automatic
Locking" mode. If no distinct sound
is heard, repeat steps 3 and 4. 5. Remove as much slack from the
belt as possible by pushing down
on the child restraint system while
feeding the shoulder belt back into
the retractor.
6. Push and pull on the child restraint system to confirm that the seat
belt is holding it firmly in place. If it
is not, release the seat belt and
repeat steps 2 through 6.
7. Double check that the retractor is in the "Automatic Locking" mode
by attempting to pull more of the
seat belt out of the retractor. If you
cannot, the retractor is in the
"Automatic Locking" mode.
If your CRS manufacturer instructs or
recommends you to use a tether
anchor with the lap/shoulder belt,
refer to the previous pages for more
information.
✽ ✽ NOTICE
When the seat belt is allowed to
retract to its fully stowed position,
the retractor will automatically
switch from the "Automatic
Locking" mode to the emergency
lock mode for normal adult usage.
To remove the child restraint, press
the release button on the buckle and
then pull the lap/shoulder belt out of
the restraint and allow the seat belt
to retract fully.
OEN036103
WARNING - Auto lock
mode
Set the retractor to Automatic
Lock mode when installing any
child restraint system. If the
retractor is not in the Automatic
Locking mode, the child restraint
can move when your vehicle
turns or stops suddenly.