ECO mode KIA CADENZA 2018 Owners Manual
[x] Cancel search | Manufacturer: KIA, Model Year: 2018, Model line: CADENZA, Model: KIA CADENZA 2018Pages: 502, PDF Size: 9.77 MB
Page 2 of 502

Kia, THE COMPANY
Thank you for becoming the owner of a new Kia vehicle.
As a global car manufacturer focused on building high-quality vehi-
cles with exceptional value, Kia Motors is dedicated to providing you
with a customer service experience that exceeds your expectations.
All information contained in this Owner’s Manual was accurate at the
time of publication. However, Kia reserves the right to make changes
at any time so that our policy of continual product improvement can
be carried out.
This manual applies to all models of this vehicle and includes descrip-
tions and explanations of optional as well as standard equipment. As a
result, you may encounter material in this manual that is not applica-
ble to your specific Kia vehicle.Drive safely and enjoy your Kia!
Page 3 of 502

i
Thank you for choosing a Kia vehicle.
When you require service, remember that your Kia dealer
knows your vehicle best. Your dealer has factory-trained tech-
nicians, recommended special tools and genuine Kia replace-
ment parts. It is dedicated to your complete customer satisfac-
tion.
Because subsequent owners require this important information
as well, this publication should remain with the vehicle if it is
sold.
This manual will familiarize you with operational, mainte-
nance and safety information about your new vehicle. It is sup-
plemented by a Warranty and Consumer Information manual
that provides important information on all warranties regarding
your vehicle.
We urge you to read these publications carefully and follow the
recommendations to help assure enjoyable and safe operation
of your new vehicle.
Kia offers a great variety of options, components and features
for its various models. Therefore, some of the equipment
described in this manual, along with the various illustrations,
may not be applicable to your particular vehicle.
The information and specifications provided in this manual
were accurate at the time of printing. Kia reserves the right to
discontinue or change specifications or design at any time
without notice and without incurring any obligation. If you
have questions, always check with your Kia dealer.
We assure you of our continuing interest in your motoring
pleasure and satisfaction in your Kia vehicle.
© 2017 Kia MOTORS AMERICA, Inc.
All rights reserved. May not be reproduced or translated in
whole or in part without the written consent of Kia Motors
America, Inc.
Printed in Korea
Foreword
Page 54 of 502

Safety features of your vehicle
38
3
4. Slowly allow the shoulder portion
of the seat belt to retract and listen
for an audible "clicking" or "ratchet-
ing" sound. This indicates that the
retractor is in the "Automatic
Locking" mode. If no distinct sound
is heard, repeat steps 3 and 4. 5. Remove as much slack from the
belt as possible by pushing down
on the child restraint system while
feeding the shoulder belt back into
the retractor.
6. Push and pull on the child restraint system to confirm that the seat
belt is holding it firmly in place. If it
is not, release the seat belt and
repeat steps 2 through 6.
7. Double check that the retractor is in the "Automatic Locking" mode
by attempting to pull more of the
seat belt out of the retractor. If you
cannot, the retractor is in the
"Automatic Locking" mode.
If your CRS manufacturer instructs or
recommends you to use a tether
anchor with the lap/shoulder belt,
refer to the previous pages for more
information.
✽ ✽ NOTICE
When the seat belt is allowed to
retract to its fully stowed position,
the retractor will automatically
switch from the "Automatic
Locking" mode to the emergency
lock mode for normal adult usage.
To remove the child restraint, press
the release button on the buckle and
then pull the lap/shoulder belt out of
the restraint and allow the seat belt
to retract fully.
OEN036103
WARNING - Auto lock
mode
Set the retractor to Automatic
Lock mode when installing any
child restraint system. If the
retractor is not in the Automatic
Locking mode, the child restraint
can move when your vehicle
turns or stops suddenly.
Page 64 of 502

Safety features of your vehicle
48
3
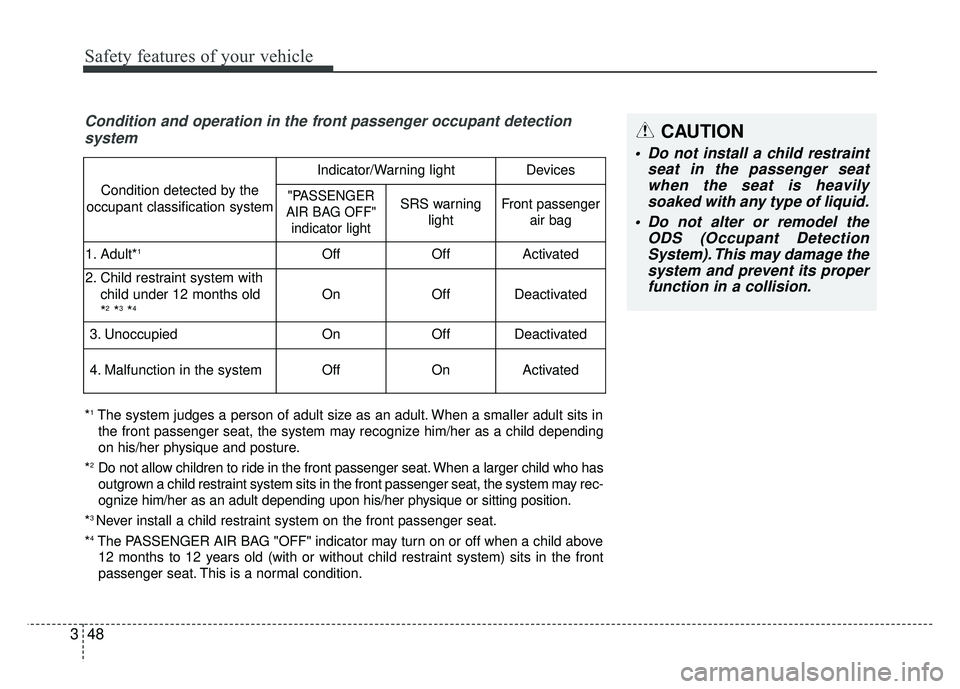
Condition and operation in the front passenger occupant detection
system
*1The system judges a person of adult size as an adult. When a smaller adult sits in
the front passenger seat, the system may recognize him/her as a child depending
on his/her physique and posture.
*
2Do not allow children to ride in the front passenger seat. When a larger child who has
outgrown a child restraint system sits in the front passenger seat, the system may rec-
ognize him/her as an adult depending upon his/her physique or sitting position.
*
3 Never install a child restraint system on the front passenger seat.
*
4The PASSENGER AIR BAG "OFF" indicator may turn on or off when a child above 12 months to 12 years old (with or without child restraint system) sits in the front
passenger seat. This is a normal condition.
Condition detected by the
occupant classification system
Indicator/Warning lightDevices
"PASSENGER
AIR BAG OFF" indicator lightSRS warning lightFront passenger air bag
1. Adult*1OffOffActivated
2. Child restraint system with
child under 12 months old
*
2*3*4OnOffDeactivated
3. Unoccupied OnOffDeactivated
4. Malfunction in the systemOffOnActivated
CAUTION
Do not install a child restraint seat in the passenger seatwhen the seat is heavilysoaked with any type of liquid.
Do not alter or remodel the ODS (Occupant DetectionSystem). This may damage thesystem and prevent its properfunction in a collision.
Page 70 of 502

Safety features of your vehicle
54
3
Driver's and passenger's front
air bagYour vehicle is equipped with an
Advanced Supplemental Restraint
(Air Bag) System and lap/shoulder
belts at both the driver and passen-
ger seating position.
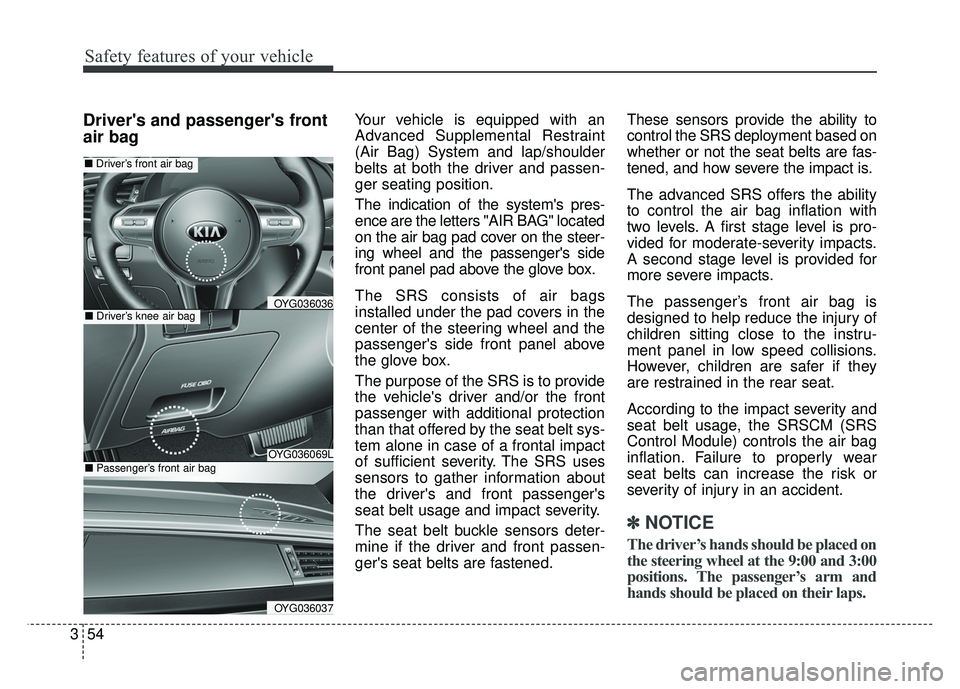
The indication of the system's pres-
ence are the letters "AIR BAG" located
on the air bag pad cover on the steer-
ing wheel and the passenger's side
front panel pad above the glove box.
The SRS consists of air bags
installed under the pad covers in the
center of the steering wheel and the
passenger's side front panel above
the glove box.
The purpose of the SRS is to provide
the vehicle's driver and/or the front
passenger with additional protection
than that offered by the seat belt sys-
tem alone in case of a frontal impact
of sufficient severity. The SRS uses
sensors to gather information about
the driver's and front passenger's
seat belt usage and impact severity.
The seat belt buckle sensors deter-
mine if the driver and front passen-
ger's seat belts are fastened. These sensors provide the ability to
control the SRS deployment based on
whether or not the seat belts are fas-
tened, and how severe the impact is.
The advanced SRS offers the ability
to control the air bag inflation with
two levels. A first stage level is pro-
vided for moderate-severity impacts.
A second stage level is provided for
more severe impacts.
The passenger’s front air bag is
designed to help reduce the injury of
children sitting close to the instru-
ment panel in low speed collisions.
However, children are safer if they
are restrained in the rear seat.
According to the impact severity and
seat belt usage, the SRSCM (SRS
Control Module) controls the air bag
inflation. Failure to properly wear
seat belts can increase the risk or
severity of injury in an accident.
✽ ✽
NOTICE
The driver’s hands should be placed on
the steering wheel at the 9:00 and 3:00
positions. The passenger’s arm and
hands should be placed on their laps.
OYG036069L
■ Driver’s front air bag
■Driver’s knee air bagOYG036036
OYG036037
■Passenger’s front air bag
Page 109 of 502

Features of your vehicle
28
4
1. Setting
To activate the Smart Trunk, go to
User Settings Mode and select
Smart Trunk on the LCD display.
❈ For more details, refer to “LCD
Display” in this chapter.
2. Detect and Alert
If you are positioned in the detecting
area (20 ~ 40 inches (50 ~100 cm)
behind the vehicle) carrying a smart
key, the hazard warning lights will
blink and the chime will sound for
about 3 seconds to alert you the
smart key has been detected and the
trunk will open.✽ ✽NOTICE
Do not approach the detecting area if
you do not want the trunk to open. If
you have unintentionally entered the
detecting area and the hazard warn-
ing lights and chime starts to operate,
leave the detecting area with the
smart key. The trunk will stay closed.
OYG046022N
Page 141 of 502

Features of your vehicle
60
4
Reprogramming a single
HomeLink®button
To program a new device to a previ-
ously trained HomeLink®button, fol-
low these steps:
1. Press and hold the desired HomeLink
®button. Do NOT
release until step 4 has been com-
pleted.
2. When the indicator light begins to flash slowly (after 20 seconds),
position the handheld transmitter 1
to 3 inches away from the
HomeLink
®surface.
3. Press and hold the handheld transmitter button. The HomeLink
®
indicator light will flash, first slowly
and then rapidly.
4. When the indicator light begins to flash rapidly, release both buttons.
5. Press and hold the just-trained HomeLink
®button and observe
the red Status Indicator LED. If the
indicator light stays on constantly,
programming is complete and
your new device should activate.
Erasing HomeLink®buttons
Individual buttons cannot be erased.
However, to erase all three pro-
grammed buttons:
1. Press and hold the two outer HomeLink
®buttons until the indi-
cator light begins to flash-after 20
seconds.
2. Release both buttons. Do not hold for longer than 30 seconds.
The Integrated HomeLink
®Wireless
Control System is now in the training
(learn) mode and can be pro-
grammed at any time following the
appropriate steps in the
Programming sections above. FCC ID: NZLZTVHL3
IC: 4112A-ZTVHL3
Pursuant to Code of Federal
Regulations, Title 47, Part 15
(“FCC Rules”)
Operation is subject to the following
two conditions:
1. This device may not cause harmful
interference, and
2. This device must accept any inter- ference received, including inter-
ference that may cause undesired
operation.
Page 152 of 502

471
Features of your vehicle
Trip Modes Fuel Economy
Distance To Empty (1)
The distance to empty is the esti-
mated distance the vehicle can be
driven with the remaining fuel.
- Distance range : 1 ~ 9999mi or 1~ 9999km.
If the estimated distance is below 1mi (1km) the trip computer will dis-
play “---” as distance to empty.
✽ ✽ NOTICE
• If the vehicle is not on level ground
or the battery power has been
interrupted, the distance to empty
function may not operate correctly.
• The distance to empty may differ from the actual driving distance as
it is an estimate of the available
driving distance.
• The trip computer may not regis- ter additional fuel if less than
1.6gallons (6liters) of fuel are
added to the vehicle.
• The fuel economy and distance to empty may vary significantly based
on driving conditions, driving
habits, and condition of the vehicle.
OYG046153N
Accumulated Info
Digital speedometer
Drive Info
TRIP
Smart Shift
Page 153 of 502

Features of your vehicle
72
4
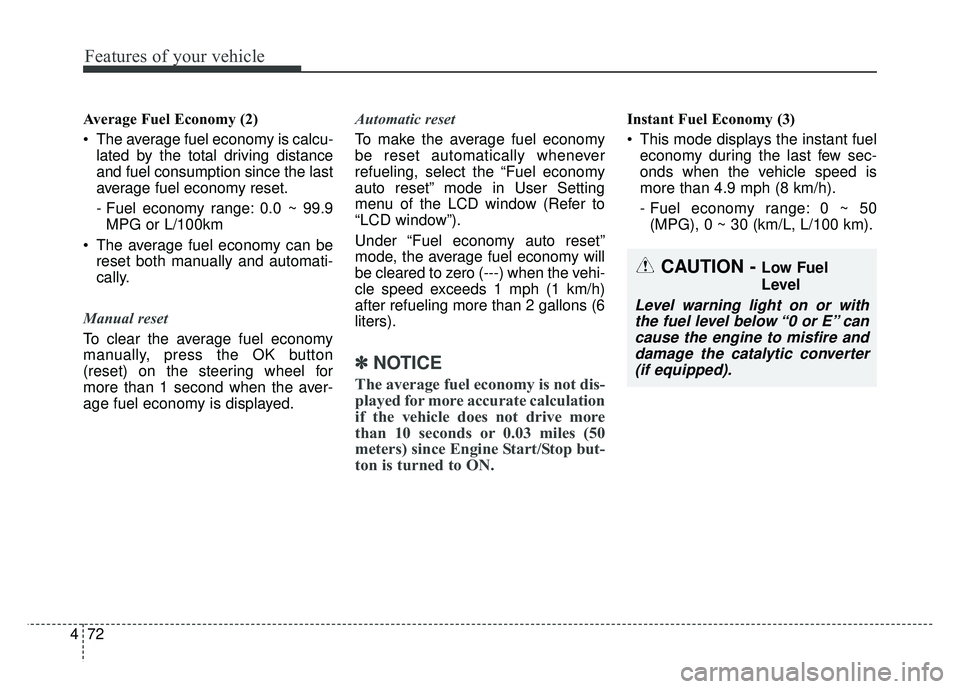
Average Fuel Economy (2)
The average fuel economy is calcu-
lated by the total driving distance
and fuel consumption since the last
average fuel economy reset.
- Fuel economy range: 0.0 ~ 99.9MPG or L/100km
The average fuel economy can be reset both manually and automati-
cally.
Manual reset
To clear the average fuel economy
manually, press the OK button
(reset) on the steering wheel for
more than 1 second when the aver-
age fuel economy is displayed. Automatic reset
To make the average fuel economy
be reset automatically whenever
refueling, select the “Fuel economy
auto reset” mode in User Setting
menu of the LCD window (Refer to
“LCD window”).
Under “Fuel economy auto reset”
mode, the average fuel economy will
be cleared to zero (---) when the vehi-
cle speed exceeds 1 mph (1 km/h)
after refueling more than 2 gallons (6
liters).
✽ ✽
NOTICE
The average fuel economy is not dis-
played for more accurate calculation
if the vehicle does not drive more
than 10 seconds or 0.03 miles (50
meters) since Engine Start/Stop but-
ton is turned to ON.
Instant Fuel Economy (3)
This mode displays the instant fuel
economy during the last few sec-
onds when the vehicle speed is
more than 4.9 mph (8 km/h).
- Fuel economy range: 0 ~ 50(MPG), 0 ~ 30 (km/L, L/100 km).
CAUTION - Low Fuel
Level
Level warning light on or withthe fuel level below “0 or E” cancause the engine to misfire anddamage the catalytic converter(if equipped).
Page 154 of 502

473
Features of your vehicle
Accumulated driving informationmode
Displays accumulated information
starting from mileage/fuel
efficiency/time default point.
Accumulated information is calcu- lated after the vehicle has run for
more than 0.19 mi (300 meters).
If you press “OK” button for more than 1 second after the Cumulative
Information is displayed, the infor-
mation will be reset.
If the engine is running, even when the vehicle is not in motion, the
information will be accumulated.
One time driving information mode
The vehicle will display Driving
Information once per one ignition cycle.
- Fuel efficiency is calculated after thevehicle has run for more than 0.19 mi
(300 meters).
- The Driving Information will be reset 4 hours after ignition has been turned
off. So, when the vehicle ignition is
turned on within 4 hours, the informa-
tion will not be reset.
- If you press “OK” button for more
than 1 second after the Driving
Information is displayed, the informa-
tion will be reset. - If the engine is running, even when
the vehicle is not in motion, the infor-
mation will be accumulated.OYG046154N
OYG046155N