climate control KIA CADENZA 2019 Owners Manual
[x] Cancel search | Manufacturer: KIA, Model Year: 2019, Model line: CADENZA, Model: KIA CADENZA 2019Pages: 518, PDF Size: 11.08 MB
Page 16 of 518
25
Your vehicle at a glance
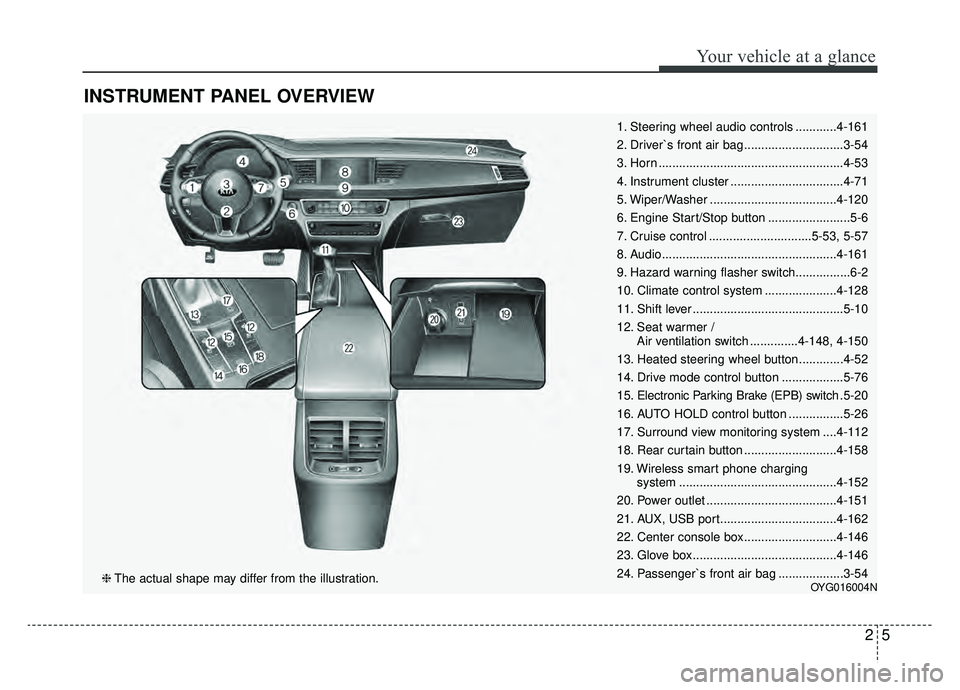
INSTRUMENT PANEL OVERVIEW
1. Steering wheel audio controls ............4-161
2. Driver`s front air bag .............................3-54
3. Horn ......................................................4-53
4. Instrument cluster .................................4-71
5. Wiper/Washer .....................................4-120
6. Engine Start/Stop button ........................5-6
7. Cruise control ..............................5-53, 5-57
8. Audio...................................................4-161
9. Hazard warning flasher switch................6-2
10. Climate control system .....................4-128
11. Shift lever ............................................5-10
12. Seat warmer /Air ventilation switch ..............4-148, 4-150
13. Heated steering wheel button.............4-52
14. Drive mode control button ..................5-76
15. Electronic Parking Brake (EPB) switch .5-20
16. AUTO HOLD control button ................5-26
17. Surround view monitoring system ....4-112
18. Rear curtain button ...........................4-158
19. Wireless smart phone charging system ..............................................4-152
20. Power outlet ......................................4-151
21. AUX, USB port..................................4-162
22. Center console box...........................4-146
23. Glove box ..........................................4-146
24. Passenger`s front air bag ...................3-54
OYG016004N❈ The actual shape may differ from the illustration.
Page 85 of 518
Wipers and washers . . . . . . . . . . . . . . . . . . . . . . . 4-120
• Windshield wipers . . . . . . . . . . . . . . . . . . . . . . . . . . . 4-120
• Front windshield washers . . . . . . . . . . . . . . . . . . . . . 4-122
Interior lights . . . . . . . . . . . . . . . . . . . . . . . . . . . . 4-123
• Automatic turn off function . . . . . . . . . . . . . . . . . . . 4-123
• Room lamp . . . . . . . . . . . . . . . . . . . . . . . . . . . . . . . . . 4-123
• Map lamp . . . . . . . . . . . . . . . . . . . . . . . . . . . . . . . . . . 4-12\
4
• Trunk room lamp . . . . . . . . . . . . . . . . . . . . . . . . . . . 4-125
• Vanity mirror lamp . . . . . . . . . . . . . . . . . . . . . . . . . . 4-125
• Glove box lamp . . . . . . . . . . . . . . . . . . . . . . . . . . . . . 4-125
Welcome system . . . . . . . . . . . . . . . . . . . . . . . . . . 4-126
• Headlight (Headlamp) escort function . . . . . . . . . . 4-126
• Interior light. . . . . . . . . . . . . . . . . . . . . . . . . . . . . . . . 4-126
• Pocket lamp . . . . . . . . . . . . . . . . . . . . . . . . . . . . . . . . 4-126
Defroster . . . . . . . . . . . . . . . . . . . . . . . . . . . . . . . . 4-127
• Rear window defroster . . . . . . . . . . . . . . . . . . . . . . . 4-127
Automatic climate control system . . . . . . . . . . . 4-128
• Automatic heating and air conditioning . . . . . . . . . 4-129
• Manual heating and air conditioning . . . . . . . . . . . 4-131
• System operation . . . . . . . . . . . . . . . . . . . . . . . . . . . . 4-137
• Climate control air filter . . . . . . . . . . . . . . . . . . . . . . 4-139
• Checking the amount of air conditionerrefrigerant and compressor lubricant . . . . . . . . . . 4-140
• Air Conditioning refrigerant label. . . . . . . . . . . . . . 4-140
Windshield defrosting and defogging . . . . . . . . . 4-141
• Automatic climate control system . . . . . . . . . . . . . . 4-141
• Defogging logic. . . . . . . . . . . . . . . . . . . . . . . . . . . . . . 4-142
Automatic ventilation. . . . . . . . . . . . . . . . . . . . . . 4-145
Clean air . . . . . . . . . . . . . . . . . . . . . . . . . . . . . . . . 4-145
• To cancel or reset the automatic ventilation . . . . . . 4-145
Storage compartments . . . . . . . . . . . . . . . . . . . . . 4-146
• Center console storage . . . . . . . . . . . . . . . . . . . . . . . 4-146
• Glove box . . . . . . . . . . . . . . . . . . . . . . . . . . . . . . . . . . 4-14\
6
• Sunglass holder . . . . . . . . . . . . . . . . . . . . . . . . . . . . . 4-147
Interior features . . . . . . . . . . . . . . . . . . . . . . . . . . 4-148
• Cup holder . . . . . . . . . . . . . . . . . . . . . . . . . . . . . . . . . 4-148
• Seat warmer . . . . . . . . . . . . . . . . . . . . . . . . . . . . . . . . 4-148
• Air ventilation seat . . . . . . . . . . . . . . . . . . . . . . . . . . 4-150
• Sunvisor . . . . . . . . . . . . . . . . . . . . . . . . . . . . . . . . . . . 4-\
150
• Power outlet . . . . . . . . . . . . . . . . . . . . . . . . . . . . . . . . 4-151
• Wireless smart phone charging system . . . . . . . . . . 4-152
• Coat hook . . . . . . . . . . . . . . . . . . . . . . . . . . . . . . . . . . 4-15\
6
• Floor mat anchor (s) . . . . . . . . . . . . . . . . . . . . . . . . . 4-157
• Side curtain . . . . . . . . . . . . . . . . . . . . . . . . . . . . . . . . 4-157
• Rear curtain . . . . . . . . . . . . . . . . . . . . . . . . . . . . . . . . 4-158
• Clock . . . . . . . . . . . . . . . . . . . . . . . . . . . . . . . . . . . . \
. . 4-158
• Luggage net (Holder) . . . . . . . . . . . . . . . . . . . . . . . . 4-159
4
Page 125 of 518
443
Features of your vehicle
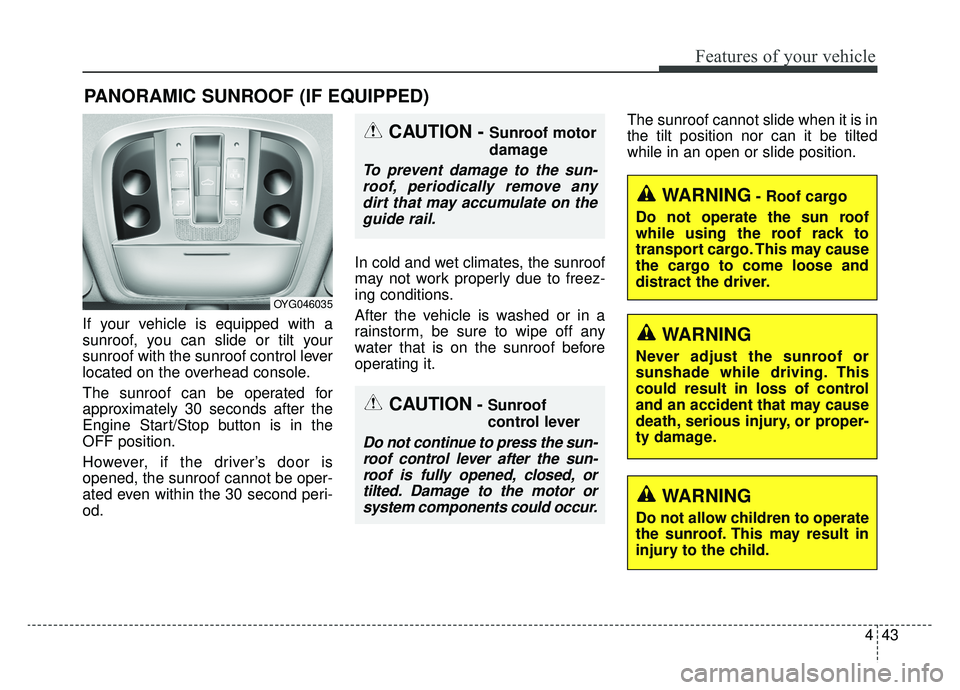
If your vehicle is equipped with a
sunroof, you can slide or tilt your
sunroof with the sunroof control lever
located on the overhead console.
The sunroof can be operated for
approximately 30 seconds after the
Engine Start/Stop button is in the
OFF position.
However, if the driver’s door is
opened, the sunroof cannot be oper-
ated even within the 30 second peri-
od.In cold and wet climates, the sunroof
may not work properly due to freez-
ing conditions.
After the vehicle is washed or in a
rainstorm, be sure to wipe off any
water that is on the sunroof before
operating it.
The sunroof cannot slide when it is in
the tilt position nor can it be tilted
while in an open or slide position.
PANORAMIC SUNROOF (IF EQUIPPED)
CAUTION- Sunroof
control lever
Do not continue to press the sun-
roof control lever after the sun-roof is fully opened, closed, ortilted. Damage to the motor orsystem components could occur.
CAUTION - Sunroof motor
damage
To prevent damage to the sun-roof, periodically remove anydirt that may accumulate on theguide rail.
WARNING- Roof cargo
Do not operate the sun roof
while using the roof rack to
transport cargo. This may cause
the cargo to come loose and
distract the driver.
OYG046035
WARNING
Do not allow children to operate
the sunroof. This may result in
injury to the child.
WARNING
Never adjust the sunroof or
sunshade while driving. This
could result in loss of control
and an accident that may cause
death, serious injury, or proper-
ty damage.
Page 210 of 518
Features of your vehicle
128
4
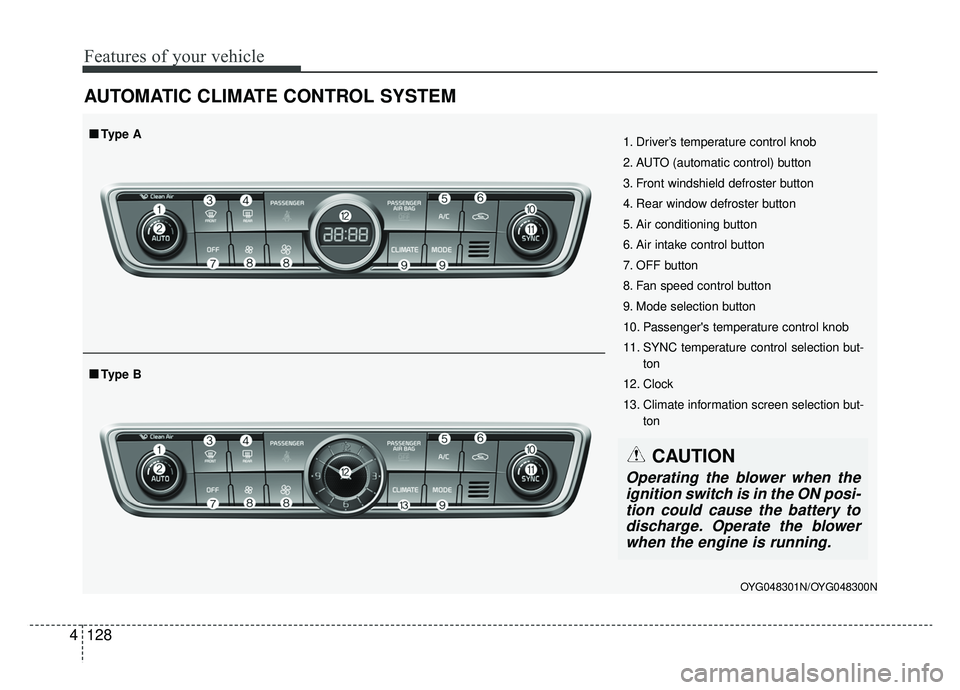
AUTOMATIC CLIMATE CONTROL SYSTEM
OYG048301N/OYG048300N
1. Driver’s temperature control knob
2. AUTO (automatic control) button
3. Front windshield defroster button
4. Rear window defroster button
5. Air conditioning button
6. Air intake control button
7. OFF button
8. Fan speed control button
9. Mode selection button
10. Passenger's temperature control knob
11. SYNC temperature control selection but-
ton
12. Clock
13. Climate information screen selection but- ton
■ ■Type B
■ ■Type A
CAUTION
Operating the blower when the
ignition switch is in the ON posi-tion could cause the battery todischarge. Operate the blowerwhen the engine is running.
Page 211 of 518
4129
Features of your vehicle
Automatic heating and air con-
ditioning
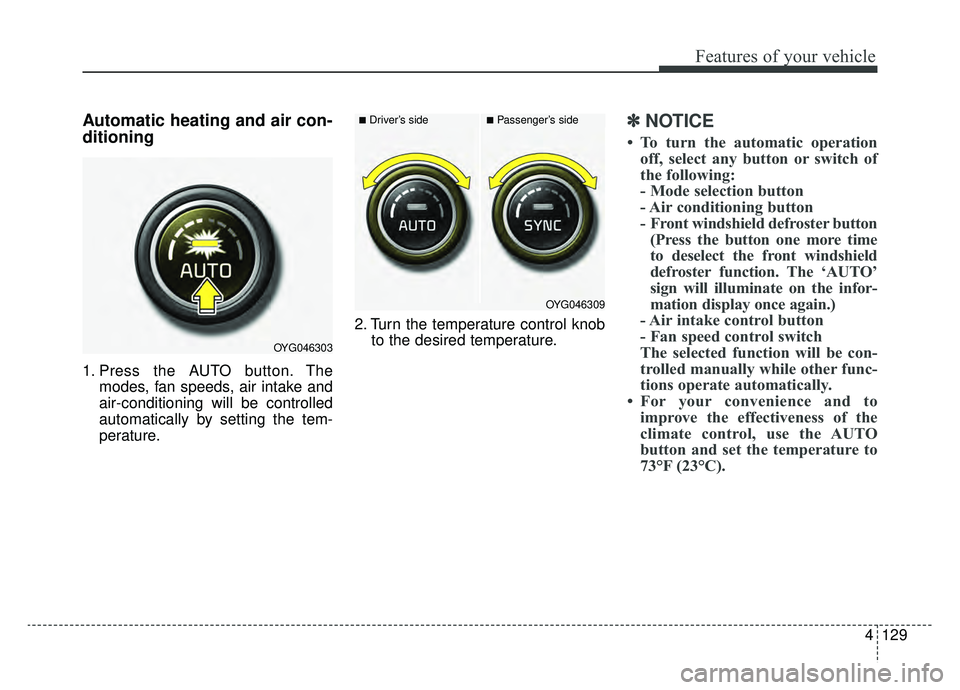
1. Press the AUTO button. Themodes, fan speeds, air intake and
air-conditioning will be controlled
automatically by setting the tem-
perature. 2. Turn the temperature control knob
to the desired temperature.
✽ ✽NOTICE
• To turn the automatic operation
off, select any button or switch of
the following:
- Mode selection button
- Air conditioning button
- Front windshield defroster button(Press the button one more time
to deselect the front windshield
defroster function. The ‘AUTO’
sign will illuminate on the infor-
mation display once again.)
- Air intake control button
- Fan speed control switch
The selected function will be con-
trolled manually while other func-
tions operate automatically.
• For your convenience and to improve the effectiveness of the
climate control, use the AUTO
button and set the temperature to
73°F (23°C).
OYG046303
■Driver’s side■Passenger’s side
OYG046309
Page 218 of 518
Features of your vehicle
136
4
Air conditioning
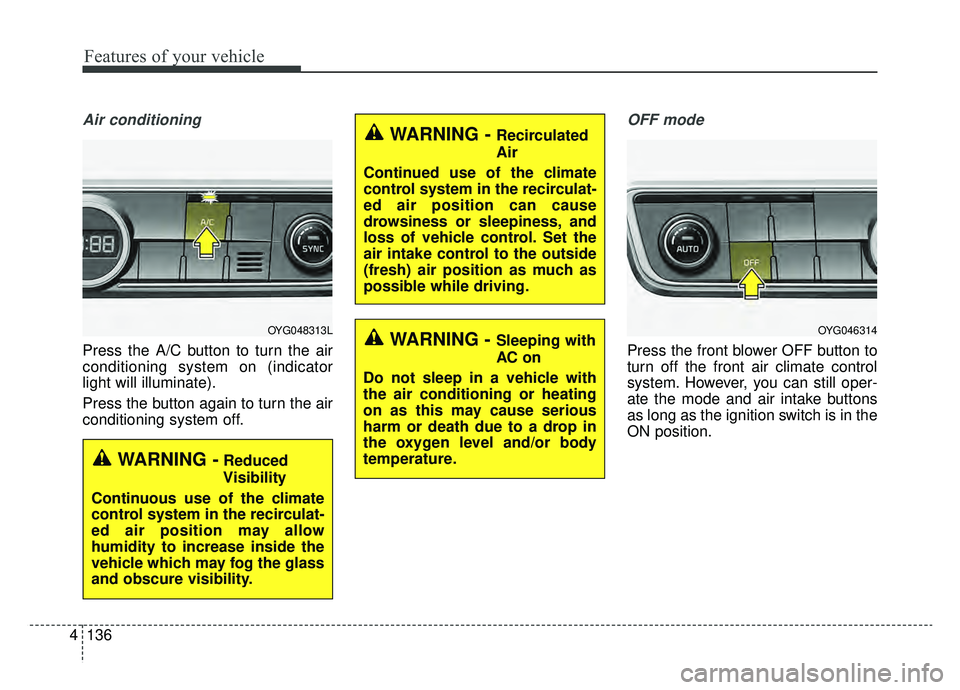
Press the A/C button to turn the air
conditioning system on (indicator
light will illuminate).
Press the button again to turn the air
conditioning system off.
OFF mode
Press the front blower OFF button to
turn off the front air climate control
system. However, you can still oper-
ate the mode and air intake buttons
as long as the ignition switch is in the
ON position.
OYG048313L
WARNING -Reduced
Visibility
Continuous use of the climate
control system in the recirculat-
ed air position may allow
humidity to increase inside the
vehicle which may fog the glass
and obscure visibility.
WARNING - Recirculated
Air
Continued use of the climate
control system in the recirculat-
ed air position can cause
drowsiness or sleepiness, and
loss of vehicle control. Set the
air intake control to the outside
(fresh) air position as much as
possible while driving.
WARNING - Sleeping with
AC on
Do not sleep in a vehicle with
the air conditioning or heating
on as this may cause serious
harm or death due to a drop in
the oxygen level and/or body
temperature.OYG046314
Page 219 of 518
4137
Features of your vehicle
Climate information screen selection (if equipped)
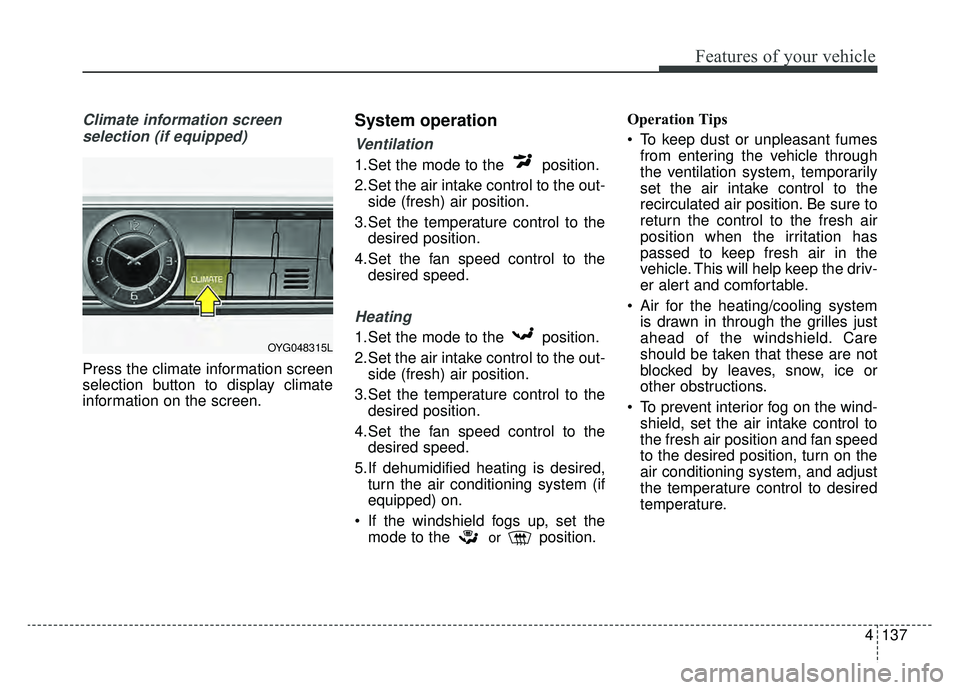
Press the climate information screen
selection button to display climate
information on the screen.
System operation
Ventilation
1.Set the mode to the position.
2.Set the air intake control to the out- side (fresh) air position.
3.Set the temperature control to the desired position.
4.Set the fan speed control to the desired speed.
Heating
1.Set the mode to the position.
2.Set the air intake control to the out-side (fresh) air position.
3.Set the temperature control to the desired position.
4.Set the fan speed control to the desired speed.
5.If dehumidified heating is desired, turn the air conditioning system (if
equipped) on.
If the windshield fogs up, set the mode to the
orposition. Operation Tips
To keep dust or unpleasant fumes
from entering the vehicle through
the ventilation system, temporarily
set the air intake control to the
recirculated air position. Be sure to
return the control to the fresh air
position when the irritation has
passed to keep fresh air in the
vehicle. This will help keep the driv-
er alert and comfortable.
Air for the heating/cooling system is drawn in through the grilles just
ahead of the windshield. Care
should be taken that these are not
blocked by leaves, snow, ice or
other obstructions.
To prevent interior fog on the wind- shield, set the air intake control to
the fresh air position and fan speed
to the desired position, turn on the
air conditioning system, and adjust
the temperature control to desired
temperature.
OYG048315L
Page 221 of 518
4139
Features of your vehicle
When using the air conditioningsystem, you may notice clear water
dripping (or even puddling) on the
ground under the passenger side
of the vehicle. This is a normal sys-
tem operation characteristic.
Operating the air conditioning sys- tem in the recirculated air position
provides maximum cooling, how-
ever, continual operation in this
mode may cause the air inside the
vehicle to become stale.
During cooling operation, you may occasionally notice a misty air flow
because of rapid cooling and
humid air intake. This is a normal
system operation characteristic.Climate control air filter
(if equipped)
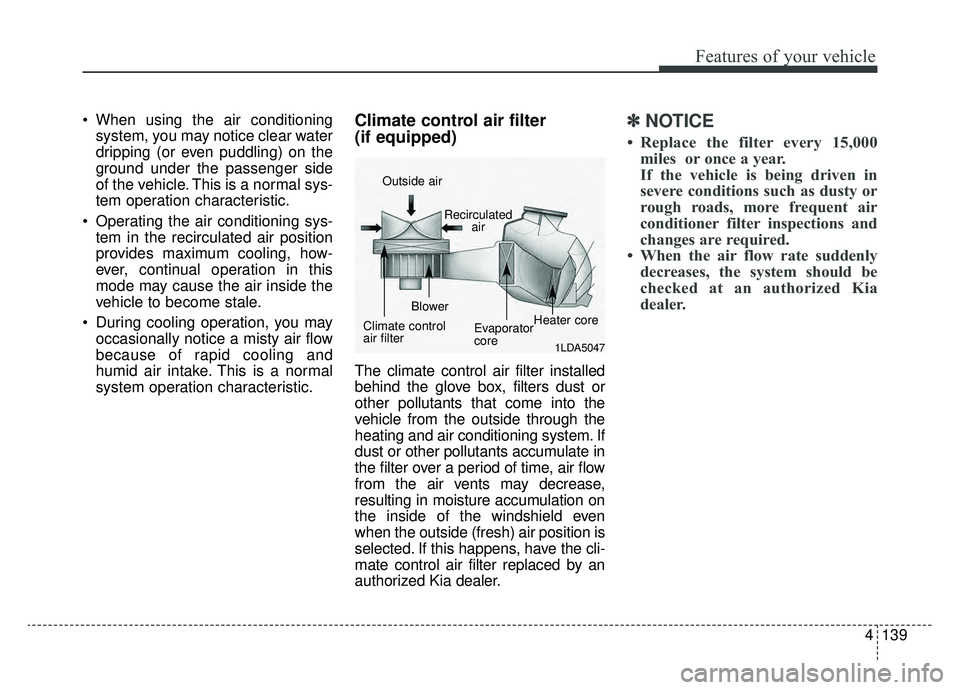
The climate control air filter installed
behind the glove box, filters dust or
other pollutants that come into the
vehicle from the outside through the
heating and air conditioning system. If
dust or other pollutants accumulate in
the filter over a period of time, air flow
from the air vents may decrease,
resulting in moisture accumulation on
the inside of the windshield even
when the outside (fresh) air position is
selected. If this happens, have the cli-
mate control air filter replaced by an
authorized Kia dealer.
✽ ✽ NOTICE
• Replace the filter every 15,000
miles or once a year.
If the vehicle is being driven in
severe conditions such as dusty or
rough roads, more frequent air
conditioner filter inspections and
changes are required.
• When the air flow rate suddenly decreases, the system should be
checked at an authorized Kia
dealer.
1LDA5047
Outside air
Recirculatedair
Climate control
air filter Blower
Evaporator
coreHeater core
Page 223 of 518
4141
Features of your vehicle
For maximum defrosting, set thetemperature control to the extreme
right/hot position and the fan speed
control to the highest speed.
If warm air to the floor is desired while defrosting or defogging, set
the mode to the floor-defrost posi-
tion.
Before driving, clear all snow and ice from the windshield, rear win-
dow, outside rear view mirrors, and
all side windows.
Clear all snow and ice from the hood and air inlet in the cowl grill to
improve heater and defroster effi-
ciency and to reduce the probabili-
ty of fogging up the inside of the
windshield.Automatic climate control
system
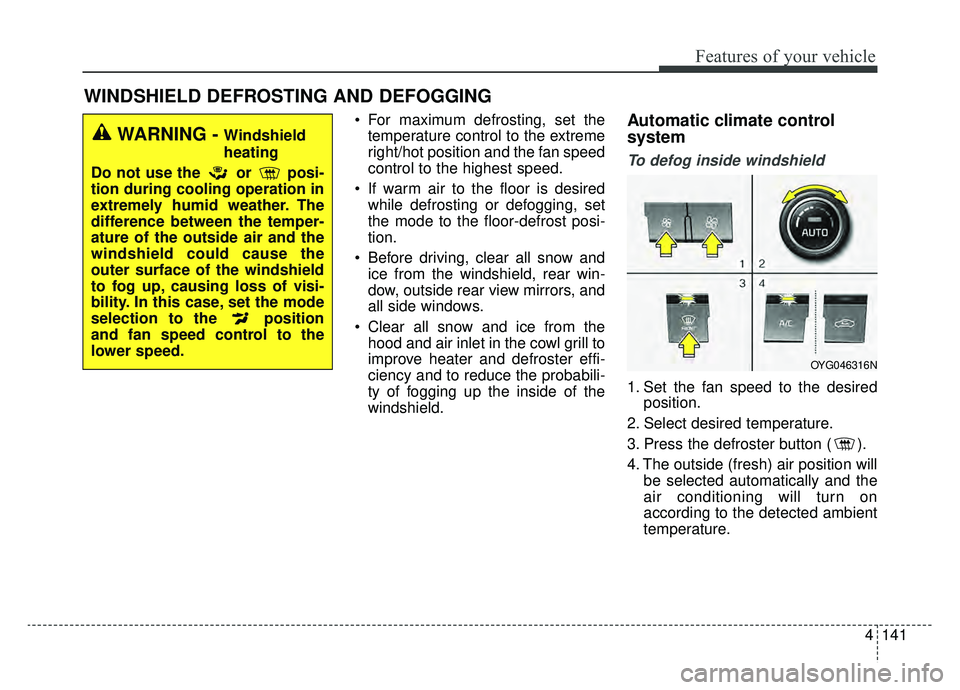
To defog inside windshield
1. Set the fan speed to the desired position.
2. Select desired temperature.
3. Press the defroster button ( ).
4. The outside (fresh) air position will be selected automatically and the
air conditioning will turn on
according to the detected ambient
temperature.
WINDSHIELD DEFROSTING AND DEFOGGING
WARNING - Windshield
heating
Do not use the or posi-
tion during cooling operation in
extremely humid weather. The
difference between the temper-
ature of the outside air and the
windshield could cause the
outer surface of the windshield
to fog up, causing loss of visi-
bility. In this case, set the mode
selection to the position
and fan speed control to the
lower speed.
OYG046316N
Page 225 of 518
4143
Features of your vehicle
Automatic climate control system
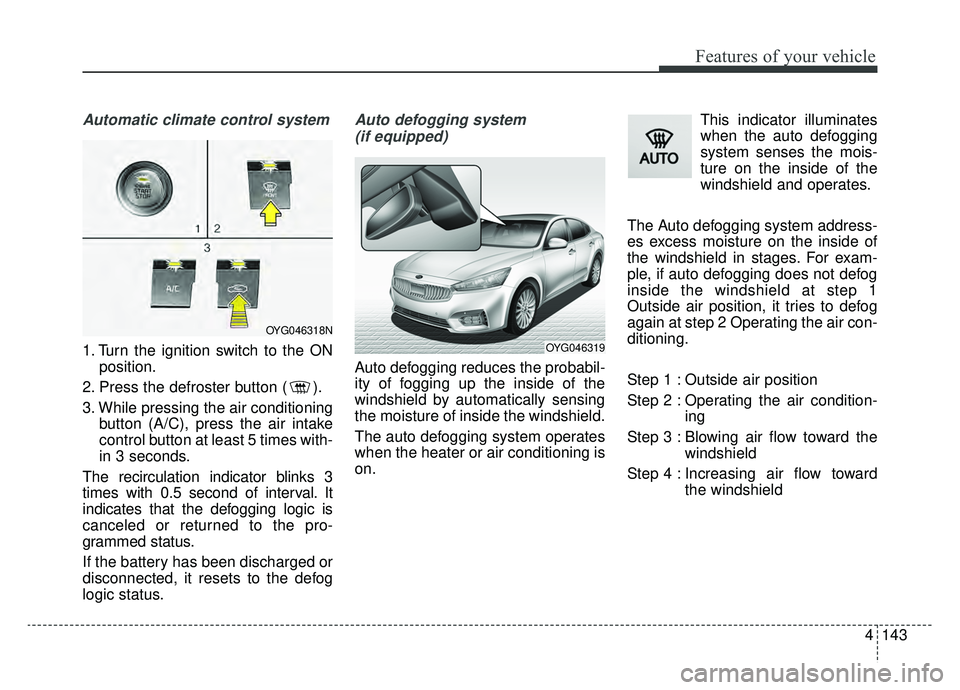
1. Turn the ignition switch to the ONposition.
2. Press the defroster button ( ).
3. While pressing the air conditioning button (A/C), press the air intake
control button at least 5 times with-
in 3 seconds.
The recirculation indicator blinks 3
times with 0.5 second of interval. It
indicates that the defogging logic is
canceled or returned to the pro-
grammed status.
If the battery has been discharged or
disconnected, it resets to the defog
logic status.
Auto defogging system (if equipped)
Auto defogging reduces the probabil-
ity of fogging up the inside of the
windshield by automatically sensing
the moisture of inside the windshield.
The auto defogging system operates
when the heater or air conditioning is
on. This indicator illuminates
when the auto defogging
system senses the mois-
ture on the inside of the
windshield and operates.
The Auto defogging system address-
es excess moisture on the inside of
the windshield in stages. For exam-
ple, if auto defogging does not defog
inside the windshield at step 1
Outside air position, it tries to defog
again at step 2 Operating the air con-
ditioning.
Step 1 : Outside air position
Step 2 : Operating the air condition- ing
Step 3 : Blowing air flow toward the windshield
Step 4 : Increasing air flow toward the windshield
OYG046318N
OYG046319