air KIA CADENZA 2020 Owners Manual
[x] Cancel search | Manufacturer: KIA, Model Year: 2020, Model line: CADENZA, Model: KIA CADENZA 2020Pages: 560, PDF Size: 11.37 MB
Page 462 of 560
717
Maintenance
Brake fluid
Check the brake fluid level in the
brake fluid reservoir. The level should
be between “MIN” and “MAX” marks
on the side of the reservoir. Use only
hydraulic brake fluid conforming to
DOT 3 or DOT 4 specification.
Parking brake
Inspect the parking brake system
including the parking brake pedal
and cables.
Brake discs, pads, calipers
and rotors
Check the pads for excessive wear,
discs for run out and wear, and
calipers for fluid leakage.
Exhaust pipe and muffler
Visually inspect the exhaust pipes,
muffler and hangers for cracks, dete-
rioration, or damage. Start the
engine and listen carefully for any
exhaust gas leakage. Tighten con-
nections or replace parts as neces-
sary.
Suspension mounting bolts
Check the suspension connections
for looseness or damage. Retighten
to the specified torque.
Steering gear box, linkage &
boots/lower arm ball joint
With the vehicle stopped and engine
off, check for excessive free-play in
the steering wheel.
Check the linkage for bends or dam-
age. Check the dust boots and ball
joints for deterioration, cracks, or
damage. Replace any damaged
parts.
Drive shafts and boots
Check the drive shafts, boots and
clamps for cracks, deterioration, or
damage. Replace any damaged
parts and, if necessary, repack the
grease.
Air conditioning refrigerant
Check the air conditioning lines and
connections for leakage and damage.
Page 468 of 560
723
Maintenance
BRAKE FLUID
Checking the brake fluid level
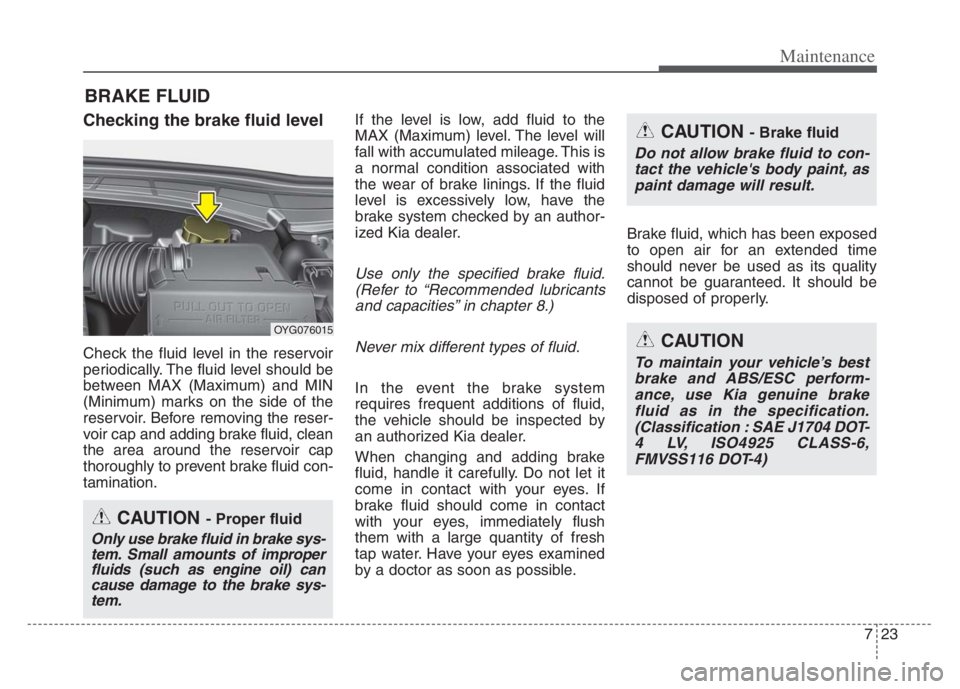
Check the fluid level in the reservoir
periodically. The fluid level should be
between MAX (Maximum) and MIN
(Minimum) marks on the side of the
reservoir. Before removing the reser-
voir cap and adding brake fluid, clean
the area around the reservoir cap
thoroughly to prevent brake fluid con-
tamination.If the level is low, add fluid to the
MAX (Maximum) level. The level will
fall with accumulated mileage. This is
a normal condition associated with
the wear of brake linings. If the fluid
level is excessively low, have the
brake system checked by an author-
ized Kia dealer.
Use only the specified brake fluid.
(Refer to “Recommended lubricants
and capacities” in chapter 8.)
Never mix different types of fluid.
In the event the brake system
requires frequent additions of fluid,
the vehicle should be inspected by
an authorized Kia dealer.
When changing and adding brake
fluid, handle it carefully. Do not let it
come in contact with your eyes. If
brake fluid should come in contact
with your eyes, immediately flush
them with a large quantity of fresh
tap water. Have your eyes examined
by a doctor as soon as possible.Brake fluid, which has been exposed
to open air for an extended time
should never be used as its quality
cannot be guaranteed. It should be
disposed of properly.
OYG076015
CAUTION - Brake fluid
Do not allow brake fluid to con-
tact the vehicle's body paint, as
paint damage will result.
CAUTION
To maintain your vehicle’s best
brake and ABS/ESC perform-
ance, use Kia genuine brake
fluid as in the specification.
(Classification : SAE J1704 DOT-
4 LV, ISO4925 CLASS-6,
FMVSS116 DOT-4)
CAUTION - Proper fluid
Only use brake fluid in brake sys-
tem. Small amounts of improper
fluids (such as engine oil) can
cause damage to the brake sys-
tem.
Page 470 of 560
725
Maintenance
AIR CLEANER
Filter replacement
It must be replaced when necessary,
and should not be washed.
You can clean the filter when inspect-
ing the air cleaner element.
Clean the filter by using compressed
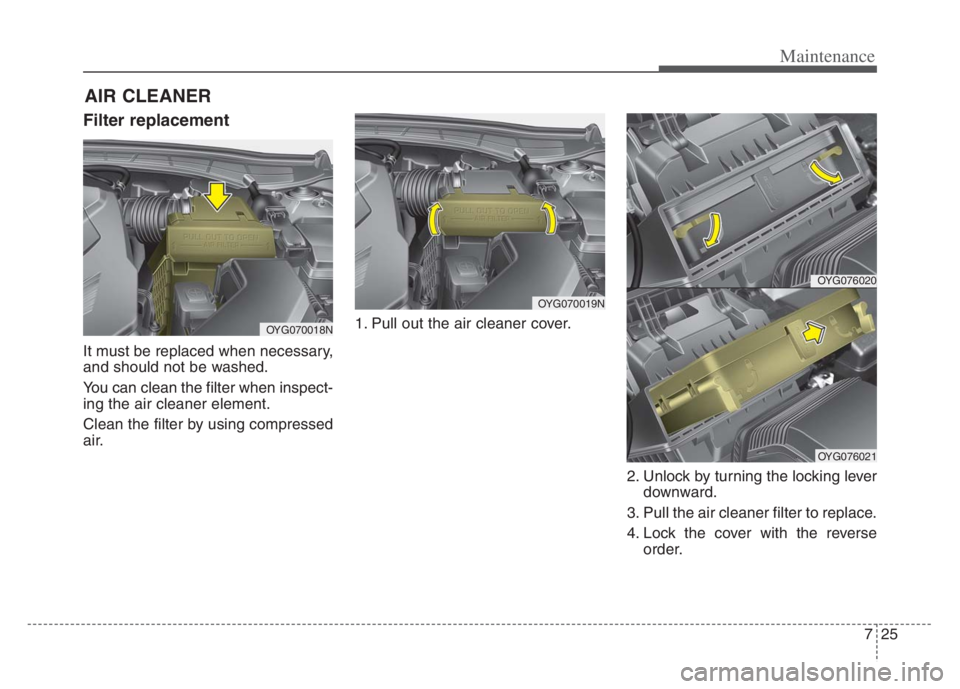
air.1. Pull out the air cleaner cover.
2. Unlock by turning the locking lever
downward.
3. Pull the air cleaner filter to replace.
4. Lock the cover with the reverse
order.
OYG070018N
OYG070019N
OYG076020
OYG076021
Page 471 of 560

Maintenance
26 7
Replace the filter according to the
Maintenance Schedule.
If the vehicle is operated in extreme-
ly dusty or sandy areas, replace the
element more often than the usual
recommended intervals. (Refer to
“Maintenance under severe usage
conditions” in this chapter.)
CAUTION - Air filter
maintenance
Do not drive with the air clean-
er removed; this will result in
excessive engine wear.
When removing the air cleaner
filter, be careful that dust or
dirt does not enter the air
intake, or damage may result.
Use a Kia genuine part. Use of
a non-genuine part could
damage the air flow sensor.
Page 472 of 560
727
Maintenance
CLIMATE CONTROL AIR FILTER
Filter inspection
The climate control air filter should
be replaced according to the
Maintenance Schedule. If the vehicle
is operated in severely air-polluted
cities or on dusty rough roads for a
long period, it should be inspected
more frequently and replaced earlier.
When you replace the climate control
air filter, replace it performing the fol-
lowing procedure, and be careful to
avoid damaging other components.
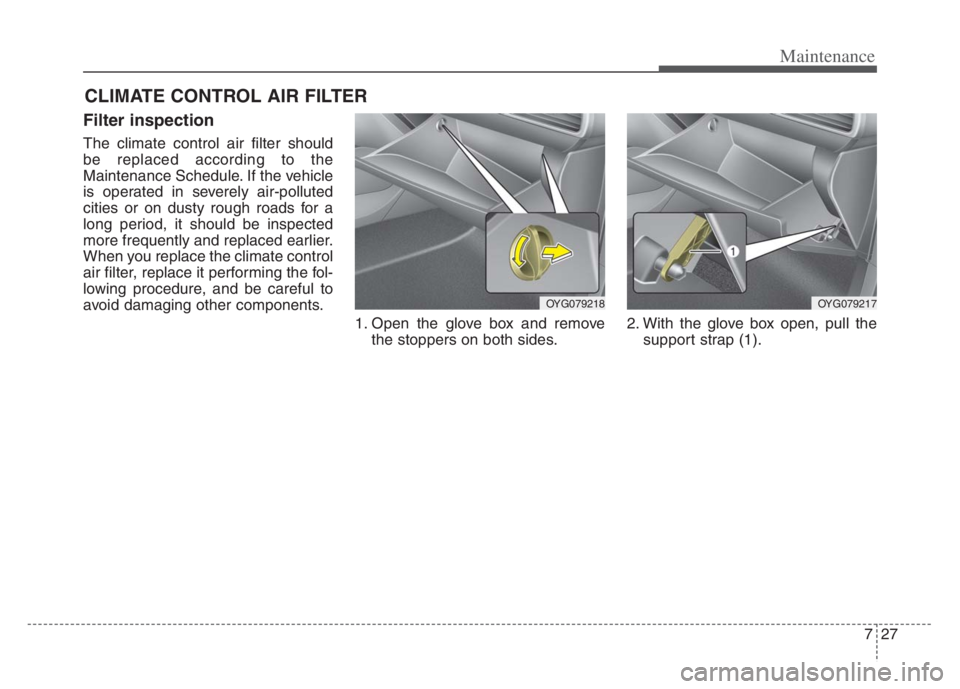
1. Open the glove box and remove
the stoppers on both sides.2. With the glove box open, pull the
support strap (1).
OYG079217OYG079218
Page 473 of 560
Maintenance
28 7
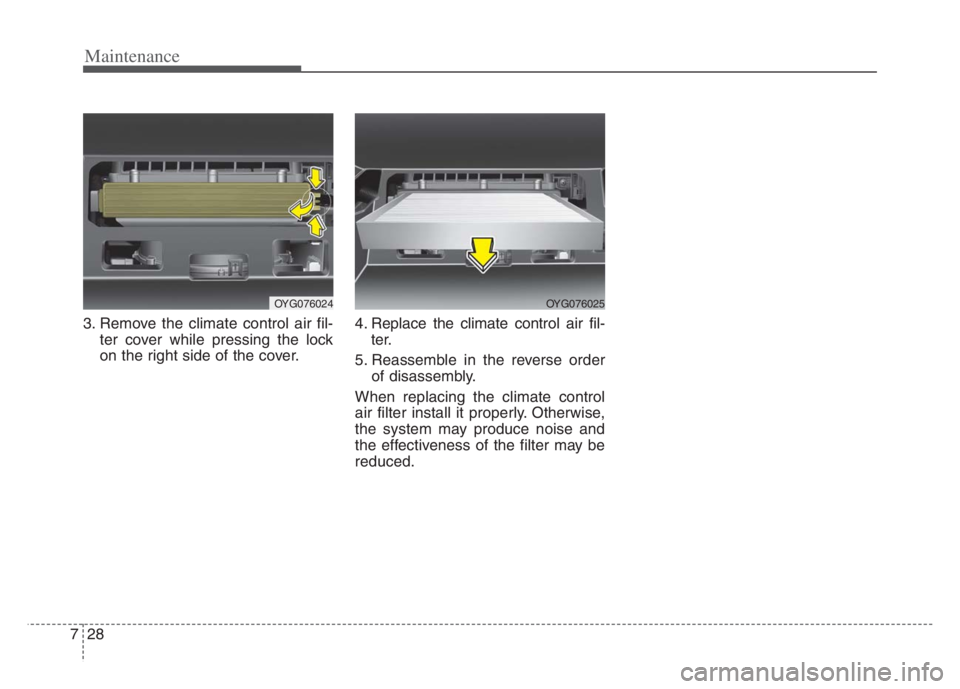
3. Remove the climate control air fil-
ter cover while pressing the lock
on the right side of the cover.4. Replace the climate control air fil-
ter.
5. Reassemble in the reverse order
of disassembly.
When replacing the climate control
air filter install it properly. Otherwise,
the system may produce noise and
the effectiveness of the filter may be
reduced.
OYG076024OYG076025
Page 481 of 560
Maintenance
36 7
Underinflation also results in
excessive wear, poor handling and
reduced fuel economy. Wheel
deformation also is possible. Keep
your tire pressures at the proper
levels. If a tire frequently needs
refilling, have it checked by an
authorized Kia dealer.
Overinflation produces a harsh
ride, excessive wear at the center
of the tire tread, and a greater pos-
sibility of damage from road haz-
ards.
Warm tires normally exceed rec-
ommended cold tire pressures by 4
to 6 psi (28 to 41 kPa). Do not
release air from warm tires to
adjust the pressure or the tires will
be underinflated.
Be sure to reinstall the tire inflation
valve caps. Without the valve cap,
dirt or moisture could get into the
valve core and cause air leakage. If
a valve cap is missing, install a
new one as soon as possible.Tire pressure
Always observe the following:
Check tire pressure when the tires
are cold. (After vehicle has been
parked for at least three hours or
hasn't been driven more than 1
mile (1.6 km) since startup.)
Check the pressure of your spare
tire each time you check the pres-
sure of other tires.
Never overload your vehicle. Be
careful not to overload a vehicle
luggage rack if your vehicle is
equipped with one.
Checking tire inflation pres-
sure
Check your tires once a month or
more.
Also, check the tire pressure of the
spare tire.
How to check
Use a good quality gauge to check
tire pressure. You can not tell if your
tires are properly inflated simply by
looking at them. Radial tires may
look properly inflated even when
they're underinflated.
Check the tire's inflation pressure
when the tires are cold. - "Cold"
means your vehicle has been sitting
for at least three hours or driven no
more than 1 mile (1.6 km).
WARNING - Tire Inflation
Overinflation or underinflation
can reduce tire life, adversely
affect vehicle handling, and
lead to sudden tire failure. This
could result in loss of vehicle
control and potential injury.
Page 482 of 560
737
Maintenance
Remove the valve cap from the tire
valve stem. Press the tire gauge firm-
ly onto the valve to get a pressure
measurement. If the cold tire inflation
pressure matches the recommended
pressure on the tire and loading
information label, no further adjust-
ment is necessary. If the pressure is
low, add air until you reach the rec-
ommended amount.
If you overfill the tire, release air by
pushing on the metal stem in the
center of the tire valve. Recheck the
tire pressure with the tire gauge. Be
sure to put the valve caps back on
the valve stems. They help prevent
leaks by keeping out dirt and mois-
ture. Inspect your tires frequently for
proper inflation as well as wear and
damage. Always use a tire pres-
sure gauge.
Tires with too much or too little
pressure wear unevenly causing
poor handling, loss of vehicle con-
trol, and sudden tire failure leading
to accidents, injuries, and even
death. The recommended cold tire
pressure for your vehicle can be
found in this manual and on the tire
label located on the driver's side
center pillar.
Remember to check the pressure
of your spare tire. Kia recommends
that you check the spare every
time you check the pressure of the
other tires on your vehicle.Tire rotation
To equalize tread wear, it is recom-
mended that the tires be rotated
every 7,500 miles (12,000 km) or
sooner if irregular wear develops.
During rotation, check the tires for
correct balance.
When rotating tires, check for uneven
wear and damage. Abnormal wear is
usually caused by incorrect tire pres-
sure, improper wheel alignment, out-
of-balance wheels, severe braking or
severe cornering. Look for bumps or
bulges in the tread or side of tire.
Replace the tire if you find either of
these conditions. Replace the tire if
fabric or cord is visible. After rotation,
be sure to bring the front and rear tire
pressures to specification and check
lug nut tightness.
Refer to “Tire and wheels” in chapter
8.
Page 487 of 560

Maintenance
42 7
3. Checking tire life (TIN : Tire
Identification Number)
Any tires that are over 6 years old,
based on the manufacturing date,
(including the spare tire) should be
replaced by new ones. You can find
the manufacturing date on the tire
sidewall (possibly on the inside of the
wheel), displaying the DOT Code.
The DOT Code is a series of num-
bers on a tire consisting of numbers
and English letters. The manufactur-
ing date is designated by the last four
digits (characters) of the DOT code.
DOT : XXXX XXXX OOOO
The front part of the DOT means a
plant code number, tire size and
tread pattern and the last four num-
bers indicate week and year manu-
factured.
For example:
DOT XXXX XXXX 1620 represents
that the tire was produced in the 16th
week of 2020.
4. Tire ply composition and mate-
rial
The number of layers or plies of rub-
ber-coated fabric in the tire. Tire
manufacturers also must indicate the
materials in the tire, which include
steel, nylon, polyester, and others.
The letter "R" means radial ply con-
struction; the letter "D" means diago-
nal or bias ply construction; and the
letter "B" means belted-bias ply con-
struction.
5. Maximum permissible inflation
pressure
This number is the greatest amount of
air pressure that should be put in the
tire. Do not exceed the maximum per-
missible inflation pressure. Refer to
the Tire and Loading Information label
for recommended inflation pressure.
6. Maximum load rating
This number indicates the maximum
load in kilograms and pounds that can
be carried by the tire. When replacing
the tires on the vehicle, always use a
tire that has the same load rating as
the factory installed tire.
7. Uniform tire quality grading
Quality grades can be found where
applicable on the tire sidewall
between tread shoulder and maxi-
mum section width.
For example:
TREADWEAR 440
TRACTION A
TEMPERATURE A
WARNING - Tire age
Replace tires within the recom-
mended time frame. Failure to
replace tires as recommended
can result in sudden tire failure,
which could lead to a loss of
control and an accident.
Page 489 of 560
Maintenance
44 7
Temperature -A, B & C
The temperature grades are A (the
highest), B and C representing the
tire’s resistance to the generation of
heat and its ability to dissipate heat
when tested under controlled condi-
tions on a specified indoor laboratory
test wheel.
Sustained high temperature can
cause the material of the tire to
degenerate and reduce tire life, and
excessive temperature can lead to
sudden tire failure. The grade C cor-
responds to a level of performance
which all passenger car tires must
meet under the Federal Motor
Vehicle Safety Standard No. 109.
Grades B and A represent higher
levels of performance on the labora-
tory test wheel than the minimum
required by law.Tire terminology and definitions
Air Pressure:The amount of air
inside the tire pressing outward on
the tire. Air pressure is expressed in
kilopascal (kPa) or pounds per
square inch (psi).
Accessory Weight:This means the
combined weight of optional acces-
sories. Some examples of optional
accessories are, automatic transmis-
sion, power seats, and air condition-
ing.
Aspect Ratio:The relationship of a
tire's height to its width.
Belt:A rubber coated layer of cords
that is located between the plies and
the tread. Cords may be made from
steel or other reinforcing materials.
Bead:The tire bead contains steel
wires wrapped by steel cords that
hold the tire onto the rim.
Bias Ply Tire:A pneumatic tire in
which the plies are laid at alternate
angles less than 90 degrees to the
centerline of the tread.Cold Tire Pressure:The amount of
air pressure in a tire, measured in
kilopascals (kPa) or pounds per
square inch (psi) before a tire has
built up heat from driving.
Curb Weight:This means the weight
of a motor vehicle with standard and
optional equipment including the
maximum capacity of fuel, oil and
coolant, but without passengers and
cargo.
DOT Markings:A code molded into
the sidewall of a tire signifying that
the tire is in compliance with the U.S.
Department of Transportation motor
vehicle safety standards. The DOT
code includes the Tire Identification
Number (TIN), an alphanumeric des-
ignator which can also identify the
tire manufacturer, production plant,
brand and date of production.