display KIA CADENZA 2020 Owners Manual
[x] Cancel search | Manufacturer: KIA, Model Year: 2020, Model line: CADENZA, Model: KIA CADENZA 2020Pages: 560, PDF Size: 11.37 MB
Page 84 of 560
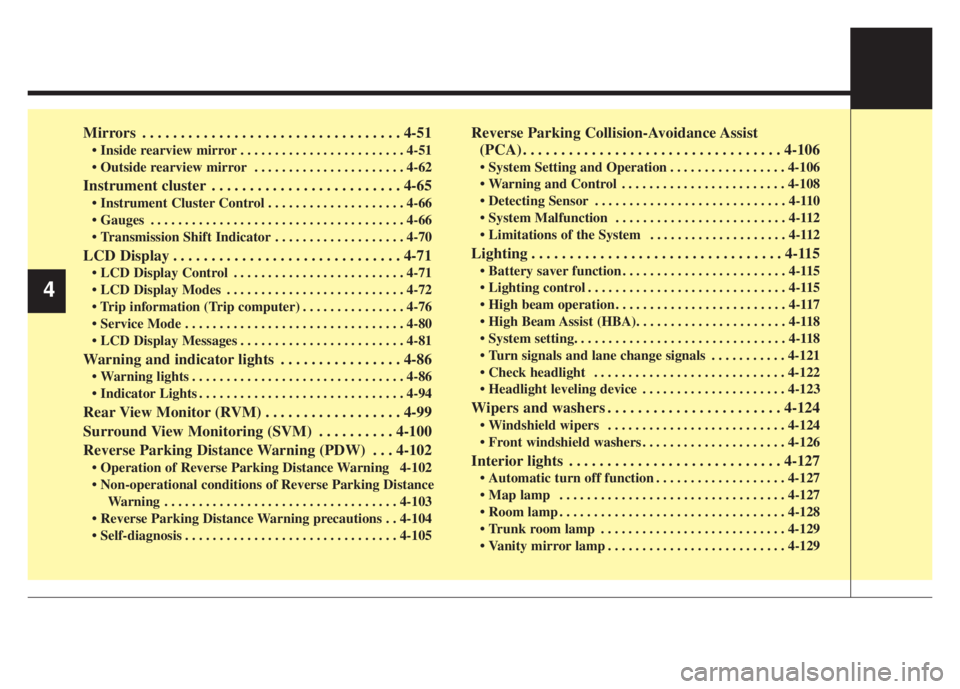
Mirrors . . . . . . . . . . . . . . . . . . . . . . . . . . . . . . . . . . 4-51
Inside rearview mirror . . . . . . . . . . . . . . . . . . . . . . . . 4-51
Outside rearview mirror . . . . . . . . . . . . . . . . . . . . . . 4-62
Instrument cluster . . . . . . . . . . . . . . . . . . . . . . . . . 4-65
Instrument Cluster Control . . . . . . . . . . . . . . . . . . . . 4-66
Gauges . . . . . . . . . . . . . . . . . . . . . . . . . . . . . . . . . . . . . 4-66
Transmission Shift Indicator . . . . . . . . . . . . . . . . . . . 4-70
LCD Display . . . . . . . . . . . . . . . . . . . . . . . . . . . . . . 4-71
LCD Display Control . . . . . . . . . . . . . . . . . . . . . . . . . 4-71
LCD Display Modes . . . . . . . . . . . . . . . . . . . . . . . . . . 4-72
. . . . . . . . . . . . . . . 4-76
Service Mode . . . . . . . . . . . . . . . . . . . . . . . . . . . . . . . . 4-80
LCD Display Messages . . . . . . . . . . . . . . . . . . . . . . . . 4-81
Warning and indicator lights . . . . . . . . . . . . . . . . 4-86
Warning lights . . . . . . . . . . . . . . . . . . . . . . . . . . . . . . . 4-86
Indicator Lights . . . . . . . . . . . . . . . . . . . . . . . . . . . . . . 4-94
Rear View Monitor (RVM) . . . . . . . . . . . . . . . . . . 4-99
Surround View Monitoring (SVM) . . . . . . . . . . 4-100
Reverse Parking Distance Warning (PDW) . . . 4-102
Operation of Reverse Parking Distance Warning 4-102
Non-operational conditions of Reverse Parking Distance
Warning . . . . . . . . . . . . . . . . . . . . . . . . . . . . . . . . . . 4-103
Reverse Parking Distance Warning precautions . . 4-104
Self-diagnosis . . . . . . . . . . . . . . . . . . . . . . . . . . . . . . . 4-105
Reverse Parking Collision-Avoidance Assist
(PCA) . . . . . . . . . . . . . . . . . . . . . . . . . . . . . . . . . . 4-106
System Setting and Operation . . . . . . . . . . . . . . . . . 4-106
Warning and Control . . . . . . . . . . . . . . . . . . . . . . . . 4-108
Detecting Sensor . . . . . . . . . . . . . . . . . . . . . . . . . . . . 4-110
System Malfunction . . . . . . . . . . . . . . . . . . . . . . . . . 4-112
Limitations of the System . . . . . . . . . . . . . . . . . . . . 4-112
Lighting . . . . . . . . . . . . . . . . . . . . . . . . . . . . . . . . . 4-115
Battery saver function . . . . . . . . . . . . . . . . . . . . . . . . 4-115
Lighting control . . . . . . . . . . . . . . . . . . . . . . . . . . . . . 4-115
High beam operation . . . . . . . . . . . . . . . . . . . . . . . . . 4-117
High Beam Assist (HBA). . . . . . . . . . . . . . . . . . . . . . 4-118
System setting. . . . . . . . . . . . . . . . . . . . . . . . . . . . . . . 4-118
Turn signals and lane change signals . . . . . . . . . . . 4-121
Check headlight . . . . . . . . . . . . . . . . . . . . . . . . . . . . 4-122
Headlight leveling device . . . . . . . . . . . . . . . . . . . . . 4-123
Wipers and washers . . . . . . . . . . . . . . . . . . . . . . . 4-124
Windshield wipers . . . . . . . . . . . . . . . . . . . . . . . . . . 4-124
Front windshield washers . . . . . . . . . . . . . . . . . . . . . 4-126
Interior lights . . . . . . . . . . . . . . . . . . . . . . . . . . . . 4-127
Automatic turn off function . . . . . . . . . . . . . . . . . . . 4-127
Map lamp . . . . . . . . . . . . . . . . . . . . . . . . . . . . . . . . . 4-127
Room lamp . . . . . . . . . . . . . . . . . . . . . . . . . . . . . . . . . 4-128
Trunk room lamp . . . . . . . . . . . . . . . . . . . . . . . . . . . 4-129
Vanity mirror lamp . . . . . . . . . . . . . . . . . . . . . . . . . . 4-129
4
Page 116 of 560
Features of your vehicle
34 4
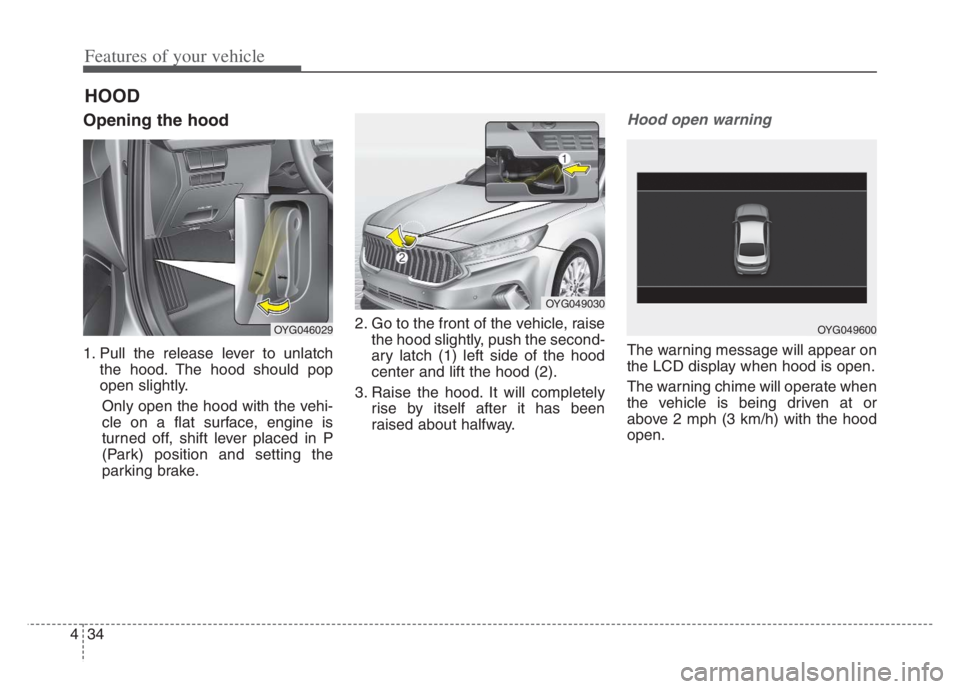
Opening the hood
1. Pull the release lever to unlatch
the hood. The hood should pop
open slightly.
Only open the hood with the vehi-
cle on a flat surface, engine is
turned off, shift lever placed in P
(Park) position and setting the
parking brake.2. Go to the front of the vehicle, raise
the hood slightly, push the second-
ary latch (1) left side of the hood
center and lift the hood (2).
3. Raise the hood. It will completely
rise by itself after it has been
raised about halfway.
Hood open warning
The warning message will appear on
the LCD display when hood is open.
The warning chime will operate when
the vehicle is being driven at or
above 2 mph (3 km/h) with the hood
open.
HOOD
OYG046029
OYG049030
OYG049600
Page 123 of 560
441
Features of your vehicle
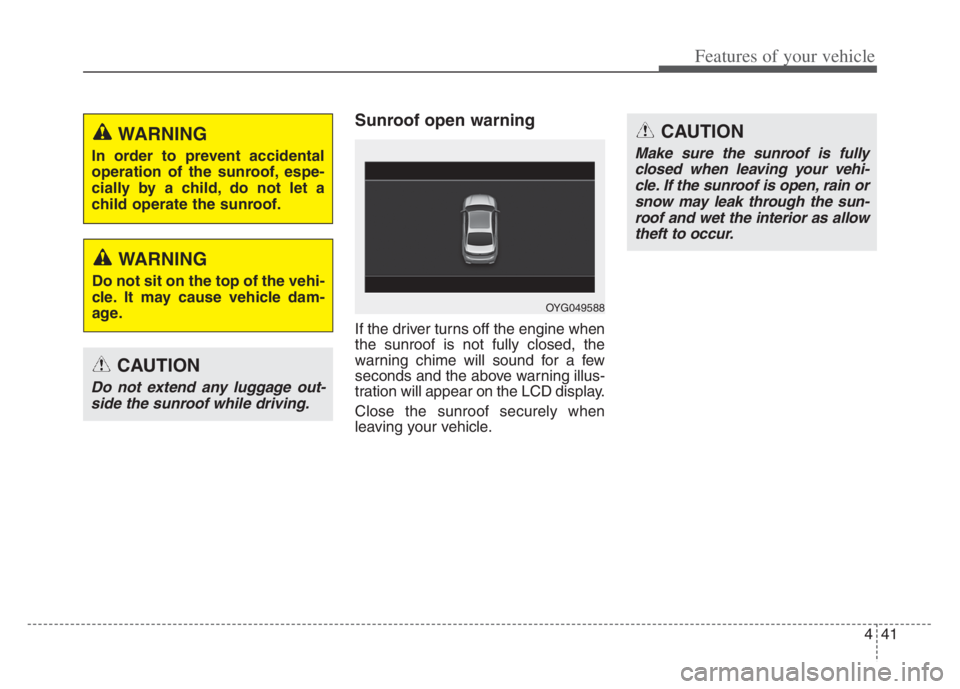
Sunroof open warning
If the driver turns off the engine when
the sunroof is not fully closed, the
warning chime will sound for a few
seconds and the above warning illus-
tration will appear on the LCD display.
Close the sunroof securely when
leaving your vehicle.
CAUTION
Do not extend any luggage out-
side the sunroof while driving.
OYG049588
CAUTION
Make sure the sunroof is fully
closed when leaving your vehi-
cle. If the sunroof is open, rain or
snow may leak through the sun-
roof and wet the interior as allow
theft to occur.
WARNING
In order to prevent accidental
operation of the sunroof, espe-
cially by a child, do not let a
child operate the sunroof.
WARNING
Do not sit on the top of the vehi-
cle. It may cause vehicle dam-
age.
Page 133 of 560
451
Features of your vehicle
MIRRORS
Inside rearview mirror
Adjust the rearview mirror so that the
center view through the rear window
is seen. Make this adjustment before
you start driving.
Do not place objects in the rear seat
or cargo area which would interfere
with your vision through the rear win-
dow.
Electric chromic mirror (ECM)
with HomeLink®system,
Compass and UVO
Your vehicle may be equipped with a
Gentex Automatic-Dimming Mirror
with a Z-Nav
®Electronic Compass
Display and an Integrated
HomeLink
®Wireless Control
System.
During nighttime driving, this feature
will automatically detect and reduce
rearview mirror glare while the com-
pass indicates the direction the vehi-
cle is pointed. The HomeLink
®
Universal Transceiver allows you to
activate your garage door(s), electric
gate, home lighting, etc.
WARNING- Mirror adjust-
ment
Do not adjust the rearview mir-
ror while the vehicle is moving.
This could result in loss of con-
trol.
WARNING
Do not modify the inside mirror
and don’t install a wide mirror. It
could result in injury during an
accident or deployment of the
air bag.
Page 134 of 560
Features of your vehicle
52 4
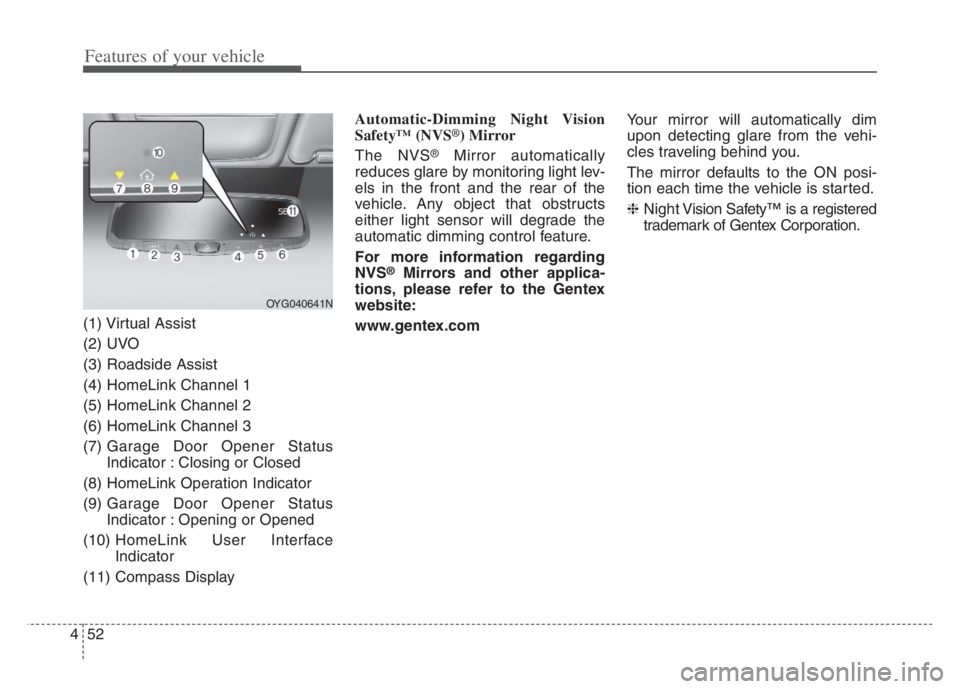
(1) Virtual Assist
(2) UVO
(3) Roadside Assist
(4) HomeLink Channel 1
(5) HomeLink Channel 2
(6) HomeLink Channel 3
(7) Garage Door Opener Status
Indicator : Closing or Closed
(8) HomeLink Operation Indicator
(9) Garage Door Opener Status
Indicator : Opening or Opened
(10) HomeLink User Interface
Indicator
(11) Compass DisplayAutomatic-Dimming Night Vision
Safety™ (NVS
®) Mirror
The NVS
®Mirror automatically
reduces glare by monitoring light lev-
els in the front and the rear of the
vehicle. Any object that obstructs
either light sensor will degrade the
automatic dimming control feature.
For more information regarding
NVS
®Mirrors and other applica-
tions, please refer to the Gentex
website:
www.gentex.comYour mirror will automatically dim
upon detecting glare from the vehi-
cles traveling behind you.
The mirror defaults to the ON posi-
tion each time the vehicle is started.
❈Night Vision Safety™ is a registered
trademark of Gentex Corporation.
OYG040641N
Page 135 of 560
453
Features of your vehicle
Z-Nav™ Compass Display
The NVS
®Mirror in your vehicle is
also equipped with a Z-NAV™
Compass that shows the vehicle
Compass heading in the Display
Window using the 8 basic cardinal
headings (N, NE, E, SE, etc.).
❈Z-Nav™ is a registered trademark
of Gentex Corporation.Compass function
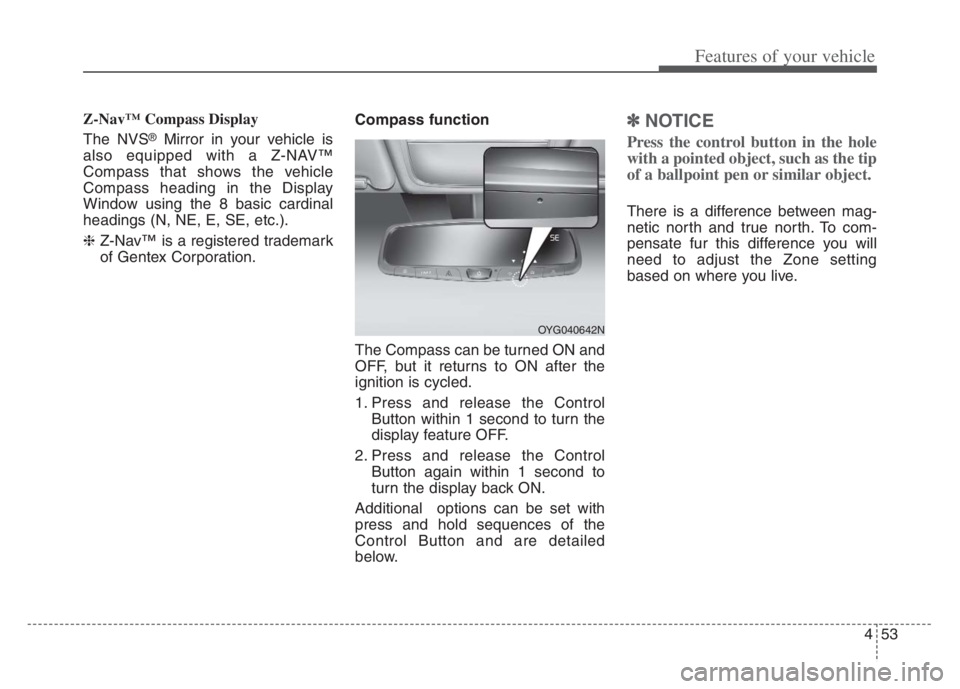
The Compass can be turned ON and
OFF, but it returns to ON after the
ignition is cycled.
1. Press and release the Control
Button within 1 second to turn the
display feature OFF.
2. Press and release the Control
Button again within 1 second to
turn the display back ON.
Additional options can be set with
press and hold sequences of the
Control Button and are detailed
below.
✽ ✽
NOTICE
Press the control button in the hole
with a pointed object, such as the tip
of a ballpoint pen or similar object.
There is a difference between mag-
netic north and true north. To com-
pensate fur this difference you will
need to adjust the Zone setting
based on where you live.
OYG040642N
Page 136 of 560
Features of your vehicle
54 4
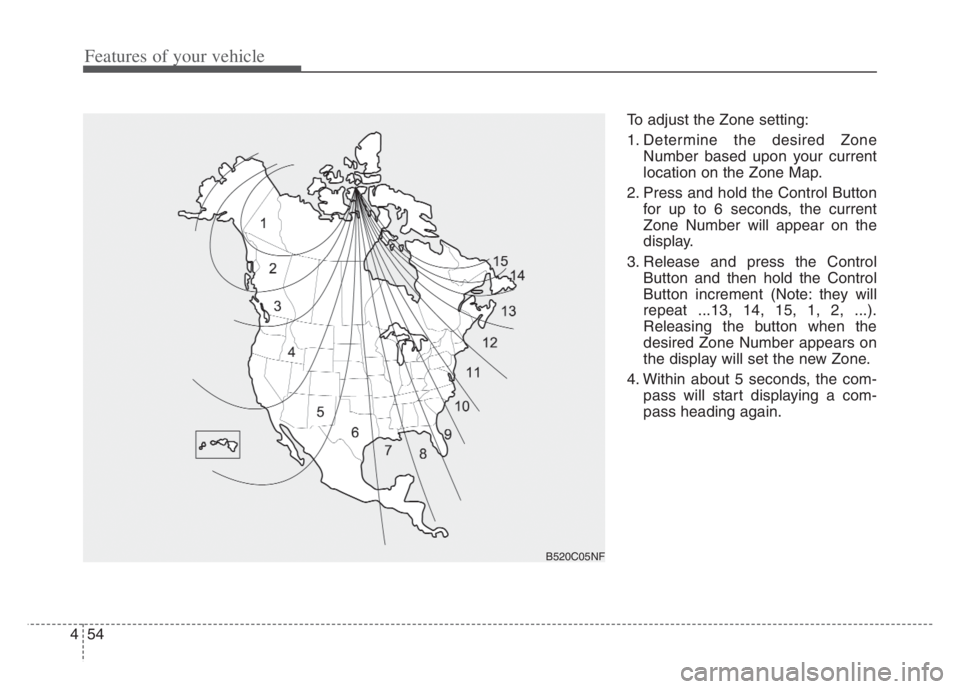
To adjust the Zone setting:
1. Determine the desired Zone
Number based upon your current
location on the Zone Map.
2. Press and hold the Control Button
for up to 6 seconds, the current
Zone Number will appear on the
display.
3. Release and press the Control
Button and then hold the Control
Button increment (Note: they will
repeat ...13, 14, 15, 1, 2, ...).
Releasing the button when the
desired Zone Number appears on
the display will set the new Zone.
4. Within about 5 seconds, the com-
pass will start displaying a com-
pass heading again.
B520C05NF
Page 137 of 560
455
Features of your vehicle
There are some conditions that can
cause changes to the vehicle mag-
nets, such as installing a ski rack or
a CB antenna. Body repair work on
the vehicle can also cause changes
to the vehicle's magnetic field. In
these situations, the compass will
need to be re-calibrated to correct
these changes.
If you need to recalibrate the com-
pass :
1. Press and hold the Control Button
for more than 6 seconds. When
the compass memory is cleared, a
“C” will appear in the display.
2. Drive the vehicle in 2 complete cir-
cles at less than 5 mph (8 km/h).Integrated HomeLink®Wireless
Control System
The HomeLink
®Wireless Control
System provides a convenient way to
replace up to three hand-held radio-
frequency (RF) transmitters with a
single built-in device. This innovative
feature will learn the radio frequency
codes of most current transmitters to
operate devices such as gate opera-
tors, garage door openers, entry
door locks, security systems, even
home lighting. Both standard and
rolling code-equipped transmitters
can be programmed by following the
outlined procedures.
Additional HomeLink
®information
can be found at : www.homelink.com,
www.youtube.com/HomeLinkGentex
or by calling 1-800-355-3515.
❈HomeLink
®is a registered trade-
mark of Johnson Controls, Inc.Retain the original transmitter of the
RF device you are programming for
use in other vehicles as well as for
future HomeLink
®programming. It is
also suggested that upon the sale of
the vehicle, the programmed
HomeLink
®buttons be erased for
security purposes.
Page 147 of 560
465
Features of your vehicle
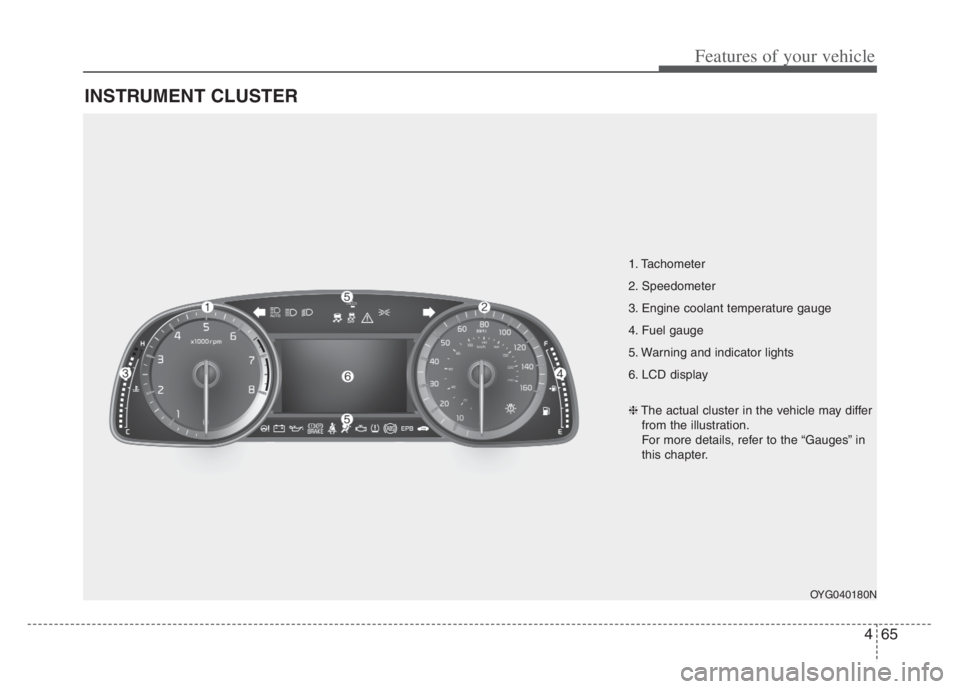
INSTRUMENT CLUSTER
1. Tachometer
2. Speedometer
3. Engine coolant temperature gauge
4. Fuel gauge
5. Warning and indicator lights
6. LCD display
OYG040180N
❈The actual cluster in the vehicle may differ
from the illustration.
For more details, refer to the “Gauges” in
this chapter.
Page 150 of 560
Features of your vehicle
68 4
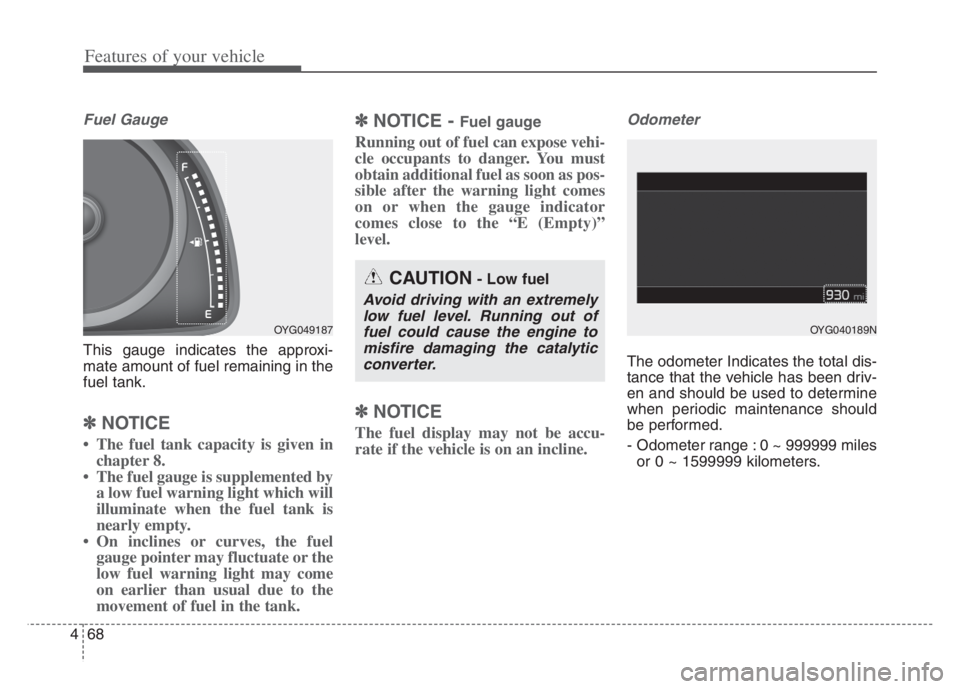
Fuel Gauge
This gauge indicates the approxi-
mate amount of fuel remaining in the
fuel tank.
✽ ✽
NOTICE
• The fuel tank capacity is given in
chapter 8.
• The fuel gauge is supplemented by
a low fuel warning light which will
illuminate when the fuel tank is
nearly empty.
• On inclines or curves, the fuel
gauge pointer may fluctuate or the
low fuel warning light may come
on earlier than usual due to the
movement of fuel in the tank.
✽ ✽
NOTICE - Fuel gauge
Running out of fuel can expose vehi-
cle occupants to danger. You must
obtain additional fuel as soon as pos-
sible after the warning light comes
on or when the gauge indicator
comes close to the “E (Empty)”
level.
✽ ✽
NOTICE
The fuel display may not be accu-
rate if the vehicle is on an incline.
Odometer
The odometer Indicates the total dis-
tance that the vehicle has been driv-
en and should be used to determine
when periodic maintenance should
be performed.
- Odometer range : 0 ~ 999999 miles
or 0 ~ 1599999 kilometers.
OYG049187
CAUTION- Low fuel
Avoid driving with an extremely
low fuel level. Running out of
fuel could cause the engine to
misfire damaging the catalytic
converter.
OYG040189N