display KIA CADENZA 2020 Owner's Guide
[x] Cancel search | Manufacturer: KIA, Model Year: 2020, Model line: CADENZA, Model: KIA CADENZA 2020Pages: 560, PDF Size: 11.37 MB
Page 216 of 560

Features of your vehicle
134 4
Automatic heating and air con-
ditioning
1. Press the AUTO button. The
modes, fan speeds, air intake and
air-conditioning will be controlled
automatically by setting the tem-
perature.2. Turn the temperature control but-
ton to the desired temperature.
✽ ✽
NOTICE
• To turn the automatic operation
off, select any button or switch of
the following:
- Mode selection button
- Air conditioning button
- Front windshield defroster button
(Press the button one more time
to deselect the front windshield
defroster function. The ‘AUTO’
sign will illuminate on the infor-
mation display once again.)
- Air intake control button
- Fan speed control switch
The selected function will be con-
trolled manually while other func-
tions operate automatically.
• For your convenience and to
improve the effectiveness of the
climate control, use the AUTO
button and set the temperature to
73°F (23°C).
OYG049343
■Driver’s side■Passenger’s side
OYG049348
Page 221 of 560
4139
Features of your vehicle
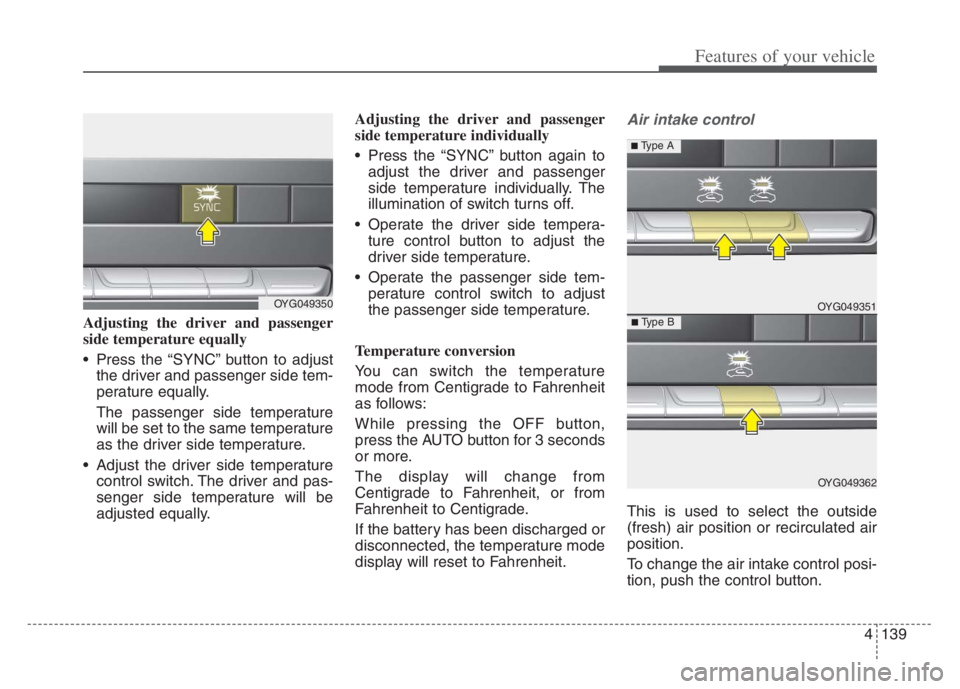
Adjusting the driver and passenger
side temperature equally
Press the “SYNC” button to adjust
the driver and passenger side tem-
perature equally.
The passenger side temperature
will be set to the same temperature
as the driver side temperature.
Adjust the driver side temperature
control switch. The driver and pas-
senger side temperature will be
adjusted equally.Adjusting the driver and passenger
side temperature individually
Press the “SYNC” button again to
adjust the driver and passenger
side temperature individually. The
illumination of switch turns off.
Operate the driver side tempera-
ture control button to adjust the
driver side temperature.
Operate the passenger side tem-
perature control switch to adjust
the passenger side temperature.
Temperature conversion
You can switch the temperature
mode from Centigrade to Fahrenheit
as follows:
While pressing the OFF button,
press the AUTO button for 3 seconds
or more.
The display will change from
Centigrade to Fahrenheit, or from
Fahrenheit to Centigrade.
If the battery has been discharged or
disconnected, the temperature mode
display will reset to Fahrenheit.
Air intake control
This is used to select the outside
(fresh) air position or recirculated air
position.
To change the air intake control posi-
tion, push the control button.
OYG049350 OYG049351
OYG049362
■ Type B
■ Type A
Page 224 of 560

Features of your vehicle
142 4
Climate information screen
selection (if equipped)
Press the climate information screen
selection button to display climate
information on the screen.
System operation
Ventilation
1.Set the mode to the position.
2.Set the air intake control to the out-
side (fresh) air position.
3.Set the temperature control to the
desired position.
4.Set the fan speed control to the
desired speed.
Heating
1.Set the mode to the position.
2.Set the air intake control to the out-
side (fresh) air position.
3.Set the temperature control to the
desired position.
4.Set the fan speed control to the
desired speed.
5.If dehumidified heating is desired,
turn the air conditioning system (if
equipped) on.
If the windshield fogs up, set the
mode to the
orposition.Operation Tips
To keep dust or unpleasant fumes
from entering the vehicle through
the ventilation system, temporarily
set the air intake control to the
recirculated air position. Be sure to
return the control to the fresh air
position when the irritation has
passed to keep fresh air in the
vehicle. This will help keep the driv-
er alert and comfortable.
Air for the heating/cooling system
is drawn in through the grilles just
ahead of the windshield. Care
should be taken that these are not
blocked by leaves, snow, ice or
other obstructions.
To prevent interior fog on the wind-
shield, set the air intake control to
the fresh air position and fan speed
to the desired position, turn on the
air conditioning system, and adjust
the temperature control to desired
temperature.
OYG049315
Page 234 of 560

Features of your vehicle
152 4
This indicator illuminates
when the auto defogging
system senses the mois-
ture on the inside of the
windshield and operates.
The Auto defogging system address-
es excess moisture on the inside of
the windshield in stages. For exam-
ple, if auto defogging does not defog
inside the windshield at step 1
Outside air position, it tries to defog
again at step 2 Operating the air con-
ditioning.
Step 1 : Outside air position
Step 2 : Operating the air condition-
ing
Step 3 : Blowing air flow toward the
windshield
Step 4 : Increasing air flow toward
the windshieldTo cancel or reset the Auto Defogging
System
To cancel or set the Auto Defogging
System, press the Front Windshield
Defroster button for 3 seconds while
Engine Start/Stop button is On.
The indicator of Front Windshield
Defroster button or “ADS OFF” mes-
sage will blink or display 3 times in
0.5 second interval and the system
will be cancelled or set.
CAUTION
Do not remove the sensor cover
located on the upper end of the
passenger side windshield
glass. Damage to the system
parts could occur and may not
be covered by your vehicle war-
ranty.
Page 246 of 560
Features of your vehicle
164 4
(Continued)
• The wireless charging will stop
when any of the doors are opened
(applicable for vehicles equipped
with smart keys).
• The wireless charging will stop
when the vehicle is turned OFF.
• The wireless charging will stop
when the smart phone is not in
complete contact with the wireless
charging pad.
• Items equipped with magnetic
components such as a credit card,
a telephone card, a bankbook, or a
transportation ticket may become
damaged during wireless charg-
ing.
• Place the smart phone on the cen-
ter of the charge pad for best
results. The smart phone may not
charge when placed near the rim
of the charging pad. When the
smart phone does get charged, it
may heat up excessively.
• For smart phones without built-in
wireless charging, an appropriate
accessory has to be equipped in
order to use the vehicle's Wireless
Charging System.
(Continued)(Continued)
• Smart phones of some manufac-
turers may display messages con-
cerning weak current. This is due
to the particular characteristic of
the smart phone and does not
imply a malfunction of the
Wireless charging System.
• The indicator light of some manu-
facturers’ smart phones may still
be yellow after the smart phone is
fully charged. This is due to the
particular characteristic of the
smart phone and not a malfunc-
tion of the Wireless charging
System.
• When any smart phone without a
wireless charging function or a
metallic object is placed on the
charging pad, a small noise may
sound. This small sound is due to
the vehicle discerning compatibili-
ty of the object placed on the
charging pad. It does not affect
your vehicle or the smart phone in
any way.
• High-speed wireless charging is
available only for those smart
phones that support the function.
(Continued)(Continued)
• While wireless charging, to pre-
vent from getting hot, the inner
fan will operate. And you may
hear the inner fan noise.
Page 261 of 560

Driving your vehicle
8 5
✽
✽
NOTICE
If you leave the ENGINE START/
STOP button in the ACC or ON
position for an extended period of
time, the battery will discharge.
Starting the engine with a
smart key
1.Carry the smart key or place it
inside the vehicle.
2.Make sure the parking brake is
firmly applied
3.Place the shift lever in P (Park).
Depress the brake pedal fully.
You can also start the engine when
the shift lever is in the N (Neutral)
position.
4.Press the ENGINE START/STOP
button while depressing the brake
pedal.
No need to depress the accelerator
pedal
5.Do not wait for the engine to warm
up while the vehicle remains sta-
tionary.
Start driving at moderate engine
speeds. (Steep accelerating and
decelerating should be avoided.) Even if the smart key is in the vehi-
cle, if it is position far away from
you, the engine may not start.
When the ENGINE START/STOP
button is in the ACC or ON position
and any door is opened, the sys-
tem checks for the presents of the
smart key. If the smart key is not in
the vehicle, a message "key is not
in the vehicle" will appear on the
LCD display. And if all doors are
closed, the chime will sound for 5
seconds. The indicator or warning
will turn off while the vehicle is
moving. Always have the smart key
with you.
WARNING- Starting
vehicle
Never press the ENGINE
START/STOP button while the
vehicle is in motion except in an
emergency. This would result in
loss of directional control and
braking function, which could
cause an accident.
Page 264 of 560
511
Driving your vehicle
When stopped on an incline, do not
hold the vehicle with the engine
power. Use the service brake or the
parking brake.
Transmission ranges
The indicator in the instrument clus-
ter displays the shift lever position
when the ENGINE START/STOP
button is in the ON position.
P (Park)
Always come to a complete stop
before shifting into P (Park). This
position locks the transmission and
prevents the drive wheels from rotat-
ing.
Shifting into P (Park) while the vehi-
cle is in motion will cause the drive
wheels to lock which will cause you
to lose control of the vehicle.R (Reverse)
Use this position to drive the vehicle
backward.
N (Neutral)
The wheels and transmission are not
engaged. The vehicle will roll freely
even on the slightest incline unless
the parking brake or service brakes
are applied.
WARNING- Leaving
Vehicle
Before leaving the driver’s seat,
always make sure the shift lever
is in the P (Park) position; then
set the parking brake fully and
shut the engine off. Do not use
the P position in place of the
parking brake. Always make
sure the shift lever is locked in
the P position and set the park-
ing brake fully. Unexpected and
sudden vehicle movement can
occur if these precautions are
not followed.
CAUTION- Transmission
To avoid damage to your trans-
mission, do not accelerate the
engine in R (Reverse) or any for-
ward gear position with the
brakes on. The transmission
may be damaged if you shift
into P (Park) while the vehicle is
in motion.
CAUTION- Shifting
Always come to a complete stop
before shifting into or out of R
(Reverse); you may damage the
transmission if you shift into R
(Reverse) while the vehicle is in
motion, except when “Rocking
the vehicle” explained in this
chapter.
Page 282 of 560
529
Driving your vehicle
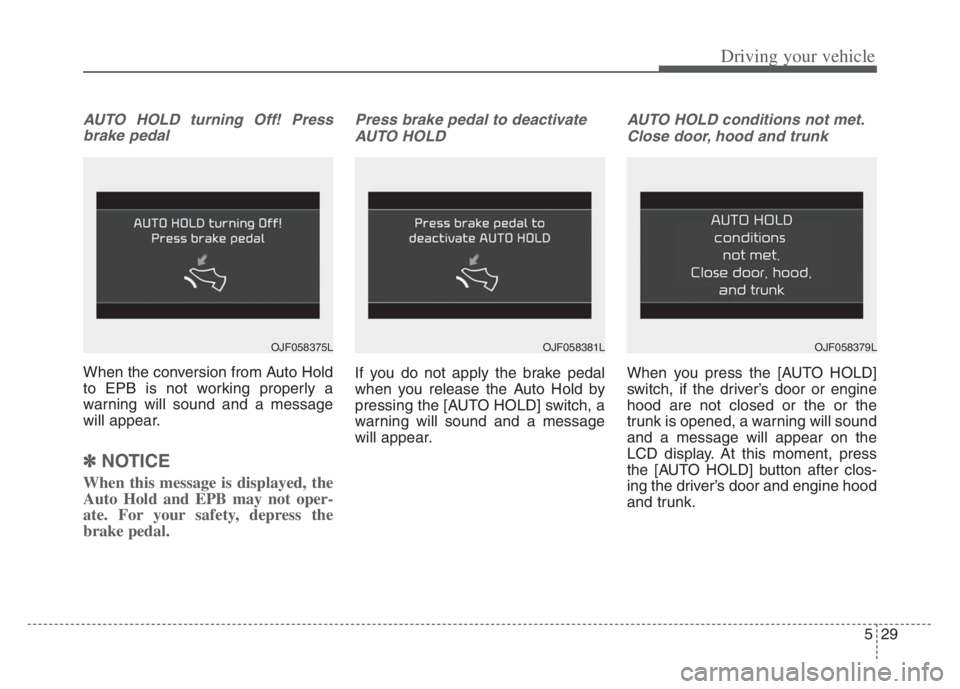
AUTO HOLD turning Off! Press
brake pedal
When the conversion from Auto Hold
to EPB is not working properly a
warning will sound and a message
will appear.
✽ ✽
NOTICE
When this message is displayed, the
Auto Hold and EPB may not oper-
ate. For your safety, depress the
brake pedal.
Press brake pedal to deactivate
AUTO HOLD
If you do not apply the brake pedal
when you release the Auto Hold by
pressing the [AUTO HOLD] switch, a
warning will sound and a message
will appear.
AUTO HOLD conditions not met.
Close door, hood and trunk
When you press the [AUTO HOLD]
switch, if the driver’s door or engine
hood are not closed or the or the
trunk is opened, a warning will sound
and a message will appear on the
LCD display. At this moment, press
the [AUTO HOLD] button after clos-
ing the driver’s door and engine hood
and trunk.
OJF058375L OJF058381L OJF058379L
Page 292 of 560

539
Driving your vehicle
DRIVE mode
The drive mode may be selected
according to the driver’s preference
or road condition.
The mode changes whenever the
DRIVE MODE button is pressed.
❈When COMFORT mode is select-
ed, it is not displayed on the clus-
ter. SMART mode : SMART mode
automatically adjusts the driving
mode (ECO " COMFORT "
SPORT) in accordance with the
driver's driving habits.
COMFORT mode : COMFORT
mode provides soft driving and
comfortable riding.
SPORT mode : SPORT mode pro-
vides sporty but firm riding.
ECO mode : ECO mode improves
fuel efficiency for eco-friendly driv-
ing.
If it is in ECO mode, ECO mode will
be set when the engine is restarted.
(However, if it is in SMART/COM-
FORT/SPORT mode, the driving
mode will be set to COMFORT mode
when the engine is restarted.)
SMART mode
DRIVE MODE INTEGRATED CONTROL SYSTEM
ECO
SMART COMFORT
SPORT
OYG059302
OJF058431L
OJF058430L
OJF058432L
Page 298 of 560
545
Driving your vehicle
The warning light illumi-
nates on the LCD display,
when you cancel FCA. The
driver can monitor the
FCA ON/OFF status on the LCD dis-
play. Also, the warning light illumi-
nates when the ESC (Electronic
Stability Control) is turned off. When
the warning light remains ON with
FCA activated, have your vehicle
inspected by an authorized Kia deal-
er.
The driver can select the initial warn-
ing activation time on the
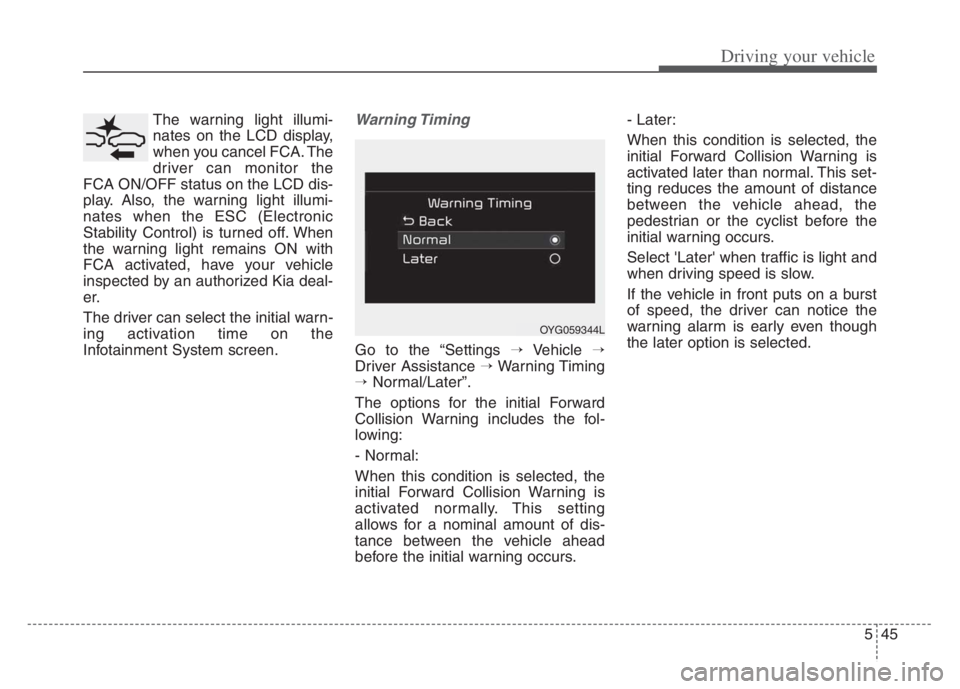
Infotainment System screen.Warning Timing
Go to the “Settings →Vehicle →
Driver Assistance →Warning Timing
→Normal/Later”.
The options for the initial Forward
Collision Warning includes the fol-
lowing:
- Normal:
When this condition is selected, the
initial Forward Collision Warning is
activated normally. This setting
allows for a nominal amount of dis-
tance between the vehicle ahead
before the initial warning occurs.- Later:
When this condition is selected, the
initial Forward Collision Warning is
activated later than normal. This set-
ting reduces the amount of distance
between the vehicle ahead, the
pedestrian or the cyclist before the
initial warning occurs.
Select 'Later' when traffic is light and
when driving speed is slow.
If the vehicle in front puts on a burst
of speed, the driver can notice the
warning alarm is early even though
the later option is selected.
OYG059344L