KIA CARNIVAL 2007 Workshop Manual
CARNIVAL 2007
KIA
KIA
https://www.carmanualsonline.info/img/2/57045/w960_57045-0.png
KIA CARNIVAL 2007 Workshop Manual
Trending: maintenance, reset sun roof, climate control, fog light, power steering fluid, fuse box, spark plugs replace
Page 101 of 1575
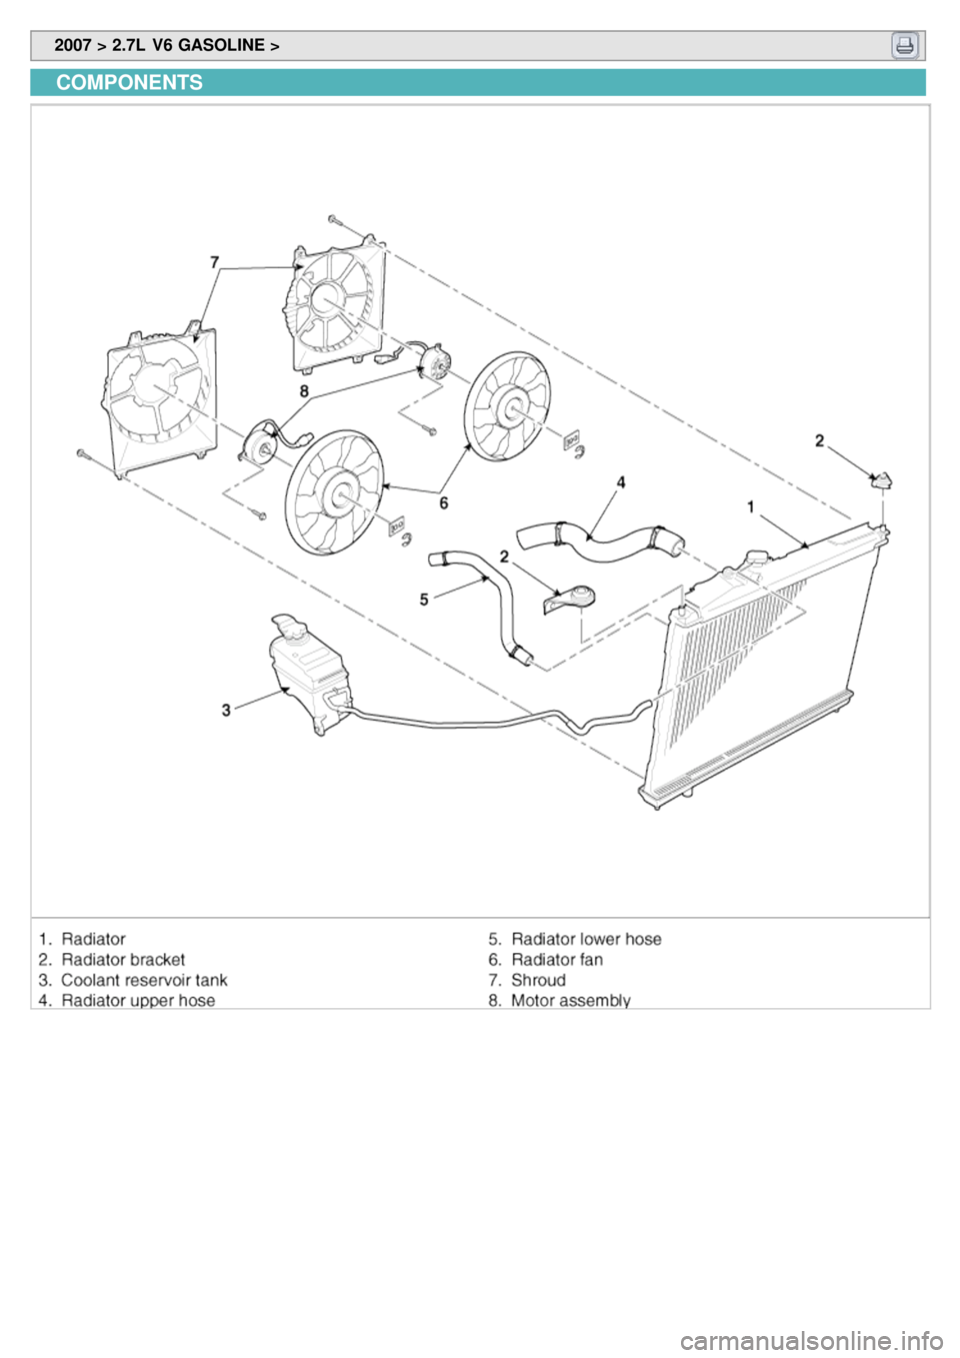
2007 > 2.7L V6 GASOLINE >
COMPONENTS
Page 102 of 1575
Page 103 of 1575
2007 > 2.7L V6 GASOLINE >
REMOVAL
WATER PUMP
1. Drain the engine coolant.
System is under high pressure when the engine is hot. To avoid danger of releasing scalding engine coolant,
remove the cap only when the engine is cool.
2. Remove drive belt(A).
3.Remove the timing belt.
4. Remove the water pump(A) and gasket(B).
WATER TEMPERATURE CONTROL ASSEMBLY
1.Drain the engine coolant.
2. Remove the air cleaner assembly.
3. Disconnect the radiator upper and lower hose(A, B).
Page 104 of 1575
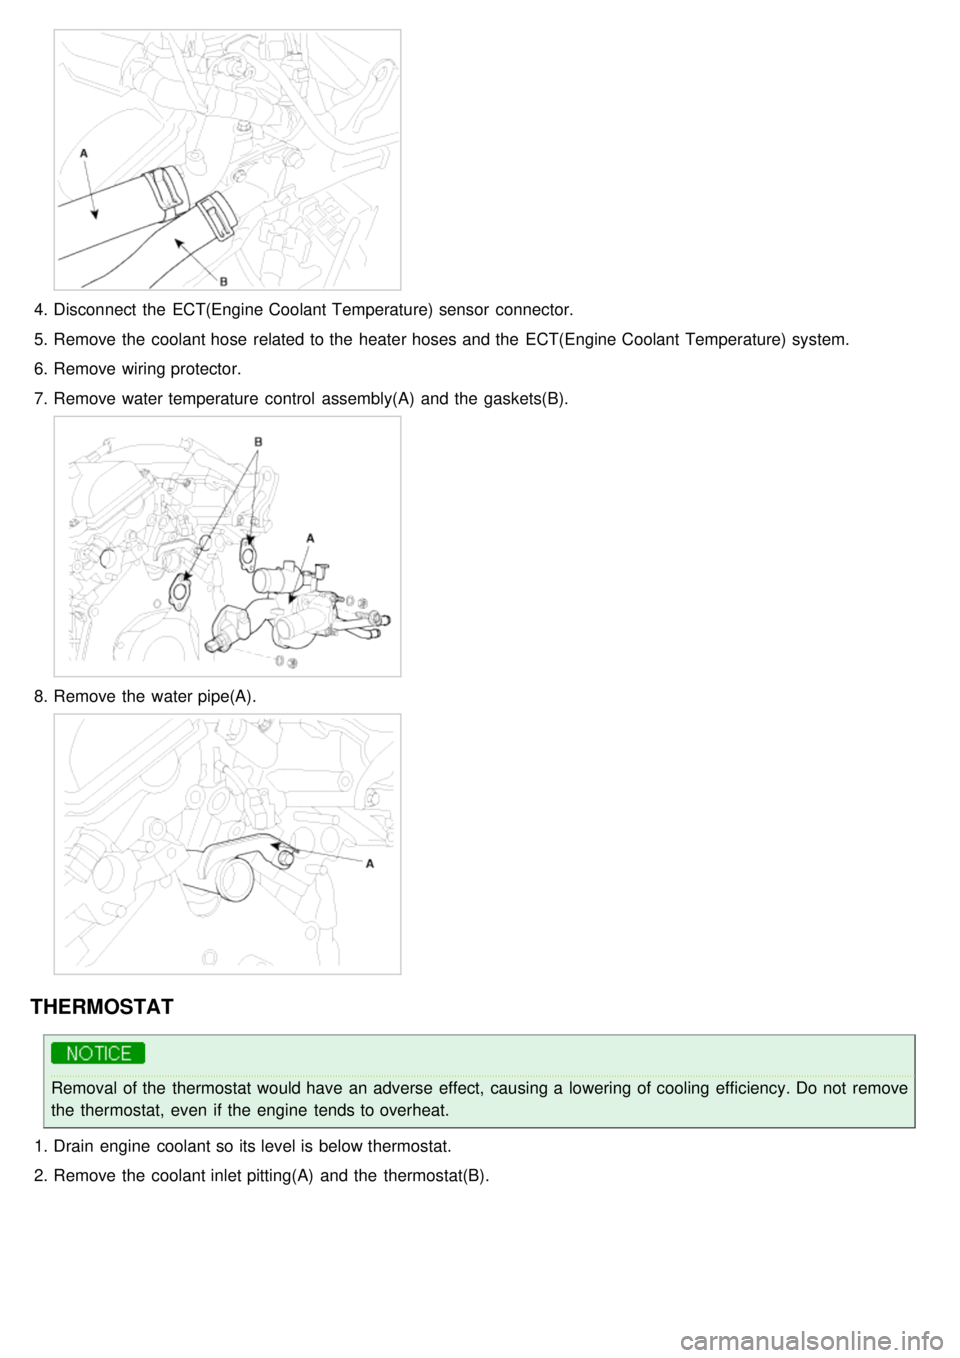
4.Disconnect the ECT(Engine Coolant Temperature) sensor connector.
5. Remove the coolant hose related to the heater hoses and the ECT(Engine Coolant Temperature) system.
6. Remove wiring protector.
7. Remove water temperature control assembly(A) and the gaskets(B).
8.Remove the water pipe(A).
THERMOSTAT
Removal of the thermostat would have an adverse effect, causing a lowering of cooling efficiency. Do not remove
the thermostat, even if the engine tends to overheat.
1. Drain engine coolant so its level is below thermostat.
2. Remove the coolant inlet pitting(A) and the thermostat(B).
Page 105 of 1575
RADIATOR
1.Drain the engine coolant.
2. Remove the radiator grille upper cover(A).
3.Remove the radiator support upper member assembly(A) for convenience sake.
The bottom side bolt(A) which can be seen after removing the under cover should be loosened for removal of
the radiator support upper member assembly.
Page 106 of 1575
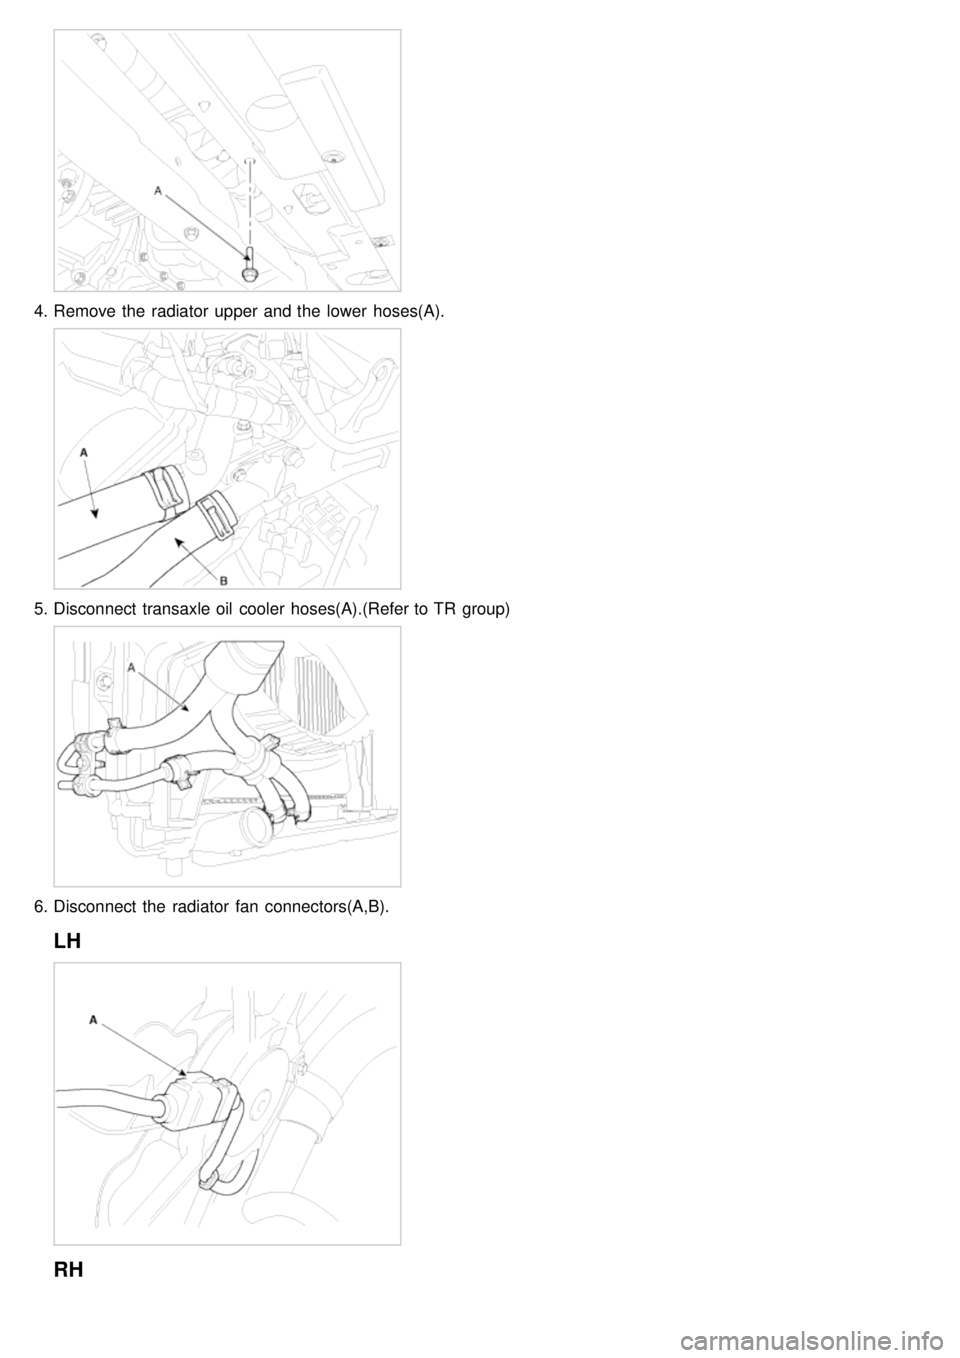
4.Remove the radiator upper and the lower hoses(A).
5.Disconnect transaxle oil cooler hoses(A).(Refer to TR group)
6.Disconnect the radiator fan connectors(A,B).
LH
RH
Page 107 of 1575
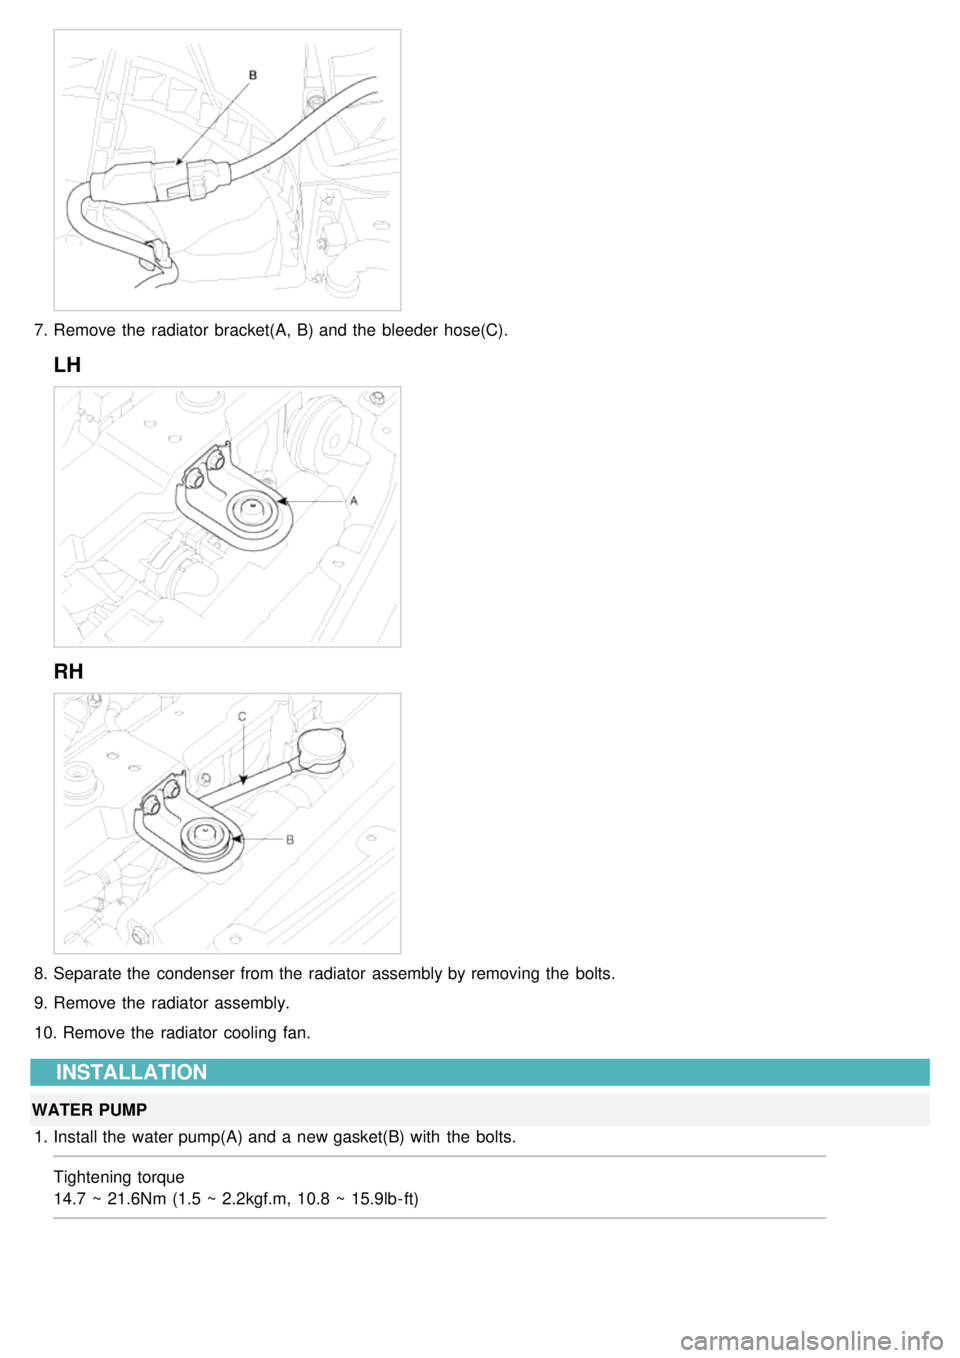
7.Remove the radiator bracket(A, B) and the bleeder hose(C).
LH
RH
8.Separate the condenser from the radiator assembly by removing the bolts.
9. Remove the radiator assembly.
10. Remove the radiator cooling fan.
INSTALLATION
WATER PUMP
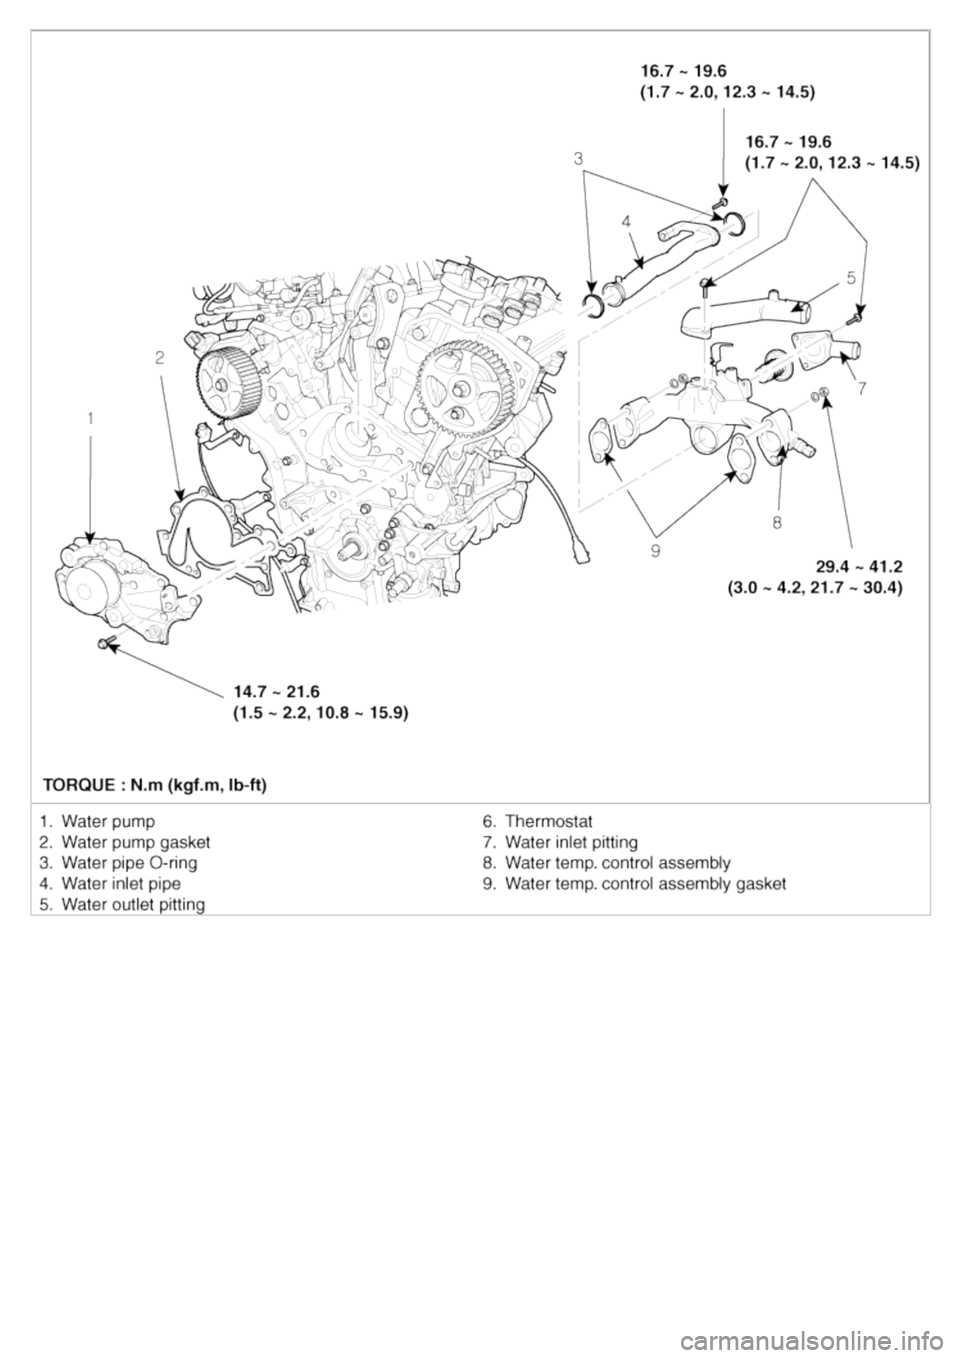
1. Install the water pump(A) and a new gasket(B) with the bolts.
Tightening torque
14.7 ~ 21.6Nm (1.5 ~ 2.2kgf.m, 10.8 ~ 15.9lb- ft)
Page 108 of 1575
Clean the contacting face before assembling.
2. Install the timing belt.
3. Install drive belt(A).
4.Fill with engine coolant.
5. Start engine and check for leaks.
6. Recheck engine coolant level.
WATER TEMPERATURE CONTROL ASSEMBLY
1.Install the water pipe(A).
Tightening torque
16.7 ~ 19.6Nm (1.7 ~ 2.0kgf.m, 12.3 ~ 14.5lb- ft)
2.Install the water temperature control assembly(A) with a new gasket(B).
Tightening torque
Page 109 of 1575
29.4 ~ 41.2Nm(3.0 ~ 4.2kgf.m, 21.7 ~ 30.4lb- ft
Use new O - rings and wet them with water or coolant when reassembling.
3. Install the wiring protector.
4. Connect the heater hose and ECT hose.
5. Connect the ECT sensor connector.
6. Connect the radiator upper and the lower hose(A).
7.Install the air cleaner assembly.
8. Fill with engine coolant.
9. Start engine and check for leaks.
10. Recheck engine coolant level.
THERMOSTAT
1.Place thermostat(B) in coolant inlet pitting(A).
Install the thermostat with the jiggle valve upward.
Page 110 of 1575
2.Install the coolant inlet pitting(A).
Tightening torque
16.66 ~ 19.60Nm (1.7 ~ 2.0kgf.m, 12.30 ~ 14.47lb- ft)
3. Fill with engine coolant.
4. Start engine and check for leaks.
RADIATOR
1.Install the radiator fan(A) to the radiator.
Tightening torque
4.9 ~ 7.8Nm (0.5 ~ 0.8kgf.m, 3.6 ~ 5.8lb - ft)
2. Install the radiator assembly to the vehicle.
3. Fix the condenser with the radiator assembly.
Tightening torque
4.9 ~ 7.8Nm (0.5 ~ 0.8kgf.m, 3.6 ~ 5.8lb - ft) - D
6.9 ~ 9.8Nm (0.7 ~ 1.0kgf.m, 5.1 ~ 7.2lb - ft) - C
4. Install the radiator bracket(A, B) and the bleeder hose(C).
LH
RH
Trending: coolant temperature, battery replacement, spark plugs, torque, transmission fluid, Drum brake, fog light bulb
