KIA CARNIVAL 2007 Manual Online
Manufacturer: KIA, Model Year: 2007, Model line: CARNIVAL, Model: KIA CARNIVAL 2007Pages: 1575, PDF Size: 44.86 MB
Page 81 of 1575
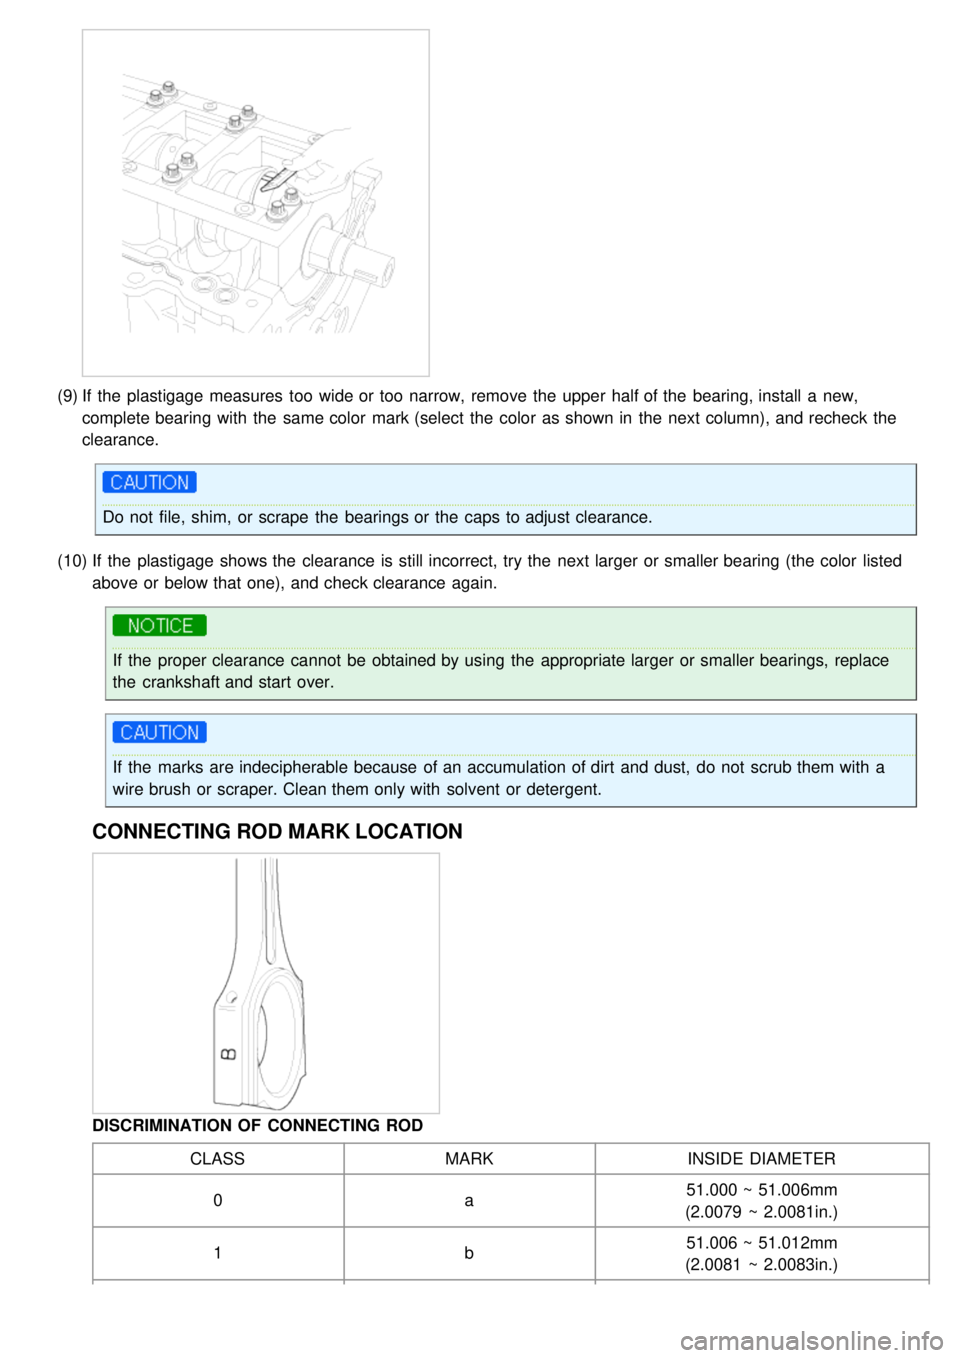
(9)If the plastigage measures too wide or too narrow, remove the upper half of the bearing, install a new,
complete bearing with the same color mark (select the color as shown in the next column), and recheck the
clearance.
Do not file, shim, or scrape the bearings or the caps to adjust clearance.
(10) If the plastigage shows the clearance is still incorrect, try the next larger or smaller bearing (the color listed
above or below that one), and check clearance again.
If the proper clearance cannot be obtained by using the appropriate larger or smaller bearings, replace
the crankshaft and start over.
If the marks are indecipherable because of an accumulation of dirt and dust, do not scrub them with a
wire brush or scraper. Clean them only with solvent or detergent.
CONNECTING ROD MARK LOCATION
DISCRIMINATION OF CONNECTING ROD
CLASS MARKINSIDE DIAMETER
0 a51.000 ~ 51.006mm
(2.0079 ~ 2.0081in.)
1 b51.006 ~ 51.012mm
(2.0081 ~ 2.0083in.)
Page 82 of 1575
2c51.012 ~ 51.018mm
(2.0083 ~ 2.0086in.)
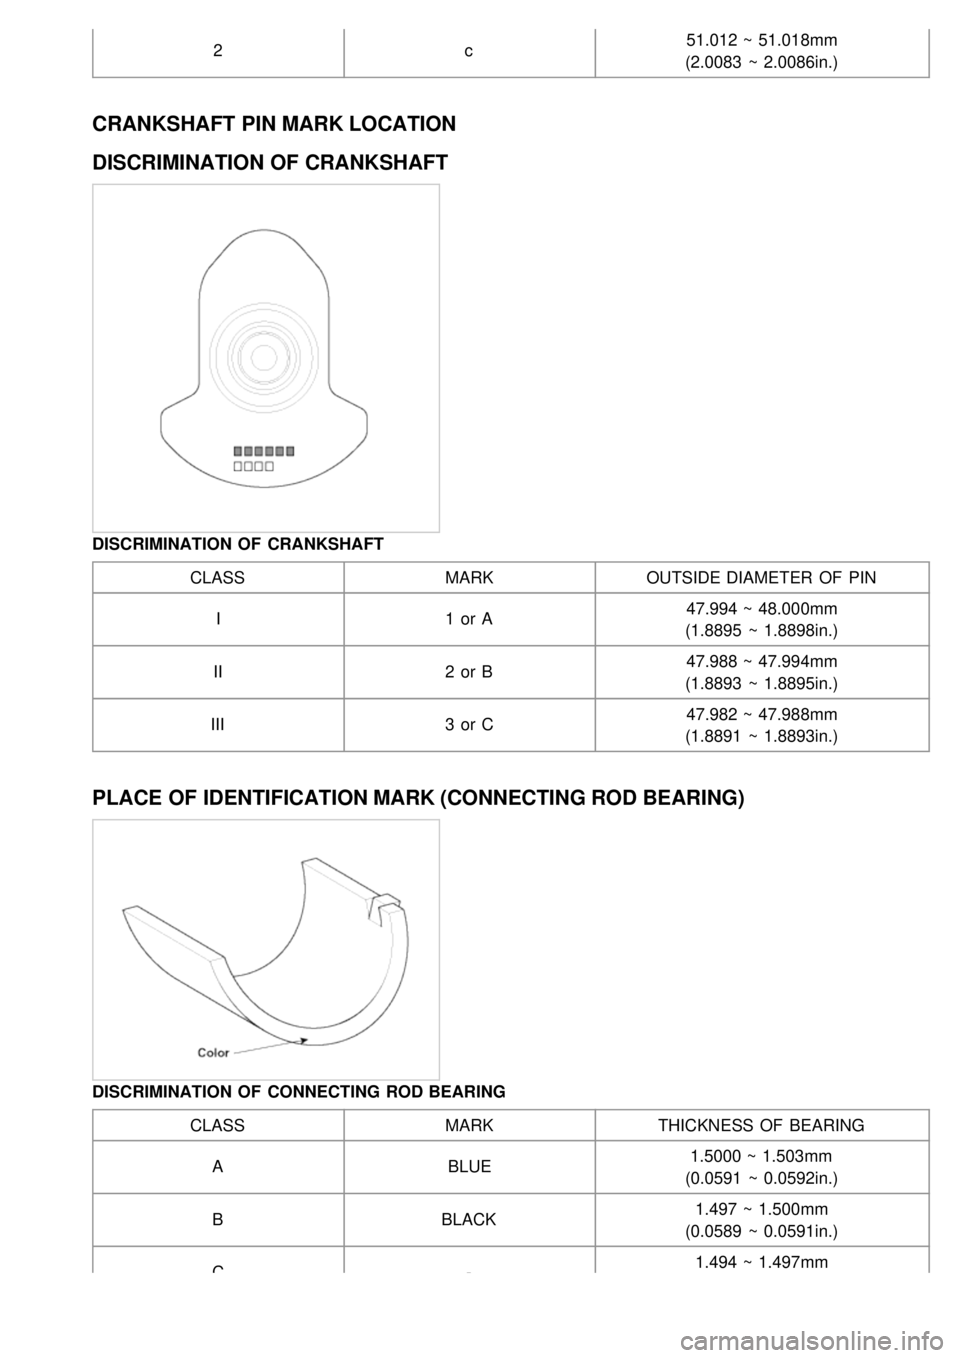
CRANKSHAFT PIN MARK LOCATION
DISCRIMINATION OF CRANKSHAFT
DISCRIMINATION OF CRANKSHAFT
CLASS MARKOUTSIDE DIAMETER OF PIN
I 1 or A 47.994 ~ 48.000mm
(1.8895 ~ 1.8898in.)
II 2 or B 47.988 ~ 47.994mm
(1.8893 ~ 1.8895in.)
III 3 or C 47.982 ~ 47.988mm
(1.8891 ~ 1.8893in.)
PLACE OF IDENTIFICATION MARK (CONNECTING ROD BEARING)
DISCRIMINATION OF CONNECTING ROD BEARING
CLASS MARKTHICKNESS OF BEARING
A BLUE 1.5000 ~ 1.503mm
(0.0591 ~ 0.0592in.)
B BLACK 1.497 ~ 1.500mm
(0.0589 ~ 0.0591in.)
C -1.494 ~ 1.497mm
(0.0588 ~ 0.0589in.)
Page 83 of 1575
C-
(0.0588 ~ 0.0589in.)
D GREEN 1.491 ~ 1.494mm
(0.0587 ~ 0.0588in.)
E YELLOW 1.488 ~ 1.491mm
(0.0586 ~ 0.0587in)
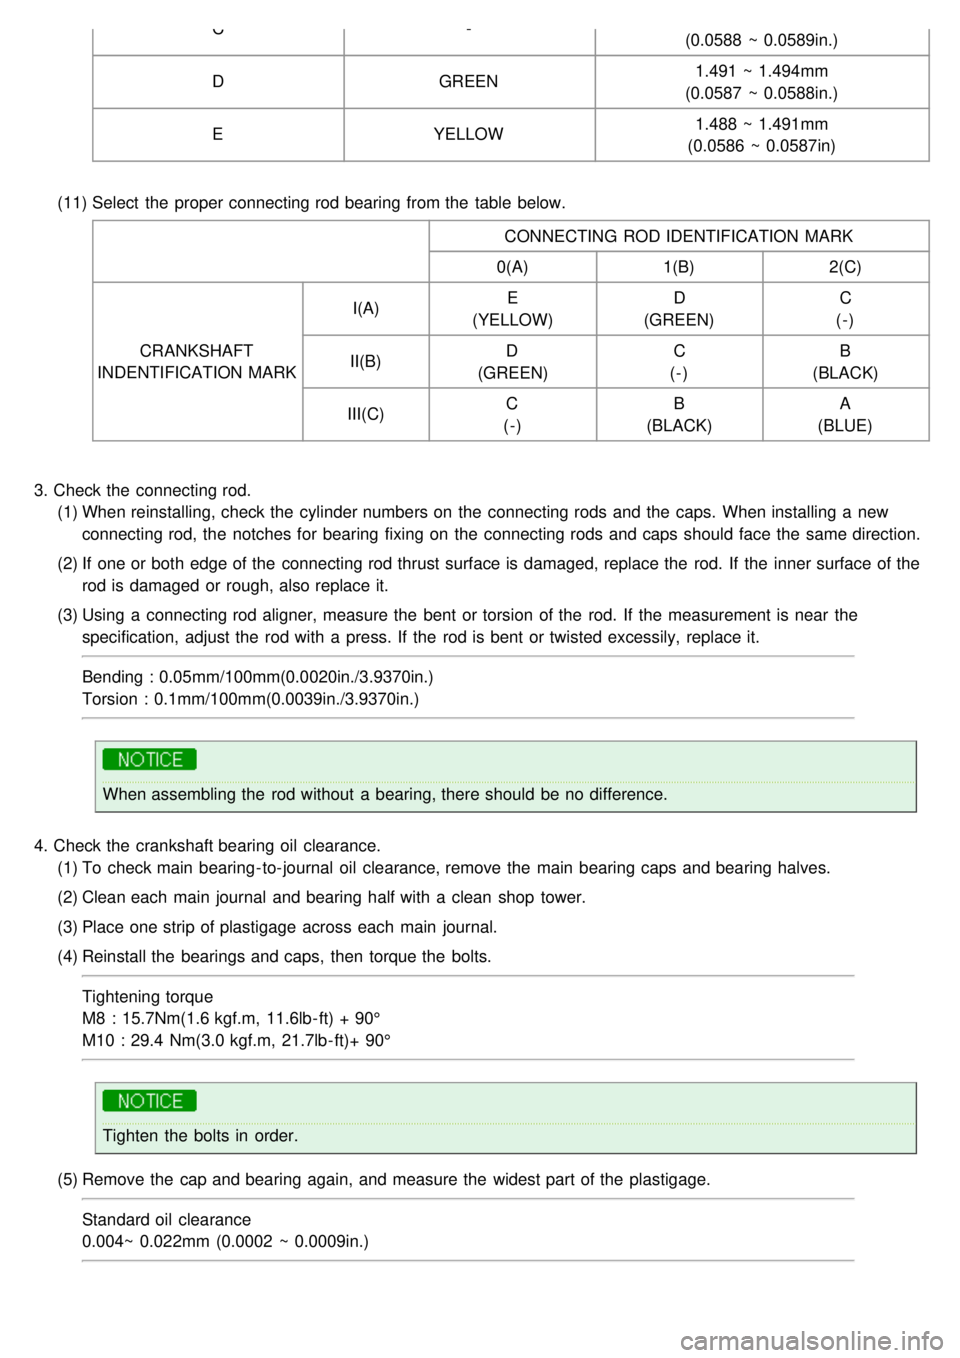
(11) Select the proper connecting rod bearing from the table below.
CONNECTING ROD IDENTIFICATION MARK
0(A) 1(B)2(C)
CRANKSHAFT
INDENTIFICATION MARK I(A)
E
(YELLOW) D
(GREEN) C
(-)
II(B) D
(GREEN) C
(-) B
(BLACK)
III(C) C
(-) B
(BLACK) A
(BLUE)
3. Check the connecting rod.
(1) When reinstalling, check the cylinder numbers on the connecting rods and the caps. When installing a new
connecting rod, the notches for bearing fixing on the connecting rods and caps should face the same direction.
(2) If one or both edge of the connecting rod thrust surface is damaged, replace the rod. If the inner surface of the
rod is damaged or rough, also replace it.
(3) Using a connecting rod aligner, measure the bent or torsion of the rod. If the measurement is near the
specification, adjust the rod with a press. If the rod is bent or twisted excessily, replace it.
Bending : 0.05mm/100mm(0.0020in./3.9370in.)
Torsion : 0.1mm/100mm(0.0039in./3.9370in.)
When assembling the rod without a bearing, there should be no difference.
4. Check the crankshaft bearing oil clearance.
(1) To check main bearing- to- journal oil clearance, remove the main bearing caps and bearing halves.
(2) Clean each main journal and bearing half with a clean shop tower.
(3) Place one strip of plastigage across each main journal.
(4) Reinstall the bearings and caps, then torque the bolts.
Tightening torque
M8 : 15.7Nm(1.6 kgf.m, 11.6lb- ft) + 90°
M10 : 29.4 Nm(3.0 kgf.m, 21.7lb- ft)+ 90°
Tighten the bolts in order.
(5) Remove the cap and bearing again, and measure the widest part of the plastigage.
Standard oil clearance
0.004~ 0.022mm (0.0002 ~ 0.0009in.)
Page 84 of 1575

(6)If the plastigage measures too wide or too narrow, remove the upper half of the bearing, install a new,
complete bearing with the same color mark (select the color as shown in the next column), and recheck the
clearance.
Do not file, shim, or scrape the bearings or the caps to adjust clearance.
(7) If the plastigage shows the clearance is still incorrect, try the next larger or smaller bearing (the color listed
above or below that one), and check clearance again.
If the proper clearance cannot be obtained by using the appropriate larger or smaller bearings, replace the
crankshaft and start over.
If the marks are indecipherable because of an accumulation of dirt and dust, do not scrub them with a wire
brush or scraper. Clean them only with solvent or detergent.
Crankshaft bore mark location
Letters have been stamped on the block as a mark for the each size of the 4 main journal bores.
No.1 journal stamping mark starts from the front of the engine.
Use the size marks which are stamped on the block and the crankshaft for the journal bore inner diameter and
the journal outer diameter to choose the correct bearings.
Page 85 of 1575
DISCRIMINATION OF CYLINDER BLOCKCLASS MARKINSIDE DIAMETER
a A66.000 ~ 66.006mm
(2.5984 ~ 2.5987in.)
b B66.006 ~ 66.012mm
(2.5987 ~ 2.5989in.)
c C66.012 ~ 66.018mm
(2.5989 ~ 2.5991in.)
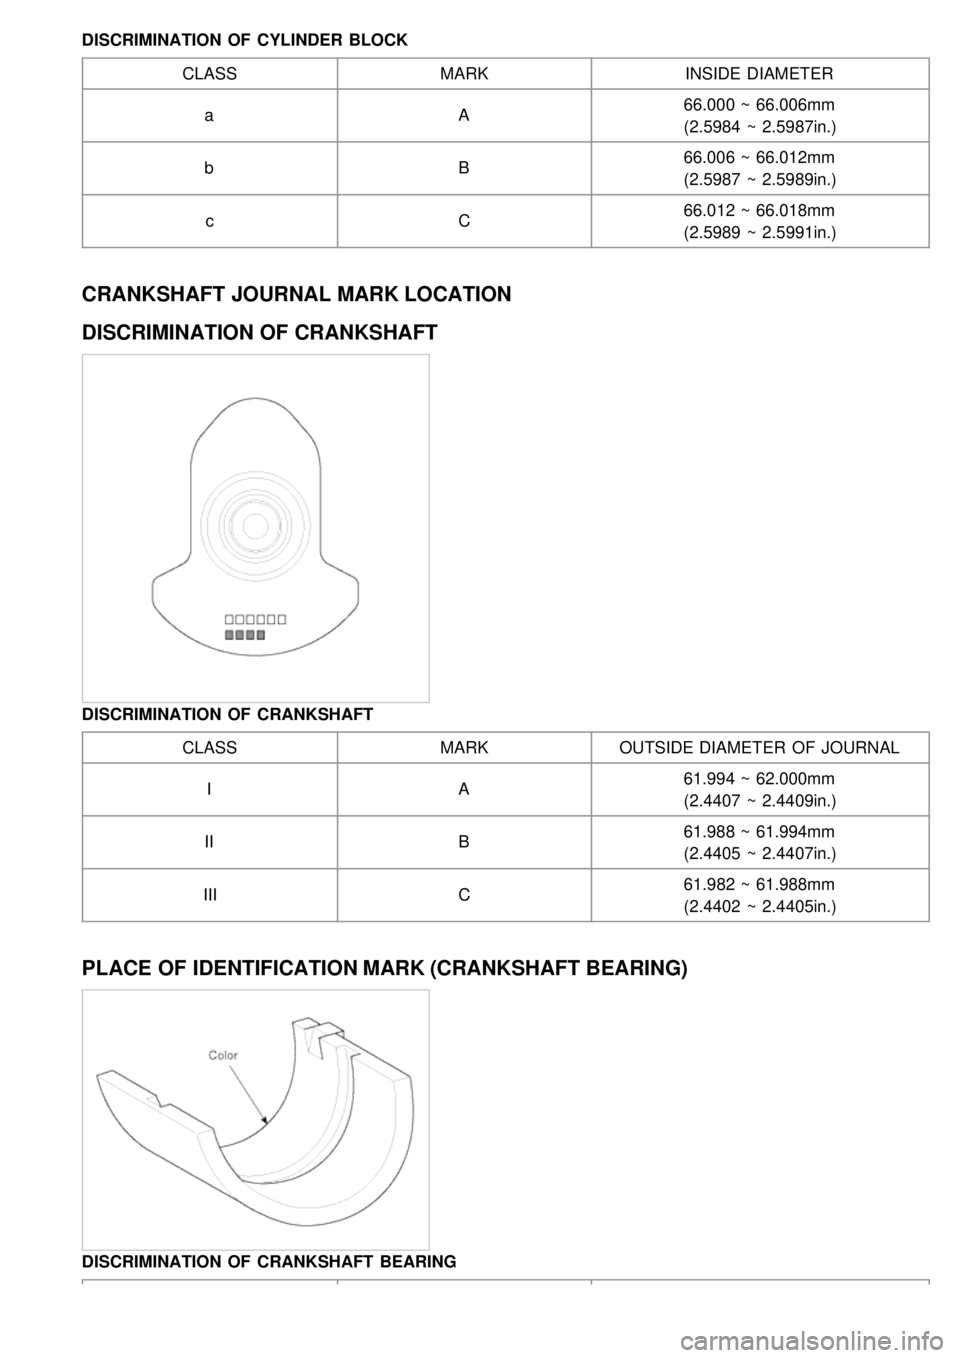
CRANKSHAFT JOURNAL MARK LOCATION
DISCRIMINATION OF CRANKSHAFT
DISCRIMINATION OF CRANKSHAFT
CLASS MARKOUTSIDE DIAMETER OF JOURNAL
I A61.994 ~ 62.000mm
(2.4407 ~ 2.4409in.)
II B61.988 ~ 61.994mm
(2.4405 ~ 2.4407in.)
III C61.982 ~ 61.988mm
(2.4402 ~ 2.4405in.)
PLACE OF IDENTIFICATION MARK (CRANKSHAFT BEARING)
DISCRIMINATION OF CRANKSHAFT BEARING
Page 86 of 1575
CLASSMARKTHICKNESS OF BEARING
A BLUE 2.007 ~ 2.010mm
(0.0790 ~ 0.0791in.)
B BLACK 2.004 ~ 2.007mm
(0.0789 ~ 0.0790in.)
C -2.001 ~ 2.004mm
(0.0788 ~ 0.0789in.)
D GREEN 1.998 ~ 2.001mm
(0.0787 ~ 0.0788in.)
E YELLOW 1.995 ~ 1.998mm
(0.0785 ~ 0.0787in.)
SELECTION TABLE CRANKSHAFT BORE IDENTIFICATION MARK
a(A) b(B)c(C)
CRANKSHAFT
IDENTIFICATION MARK I(A)
E
(YELLOW) D
(GREEN) C
(-)
II(B) D
(GREEN) C
(-) B
(BLACK)
III(C) C
(-) B
(BLACK) A
(BLUE)
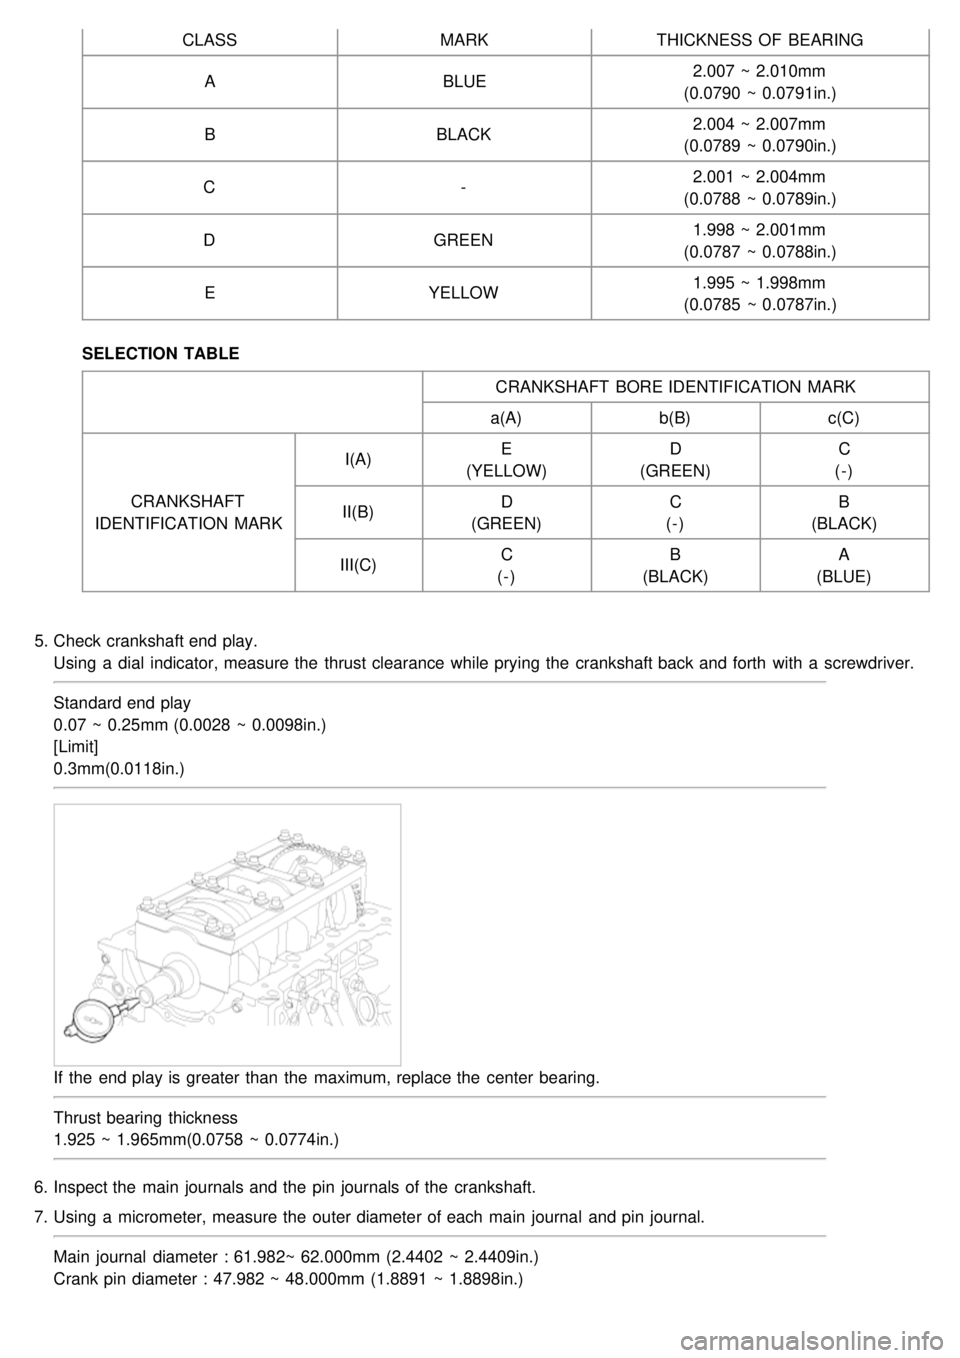
5. Check crankshaft end play.
Using a dial indicator, measure the thrust clearance while prying the crankshaft back and forth with a screwdriver.
Standard end play
0.07 ~ 0.25mm (0.0028 ~ 0.0098in.)
[Limit]
0.3mm(0.0118in.)
If the end play is greater than the maximum, replace the center bearing.
Thrust bearing thickness
1.925 ~ 1.965mm(0.0758 ~ 0.0774in.)
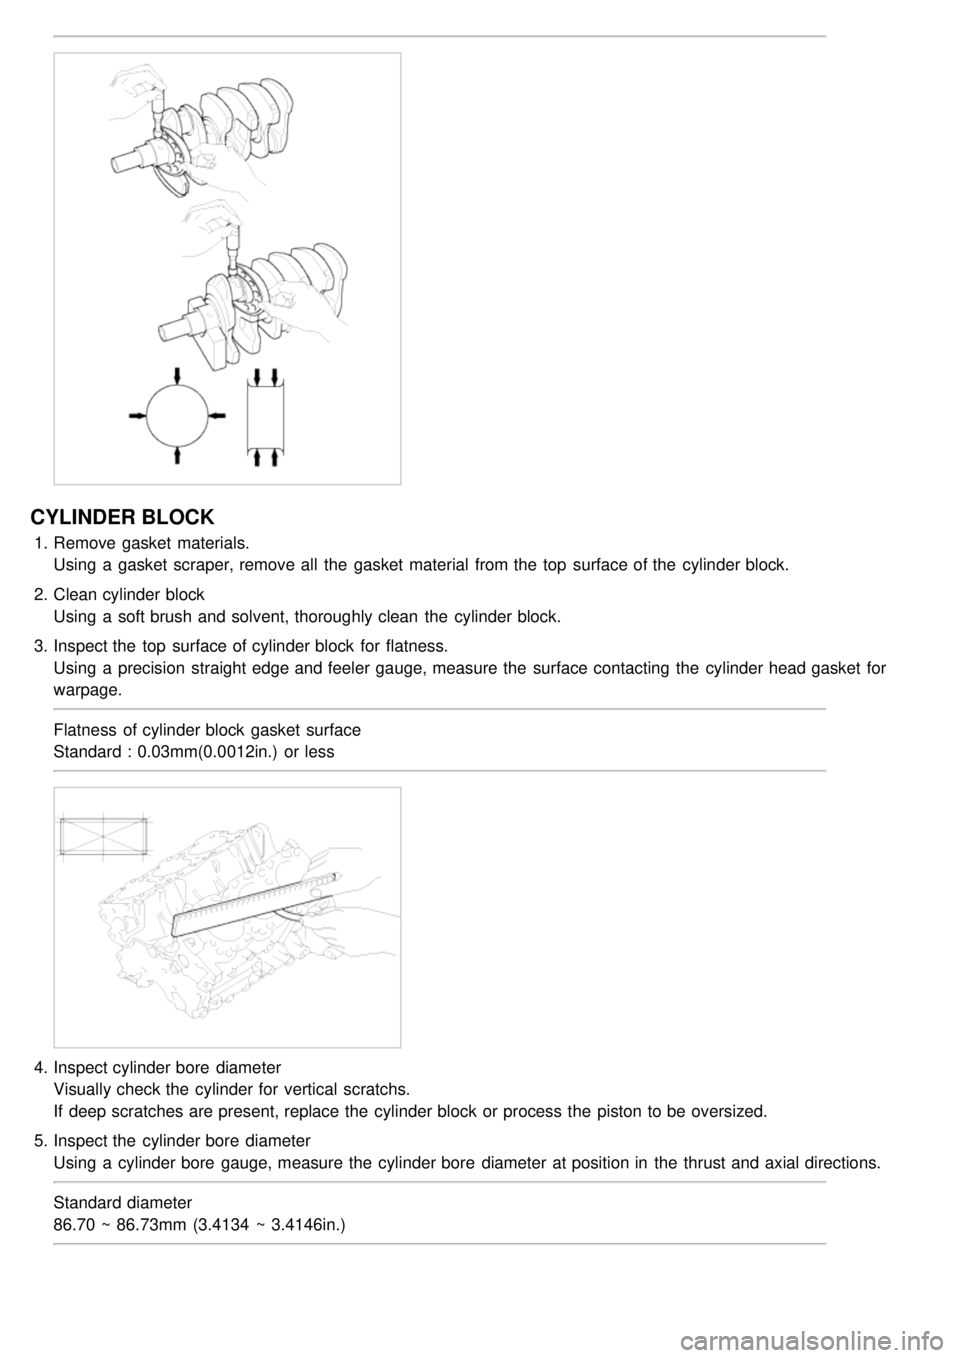
6. Inspect the main journals and the pin journals of the crankshaft.
7. Using a micrometer, measure the outer diameter of each main journal and pin journal.
Main journal diameter : 61.982~ 62.000mm (2.4402 ~ 2.4409in.)
Crank pin diameter : 47.982 ~ 48.000mm (1.8891 ~ 1.8898in.)
Page 87 of 1575
CYLINDER BLOCK
1.Remove gasket materials.
Using a gasket scraper, remove all the gasket material from the top surface of the cylinder block.
2. Clean cylinder block
Using a soft brush and solvent, thoroughly clean the cylinder block.
3. Inspect the top surface of cylinder block for flatness.
Using a precision straight edge and feeler gauge, measure the surface contacting the cylinder head gasket for
warpage.
Flatness of cylinder block gasket surface
Standard : 0.03mm(0.0012in.) or less
4.Inspect cylinder bore diameter
Visually check the cylinder for vertical scratchs.
If deep scratches are present, replace the cylinder block or process the piston to be oversized.
5. Inspect the cylinder bore diameter
Using a cylinder bore gauge, measure the cylinder bore diameter at position in the thrust and axial directions.
Standard diameter
86.70 ~ 86.73mm (3.4134 ~ 3.4146in.)
Page 88 of 1575
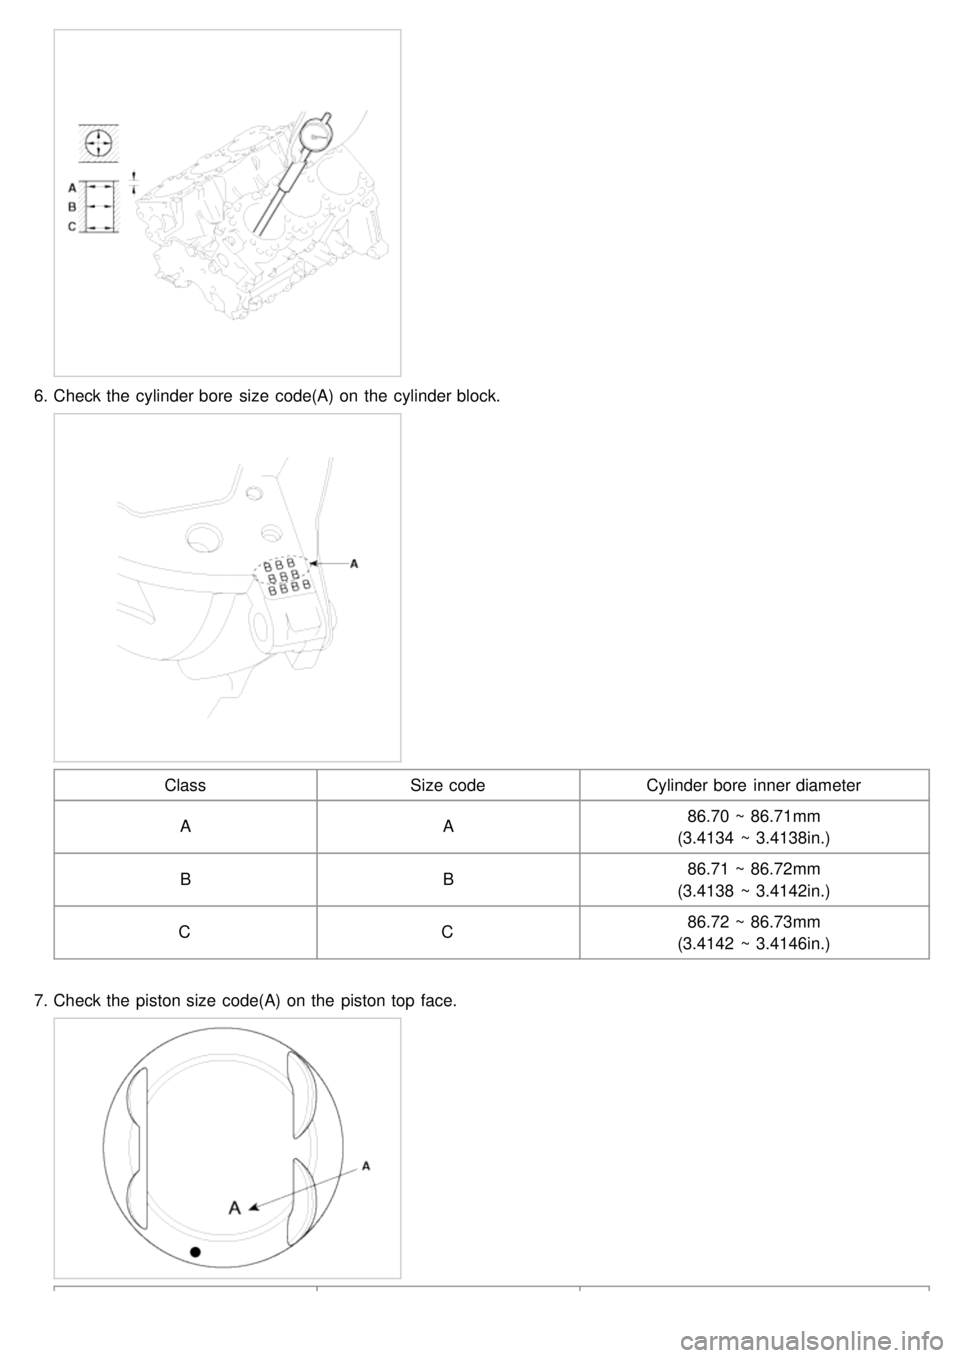
6.Check the cylinder bore size code(A) on the cylinder block.
Class Size codeCylinder bore inner diameter
A A86.70 ~ 86.71mm
(3.4134 ~ 3.4138in.)
B B86.71 ~ 86.72mm
(3.4138 ~ 3.4142in.)
C C86.72 ~ 86.73mm
(3.4142 ~ 3.4146in.)
7. Check the piston size code(A) on the piston top face.
Page 89 of 1575

ClassSize code Piston outer diameter
A A86.67 ~ 86.68mm
(3.4122 ~ 3.4126in.)
B -86.68 ~ 86.69mm
(3.4126 ~ 3.4130in.)
C C86.69 ~ 86.70mm
(3.4130 ~ 3.4134in.)
8. Select the proper piston related to the cylinder bore class.
Clearance : 0.02 ~ 0.04mm(0.0008 ~ 0.0016in.)
CYLINDER BORING
1.The over size piston is chosen on the maximum inner diameter of the cylinder.
The piston size mark is on the top surface of the piston.
2. Measure the outer diameter of the piston which is installed before.
3. Calculate the new bore size with the measurement in the step 2.
New bore size = measured outer diameter of piston + 0.02 ~ 0.04mm(0.0008~0.0016in.)[clearance] -
0.01mm(0.0004in.)[for horning]
4. Bore the cylinder to the calculated size.
Bore the cylinders in firing order to prevent the cylinders from be twisted by high temperature.
5. Stop boring and start horning for the proper clearance.
6. Measure the clearance between a piston and a cylinder.
Specification
0.02 ~ 0.04mm(0.0008 ~ 0.0016in.)
Bore all the cylinders with the same over size.
PISTON AND RINGS
1.Clean pistons.
(1) Using a gasket scraper, remove the carbon from the piston top.
(2) Using a groove cleaning tool or a broken ring, clean the piston ring grooves.
(3) Using solvent and a brush, thoroughly clean the piston.
Do not use a wire brush.
2. The standard measurement of the piston outside diameter is taken 14 mm (0.5512 in.) from the bottom of the
piston.
Page 90 of 1575
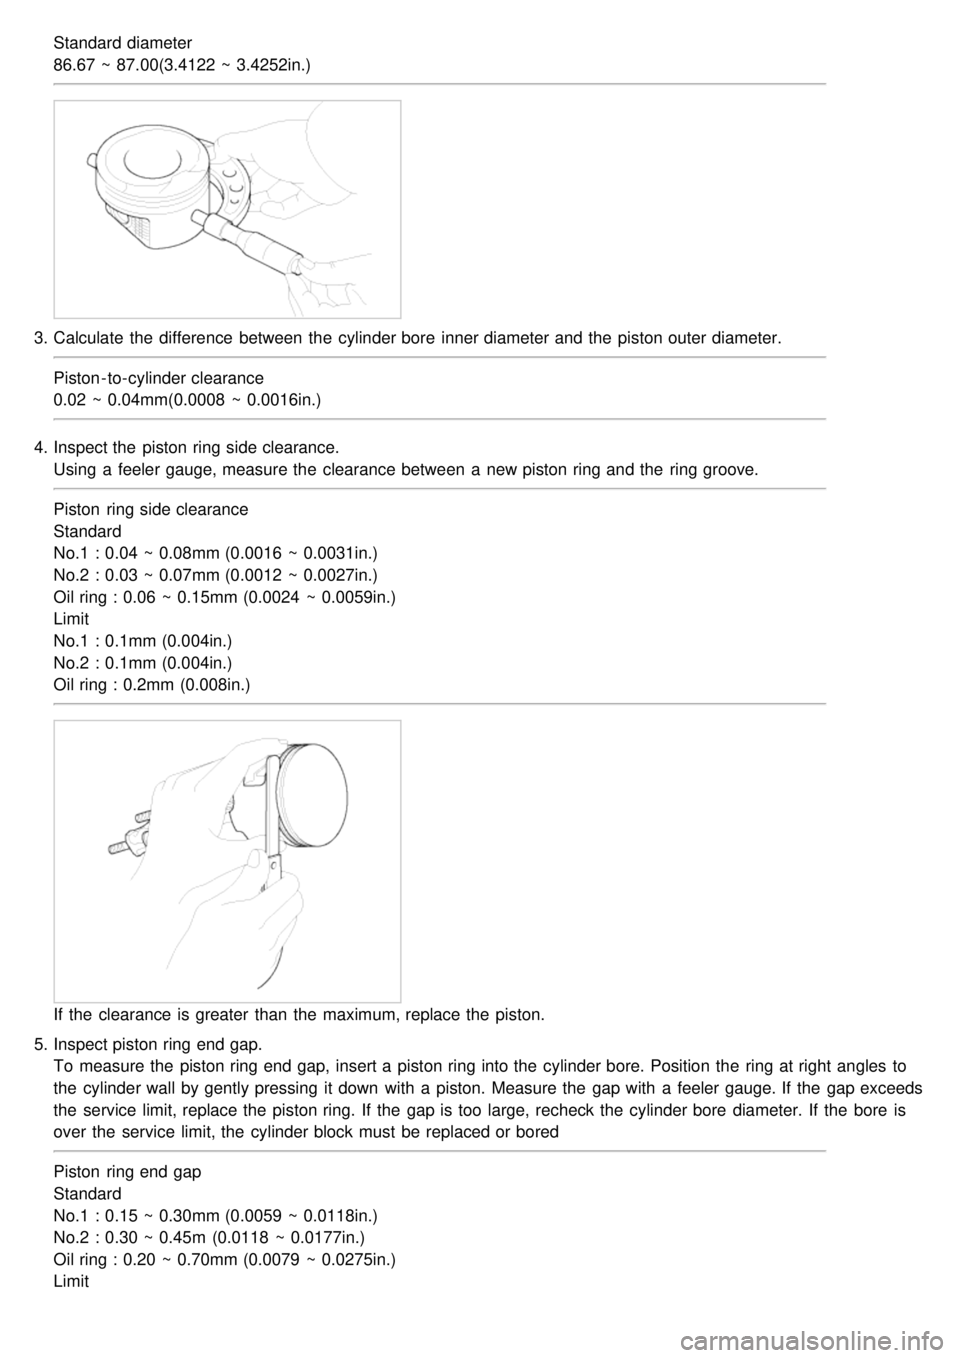
Standard diameter
86.67 ~ 87.00(3.4122 ~ 3.4252in.)
3.Calculate the difference between the cylinder bore inner diameter and the piston outer diameter.
Piston - to- cylinder clearance
0.02 ~ 0.04mm(0.0008 ~ 0.0016in.)
4. Inspect the piston ring side clearance.
Using a feeler gauge, measure the clearance between a new piston ring and the ring groove.
Piston ring side clearance
Standard
No.1 : 0.04 ~ 0.08mm (0.0016 ~ 0.0031in.)
No.2 : 0.03 ~ 0.07mm (0.0012 ~ 0.0027in.)
Oil ring : 0.06 ~ 0.15mm (0.0024 ~ 0.0059in.)
Limit
No.1 : 0.1mm (0.004in.)
No.2 : 0.1mm (0.004in.)
Oil ring : 0.2mm (0.008in.)
If the clearance is greater than the maximum, replace the piston.
5. Inspect piston ring end gap.
To measure the piston ring end gap, insert a piston ring into the cylinder bore. Position the ring at right angles to
the cylinder wall by gently pressing it down with a piston. Measure the gap with a feeler gauge. If the gap exceeds
the service limit, replace the piston ring. If the gap is too large, recheck the cylinder bore diameter. If the bore is
over the service limit, the cylinder block must be replaced or bored
Piston ring end gap
Standard
No.1 : 0.15 ~ 0.30mm (0.0059 ~ 0.0118in.)
No.2 : 0.30 ~ 0.45m (0.0118 ~ 0.0177in.)
Oil ring : 0.20 ~ 0.70mm (0.0079 ~ 0.0275in.)
Limit