bolt pattern KIA CARNIVAL 2007 Workshop Manual
[x] Cancel search | Manufacturer: KIA, Model Year: 2007, Model line: CARNIVAL, Model: KIA CARNIVAL 2007Pages: 1575, PDF Size: 44.86 MB
Page 328 of 1575

2007 > 2.7L V6 GASOLINE >
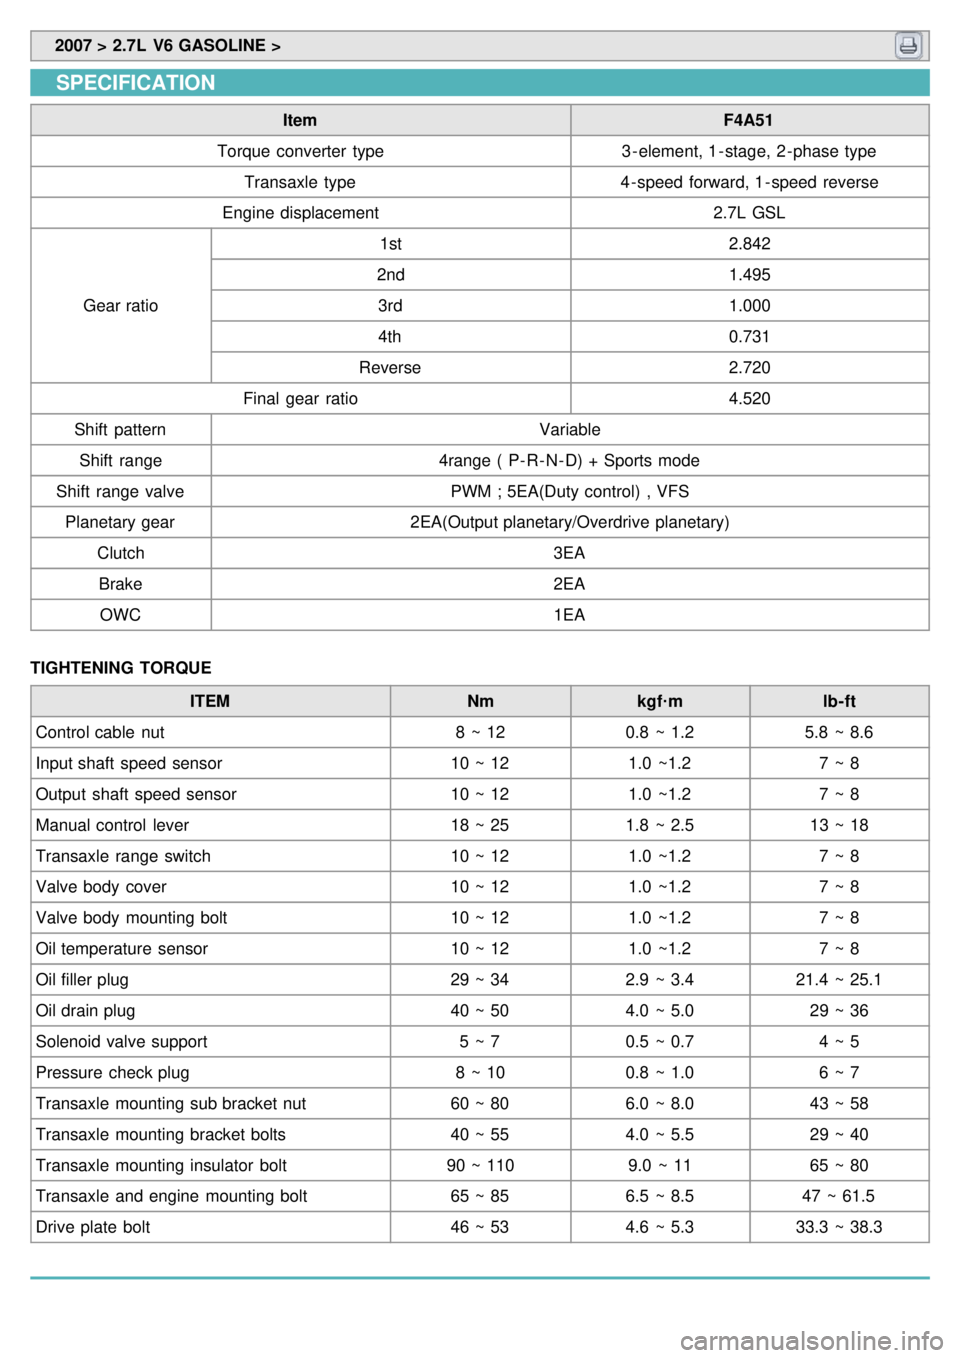
SPECIFICATION
Item F4A51
Torque converter type 3 - element, 1 - stage, 2 - phase type
Transaxle type 4 - speed forward, 1 - speed reverse
Engine displacement 2.7L GSL
Gear ratio 1st
2.842
2nd 1.495
3rd 1.000
4th 0.731
Reverse 2.720
Final gear ratio 4.520
Shift pattern Variable
Shift range 4range ( P- R- N- D) + Sports mode
Shift range valve PWM ; 5EA(Duty control) , VFS
Planetary gear 2EA(Output planetary/Overdrive planetary)
Clutch 3EA
Brake 2EA
OWC 1EA
TIGHTENING TORQUE ITEM Nmkgf·m lb- ft
Control cable nut 8 ~ 120.8 ~ 1.2 5.8 ~ 8.6
Input shaft speed sensor 10 ~ 121.0 ~1.2 7 ~ 8
Output shaft speed sensor 10 ~ 121.0 ~1.2 7 ~ 8
Manual control lever 18 ~ 251.8 ~ 2.5 13 ~ 18
Transaxle range switch 10 ~ 121.0 ~1.2 7 ~ 8
Valve body cover 10 ~ 121.0 ~1.2 7 ~ 8
Valve body mounting bolt 10 ~ 121.0 ~1.2 7 ~ 8
Oil temperature sensor 10 ~ 121.0 ~1.2 7 ~ 8
Oil filler plug 29 ~ 342.9 ~ 3.421.4 ~ 25.1
Oil drain plug 40 ~ 504.0 ~ 5.0 29 ~ 36
Solenoid valve support 5 ~ 70.5 ~ 0.7 4 ~ 5
Pressure check plug 8 ~ 100.8 ~ 1.0 6 ~ 7
Transaxle mounting sub bracket nut 60 ~ 806.0 ~ 8.0 43 ~ 58
Transaxle mounting bracket bolts 40 ~ 554.0 ~ 5.5 29 ~ 40
Transaxle mounting insulator bolt 90 ~ 1109.0 ~ 1165 ~ 80
Transaxle and engine mounting bolt 65 ~ 856.5 ~ 8.5 47 ~ 61.5
Drive plate bolt 46 ~ 534.6 ~ 5.333.3 ~ 38.3
Page 488 of 1575

accelerating around a cornerSee DS group - driveshaft.
Front suspension noise - A squeak,
creak, or rattle noise - occurs mostly
over bumps or rough roads Steering components
Loose or bent front struts or shock
absorbers
Damaged spring or spring mounts
Damaged or worn arm bushings
Worn or damaged stabilizer bar
bushing or linksGo to detailed test A.
Groaning or grinding - noise from the
front strut, occurs when driving on
bumpy roads or turning the vehicle Uneven seating surface between the
insulator and panel by the burrs
around the strut insulator mounting
bolts and the insulator boltes
mounting holesRepair or install a new parts as
necessary.
Rear suspension noise - a squeak,
creak or rattle noise - occurs mostly
over bumps or rough roads Loose or bent rear shock absorbers
Damaged spring or spring mounts
Damaged or worn control arm
bushingsGo to detailed test B.
Shudder - occurs during acceleration
from a slow speed or stop Rear axle assembly mis - positioned
Damaged or worn front suspension
componentsCheck the axle mounts and rear
suspension for damage or wear.
Repair as necessary.
Check for a loose stabilizer bar,
damaged or loose strut/strut bushings
or loose or worn ball joints. Inspect
the steering linkage for wear or
damage. Repair or Install new
components as necessary.
Shimmy - most noticeable on
coast/deceleration - also hard steering
condition Excessive positive caster
Check the caster alignment angle.
Correct as necessary.
Tire noise - hum/moan at constant
speeds Abnormal wear patterns
Spin the tire and Check for tire wear.
Install a new tire as necessary.
Inspect for damaged/worn suspension
components. Perform wheel
alignment.
Tire noise - noise tone lowers as the
vehicle speed is lowered Out- of- balance tire
Balance the tire and road test. Install
a new tire as necessary.
Tire noise - ticking noise, change with
speed Nail puncture or stone in tire tread
Inspect the tire. Repair or replace as
necessary.
Wheel and tire - vibration and noise
concern is directly related to vehicle
speed and is not affected by
acceleration, coasting or decelerating Damaged or worn tire
Go to detailed test C.
Tire wobble or shudder - occurs at
lower speeds Damaged wheel bearings
Spin the tire and check for abnormal
wheel bearing play or roughness.
Adjust or Install new wheel bearings
as necessary.
See DS group - front/rear axle.
Damaged wheel Inspect the wheel for damage. Install
a new wheel as necessary.
Damaged or worn suspension
components Inspect the suspension components
for wear or damage. Repair as
necessary.
Page 490 of 1575

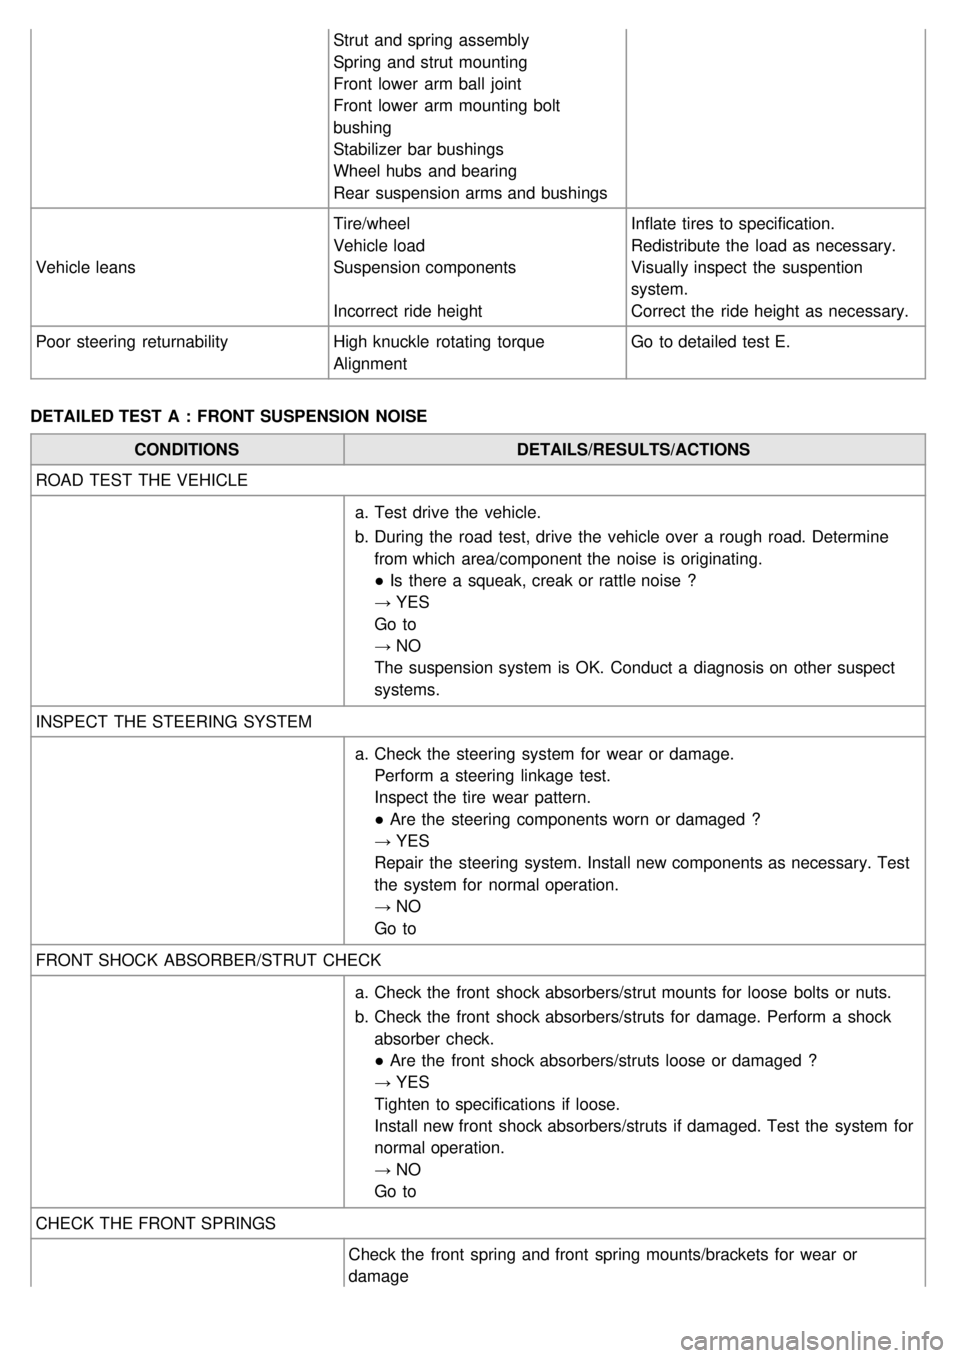
Strut and spring assembly
Spring and strut mounting
Front lower arm ball joint
Front lower arm mounting bolt
bushing
Stabilizer bar bushings
Wheel hubs and bearing
Rear suspension arms and bushings
Vehicle leans Tire/wheel
Vehicle load
Suspension components
Incorrect ride heightInflate tires to specification.
Redistribute the load as necessary.
Visually inspect the suspention
system.
Correct the ride height as necessary.
Poor steering returnability High knuckle rotating torque
AlignmentGo to detailed test E.
DETAILED TEST A : FRONT SUSPENSION NOISE CONDITIONS DETAILS/RESULTS/ACTIONS
ROAD TEST THE VEHICLE
a.Test drive the vehicle.
b. During the road test, drive the vehicle over a rough road. Determine
from which area/component the noise is originating.
● Is there a squeak, creak or rattle noise ?
→ YES
Go to
→ NO
The suspension system is OK. Conduct a diagnosis on other suspect
systems.
INSPECT THE STEERING SYSTEM a.Check the steering system for wear or damage.
Perform a steering linkage test.
Inspect the tire wear pattern.
● Are the steering components worn or damaged ?
→ YES
Repair the steering system. Install new components as necessary. Test
the system for normal operation.
→ NO
Go to
FRONT SHOCK ABSORBER/STRUT CHECK a.Check the front shock absorbers/strut mounts for loose bolts or nuts.
b. Check the front shock absorbers/struts for damage. Perform a shock
absorber check.
● Are the front shock absorbers/struts loose or damaged ?
→ YES
Tighten to specifications if loose.
Install new front shock absorbers/struts if damaged. Test the system for
normal operation.
→ NO
Go to
CHECK THE FRONT SPRINGS Check the front spring and front spring mounts/brackets for wear or
damage
Page 493 of 1575

c.Inspect the tire wear pattern.
● Do the tires have an abnormal wear pattern ?
→ YES
Correct the condition that caused the abnormal wear. Install new tire(s).
Test the system for normal operation.
→ NO
Go to
TIRE ROTATION DIAGNOSIS a.Spin the tires slowly and watch for signs of lateral runout.
b. Spin the tires slowly and watch for signs of radial runout.
● Are there signs of visual runout ?
→ YES
Go to
→ NO
Check the wheel and tire balance.
Correct as necessary. Test the system for normal operation.
RADIAL RUNOUT CHECK ON THE TIRE Measure the radial runout of the wheel and tire assembly. A typical
specification for total radial runout is 1.15mm (0.059 inch).
● Is the radial runout within specifications ?
→ YES
Go to C8.
→ NO
Go to C6.
RADIAL RUNOUT CHECK ON THE WHEEL Measure the radial runout of the wheel. A typical specification for total radial
runout is 1.14mm (0.045 inch.).
● Is the radial runout within specifications ?
→ YES
Install a new tire. Test the system for normal operation.
→ NO
Go to C7.
CHECK THE HUB/BRAKE DISC OR DRUM PILOT RUNOUT OR BOLT CIRCLE RUNOUT Measure the pilot or bolt circle runout. A typical specification for radial
runout is :
● pilot runout - less than 0.15mm (0.006 inch.)
● bolt circle runout - less than 0.38 mm (0.015 inch.)
● Is the radial runout within specification ?
→ YES
Install a new wheel. Test the system for normal operation.
→ NO
Repair or Install new components as necessary.
LATERAL RUNOUT CHECK ON THE TIRE Measure the lateral runout of the wheel and tire assembly. A typical
specification for total lateral runout is 2.5mm (0.098 inch).