window KIA CARNIVAL 2007 Workshop Manual
[x] Cancel search | Manufacturer: KIA, Model Year: 2007, Model line: CARNIVAL, Model: KIA CARNIVAL 2007Pages: 1575, PDF Size: 44.86 MB
Page 224 of 1575
during testing. An example would be if a problem appears only when the vehicle is cold but has not appeared when
warm. In this case, the technician should thoroughly make out a "CUSTOMER PROBLEM ANALYSIS SHEET" and
recreate (simulate) the environment and condition which occurred when the vehicle was having the issue.1. Clear Diagnostic Trouble Code (DTC).
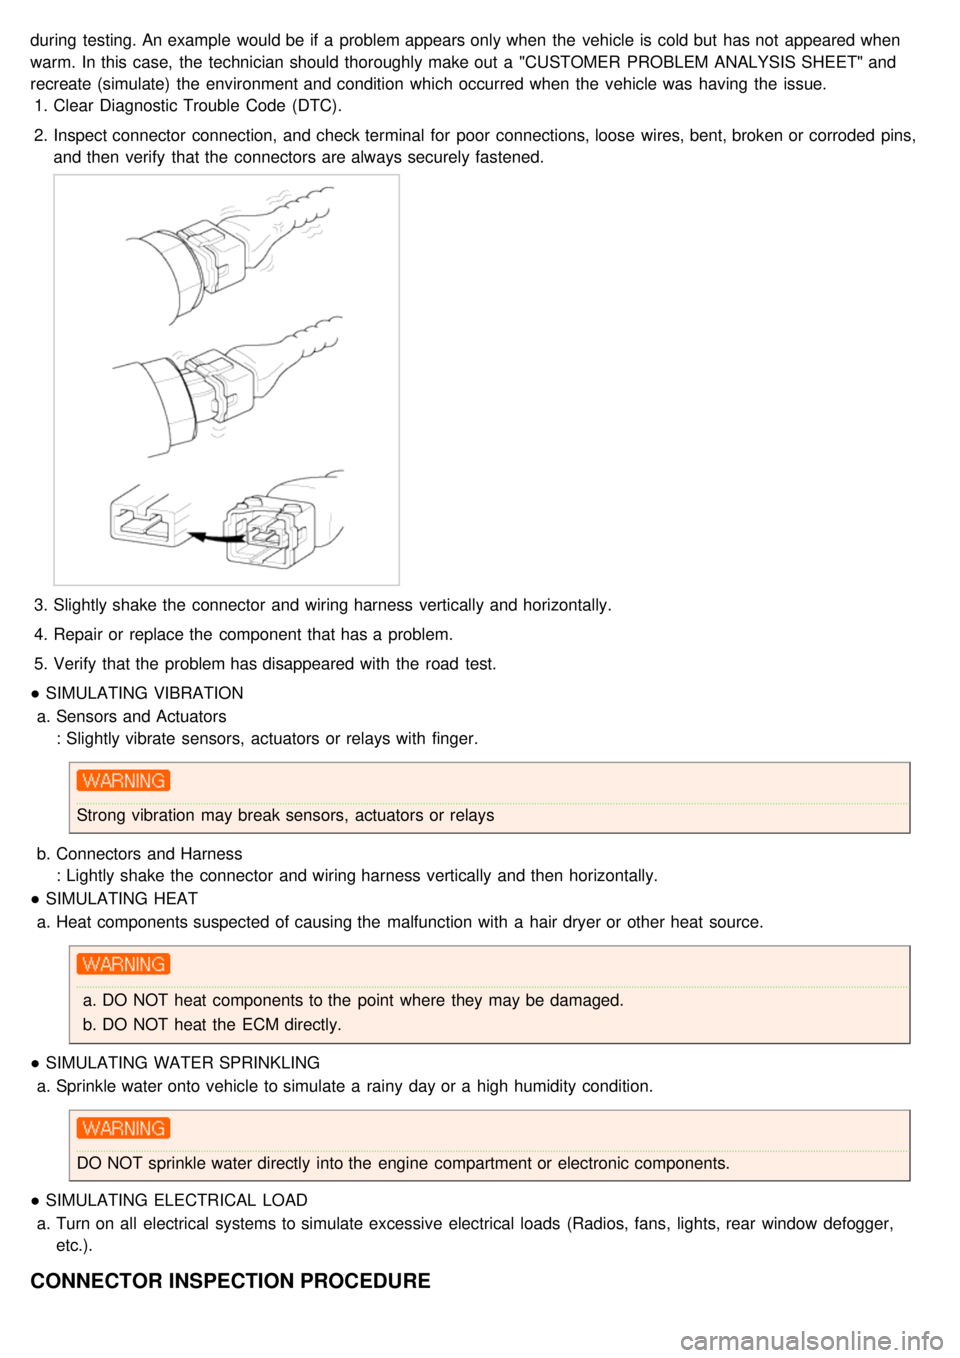
2. Inspect connector connection, and check terminal for poor connections, loose wires, bent, broken or corroded pins,
and then verify that the connectors are always securely fastened.
3.Slightly shake the connector and wiring harness vertically and horizontally.
4. Repair or replace the component that has a problem.
5. Verify that the problem has disappeared with the road test.
● SIMULATING VIBRATION
a. Sensors and Actuators
: Slightly vibrate sensors, actuators or relays with finger.
Strong vibration may break sensors, actuators or relays
b. Connectors and Harness
: Lightly shake the connector and wiring harness vertically and then horizontally.
● SIMULATING HEAT
a. Heat components suspected of causing the malfunction with a hair dryer or other heat source.
a.DO NOT heat components to the point where they may be damaged.
b. DO NOT heat the ECM directly.
● SIMULATING WATER SPRINKLING
a. Sprinkle water onto vehicle to simulate a rainy day or a high humidity condition.
DO NOT sprinkle water directly into the engine compartment or electronic components.
● SIMULATING ELECTRICAL LOAD
a. Turn on all electrical systems to simulate excessive electrical loads (Radios, fans, lights, rear window defogger,
etc.).
CONNECTOR INSPECTION PROCEDURE
Page 993 of 1575
2007 > 2.7L V6 GASOLINE >
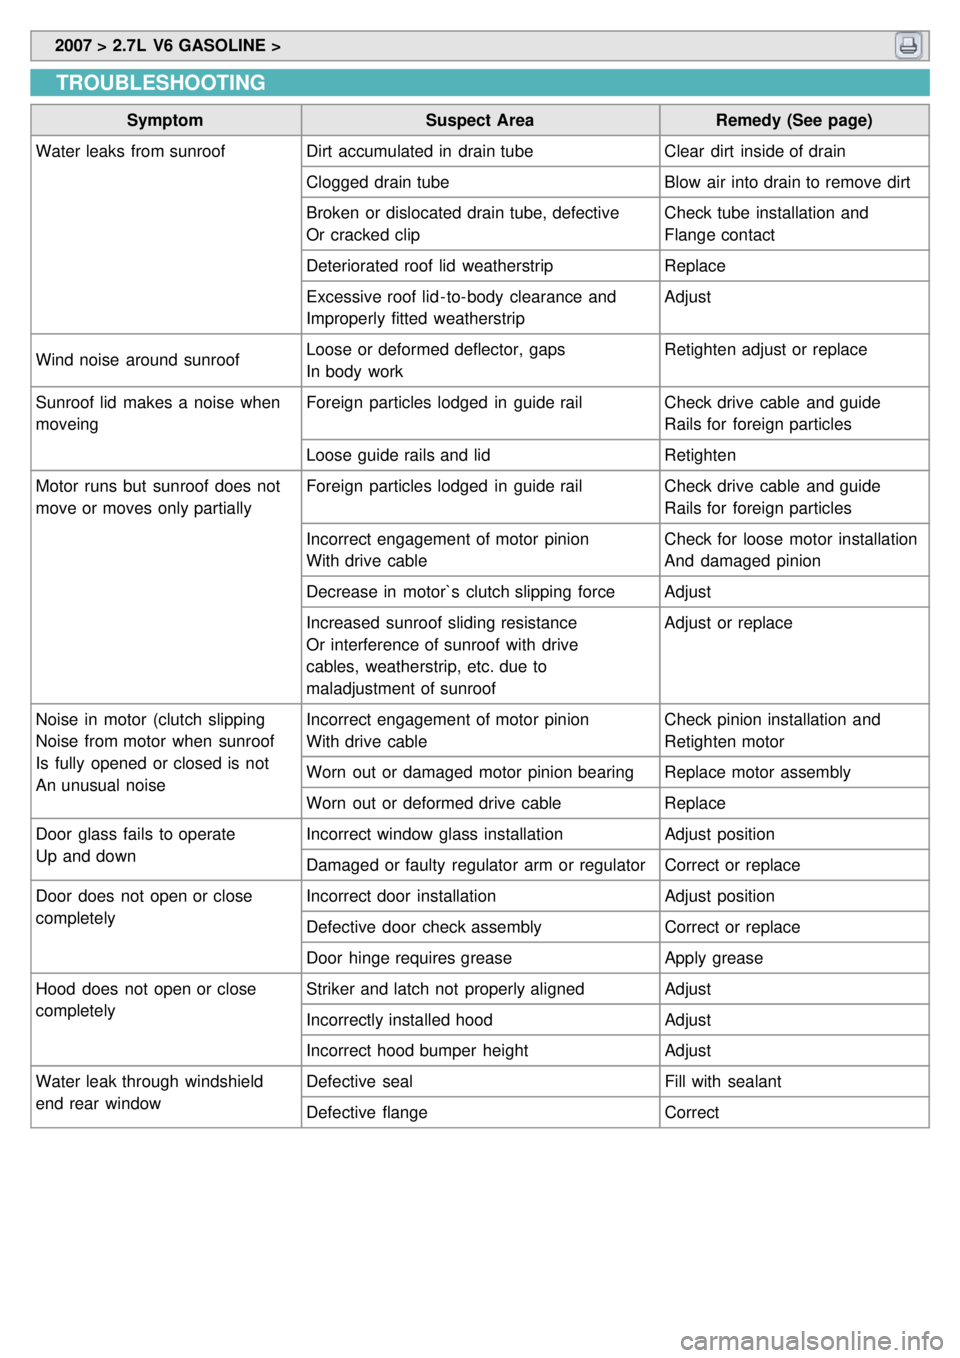
TROUBLESHOOTING
Symptom Suspect AreaRemedy (See page)
Water leaks from sunroof Dirt accumulated in drain tube Clear dirt inside of drain
Clogged drain tube Blow air into drain to remove dirt
Broken or dislocated drain tube, defective
Or cracked clip Check tube installation and
Flange contact
Deteriorated roof lid weatherstrip Replace
Excessive roof lid - to- body clearance and
Improperly fitted weatherstrip Adjust
Wind noise around sunroof Loose or deformed deflector, gaps
In body work Retighten adjust or replace
Sunroof lid makes a noise when
moveing Foreign particles lodged in guide rail
Check drive cable and guide
Rails for foreign particles
Loose guide rails and lid Retighten
Motor runs but sunroof does not
move or moves only partially Foreign particles lodged in guide rail
Check drive cable and guide
Rails for foreign particles
Incorrect engagement of motor pinion
With drive cable Check for loose motor installation
And damaged pinion
Decrease in motor`s clutch slipping force Adjust
Increased sunroof sliding resistance
Or interference of sunroof with drive
cables, weatherstrip, etc. due to
maladjustment of sunroof Adjust or replace
Noise in motor (clutch slipping
Noise from motor when sunroof
Is fully opened or closed is not
An unusual noise Incorrect engagement of motor pinion
With drive cable
Check pinion installation and
Retighten motor
Worn out or damaged motor pinion bearing Replace motor assembly
Worn out or deformed drive cable Replace
Door glass fails to operate
Up and down Incorrect window glass installation
Adjust position
Damaged or faulty regulator arm or regulator Correct or replace
Door does not open or close
completely Incorrect door installation
Adjust position
Defective door check assembly Correct or replace
Door hinge requires grease Apply grease
Hood does not open or close
completely Striker and latch not properly aligned
Adjust
Incorrectly installed hood Adjust
Incorrect hood bumper height Adjust
Water leak through windshield
end rear window Defective seal
Fill with sealant
Defective flange Correct
Page 994 of 1575
2007 > 2.7L V6 GASOLINE >
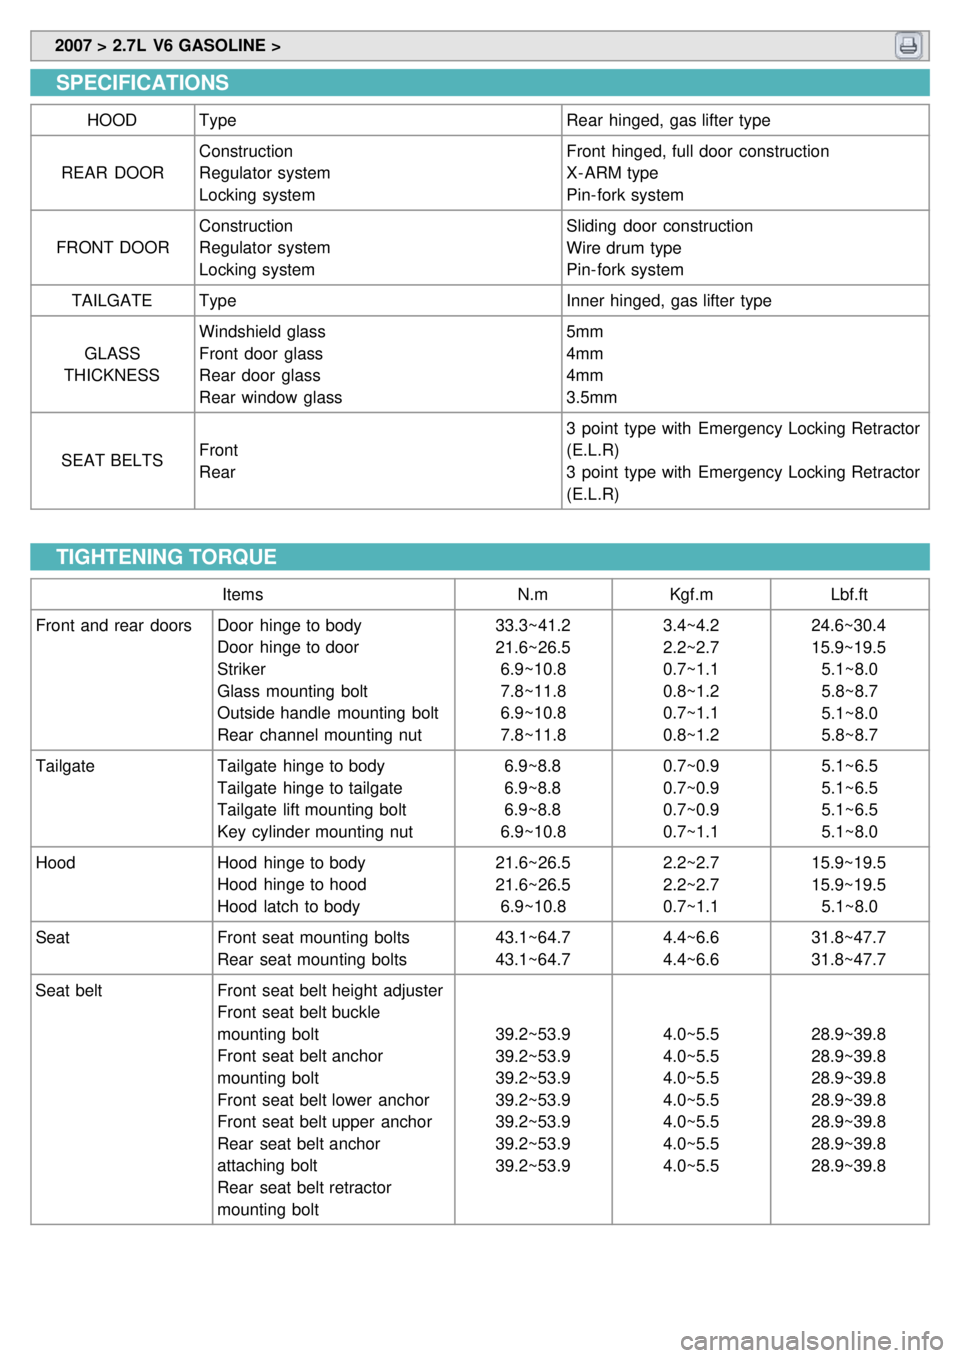
SPECIFICATIONS
HOOD Type Rear hinged, gas lifter type
REAR DOOR Construction
Regulator system
Locking system Front hinged, full door construction
X- ARM type
Pin- fork system
FRONT DOOR Construction
Regulator system
Locking system Sliding door construction
Wire drum type
Pin- fork system
TAILGATE Type Inner hinged, gas lifter type
GLASS
THICKNESS Windshield glass
Front door glass
Rear door glass
Rear window glass 5mm
4mm
4mm
3.5mm
SEAT BELTS Front
Rear 3 point type with Emergency Locking Retractor
(E.L.R)
3 point type with Emergency Locking Retractor
(E.L.R)
TIGHTENING TORQUE
Items
N.mKgf.m Lbf.ft
Front and rear doors Door hinge to body
Door hinge to door
Striker
Glass mounting bolt
Outside handle mounting bolt
Rear channel mounting nut 33.3~41.2
21.6~26.5
6.9~10.8
7.8~11.8
6.9~10.8
7.8~11.8 3.4~4.2
2.2~2.7
0.7~1.1
0.8~1.2
0.7~1.1
0.8~1.224.6~30.4
15.9~19.5
5.1~8.0
5.8~8.7
5.1~8.0
5.8~8.7
Tailgate Tailgate hinge to body
Tailgate hinge to tailgate
Tailgate lift mounting bolt
Key cylinder mounting nut 6.9~8.8
6.9~8.8
6.9~8.8
6.9~10.8 0.7~0.9
0.7~0.9
0.7~0.9
0.7~1.15.1~6.5
5.1~6.5
5.1~6.5
5.1~8.0
Hood Hood hinge to body
Hood hinge to hood
Hood latch to body 21.6~26.5
21.6~26.5
6.9~10.8 2.2~2.7
2.2~2.7
0.7~1.115.9~19.5
15.9~19.5
5.1~8.0
Seat Front seat mounting bolts
Rear seat mounting bolts 43.1~64.7
43.1~64.74.4~6.6
4.4~6.631.8~47.7
31.8~47.7
Seat belt Front seat belt height adjuster
Front seat belt buckle
mounting bolt
Front seat belt anchor
mounting bolt
Front seat belt lower anchor
Front seat belt upper anchor
Rear seat belt anchor
attaching bolt
Rear seat belt retractor
mounting bolt 39.2~53.9
39.2~53.9
39.2~53.9
39.2~53.9
39.2~53.9
39.2~53.9
39.2~53.9
4.0~5.5
4.0~5.5
4.0~5.5
4.0~5.5
4.0~5.5
4.0~5.5
4.0~5.528.9~39.8
28.9~39.8
28.9~39.8
28.9~39.8
28.9~39.8
28.9~39.8
28.9~39.8
Page 1023 of 1575
2007 > 2.7L V6 GASOLINE >
REPLACEMENT
FRONT DOOR TRIM REPLACEMENT
a. Take care not to scratch the door trim and other parts.
b. Put on gloves to protect your hands.
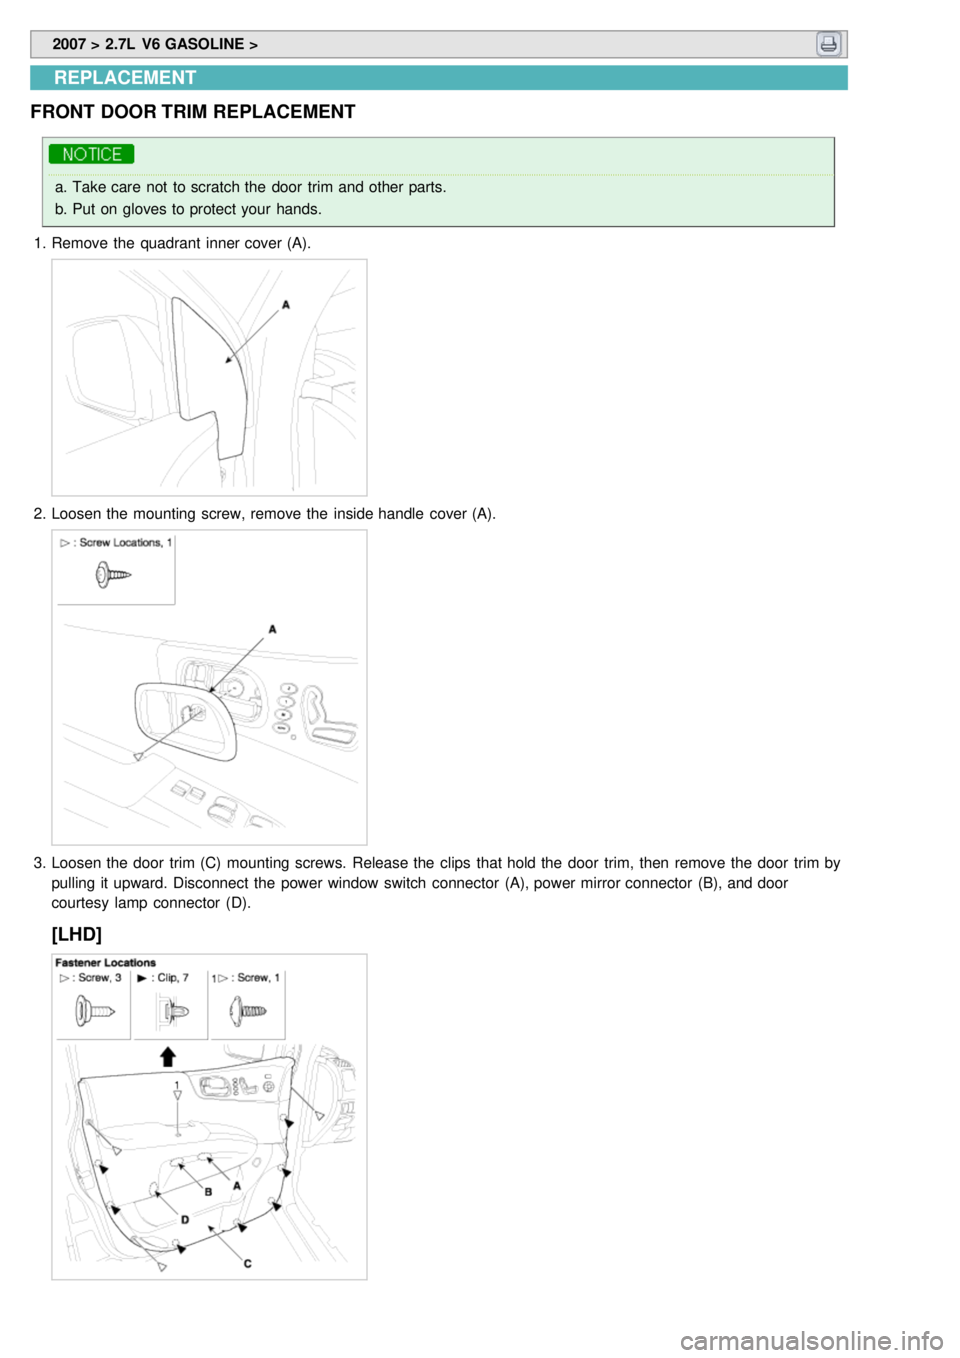
1. Remove the quadrant inner cover (A).
2.Loosen the mounting screw, remove the inside handle cover (A).
3.Loosen the door trim (C) mounting screws. Release the clips that hold the door trim, then remove the door trim by
pulling it upward. Disconnect the power window switch connector (A), power mirror connector (B), and door
courtesy lamp connector (D).
[LHD]
Page 1024 of 1575
![KIA CARNIVAL 2007 Workshop Manual [RHD]
4.Installation is the reverse of removal.
a.Make sure of connectors is plugged in properly and each rod is connected securely.
b. Make sure the door locks and opens properly.
GLASS REP KIA CARNIVAL 2007 Workshop Manual [RHD]
4.Installation is the reverse of removal.
a.Make sure of connectors is plugged in properly and each rod is connected securely.
b. Make sure the door locks and opens properly.
GLASS REP](/img/2/57045/w960_57045-1023.png)
[RHD]
4.Installation is the reverse of removal.
a.Make sure of connectors is plugged in properly and each rod is connected securely.
b. Make sure the door locks and opens properly.
GLASS REPLACEMENT
1.Remove the front door trim.
2. Remove the door trim seal (A).
3.Carefully move the glass (A) until you can see the bolts, then loosen them. Carefully pull the glass out through the
window slot (B).
4.Installation is the reverse of removal.
Page 1026 of 1575
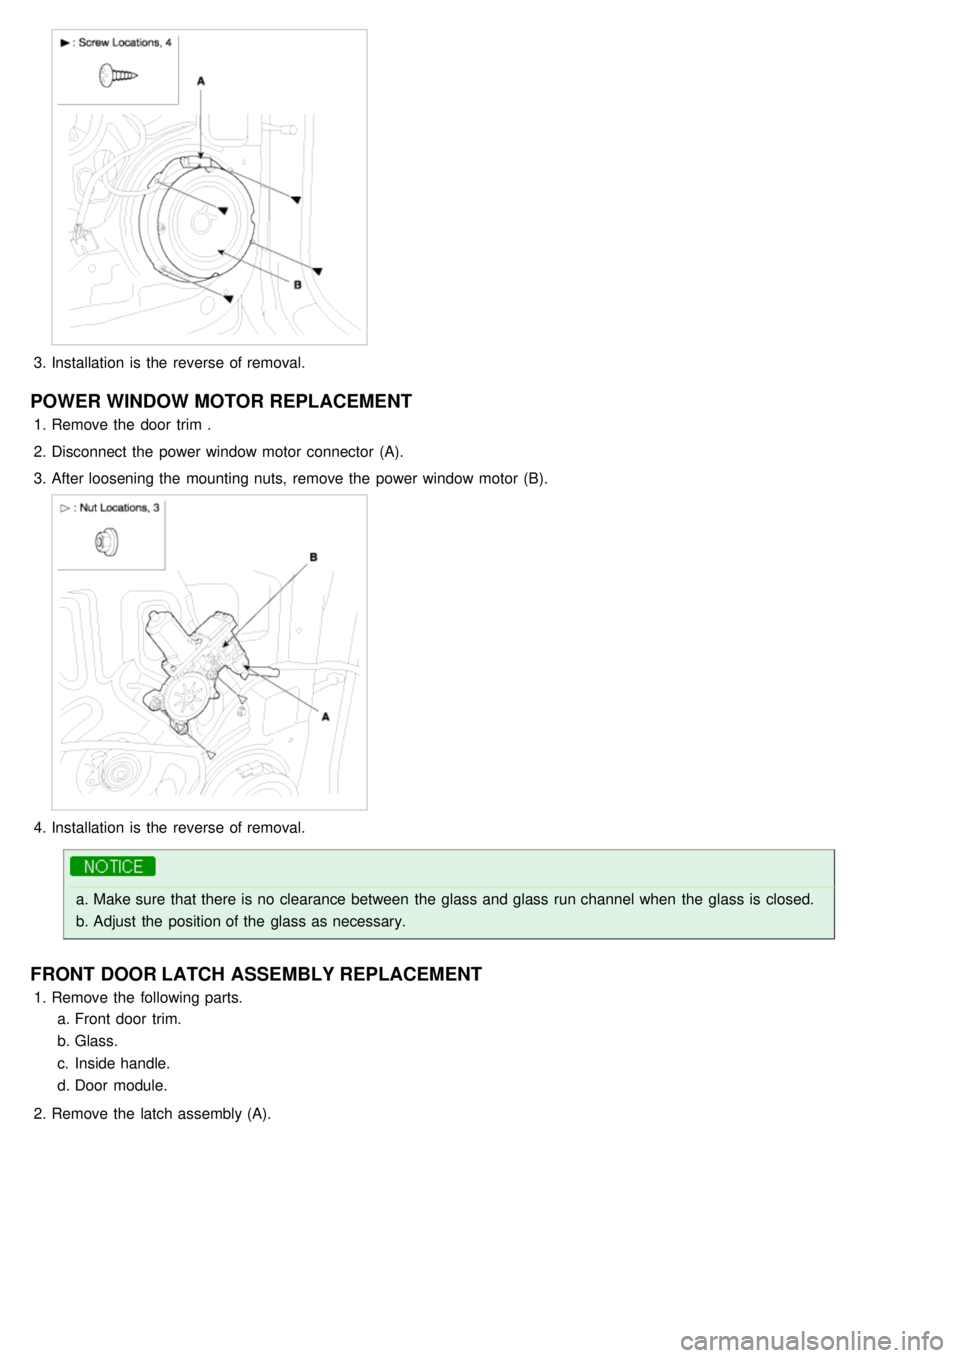
3.Installation is the reverse of removal.
POWER WINDOW MOTOR REPLACEMENT
1.Remove the door trim .
2. Disconnect the power window motor connector (A).
3. After loosening the mounting nuts, remove the power window motor (B).
4.Installation is the reverse of removal.
a.Make sure that there is no clearance between the glass and glass run channel when the glass is closed.
b. Adjust the position of the glass as necessary.
FRONT DOOR LATCH ASSEMBLY REPLACEMENT
1.Remove the following parts.
a. Front door trim.
b. Glass.
c. Inside handle.
d. Door module.
2. Remove the latch assembly (A).
Page 1030 of 1575
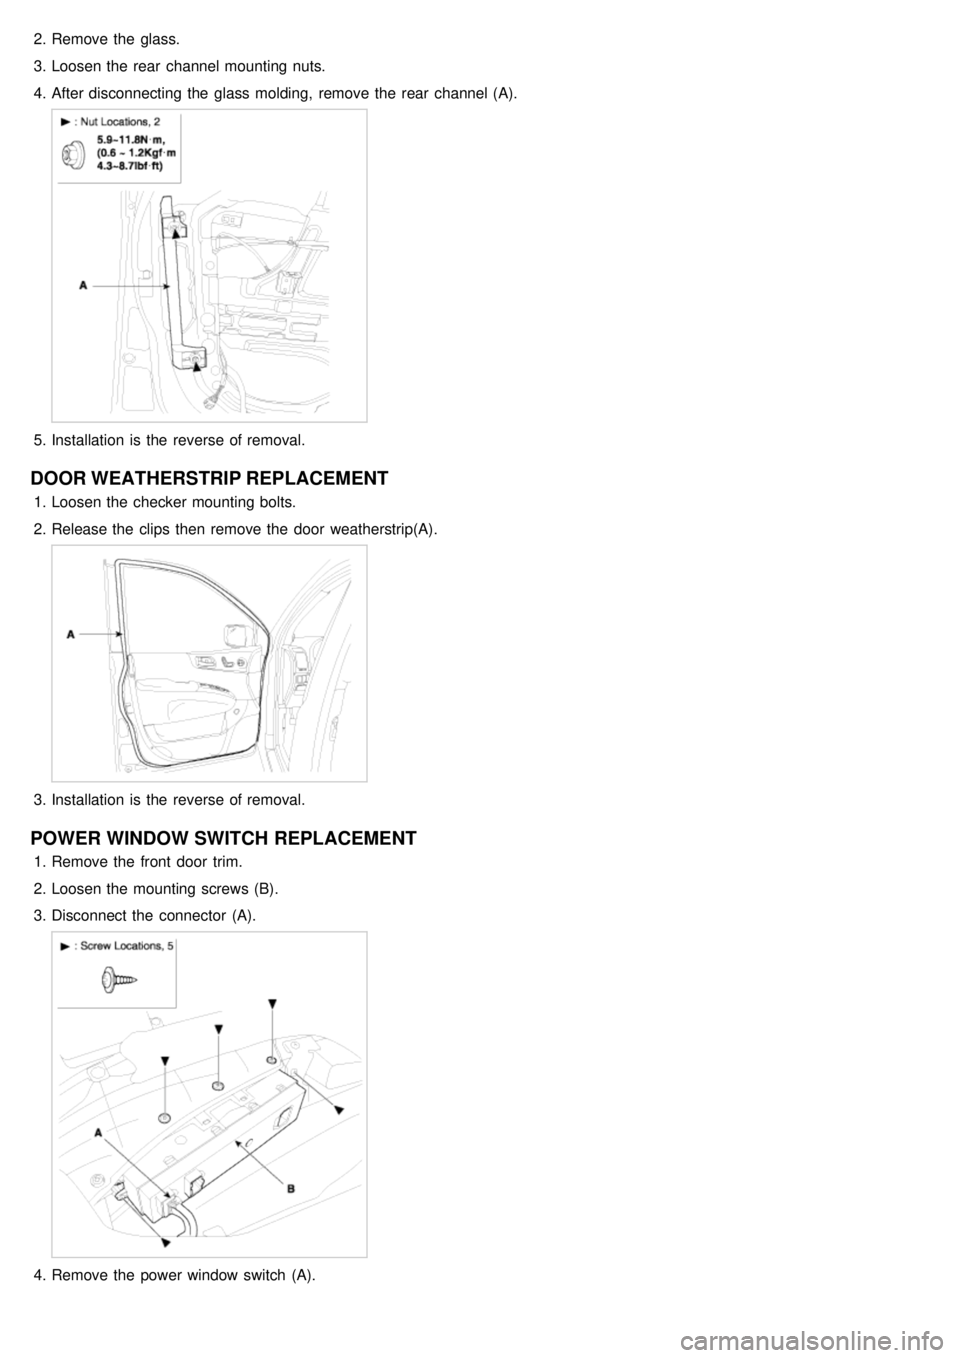
2.Remove the glass.
3. Loosen the rear channel mounting nuts.
4. After disconnecting the glass molding, remove the rear channel (A).
5.Installation is the reverse of removal.
DOOR WEATHERSTRIP REPLACEMENT
1.Loosen the checker mounting bolts.
2. Release the clips then remove the door weatherstrip(A).
3.Installation is the reverse of removal.
POWER WINDOW SWITCH REPLACEMENT
1.Remove the front door trim.
2. Loosen the mounting screws (B).
3. Disconnect the connector (A).
4.Remove the power window switch (A).
Page 1037 of 1575
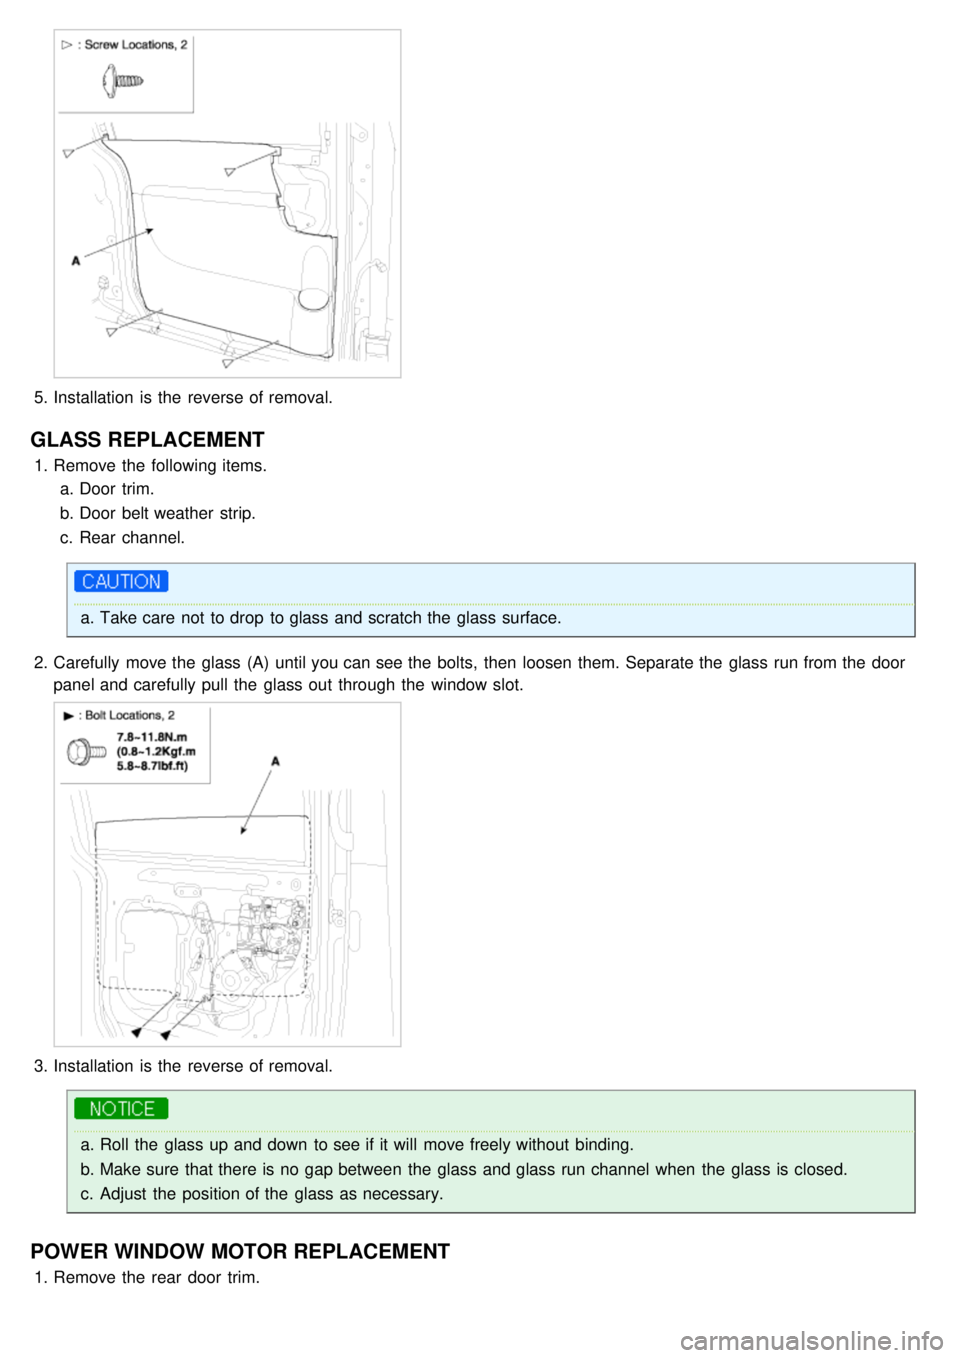
5.Installation is the reverse of removal.
GLASS REPLACEMENT
1.Remove the following items.
a. Door trim.
b. Door belt weather strip.
c. Rear channel.
a.Take care not to drop to glass and scratch the glass surface.
2. Carefully move the glass (A) until you can see the bolts, then loosen them. Separate the glass run from the door
panel and carefully pull the glass out through the window slot.
3.Installation is the reverse of removal.
a.Roll the glass up and down to see if it will move freely without binding.
b. Make sure that there is no gap between the glass and glass run channel when the glass is closed.
c. Adjust the position of the glass as necessary.
POWER WINDOW MOTOR REPLACEMENT
1.Remove the rear door trim.
Page 1038 of 1575

2.After disconnecting the connector (B), remove the power window motor (A).
3.Installation is the reverse of removal.
a.Roll the glass up and down to see if it move will freely without binding.
OUT SIDE HANDLE REPLACEMENT
1.Remove the following items.
a. Door trim.
b. Door trim seal.
c. Actuator.
2. Loosen the mounting bolt, then remove the outside handle bracket (A).
3.Remove the outside handle (A).
Page 1040 of 1575
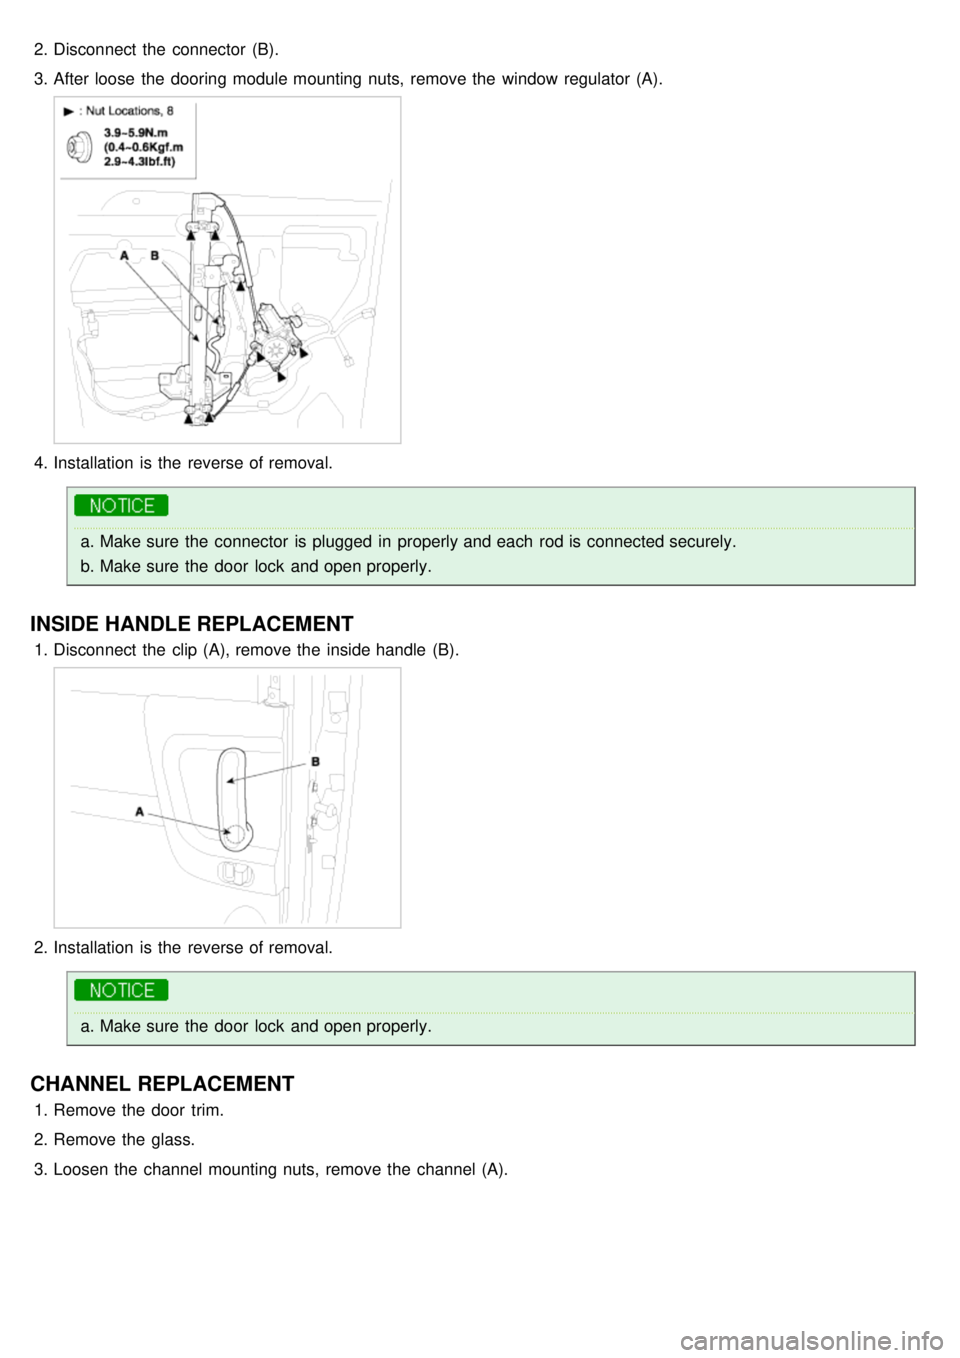
2.Disconnect the connector (B).
3. After loose the dooring module mounting nuts, remove the window regulator (A).
4.Installation is the reverse of removal.
a.Make sure the connector is plugged in properly and each rod is connected securely.
b. Make sure the door lock and open properly.
INSIDE HANDLE REPLACEMENT
1.Disconnect the clip (A), remove the inside handle (B).
2.Installation is the reverse of removal.
a.Make sure the door lock and open properly.
CHANNEL REPLACEMENT
1.Remove the door trim.
2. Remove the glass.
3. Loosen the channel mounting nuts, remove the channel (A).