check engine KIA CEED 2013 Owners Manual
[x] Cancel search | Manufacturer: KIA, Model Year: 2013, Model line: CEED, Model: KIA CEED 2013Pages: 1168, PDF Size: 48.01 MB
Page 1071 of 1168
Maintenance
34
7
Brake hoses and lines
Visually check for proper installation,
chafing, cracks, deterioration and any
leakage. Replace any deteriorated or
damaged parts immediately. Brake fluid
Check brake fluid level in the brake fluid
reservoir. The level should be between
“MIN” and “MAX” marks on the side of
the reservoir. Use only hydraulic brake
fluid conforming to DOT 3 or DOT 4specification. Brake pads, calipers and rotors
Check the pads for excessive wear, discs
for run out and wear, and calipers for fluid
leakage.
For more information on checking the
pads or lining wear limit, refer to the Kia
web site. Suspension mounting bolts
Check the suspension connections for
looseness or damage. Retighten to the
specified torque.
Parking brake
Inspect the parking brake system includ-
ing the EPB actuator, wiring and connec-
tors.Steering gear box, linkage &
boots/lower arm ball joint
With the vehicle stopped and engine off,
check for excessive free-play in the
steering wheel.
Check the linkage for bends or damage.
Check the dust boots and ball joints for
deterioration, cracks, or damage.
Replace any damaged parts. Drive shafts and boots
Check the drive shafts, boots and clamps
for cracks, deterioration, or damage.
Replace any damaged parts and, if nec-
essary, repack the grease.
Air conditioning refrigerant/ compressor (if equipped)
Check the air conditioning lines and con-
nections for leakage and damage.
JD RHD 7.QXP 7/21/2012 12:47 PM Page 34
Page 1072 of 1168
735
Maintenance
ENGINE OIL
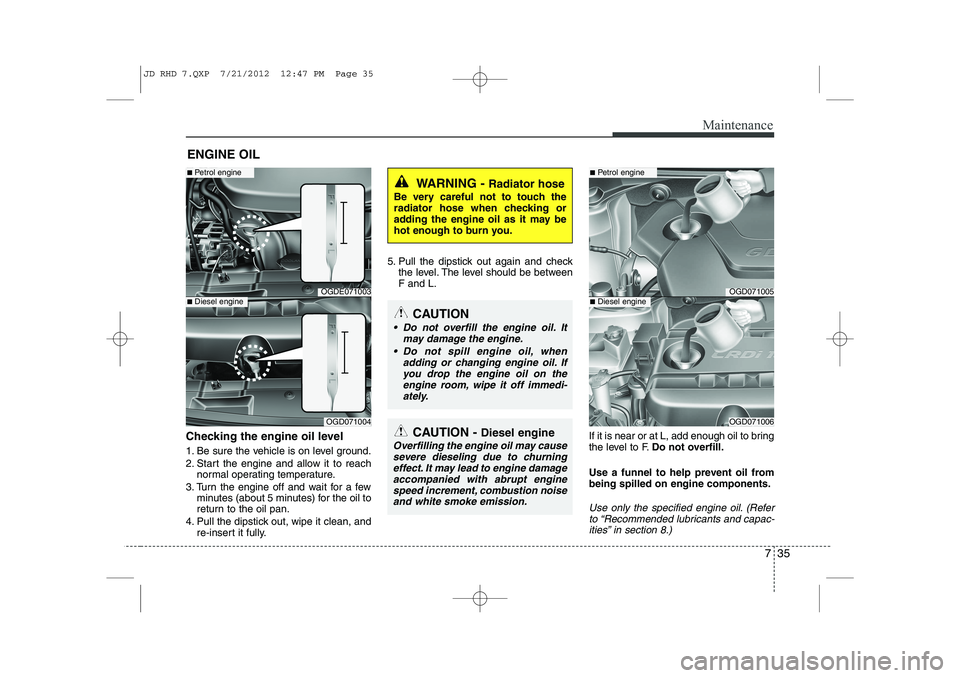
Checking the engine oil level
1. Be sure the vehicle is on level ground.
2. Start the engine and allow it to reach normal operating temperature.
3. Turn the engine off and wait for a few minutes (about 5 minutes) for the oil to
return to the oil pan.
4. Pull the dipstick out, wipe it clean, and re-insert it fully. 5. Pull the dipstick out again and check
the level. The level should be between F and L.
If it is near or at L, add enough oil to bring
the level to F.Do not overfill.
Use a funnel to help prevent oil frombeing spilled on engine components.
Use only the specified engine oil. (Refer to “Recommended lubricants and capac-
ities” in section 8.)
WARNING - Radiator hose
Be very careful not to touch the
radiator hose when checking or
adding the engine oil as it may be
hot enough to burn you.
CAUTION - Diesel engine
Overfilling the engine oil may cause
severe dieseling due to churningeffect. It may lead to engine damage
accompanied with abrupt enginespeed increment, combustion noise and white smoke emission.
CAUTION
Do not overfill the engine oil. It
may damage the engine.
Do not spill engine oil, when adding or changing engine oil. Ifyou drop the engine oil on theengine room, wipe it off immedi-
ately.
OGDE071003
■ Petrol engine
OGD071004
■Diesel engineOGD071005
■Petrol engine
OGD071006
■Diesel engine
JD RHD 7.QXP 7/21/2012 12:47 PM Page 35
Page 1074 of 1168
737
Maintenance
(Continued)
Even if the engine is not operat-ing, do not remove the radiator cap or the drain plug whilst the
engine and radiator are hot. Hot
coolant and steam may still blow
out under pressure, causing seri-
ous injury.
ENGINE COOLANT
The high-pressure cooling system has a
reservoir filled with year-round antifreeze
coolant. The reservoir is filled at the fac-
tory.
Check the antifreeze protection and
coolant concentration level at least once
a year, at the beginning of the winter sea-
son, and before travelling to a colder cli-
mate. Checking the coolant level
WARNING
Removing radiatorcap
Never attempt to remove the radi- ator cap whilst the engine is
operating or hot. Doing so mightlead to cooling system and
engine damage and could result
in serious personal injury fromescaping hot coolant or steam.
Turn the engine off and wait until it cools down. Use extreme care
when removing the radiator cap.
Wrap a thick towel around it, and
turn it counterclockwise slowly to
the first stop. Step back whilst
the pressure is released from the
cooling system. When you aresure all the pressure has been
released, press down on the cap,
using a thick towel, and continue
turning counterclockwise to
remove it.
(Continued)
JD RHD 7.QXP 7/21/2012 12:47 PM Page 37
Page 1075 of 1168
Maintenance
38
7
Check the condition and connections of all cooling system hoses and heater
hoses. Replace any swollen or deterio-
rated hoses.
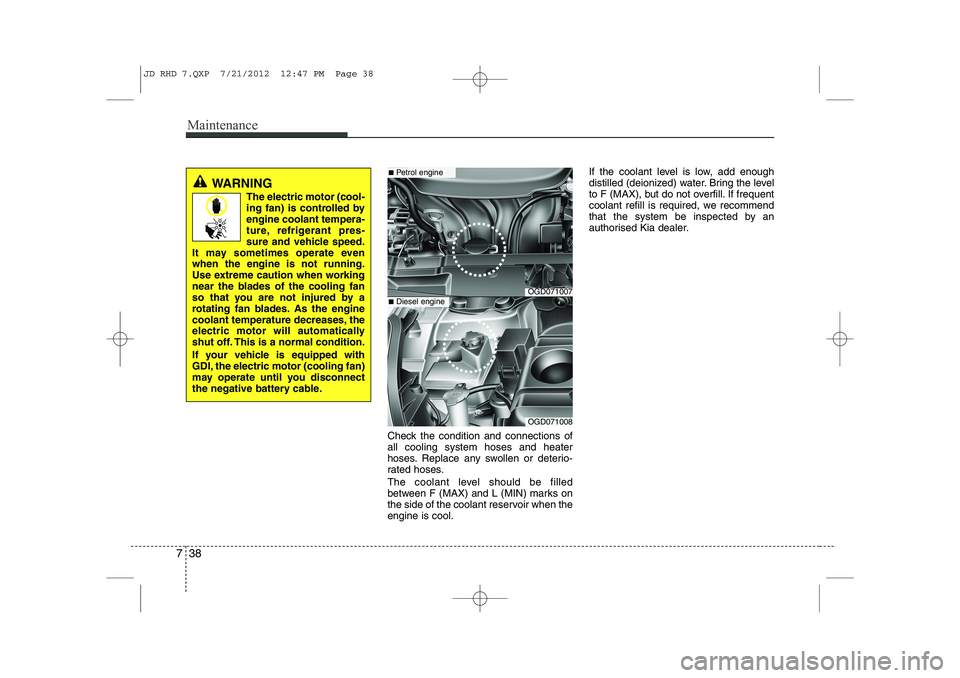
The coolant level should be filled
between F (MAX) and L (MIN) marks on
the side of the coolant reservoir when theengine is cool. If the coolant level is low, add enough
distilled (deionized) water. Bring the level
to F (MAX), but do not overfill. If frequent
coolant refill is required, we recommend
that the system be inspected by an
authorised Kia dealer.
WARNING
The electric motor (cool-
ing fan) is controlled byengine coolant tempera-
ture, refrigerant pres-
sure and vehicle speed.
It may sometimes operate evenwhen the engine is not running.
Use extreme caution when working
near the blades of the cooling fan
so that you are not injured by a
rotating fan blades. As the engine
coolant temperature decreases, the
electric motor will automatically
shut off. This is a normal condition.
If your vehicle is equipped with
GDI, the electric motor (cooling fan)
may operate until you disconnect
the negative battery cable.
OGD071007
■ Petrol engine
OGD071008
■Diesel engine
JD RHD 7.QXP 7/21/2012 12:47 PM Page 38
Page 1077 of 1168
Maintenance
40
7
BRAKE/CLUTCH FLUID
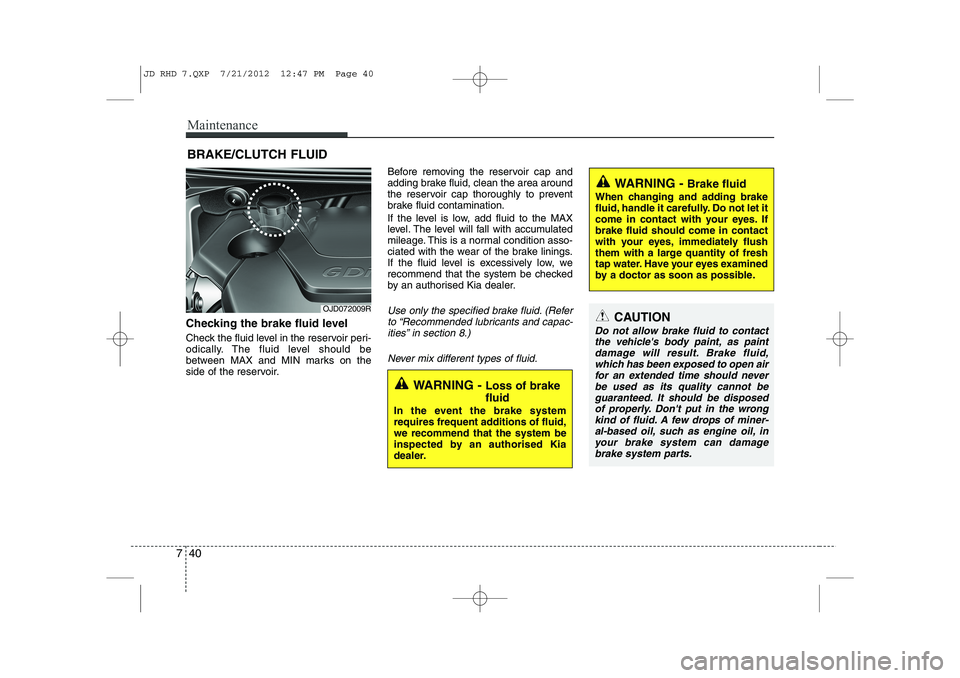
Checking the brake fluid level
Check the fluid level in the reservoir peri-
odically. The fluid level should be
between MAX and MIN marks on the
side of the reservoir. Before removing the reservoir cap and
adding brake fluid, clean the area around
the reservoir cap thoroughly to prevent
brake fluid contamination.
If the level is low, add fluid to the MAX
level. The level will fall with accumulated
mileage. This is a normal condition asso-
ciated with the wear of the brake linings.
If the fluid level is excessively low, we
recommend that the system be checked
by an authorised Kia dealer.
Use only the specified brake fluid. (Refer
to “Recommended lubricants and capac-ities” in section 8.)
Never mix different types of fluid.
WARNING - Brake fluid
When changing and adding brake
fluid, handle it carefully. Do not let it
come in contact with your eyes. Ifbrake fluid should come in contact
with your eyes, immediately flush
them with a large quantity of fresh
tap water. Have your eyes examined
by a doctor as soon as possible.
WARNING - Loss of brake fluid
In the event the brake system
requires frequent additions of fluid,we recommend that the system be
inspected by an authorised Kia
dealer.
CAUTION
Do not allow brake fluid to contact the vehicle's body paint, as paint
damage will result. Brake fluid,which has been exposed to open air for an extended time should neverbe used as its quality cannot be
guaranteed. It should be disposed of properly. Don't put in the wrongkind of fluid. A few drops of miner-al-based oil, such as engine oil, in
your brake system can damagebrake system parts.
OJD072009R
JD RHD 7.QXP 7/21/2012 12:47 PM Page 40
Page 1089 of 1168

Maintenance
52
7
Reset items
Items should be reset after the battery
has been discharged or the battery hasbeen disconnected.
Auto up/down window (See section 4)
Sunroof (See section 4)
Trip computer (See section 4)
Climate control system
(See section 4)
Audio (See section 4)(Continued)
Wear eye protection when check- ing the battery during charging.
Disconnect the battery charger in the following order.
1. Turn off the battery charger
main switch.
2. Unhook the negative clamp from the negative battery ter- minal.
3. Unhook the positive clamp from the positive battery termi-nal.
Before performing maintenance or recharging the battery, turn offall accessories and stop the
engine.
The negative battery cable must be removed first and installed
last when the battery is discon-nected.
JD RHD 7.QXP 7/21/2012 12:48 PM Page 52
Page 1100 of 1168

763
Maintenance
FUSESA vehicle’s electrical system is protected
from electrical overload damage by
fuses.
This vehicle has 3 (or 4) fuse panels, one
located in the driver’s side panel bolster,
others in the engine compartment near
the battery.
If any of your vehicle’s lights, acces-
sories, or controls do not work, check the
appropriate circuit fuse. If a fuse has
blown, the element inside the fuse will bemelted.
If the electrical system does not work,
first check the driver’s side fuse panel.
Always replace a blown fuse with one of
the same rating.
Before replacing a blown fuse, discon-
nect the negative battery cable.
If the replacement fuse blows, this indi-
cates an electrical problem. Avoid using
the system involved and we recommend
that you consult an authorised Kia deal-
er.
Three kinds of fuses are used: blade typefor lower amperage rating, cartridge type, and multi fuse type for higher amperageratings.✽✽ NOTICE
The actual fuse/relay panel label may
differ from equipped items.
WARNING - Fuse replace-
ment
Never replace a fuse with any- thing but another fuse of the same rating.
A higher capacity fuse could cause damage and possibly a
fire.
Never install a wire or aluminum foil instead of the proper fuse -
even as a temporary repair. It may
cause extensive wiring damage
and a possible fire.
CAUTION
Do not use a screwdriver or any
other metal object to remove fusesbecause it may cause a short circuitand damage the system.
Normal
Normal
■
Blade type
■ Cartridge type
■ Multi fuse type Blown
Blown
Normal Blown
ORB072110/ODM072020
Normal
Blown
■
Battery fuse terminal
JD RHD 7.QXP 7/21/2012 12:49 PM Page 63
Page 1101 of 1168
Maintenance
64
7
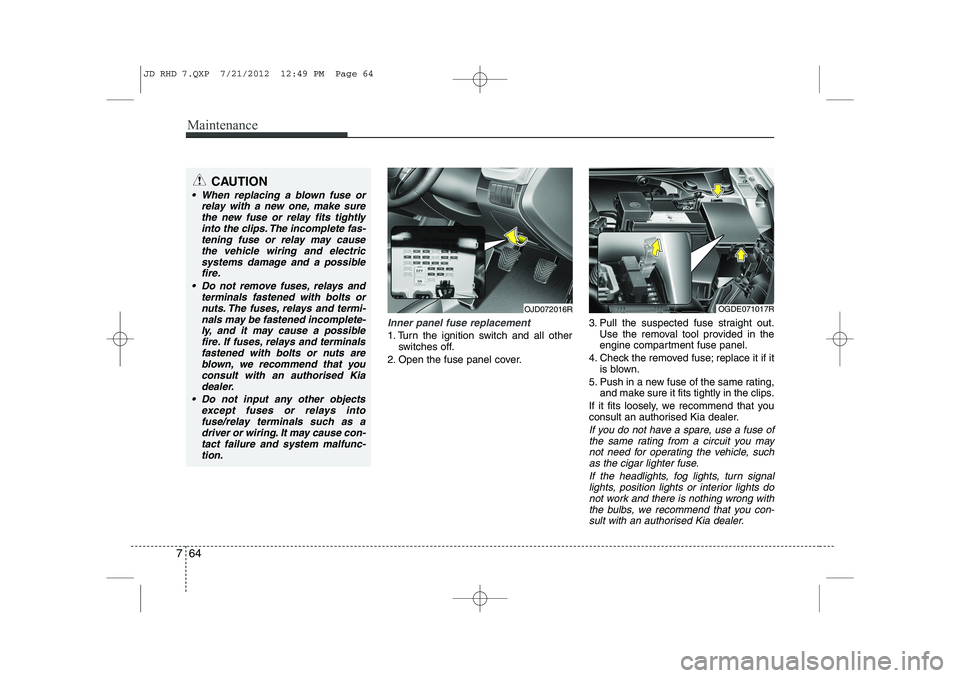
Inner panel fuse replacement
1. Turn the ignition switch and all other
switches off.
2. Open the fuse panel cover. 3. Pull the suspected fuse straight out.
Use the removal tool provided in the
engine compartment fuse panel.
4. Check the removed fuse; replace it if it is blown.
5. Push in a new fuse of the same rating, and make sure it fits tightly in the clips.
If it fits loosely, we recommend that you
consult an authorised Kia dealer.
If you do not have a spare, use a fuse of the same rating from a circuit you may
not need for operating the vehicle, suchas the cigar lighter fuse.
If the headlights, fog lights, turn signallights, position lights or interior lights do not work and there is nothing wrong with
the bulbs, we recommend that you con- sult with an authorised Kia dealer.
OJD072016ROGDE071017R
CAUTION
When replacing a blown fuse or relay with a new one, make sure
the new fuse or relay fits tightlyinto the clips. The incomplete fas-tening fuse or relay may cause the vehicle wiring and electric
systems damage and a possiblefire.
Do not remove fuses, relays and terminals fastened with bolts or
nuts. The fuses, relays and termi-nals may be fastened incomplete-ly, and it may cause a possiblefire. If fuses, relays and terminals
fastened with bolts or nuts areblown, we recommend that youconsult with an authorised Kia
dealer.
Do not input any other objects except fuses or relays intofuse/relay terminals such as adriver or wiring. It may cause con-
tact failure and system malfunc-tion.
JD RHD 7.QXP 7/21/2012 12:49 PM Page 64
Page 1103 of 1168

Maintenance
66
7
3. Check the removed fuse; replace it if it
is blown. To remove or insert the fuse, use the fuse puller in the engine com-
partment fuse panel.
4. Push in a new fuse of the same rating, and make sure it fits tightly in the clips.
If it fits loosely, we recommend that you
consult an authorised Kia dealer.
Main fuse
If the main fuse is blown, it must be
removed as follows:
1. Turn off the engine.
2. Disconnect the negative battery cable.
3. Remove the nuts shown in the picture above.
4. Replace the fuse with a new one of the same rating.
5. Reinstall in the reverse order of removal.
Multi fuse
If the multi fuse is blown, it must be
removed as follows:
1. Turn off the engine.
2. Disconnect the negative battery cable.
3. Remove the fuse panel on the right side in the engine compartment.
4. Remove the nuts shown in the picture above.
5. Replace the fuse with a new one of the
same rating.
6. Reinstall in the reverse order of removal.
✽✽ NOTICE
If the multi fuse or main fuse is blown,
we recommend that you consult an
authorised Kia dealer.
OJD072018
CAUTION
After checking the fuse box in the engine compartment, securelyinstall the fuse box cover. If not,electrical failures may occur from water leaking in.
OGDE071020R
JD RHD 7.QXP 7/21/2012 12:49 PM Page 66
Page 1111 of 1168
Maintenance
74
7
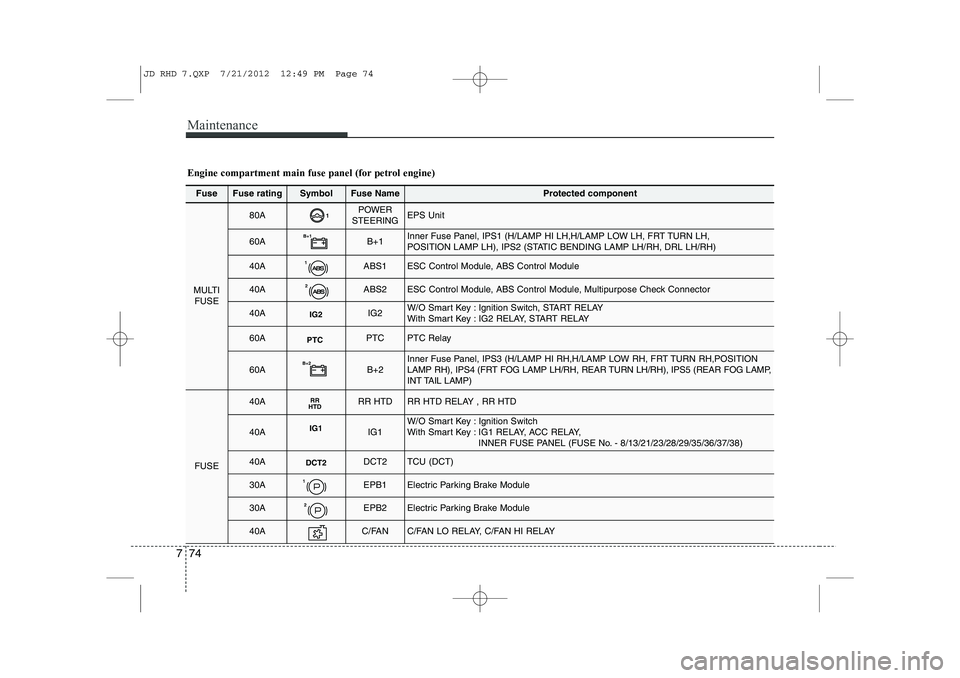
Fuse Fuse ratingSymbolFuse NameProtected component
MULTI
FUSE
80A1POWER
STEERINGEPS Unit
60AB+1B+1Inner Fuse Panel, IPS1 (H/LAMP HI LH,H/LAMP LOW LH, FRT TURN LH,
POSITION LAMP LH), IPS2 (STATIC BENDING LAMP LH/RH, DRL LH/RH)
40A1ABS1ESC Control Module, ABS Control Module
40A2ABS2ESC Control Module, ABS Control Module, Multipurpose Check Connector
40AIG2IG2W/O Smart Key : Ignition Switch, START RELAY
With Smart Key : IG2 RELAY, START RELAY
60APTCPTCPTC Relay
60AB+2B+2Inner Fuse Panel, IPS3 (H/LAMP HI RH,H/LAMP LOW RH, FRT TURN RH,POSITION
LAMP RH), IPS4 (FRT FOG LAMP LH/RH, REAR TURN LH/RH), IPS5 (REAR FOG LAMP,
INT TAIL LAMP)
FUSE
40ARR
HTDRR HTDRR HTD RELAY , RR HTD
40AIG1IG1W/O Smart Key : Ignition Switch
With Smart Key : IG1 RELAY, ACC RELAY,
INNER FUSE PANEL (FUSE No. - 8/13/21/23/28/29/35/36/37/38)
40ADCT2DCT2TCU (DCT)
30A1EPB1Electric Parking Brake Module
30A2EPB2Electric Parking Brake Module
40AC/FANC/FAN LO RELAY, C/FAN HI RELAY
Engine compartment main fuse panel (for petrol engine)
JD RHD 7.QXP 7/21/2012 12:49 PM Page 74