Door KIA CEED 2014 Owners Manual
[x] Cancel search | Manufacturer: KIA, Model Year: 2014, Model line: CEED, Model: KIA CEED 2014Pages: 1206, PDF Size: 50.15 MB
Page 614 of 1206
23
Your vehicle at a glance
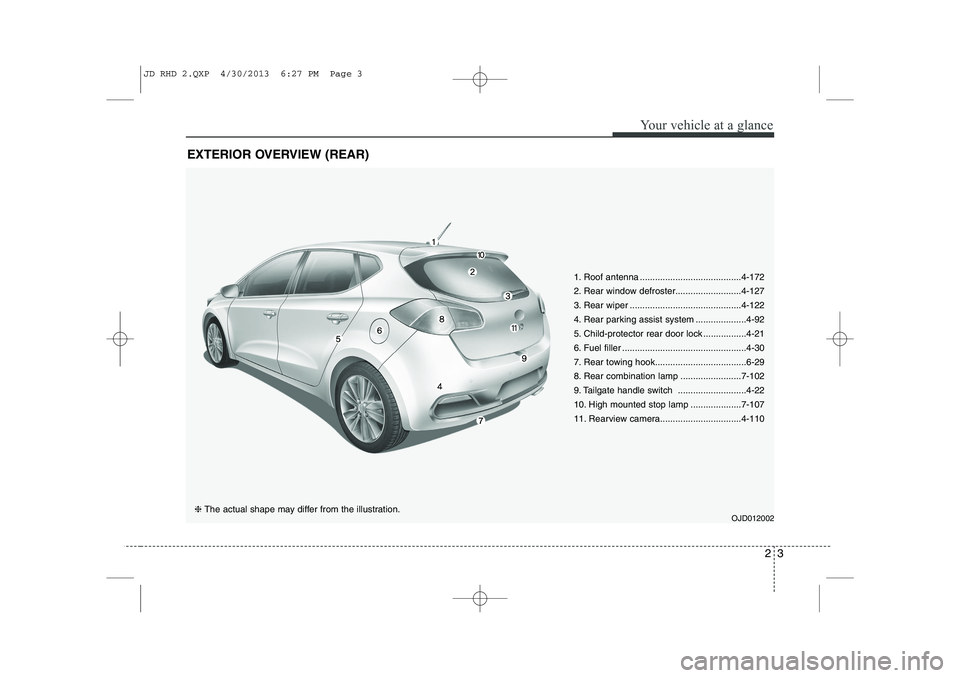
EXTERIOR OVERVIEW (REAR)
1. Roof antenna ........................................4-172
2. Rear window defroster..........................4-127
3. Rear wiper ............................................4-122
4. Rear parking assist system ....................4-92
5. Child-protector rear door lock .................4-21
6. Fuel filler .................................................4-30
7. Rear towing hook....................................6-29
8. Rear combination lamp ........................7-102
9. Tailgate handle switch ...........................4-22
10. High mounted stop lamp ....................7-107
11. Rearview camera................................4-110OJD012002
❈ The actual shape may differ from the illustration.
JD RHD 2.QXP 4/30/2013 6:27 PM Page 3
Page 615 of 1206

Your vehicle at a glance
4
2
INTERIOR OVERVIEW
1. Seat..........................................................3-2
2. Inside door handle ................................4-18
3. Power window switch ............................4-24
4. Power window lock switch......................4-26
5. Bonnet release lever ..............................4-28
6. Outside rearview mirror folding ..............4-45
7. Outside rearview mirror control..............4-44
8. Headlight levelling device ....................4-117
9. Instrument panel illumination control
system ..........................................4-47, 4-61
10. Idle Stop and Go (ISG) OFF button ....5-15
11. Active ECO button ..............................5-32
12. Lane departure warning system button ..5-59
13. Heated steering wheel button ..............4-38
14. Light control/Turn signals ..................4-112
15. Steering wheel ....................................4-37
16. Wiper/Washer ....................................4-119
17. Transaxle shift lever ....................5-20, 5-23
18. Tilt and telescopic steering control lever..........................................4-38
19. Fuse box ..............................................7-66
OJD012003R
❈ The actual shape may differ from the illustration. ■
Type A
■ Type B
JD RHD 2.QXP 4/30/2013 6:27 PM Page 4
Page 616 of 1206
25
Your vehicle at a glance
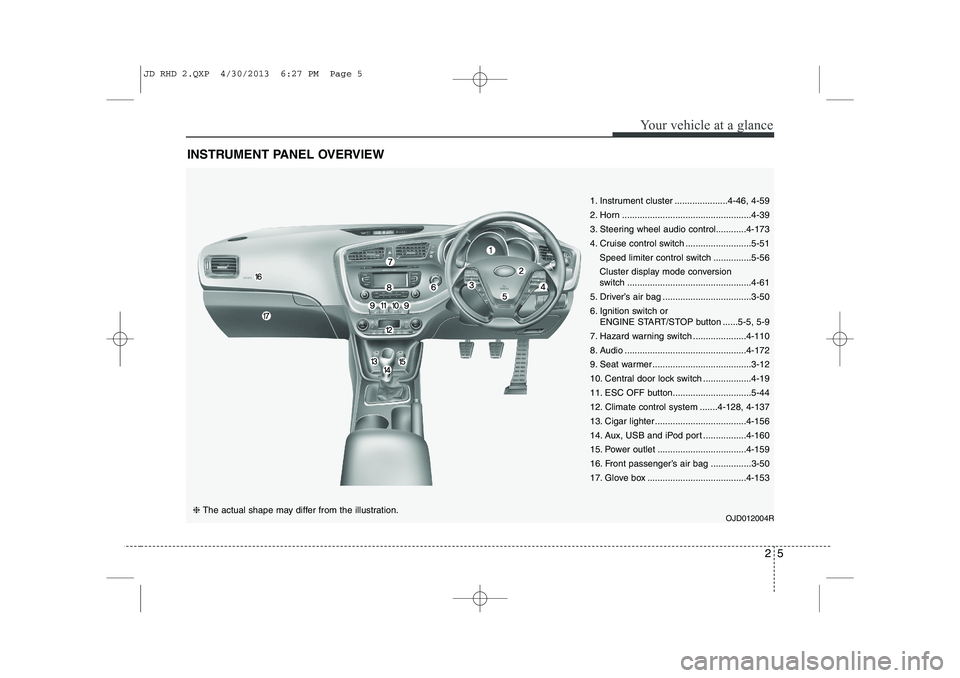
INSTRUMENT PANEL OVERVIEW
OJD012004R❈ The actual shape may differ from the illustration. 1. Instrument cluster .....................4-46, 4-59
2. Horn ...................................................4-39
3. Steering wheel audio control............4-173
4. Cruise control switch ..........................5-51
Speed limiter control switch ...............5-56
Cluster display mode conversion
switch .................................................4-61
5. Driver’s air bag ...................................3-50
6. Ignition switch or ENGINE START/STOP button ......5-5, 5-9
7. Hazard warning switch .....................4-110
8. Audio ................................................4-172
9. Seat warmer .......................................3-12
10. Central door lock switch ...................4-19
11. ESC OFF button...............................5-44
12. Climate control system .......4-128, 4-137
13. Cigar lighter ....................................4-156
14. Aux, USB and iPod port .................4-160
15. Power outlet ...................................4-159
16. Front passenger’s air bag ................3-50
17. Glove box .......................................4-153
JD RHD 2.QXP 4/30/2013 6:27 PM Page 5
Page 621 of 1206

Safety system of your vehicle
2
3
Driver’s seat
(1) Seat adjustment, forward/backward
(2) Seatback recliner
(3) Seat adjustment, height
(4) Lumbar support*
(5) Seat warmer*
(6) Headrest adjustment
(7) Walk-in seat
(for 3 door vehicle only)
Front passenger seat
(8) Seat adjustment, forward/backward
(9) Seatback recliner(10) Seat adjustment, height*
(11) Lumbar support*
(12) Seat warmer*
(13) Walk-in seat (for 3 door vehicle only)
(14) Headrest adjustment Rear seat
(15) Armrest*
(16) Headrest adjustment
(17) Split folding rear seat
* : if equipped
SEAT
OJD033001R
■ Type A
■Type B
JD RHD 3.QXP 4/29/2013 11:20 AM Page 2
Page 627 of 1206
Safety system of your vehicle
8
3
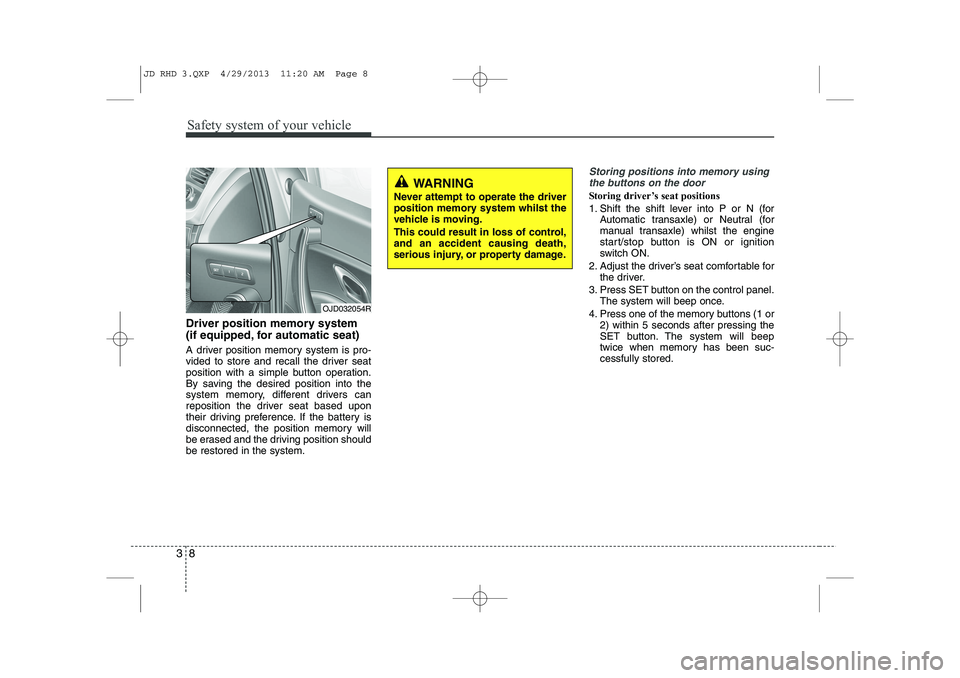
Driver position memory system
(if equipped, for automatic seat)
A driver position memory system is pro-
vided to store and recall the driver seat
position with a simple button operation.
By saving the desired position into the
system memory, different drivers can
reposition the driver seat based upon
their driving preference. If the battery is
disconnected, the position memory will
be erased and the driving position shouldbe restored in the system.
Storing positions into memory using
the buttons on the door
Storing driver’s seat positions
1. Shift the shift lever into P or N (for Automatic transaxle) or Neutral (for
manual transaxle) whilst the engine
start/stop button is ON or ignition
switch ON.
2. Adjust the driver’s seat comfortable for the driver.
3. Press SET button on the control panel. The system will beep once.
4. Press one of the memory buttons (1 or 2) within 5 seconds after pressing the
SET button. The system will beep
twice when memory has been suc-cessfully stored.
WARNING
Never attempt to operate the driver
position memory system whilst the
vehicle is moving.
This could result in loss of control, and an accident causing death,
serious injury, or property damage.
OJD032054R
JD RHD 3.QXP 4/29/2013 11:20 AM Page 8
Page 628 of 1206

39
Safety system of your vehicle
Recalling positions from memory
1. Shift the shift lever into P or N (forAutomatic transaxle) or Neutral (for
manual transaxle) whilst the engine
start/stop button is ON or ignition
switch ON.
2. To recall the position in the memory, press the desired memory button (1 or
2). The system will beep once, then the
driver’s seat will automatically adjust tothe stored position.
Adjusting the control switch for the dri-
ver’s seat whilst the system is recalling
the stored position will cause the move-
ment to stop and move in the direction
that the control switch is moved.Easy access function (if equipped)
The system will move the driver's seat
automatically as follows:
Without smart key system - It will move the driver’s seat rearwardwhen the ignition key is removed and
front driver’s door is opened.
- It will move the driver’s seat forward when the ignition key is inserted.
With smart key system - It will move the driver’s seat rearwardwhen the engine start/stop button ischanged to the OFF position and front
driver’s door is opened.
- It will move the driver’s seat forward when the engine start/stop button is
changed to the ACC or START posi-tion.
You can activate or deactivate this feature.
Refer to "User settings" in section 4.
WARNING
Use caution when recalling the
adjustment memory whilst sitting
in the vehicle. Push the seat posi-
tion control switch to the desired
position immediately if the seat
moves too far in any direction.
JD RHD 3.QXP 4/29/2013 11:20 AM Page 9
Page 632 of 1206

313
Safety system of your vehicle
Seatback pocket (if equipped)
The seatback pocket is provided on the
back of the front passenger’s and driver’s
seatbacks.
Rear Seat Entry (For 3-door vehicle only)
To get in or get out of the rear seat, the
driver’s or front passenger’s seat should
be folded and the seat should be slide.
1. Fold the front seatback by pulling upthe walk-in seat lever and then slide
the front seat forward.
OJD032013
WARNING - Seatback
pockets
Do not put heavy or sharp objects
in the seatback pockets. In an acci-
dent they could come loose from
the pocket and injure vehicle occu-pants.
OJD033064E/H
OJD033065/H
Driver’s seat
Front passenger’s seat
JD RHD 3.QXP 4/29/2013 11:20 AM Page 13
Page 635 of 1206

Safety system of your vehicle
16
3
Folding the rear seat
The rear seatbacks (or cushions) may be
folded to facilitate carrying long items orto increase the luggage capacity of the
vehicle.
To fold the rear seat cushion and back
(5 Door and Wagon)
1. Set the front seatback to the uprightposition and if necessary, slide the
front seat forward.
2. Lift the front portion of the seat cush- ion up.
3. Lift the rear portion of the seat cush-ion. Stand the rear seat cushion verti-
cally.
4. Pull the lock release lever (red visible).
OJD032018
OJD032019
OJD032017
WARNING
The purpose of the fold-down rear
seatbacks (or cushions) is to allow
you to carry longer objects thancould otherwise be accommodated.
Never allow passengers to sit on
top of the folded down seatback
whilst the car is moving as this is
not a proper seating position and
no seat belts are available for use.
This could result in serious injuryor death in case of an accident or
sudden stop. Objects carried on the
folded down seatback should not
extend higher than the top of the
front seats. This could allow cargo
to slide forward and cause injury or
damage during sudden stops.
JD RHD 3.QXP 4/29/2013 11:21 AM Page 16
Page 637 of 1206

Safety system of your vehicle
18
3
10. Return the seat cushion to the origi-
nal position by pushing down the rear
side of the seat cushion first. Make
sure the seat cushion is locked in
place.
11. Return the rear seat belt to the prop- er position. To fold down the rear seatback
(for 3 Door):
1. Make sure the rear seat belt webbing
is in the guide to prevent the seat belt from being damaged.
2. Set the front seatback to the upright position and if necessary, slide the
front seat forward.
3. Lower the rear headrests to the lowest position. 4. Pull the lock release lever (1) and fold
the rear seatback forward and down
firmly.
If the seat belt locks after unfolding the
rear seatback, pull out the locked seatbelt, release it then pull it out again.
OJD032023OJD033066OJD033067
JD RHD 3.QXP 4/29/2013 11:21 AM Page 18
Page 642 of 1206
323
Safety system of your vehicle
If the rear seat belt is fastened, the warn-
ing light will turn off immediately. If the rear seat belt is disconnected when
you drive over the 20km/h, the corre-
sponding seat belt warning light will blink
and warning chime will sound for 35 sec-
onds. But, if the rear passenger's lap/shoulder belt is/are connected and disconnectedtwice within 9 seconds after the belt is
fastened, the corresponding seat belt
warning light will not operate.
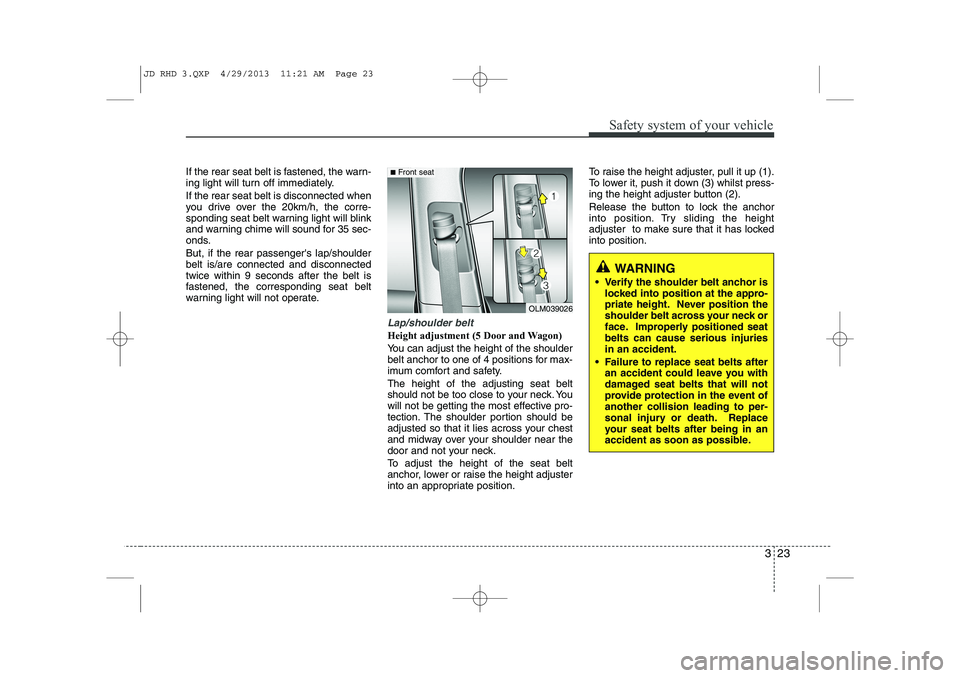
Lap/shoulder belt
Height adjustment (5 Door and Wagon)
You can adjust the height of the shoulder
belt anchor to one of 4 positions for max-
imum comfort and safety. The height of the adjusting seat belt
should not be too close to your neck. You
will not be getting the most effective pro-
tection. The shoulder portion should be
adjusted so that it lies across your chest
and midway over your shoulder near the
door and not your neck.
To adjust the height of the seat belt
anchor, lower or raise the height adjuster
into an appropriate position.To raise the height adjuster, pull it up (1).
To lower it, push it down (3) whilst press-
ing the height adjuster button (2).
Release the button to lock the anchor
into position. Try sliding the height
adjuster to make sure that it has lockedinto position.
OLM039026
■
Front seat
WARNING
Verify the shoulder belt anchor is locked into position at the appro-
priate height. Never position the
shoulder belt across your neck or
face. Improperly positioned seatbelts can cause serious injuriesin an accident.
Failure to replace seat belts after an accident could leave you with
damaged seat belts that will not
provide protection in the event ofanother collision leading to per-
sonal injury or death. Replace
your seat belts after being in an
accident as soon as possible.
JD RHD 3.QXP 4/29/2013 11:21 AM Page 23