head unit KIA Cerato 2016 2.G Owner's Manual
[x] Cancel search | Manufacturer: KIA, Model Year: 2016, Model line: Cerato, Model: KIA Cerato 2016 2.GPages: 501, PDF Size: 14.8 MB
Page 120 of 501
449
Features of your vehicle
Rolling code programming
To train a garage door opener (or
other rolling code equipped devices)
with the rolling code feature, follow
these instructions after completing
the "Programming" portion of this
text. (A second person may make the
following training procedures quicker
& easier.)
4. Locate the "learn" or "smart" but-ton on the device’s motor head
unit. Exact location and color of
the button may vary by product
brand. If there is difficulty locating
the "learn" or "smart" button, refer-
ence the device’s owner’s manual
or contact Homelink
®at 1-800-
355-3515 or on the internet at
www.homelink.com.
5. Press and release the "learn" or "smart" button on the device’s
motor head unit. You have 30 sec-
onds to complete step number 6. 6. Return to the vehicle and firmly
press and release the pro-
grammed Homelink
®button up to
three times. The rolling code
equipped device should now rec-
ognize the Homelink
®signal and
activate when the Homelink®but-
ton is pressed. The remaining two
buttons may now be programmed
if this has not previously been
done. Refer to the "Programming"
portion of this text. Operating Homelink
®
To operate, simply press the pro-
grammed Homelink®button.
Activation will now occur for the
trained product (garage door, securi-
ty system, entry door lock, estate
gate, or home or office lighting). For
convenience, the hand-held trans-
mitter of the device may also be used
at any time. The Homelink
®Wireless
Controls System (once programmed)
or the original hand-held transmitter
may be used to activate the device
(e.g. garage door, entry door lock,
etc.). In the event that there are still
programming difficulties, contact
Homelink
®at 1-800-355-3515 or on
the internet at www.homelink.com.
Page 230 of 501
4159
Features of your vehicle
Before Using the Bluetooth®
Handsfree
What is Bluetooth®?
Bluetooth®refers to a short-dis-
tance wireless networking technol-
ogy which uses a 2.4GHz
~2.48GHz frequency to connect
various devices within a certain
distance.
Supported within PCs, external devices,
Bluetooth®phones, PDAs,
various electronic devices, and
automotive environments,
Bluetooth®allows data to be trans-
mitted at high speeds without hav-
ing to use a connector cable.
Bluetooth®Handsfree refers to a
device which allows the user to
conveniently make phone calls with
Bluetooth®mobile phones through
the AV/Navigation system.
Bluetooth®Handsfree may not be
supported in some mobile phones.
To learn more about mobile device
compatibility, visit
http://www
.kia.com/us/en/con-
tent/owners/bluetooth.
Precautions for Safe Driving
Bluetooth®Handsfree is a feature
that enables drivers to practice
safe driving. Connecting the head
unit with a
Bluetooth®phone allows
the user to conveniently make and
receive calls and use contacts.
Before using
Bluetooth®, carefully
read the contents of this user’s
manual.
Excessive use or operations while driving may lead to negligent driv-
ing practices and result in acci-
dents. Refrain from excessive
operations while driving.
Viewing the screen for prolonged periods of time is dangerous and
may lead to accidents. When driv-
ing, view the screen only for short
periods of time.
When connecting a Bluetooth®
Phone
Before connecting the head unit
with the mobile phone, check to
see that the mobile phone sup-
ports
Bluetooth®features.
Even if the phone supports
Bluetooth®, the phone will not be
found during device searches if
the phone has been set to hidden
state or the
Bluetooth®power is
turned off. Disable the hidden
state or turn on the
Bluetooth®
power prior to searching/con-
necting with the Head unit.
Bluetooth phone is automatically
connected when the ignition on.
If you do not want automatic con-
nection with your
Bluetooth®
device, turn off the Bluetooth®
feature within your mobile phone.
The Handsfree call volume and
quality may differ depending on
the mobile phone.
(Continued)
Page 231 of 501
Features of your vehicle
160
4
(Continued)
Park the vehicle when connect-
ing the head unit with the mobile
phone.
Bluetooth®connection may
become intermittently discon-
nected in some mobile phones.
Follow these steps to try again.
1. Within the mobile phone, turn
the
Bluetooth®function off/on
and try again.
2. Turn the mobile phone power Off/On and try again.
3. Completely remove the mobile phone battery, reboot, and then
again.
4. Reboot the Audio Video Navigation System and try
again.
5. Delete all paired devices, pair and try again.
Handsfree call quality and volume may differ depending on the model
of your mobile phone.
Voice Recognition
When using the voice recognitionfeature, only commands listed
within the user's manual are sup-
ported.
Be aware that during the operation of the voice recognition system,
pressing any key other than the key terminate voice recogni-
tion mode.
For superior voice recognition per- formance, position the microphone
used for voice recognition above
the head of the driver’s seat and
maintain a proper position when
saying commands.
Within the following situations, voice recognition may not function
properly due to external sound.
- When the windows and sunroofare open
- When the wind of the cooling / heating device is strong
- When entering and passing through tunnels
(Continued)(Continued)
- When driving on rugged anduneven roads
- During severe rain (heavy rains, windstorms)
Phone related voice commands can be used only when a
Bluetooth®Wireless Technology
device is connected.
When making calls by stating a name, the corresponding contact
must be downloaded and stored
within the audio system.
After downloading the
Bluetooth®
Wireless Technology phone book,
it takes some times to convert the
phone book data into voice infor-
mation. During this time, voice
recognition may not properly oper-
ate.
Pronounce the voice commands naturally and clearly as if in a nor-
mal conversation.
Page 234 of 501
4163
Features of your vehicle
SYSTEM CONTROLLERS
AND FUNCTIONS
❈Display and settings may differ
depending on the selected audio.
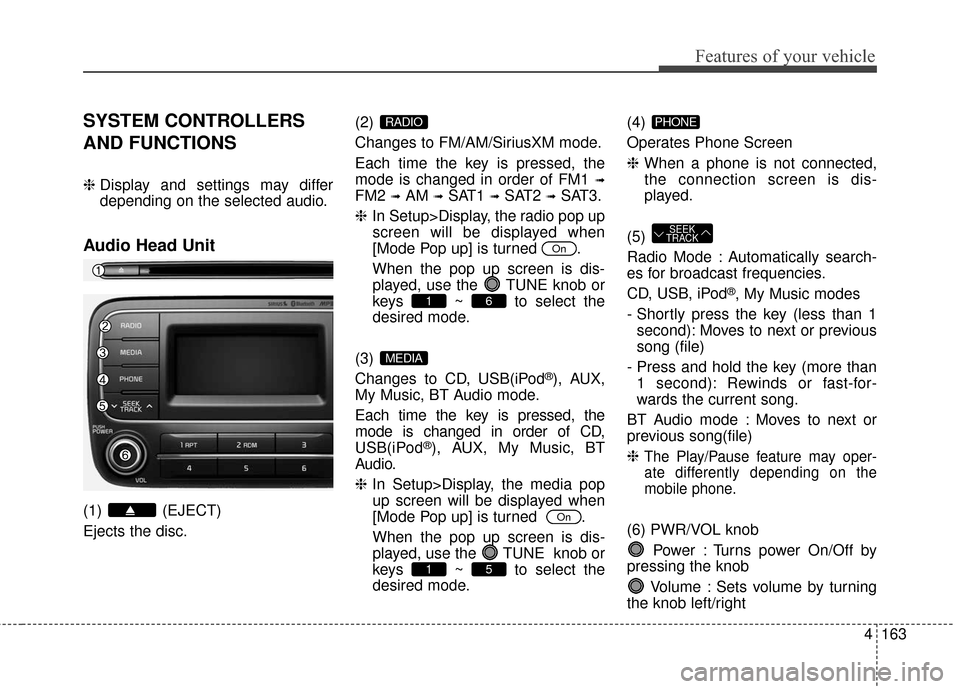
Audio Head Unit
(1) (EJECT)
Ejects the disc. (2)
Changes to FM/AM/SiriusXM mode.
Each time the key is pressed, the
mode is changed in order of FM1
➟
FM2 ➟AM ➟SAT1 ➟SAT2 ➟SAT3.
❈ In Setup>Display, the radio pop up
screen will be displayed when
[Mode Pop up] is turned .
When the pop up screen is dis- played, use the TUNE knob or
keys ~ to select the
desired mode.
(3)
Changes to CD, USB(iPod
®), AUX,
My Music, BT Audio mode.
Each time the key is pressed, the
mode is changed in order of CD,
USB(iPod
®), AUX, My Music, BT
Audio.
❈ In Setup>Display, the media pop
up screen will be displayed when
[Mode Pop up] is turned .
When the pop up screen is dis-
played, use the TUNE knob or
keys ~ to select the
desired mode. (4)
Operates Phone Screen
❈
When a phone is not connected,
the connection screen is dis-
played.
(5)
Radio Mode : Automatically search-
es for broadcast frequencies.
CD, USB, iPod
®, My Music modes
- Shortly press the key (less than 1 second): Moves to next or previous
song (file)
- Press and hold the key (more than 1 second): Rewinds or fast-for-
wards the current song.
BT Audio mode : Moves to next or
previous song(file)
❈
The Play/Pause feature may oper- ate differently depending on the
mobile phone.
(6) PWR/VOL knob
Power : Turns power On/Off by
pressing the knob
Volume : Sets volume by turning
the knob left/right
SEEK
TRACK
PHONE
51
On
MEDIA
61
On
RADIO
Page 279 of 501
Features of your vehicle
208
4
SYSTEM CONTROLLERS
AND FUNCTIONS
❈ Display and settings may differ
depending on the selected audio.
Audio Head Unit
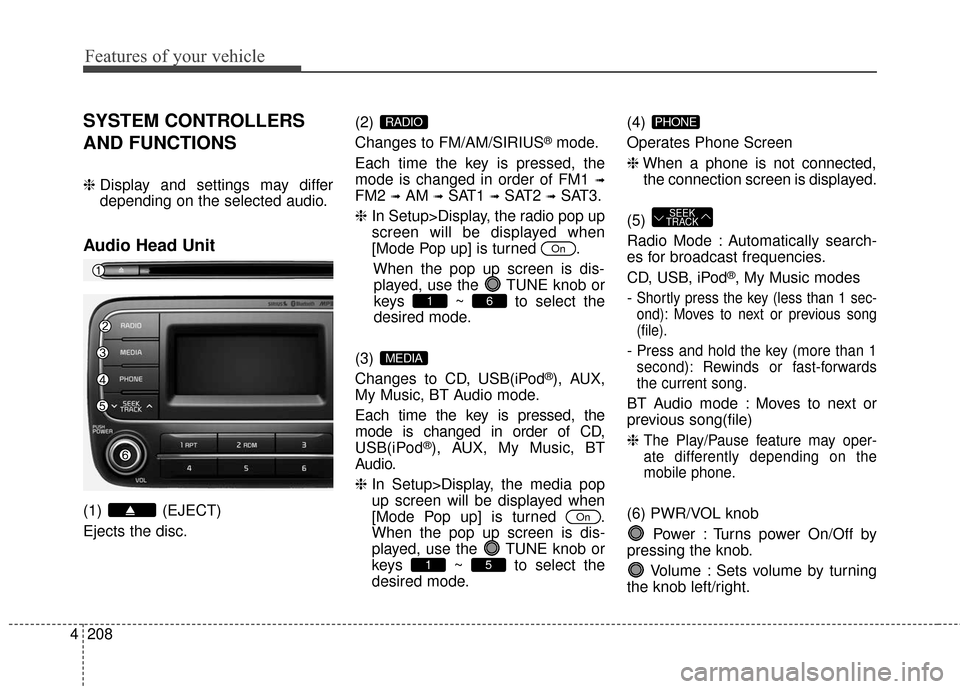
(1) (EJECT)
Ejects the disc. (2)
Changes to FM/AM/SIRIUS
®mode.
Each time the key is pressed, the
mode is changed in order of FM1
➟
FM2 ➟AM ➟SAT1 ➟SAT2 ➟SAT3.
❈ In Setup>Display, the radio pop up
screen will be displayed when
[Mode Pop up] is turned .
When the pop up screen is dis-played, use the TUNE knob or
keys ~ to select the
desired mode.
(3)
Changes to CD, USB(iPod
®), AUX,
My Music, BT Audio mode.
Each time the key is pressed, the
mode is changed in order of CD,
USB(iPod
®), AUX, My Music, BT
Audio.
❈ In Setup>Display, the media pop
up screen will be displayed when
[Mode Pop up] is turned .
When the pop up screen is dis-
played, use the TUNE knob or
keys ~ to select the
desired mode. (4)
Operates Phone Screen
❈
When a phone is not connected,
the connection screen is displayed.
(5)
Radio Mode : Automatically search-
es for broadcast frequencies.
CD, USB, iPod
®, My Music modes
-
Shortly press the key (less than 1 sec-
ond): Moves to next or previous song
(file).
- Press and hold the key (more than 1
second): Rewinds or fast-forwards
the current song.
BT Audio mode : Moves to next or
previous song(file)
❈
The Play/Pause feature may oper-
ate differently depending on the
mobile phone.
(6) PWR/VOL knob Power : Turns power On/Off by
pressing the knob.
Volume : Sets volume by turning
the knob left/right.
SEEK
TRACK
PHONE
51
On
MEDIA
61
On
RADIO
Page 452 of 501
749
Maintenance
Wheel replacement
When replacing the metal wheels for
any reason, make sure the new
wheels are equivalent to the original
factory units in diameter, rim width
and offset.
A wheel that is not the correct size
may adversely affect wheel and
bearing life, braking and stopping
abilities, handling characteristics,
ground clearance, body-to-tire clear-
ance, snow chain clearance,
speedometer and odometer calibra-
tion, headlight aim and bumper
height.
Tire traction
Tire traction can be reduced if you
drive on worn tires, tires that are
improperly inflated or on slippery
road surfaces. Tires should be
replaced when tread wear indicators
appear. Slow down whenever there
is rain, snow or ice on the road, to
reduce the possibility of losing con-
trol of the vehicle.
Tire maintenance
In addition to proper inflation, correct
wheel alignment helps to decrease
tire wear. If you find a tire is worn
unevenly, have your dealer check the
wheel alignment.
When you have new tires installed,
make sure they are balanced. This
will increase vehicle ride comfort and
tire life. Additionally, a tire should
always be rebalanced if it is removed
from the wheel.
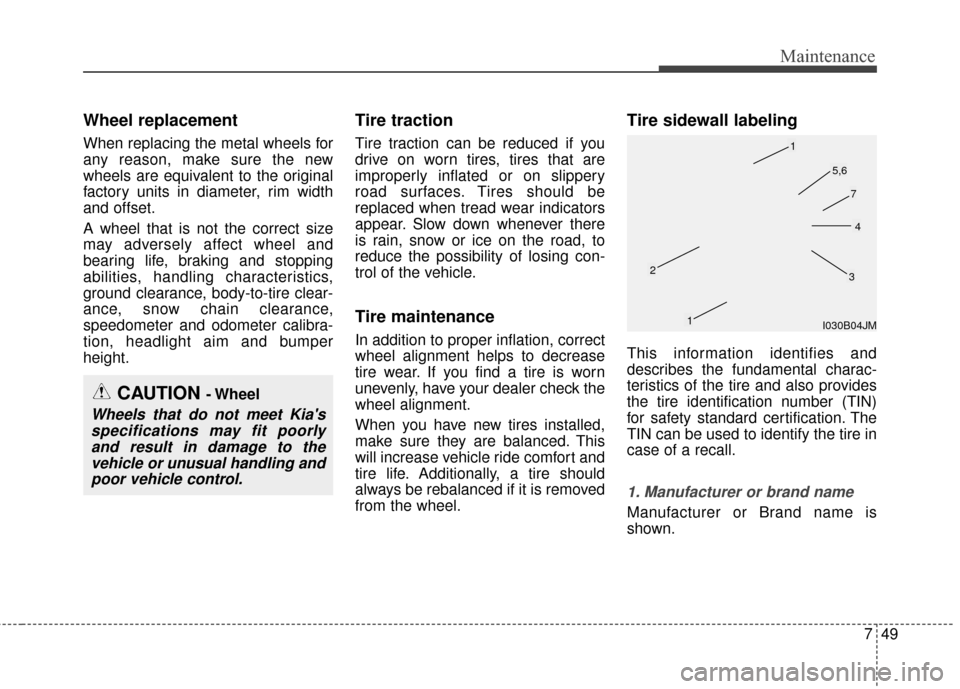
Tire sidewall labeling
This information identifies and
describes the fundamental charac-
teristics of the tire and also provides
the tire identification number (TIN)
for safety standard certification. The
TIN can be used to identify the tire in
case of a recall.
1. Manufacturer or brand name
Manufacturer or Brand name is
shown.
CAUTION - Wheel
Wheels that do not meet Kia'sspecifications may fit poorlyand result in damage to thevehicle or unusual handling andpoor vehicle control.
I030B04JM
1
1
23
4
5,6
7
Page 469 of 501
Maintenance
66
7
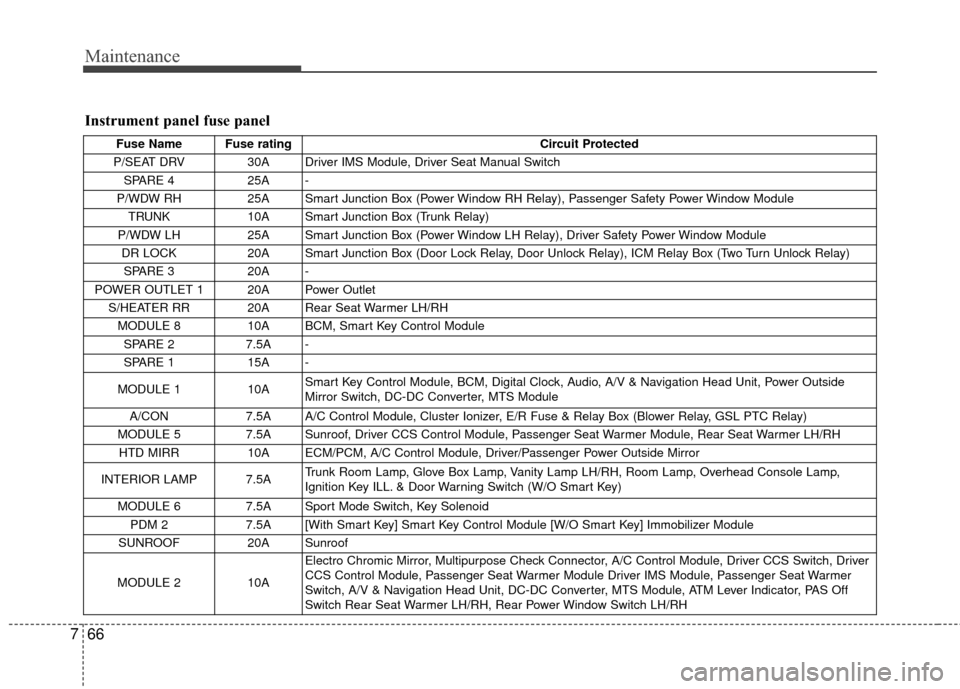
Instrument panel fuse panel
Fuse Name Fuse rating Circuit Protected
P/SEAT DRV 30A Driver IMS Module, Driver Seat Manual Switch SPARE 4 25A -
P/WDW RH 25A Smart Junction Box (Power Window RH Relay), Passenger Safety Power Window Module
TRUNK 10A Smart Junction Box (Trunk Relay)
P/WDW LH 25A Smart Junction Box (Power Window LH Relay), Driver Safety Power Window Module
DR LOCK 20A Smart Junction Box (Door Lock Relay, Door Unlock Relay), ICM Relay Box (Two Turn Unlock Relay)
SPARE 3 20A -
POWER OUTLET 1 20A Power Outlet S/HEATER RR 20A Rear Seat Warmer LH/RH MODULE 8 10A BCM, Smart Key Control Module
SPARE 2 7.5A -
SPARE 1 15A -
MODULE 1 10A Smart Key Control Module, BCM, Digital Clock, Audio, A/V & Navigation Head Unit, Power Outside
Mirror Switch, DC-DC Converter, MTS Module
A/CON 7.5A A/C Control Module, Cluster Ionizer, E/R Fuse & Relay Box (Blower Relay, GSL PTC Relay)
MODULE 5 7.5A Sunroof, Driver CCS Control Module, Passenger Seat Warmer Module, Rear Seat Warmer LH/RH HTD MIRR 10A ECM/PCM, A/C Control Module, Driver/Passenger Power Outside Mirror
INTERIOR LAMP 7.5A Trunk Room Lamp, Glove Box Lamp, Vanity Lamp LH/RH, Room Lamp, Overhead Console Lamp,
Ignition Key ILL. & Door Warning Switch (W/O Smart Key)
MODULE 6 7.5A Sport Mode Switch, Key Solenoid PDM 2 7.5A [With Smart Key] Smart Key Control Module [W/O Smart Key] Immobilizer Module
SUNROOF 20A Sunroof
MODULE 2 10A
Electro Chromic Mirror, Multipurpose Check Connector, A/C Control Module, Driver CCS Switch, Driver
CCS Control Module, Passenger Seat Warmer Module Driver IMS Module, Passenger Seat Warmer
Switch, A/V & Navigation Head Unit, DC-DC Converter, MTS Module, ATM Lever Indicator, PAS Off
Switch Rear Seat Warmer LH/RH, Rear Power Window Switch LH/RH
Page 470 of 501
767
Maintenance
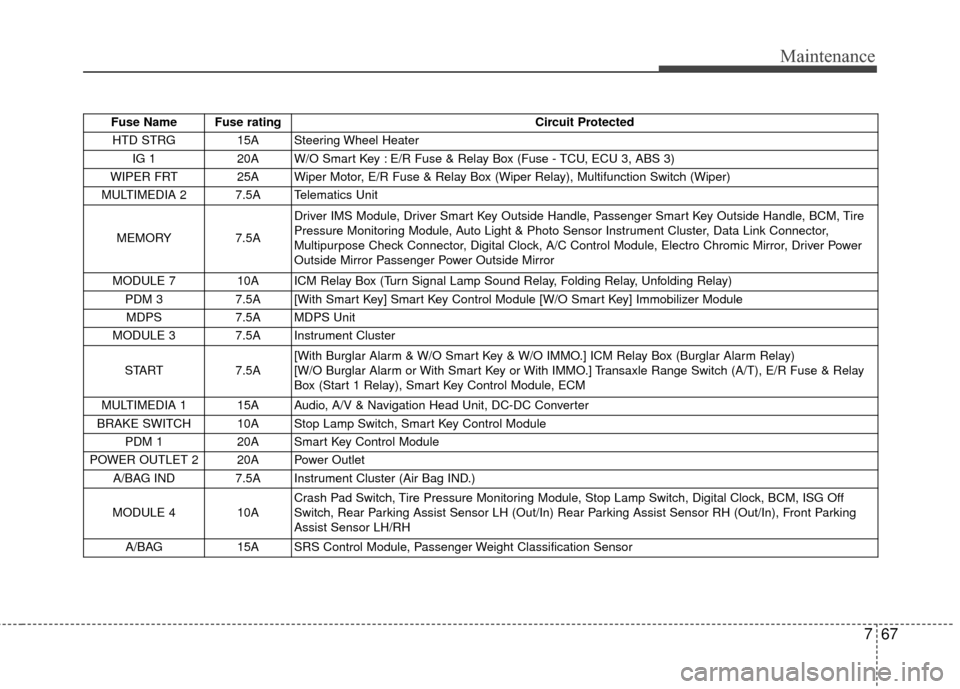
Fuse Name Fuse ratingCircuit Protected
HTD STRG 15A Steering Wheel Heater IG 1 20A W/O Smart Key : E/R Fuse & Relay Box (Fuse - TCU, ECU 3, ABS 3)
WIPER FRT 25A Wiper Motor, E/R Fuse & Relay Box (Wiper Relay), Multifunction Switch (Wiper)
MULTIMEDIA 2 7.5A Telematics Unit
MEMORY 7.5ADriver IMS Module, Driver Smart Key Outside Handle, Passenger Smart Key Outside Handle, BCM, Tire
Pressure Monitoring Module, Auto Light & Photo Sensor Instrument Cluster, Data Link Connector,
Multipurpose Check Connector, Digital Clock, A/C Control Module, Electro Chromic Mirror, Driver Power
Outside Mirror Passenger Power Outside Mirror
MODULE 7 10A ICM Relay Box (Turn Signal Lamp Sound Relay, Folding Relay, Unfolding Relay) PDM 3 7.5A [With Smart Key] Smart Key Control Module [W/O Smart Key] Immobilizer Module
MDPS 7.5A MDPS Unit
MODULE 3 7.5A Instrument Cluster
START 7.5A[With Burglar Alarm & W/O Smart Key & W/O IMMO.] ICM Relay Box (Burglar Alarm Relay)
[W/O Burglar Alarm or With Smart Key or With IMMO.] Transaxle Range Switch (A/T), E/R Fuse & Relay
Box (Start 1 Relay), Smart Key Control Module, ECM
MULTIMEDIA 1 15A Audio, A/V & Navigation Head Unit, DC-DC Converter
BRAKE SWITCH 10A Stop Lamp Switch, Smart Key Control Module PDM 1 20A Smart Key Control Module
POWER OUTLET 2 20A Power Outlet A/BAG IND 7.5A Instrument Cluster (Air Bag IND.)
MODULE 4 10A Crash Pad Switch, Tire Pressure Monitoring Module, Stop Lamp Switch, Digital Clock, BCM, ISG Off
Switch, Rear Parking Assist Sensor LH (Out/In) Rear Parking Assist Sensor RH (Out/In), Front Parking
Assist Sensor LH/RH
A/BAG 15A SRS Control Module, Passenger Weight Classification Sensor
Page 471 of 501
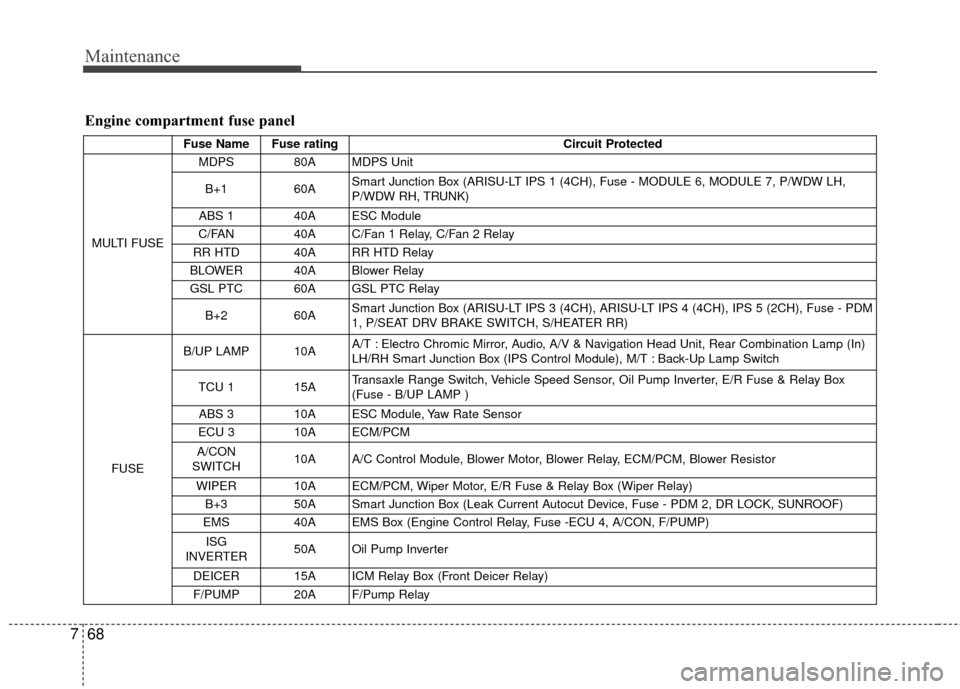
Maintenance
68
7
Engine compartment fuse panel
Fuse Name Fuse rating Circuit Protected
MULTI FUSE MDPS 80A MDPS Unit
B+1 60A Smart Junction Box (ARISU-LT IPS 1 (4CH), Fuse - MODULE 6, MODULE 7, P/WDW LH,
P/WDW RH, TRUNK)
ABS 1 40A ESC Module
C/FAN 40A C/Fan 1 Relay, C/Fan 2 Relay
RR HTD 40A RR HTD Relay
BLOWER 40A Blower Relay
GSL PTC 60A GSL PTC Relay
B+2 60A Smart Junction Box (ARISU-LT IPS 3 (4CH), ARISU-LT IPS 4 (4CH), IPS 5 (2CH), Fuse - PDM
1, P/SEAT DRV BRAKE SWITCH, S/HEATER RR)
FUSE B/UP LAMP 10A
A/T : Electro Chromic Mirror, Audio, A/V & Navigation Head Unit, Rear Combination Lamp (In)
LH/RH Smart Junction Box (IPS Control Module), M/T : Back-Up Lamp Switch
TCU 1 15A Transaxle Range Switch, Vehicle Speed Sensor, Oil Pump Inverter, E/R Fuse & Relay Box
(Fuse - B/UP LAMP )
ABS 3 10A ESC Module, Yaw Rate Sensor
ECU 3 10A ECM/PCM
A/CON
SWITCH 10A A/C Control Module, Blower Motor, Blower Relay, ECM/PCM, Blower Resistor
WIPER 10A ECM/PCM, Wiper Motor, E/R Fuse & Relay Box (Wiper Relay) B+3 50A Smart Junction Box (Leak Current Autocut Device, Fuse - PDM 2, DR LOCK, SUNROOF)
EMS 40A EMS Box (Engine Control Relay, Fuse -ECU 4, A/CON, F/PUMP)
ISG
INVERTER 50A Oil Pump Inverter
DEICER 15A ICM Relay Box (Front Deicer Relay)
F/PUMP 20A F/Pump Relay