engine KIA EV6 2022 Features and Functions Guide
[x] Cancel search | Manufacturer: KIA, Model Year: 2022, Model line: EV6, Model: KIA EV6 2022Pages: 70, PDF Size: 6.39 MB
Page 2 of 70
WELCOME TO THE KIA FAMILY!
Your new Kia vehicle has been designed, engineered and manufactured to provide you with years of comfortable and dependable driving. Kia is committed to quality, innovation, safety and — above all — your satisfaction.
USING THIS FEATURES & FUNCTIONS GUIDE
The information contained in this guide is a brief overview of the operation and features of your new Kia vehicle.
This Features & Functions Guide and the specific operational and safety information it provides are not a substitute for your Owner’s Manual. In the interest of your safety and that of the vehicle’s occupants, and to help you avoid risks that may result in death or serious injury, Kia reminds you to carefully read the Owner’s Manual in order to fully familiarize yourself with the important information and safety warnings it contains.
While Kia endeavors to ensure that the information contained in this guide is accurate at the time of printing, Kia may change vehicle specifications without notice in advance of or after the fact and assumes no liability in connection with such changes.
VIDEOS AND QR CODES
Kia provides a number of video resources to assist you with becoming familiar with the features and functions found in your Kia vehicle. You can access these resources by snapping the QR Codes with your mobile device using the built-in QR Code Reader or a downloaded QR Code Reader App.
After opening the QR Code Reader App on your mobile device, the app will utilize your device’s camera. Center the code in the camera viewing area — with some apps, as soon as the app recognizes the code, it will launch the corresponding video.
With other apps, you will have to snap or “take a picture” of the code. The app will then launch the corresponding video.
For operation specifics, refer to the instructions that come with the QR Code Reader App. You can also view the videos by visiting the following website: www.youtube.com/KiaFeatureVideos
If you’re having trouble scanning codes, check the following:
•
The code should be centered and focused in your mobile device’s camera screen
•
Consider moving your device closer to or far ther away from the code
•
The code should be well lit, without significant shadow
•Avoid scanning from a significant angle
•
Confirm that the device’s app suppor ts 2D QR Code scanning
•
Tr y another QR Code Reader App; not all apps are created equal
After scanning, you may experience a “connection error ” message or a “connecting” message with no subsequent response. These messages t ypically indicate that your device is having trouble connecting to the Internet
QUICK TIPS
Refer to the inside front cover for more information on QR codes.www.youtube.com/KiaFeatureVideos
Your New Kia Important Care Tips Video
QR CODES
Page 33 of 70
Refer to the inside front cover for more information on QR codes.www.youtube.com/KiaFeatureVideos
Navigation-based Smart Cruise Control (NSCC) Video
QR CODE
31†LEGAL DISCL AIMERS ON BACK INSIDE COVER | *IF EQUIPPEDALWAYS CHECK THE OWNER ’S MANUAL FOR COMPLETE OPER ATING INFORMATION AND SAFET Y WARNINGS.
ADAS
ADVANCED DRIVER ASSISTANCE SYSTEMS (ADAS)
The speed set ting for SCC can be adjusted under the following conditions:
-You must be traveling at a minimum speed of 5 mph (may var y on newer models)
-
When following a vehicle, there is no minimum speed requirement
-
If your vehicle speed is less than 20 mph, when SCC is turned on and activated, the vehicle speed will be set to 20 mph
-Always keep the front-view camera and front radar sensor areas clean and free from debris to maintain optimal per formance
QUICK TIPS
Navigation-based Smart Cruise Control
(NSCC)* †4 , 8
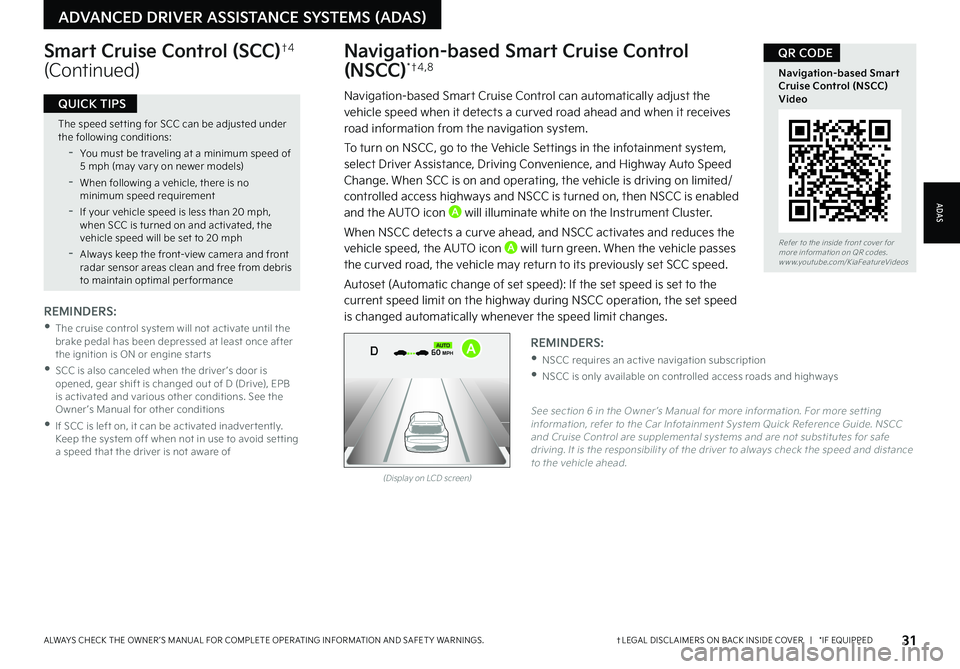
Navigation-based Smart Cruise Control can automatically adjust the vehicle speed when it detects a curved road ahead and when it receives road information from the navigation system.
To turn on NSCC, go to the Vehicle Settings in the infotainment system, select Driver Assistance, Driving Convenience, and Highway Auto Speed Change. When SCC is on and operating, the vehicle is driving on limited/controlled access highways and NSCC is turned on, then NSCC is enabled and the AUTO icon A will illuminate white on the Instrument Cluster.
When NSCC detects a curve ahead, and NSCC activates and reduces the vehicle speed, the AUTO icon A will turn green. When the vehicle passes
the curved road, the vehicle may return to its previously set SCC speed.
Autoset (Automatic change of set speed): If the set speed is set to the current speed limit on the highway during NSCC operation, the set speed is changed automatically whenever the speed limit changes.
Smart Cruise Control (SCC)†4
(Continued)
REMINDERS:
•
The cruise control system will not activate until the brake pedal has been depressed at least once after the ignition is ON or engine star ts
•
SCC is also canceled when the driver ’s door is opened, gear shift is changed out of D (Drive), EPB is activated and various other conditions. See the Owner ’s Manual for other conditions
•
If SCC is left on, it can be activated inadver tently. Keep the system off when not in use to avoid set ting a speed that the driver is not aware of
See section 6 in the Owner ’s Manual for more information. For more set ting information, refer to the Car Infotainment System Quick Reference Guide. NSCC and Cruise Control are supplemental systems and are not substitutes for safe driving. It is the responsibilit y of the driver to always check the speed and distance to the vehicle ahead.
REMINDERS:
•NSCC requires an active navigation subscription
•NSCC is only available on controlled access roads and highways
(Display on LCD screen)
0mph
0 KMH020 4060
202 m100 kWh/ 100m96%Lv 1READY66°F
2 72m
CHG
PWR
60 MPH
0mph
0 KMH
020 4060
202 m100 kWh/ 100m96%Lv 1READY66°F
2 72m
CHG
PWR
60 MPH
0mph
0 KMH
020 4060
202 m100 kWh/ 100m96%Lv 1READY66°F
2 72m
CHG
PWR
60 MPHCRUISED
DAUTOA
Page 44 of 70
42*IF EQUIPPEDEV6 FEATURES & FUNCTIONS GUIDE
STEERING WHEEL CONTROLS
STEERING
WHEEL CONTROLS
OFFAUTO
AUTO
OFFAUTO
AUTO
OFFAUTO
AUTO
OFFAUTO
AUTO
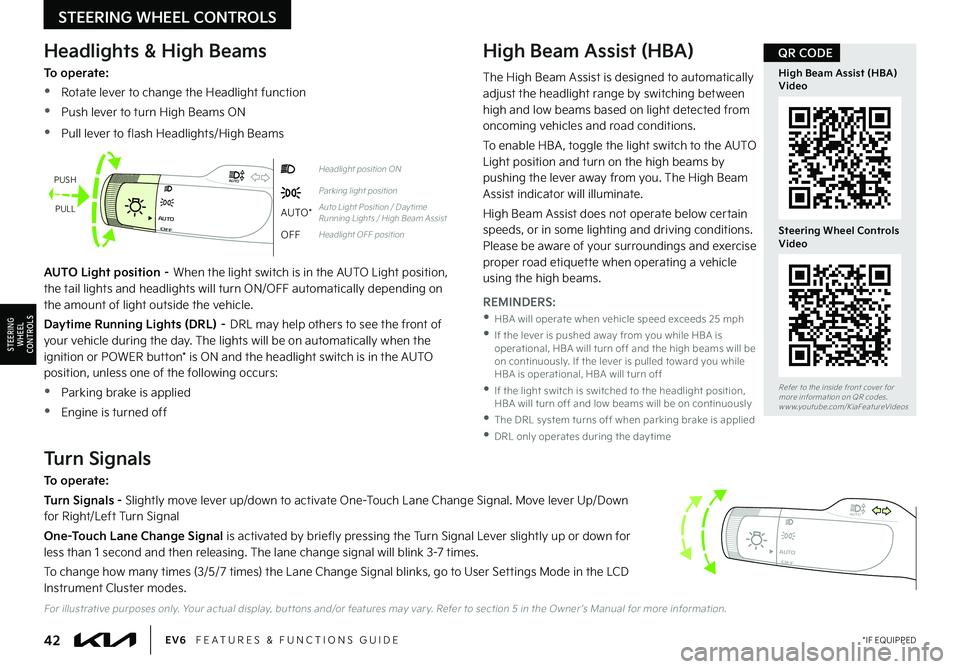
Headlight position ON
Parking light position
AUTO*Auto Light Position / Day time Running Lights / High Beam Assist
OFFHeadlight OFF position
Headlights & High Beams
To operate:
•Rotate lever to change the Headlight function
•Push lever to turn High Beams ON
•Pull lever to flash Headlights/High Beams
High Beam Assist (HBA)
AUTO Light position – When the light switch is in the AUTO Light position, the tail lights and headlights will turn ON/OFF automatically depending on the amount of light outside the vehicle.
Daytime Running Lights (DRL) – DRL may help others to see the front of your vehicle during the day. The lights will be on automatically when the ignition or POWER button* is ON and the headlight switch is in the AUTO position, unless one of the following occurs:
•Parking brake is applied
•Engine is turned off
Turn Signals
To operate:
Turn Signals - Slightly move lever up/down to activate One-Touch Lane Change Signal. Move lever Up/Down for Right/Left Turn Signal
One-Touch Lane Change Signal is activated by briefly pressing the Turn Signal Lever slightly up or down for less than 1 second and then releasing. The lane change signal will blink 3-7 times.
To change how many times (3/5/7 times) the Lane Change Signal blinks, go to User Settings Mode in the LCD Instrument Cluster modes.
PUSH
PULL
For illustrative purposes only. Your actual display, but tons and/or features may var y. Refer to section 5 in the Owner ’s Manual for more information.
REMINDERS:
•
HBA will operate when vehicle speed exceeds 25 mph
•
If the lever is pushed away from you while HBA is operational, HBA will turn off and the high beams will be on continuously. If the lever is pulled toward you while HBA is operational, HBA will turn off
•
If the light switch is switched to the headlight position, HBA will turn off and low beams will be on continuously
•The DRL system turns off when parking brake is applied
•DRL only operates during the day time
The High Beam Assist is designed to automatically adjust the headlight range by switching between high and low beams based on light detected from oncoming vehicles and road conditions.
To enable HBA , toggle the light switch to the AUTO Light position and turn on the high beams by pushing the lever away from you. The High Beam Assist indicator will illuminate.
High Beam Assist does not operate below certain speeds, or in some lighting and driving conditions. Please be aware of your surroundings and exercise proper road etiquette when operating a vehicle
using the high beams.
Refer to the inside front cover for more information on QR codes.www.youtube.com/KiaFeatureVideos
High Beam Assist (HBA) Video
Steering Wheel Controls Video
QR CODE
Page 50 of 70
48*IF EQUIPPEDEV6 FEATURES & FUNCTIONS GUIDE
•The smar tphone and vehicle need to be connected to a cellular net work with good wireless signal strength in order to use Kia Connect. If these conditions are not met, remote command may not execute or may take a long time. It will also affect voice commands
•
To use Remote Star t or Remote Star t with Climate Control feature, all doors, hood and trunk/liftgate must be closed and locked
•When Remote Star t is activated, if the driver does not enter the vehicle within 10 minutes, the Remote Star t will turn the engine off
•When using Remote Star t with Climate Control, turn on for at least a few minutes before get ting into the vehicle, allowing the vehicle interior to reach your desired temperature
•
The quickest way to obtain accurate vehicle status through the app is by pressing the refresh but ton on the app or refreshing the web page when using the customer web por tal
•In order to preser ve the vehicle bat ter y, Kia Connect will not turn on seven days after the last ignition was on. You will need to restar t the vehicle with a key fob in order to use Kia Connect again
•Do not use remote climate control or remote star t if vehicle is in an enclosed area (e.g., closed garage) or a par tially enclosed area without ventilation. Close all doors leading from adjacent living areas to the vehicle area before executing a remote climate control or remote star t command
QUICK TIPS
Kia Access App Download
Go to an app marketplace to download the Kia Access App. Once you download the app, make sure you register your vehicle and start an account (refer to Kia Connect Activation page). Get to know your new Kia and the available convenient features on the app.
2020 SOULMILEAGE722 mi.
355 miEst. RangeDOOR LOCKSREMOTE STARTFind My Car
The Kia Access App Features Guide is a guide to help you utilize the app to its full potential by detailing each feature and how to adjust various settings. Below are some of the topics included:
•Remote Commands
•Set Climate
•Schedule Remote Start/Climate
•Schedule Charge
•Schedule Service
•Dealer Settings
•Manage Vehicles and Profiles
Kia Access App Features Guide
Do not use remote climate control or remote star t if vehicle is in an enclosed area (e.g., closed garage) or a par tially enclosed area without ventilation. Close all doors leading from adjacent living areas to the vehicle area before executing a remote climate control or remote star t command.
App Screen for illustrative purposes only. Actual App screen and functionalit y may var y. For fur ther Kia Connect operations, refer to the Car Infotainment System Quick Reference Guide.
Kia Access App Features Guide. Click this dynamic QR code to access the guide. Some phone’s operating systems may need to be updated to scan dynamic QR codes.
Download the Kia Access App by clicking this dynamic QR code. Some phone’s operating systems may need to be updated to scan dynamic QR codes.
QR CODES
INFOTAINMENT SYSTEMS
INFOTAINMENTSYSTEMS
Page 56 of 70
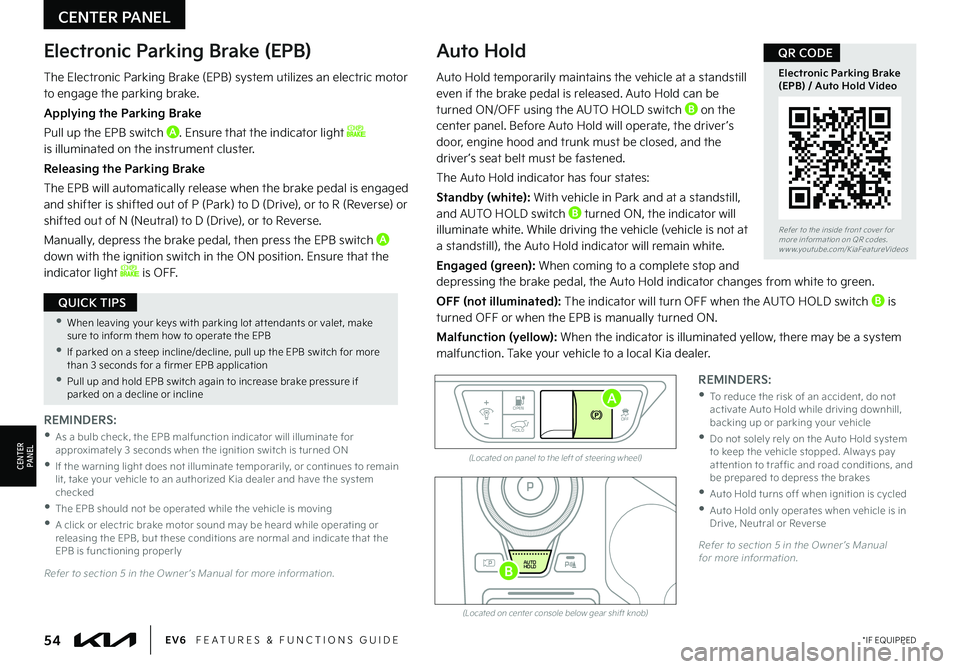
(Located on panel to the left of steering wheel)
(Located on center console below gear shift knob)
Electronic Parking Brake (EPB)Auto Hold
REMINDERS:
•
As a bulb check, the EPB malfunction indicator will illuminate for approximately 3 seconds when the ignition switch is turned ON
•
If the warning light does not illuminate temporarily, or continues to remain lit, take your vehicle to an authorized Kia dealer and have the system checked
•The EPB should not be operated while the vehicle is moving
•
A click or electric brake motor sound may be heard while operating or releasing the EPB, but these conditions are normal and indicate that the EPB is functioning properly
REMINDERS:
•
To reduce the risk of an accident, do not activate Auto Hold while driving downhill, backing up or parking your vehicle
•
Do not solely rely on the Auto Hold system to keep the vehicle stopped. Always pay at tention to traf fic and road conditions, and be prepared to depress the brakes
•Auto Hold turns off when ignition is cycled
•
Auto Hold only operates when vehicle is in Drive, Neutral or Reverse
EV
RN
P
AUTO
HOLD
DOPEN
OFF
HOLD
Auto Hold temporarily maintains the vehicle at a standstill even if the brake pedal is released. Auto Hold can be turned ON/OFF using the AUTO HOLD switch B on the center panel. Before Auto Hold will operate, the driver ’s door, engine hood and trunk must be closed, and the driver ’s seat belt must be fastened.
The Auto Hold indicator has four states:
Standby (white): With vehicle in Park and at a standstill, and AUTO HOLD switch B turned ON, the indicator will illuminate white. While driving the vehicle (vehicle is not at a standstill), the Auto Hold indicator will remain white.
Engaged (green): When coming to a complete stop and depressing the brake pedal, the Auto Hold indicator changes from white to green.
OFF (not illuminated): The indicator will turn OFF when the AUTO HOLD switch B is turned OFF or when the EPB is manually turned ON.
Malfunction (yellow): When the indicator is illuminated yellow, there may be a system malfunction. Take your vehicle to a local Kia dealer.
Refer to section 5 in the Owner ’s Manual for more information.
Refer to section 5 in the Owner ’s Manual for more information.
A
B
CENTER PANEL
CENTERPA N EL
•When leaving your keys with parking lot at tendants or valet, make sure to inform them how to operate the EPB
•If parked on a steep incline/decline, pull up the EPB switch for more than 3 seconds for a firmer EPB application
•Pull up and hold EPB switch again to increase brake pressure if parked on a decline or incline
QUICK TIPS
The Electronic Parking Brake (EPB) system utilizes an electric motor to engage the parking brake.
Applying the Parking Brake
Pull up the EPB switch A. Ensure that the indicator light is illuminated on the instrument cluster.
Releasing the Parking Brake
The EPB will automatically release when the brake pedal is engaged and shifter is shifted out of P (Park) to D (Drive), or to R (Reverse) or shifted out of N (Neutral) to D (Drive), or to Reverse.
Manually, depress the brake pedal, then press the EPB switch A
down with the ignition switch in the ON position. Ensure that the indicator light is OFF.
54*IF EQUIPPEDEV6 FEATURES & FUNCTIONS GUIDE
Refer to the inside front cover for more information on QR codes.www.youtube.com/KiaFeatureVideos
Electronic Parking Brake (EPB) / Auto Hold Video
QR CODE
Page 63 of 70
61†LEGAL DISCL AIMERS ON BACK INSIDE COVER | *IF EQUIPPEDALWAYS CHECK THE OWNER ’S MANUAL FOR COMPLETE OPER ATING INFORMATION AND SAFET Y WARNINGS.
OTHER KEY FEATURES
OTHER KEY F E AT U R E S
Refer to the inside front cover for more information on QR codes.www.youtube.com/KiaFeatureVideos
Smart Key - Remote Start, Remote Smart Parking Assist (RSPA) Video
QR CODE
Refer to section 5 in the Owner ’s Manual for more information.
Smart Power Liftgate*†1 7 (Continued)
Auto Open (Opening with no-touch activation):
When the Smart Key fob is on your person and you are near the back of the vehicle, within close proximity, the hazard lights will blink and a chime will sound for about 3 seconds as an alert that the Smart Power Liftgate is about to open.
Then the alert system will blink and chime two additional times before opening the Smart Power Liftgate.
Smart Key:
To open the Smart Power Liftgate, press and hold the Smart Key Liftgate button B until the Liftgate begins opening. Press again and hold to close.
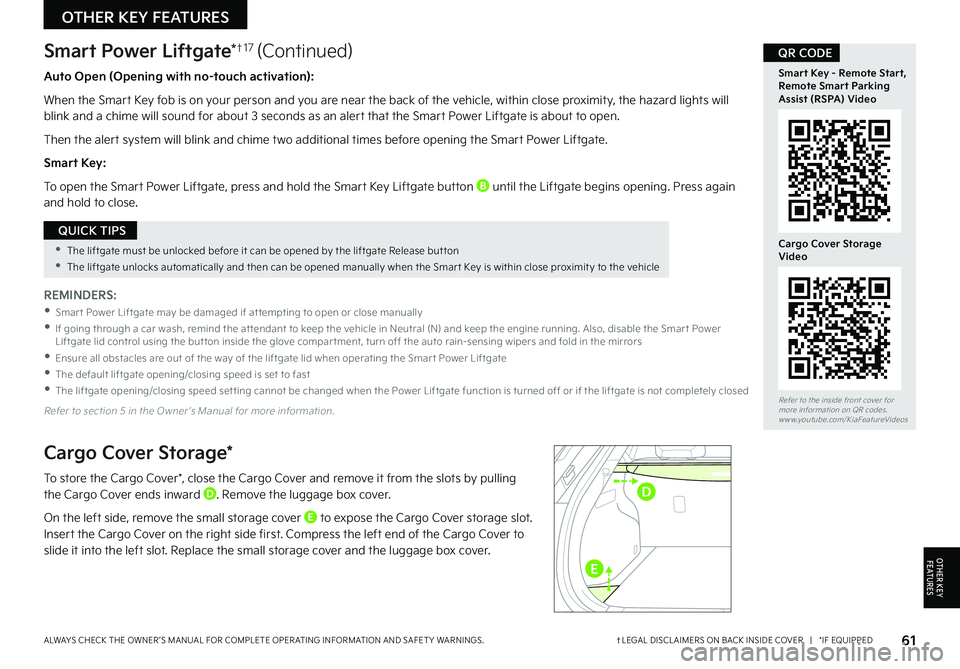
Cargo Cover Storage*
To store the Cargo Cover*, close the Cargo Cover and remove it from the slots by pulling the Cargo Cover ends inward D. Remove the luggage box cover.
On the left side, remove the small storage cover E to expose the Cargo Cover storage slot. Insert the Cargo Cover on the right side first. Compress the left end of the Cargo Cover to slide it into the left slot. Replace the small storage cover and the luggage box cover.
REMINDERS:
•
Smar t Power Liftgate may be damaged if at tempting to open or close manually
•
If going through a car wash, remind the at tendant to keep the vehicle in Neutral (N) and keep the engine running. Also, disable the Smar t Power Liftgate lid control using the but ton inside the glove compar tment, turn off the auto rain-sensing wipers and fold in the mirrors
•
Ensure all obstacles are out of the way of the liftgate lid when operating the Smar t Power Liftgate
•The default liftgate opening/closing speed is set to fast
•
The liftgate opening/closing speed set ting cannot be changed when the Power Liftgate function is turned off or if the liftgate is not completely closed
•The liftgate must be unlocked before it can be opened by the liftgate Release but ton
•The liftgate unlocks automatically and then can be opened manually when the Smar t Key is within close proximit y to the vehicle
QUICK TIPS
D
E
Cargo Cover Storage Video