KIA FORTE 2017 Owners Manual
Manufacturer: KIA, Model Year: 2017,
Model line: FORTE,
Model: KIA FORTE 2017
Pages: 595, PDF Size: 11.5 MB
KIA FORTE 2017 Owners Manual
FORTE 2017
KIA
KIA
https://www.carmanualsonline.info/img/2/40398/w960_40398-0.png
KIA FORTE 2017 Owners Manual
Trending: alarm, open gas tank, roof rack, checking oil, power steering fluid, brake light, Page 43
Page 551 of 595
789
Maintenance
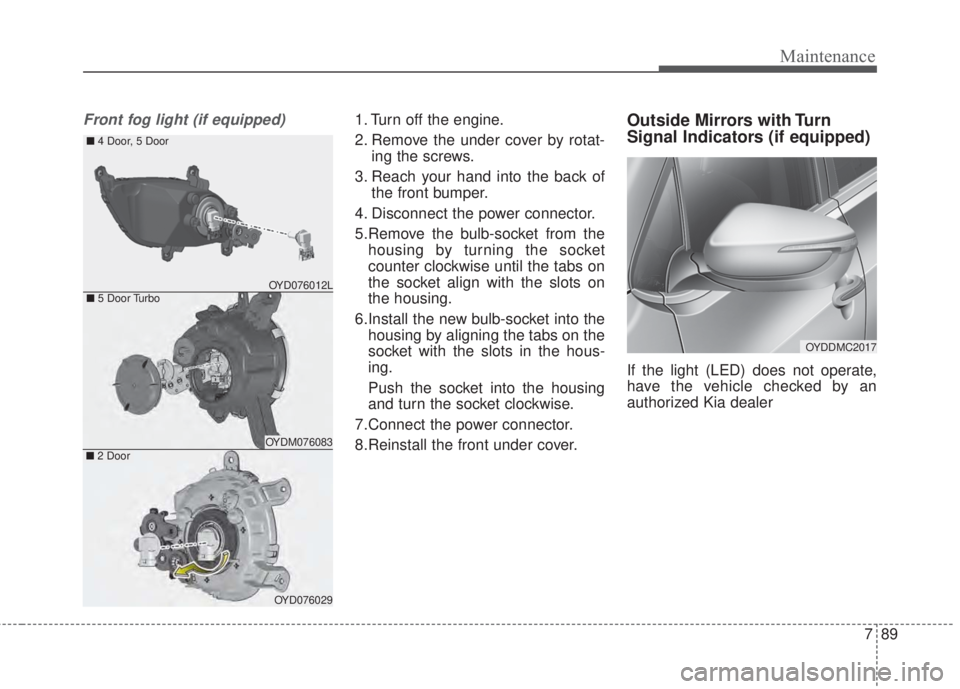
Front fog light (if equipped)1. Turn off the engine.
2. Remove the under cover by rotat-
ing the screws.
3. Reach your hand into the back of
the front bumper.
4. Disconnect the power connector.
5.Remove the bulb-socket from the
housing by turning the socket
counter clockwise until the tabs on
the socket align with the slots on
the housing.
6.Install the new bulb-socket into the
housing by aligning the tabs on the
socket with the slots in the hous-
ing.
Push the socket into the housing
and turn the socket clockwise.
7.Connect the power connector.
8.Reinstall the front under cover.Outside Mirrors with Turn
Signal Indicators (if equipped)
If the light (LED) does not operate,
have the vehicle checked by an
authorized Kia dealer
■5 Door Turbo
■4 Door, 5 Door
OYDM076083■2 Door
OYD076029
OYD076012L
OYDDMC2017
Page 552 of 595
Maintenance
90 7
Rear combination lamp bulb
replacement
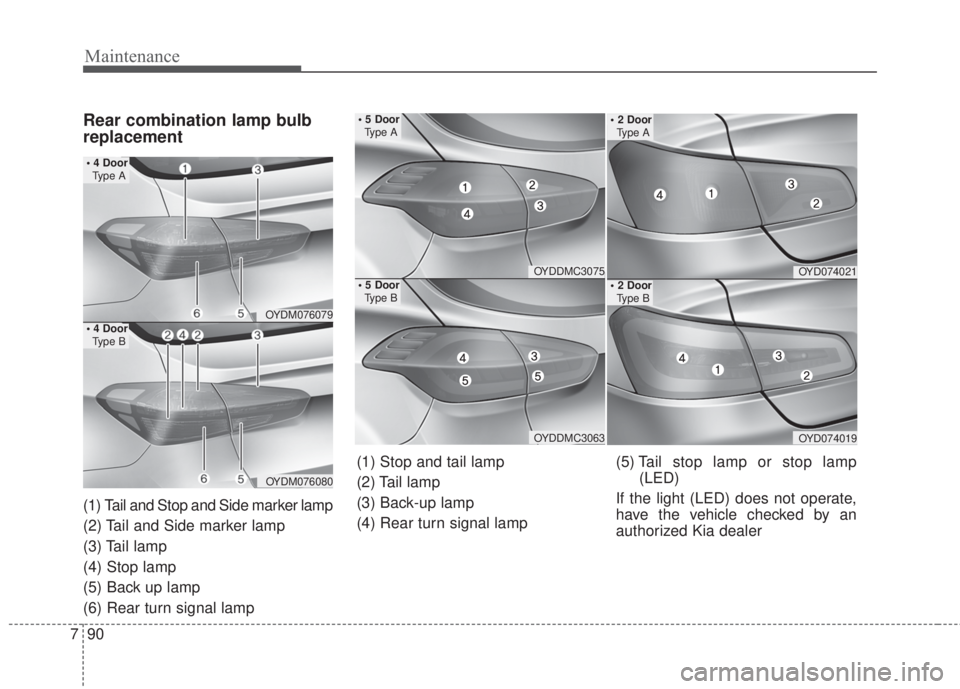
(1) Tail and Stop and Side marker lamp
(2) Tail and Side marker lamp
(3) Tail lamp
(4) Stop lamp
(5) Back up lamp
(6) Rear turn signal lamp
OYDM076079
OYDM076080
• 4 Door
Type A
• 4 Door
Type B
OYDDMC3075
OYDDMC3063
• 5 Door
Type A
• 5 Door
Type BOYD074021
OYD074019
• 2 Door
Type A
• 2 Door
Type B
(1) Stop and tail lamp
(2) Tail lamp
(3) Back-up lamp
(4) Rear turn signal lamp(5) Tail stop lamp or stop lamp
(LED)
If the light (LED) does not operate,
have the vehicle checked by an
authorized Kia dealer
Page 553 of 595
791
Maintenance
Outside lamp
• 4 Door, 2 Door
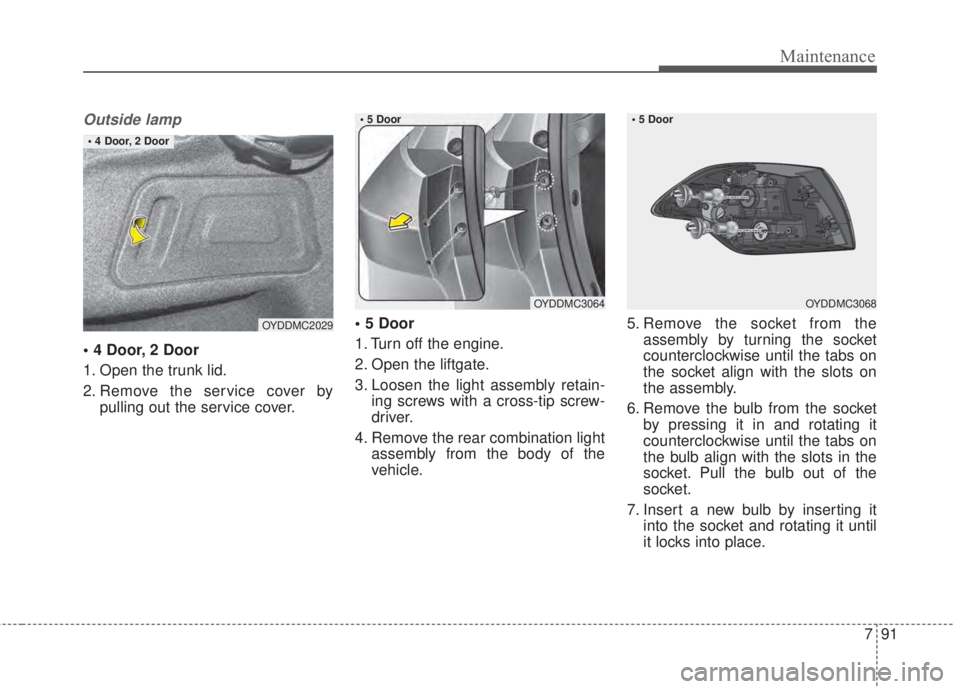
1. Open the trunk lid.
2. Remove the service cover by
pulling out the service cover.• 5 Door
1. Turn off the engine.
2. Open the liftgate.
3. Loosen the light assembly retain-
ing screws with a cross-tip screw-
driver.
4. Remove the rear combination light
assembly from the body of the
vehicle.5. Remove the socket from the
assembly by turning the socket
counterclockwise until the tabs on
the socket align with the slots on
the assembly.
6. Remove the bulb from the socket
by pressing it in and rotating it
counterclockwise until the tabs on
the bulb align with the slots in the
socket. Pull the bulb out of the
socket.
7. Insert a new bulb by inserting it
into the socket and rotating it until
it locks into place.
OYDDMC2029
• 4 Door, 2 Door
OYDDMC3064 • 5 Door OYDDMC3068 • 5 Door
Page 554 of 595
Maintenance
92 7
8. Install the socket in the assembly
by aligning the tabs on the socket
with the slots in the assembly.
Push the socket into the assembly
and turn the socket clockwise.
9. Reinstall the light assembly to the
body of the vehicle.Stop/Tail lamp and turn signal
lamp
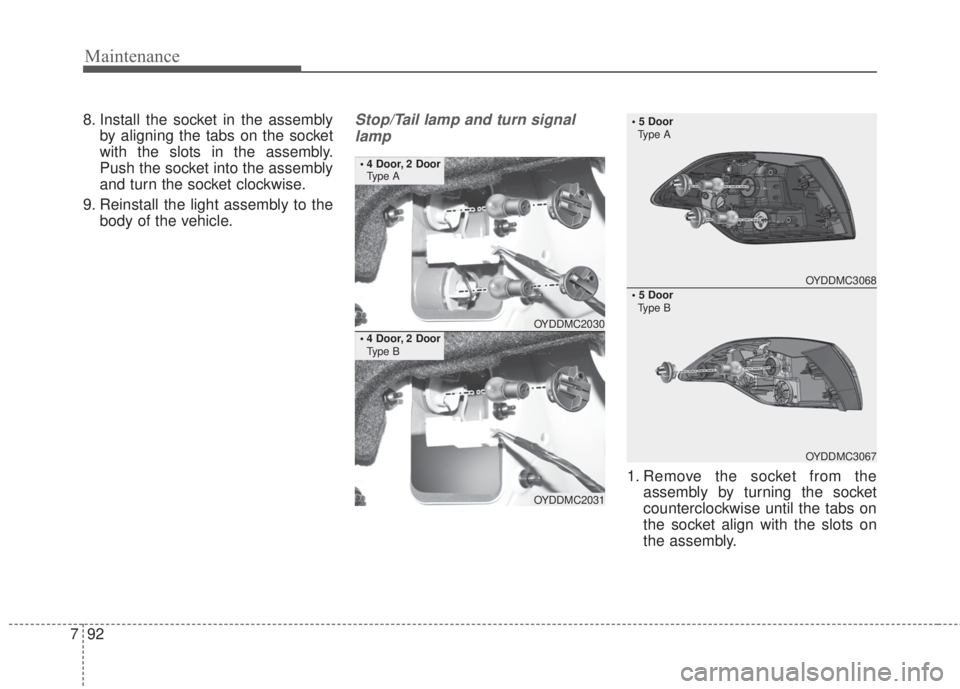
1. Remove the socket from the
assembly by turning the socket
counterclockwise until the tabs on
the socket align with the slots on
the assembly.
OYDDMC2030
OYDDMC2031
• 4 Door, 2 Door
Type A
• 4 Door, 2 Door
Type B
OYDDMC3068
OYDDMC3067
• 5 Door
Type A
• 5 Door
Type B
Page 555 of 595
793
Maintenance
2. Remove the bulb from the socket
by pressing it in and rotating it
counterclockwise until the tabs on
the bulb align with the slots in the
socket. Pull the bulb out of the
socket.
3. Insert a new bulb by inserting it
into the socket and rotating it until
it locks into place.
4. Install the socket in the assembly
by aligning the tabs on the socket
with the slots in the assembly.
Push the socket into the assembly
and turn the socket clockwise.
5. Install the service cover by putting
it into the service hole.
Stop and tail light (LED type)
If the light does not operate, we rec-
ommend that the system be checked
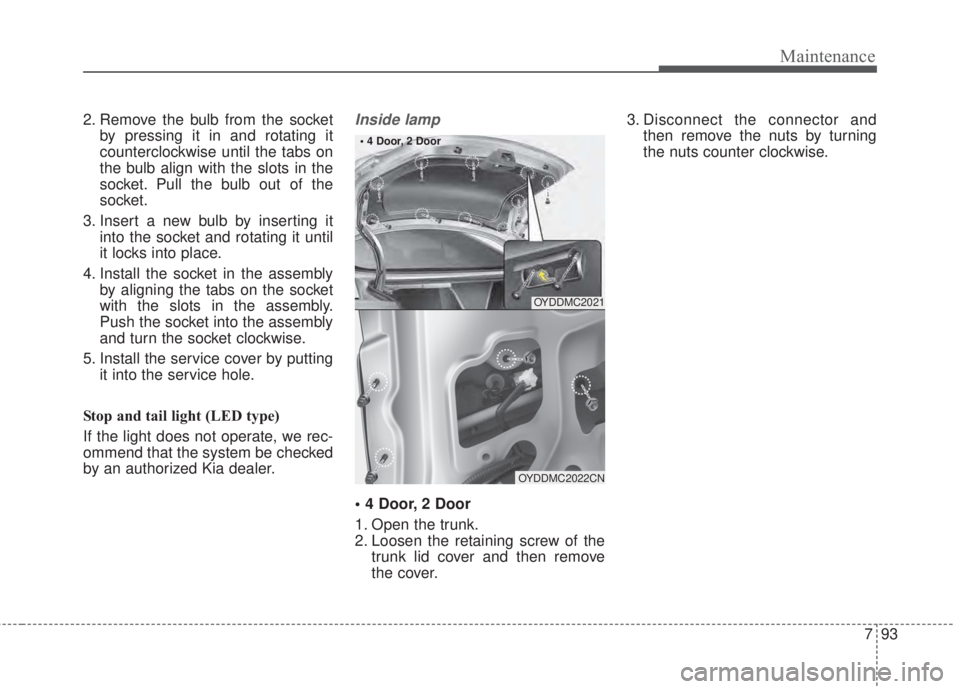
by an authorized Kia dealer.Inside lamp
• 4 Door, 2 Door
1. Open the trunk.
2. Loosen the retaining screw of the
trunk lid cover and then remove
the cover.3. Disconnect the connector and
then remove the nuts by turning
the nuts counter clockwise.
OYDDMC2021
OYDDMC2022CN • 4 Door, 2 Door
Page 556 of 595
Maintenance
94 7
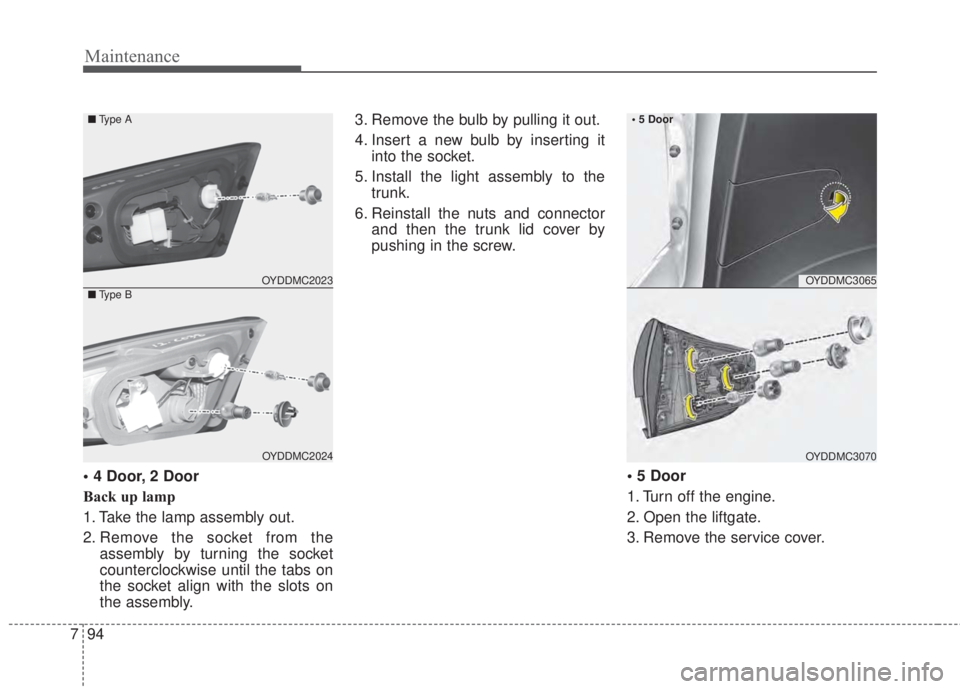
• 4 Door, 2 Door
Back up lamp
1. Take the lamp assembly out.
2. Remove the socket from the
assembly by turning the socket
counterclockwise until the tabs on
the socket align with the slots on
the assembly.3. Remove the bulb by pulling it out.
4. Insert a new bulb by inserting it
into the socket.
5. Install the light assembly to the
trunk.
6. Reinstall the nuts and connector
and then the trunk lid cover by
pushing in the screw.
• 5 Door
1. Turn off the engine.
2. Open the liftgate.
3. Remove the service cover.
OYDDMC3065
OYDDMC3070 • 5 Door
OYDDMC2023
OYDDMC2024 ■Type A
■Type B
Page 557 of 595
795
Maintenance
4. Remove the socket from the
assembly by turning the socket
counterclockwise until the tabs on
the socket align with the slots on
the assembly.
5. Remove the bulb from the socket
by pressing it in and rotating it
counterclockwise until the tabs on
the bulb align with the slots in the
socket. Pull the bulb out of the
socket.
6. Insert a new bulb by inserting it
into the socket and rotating it until
it locks into place.
7. Install the socket in the assembly
by aligning the tabs on the socket
with the slots in the assembly.
Push the socket into the assembly
and turn the socket clockwise.
8. Install the service cover by putting
it into the service hole.
Stop/tail light (LED type)
If the light does not operate, we rec-
ommend that the system be checked
by an authorized Kia dealer.High mounted stop lamp
replacement
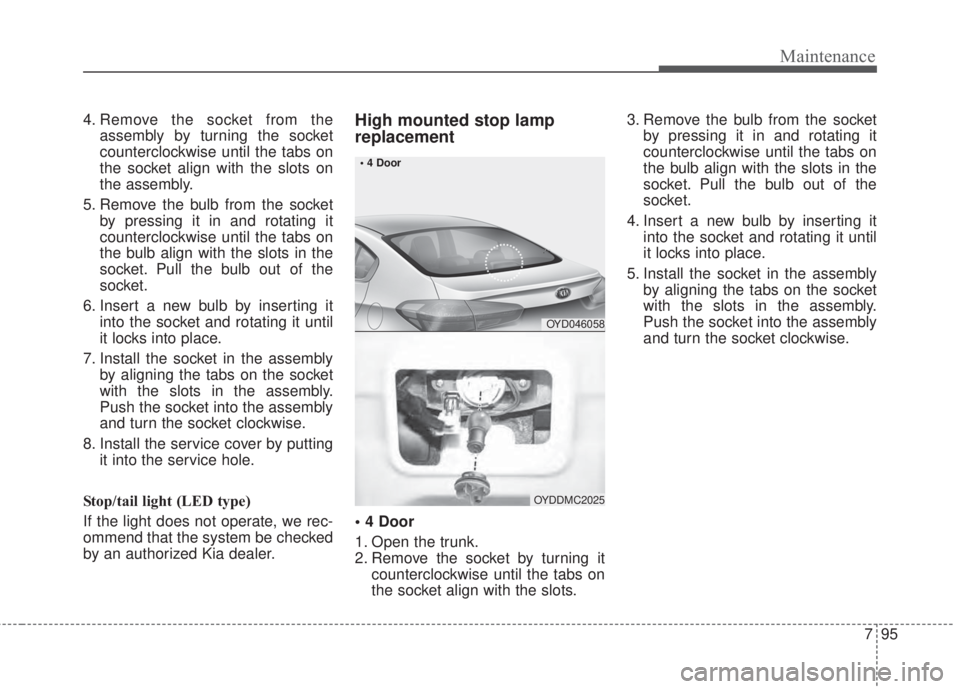
• 4 Door
1. Open the trunk.
2. Remove the socket by turning it
counterclockwise until the tabs on
the socket align with the slots.3. Remove the bulb from the socket
by pressing it in and rotating it
counterclockwise until the tabs on
the bulb align with the slots in the
socket. Pull the bulb out of the
socket.
4. Insert a new bulb by inserting it
into the socket and rotating it until
it locks into place.
5. Install the socket in the assembly
by aligning the tabs on the socket
with the slots in the assembly.
Push the socket into the assembly
and turn the socket clockwise.
OYD046058
OYDDMC2025 • 4 Door
Page 558 of 595
Maintenance
96 7
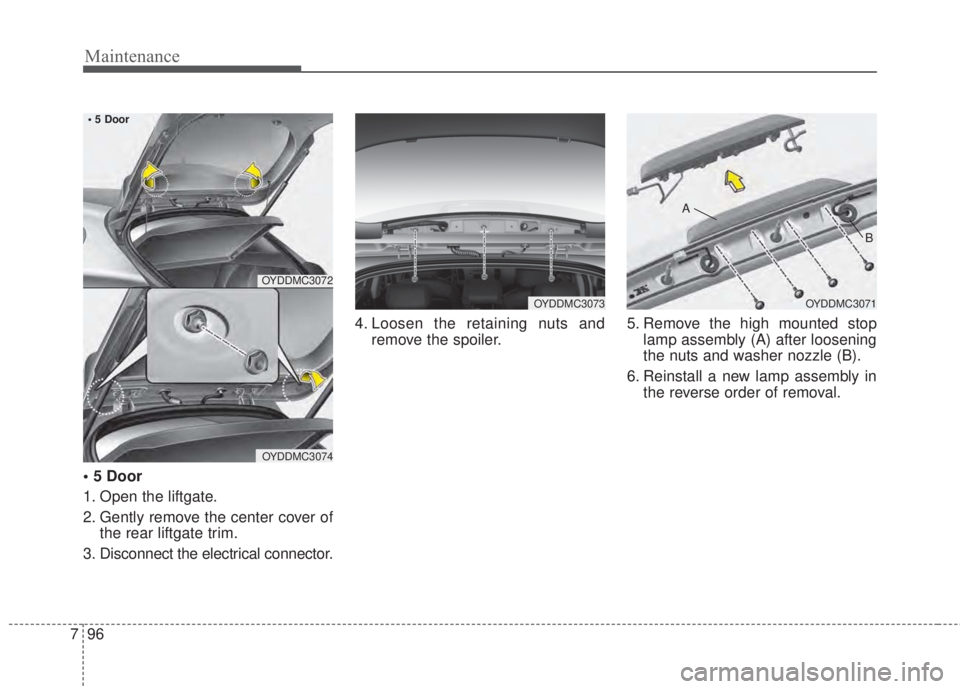
• 5 Door
1. Open the liftgate.
2. Gently remove the center cover of
the rear liftgate trim.
3. Disconnect the electrical connector.4. Loosen the retaining nuts and
remove the spoiler.5. Remove the high mounted stop
lamp assembly (A) after loosening
the nuts and washer nozzle (B).
6. Reinstall a new lamp assembly in
the reverse order of removal.
OYDDMC3072
OYDDMC3074
• 5 Door
OYDDMC3073OYDDMC3071
B A
Page 559 of 595
797
Maintenance
• 2 Door
If the light bulb does not operate, we
recommend the vehicle be checked
by an authorized Kia dealer. A skilled
technician should check or repair the
high mounted stop light, for it may
affect the performance of the curtain
airbags or damage related interior
parts of the vehicle.
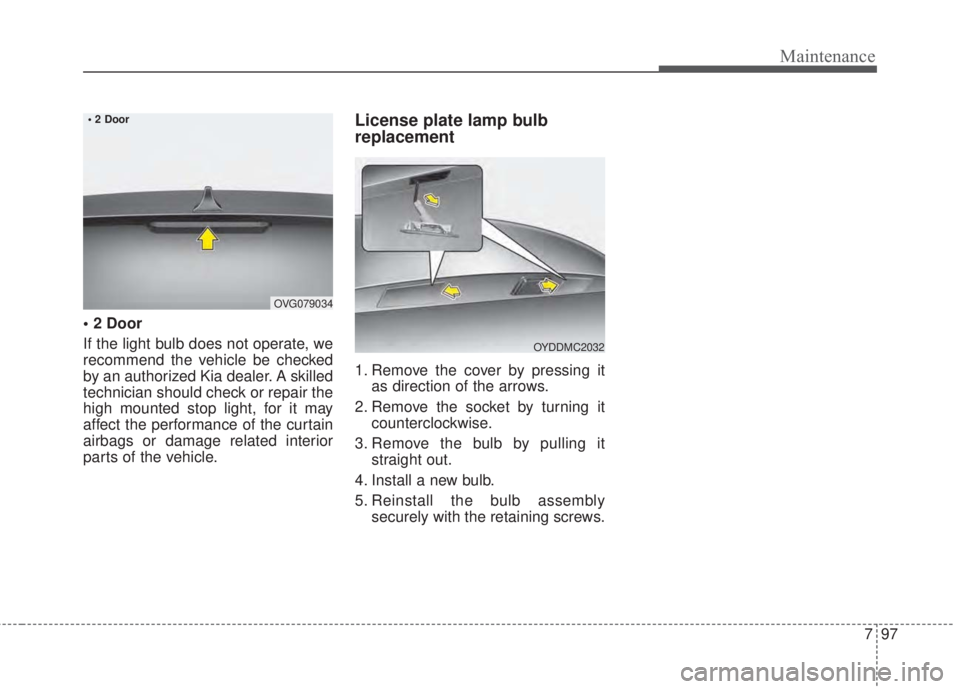
License plate lamp bulb
replacement
1. Remove the cover by pressing it
as direction of the arrows.
2. Remove the socket by turning it
counterclockwise.
3. Remove the bulb by pulling it
straight out.
4. Install a new bulb.
5. Reinstall the bulb assembly
securely with the retaining screws.
OVG079034 • 2 Door
OYDDMC2032
Page 560 of 595
Maintenance
98 7
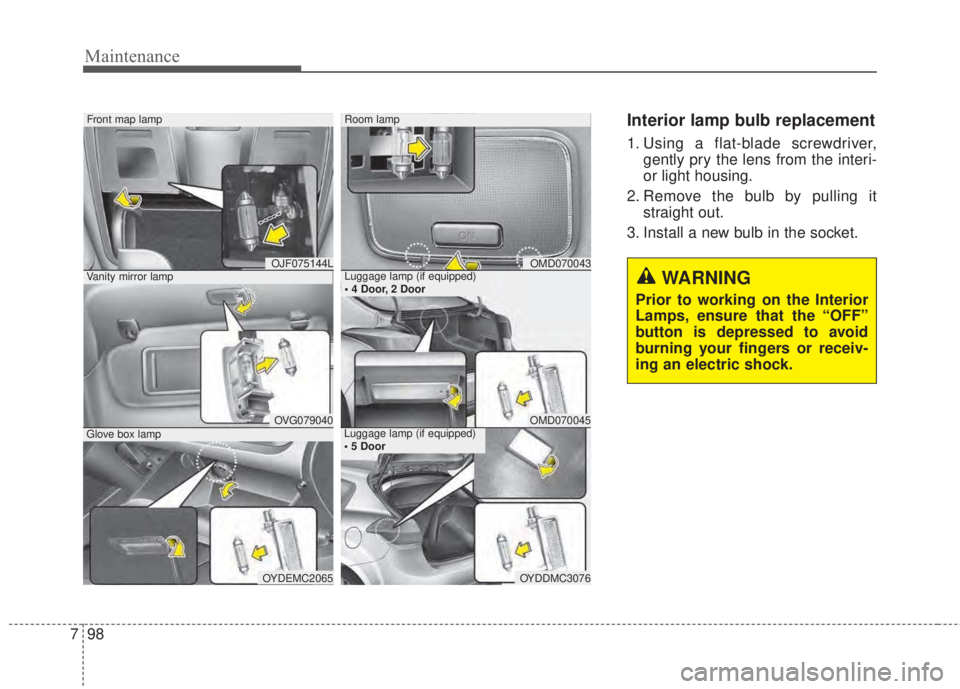
Interior lamp bulb replacement
1. Using a flat-blade screwdriver,
gently pry the lens from the interi-
or light housing.
2. Remove the bulb by pulling it
straight out.
3. Install a new bulb in the socket.
Vanity mirror lamp
Front map lamp
OVG079040Glove box lamp
OYDEMC2065
OJF075144LLuggage lamp (if equipped)
• 4 Door, 2 Door
Room lamp
OMD070045Luggage lamp (if equipped)
• 5 Door
OYDDMC3076
OMD070043
WARNING
Prior to working on the Interior
Lamps, ensure that the “OFF”
button is depressed to avoid
burning your fingers or receiv-
ing an electric shock.
Trending: transmission fluid, caliper, instrument cluster, turn signal bulb, headlamp, change transmission fluid, weight
