lock KIA K900 2015 1.G User Guide
[x] Cancel search | Manufacturer: KIA, Model Year: 2015, Model line: K900, Model: KIA K900 2015 1.GPages: 522, PDF Size: 7.92 MB
Page 50 of 522
Seat and safety features of your vehicle
3
3-33
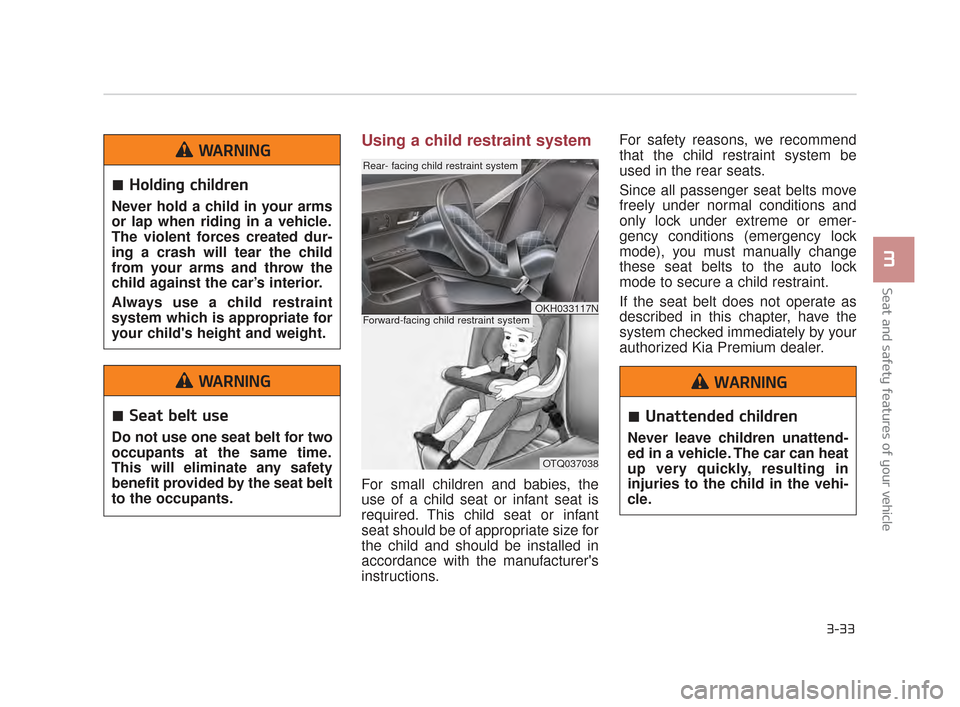
Using a child restraint system
For small children and babies, the
use of a child seat or infant seat is
required. This child seat or infant
seat should be of appropriate size for
the child and should be installed in
accordance with the manufacturer's
instructions. For safety reasons, we recommend
that the child restraint system be
used in the rear seats.
Since all passenger seat belts move
freely under normal conditions and
only lock under extreme or emer-
gency conditions (emergency lock
mode), you must manually change
these seat belts to the auto lock
mode to secure a child restraint.
If the seat belt does not operate as
described in this chapter, have the
system checked immediately by your
authorized Kia Premium dealer.
OTQ037038
Rear- facing child restraint system
Forward-facing child restraint systemOKH033117N
Holding children
Never hold a child in your arms
or lap when riding in a vehicle.
The violent forces created dur-
ing a crash will tear the child
from your arms and throw the
child against the car’s interior.
Always use a child restraint
system which is appropriate for
your child's height and weight.
WARNING
Seat belt use
Do not use one seat belt for two
occupants at the same time.
This will eliminate any safety
benefit provided by the seat belt
to the occupants.
WARNING
Unattended children
Never leave children unattend-
ed in a vehicle. The car can heat
up very quickly, resulting in
injuries to the child in the vehi-
cle.
WARNING
KH CAN (ENG) 3:2015 3/26/2015 6:08 AM Page 33
Page 51 of 522
3-34
Seat and safety features of your vehicle
✽NOTICE
If the vehicle headrest prevents
proper installation of a child seat (as
described in the child seat system
manual), the headrest of the respec-
tive seating position shall be read-
justed or entirely removed.
Placing a passenger seat belt
into the auto lock mode
The auto lock mode will help prevent
the normal movement of the child in
the vehicle from causing the seat belt
to loosen and compromise the child
restraint system. To secure a child
restraint system, use the following
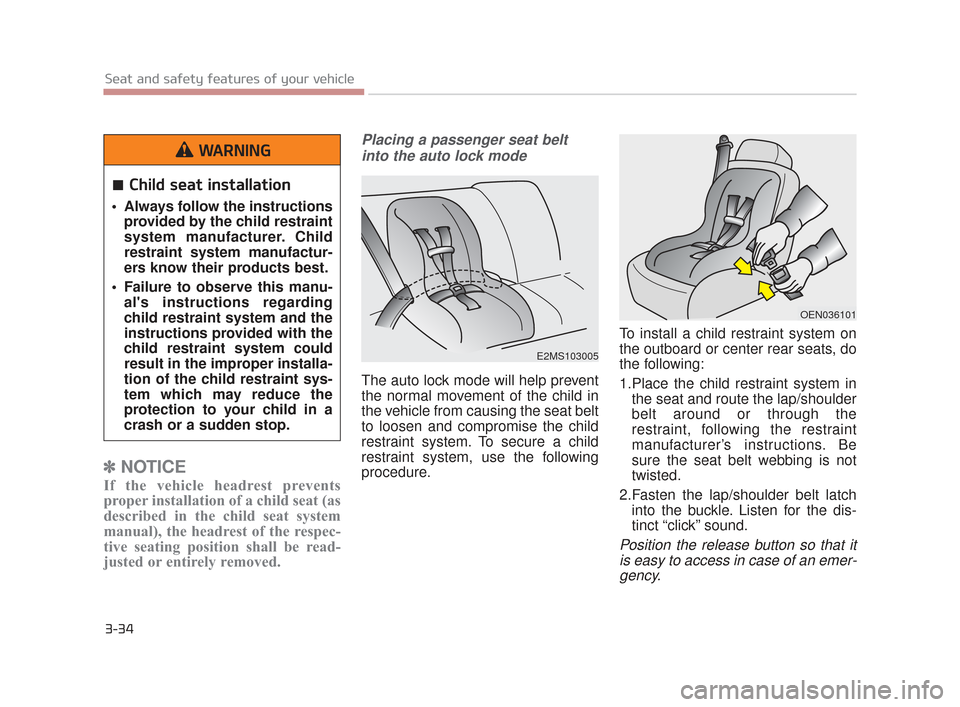
procedure. To install a child restraint system on
the outboard or center rear seats, do
the following:
1.Place the child restraint system in
the seat and route the lap/shoulder
belt around or through the
restraint, following the restraint
manufacturer’s instructions. Be
sure the seat belt webbing is not
twisted.
2.Fasten the lap/shoulder belt latch into the buckle. Listen for the dis-
tinct “click” sound.
Position the release button so that itis easy to access in case of an emer-gency.
E2MS103005
OEN036101
Child seat installation
Always follow the instructions provided by the child restraint
system manufacturer. Child
restraint system manufactur-
ers know their products best.
Failure to observe this manu- al's instructions regarding
child restraint system and the
instructions provided with the
child restraint system could
result in the improper installa-
tion of the child restraint sys-
tem which may reduce the
protection to your child in a
crash or a sudden stop.
WARNING
KH CAN (ENG) 3:2015 3/26/2015 6:08 AM Page 34
Page 52 of 522
Seat and safety features of your vehicle
3
3-35
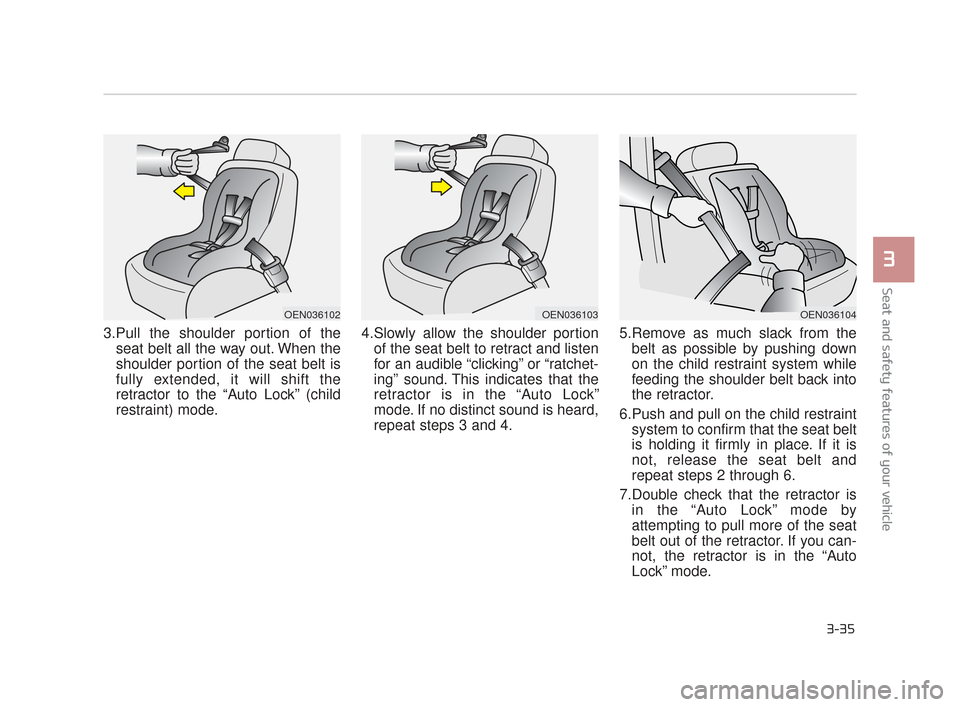
3.Pull the shoulder portion of theseat belt all the way out. When the
shoulder portion of the seat belt is
fully extended, it will shift the
retractor to the “Auto Lock” (child
restraint) mode. 4.Slowly allow the shoulder portion
of the seat belt to retract and listen
for an audible “clicking” or “ratchet-
ing” sound. This indicates that the
retractor is in the “Auto Lock”
mode. If no distinct sound is heard,
repeat steps 3 and 4. 5.Remove as much slack from the
belt as possible by pushing down
on the child restraint system while
feeding the shoulder belt back into
the retractor.
6.Push and pull on the child restraint system to confirm that the seat belt
is holding it firmly in place. If it is
not, release the seat belt and
repeat steps 2 through 6.
7.Double check that the retractor is in the “Auto Lock” mode by
attempting to pull more of the seat
belt out of the retractor. If you can-
not, the retractor is in the “Auto
Lock” mode.
OEN036102OEN036103OEN036104
KH CAN (ENG) 3:2015 3/26/2015 6:08 AM Page 35
Page 53 of 522
3-36
Seat and safety features of your vehicle
The lap/shoulder belt automatically
returns to the “emergency lock
mode” whenever the belt is allowed
to retract fully.
Therefore, the preceding seven
steps must be followed each time a
child restraint is installed.
To remove the child restraint, press
the release button on the buckle and
then pull the lap/shoulder belt out of
the restraint and allow the seat belt
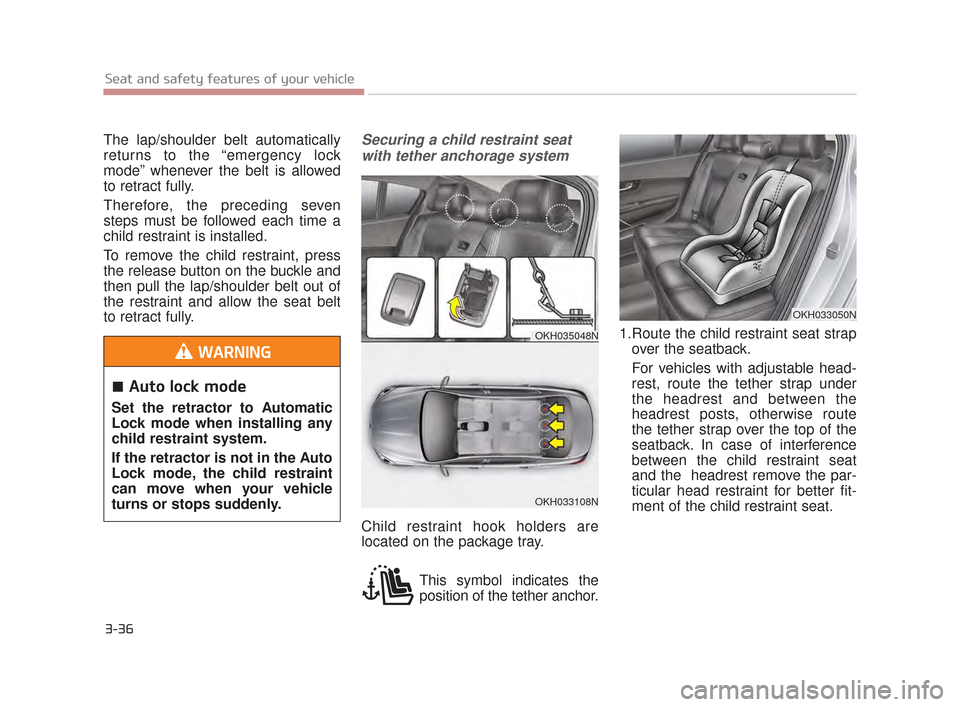
to retract fully.Securing a child restraint seatwith tether anchorage system
Child restraint hook holders are
located on the package tray.
This symbol indicates the
position of the tether anchor. 1.Route the child restraint seat strap
over the seatback.
For vehicles with adjustable head-
rest, route the tether strap under
the headrest and between the
headrest posts, otherwise route
the tether strap over the top of the
seatback. In case of interference
between the child restraint seat
and the headrest remove the par-
ticular head restraint for better fit-
ment of the child restraint seat.
OKH033108N
OKH033050N
OKH035048N
Auto lock mode
Set the retractor to Automatic
Lock mode when installing any
child restraint system.
If the retractor is not in the Auto
Lock mode, the child restraint
can move when your vehicle
turns or stops suddenly.
WARNING
KH CAN (ENG) 3:2015 3/26/2015 6:08 AM Page 36
Page 55 of 522
3-38
Seat and safety features of your vehicle
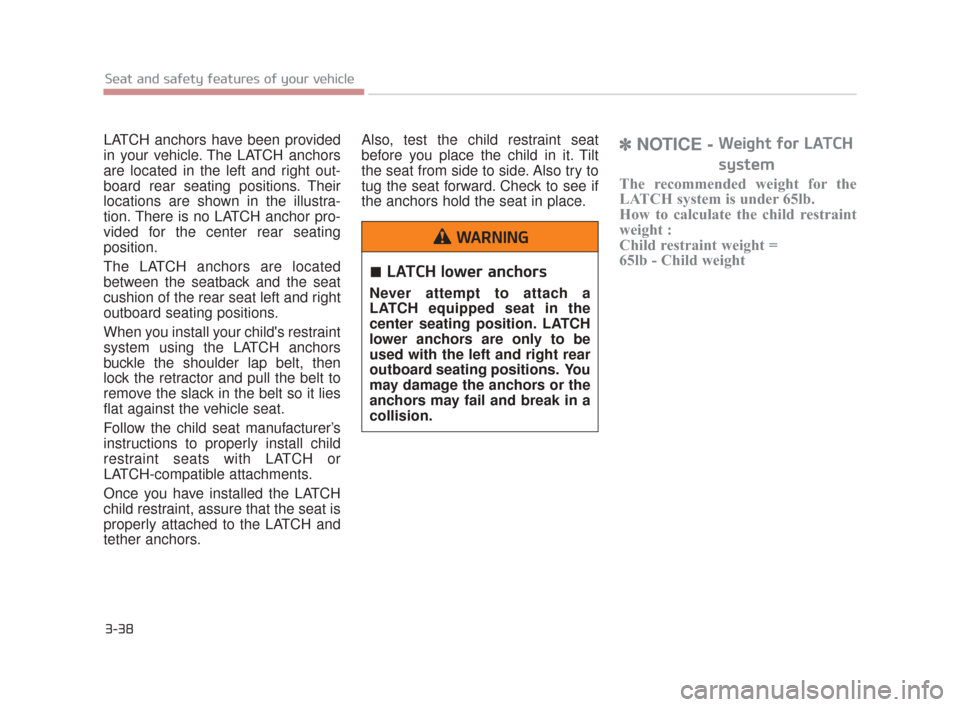
LATCH anchors have been provided
in your vehicle. The LATCH anchors
are located in the left and right out-
board rear seating positions. Their
locations are shown in the illustra-
tion. There is no LATCH anchor pro-
vided for the center rear seating
position.
The LATCH anchors are located
between the seatback and the seat
cushion of the rear seat left and right
outboard seating positions.
When you install your child's restraint
system using the LATCH anchors
buckle the shoulder lap belt, then
lock the retractor and pull the belt to
remove the slack in the belt so it lies
flat against the vehicle seat.
Follow the child seat manufacturer’s
instructions to properly install child
restraint seats with LATCH or
LATCH-compatible attachments.
Once you have installed the LATCH
child restraint, assure that the seat is
properly attached to the LATCH and
tether anchors.Also, test the child restraint seat
before you place the child in it. Tilt
the seat from side to side. Also try to
tug the seat forward. Check to see if
the anchors hold the seat in place.✽
NOTICE - Weight for LATCH
system
The recommended weight for the
LATCH system is under 65lb.
How to calculate the child restraint
weight :
Child restraint weight =
65lb - Child weight
LATCH lower anchors
Never attempt to attach a
LATCH equipped seat in the
center seating position. LATCH
lower anchors are only to be
used with the left and right rear
outboard seating positions. You
may damage the anchors or the
anchors may fail and break in a
collision.
WARNING
KH CAN (ENG) 3:2015 3/26/2015 6:08 AM Page 38
Page 80 of 522
Features of your vehicle
4
Features of your vehicle
Smart key............................................................4-4
.........................................4-4
............................................4-6
...............4-7
...........................................4-8
................................................4-9
....................................4-11
Theft-alarm system ...........................................4-14
..........................................................4-14
..................................................4-15
.....................................................4-15
Door locks .........................................................4-17
......4-17
...................................................4-18
........4-18
......................4-20
................................4-20
Trunk .................................................................4-21
................................................4-21
...........................................................4-22
.........................................4-25
...........................................................4-27
Windows ...........................................................4-31
.....................................4-34
Hood .................................................................4-35
...................................................4-36
Fuel filler lid.......................................................4-37
.......................................4-37
.........................................4-37
............................4-39
Panoramic sunroof ............................................4-40
...........................................4-40
................................................4-41
...............................................4-41
..................................................4-42
..............................................................4-43
............................................4-44
Steering wheel ..................................................4-45
.............................4-45
..........................................4-46
......................................................................4-\
47
Mirrors ...............................................................4-48
.........................................4-56
Instrument cluster .............................................4-60
......................................4-61
4
KH CAN (ENG) 4:2015 3/26/2015 10:36 AM Page 1
Page 83 of 522
Record your key number
The key code num-
ber is stamped on
the key code tag
attached to the key
set. Should you
lose your keys, this number will
enable an authorized Kia Premium
dealer to duplicate the keys easily.
Remove the key code tag and store it
in a safe place. Also, record the key
code number and keep it in a safe
and handy place, but not in the vehi-
cle.
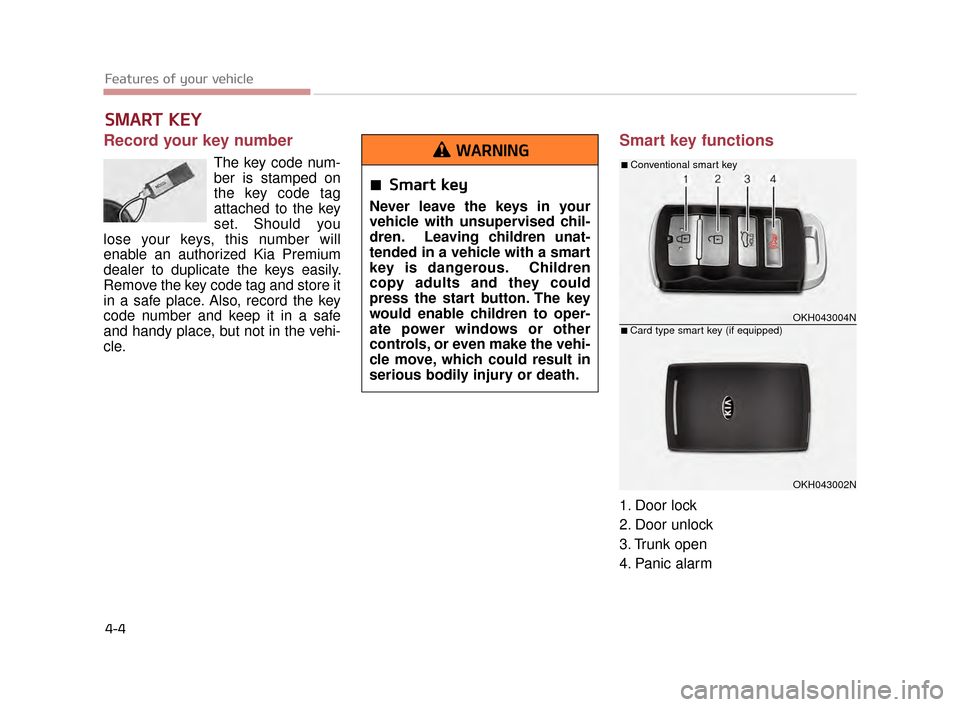
Smart key functions
1. Door lock
2. Door unlock
3. Trunk open
4. Panic alarm
SMART KEY
Features of your vehicle
4-4
OKH043004N
OKH043002N
■ Conventional smart key
■ Card type smart key (if equipped)
Smart key
Never leave the keys in your
vehicle with unsupervised chil-
dren. Leaving children unat-
tended in a vehicle with a smart
key is dangerous. Children
copy adults and they could
press the start button. The key
would enable children to oper-
ate power windows or other
controls, or even make the vehi-
cle move, which could result in
serious bodily injury or death.
WARNING
KH CAN (ENG) 4:2015 3/26/2015 10:36 AM Page 4
Page 84 of 522
With smart key, you can lock or
unlock doors (and trunk) and start
the engine without inserting the key.
Refer to the following, for more
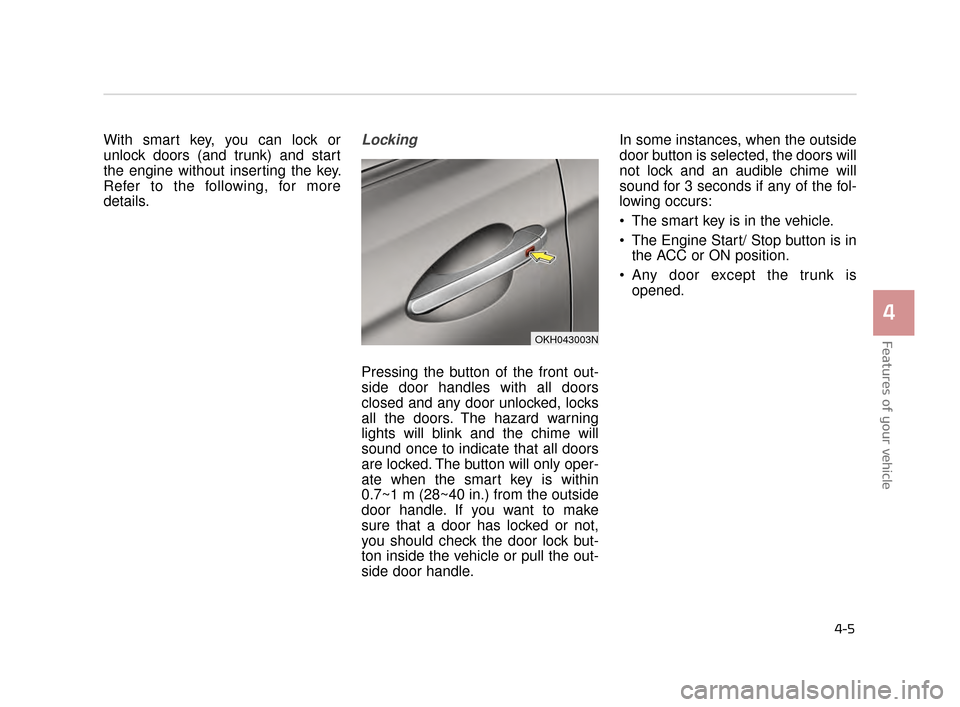
details.Locking
Pressing the button of the front out-
side door handles with all doors
closed and any door unlocked, locks
all the doors. The hazard warning
lights will blink and the chime will
sound once to indicate that all doors
are locked. The button will only oper-
ate when the smart key is within
0.7~1 m (28~40 in.) from the outside
door handle. If you want to make
sure that a door has locked or not,
you should check the door lock but-
ton inside the vehicle or pull the out-
side door handle.In some instances, when the outside
door button is selected, the doors will
not lock and an audible chime will
sound for 3 seconds if any of the fol-
lowing occurs:
The smart key is in the vehicle.
The Engine Start/ Stop button is in
the ACC or ON position.
Any door except the trunk is opened.
Features of your vehicle
4
4-5
OKH043003N
KH CAN (ENG) 4:2015 3/26/2015 10:36 AM Page 5
Page 85 of 522
Features of your vehicle
4-6
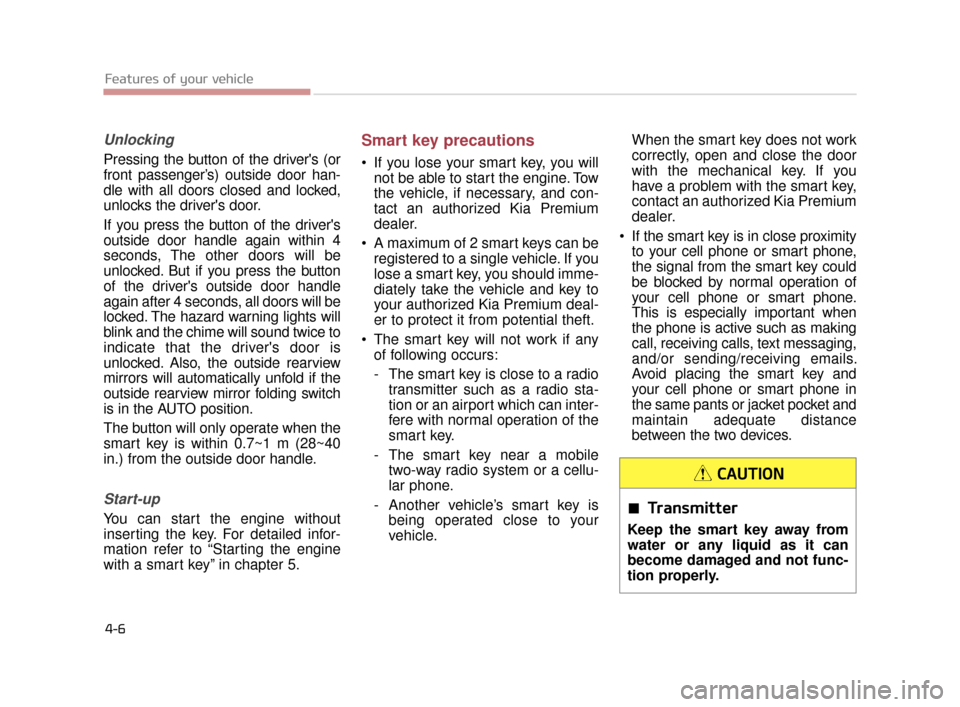
Unlocking
Pressing the button of the driver's (or
front passenger’s) outside door han-
dle with all doors closed and locked,
unlocks the driver's door.
If you press the button of the driver's
outside door handle again within 4
seconds, The other doors will be
unlocked. But if you press the button
of the driver's outside door handle
again after 4 seconds, all doors will be
locked. The hazard warning lights will
blink and the chime will sound twice to
indicate that the driver's door is
unlocked. Also, the outside rearview
mirrors will automatically unfold if the
outside rearview mirror folding switch
is in the AUTO position.
The button will only operate when the
smart key is within 0.7~1 m (28~40
in.) from the outside door handle.
Start-up
You can start the engine without
inserting the key. For detailed infor-
mation refer to “Starting the engine
with a smart key” in chapter 5.
Smart key precautions
If you lose your smart key, you willnot be able to start the engine. Tow
the vehicle, if necessary, and con-
tact an authorized Kia Premium
dealer.
A maximum of 2 smart keys can be registered to a single vehicle. If you
lose a smart key, you should imme-
diately take the vehicle and key to
your authorized Kia Premium deal-
er to protect it from potential theft.
The smart key will not work if any of following occurs:
- The smart key is close to a radio transmitter such as a radio sta-
tion or an airport which can inter-
fere with normal operation of the
smart key.
- The smart key near a mobile two-way radio system or a cellu-
lar phone.
- Another vehicle’s smart key is being operated close to your
vehicle. When the smart key does not work
correctly, open and close the door
with the mechanical key. If you
have a problem with the smart key,
contact an authorized Kia Premium
dealer.
If the smart key is in close proximity to your cell phone or smart phone,
the signal from the smart key could
be blocked by normal operation of
your cell phone or smart phone.
This is especially important when
the phone is active such as making
call, receiving calls, text messaging,
and/or sending/receiving emails.
Avoid placing the smart key and
your cell phone or smart phone in
the same pants or jacket pocket and
maintain adequate distance
between the two devices.
Transmitter
Keep the smart key away from
water or any liquid as it can
become damaged and not func-
tion properly.
CAUTION
KH CAN (ENG) 4:2015 3/26/2015 10:36 AM Page 6
Page 86 of 522
Features of your vehicle
4
4-7
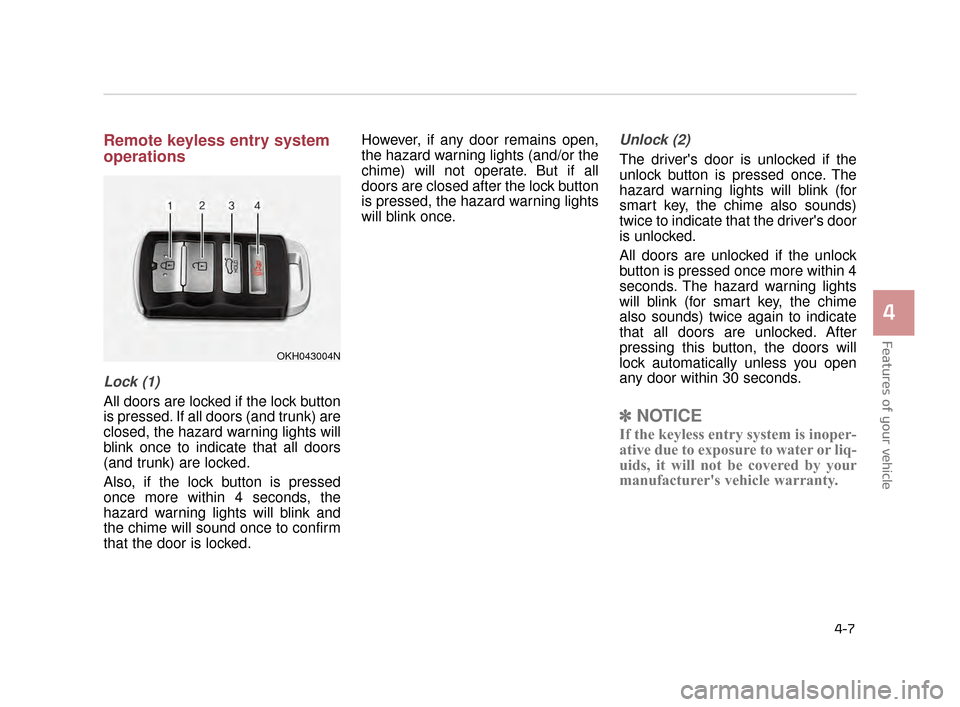
Remote keyless entry system
operations
Lock (1)
All doors are locked if the lock button
is pressed. If all doors (and trunk) are
closed, the hazard warning lights will
blink once to indicate that all doors
(and trunk) are locked.
Also, if the lock button is pressed
once more within 4 seconds, the
hazard warning lights will blink and
the chime will sound once to confirm
that the door is locked.However, if any door remains open,
the hazard warning lights (and/or the
chime) will not operate. But if all
doors are closed after the lock button
is pressed, the hazard warning lights
will blink once.
Unlock (2)
The driver's door is unlocked if the
unlock button is pressed once. The
hazard warning lights will blink (for
smart key, the chime also sounds)
twice to indicate that the driver's door
is unlocked.
All doors are unlocked if the unlock
button is pressed once more within 4
seconds. The hazard warning lights
will blink (for smart key, the chime
also sounds) twice again to indicate
that all doors are unlocked. After
pressing this button, the doors will
lock automatically unless you open
any door within 30 seconds.
✽
NOTICE
If the keyless entry system is inoper-
ative due to exposure to water or liq-
uids, it will not be covered by your
manufacturer's vehicle warranty.
OKH043004N
KH CAN (ENG) 4:2015 3/26/2015 10:36 AM Page 7