battery replacement KIA NIRO 2017 Owners Manual
[x] Cancel search | Manufacturer: KIA, Model Year: 2017, Model line: NIRO, Model: KIA NIRO 2017Pages: 552, PDF Size: 14.92 MB
Page 110 of 552
47
Features of your vehicle
When the transmitter does not workcorrectly, open and close the door
with the ignition key. If you have a
problem with the transmitter, con-
tact an authorized Kia dealer.
If the transmitter is in close proxim- ity to your mobile phone, the signal
could be blocked by your mobile
phones normal operational signals.
This is especially important when
the phone is active such as making
and receiving calls, text messag-
ing, and/or sending/receiving
emails. Avoid placing the transmit-
ter and your mobile phone in the
same pants or jacket pocket and
always try to maintain an adequate
distance between the two devices.
✽ ✽ NOTICE
If the keyless entry system is inoper-
ative due to exposure to water or liq-
uids, it will not be covered by your
manufacturer’s vehicle warranty.
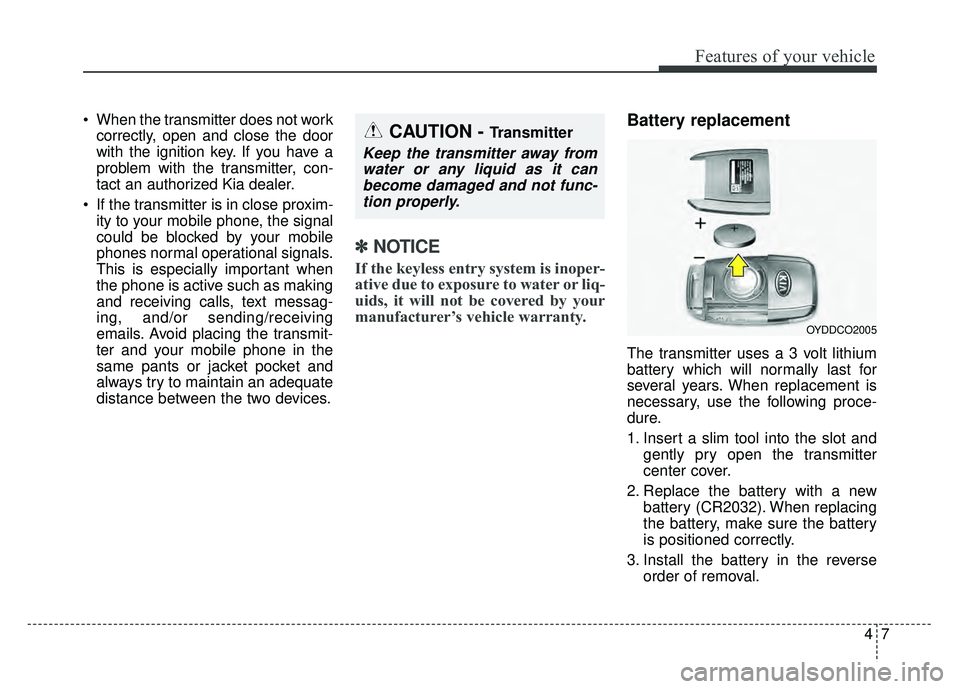
Battery replacement
The transmitter uses a 3 volt lithium
battery which will normally last for
several years. When replacement is
necessary, use the following proce-
dure.
1. Insert a slim tool into the slot and
gently pry open the transmitter
center cover.
2. Replace the battery with a new battery (CR2032). When replacing
the battery, make sure the battery
is positioned correctly.
3. Install the battery in the reverse order of removal.
OYDDCO2005
CAUTION - Transmitter
Keep the transmitter away fromwater or any liquid as it canbecome damaged and not func-tion properly.
Page 111 of 552
Features of your vehicle
84
For replacement transmitters, see an
authorized Kia dealer for transmitter
reprogramming.
The transmitter is designed to giveyou years of trouble-free use, how-
ever it can malfunction if exposed to
moisture or static electricity. If you
are unsure how to use your trans-
mitter or replace the battery, contact
an authorized Kia dealer.
Using the wrong battery can cause the transmitter to malfunction. Be
sure to use the correct battery.
To avoid damaging the transmitter, don't drop it, get it wet, or expose it
to heat or sunlight.
An inappropriately dis- posed battery can be
harmful to the environment
and may cause harm to
human health. Dispose the
battery according to your
local law(s) or regulation.Immobilizer system
(if equipped)
Your vehicle is equipped with an
electronic engine immobilizer system
to reduce the risk of unauthorized
vehicle use.
Your immobilizer system is com-
prised of a small transponder in the
ignition key and electronic devices
inside the vehicle.
With the immobilizer system, when-
ever you insert your ignition key into
the ignition switch and turn it to ON,
verifies if the ignition key is valid.
If the key is determined to be valid,
the engine will start.
If the key is determined to be invalid,
the engine will not start.
CAUTION - Transmitter
damage
Do not drop, wet or expose the keyless entry system transmit-ter to heat or sunlight.
Page 118 of 552
415
Features of your vehicle
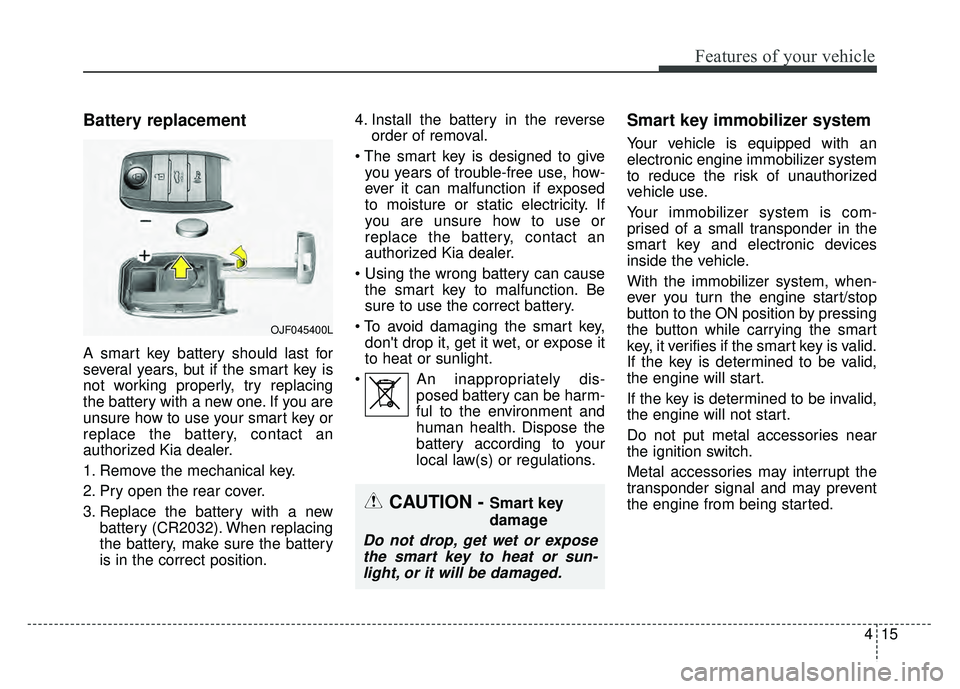
Battery replacement
A smart key battery should last for
several years, but if the smart key is
not working properly, try replacing
the battery with a new one. If you are
unsure how to use your smart key or
replace the battery, contact an
authorized Kia dealer.
1. Remove the mechanical key.
2. Pry open the rear cover.
3. Replace the battery with a newbattery (CR2032). When replacing
the battery, make sure the battery
is in the correct position. 4. Install the battery in the reverse
order of removal.
you years of trouble-free use, how-
ever it can malfunction if exposed
to moisture or static electricity. If
you are unsure how to use or
replace the battery, contact an
authorized Kia dealer.
the smart key to malfunction. Be
sure to use the correct battery.
don't drop it, get it wet, or expose it
to heat or sunlight.
An inappropriately dis- posed battery can be harm-
ful to the environment and
human health. Dispose the
battery according to your
local law(s) or regulations.
Smart key immobilizer system
Your vehicle is equipped with an
electronic engine immobilizer system
to reduce the risk of unauthorized
vehicle use.
Your immobilizer system is com-
prised of a small transponder in the
smart key and electronic devices
inside the vehicle.
With the immobilizer system, when-
ever you turn the engine start/stop
button to the ON position by pressing
the button while carrying the smart
key, it verifies if the smart key is valid.
If the key is determined to be valid,
the engine will start.
If the key is determined to be invalid,
the engine will not start.
Do not put metal accessories near
the ignition switch.
Metal accessories may interrupt the
transponder signal and may prevent
the engine from being started.
OJF045400L
CAUTION - Smart key
damage
Do not drop, get wet or exposethe smart key to heat or sun-light, or it will be damaged.
Page 409 of 552
What to do in an emergency
28
7
The system of compressor and seal-
ing compound effectively and com-
fortably seals most punctures in a
passenger car tire caused by nails or
similar objects and reinflates the tire.
After you ensured that the tire is prop-
erly sealed you can drive cautiously on
the tire (up to 120 miles (200 km)) at a
max. speed of 50 mph (80 km/h) in
order to reach a service station or tire
dealer to have the tire replacement.
It is possible that some tires, especially
with larger punctures or damage to the
sidewall, cannot be sealed completely.
Air pressure loss in the tire may
adversely affect tire performance.
For this reason, you should avoid
abrupt steering or other driving
maneuvers, especially if the vehicle is
heavily loaded or if a trailer is in use.
The Tire Mobility Kit is not designed
or intended as a permanent tire
repair method and is to be used for
one tire only.
This instruction shows you step by
step procedure to temporarily seal
the puncture.
Read the section "Notes on the safe
use of the Tire Mobility Kit".Notes on the safe use of the
Tire Mobility Kit
Park your car at the side of the
road so that you can work with the
Tire Mobility Kit away from moving
traffic.
To be sure your vehicle will not move, even when you're on fairly
level ground, always set your park-
ing brake.
Only use the Tire Mobility Kit for sealing/inflation passenger car
tires. Only punctured areas located
within the tread region of the tire
can be sealed using the Tire
Mobility Kit.
Do not use on motorcycles, bicy- cles or any other type of tires.
When the tire and wheel are dam- aged, do not use Tire Mobility Kit
for your safety. Use of the Tire Mobility Kit may not
be effective for tire damage larger
than approximately 0.24 in (6 mm).
Please contact the nearest Kia
dealership if the tire cannot be
made roadworthy with the Tire
Mobility Kit.
Do not use the Tire Mobility Kit if a tire is severely damaged by driving
run flat or with insufficient air pres-
sure.
Do not remove any foreign objects such as nails or screws that have
penetrated the tire.
Provided the car is outdoors, leave the engine running. Otherwise
operating the compressor may
eventually drain the car battery.
Never leave the Tire Mobility Kit unattended while it is being used.
Do not leave the compressor run- ning for more than 10 min. at a time
or it may overheat.
Do not use the Tire Mobility Kit if the ambient temperature is below -
22°F (-30°C).
Page 481 of 552
Maintenance
58
8
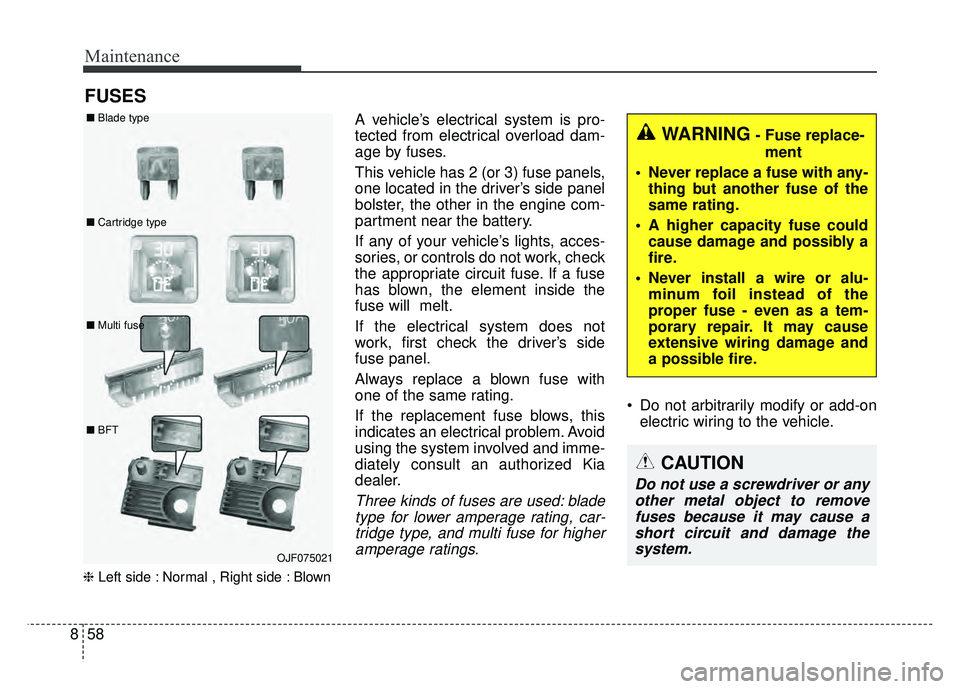
FUSES
❈ Left side : Normal , Right side : Blown
A vehicle’s electrical system is pro-
tected from electrical overload dam-
age by fuses.
This vehicle has 2 (or 3) fuse panels,
one located in the driver’s side panel
bolster, the other in the engine com-
partment near the battery.
If any of your vehicle’s lights, acces-
sories, or controls do not work, check
the appropriate circuit fuse. If a fuse
has blown, the element inside the
fuse will melt.
If the electrical system does not
work, first check the driver’s side
fuse panel.
Always replace a blown fuse with
one of the same rating.
If the replacement fuse blows, this
indicates an electrical problem. Avoid
using the system involved and imme-
diately consult an authorized Kia
dealer.
Three kinds of fuses are used: blade
type for lower amperage rating, car-tridge type, and multi fuse for higheramperage ratings.
Do not arbitrarily modify or add-on electric wiring to the vehicle.
WARNING- Fuse replace-
ment
Never replace a fuse with any- thing but another fuse of the
same rating.
A higher capacity fuse could cause damage and possibly a
fire.
Never install a wire or alu- minum foil instead of the
proper fuse - even as a tem-
porary repair. It may cause
extensive wiring damage and
a possible fire.
CAUTION
Do not use a screwdriver or anyother metal object to removefuses because it may cause ashort circuit and damage thesystem.
OJF075021
■
Blade type
■ Cartridge type
■ Multi fuse
■ BFT
Page 482 of 552
859
Maintenance
✽
✽NOTICE
• When replacing fuse, turn the
ignition “OFF” and turn off
switches of all electrical devices
then remove battery (-) terminal.
• The actual fuse/relay panel label may differ from equipped items.
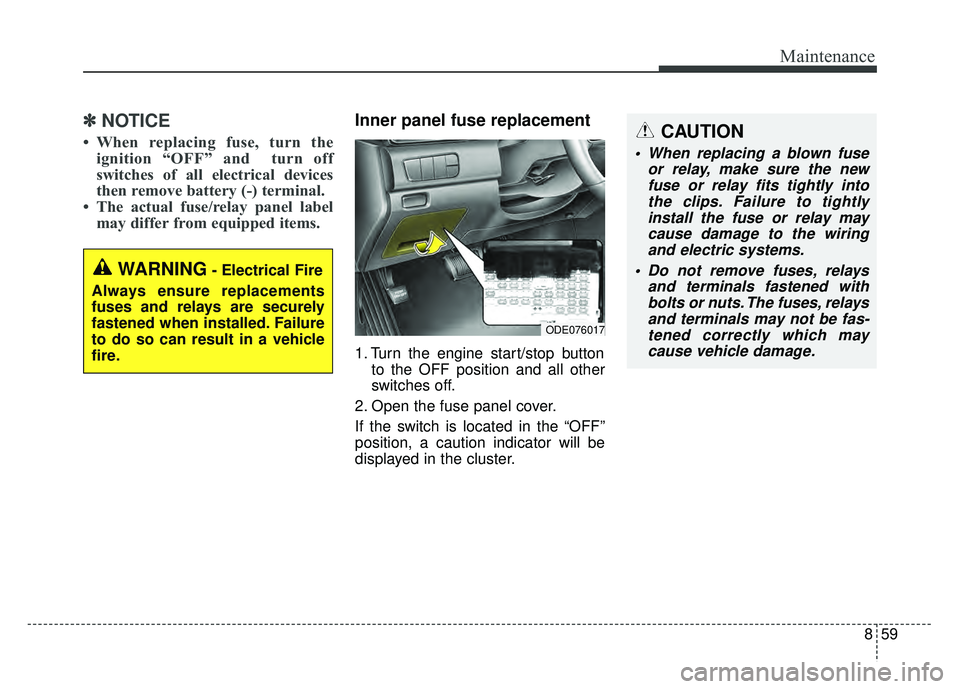
Inner panel fuse replacement
1. Turn the engine start/stop button
to the OFF position and all other
switches off.
2. Open the fuse panel cover.
If the switch is located in the “OFF”
position, a caution indicator will be
displayed in the cluster.
WARNING- Electrical Fire
Always ensure replacements
fuses and relays are securely
fastened when installed. Failure
to do so can result in a vehicle
fire.
CAUTION
When replacing a blown fuse or relay, make sure the newfuse or relay fits tightly intothe clips. Failure to tightlyinstall the fuse or relay maycause damage to the wiringand electric systems.
Do not remove fuses, relays and terminals fastened withbolts or nuts. The fuses, relaysand terminals may not be fas-tened correctly which maycause vehicle damage.
ODE076017
Page 498 of 552

875
Maintenance
LIGHT BULBS
Bulb replacement precaution
Please keep extra bulbs on hand
with appropriate wattage ratings in
case of emergencies.
Refer to “Bulb Wattage” in chapter 9.
When changing lamps, first turn off
the engine at a safe place, firmly
apply the parking brake and detach
the battery’s negative (-) terminal.
Use only bulbs of the specifiedwattage.✽ ✽ NOTICE
• If the light bulb or lamp connector
is removed while the lamp is still
on, the fuse box's electronic sys-
tem may log it as a malfunction.
Therefore, a lamp malfunction
incident may be recorded as a
Diagnostic Trouble Code (DTC) in
the fuse box.
• It is normal for an operating lamp to flicker momentarily. This is due
to a stabilization function of the
vehicle’s electronic control device.
If the lamp lights up normally
after momentarily blinking, then
it is functioning as normal.
However, if the lamp continues to
flicker several times or turns off
completely, there may be an error
in the vehicle’s electronic control
device. Please have the vehicle
checked by an authorized Kia
dealer immediately.
WARNING- Working on
the lights
Prior to working on the light,
firmly apply the parking brake,
ensure that the engine
start/stop button is in OFF posi-
tion and turn off the lights to
avoid sudden movement of the
vehicle and burning your fingers
or receiving an electric shock.
CAUTION -Light replace-
ment
Be sure to replace the burned- out bulb with one of the samewattage rating. Otherwise, itmay cause damage to the fuseor electric wiring system.
CAUTION -Headlamp
Lens
To prevent damage, do notclean the headlamp lens withchemical solvents or strongdetergents.
Page 540 of 552
I3
Index
Back-up lamp bulb replacement . . . . . . . . . . . . . . . . . . 8-83
Battery saver function . . . . . . . . . . . . . . . . . . . . . . . . . 4-100
Before driving . . . . . . . . . . . . . . . . . . . . . . . . . . . . . . . . . 6-4
Before Jump Starting . . . . . . . . . . . . . . . . . . . . . . . . . . . 7-5
Blind Spot Detection System(BSD) . . . . . . . . . . . . . . . 6-66BSD (Blind Spot Detection) /LCA (Lane Change Assist) . . . . . . . . . . . . . . . . . . 6-67
Limitations condition . . . . . . . . . . . . . . . . . . . . . . . . 6-72
RCTA (Rear cross traffic alert . . . . . . . . . . . . . . . . . 6-70
Bonnet see the hood . . . . . . . . . . . . . . . . . . . . . . . . . . . 4-32
Brake fluid . . . . . . . . . . . . . . . . . . . . . . . . . . . . . . . . . . 8-31\
Checking the brake fluid level . . . . . . . . . . . . . . . . . 8-31
Brake system. . . . . . . . . . . . . . . . . . . . . . . . . . . . . . . . . 6-23 Anti-lock brake system (ABS) . . . . . . . . . . . . . . . . . 6-27
Electronic stability control (ESC) . . . . . . . . . . . . . . 6-29
Hill-start assist control (HAC) . . . . . . . . . . . . . . . . . 6-34
Parking brake . . . . . . . . . . . . . . . . . . . . . . . . . . . . . 6-25
Power brakes . . . . . . . . . . . . . . . . . . . . . . . . . . . . . . 6-23
Vehicle stability management (VSM) . . . . . . . . . . . 6-32
Bulb replacement . . . . . . . . . . . . . . . . . . . . . . . . . . . . . 8-75
Bulb replacement precaution . . . . . . . . . . . . . . . . . . . . 8-75
Bulb wattage . . . . . . . . . . . . . . . . . . . . . . . . . . . . . . . . . . 9-3
Button start/stop, see engine start/stop button . . . . . . . . 6-9 California Perchlorate notice . . . . . . . . . . . . . . . . . . . . 8-99
Camera (Rear view) . . . . . . . . . . . . . . . . . . . . . . . . . . . 4-99
Capacities (Lubricants) . . . . . . . . . . . . . . . . . . . . . . . . . . 9-6
Care
Care of seat belts . . . . . . . . . . . . . . . . . . . . . . . . . . . 3-30
Exterior care . . . . . . . . . . . . . . . . . . . . . . . . . . . . . . . 8-88
Interior care . . . . . . . . . . . . . . . . . . . . . . . . . . . . . . . 8-93
SRS Care . . . . . . . . . . . . . . . . . . . . . . . . . . . . . . . . . 3-66
Tire care . . . . . . . . . . . . . . . . . . . . . . . . . . . . . . . . . . 8-43\
Care of seat belts . . . . . . . . . . . . . . . . . . . . . . . . . . . . . 3-30
Center console storage . . . . . . . . . . . . . . . . . . . . . . . . 4-133
Central door lock switch. . . . . . . . . . . . . . . . . . . . . . . . 4-22
Certification label . . . . . . . . . . . . . . . . . . . . . . . . . . . . . 6-92
Chains - Tire . . . . . . . . . . . . . . . . . . . . . . . . . . . . . . . . . 6-86
Checking tire inflation pressure . . . . . . . . . . . . . . . . . . 8-44
Child restraint system . . . . . . . . . . . . . . . . . . . . . . . . . . 3-31 Installing a Child Restraint System (CRS) . . . . . . . 3-35
"Securing a child restraint seatwith ""Tether Anchor"" system" . . . . . . . . . . . . . . . . . . . 3-38
"Securing a child restraint withthe LATCH anchors system" . . . . . . . . . . . . . . . . . . . . . . . . . . . 3-37
Selecting a Child Restraint System (CRS) . . . . . . . 3-32
Child-protector rear door lock . . . . . . . . . . . . . . . . . . . 4-23
Clean air . . . . . . . . . . . . . . . . . . . . . . . . . . . . . . . . . . . 4-\
132
BC
Page 543 of 552
Index
6I
Drive shafts and boots . . . . . . . . . . . . . . . . . . . . . . . 8-24
Dual clutch transmission fluid . . . . . . . . . . . . . . . . . 8-22
Engine oil and filter . . . . . . . . . . . . . . . . . . . . . . . . . 8-21
Exhaust pipe and muffler . . . . . . . . . . . . . . . . . . . . . 8-24
Fuel filter (for gasoline) . . . . . . . . . . . . . . . . . . . . . . 8-21
Fuel lines, fuel hoses and connections . . . . . . . . . . . 8-21
HSG (Hybrid starter & generator) belt . . . . . . . . . . 8-21
Parking brake . . . . . . . . . . . . . . . . . . . . . . . . . . . . . 8-24
Spark plugs . . . . . . . . . . . . . . . . . . . . . . . . . . . . . . . . 8-22
Steering gear box, linkage & boots/lower arm ball joint . . . . . . . . . . . . . . . . . . . . . . . . 8-24
Suspension mounting bolts . . . . . . . . . . . . . . . . . . . 8-24
Vacuum crankcase ventilation hoses . . . . . . . . . . . . 8-22
Vapor hose and fuel filler cap . . . . . . . . . . . . . . . . . 8-21
Exterior care . . . . . . . . . . . . . . . . . . . . . . . . . . . . . . . . . 8-88
Exterior features . . . . . . . . . . . . . . . . . . . . . . . . . . . . . 4-149 Roof rack . . . . . . . . . . . . . . . . . . . . . . . . . . . . . . . . 4-149
Exterior overview (Front) . . . . . . . . . . . . . . . . . . . . . . . . 2-2
Exterior overview (Rear) . . . . . . . . . . . . . . . . . . . . . . . . 2-3
Flat tire . . . . . . . . . . . . . . . . . . . . . . . . . . . . . . . . . . . . \
. 7-18 Changing tires . . . . . . . . . . . . . . . . . . . . . . . . . . . . . 7-20
Compact spare tire . . . . . . . . . . . . . . . . . . . . . . . . . . 7-24
Jack and tools . . . . . . . . . . . . . . . . . . . . . . . . . . . . . . 7-18
Removing and storing the spare tire . . . . . . . . . . . . 7-19
Flat tires, see tire mobility kit. . . . . . . . . . . . . . . . . . . . 7-27 Floor mat anchor(s) . . . . . . . . . . . . . . . . . . . . . . . . . . 4-146
Fluid
Brake fluid . . . . . . . . . . . . . . . . . . . . . . . . . . . . . . . . 8-31
Engine clutch actuator fluid . . . . . . . . . . . . . . . . . . . 8-32
Washer fluid . . . . . . . . . . . . . . . . . . . . . . . . . . . . . . . 8-34
Fog lamp/DRL bulb replacement . . . . . . . . . . . . . . . . . 8-80
Fog light (front) . . . . . . . . . . . . . . . . . . . . . . . . . . . . . 4-104
Folding key . . . . . . . . . . . . . . . . . . . . . . . . . . . . . . . . . . . 4-\
4 Battery replacement . . . . . . . . . . . . . . . . . . . . . . . . . . 4-7
Immobilizer system . . . . . . . . . . . . . . . . . . . . . . . . . . 4-8
Key operations . . . . . . . . . . . . . . . . . . . . . . . . . . . . . . 4-4
Record your key number . . . . . . . . . . . . . . . . . . . . . . 4-4
Transmitter precautions . . . . . . . . . . . . . . . . . . . . . . . 4-6
Folding the outside rearview mirror . . . . . . . . . . . . . . . 4-49
Folding the rear seat . . . . . . . . . . . . . . . . . . . . . . . . . . . 3-16
"Front passenger andrear seat 3-point system withcombination locking retractor" . . . . . . . . . . . . . . 3-23
Front seat adjustment (manual) . . . . . . . . . . . . . . . . . . . 3-7
Front seat adjustment (power) . . . . . . . . . . . . . . . . . . . . 3-8
Front seat belt warning . . . . . . . . . . . . . . . . . . . . . . . . . 3-21
Front turn signal lamp bulb replacement . . . . . . . . . . . 8-80
Fuel filler lid . . . . . . . . . . . . . . . . . . . . . . . . . . . . . . . . . 4-34
Fuel Gauge . . . . . . . . . . . . . . . . . . . . . . . . . . . . . . . . . . 4-55\
Fuel requirements . . . . . . . . . . . . . . . . . . . . . . . . . . . . . . 1-2
Fuses . . . . . . . . . . . . . . . . . . . . . . . . . . . . . . . . . . . . \
. . . 8-58 Engine compartment fuse replacement . . . . . . . . . . 8-61
Fuse/relay panel description. . . . . . . . . . . . . . . . . . . 8-63
Inner panel fuse replacement . . . . . . . . . . . . . . . . . 8-59
F
Page 544 of 552
I7
Index
Gauges . . . . . . . . . . . . . . . . . . . . . . . . . . . . . . . . . . . . \
. 4-53Distance to empty. . . . . . . . . . . . . . . . . . . . . . . . . . . 4-56
Fuel Gauge . . . . . . . . . . . . . . . . . . . . . . . . . . . . . . . . 4-55
Hybrid Battery SOC (State of Charge) Gauge . . . . 4-54
Hybrid System Gauge . . . . . . . . . . . . . . . . . . . . . . . 4-53
Odometer . . . . . . . . . . . . . . . . . . . . . . . . . . . . . . . . . 4-57
Outside Temperature Gauge . . . . . . . . . . . . . . . . . . . 4-57
Speedometer . . . . . . . . . . . . . . . . . . . . . . . . . . . . . . . 4-53
Glove box . . . . . . . . . . . . . . . . . . . . . . . . . . . . . . . . . . 4-13\
3
Gross vehicle weight. . . . . . . . . . . . . . . . . . . . . . . . . . . . 9-5
Hazard warning flasher . . . . . . . . . . . . . . . . . . . . . . . . . . 7-2
Hazardous driving conditions . . . . . . . . . . . . . . . . . . . . 6-80
Headlamp (HID type) bulb replacement . . . . . . . . . . . 8-77
Headlamp (High/Low beam) bulb replacement . . . . . . 8-78
Headlight (Headlamp) escort function . . . . . . . . . . . . 4-100
Headlight position. . . . . . . . . . . . . . . . . . . . . . . . . . . . 4-101
Headrest (rear) . . . . . . . . . . . . . . . . . . . . . . . . . . . . . . . 3-14
Headrest(front) . . . . . . . . . . . . . . . . . . . . . . . . . . . . . . . 3-11
Heated steering wheel. . . . . . . . . . . . . . . . . . . . . . . . . . 4-44
HEV power train . . . . . . . . . . . . . . . . . . . . . . . . . . . . . . . 1-5
High - beam operation . . . . . . . . . . . . . . . . . . . . . . . . 4-102
High mounted stop lamp bulb replacement . . . . . . . . . 8-84
Highway driving . . . . . . . . . . . . . . . . . . . . . . . . . . . . . . 6-84 Hill-start assist control (HAC) . . . . . . . . . . . . . . . . . . . 6-34
Hood . . . . . . . . . . . . . . . . . . . . . . . . . . . . . . . . . . . . \
. . . 4-32
Horn . . . . . . . . . . . . . . . . . . . . . . . . . . . . . . . . . . . . \
. . . 4-45
Hybrid Battery SOC (State of Charge) Gauge . . . . . . . 4-54
Hybrid System Gauge. . . . . . . . . . . . . . . . . . . . . . . . . . 4-53
If an accident occurs . . . . . . . . . . . . . . . . . . . . . . . . . . . 7-42
Ignition switch illumination . . . . . . . . . . . . . . . . . . . . . . 6-6
Ignition switch position . . . . . . . . . . . . . . . . . . . . . . . . . 6-6
Indicator Lights. . . . . . . . . . . . . . . . . . . . . . . . . . . . . . . 4-85
Inflation conditions(Air bags) . . . . . . . . . . . . . . . . . . . 3-64
Inside rearview mirror . . . . . . . . . . . . . . . . . . . . . . . . . 4-46
Instrument cluster . . . . . . . . . . . . . . . . . . . . . . . . . . . . . 4-51
Coasting guide . . . . . . . . . . . . . . . . . . . . . . . . . . . . . 4-70
Indicator Lights . . . . . . . . . . . . . . . . . . . . . . . . . . . . 4-85
Instrument Cluster Control. . . . . . . . . . . . . . . . . . . . 4-52
LCD Modes . . . . . . . . . . . . . . . . . . . . . . . . . . . . . . . 4-65
LCD window . . . . . . . . . . . . . . . . . . . . . . . . . . . . . . 4-59
LCD window Control. . . . . . . . . . . . . . . . . . . . . . . . 4-52
Service Mode . . . . . . . . . . . . . . . . . . . . . . . . . . . . . . 4-66
User settings mode . . . . . . . . . . . . . . . . . . . . . . . . . . 4-67
Warning and Indicator lights . . . . . . . . . . . . . . . . . . 4-78
Warning lights . . . . . . . . . . . . . . . . . . . . . . . . . . . . . 4-78
Instrument panel overview . . . . . . . . . . . . . . . . . . . . . . . 2-5
Interior care. . . . . . . . . . . . . . . . . . . . . . . . . . . . . . . . . . 8-93\
Interior features. . . . . . . . . . . . . . . . . . . . . . . . . . . . . . 4-136
H
I
G